1
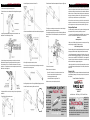
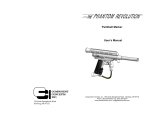
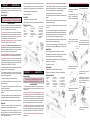
Airow Gun®
PELLET User’s Manual
Congratulations on your purchase of the Airow Gun. Please read through this owner’s manual completely before operating. Keep the owner’s manual in a safe place for future reference. If you have any
questions, please call 866-349-1130.
Important Safety Rules
ADULT SUPERVISION OF ALL CHILDREN UNDER THE AGE OF 18 IS REQUIRED.
THE AIROW GUN IS NOT RECOMMENDED FOR CHILDREN UNDER SEVEN (7) YEARS OF AGE.
WARNINGS AND PRECAUTIONS
The Airow Gun is designed to be a safe and fun product. However, as with any shooting sports
product, safety rules must be observed. Read all instructions before using. Buyer and user have
the duty to obey all laws regarding the use and ownership of this device.
1. The Airow Gun is not a toy. Misuse or careless use may result in serious injury or death. May be
dangerous up to 500 yards (457m). For maximum safety and enjoyment, always exercise caution,
common sense, and safety rules when shooting the Airow Gun. Never play with your Airow Gun. It
is a potentially dangerous weapon that can cause serious harm or death.
3. Place pellet in pellet staging area (20) with the flat head of the pellet pointing into the chamber.
5. Never fire your Airow Gun paintball at animals. It can result in injury or death and is considered cruelty.
4. Push pellet completely into the chamber. The depth can be adjusted by turning the knob on the
pellet plunger (22). Doing so will change the distance that the pellet is seated into the chamber.
6. Check your target and beyond your target. Be sure all persons not properly equipped for paintball
games are well clear of the target area before you shoot. Check behind and beyond your target to be
certain you have a safe backstop and that no person or property could be endangered.
5. Pull back cocking mechanism lever to advance the pellet chamber.
7. Learn how to handle, load, unload, operate, fire and care for your Airow Gun.
6. Repeat until the pellet chamber is full.
8. Avoid ricochet. Never shoot at the surface of water. Paintballs can ricochet off of water just like a
skipped rock.
Shooting Pellets
1. After pellet chamber is fully loaded, simply draw bow and release.
2. After each shot, pull cocking mechanism lever to advance pellet chamber to the next pellet and repeat.
Pellet Airow Gun Parts List
1.
2.
3.
4.
5.
6.
7.
Aluminum arrow
Plunger
Nock
Nock clamp
Detachable barrel
Rubber O-ring
Receiver
8.
9.
10.
11.
12.
13.
14.
Receiver mount
Riser mounting bracket
Cocking peg
Cocking slide hole
Cocking mechanism lever
Elevated scope mount (optional)
Arrow safety ring
15.
16.
17.
18.
19.
20.
21.
22.
Large air chamber tube
Front air transfer case
Small air chamber tube
Rear air transfer case
Front attachment ring
Pellet staging area
8 shot pellet chamber
Pellet plunger
2. Always wear approved protective eyewear when using the Airow Gun. Choose shooting
glasses that meet or exceed ASTM, PECC, ANSI and CE standards.
12. Dress appropriately when playing the game of paintball. Avoid exposing any skin when playing.
Even a light layer will absorb some of the impact and protect you from the paintballs.
13. Avoid alcoholic beverages before and during the use of the Airow Gun. Handling while under the
influence of drugs or alcohol is a criminal disregard for public safety.
4. Attach staging tube to the receiver (7).
Shooting Paintballs
6. Avoid alcoholic beverages before and during the use of the Airow Gun. Handling while under the
influence of drugs or alcohol is a criminal disregard for public safety.
11. Always keep your Airow Gun unloaded until ready to fire and make sure that it is unloaded
before cleaning.
12. Store the Airow Gun and pellets separately beyond the reach of children. Make sure the Airow Gun
and pellets are locked and secured so children and untrained individuals will be denied access.
13. Lead-off shots should be taken at closer ranges until the shooter is more accurate at longer distances.
Loading Pellets
1. Flat nose or any .22 cal pellets (not included) shorter than .35” can be used with the Airow Gun.
Beeman pellets are of high quality and recommended for use in the Airow Gun.
2. After installing the unit onto the bow, pull back on the cocking mechanism to ensure everything is in working order. When lever is pulled back, the 8 shot pellet chamber (21) should rotate
counterclockwise one chamber rotation (i.e., if the chamber starts at 8, it should be positioned at
7 after the cocking mechanism lever is pulled).
7. Remove 4 screws and pull out large elbow.
Shift tube to other side, insert tube into small
elbow and reinstall larger elbow on opposite
side.
1. Use only .68 caliber paintballs. Never load or fire any foreign objects in your Airow Gun.
3. Fill paintball staging tube (19) with paintballs (maximum of 14 plus 1 chambered). Staging tube can
be loaded while it is on the unit as well as off.
10. Keep the muzzle clear. Never let anything obstruct the muzzle of your Airow Gun. Don’t allow the
muzzle to come in contact with the ground.
3. Remove 2 screws at front of receiver and 2
screws at rear of receiver. Lift receiver away
from base.
Loading Paintballs
5. Treat the Airow Gun as if it were loaded. You can never be positive that you were the last person
to handle it. Never take anyone’s word about whether or not the Airow Gun is loaded. Always check to
see if it is loaded when removed from storage or received from another person. ALWAYS TREAT
YOUR AIROW GUN AS IF IT IS LOADED, EVEN IF YOU KNOW IT ISN’T.
9. Avoid ricochet. Never shoot at a flat hard surface or at the surface of water. Pellets can ricochet off
of water just like a skipped rock.
2. Unscrew barrel from receiver. (Note: Pellet
Module Only - The front attachment ring (19)
screw must be removed prior to barrel removal).
11. Store the Airow Gun and paintballs separately beyond the reach of children. Make sure the Airow
Gun and paintballs are locked and secured so children and untrained individuals will be denied access.
2. After installing the unit to the bow, pull back on the cocking mechanism to ensure everything is in
working order. When lever is pulled back, the next paintball should fall into place.
8. Learn how to handle, load, unload, operate, fire and care for your Airow Gun.
6. Remove brackets and reassemble on opposite side.
10. Always keep your Airow Gun unloaded until ready to fire and make sure that it is unloaded
before cleaning.
4. NEVER aim or draw the Airow Gun in the direction of a person. Aim and draw ONLY in the direction of an appropriate target. ALWAYS have a full view of the target path and beyond when shooting.
7. Check your target and beyond your target. Be sure all persons are well clear of the target area
before you shoot. Check behind and beyond your target to be certain you have a safe backstop and
that no person or property could be endangered.
1. Conversion must be performed with the Airow
Gun removed from bow.
9. Keep the muzzle clear. Never let anything obstruct the muzzle of the Airow Gun. Don’t allow the
muzzle to come in contact with the ground.
14. Your Airow Gun is designed for target shooting and is suited for both indoor and outdoor use.
Always remember to place your target carefully. THINK about what you will hit if you miss the target.
3. Lead pellets (not included). Do not inhale dust or put pellets in mouth. Wash hands after handling.
This product contains lead, a chemical known to cause cancer and birth defects (or other reproductive harm).
WARNING: Use only .22 caliber pellets with the Airow Gun (see Loading Pellets). Never reuse ammunition.
Use of any other ammunition can cause injury to you or damage to your Airow Gun.
Right Hand to Left Hand Conversion
1. After paintball staging tube is fully loaded, simply draw back bow and release.
Airow Gun®
PAINTBALL User’s Manual
Important Safety Rules
ADULT SUPERVISION OF ALL CHILDREN UNDER THE AGE OF 18 IS REQUIRED.
THE AIROW GUN IS NOT RECOMMENDED FOR CHILDREN UNDER SEVEN (7) YEARS OF AGE.
WARNINGS AND PRECAUTIONS
1. The Airow Gun is not a toy. Misuse or careless use may result in serious injury or death. For
maximum safety and enjoyment, always exercise caution, common sense, and safety rules when
shooting the Airow Gun.
4. Remove 2 screws, remove elbow and o-ring.
Move elbow to opposite side of base.
8. Perform step 3 and then 2, in reverse to
reassemble receiver and barrel.
2. After each shot, pull cocking mechanism lever (12) to advance the next paintball and repeat.
Paintball Airow Gun Parts List
1.
2.
3.
4.
5.
6.
7.
Aluminum arrow
Plunger
Nock
Nock clamp
Detachable barrel
Rubber O-ring
Receiver
8.
9.
10.
11.
12.
13.
14.
Receiver mount
Riser mounting bracket
Cocking peg
Cocking slide hole
Cocking mechanism lever
Elevated scope mount
Arrow safety ring
15.
16.
17.
18.
19.
20.
21.
9. Paintball Module Only – Remove 2 screws
and reverse the position of the Hopper Base.
Remove 1 screw and relocate the Air Pressure
Control Arm to the opposite side.
Large air chamber tube
Front air transfer case
Small air chamber tube
Rear air transfer case
Paintball staging tube
R/L Adjustable paintball feed
Air pressure control valve
5. Reinstall screws and o-ring. Elbow should be
positioned like diagram below.
2. Never fire your Airow Gun with people around (including yourself) who are not wearing
proper paintball approved goggles, mask & ear protection. ALWAYS have a full view of the
path to the target and beyond when shooting. All persons within a 200 yard radius should always
wear approved full face, eye and ear protection that meet or exceed ASTM, PECC, ANSI and CE
standards. Failure to follow the paintball mask manufacter’s instructions when shooting the Airow
Gun could result in bodily harm including face, eyes and ear injury, blindness and deafness.
3. Treat the Airow Gun as if it were loaded. You can never be positive that you were the last
person to handle it. Never take anyone’s word about whether or not the Airow Gun is loaded.
Always check to see if it is loaded when removed from storage or received from another person.
ALWAYS TREAT YOUR AIROW GUN AS IF IT IS LOADED, EVEN IF YOU KNOW IT ISN’T.
4. Never fire your Airow Gun at personal property of others. Paintballs can stain the paint of
automobiles and houses.
10. Proceed to General Assembly Instructions to
mount Airow Gun to bow.
Airow Gun® Assembly INSTRUCTIONS
8. Insert the Plunger Assembly into the rear end of the Lower Tube.
14. Place the Nock onto the Protective Sleeve and replace the Nock Cap and screws. Tighten screws.
Airow Gun® Warranty Information
Airow Gun warrants this product to be free from defects in materials and workmanship for a period of
180 days from the original date of purchase by the initial owner/purchaser. This warranty does not
apply to defects discovered after purchase that were caused by the unauthorized modifications and
alterations of our product. This warranty will be voided if damage occurs due to improper operation,
dropping the product, attempting to dismantle or modify it, using inferior quality ammo or foreign
objects, failure to carry out routine maintenance or any other cosmetic modifications.
1. Remove arrow rest and bow sight (if necessary) from your bow.
2. Position Airow Gun as shown in the illustration with the Riser Mounting Bracket over berger holes
of the riser.
Airow Gun will replace or repair, without charge, any of its Airow Gun products that have failed
through defect in material or workmanship. Airow Gun is dedicated to providing you with the ultimate in shooting products and the quality support necessary to satisfactorily enjoy the sport.
9. Position mark on arrow shaft flush with end of tube. Mark arrow shaft with a pencil at string position.
3. Align holes of Riser Mounting Bracket with berger holes of riser so that dimension “A” is the
smallest possible. This will increase the rigidity of the setup.
15. The Airow Gun must now be adjusted so that the arrow shaft is in the center of the Large Air
Chamber Tube. Make necessary adjustments and retighten bolts.
16. Once everything is set and adjusted, tighten set screws into the Riser Mounting Bracket to lock
the Arrow Gun into position. This will make small dimples in your riser but will keep the Airow Gun
from moving.
Warranty and Repair Procedure
If you should encounter any problems with your Airow Gun, please use the following steps to initiate
the warranty (within the 180 days) or non-warranty (after 180 days) repair process:
1. You must have an Return Merchandise Authorization Number (RMA#) in order to ship your Airow
Gun product. In order to obtain an RMA#, contact Airow Gun Customer Service toll free:
866-349-1130 or
[email protected]
2. When you receive your RMA#, you will be given instructions on how to send your product. Postage
and delivery charges must be prepaid. Ship or deliver your product to:
1820 W 7th Avenue, Eugene, OR 97402
Take care when shipping your Airow Gun product by adequately packing it. Airow Gun is not responsible
for damage to your product while in shipment. Shipping insurance isn’t required but recommended.
4) Insert bolts into berger holes and tighten, taking care not to deform or dent the air chamber.
Shorter bolts should be used except when mounting accessories with the Airowgun to the riser.
5. Next, look at dimension “B” on bow. This dimension should be between 2 to 3 inches and not
less than 2 inches. To adjust this dimension, remove bolts then adjust the position of the Airow Gun.
When dimension is correct, retighten bolts.
3. Include a brief statement regarding the requested repair work. We will return ship it to you usually
within 72 hours after we receive it via regular ground shipment. If you wish to have it returned using
a faster service, you can request NEXT DAY AIR or SECOND DAY AIR. You will be charged for this
service and must include your credit card number with the expiration date. Your card will be charged
the difference in additional cost over regular ground shipping service.
10. Remove Plunger Assembly and cut arrow shaft on pencil mark.
11. Use an archery “hot melt” or other suitable nock glue (not provided) to glue nock assembly into
end of arrow shaft. Hold in position until glue cures.
4. When sending your Airow Gun in for repair within the 180-day warranty period be sure to include a
copy of the original sales receipt from the date of purchase. Be sure to include your full name, address
& phone number.
17. Your Airow Gun is now installed!
18. Before you shoot, make a few quick checks.
–
–
–
–
Dimension “B” should be set at 2 to 3 inches minimum and not less then 2 inches.
The mark on the arrow shaft should be flush with the end of the tube.
Is the nock properly glued into the arrow shaft?
Is the Arrow Shaft centered in the Large Air Chamber Tube?
Disclaimer of Liability
By accepting this archery product, buyer agrees to hold harmless the manufacturer and all associated
parties from liability for any damage to persons or property which may result, for any reason, from the
use of this product.
Designed & Manufactured by Romney Motion, Inc.
If all of these are correct, you are now ready to shoot your Airow Gun.
12. Insert Plunger Assembly back into Lower Tube again. Reinstall Safety Ring and tighten set screw.
13. Install the Protective Sleeve around string. Remove screws & Nock Cap.
6. Adjust position of Airow Gun so that it is square to the string. Once square, tighten all previously
mentioned bolts.
7. Remove Rear Safety Ring by loosening the set screw.
accessorize & protect
your Airow Gun.
Increase your accuracy
with high powered
optics. With our Scope
Mount you can attach
most scopes and red
dot sights. This rail fits
on the Paintball and
Pellet version.
available at
www.airowgun.com
Playing paintball in the
woods can be rough
on your equipment.
Protect your Airow Gun
from dings and dents
with the Air Chamber
Shield, where form and
function meets in one
accessory.
®
Airow Gun
For Customer Support:
866-349-1130
www.AirowGun.com • Patent Pending • © 2009 Airow Gun Products
go from Pellets
to Paintballs &
back to Pellets
Love the pellet or
paintball version of
the Airow Gun? Wish
you had one of each?
Why choose when we
make it so easy.
Switch from pellets to paintballs, or paintballs to pellets, in a matter of minutes with a simple barrel
change. Interchangeable conversion kits, complete with barrel and corresponding receiver, are available
at your local airow gun dealer or online at airowgun.com.