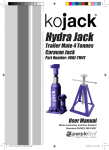
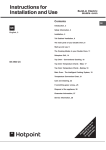
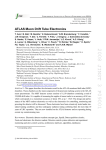
1
TruckCam
Frame Check System
20100129
Vehicle data:
Registration no:
Make, type:
Mileage:
Notes:
TruckCam AB
ABC 123
Volvo FH16 700
1520
Högmossevägen 3
SE 641 39 Katrineholm
Sweden
Sign:
A. Johansson
Twist
+4
mm
Tilt
+3
mm
Vertical
Bending
in mm
Side
Bending
in mm
© TruckCam AB
User Manual
Software version 2.x.x
TruckCam AB Högmossevägen 3 SE-641 39 Katrineholm Sweden
Tel: +46 (0)150 66 25 40 Fax: +46 (0)150 66 25 41
E-mail: [email protected] Internet: www.truckcam.com
TruckCam Frame Check System
User Manual
Software version 2.x.x
Index
1. Product Description
5
2. Software Installation and Setup
10
3. Measurement Preparation
18
4. Calibration of Equipment
21
5. Measurement Procedures
27
6. Measurement Documentation
32
7. System Maintenance
33
Appendix A - System Spare Parts
34
Appendix B - CE Declaration
39
Appendix C - Contact Information
41
TruckCam Frame Check System
User Manual
Software version 2.x.x
TruckCam Frame Check System
User Manual
Software version 2.x.x
1. Product Description
Agreed Functionality
• The TruckCam Frame Check System is designed for measuring of frames and chassis
of commercial vehicles.
• The TruckCam Frame Check System provides measurement of side sway, vertical bend, tilt and twist.
• The TruckCam Frame Check System enables dynamic measurement while in driving
position. No lifting of frame or chassis is required during the measurement.
• The TruckCam Frame Check System enables measurements to be performed fast and
reliable on all types of commercial vehicles.
• The TruckCam Frame Check System uses wireless communication technology for
transmission of information between camera sensors and computer.
TruckCam Frame Check System
User Manual
Software version 2.x.x
Technical Data
Operating time with fully charged batteries Charging unit operating voltage
Operating temperature
>16h
100-240V, 50-60Hz
-5° to +40° centigrade
System Requirements
Recommended
Central Processing Unit (CPU)
Memory (RAM)
Available hard disk space
Ports Intel Pentium IV 1,8GHz or equal
2GB
1GB
1xUSB2.0
Minimum
Central Processing Unit (CPU)
Memory (RAM)
Available hard disk space
Ports Intel Pentium IV 1GHz or equal
1GB
1GB
1xUSB2.0
Required operating system
Microsoft Windows 2000 SP3 / XP SP2 / Vista
Additional system requirements might apply to get the above mentioned operating systems
fully functional, please check with your operating systems supplier.
TruckCam Frame Check System
User Manual
Software version 2.x.x
Component Description
For component spare parts, see Appendix A – Spare Parts
Camera Sensor TC-256
The TruckCam Camera Sensor is a rugged, high precision sensor
specially designed to measure angles and distance relative to a
reflective target. It has a strong housing with rubber protection at
both ends. The camera lens and built-in flasher is protected by a
hardened front glass.
The camera is equipped with an infra-red (IR) flasher, sending out
short flashes of IR light a few times per second. When this light
hits a reflective target, the light will reflect back to the camera lens. The lens is equipped with
an IR-filter, only permitting IR light to pass through. The result is a picture having a reflective target depicted against a black background. Thus the camera can operate in complete
darkness or in sunshine, since it only uses the light from the IR flasher.
The picture is analyzed by a microprocessor within the camera sensor itself, and information
is sent to the computer by wireless communication. The computer finishes the calculations,
giving the three angles α (alfa), β (beta) and camber as well as the distance to the target as
a result. These parameters are then used by the computer software to calculate the wheel
angles and frame deformations.
The camera is equipped with three electronic inclinometers as well as a gyroscope. The
signals from these sensors are combined with the data from the camera to produce a very
powerful tool to be used for wheel alignment. The gyroscope is used to extend the angle
range to handle max turn angles for steerable axles. The electronic inclinometers are used to
calculate camber, caster and KPI directly on the wheel itself.
The camera sensor is powered by a built-in battery pack, and the batteries are recharged
every time the camera is placed in the charging cradle. The operating time of the batteries
is >16 hours, depending on the way of use of the system. The camera has a standby mode
where it consumes only 15% of the power. In standby mode the wireless connection is still
active while the camera part itself is switched off. The software in the computer automatically switches the camera from standby mode to operation mode as needed.
Needed for measurements, how ever not included in the TC-2007 TruckCam Upgrade System for Frame Measurement.
TruckCam Frame Check System
User Manual
Software version 2.x.x
Frame Markers TC-207
The Frame Markers are markers that the camera sensor uses to
determine angles and distances. These markers need to be kept
clean, to maintain high measurement accuracy and long life time
of the TruckCam system. For cleaning recommendations, please
see Chapter 8 System Maintenance, page 30.
Wireless Server TC-305
The Wireless Server is connected to a PC and powered via a USB cable. It permits the camera to communicate with the PC software.
Wheel Adapter TC-150
The TruckCam Wheel Adapter is used to mount the cameras to the
wheels of the vehicle. The wheel adapter is designed according to a
tripod principle, to enable the best accuracy possible when measuring
and fits aluminum as well as steel rims in sizes 12” – 24”.
Frame gauges TC-102
The TruckCam Frame Gauges work according to a self-centering principle. When mounted to a vehicle they determine the vehicle center line, which is the basis
for all TruckCam wheel angle calculations. The reflective targets are placed at the end of
each frame gauge, to make up a square of known points for each measurement.
Needed for measurements, how ever not included in the TC-2007 TruckCam Upgrade System for Frame Measurement.
Needed for measurements, how ever not included in the TC-2007 TruckCam Upgrade System for Frame Measurement.
Needed for measurements, how ever not included in the TC-2007 TruckCam Upgrade System for Frame Measurement.
TruckCam Frame Check System
User Manual
Software version 2.x.x
TruckCam Accessories
TruckCam offers a wide range of accessories to enhance and ease the frame measurement
procedures even further:
Magnet Adapter TC-1029-2
This adapter can be used when ever needed to make the
fitting of the frame gauges to the vehicle easier.
Chassis Extender TC-1026-2
This adapter is used when mounting the frame gauges to
a vehicle with a very short overhang in the rear.
Frame Gauge Extender TC-102-30-2
The frame gauge extenders are used when mounting the frame
gauge to vehicles with wide frames, where the maximum width
of 130cm between frame gauge hangers is not enough. The
total width between the hangers is with these units extended to
180cm.
TruckCam Frame Check System
User Manual
Software version 2.x.x
2. Software Installation and Setup
Installation
Start your computer and insert the TruckCam Software CD.
Plug the TruckCam Wireless Server into a USB port. Windows will find the server and ask
you to install its device driver.
Wireless Server
Choose not to connect to Windows Update, since the Server device driver can be found on
the TruckCam Software CD. Click [Next].
Choose to install the device driver from a specific location. Click [Next].
10
TruckCam Frame Check System
User Manual
Software version 2.x.x
Choose to search removable media for the device driver or choose to specify a location and
browse to the TruckCam Software CD. Click [Next].
Click [Continue Anyway]. The device driver for the TruckCam Wireless Server is perfectly
Windows 2000/XP/Vista compatible, although this warning might occur during installation.
Click [Finish] when the device driver has been completely installed.
11
TruckCam Frame Check System
User Manual
Software version 2.x.x
PC software
Load the TruckCam Software CD, and choose the folder for the applicable language.
Double click on the ‘Setup’ icon.
The software installation process will start up.
Choose to install the TruckCam program in a different folder by clicking [Browse] or continue the installation by clicking [Next].
12
TruckCam Frame Check System
User Manual
Software version 2.x.x
Click ‘I accept the license agreement’ and then click [Next].
Click [Next].
Click [Finish] when installation is complete. If the above ‘Restart’ dialog shows, please click
[Restart] to restart the computer before starting to use your TruckCam system, in order for
the software to work properly.
13
TruckCam Frame Check System
User Manual
Software version 2.x.x
Setup
Double click on the TruckCam program icon to start the TruckCam program. Start up the
cameras by pressing the ON/OFF button on the units respectively.
Click [Setup] to enter the program setup. Before using the system for the first time, it is
required to enter the setup area to configure the program settings. These settings will then
be stored in the program when you click [Next] in the setup window.
14
TruckCam Frame Check System
User Manual
Software version 2.x.x
Communication setup
It is vital to the functionality of the system that you enter the correct radio numbers of the
cameras here, in order for the wireless connections to work properly. The system is shipped
with the entire wireless communication interface between the units fully set up and functional. However, when experiencing problems with wireless communication, you might need
to ‘Pair’ the system units. Instructions on how to do this can be found in Section Pairing on
page 16.
System standby
This is where you set the time of system inactivity before the system enters standby mode.
A 0 value indicates that the standby mode is inactivated.
Report header and preview
Enter company details to be printed on each measurement report sheet. Also specify the
path to the logo you want to use on each measuring report. In case you would prefer to use
the TruckCam logo, this logo can be found in the Support subfolder of the TruckCam folder.
Please note that a logo needs to be specified in order for the system to print a measurement
report.
15
TruckCam Frame Check System
User Manual
Software version 2.x.x
Pairing
Enter the Pairing function of the TruckCam system by clicking [Pairing] in the “Setup”
window. Follow the steps presented by the help texts in the yellow square on the computer
screen.
1. Press and hold both OK buttons on each camera for 7 seconds to activate the service
channel. This is indicated by the blue LEDs on the cameras, which start to blink once
the camera has entered service channel.
2. Wait until the red squares on the screen has turned green for both cameras.
16
TruckCam Frame Check System
User Manual
Software version 2.x.x
3. Click [Pair] to automatically change the wireless channel to a
randomly selected channel number, or click [Advanced] to set the
wireless channel to a manually selected number between 1 and
60.
4. The squares on the screen will change from green to red and back to green again as the
changing of communication channel is performed on all units. Please wait during this
procedure.
5. The system will tell you when the pairing of the units is done by a message in the yellow
help text square. Now the units should communicate with each other.
17
TruckCam Frame Check System
User Manual
Software version 2.x.x
3. Measurement Preparation
Before you start measuring the vehicle, please complete the below mentioned steps:
• Check tire pressure, tire size and inflate the tires to the specified pressure.
• Check if the floor or other surface that you’re measuring on is reasonably flat.
90
°
Mount Frame Gauges
°
90
Mount the self centering frame gauges as square as possible to the frame of the vehicle, one
in the front, the other in the rear. When using more than two frame gauges, please hang the
extra frame gauges on the positions of the frame or chassis which you want to measure.
There are several different TruckCam
adapter types available to make it easier
to mount the frame gauges to the frame,
please check out the accessories list in
this manual or contact your local TruckCam
supplier for further information.
Section Product Description, cnapter Accessories, page 9
18
TruckCam Frame Check System
User Manual
Software version 2.x.x
Place the reflective targets on the frame gauges. Make sure the targets are positioned correctly.
Mount Wheel Adapters
The TruckCam Wheel Adapters are made to fit both aluminum and steel rims in sizes
12” to 24”.
They are mounted by fitting the hooks at the end of the wheel adapter legs either on the
inside of the rim or between rim and tire, depending on rim make, and rotating the knob on
the side of the wheel adapter to secure it.
19
TruckCam Frame Check System
User Manual
Software version 2.x.x
Software and hardware startup
Start your computer, and start the TruckCam software by double clicking the program icon.
Start up the cameras by pressing the ON/OFF button.
In the TruckCam startup screen, choose [Continue] to start a new measurement or
[Resume] to resume the latest measurement.
Please note! A [Resume] is only possible within 24 hours of the latest measurement.
When choosing [Continue] the screen “Frame Measure” is shown. This is the basic screen
from where both measurement and calibration functions are started.
20
TruckCam Frame Check System
User Manual
Software version 2.x.x
4. Calibration of Equipment
Camera Calibration
The TruckCam software has a built-in functionality for checking and calibrating the cameras.
This calibration is carried out on the vehicle to be measured, using the standard measurement equipment.
If necessary, start up the unit itself by pressing the ON/OFF button on
the back of the camera.
Start the program and continue by clicking [Continue].
In the “Frame measure” measurement window, click [Camera Calibration]
Aim the camera at the far marker.
21
TruckCam Frame Check System
User Manual
Software version 2.x.x
Follow the steps presented by the help texts in the yellow square on the computer screen.
1. Aim the camera slightly upwards and press the OK button. 2. Aim the camera slightly downwards and press the OK button.
3. Aim the camera horizontally and press the OK button.
22
TruckCam Frame Check System
User Manual
Software version 2.x.x
4. End turn the camera by taking it off of the wheel adapter spindle, turning it upside down
and putting it back on the wheel adapter spindle again. 5. Aim the camera at the same marker and press the OK button.
The screen will display the calibrated values.
Click [Print] to print a calibration report.
Click [End] to continue.
23
TruckCam Frame Check System
User Manual
Software version 2.x.x
Frame gauge calibration
In order to perform a proper and correct measurement it is not only important to check if the
cameras are calibrated but also very important to check whether the hardware (frame
gauges) you are using is in perfect order. This checking of hardware can be done by use of
the software and cameras under Frame Gauge Calibration.
In the “Frame measure” measurement window, please click on [Frame gauge calibration].
Mount two wheel adapters with cameras on one of the vehicle axles. Hang the self centring
gauge you are about to calibrate as square as possible to the frame, either in the front of
the vehicle or at the position on the frame where it is easiest to end turn the frame gauge by
180°. Place the front markers in the correct positions on the frame gauge.
24
TruckCam Frame Check System
User Manual
Software version 2.x.x
Please follow the steps presented by the help texts in the yellow square on the computer
screen:
Position 1
1. Aim one camera with the securing screw up at one of the markers and press OK.
2. Aim the camera on the other side of the vehicle, with the securing screw up at the other
marker and press OK.
Position 2
3. End turn the frame gauge by rotating it 180° and hang it on the same spot in the frame
as before.
4. Move the markers to the correct positions and make sure they are faced at the cameras.
5. Press OK on one of the cameras.
Please note! The cameras should not be touched during the frame gauge rotation as this will
influence the calibration result.
25
TruckCam Frame Check System
User Manual
Software version 2.x.x
The bar graphs on the screen will now show the error of the frame gauge in vertical as well
as side position.
Adjust the frame gauge hangers until the bar graphs on the computer screen shows zero or
turn into green.
The frame gauge is now calibrated and ready for use.
Click on [End] to return to the screen “Frame Measure”.
Please note! In order to get perfect measurement results, please calibrate all frame gauges
before measuring a frame.
26
TruckCam Frame Check System
User Manual
Software version 2.x.x
5. Measurement Procedures
Start the TruckCam software by double clicking on the program icon.
Follow the necessary steps for preparation as described in Chapter 3 Measurement preparation and Chapter 4 Calibration of equipment.
To start measuring a frame, the software first needs some parameters from the frame and
frame gauges.
1. Measure the width of the frame with a tape measure in the front. 2. Enter the data into the software in the “Frame Measure” measurement screen, either by
clicking with the mouse on the green or red arrows, or by entering the numbers from the
computer keyboard.
Please note! The values shown on the computer screen are in mm.
3. Measure the width of the frame in the rear. Enter the data into the screen as described
above.
27
TruckCam Frame Check System
User Manual
Software version 2.x.x
4. Measure the inside distance between the left and right marker. Enter the data into the
screen as described above. The program needs this distance in order to calculate the
twist value for the frame width you entered.
5. Click on [Store].
28
TruckCam Frame Check System
User Manual
Software version 2.x.x
Please follow the steps presented by the help texts in the yellow square on the computer
screen:
1. Aim one camera with the securing screw up at the
closest marker and press OK.
2. Take the first camera from the spindle and place the
second camera on the same wheel adapter. Aim this
second camera with the securing screw up at the
same marker and press OK. The two cameras have both taken a picture of the
same target in order to let the computer combine
both pictures to calculate the correct values.
3. Stay on the same side and remove the camera from
the spindle, turn it 180° and remount it on the spindle. Aim the camera with the securing screw up at
the far marker and press OK.
4. Go to the other side with the free camera. Mount
that camera on the spindle and aim the camera with
the securing screw up at the closest marker and
press OK.
5. Remove the camera from the spindle, turn it 180°
and remount it on the spindle. Aim the camera with
the securing screw up at the far marker and press
OK.
29
TruckCam Frame Check System
User Manual
Software version 2.x.x
The program has taken four reference points of the frame, the data of which is now displayed on the computer screen. The screen displays the distance between the scales in the
front and the back of the frame. On the left side you can see the twist of the frame, which in
this example is 4mm, and the tilt (leaning) which in the example is 3mm.
If you are using more than two frame gauges, and you have placed for instance three more
gauges in between the front and the rear gauges, you are now able to move the targets
which are placed on the gauges on the far side to the next frame gauge in order to take a
3rd, a 4th and a 5th measuring point.
When you are using two frame gauges, you need to move the frame gauge on the far side
including the markers to the next point of the frame you want to measure.
Please note! You are not allowed to touch or move the cameras as they are now in measurement position. Any movement will result in measurement errors and the measurement will
need to be started over again.
30
TruckCam Frame Check System
User Manual
Software version 2.x.x
For the third and following measurement points the live value will appear on the computer
screen.
In this example you can see that in this particular point of the frame (5,31m) there is a side
bend of 1mm and a vertical bend of 3mm.
Click on [Store Value] in order to save the measured values in this point.
To remove the value, click on [Delete].
Move your targets or the complete frame gauge with targets to the next point you want to
measure and save the values.
All values in the screen are now shown and calculated with reference points in the front and
in the rear of the chassis.
The software allows you to change the reference points by clicking on the squares under
“Reference”. When changing the reference points, the software automatically calculates the
values for side bending and vertical bend. In this case no new measurement is required.
31
TruckCam Frame Check System
User Manual
Software version 2.x.x
6. Measurement Documentation
Printed and saved report
To print and/or save a report of the measurement, click [Report].
20100129
Vehicle data:
Registration no:
Make, type:
Mileage:
Notes:
TruckCam AB
ABC 123
Volvo FH16 700
1520
Högmossevägen 3
SE 641 39 Katrineholm
Sweden
Sign:
A. Johansson
Twist
+4
mm
Tilt
+3
mm
Vertical
Bending
in mm
Side
Bending
in mm
© TruckCam AB
Choose [Vehicle data] to enter data about the measured vehicle, [Save] to save the current
measurement, [Print] to print the report sheet and [Done] to return to the “Frame Measure”
measurement window.
When clicking [Save] a dialog box will open to allow you to choose file name and where to
save the measureemnt data. The data will be saved in the form of a jpg-image, a picture of
the printed report.
32
TruckCam Frame Check System
User Manual
Software version 2.x.x
7. System Maintenance
Well kept and well maintained system parts will greatly increase and secure the reliability and
life time of the system.
Cameras
In order to maintain the measurement system, make sure the cameras are kept in order
and store them in the charging cradle when not in use to avoid damage. The protective
front glass of the cameras may be cleaned using a dry, soft cloth if necessary. If a camera is
dropped on the floor, please do a calibration of the unit. If that calibration fails, please send
the unit for repair accompanied by necessary fault descriptions.
Reflective targets
The reflective targets should be kept clean at all times. Clean them when necessary using a
mixture of 50% alcohol and 50% water and dry them with a soft cloth. Please be aware that
grease or oil on the reflective wave will affect the functionality of the system and might influence measurement results and/or the working speed of the cameras.
Other equipment
Please check on regular basis the functionality of all other hardware, like wheel adapters and
frame gauges, in order to avoid faulty measurements.
33
34
3
4
FINISH:
DEBUR AND
BREAK SHARP
EDGES
DESCRIPTION
7
SPARE PARTS/QTY.
8
A
F
E
Q.A
MFG
APPV'D
CHK'D
DRAWN
Hkan
NAME
SIGNATURE
2008-08-20
DATE
WEIGHT:
MATERIAL:
TC-250-10
12272
TC-382
1
2
3
UNLESS OTHERWISE SPECIFIED:
DIMENSIONS ARE IN MILLIMETERS
SURFACE FINISH: Ra xx
TOLERANCES: ISO 2768-mk
PART NUMBER
ITEM NO.
mm
SCALE:1:1
DWG NO.
TITLE:
1
1
1
REVISION
SHEET 2 OF 2
12309
Spare Parts
TC-256
www.truckcam.se
DO NOT SCALE DRAWING
Handle
Antenna
Battery
B
A3
D
2
6
D
3
5
C
1
4
C
2
3
B
1
2
B
A
1
TruckCam Frame Check System
User Manual
Software version 2.x.x
Appendix A - System Spare Parts
Camera Sensor, TC-256
TruckCam Frame Check System
User Manual
Software version 2.x.x
Frame Markers, TC-207-10, -20, -30, -40
1. Sticker
2. Plate
Item Product / PART TC-207-10
1.
Frame marker reflex sticker FL
2.
Frame marker FL RR sheet
TC-207-20
1.
Frame marker reflex sticker FR
2.
Frame marker FR RL sheet
TC-207-30
1.
Frame marker reflex sticker RL
2.
Frame marker FR RL sheet
TC-207-40
1.
Frame marker reflex sticker RR
2.
Frame marker FL RR sheet
Product / PART nO TC-207-01
TC-207 FL RR
TC-207-02
TC-207 FR RL
TC-207-03
TC-207 FR RL
TC-207-04
TC-207 FL RR
35
36
1
29
26
27
13
2
2
12
11
16
10
18
3
13
23
14
15
9
25
24
21
22
19
20
22
3
5
17
6
2
28
4
4
1
3
3
7
4
DETAIL A
SCALE 1 : 1
Q.A
MFG
APPV'D
CHK'D
DRAWN
AG
NAME
FINISH:
SIGNATURE
UNLESS OTHERWISE SPECIFIED:
DIMENSIONS ARE IN MILLIMETERS
SURFACE FINISH: Ra xx
TOLERANCES: ISO 2768-mk
A
5
5
F
E
D
C
B
A
1
DEBUR AND
BREAK SHARP
EDGES
2008-01-29
DATE
WEIGHT:
MATERIAL:
7
8
DO NOT SCALE DRAWING
A
QTY.
1
3
3
3
3
3
6
2
2
1
1
2
3
3
2
2
1
1
1
1
4
3
3
1
3
3
1
3
D
C
B
A
SCALE:1:10
DWG NO.
SHEET 1 OF 1
Wheeladapter 12"-24"
A3
12610
REVISION
DESCRIPTION
Wheeladapter bas
Rim hook
Leg
Screw
Lock nut
FRP 4x20
Polyesterwasher18x6
Spring carrier
Spring
Bracket
Screw
Nut
Screw
Domescrew
Washer
Knob
Axle
Bracket
Sleeve
Joint axle
Washer 23/ 8,2
Spring washer 15/8,2
Stop screw
Knob white
Claws screw
Claws metal
FRP 3x20
Distans
321
381
TC-150
TITLE:
ITEM
PART NUMBER
NO.
1 12599
2 10324
3 10322
4 MC6S-M6x25
5 Lock-Nut M6
6 FRP4x20
7 11077
9 12601
10 1621
11 10375
12 MC6S-M8x40
13 Lock-Nut-M8
14 MF6S-M10x30
15 MK6S M10x20
16 Washer-DIN-125-8,4
17 10357
18 12189
19 10353
20 10354
21 10358
22 4297
23 4266
24 S6SS M6x6
25 10025
26 11065
27 11062
28 FRP3x20
29 12489
6
TruckCam Frame Check System
User Manual
Software version 2.x.x
Wheel Adapter 12” - 24”, TC-150
F
E
D
C
B
A
1
1
2
2
3
3
3
2
4
4
7
8
APPV'D
CHK'D
DRAWN
Q.A
MFG
6
AG
NAME
SIGNATURE
FINISH:
6
9
5
7
DATE
WEIGHT:
MATERIAL:
mm
DEBUR AND
BREAK SHARP
EDGES
SCALE:1:5
DWG NO.
TITLE:
REVISION
REVISION
B
explspare/QTY.
1
1
2
2
2
2
2
2
8
SHEET 2 OF 2
15650
A3
TC-102 Frame gauge
Spare parts
www.truckcam.se
DO NOT SCALE DRAWING
Selfcentering part Frame Gauge
Knob
Knob
Knob
Extension Tube
Hanger L=620
Hanger L=320
Hanger L=870mm (Optional)
Rotating bracket assy
DESCRIPTION
4
2006-01-22
PART
ITEM NO. NUMBER
1
15640
2
10668
3
10667
4
10666
5
12143
6
10663
7
10665
8
10661
9
12113
UNLESS OTHERWISE SPECIFIED:
DIMENSIONS ARE IN MILLIMETERS
SURFACE FINISH: Ra xx
TOLERANCES: ISO 2768-mk
1
5
D
C
B
A
TruckCam Frame Check System
User Manual
Software version 2.x.x
Frame Gauge, TC-102
37
TruckCam Frame Check System
User Manual
Software version 2.x.x
Charging Cradle, TC-395
38
TruckCam Frame Check System
User Manual
Software version 2.x.x
C
O
PY
Appendix B - CE Declaration
39
TruckCam Frame Check System
User Manual
Software version 2.x.x
40
TruckCam Frame Check System
User Manual
Software version 2.x.x
Appendix C - Contact Information
For support, please contact the local TruckCam representative in your area or country.
System Manufacturer
TruckCam AB
Högmossevägen 3
SE 641 39 Katrineholm
Sweden
Tel: +46 (0)150 66 25 40
Fax: +46 (0)150 66 25 41
E-mail: [email protected]
Internet: www.truckcam.com
41
TruckCam Frame Check System User Manual, Software version 2.x.x
TruckCam Part no. 19101
Printed: February 17, 2010