1
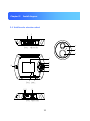
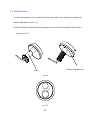
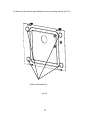
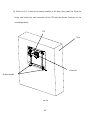
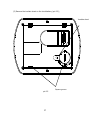
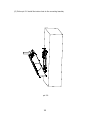
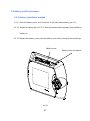
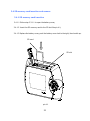
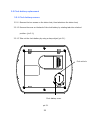
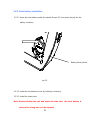
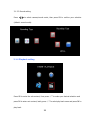
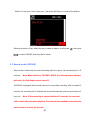
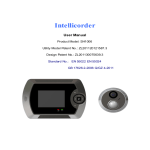
Intellicorder User Manual Dear Users, Please read the user manual carefully before using this product and Kindly safe keep this manual for future reference. Safety Use Note: Warning: Please install the digital door viewer in the recommended places to ensure safety. To guard against the explosion, please use the original battery. Please ask for maintenance from qualified service professionals. FCC Note: (U.S. only) This device complies with Part 15 of the FCC Rules. Operation is subject to the following two conditions: (1) This device may not cause harmful interference,and (2) this device must accept any interference received, including interference that may cause undesired operation. Equipment Maintenance • Do not shake and tap equipment violently. • If dust or water droplets splashing on the device, carefully wipe with a dry cloth. • Do not use any battery charger except the supplied one. • Please charge with our specially equipped battery charger. 2 Catalog Chapter I: Product information 1.1 Package contents 1.2 Product appearance 1.3 Main features, functions 1.4 Main specifications Chapter II: Install diagram 2.1 Structure chart 2.2 Installation process 2.3 Battery installation and remove method 2.3.1 Battery installation method 2.3.2 Battery remove method 2.4 SD memory card insertion and remove 2.4.1 SD memory card insertion 2.4.2 SD memory card remove 2.5 Clock battery replacement 2.5.1 Clock battery remove 3 2.5.2 Clock battery installation 2.6 Charge Chapter III: Intellicorder use instruction 3.1 Live mode 3.1.1 System setting 3.1.2 Time setting 3.1.3 Parameters setting 3.1.4 Playback setting 3.2 Record mode Chapter IV: FAQ Chapter V: Fault、solution and Precautions Note: Please read the user manual carefully before using this product and Kindly safe keep this manual for future reference. 4 Chapter I Product introduction 1.1 Package contents (1) Intellicorder indoor host 1pc (2) Intellicorder outdoor host 1pc (3) Indoor host mounting plate 1pc (4) Power adaptor 1pc (5) Lithium battery 1pc (6) Clock battery 1pc (Loaded. Not installation for will loss of power, fitted when using) (7) Fixed nut 1pc (8) Screw 2pcs (9) Phillips screwdriver 1pc (10) User manual 1pc In the event the packing accessories are incomplete to ensure your interests, kindly contact the dealer or the company immediately. 5 1.2 Product Appearance 6 1.3 Product features and functions The intellicorder HML2345X is a new generation of visual digital recording door viewer, it incorporated the most advanced technical digital chipset. With a unique assembly method, user can enjoy easy and convenient installation without the need of any wiring and any need to alter or modify their current traditional peep-hole on their door construction. This is indeed a simple, practical and yet highly technologically advanced home security product. Main features and functions (1) 2.8” LCD display screen (2) Attractive & Fashionable appearance (3) Easy to operate and install, no wiring (4) Indoor host monitoring outside (5) Infrared detection video / photo (6) Own 256M built-in memory, easy to use (7) Support SD card extension, up to 32G (8) Record the date, time, the video length, facilitate to provide valuable data when inquiry (9) No radiation, low power consumption (10) 3X digital zoom (11) 0.3 mega pixel high resolution (12) Automatic power saving mode 7 1.4 Product specifications Item Indoor unit size Machine Part Outdoor unit size Adapter plate Spec. Remarks 138mm*103mm*25mm 18mm*Dia.50mm 100mm*78mm*9.5mm Working environment Ambient light Illumination of the outdoor unit adaptation 20 lux~3500 lux The resolution of images on the indoor Resolution monitor should not be less than 200 (Central level, under800 lux condition) Capacitive Electret Diameter 6MM Height: 2.7MM MIC part Microphone Sensitivity: 40 + /-3dB Camera Pixel Width:640, Height:480 Diagonal:115+/-5 degrees Camera Part Camera Angle Horizontal:102+/-3 degrees Vertical: 85+/-3 degrees Digital Zoom 3X digital zoom 8 300K Pixel Diameter:20MM Loudspeaker Part Power:1W Loudspeaker Impedance:8 OHM Display Type LCD Type 240(R+G+B)*320 Dots 2.8 inch TFT LCD Display Screen Viewing Direction Backlight 6 O”colock 4 LED white color water-proof Indoor Unit: IP30; dust-proof Outdoor Unit: IP33 requirements Door thickness is: 35mm-55mm 、 Door Thickness Installation Part suited 55mm-85mm and 85mm-105mm. Can be customized so that fit for any thickness of the door Door peephole size Dia.15mm Own memory Memory 256M Maximum support 32G SD card and Memory Extension backward compatible 9 Battery Charger 5.0V Input: 110 V to 240 V 50/60 Hz, 0.3 A (MODEL:VA8B-050 Output: Dc 5.0 V 1.0A 100) Power Part Battery Pack (lithium-ion) Voltage/capacity: 3.7 V, 1800 mAh (MODEL:DS-L600) Clock battery Dia.20.0 thick:3.2 3.0V CR2032 Infrared mobile Distance Near: <1.5M ; Far: <2.5M monitoring Ambient -10 ℃~+55 ℃; temperature Working Relative Humidity 10 %~95 %; Condition Atmospheric 86 kPa~106 kPa pressure Include SD card or Optional not according to customer’s request Others Include battery Language Include 1pc 1800mAh lithium battery Kinds of language to set 10 Settings function time and date settings function Sleep automatically Can automatically go to sleep File save format JPEG,MP4 11 Chapter II Install diagram 2.1 Intellicorder structure chart 1 host 2 14 underside 15 16 3 4 5 6 10 7 8 9 host front 11 12 13 host underside 12 Explain the various parts of the structure or button: (1) Battery Cover (SD memory card and lithium battery inside) (2) Lock bracket for battery cover (3) Color LCD screen (4) Return: (5) Cursor: △▽ (6) OK: confirm setting (7) Power: power on or power off (8) Charge indicator (red): when there the external power adaptor is connected, light on (9) New record indicator (green): recording when in recording mode ,light on (10) Speaker: Play the recorded audio sound under record mode (11) Charging interface (12) RESET – use a pointer or alike to press this button to reset the unit (13) Mode switch key: switch btw (RECORD) and (LIVE) mode (14) Lens (15) Microphone (16) Infrared motion-activated Sensor – detects motion up to 2-2.5m 13 2.2 Install process (1) Unscrew the sleeve out completely first from the outdoor part, Remove the backing of double-sided adhesive (pic.2.1); (2) Pass the Outdoor slave through the peephole, and stick it to the outside of the door like shown in pic.2.2; Double-sided adhesive sleeve pic.2.1 pic.2.2 14 (3) Removing the double-sided adhesive on the mounting bracket (pic.2.3); Double-sided adhesive pic.2.3 15 (4) Follow pic.2.4, to stick the mounting bracket on the door, then install the Screw for fixing, and buckle the male connector of the FPC with the female Connector on the mounting bracket; FPC Door Fixed nut Director buckle pic.2.4 16 (5) Remove the insulate sheet on the clock battery (pic.2.5); Insulate sheet pic.2.5 17 Square groove (6) Follow pic.2.6 install the indoor host to the mounting bracket; pic.2.6 18 (7) Lock the screws with the Philips screwdriver (pic.2.7); Screw pic.2.7 (8) Install finished. 19 2.3 Battery install and remove 2.3.1 Battery installation method 2.3.1.1 Push the battery cover lock to the left, it will open automatically (pic.3.1); 2.3.1.2 Install the battery like in Pic.3.2: push the battery Buckle outward, then install the battery in; 2.3.1.3 Replace the battery cover, push the battery cover lock to the right, then buckle up. Battery cover Battery cover lock pannel pic.3.1 20 2.3.2 Battery remove method Opposite to the battery install steps. Battery Battery buckle pic.3.2 21 2.4 SD memory card insertion and remove 2.4.1 SD memory card insertion 2.4.1.1 Follow step 2.3.1.1 to open the battery cover; 2.4.1.2 Insert the SD memory card to the SD slot like pic.4.1; 2.4.1.3 Replace the battery cover, push the battery cover lock to the right, then buckle up. SD card SD slot pic.4.1 22 2.4.2 SD memory card remove 2.4.2.1 Follow step 3.1.1 to open the battery cover; 2.4.2.2 Press and release SD card (pic.4.2); 2.4.2.3 Replace the battery cover, push the battery cover lock to the right, then buckle up. Release SD card SD card pic.4.2 23 2.5 Clock battery replacement 2.5.1 Clock battery remove 2.5.1.1 Remove the two screws on the indoor host, then take down the indoor host; 2.5.1.2 Remove the cover on the back of the clock battery by rotating tabs into unlocked position. (pic.5.1); 2.5.1.3 Take out the clock battery by using a sharp object (pic.5.1). Pick out hole Clock battery cover pic.5.1 24 2.5.2 Clock battery installation 2.5.2.1 Insert the clock battery under the splinter like pic.5.3, then press the top into the battery container; Battery block splinter pic.5.2 2.5.2.2 Install the clock battery cover by rotating it clockwise; 2.5.2.3 Install the indoor host. Note: Please initialize the unit and adjust the time after removed for a long time or it be replaced 25 the clock battery is 2.6 Charge When the battery has low capacity, the capacity icon will indicate empty, please charge the battery. 2.6.1 Connect the power adaptor to the power supply; 2.6.2 Insert the DC plug to charging pot of the host, the indicate Light turn on (red); 2.6.3 On the LCD screen, you can see the battery icon is rolling, this is the charging indicate; 2.6.4 The battery icon stops rolling and shows full power when fully charged. 26 Chapter III Operation Press power on key to turn on the device ( )(5 seconds). Mode selection: Live mode (LIVE) / Record mode (RECORD), through the mode switch in the lower side for selection. Notes: Under live mode (LIVE), shut down automatically when non-operation for 40 seconds. Under record mode (RECORD), automatically store auto-recording 15 seconds, and start again if have trigger. 27 data and standby after 3.1 Live mode (LIVE) Press △▽ to zoom in/out image with 3X; Press to switch btw camera mode and recording mode; ■ Camera mode: Press OK to take photos ■Recording mode: Press OK to start/stop Shortly press OK to enter main menu. 28 Press△▽ to select setting, Press OK to enter setting ,press to previous menu,shortly press System setting Time setting Parameter setting Playback setting to return to monitoring interface. 29 once to return 3.1.1 System setting Press△▽ to switch setting option, and press OK enter to the setting catalog. 3.1.1.1 Language setting Press to select language, then press OK to confirm. 30 3.1.1.2 Infrared setting Press to select close/far, then press OK to confirm. 31 Near: infrared distance is around 0-1.5M Far: infrared distance is around 0-2.5M 32 3.1.1.3 Format Press to select YES/NO, then press OK to confirm your selection. Note: Format will delete what saved in the SD memory card, please use with caution. 3.1.1.4 Default setting Press to select YES/NO, then press OK to confirm whether to restore factory settings. 33 3.1.1.5 Version No. Show software Version No. 3.1.1.6 NAND Remove to SD Card Press △ ▽ to select Yes or No, then press OK key to confirm if removing the built-in memory to SD card. 34 3.1.2 Time setting Press OK to select or switch setting position, then press△▽to adjust time. 35 3.1.3 Parameter setting Press to switch setting option, then press OK enter to the setting catalog. Note: Settings updates take effect when you reboot the intellicorder. 3.1.3.1 Back light Press to select back light or NO (if need to open screen under record mode), then press OK to confirm your selection (default: NO). 36 3.1.3.2 Timestamp Press to select YES/NO (if show time when camera/record), then press OK to confirm your selection (default: YES). 37 3.1.3.3 Record setting Press to select camera/record mode, then press OK to confirm your selection (default: record mode). 3.1.4 Playback setting Press OK to enter the sub-content, then press △▽to make your desired selection and press OK to enter root-content, lastly press △▽to select play back menu and press OK to play back. 38 Playing back photos, press to review your photos; Playing back recording, press OK to select play/pause; Press / to select backward/forward; Volume + / Volume -, Press △/▽; When the storage space is full, the below reminder will come to the interface. Delete the directory or file: Select the file or directory you need to delete, press 39 button for long time, then choose yes , then press OK button to confirm the deletion. Deleting contents or files, select the one you want to delete, shortly press , then press to select YES/NO, and press OK to delete. 3.2 Record mode (RECORD) When motion is detected, the record indicating light turns green, the recording time is 15 seconds. Note: When switch to “RECORD” MODE, the infrared motion detector will work, the live display screen turn off. HML2345X is equipped with internal memory for immediate recording, after recorded 15 seconds, the recording will be finished and stored automatically, and the green light will turn out. Note: If the recording is stopped without 15 seconds, the recorded video couldn’t be read when playback. The interval time needed to reactivate the motion sensor is about 15 seconds. 40 When recording, press power key to turn on/off the LCD display. Infrared Caution: 1. Susceptible to radio frequency radiation interference, to be away from sources of interference . 2. Away from the air-conditioning, refrigerator, stove and other places sensitive to temperature changes. 3. Motion sensor may not be activated in the following situations: When the action is very slow or very fast; When the moving object is very small; When the action only in a corner of the viewing area. 41 Chapter IV FAQ 1. Q: How long will the image turn out after the HML2345X is powered on? A: Around 5 seconds, because the system needs time to initial. 2. Q: When the HML2345X is working, how long will it enter into standby mode? A: after no operation for 40 seconds, it will enter to standby mode and save power. 3. Q: How long will the full-charged battery last for? A: It can last for around one to two months (estimate 5times/day, 40 seconds/time). 4. Q: Why the image is fuzzy? A: May display or camera protective film does not tear up, please tear away the protective film. 5. Q: What thickness of the door will the HML2345X fit? A:The ranges are 35mm ~ 55mm,55~85mm,85~105mm. 6. Q: Why does the image looks fuzzy not clear? A: Outdoor unit is not properly installed, the camera should be in the above, infrared detection head in below, and then fine-tuning the outdoor unit in order to image display properly. 7. Q: How many pictures and how long of video can the memory store? 42 A:It own 256M memory, except for system memory, about 240M left available, so can store pictures about 1113pcs, and 11 minutes of video. Please consult below chart for details: Capacity(GB) Number of pictures (pcs) Video time(minutes) 1 6625 65 2 13250 130 4 26500 260 8 53000 520 16 106000 1040 32 212000 2080 Note: Capacity for pictures=capacity/size of each picture, 1GB=1000MB=1000*1000KB. Video time=capacity/video size of each minute (15s is 3.2MB, 60s is 3.2*4=12.8MB). 43 Chapter V Fault、solution and Precautions 1. Please do not use sharp objects to graze the LCD of indoor host to prevent scratch on the LCD. 2. When magnifying the image, the noise will become higher, this is normal. 3. Please follow above install process. 4. After the machine is installed, to avoid damage of the connecting line, please do not rotate both of the indoor and outdoor hosts. If the connecting line break caused by above reason, then the product will not be in the warranty. 5. Turn off the display each time you finished a conversation, this can help to save power of the battery. 6. Discard your battery properly to avoid pollution the environment. 7. To prevent misconduct, please use the product: Keep out of direct sunlight Keep out of be heated, such as heaters, heat sinks and heat lamp. Keep out of strong dry, such as central heating vents. 44