1
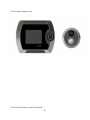
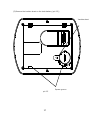
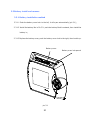
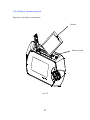
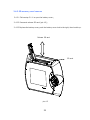
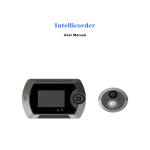
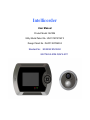
Intellicorder User Manual Product Model: SH1006 Utility Model Patent No.: ZL201120121587.3 Design Patent No.: ZL201130075639.3 Standard No.: EN 55022 EN 55024 GB 17626.2-2006 Q/GZ 4-2011 Dear Users, Ple ase read the use r m anual carefully before using this product and Kindly safe kee p this manual for future re fe re nce . Safety Use Note: Warning: Please install the digital door vie we r in the re com mende d places to e nsure safe ty. To guard against the e xplosion, ple ase use the original batte ry. Please ask for mainte nance from qualified se rvice profe ssionals. Equipment Ma intena nce • Do not shak e and tap equipment violently. • If dust or wate r drople ts splashing on the de vice , care fully wipe with a dry cloth. • Do not use any batte ry charge r ex cept the supplie d one. • Please charge with our spe cially equipped batte ry charge r. 2 Catalog Chapter I: Product information 1.1 Package contents 1.2 Product appe arance 1.3 Main feature s, functions 1.4 Main spe cifications Chapter II: Install diagram 2.1 Structure chart 2.2 Installation proce ss 2.3 Batte ry installation and re move me thod 2.3.1 Batte ry installation me thod 2.3.2 Batte ry rem ove me thod 2.4 SD memory card inse rtion and remove 2.4.1 SD memory card inse rtion 2.4.2 SD memory card re move 2.5 C lock batte ry replaceme nt 2.5.1 C lock batte ry re move 3 2.5.2 C lock batte ry installation 2.6 C harge Chapter III: Intellicorder use instruction 3.1 Live mode 3.1.1 Syste m se tting 3.1.2 Time se tting 3.1.3 Parame te rs se tting 3.1.4 Playback se tting 3.2 Re cord mode Chapter IV: FAQ Chapter V: Fault、solution and Precautions Note: Ple ase read the use r manual care fully be fore using this product and Kindly safe k eep this manual for future re fe rence . 4 Chapter I Product introduction 1.1 Package contents (1) Intellicorde r indoor host 1pc (2) Inte llicorde r outdoor host 1pc (3) Indoor host m ounting plate 1pc (4) Powe r adaptor 1pc (5) Lithium batte ry 1pc (6) C lock batte ry 1pc (Loaded. Not installation for will loss of powe r, fitted whe n using ) (7) Fixed nut 1pc (8) Scre w 2pcs (9) Phillips scre wdrive r 1pc (10) Use r manual 1pc In the e ve nt the pack ing acce ssories a re incomple te to e nsure your inte rests, k indly contact the deale r or the com pany imme diate ly. 5 1.2 Product Appearance 1.3 Product features and functions 6 The inte llicorde r SH1006 is a ne w gene ration of visual digital re cording door vie we r, it incorporate d the m ost advance d te chnical digital chipse t. W ith a unique asse mbly me thod, use r can e njoy easy and convenie nt installation without the need of any wiring and any need to alte r or modify the ir curre nt traditional peep -hole on the ir door construction. This is indeed a sim ple , practical and ye t highly te chnologically advance d home se curity product. Main features and functions (1) 2.8” LC D display scre en (2) Attractive & Fashionable appearance (3) Easy to ope rate and install, no wiring (4) Indoor host m onitoring outside (5) Infrared de te ction vide o / photo (6) O wn 256M built-in memory, easy to use (7) Support SD card ex tension, up to 32G (8) Re cord the date , time , the video le ngth, facilitate to provide valuable data whe n inquiry (9) No radiation, low powe r consumption (10) 3X digital zoom (11) 0.3 me ga pixe l high resolution (12) Automatic powe r saving mode 1.4 Product specifications 7 Item Indoor unit size Machine Part O utdoor unit size Adapte r plate Spe c. Rem ark s 138mm *103mm *25mm 18m m*Dia.50m m 100mm *78mm *9.5mm Work ing environment Am bient light Illum ination of the outdoor unit adaptation 20 lux ~3500 lux The re solution of images on the indoor Re solution monitor should not be less than 200 (Ce ntral le ve l, unde r800 lux condition) C apacitive Ele ctre t Diame te r 6MM He ight: 2.7MM MIC part Microphone Se nsitivity: 40 + /-3dB C ame ra Pixe l W idth:640, He ight:480 Diagonal:115+/-5 de gre es C ame ra Part C ame ra Angle Horizontal:102+/-3 degrees Ve rtical: 85+/-3 de grees Digital Zoom 3X digital zoom 8 300K Pixe l Diame te r:20MM Loudspe ake r Part Powe r:1W Loudspe ake r Impe dance :8 O HM Display Type LC D Type 240(R +G+B)*320 Dots 2.8 inch TFT LC D Display Scree n Vie wing Dire ction Back light 6 O ”colock 4 LED white color wate r-proof Indoor Unit: IP30; dust-proof O utdoor Unit: IP33 re quirem ents Door Thick ness Installation Part suite d Door thick ness is: 35mm -55mm , 55m m-85mm and 85mm -105mm . Door pe ephole size Dia.15mm O wn mem ory Memory 256M Max im um support 32G SD card and Memory Ex tension back ward compatible 9 Batte ry C harge r 5.0V Input: 110 V to 240 V 50/60 Hz, 0.3 A (MO DEL:VA8B-050 O utput: Dc 5.0 V 1.0A 100) Powe r Part Batte ry Pack (lithium-ion) Voltage /capacity: 3.7 V, 1800 m Ah (MO DEL:DS-L600) C lock batte ry Dia.20.0 thick :3.2 3.0V CR 2032 Infrared mobile Distance Ne ar: <1.5M ; Far: <2.5M monitoring Am bient -10 ℃~+55 ℃; tem pe rature Work ing Re lative Hum idity 10 %~95 %; C ondition Atm osphe ric 86 kPa ~106 k Pa pre ssure Include SD card or O ptional according to custome r’s O the rs not Include batte ry Language re quest Include 1pc 1800m Ah lithium batte ry Kinds of language to se t 10 Se ttings function time and date se ttings function Slee p automatically C an a utomatically go to sleep File save format JPEG,MP4 11 Chapter II Install diagram 2.1 Intellicorder structure chart 1 2 14 host underside 15 16 3 4 5 6 10 7 8 9 host front 11 12 13 host underside 12 Ex plain the various pa rts of the structure or button: (1) Batte ry Cove r (SD m emory card and lithium batte ry inside ) (2) Lock bracke t for batte ry cove r (3) Color LC D scree n (4) Re turn: (5) C ursor: △▽ (6) O K: confirm se tting (7) Powe r: powe r on or powe r off (8) C harge indicator (re d): whe n the re the ex te rnal powe r adaptor is conne cte d, light on (9) Ne w re cord indicator (gree n): re cording whe n in re cording mode ,light on (10) Speake r: Play the re corded audio sound unde r re cord m ode (11) Charging inte rface (12) R ESET – use a pointe r or alike to pre ss this button to re se t the unit (13) Mode switch k e y: switch btw (R EC OR D) and (LIVE) m ode (14) Le ns (15) Microphone (16) Infrare d m otion-activated Se nsor – de te cts motion up to 2-2.5m 13 2.2 Install process (1) Unscre w the slee ve out com ple te ly first from the outdoor part, Rem ove the back ing of double -sided adhe sive (pic.2.1); (2) Pass the Outdoor slave through the pee phole, and stick it to the outside of the door like shown in pic.2.2; Double-side d adhesive slee ve pic.2.1 pic.2.2 14 (3) Removing the double-side d adhe sive on the mounting brack e t (pic.2.3); Double-side d adhesive pic.2.3 15 (4) Follow pic.2.4, to stick the mounting brack e t on the door, then install the Scre w for fix ing, and buck le the m ale conne ctor of the FPC with the female Conne ctor on the mounting bracke t; FPC Door Fixe d nut Dire ctor buck le pic.2.4 16 (5) Remove the insulate shee t on the clock batte ry (pic.2.5); Insulate she e t Square groove pic.2.5 17 (6) Follow pic.2.6 install the indoor host to the mounting bracke t; pic.2.6 18 (7) Lock the scre ws with the Philips scre wdrive r (pic.2.7); Scre w pic.2.7 (8) Install finishe d. 19 2.3 Battery install and remove 2.3.1 Battery installation method 2.3.1.1 Push the batte ry cove r lock to the le ft, it will ope n automatically (pic.3.1); 2.3.1.2 Install the batte ry like in Pic.3.2: push the batte ry Buckle outward, then install the batte ry in; 2.3.1.3 Re place the batte ry cove r, push the batte ry cove r lock to the right, the n buckle up. Batte ry cove r Batte ry cove r lock pannel pic.3.1 20 2.3.2 Battery remove method O pposite to the batte ry install ste ps. Batte ry Batte ry buck le pic.3.2 21 2.4 SD memory card insertion and remove 2.4.1 SD memory card insertion 2.4.1.1 Follow step 2.3.1.1 to ope n the batte ry cove r; 2.4.1.2 Inse rt the SD m emory card to the SD slot like pic.4.1; 2.4.1.3 Re place the batte ry cove r, push the batte ry cove r lock to the right, the n buckle up. SD card SD slot pic.4.1 22 2.4.2 SD memory card remove 2.4.2.1 Follow step 3.1.1 to ope n the batte ry cove r; 2.4.2.2 Press and re lease SD card (pic.4.2); 2.4.2.3 Re place the batte ry cove r, push the batte ry cove r lock to the right, the n buckle up. Re le ase SD card SD card pic.4.2 23 2.5 Clock battery replacement 2.5.1 Clock battery remove 2.5.1.1 Remove the two scre ws on the indoor host, the n take down the indoor host; 2.5.1.2 Remove the cove r on the back of the clock batte ry by rotating tabs into unlocked position. (pic.5.1); 2.5.1.3 Take out the clock batte ry by using a sharp obje ct (pic.5.1). Pick out hole C lock batte ry cove r pic.5.1 24 2.5.2 Clock battery installation 2.5.2.1 Inse rt the clock batte ry unde r the splinte r like pic.5.3, then press the top into the batte ry containe r; Batte ry block splinte r pic.5.2 2.5.2.2 Install the clock batte ry cove r by rotating it clock wise ; 2.5.2.3 Install the indoor host. 25 2.6 Charge When the battery has low capacity, the capacity icon will indicate empty, please charge the battery. 2.6.1 Connect the power adaptor to the power supply; 2.6.2 Insert the DC plug to charging pot of the host, the indicate Light turn on (red); 2.6.3 On the LCD screen, you can see the battery icon is rolling, this is the charging indicate; 2.6.4 The battery icon stops rolling and shows full power when fully charged. 26 Chapter III Operation Press powe r on ke y to turn on the de vice ( )(5 se conds). Mode se le ction: Live mode (LIVE) / Re cord mode (R ECOR D), through the mode switch in the lowe r side for se le ction. Note s: Unde r live m ode (LIVE), shut down automatically whe n non-ope ration for 40 se conds. Unde r re cord mode (R ECOR D), automatically store auto-re cording 15 se conds, and start again if have trigge r. 27 data and standby afte r 3.1 Live mode (LIVE) Press △▽ to zoom in/out image with 3X; Press to switch btw came ra m ode and re cording m ode ; ■ Came ra mode: Press O K to take photos ■Re cording m ode : Press O K to start/stop Shortly pre ss O K to e nte r m ain me nu. 28 Press△▽ to to se le ct se tting, Press O K to e nte r se tting ,press pre vious me nu,shortly press System se tting Tim e se tting Parame te r se tting Playback se tting to re turn to monitoring inte rface . 29 once to re turn 3.1.1 System setting Press△▽ to switch se tting option, and press O K e nte r to the se tting catalog . 3.1.1.1 Language se tting Press to se le ct language , then press O K to confirm . 30 3.1.1.2 Infrare d se tting Press to se le ct close/far, then pre ss O K to confirm . 31 Ne ar: infrare d distance is around 0-1.5M Far: infrared distance is around 0-2.5M 32 3.1.1.3 Format Press to se le ct YES/NO , then press O K to confirm your se le ction. Note: Fo rmat will delete what saved in the SD memory car d, p lease use with caution. 3.1.1.4 Default se tting Press to se le ct YES/NO , the n press O K to confirm whe the r to re store factory se ttings. 33 3.1.1.5 Ve rsion No. Show software Ve rsion No. 3.1.1.6 NAND R emove to SD C ard Press △ ▽ to se le ct Yes or No, the n press O K ke y to confirm if removing the built-in mem ory to SD card. 34 3.1.2 Time setting Press O K to se le ct or switch se tting position, the n press△▽to adjust time . 35 3.1.3 Parameter setting Press to switch se tting option, the n press O K ente r to the se tting catalog. Note : Se ttings updates take e ffe ct whe n you reboot the inte llicorder. 3.1.3.1 Back light Press to se le ct back light or NO (if nee d to ope n scree n unde r re cord mode ), then pre ss O K to confirm your se le ction (de fault: NO ). 36 3.1.3.2 Time stam p Press to se le ct YES/NO (if show time whe n came ra/re cord), then press O K to confirm your se le ction (de fault: YES). 37 3.1.3.3 Re cord se tting Press to se le ct cam e ra/re cord mode , the n press O K to confirm your se le ction (de fault: re cord m ode ). 3.1.4 Playback setting Press O K to ente r the sub-conte nt, the n press △▽to mak e your desired se le ction and pre ss O K to ente r root-conte nt, lastly press △▽to se le ct play back me nu and press O K to play back. 38 Playing back photos, press to re vie w your photos; Playing back re cording, press O K to se le ct play/pause ; Press / to se le ct back ward/forward; Volume + / Volume -, Press △/▽; W he n the storage space is full, the be low re m inde r will come to the inte rface . De le te the dire ctory or file : Se le ct the file or dire ctory you nee d to de le te , press 39 button for long time , then choose ye s , then press O K button to confirm the de le tion. De le ting conte nts or file s, se le ct the one you want to de le te , shortly pre ss , then press to se le ct YES/NO , and pre ss O K to de le te . 3.2 Record mode (RECORD) W he n motion is de te cte d, the re cord indicating light turns gree n, the re cording time is 15 se conds. Note: When s witch to “RE CORD” MODE, the infrared mot ion detector will work, the live dis play screen tur n off. SH1006 is e quippe d with inte rnal mem ory for imme diate re cording, afte r re corded 15 se conds, the re cording will be finishe d and stored autom atically, and the gre en light will turn out. Note: If the record ing is stopped without 15 sec onds, the recorded video couldn’t be rea d when p layback. The interval time needed to reactivate t he motion senso r is about 15 seco nds. 40 W he n re cording, pre ss powe r k e y to turn on/off the LC D display. Infrared C aution: 1. Susceptible to radio freque ncy radiation inte rfe re nce, to be away from sources of inte rfe rence . 2. Away from the air-conditioning, re frige rator, stove and o the r place s se nsitive to tem pe rature change s. 3. Motion se nsor may not be activate d in the following situations: W he n the action is ve ry slow or ve ry fast; W he n the moving obje ct is ve ry small; W he n the action only in a corne r of the vie wing are a. 41 Chapter IV 1. FAQ Q : How long will the image turn out afte r the SH1006 is powe red on? A: Around 5 se conds, be cause the system nee ds time to initial. 2. Q : When the SH1006 is work ing, how long will it e nte r into standby mode ? A: afte r no ope ration for 40 se conds, it will ente r to standby mode and save powe r. 3. Q : How long will the full-charge d batte ry last for? A: It can last for around one to two months (estimate 5time s/day, 40 se conds/time). 4. Q : W hy the image is fuzzy? A: May display or came ra prote ctive film does no t te ar up, ple ase tear away the prote ctive film. 5. Q : What thickne ss of the door will the SH1006 fit? A:The range s are 35mm ~ 55mm ,55~85m m ,85~105mm . 6. Q : Why doe s the image looks fuzzy not cle ar? A: O utdoor unit is not prope rly installed, the came ra should be in the above, infrared de te ction head in be low, and the n fine -tuning the outdoor unit in orde r to image display prope rly. 7. Q : How m any pictures and how long of video can the me mory store? 42 A:It own 256M memory, ex cept for system me mory, about 240M le ft available , so can store picture s about 1113pcs, and 11 m inute s of video. Ple ase consult below chart for de tails: C apacity(GB) Num be r of picture s (pcs) Video time (m inute s) 1 6625 65 2 13250 130 4 26500 260 8 53000 520 16 106000 1040 32 212000 2080 Note : Capacity for pictures=capacity/size of each picture, 1GB=1000MB=1000*1000KB. Video time =capacity/video size of e ach m inute (15s is 3.2MB, 60s is 3.2*4=12.8MB). 43 Chapter V Fault、solution and Precautions 1. Please do not use sharp obje cts to graze the LC D of indoor host to pre ve nt scratch on the LC D. 2. W he n magnifying the image, the noise will be come highe r, this is norm al. 3. Ple ase follow above install process. 4. Afte r the machine is installe d, to avoid damage of the conne cting line , please do not rotate both of the indoor and outdoor hosts. If the conne cting line break caused by above re ason, the n the product will not be in the warranty. 5. Turn off the display each time you finished a conve rsation, this can he lp to save powe r of the batte ry. 6. Discard your batte ry prope rly to avoid pollution the e nvironm ent. 7. To pre vent m isconduct, please use the product: Kee p out of dire ct sunlight Kee p out of be heated, such as he ate rs, heat sink s and heat lam p. Kee p out of strong dry, such as ce ntral heating ve nts. 44