1
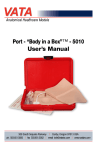
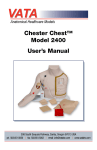
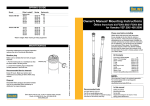
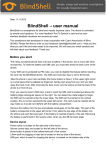
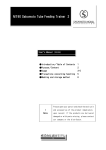
Nita Newborn™
Model 1800
User Manual
308 South Sequoia Parkway, Canby, Oregon 97013 USA
ph. 503.651.5050 | fax 503.651.5052 | email [email protected] | www.vatainc.com
Meet Nita NewbornTM
Nita Newborn™ is a unique latex-free, anatomically accurate representation of a 4 lb.,
16 inch female baby developed to teach and practice vascular accessing of newborns
and infants. An invaluable teaching aid, this model permits instruction in the skills
associated with accessing, securing, dressing, site care and maintenance for standard
venipuncture, central catheters, PICC lines and umbilical catheters. These techniques
can now be mastered on a realistic model before they are performed on newborns
and infants.
A realistic flashback of simulated blood confirms correct needle location in the
vein. All veins allow the opportunity to practice blood withdrawal, fluid infusion and
heparinization.
A unique feature of the simulator is a life-like umbilicus allowing the repeated
catheterization of the umbilical vein, using a 5FR catheter, with proper placement
being verified by a blood return. Umbilical tape can even be tied around the umbilicus
to secure the catheter.
When accessing, the skin rolls as you palpate the vein and a “pop” is felt as the
needle enters the vein. Vein size and wall thickness have been selected to provide the
realistic feel and appearance of a newborn. The translucent skin allows visualization of
the underlying blue veins. The blue colored veins, made of self-sealing material, are
able to be accessed repeatedly.
Nita Newborn™ is easily maintained with replaceable veins and skins. Simplicity of
design allows for easy set up and ensures a realistic training experience.
Nasal and oral openings with internal passageways are present. These permit the
verification of nasal airway patency, placement of nasal cannulas, suctioning of upper
airway, measurement of proper feeding tube length using anatomical reference points
and procedures associated with gavage feeding.
Contact Information
Whatever your question, problem, or comment, VATA’s Customer
Service is here to help. There are four quick, easy ways to contact
us, so you can choose what works best for you. If there’s anything
we can do, just let us know!
VATA Inc.
308 South Sequoia Parkway, Canby, Oregon 97013, USA
Phone : 503.651-5050
Fax : 503.651-5052
E-Mail : [email protected] Web : www.vatainc.com
2
List of Components:
1 Carrying Case – 0875
8 I.D. Bracelet
2 Female Baby Body – 1800
9 Diaper
3 Umbilicus – 0804
10 Vein Tubing with
Umbilical Valve – 1805
4 Right Arm Skin – 0806
11 Blood Reservoir Bag with
5 Left Arm Skin – 0807
Attched Tubing – 0609
6 Right Leg Skin – 0808
12 One Pint Bottle of Simulated
Blood Concentrate
7 Head Skin – 0809
13 Instruction Manual
1
13
12
11
2
3
10
7
9
4
5
6
8
IT IS STRONGLY SUGGESTED THAT THE ENTIRE MANUAL
BE READ PRIOR TO USING NITA NEWBORN™
3
Setting up for Use:
1. Remove bottle with simulated blood concentrate and add 380cc of
distilled water; mix and set aside.
2. Remove the blood reservoir bag with attached tubing, making sure the
roller clamp is closed, and fill with the simulated blood.
3. Hang the blood reservoir bag approximately 16 inches above the model.
Note: While some leakage is normal, hanging the blood reservoir bag over
16 inches high can result in too
much pressure and excessive
leakage.
4. Remove Nita NewbornTM from
case by releasing the Velcro
strap.
5. Place Nita NewbornTM on a level
surface near a sink and remove
the white luer caps on the end of
the clear tubing exiting the head
and the right leg (See photo 1).
photo 1
6. Position the leg tubing over the
sink and slightly elevate the
feet above the head. Attach the
blood reservoir bag tubing to
the tubing exiting the head (See
photo 2).
7. Open the white snap clamps on
both of the clear tubes exiting
the model (See photo 3).
photo 2
photo 3
4
www.vatainc.com
Setting up for Use:
8. Gradually prime the veins with
simulated blood by slowly
opening the roller clamp on
the blood reservoir bag tubing
attached to the clear tubing
on the head. Permit simulated
blood to flow through the system
until a solid stream of blood is
visible in the clear tubing exiting
the leg (See photo 4). Close the
snap clamp on the leg tubing
and re-attach the white cap.
photo 4
9. The legs can now be lowered. If
you are planning on accessing
with an umbilical catheter it
is best to place Nita on an
absorptive surface as some
leakage is normal when working
with an umbilical catheter (See
photo 5).
10. Nita NewbornTM is now primed
and ready to use.
photo 5
Please note when using 24g and smaller IV catheters it may take more time
to see a flashback. You can enhance the visualization of seeing a flashback
by securely closing the top on the blood reservoir bag with the simulated
blood and gently squeezing the bag to increase the pressure in the system.
Caution – over squeezing can cause the blood reservoir bag top to pop open
and fluid to leak out.
www.vatainc.com
5
Access Sites Available
•
Frontal scalp vein on forehead
•
Temporal scalp vein on left side of head
•
Posterior Auricular scalp vein on left side of head behind ear
•
Jugular on left side
•
Basilic on right and left arm
•
Cephalic on right arm
•
Superficial veins on back side of right hand, just below the first and
third digits
•
Superficial vein on backside of left hand, just below the fourth digit
•
Great Saphenous vein, Dorsal Venous Arch, and Small Saphenous
vein on right leg
•
Umbilical vein
Additional Features
6
•
Measurement of proper feeding tube length, using anatomical
reference points.
•
Procedures associated with gavage feeding
•
Practice of placing and securing nasal cannulas
•
Suctioning of nasal passages and the ability to verify patency
of nasal passages
•
Suctioning of the upper airway
•
Fluid can be introduced into the nasal and oral passageways
to practice aspiration
www.vatainc.com
Accessing with an umbilical catheter
Nita NewbornTM Model 1800 has a
newly designed valve that permits
fluid withdrawal and infusion. The new
valve will only perform properly with a
5FR umbilical catheter; use of another
size may result in excessive leakage.
A polyurethane catheter will work best
due it its stiffness, but a silicone catheter
may also be used. Thread the umbilical
catheter down any of the three openings
of the umbilicus, as they all join at a
common point (See photo 6). Rolling
the umbilical catheter between your
fingers as you insert the catheter will
aid in advancing the catheter through
the umbilical valve. This motion should
be done quickly to seat the catheter in
the valve and to minimize leakage. Once
the umbilical catheter is placed, you can
infuse and withdraw fluid. Some leakage
may occur and be visible on the surface
or under the model after infusing which
is normal. Once you have completed the
session, remove the umbilical stump and
use a Q-tip to soak up any liquid present
on the top of the valve (See photo 7).
photo 6
photo 7
Cautions:
•
Do not use solvents to clean the model as they may cause damage.
•
Simulated blood is for use with Nita NewbornTM only and is not intended for
any other use.
•
Do not use dull or burred needles as these will damage the vein tubing and
may cause the veins to leak.
•
While some leakage is normal, exceeding 500cc of simulated blood or a
fluid bag height of 16 inches will increase fluid pressure and may result in
excessive leakage through previously accessed sites.
•
Do not place model on printed matter or mark with a pen as this will
permanently stain the model’s skin.
•
Do not replace skin and veins if model has not received the barrier coating.
Material reaction will occur, resulting in break down of skin and veins.
*** See NOTE in Replacement Parts for Nita Newborn™ on page 12
www.vatainc.com
7
Care and Cleaning of Nita Newborn™
1. After each use close the roller clamp on the blood reservoir bag tubing
and the snap clamp on the clear tubing exiting the head.
2. Disconnect and drain the blood reservoir bag. Flush blood reservoir bag
and tubing with water.
3. Refill blood reservoir bag with clean water and reattach to clear tubing
exiting the head.
4. Position clear leg tubing over sink or container and remove white cap.
Open snap clamps, followed by roller clamp, and flush the model until
clean water is visible in clear leg tubing.
5. Disconnect and drain the blood reservoir bag.
6. It is recommended that a 12cc syringe or larger be used to blow out any
remaining water. To do this pull back on plunger and then insert syringe
into the fitting on clear tubing exiting the head. Push plunger in and
repeat until water is no longer
visible coming out of the clear
tubing at the foot (See photo 8).
7. Ordinary stains can be removed
by washing with soap and warm
water.
8. Return model to case and store
with white end caps removed
and snap clamps open to allow
tubing to dry.
The life of the vein and skins will
be maximized by the use of small
gauge needles (22g or smaller) and
proper care and storage. Over time
and use, it may become necessary
to replace the vein and skins.
*** See NOTE in Replacement
Parts for Nita Newborn™ on
page 12
8
www.vatainc.com
photo 8
Problem Solving:
Problem: Unable to prime model
Solution: Verify that both snap clamps are opened and the white caps have
been removed. Check roller clamp. Visually inspect vein tubing for any
twisting or kinking. Be aware the ID of the tubing is very small and it may
take several minutes to prime.
Problem: Unable to infuse fluid
Solution: Check steps above. Check that fluid bag does not contain more
than 500cc.
Problem: Air present when withdrawing from veins
Solution: Model is not properly primed. Re-prime and flush trapped air until
no air is present in leg tubing.
Problem: Unable to insert umbilical catheter
Solution: Check that you are using a 5FR umbilical catheter, as this is the size
that will minimize leakage. Umbilical catheters made of softer materials
should have the “guide wire/stiffening wire” left in place to aid placement.
Check backside of the model to make sure that the umbilical valve housing
is pushed all the way in. Place a small amount of Vaseline on the catheter
and re-insert.
www.vatainc.com
9
Instructions for Replacing Veins on
Nita NewbornTM
1. Remove head, two arm and right
leg skins. New veins sets are
supplied with the barbed female
luer fitting not installed. Do not
install these until step #6 below.
2. Remove umbilicus and take the
eraser end of a pencil to gently
push down in the umbilicus
opening to dislodge the umbilical
valve (See photo 9 and 10).
Note: Your umbilicus may look
different, as the one shown in
photo 10 is newly redesigned
Remove umbilical valve and blue
vein tubing.
3. From the backside of the baby,
install the new umbilical valve,
checking that the shorter end
(15”) of the blue veins is oriented
toward the legs. Follow the arrows
and lettering to re-vein both of
the veins (A, B, C for the shorter
length blue veins and D through
K for the longer blue veins (See
photo 11). Continued on page
11...
photo 9
photo 10
photo 11
*** See NOTE in Replacement Parts for Nita Newborn™ on page 12
10
www.vatainc.com
Instructions for Replacing Veins on
Nita NewbornTM Continued
3. Continued from page 10... It
is important to secure the veins
under the tabs in the vein channel.
To do this, place one finger on the
installed veins, pressing down
to stabilize it. With your other
hand, pinch the loose vein with
thumb and pointer finger and
stretch/pull it to reduce its width
(See photo 12) which will make
it easier to position it below the
tabs. Release the pinched end
first (See photo 13) and repeat
until done.
photo 12
photo 13
4. Reinstall arm and leg skins.
5. When reinstalling the head skin
place the clear tubing through
the hole in the head skin from the
inside and then pull the skin onto
the head securing the chin strap
under the chin.
6. Install the snap connector and
the female barb fitting at the end
of each of the clear tubes exiting
the head and leg (See photo 14).
photo 14
*** See NOTE in Replacement Parts for Nita Newborn™ on page 12
www.vatainc.com
11
Replacement Parts for Nita NewbornTM
Item #
Description
1800 Nita Newborn™
1801 Replacement Skin and Vein Set - Latex Free (includes Head,
Leg, Right Arm and Left Arm) *** see NOTE below
1805 New Vein Set with Umbilical Valve Attached - Latex Free
0804 Replacement Umbilicus
0806 Right Arm Skin
0807 Left Arm Skin
0808 Right Leg Skin
0809 Head Skin
0875 Nita Newborn™ Case
0609 Blood Reservoir Bag with Attached Tubing
1491 Simulated Blood-Stain Resistant-One Quart
1494 Simulated Blood-Stain Resistant-One gallon
LF01022U Fluid Supply Stand
***NOTE: New skin and vein sets should
only be used on models that have had a
barrier coat applied. You can tell if your
model has the barrier coat by looking on
the left buttocks and seeing if there is a
small recessed dimple above the last “A”
in VATA (See photo 15).
If your model does not have the recessed
dimple, please contact VATA to have
your model returned and the barrier coat
applied at no charge. Contact us at 503
651-5050 or email at [email protected]
photo 15
Refurbish Service
Factory refurbishing of your model is available which includes replacement of
all parts as needed. Please call for more information.
308 South Sequoia Parkway, Canby, Oregon 97013 USA
ph. 503.651.5050 | fax 503.651.5052 | email [email protected] | www.vatainc.com
12
081711