1
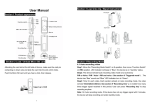
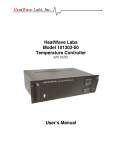
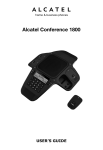
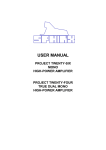
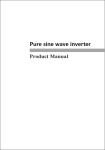
User manual QV-3846 Product description 1)UP button 4)USB interface 2)MENU button 5 3)DOWN button )Camera 6)Speaker 7)OK button 8)MODE button 9 )Power button 10)Display screen 11)MicroSD slot 12 )IR LEDs 13)Bracket slot 14)Reset button 15 )Microphone REC/Photo & Playback Operation Power On - Press the “power” button to start. The screen will turn on after making a sound, then the unit will enter record mode Power Off - Hold the “power” button to turn unit off. Once the screen turns off, let go of the “power” button Ignition Start Function - Connect the unit to the supplied cigarette adaptor while it is plugged in to the cigarette socket - Once the ignition is turned and the car is on, the Unit will automatically turn on and begin recording - Once ignition is turned off, the Unit will automatically turn off after about 20 seconds after saving the recording Record (REC) Mode - Press the “M” button to select REC mode (if not already on REC mode), REC icon will appear on the top left corner - Press “OK” to start recording. A Flashing red dot on the REC icon will appear to indicate the Unit is recording Incident Recording Once the unit senses a spike in G-Forces while recording, the unit will separate and label that file starting with “SOS”. A spike in G-Forces may occur when an incident happens, the unit assist in locating the file by saving it under “SOS” and protects the file by locking it from accidental deletion Photo mode - Press the “M” button while on “REC” mode to select Photo mode, a photo icon will appear on the top left corner to indicate the unit is on this mode - Press the “OK” button to take a photo, screen will flash one time which means a photo has been taken Video/photo playback - Press the “M” button while on “Photo” mode to select playback mode, a playback icon will appear on the top left corner to indicate the unit is on this mode - Press the key to move up the listed files - Press the key to move down the listed files - Press the “OK” button to play or view the selected video files Zoom While the unit is on or recording, press the button to zoom in or the to zoom out. The maximum amount of zoom is 3.9x. IR LEDs (for low light recording) While the unit is recording, press the “power” button to turn the IR (infrared) LEDs to assist low light or night time recording. Position Recommendation: It is recommended that the camera lens is pressed up or as close to the windscreen while using the IR LEDs to help prevent light distortion. NOTE: IR light is invisible to the human eye, the only indication that the IR LEDs are operating is viewing from the LCD. Recording, Photo & Playback Settings Menu While on “REC”, “Photo” or “Playback” mode, press the “menu” button once to access the Video, Photo or Playback mode settings respectively. Press the or the to move up or down in the menu settings, press the “OK” button to select a setting. Once within a setting, use the and button to scroll through the options and press OK to toggle a setting. The selectable settings for the Video Mode are as follows: * Resolution – Enter to select the available recording resolution * Loop Recording – Enter to select the file recording lengths. Off / Turn off Loop Recording Function 1 Min / File recording will be save in 1 minute intervals 2 Min / File recording will be save in 2 minute intervals 3 Min / File recording will be save in 3 minute intervals Once the MicroSD card is full, the oldest recorded file will be recorded over, and so on. NOTE: If “Off” is selected, then the file lengths will be divided in to 10 minute files. Unit can not record in greater then 10 minute files * EV – Enter to adjust the exposure balance settings * Motion Detection – Enter to toggle on or off the motion recording function * Audio – Enter to turn on or off the built in microphone for video with audio recording. * Date Stamp – Enter to add or remove a date stamp on the video recording * G Sensor – Enter to adjust the level of force required for an Event file to be save * Buttons sound – Enter to turn on or off the sound the unit makes once a button is pressed. The selectable settings for the Photo Mode are as follows: * Timer – Enter to select the length of time for a photo to be taken after pressing the snap shot (OK) button from “Single” (straight away), “2 seconds” (2S), “5 seconds” (5S) or “10 seconds” (10S). * Resolution – Enter to select the available resolutions * Sequence – Enter to toggle on or off a 5 photo burst shot * Quality – Enter to select the file size or quality you want for the images taken. * Sharpness – Enter to adjust the photo function’s sharpness * White Balance – Enter to select different photo modes * Color – E nter to se lect either “Normal”, “Black and W hite” or “Sep ia” filters for the photo function * ISO – Enter to adjust the ISO (capture) speed settings * EV – Enter to adjust the exposure balance settings * Anti-Shaking – Enter to toggle the Anti-Shaking function on or off * Quick Re view – Enter to toggle a quick revi ew of a photo once taken for 2 seconds, 5 seconds or off * Date Stamp – Enter to add or remove date stamp on photos The selectable settings for the Playback Mode are as follows: * Delete – Select to delete the current file on view * Protect – Enter to lock or unlock current f ile on view or all files available on the memory card inserted. Once a file is locked, it can not be deleted on the unit until the file is unlocked. Recording, Photo & Playback Setup Menu While on “REC”, “Photo” or “playback” mode, press the “menu” button twice to access the Video, Photo or playback Mode set up menu respectively. Press the or the to move up or down in the menu settings, press the “OK” button to select a setting. Once with-in a setting, use the and button to scroll through the options and press OK to toggle a setting. The selectable Setup options are as follows: * Set Date/Time – Enter to set Date and Time on the unit for use with the “Date Stamp” function. Press or to change values and “OK” to move to the next value. The date format is selectable, once the day, month, year and time is chosen, the last option is to change the format for, DD/MM/YY, MM/DD/YY or YY/MM/DD * Language – Enter to change the language settings from 11 different options * Light frequency – Enter to adjust the frequency based on your location * Screen Saver – Enter to adjust how long the screen will turn off during recording * Image Rotation – Enter to change the screens orientation from normal to upside down. Selecting on will rotate the screen to upside down or select off to rotate the screen back to normal * Format – Enter to format memory card * Default Setting – Enter to restore the unit back to factory default * Firmware Version – Enter to view Firmware version USB mode Once the unit is connected to the computer via USB, 2 options will come up: 1:Mass Storage Select this mode to access the files saved on to the unit’s memory card 2:PC-Camera Select this mode to use the unit as a web camera Battery Information Battery indication image: Full battery half capacity low capacity ba ttery empty Charging the unit: To charge the unit connect it to a USB s upply using the supplied car char ger, the USB cable when connected to a PC or USB power adaptor. The red indicator will light up when char ging, the average char ge time is about 180 m inutes, once full the red light will turn off. Other usage notes: If the unit freezes or does not respon d to any button command, use a pin or a thin tool to press the reset button located near the microphone Once the unit senses a s pike in G-Forces while record ing, the unit will separate and label th at file starting with “SOS”. A spike in G-Forces m ay occur when an incident happens, the unit assist in lo cating the file by saving it under “SOS” and protects the file by locking it from accidental deletion Products specifications LCD screen size Camera 1.4” 120° angle lens Files format AVI Resolution 1080p Recording video format M-JPEG Photo resolution 5 mp Photo format JPEG Memory card MicroSD. Requies 2GB to 32GB, Class 6 or above. Current frequency 50HZ/60HZ Battery use time 25 minutes on average Power interface 5V 800ma Battery Built-in 240mAh Trouble shooting: The unit is not recording or taking a photo Check if the MicroSD card has enough space or locked Automatically stop when recording Use the compatible high-speed MicroSD card with SDHC, class 6 or higher and 2 GB to 32GB max. “Files error” message appears during replay of photo or video Uncompleted file because of MicroSD card storage error, please use formatting function to format your MicroSD card Unclear video Check if there is any dirt or fingerprint on lens. Use a dry soft cloth to clean the lens. Cross strip interference on image Please set it to 50Hz or 60Hz according to the local power supply frequency