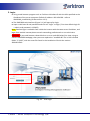
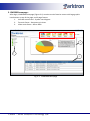
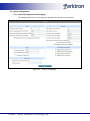
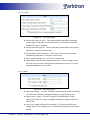
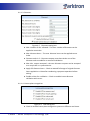
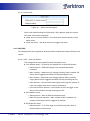
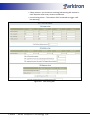
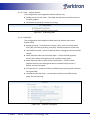
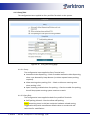
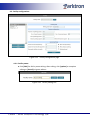
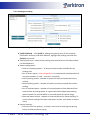
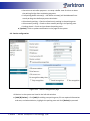
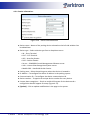
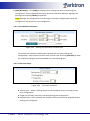
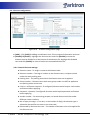
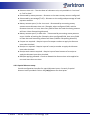
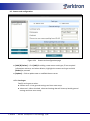
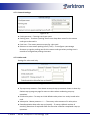
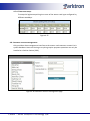
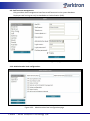
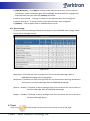
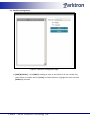
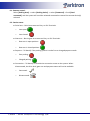
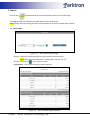
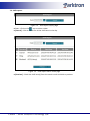
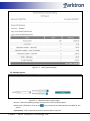
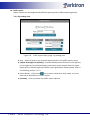
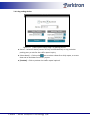
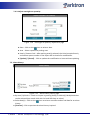
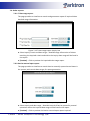
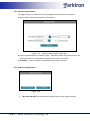
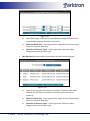
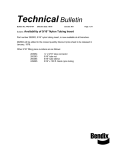
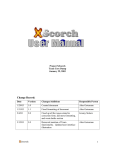
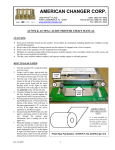
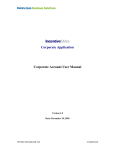
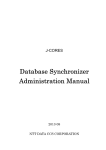
1
Intelligent Parking Management System Central Management Software – IPMS2000 User’s Manual Version 2.0.1 © 2001 - 2010 Parktron Technology Ltd. -1- Table of Content 1. Introduction: ...................................................................................................................................... 4 1-1. IPS2000 parking system diagram: ........................................................................................... 4 1-2. Software features:................................................................................................................... 4 2. Login: .................................................................................................................................................. 5 3. IPMS200 homepage: .......................................................................................................................... 6 3-1. System tree diagram: .............................................................................................................. 7 3-1-1 System device status:.................................................................................................... 8 3-2. Occupancy pie chart: ............................................................................................................ 10 3-3. Alarm table: .......................................................................................................................... 10 4. Configuration: .......................................................................................................................... 11 4-1. System configuration: ........................................................................................................... 12 4-1-1. Overall (Configuration default page): ........................................................................ 12 4-1-2. APS/POS: .................................................................................................................... 15 4-1-3. Entry/Exit: .................................................................................................................. 18 4-2. Facility configuration: ........................................................................................................... 19 4-2-1. Facility name: ............................................................................................................. 19 4-2-2. Parking area setup: .................................................................................................... 20 4-3. Device configuration: ............................................................................................................ 21 4-3-1. Device information: ................................................................................................... 22 4-3-2. License plate recognition: .......................................................................................... 23 4-4. Parking rate configuration: ................................................................................................... 24 4-4-1. Fee calculation simulator:.......................................................................................... 25 4-4-2. Time zone setup: ....................................................................................................... 25 4-4-3. Parking rate configuration by time zone: .................................................................. 26 4-5. Holiday configuration:........................................................................................................... 27 4-6. Discount configuration:......................................................................................................... 28 4-6-1. General discount settings: ......................................................................................... 28 4-6-2. Special discount setup: .............................................................................................. 29 4-7. Season card configuration: ................................................................................................... 30 4-7-1. Card type: .................................................................................................................. 30 4-7-2. General settings: ........................................................................................................ 31 4-7-3. Value card: ................................................................................................................. 31 4-7-4. Time zone setup: ....................................................................................................... 32 4-8. Customer account management: ......................................................................................... 32 4-9. Staff account management: .................................................................................................. 33 4-10. Administration level configuration: .................................................................................... 33 © 2001 - 2010 Parktron Technology Ltd. -2- 4-11. Alarm setting:...................................................................................................................... 34 5. Ticket: ............................................................................................................................................... 34 5-1. Blacklist management:.......................................................................................................... 35 6. Remote control: ............................................................................................................................... 36 6-1. Remote control: .................................................................................................................... 37 6-2. Device status: ........................................................................................................................ 37 7. Report:.............................................................................................................................................. 38 7-1. Daily report: .......................................................................................................................... 38 7-2. Shift report: ........................................................................................................................... 39 7-3. Monthly report: .................................................................................................................... 40 7-4. Traffic report: ........................................................................................................................ 42 7-4-1. By parking area: ......................................................................................................... 42 7-4-2. By parking device: ...................................................................................................... 43 7-4-3. Adjust overnight car quantity: ................................................................................... 44 7-5. Alarm history: ....................................................................................................................... 44 7-6. Other reports: ....................................................................................................................... 45 7-6-1. Ticket usage report: ................................................................................................... 45 7-6-2. Barrier manual open report: ..................................................................................... 45 7-6-3. Overnight cars report: ............................................................................................... 46 7-6-4. Payment detail report:............................................................................................... 47 7-6-5. Discount Usage Report: ............................................................................................. 47 Revision History: Manual Version Released Date Software Version Revision Notes 1.0.0 Nov. 25, 2009 5.0.5 First release of User’s Manual for IPMS2000 Server 2.0.0 Sep. 23, 2010 1.0.0 Web based interface first release 2.0.1 Oct. 27, 2011 1.0.0 Add/Modify discount usage report © 2001 - 2010 Parktron Technology Ltd. -3- 1. Introduction: 1-1. IPS2000 parking system diagram: Figure 1-1 1-2. Software features: The IPMS2000 Central Management Software (hereafter refer as “The CMS”) installed on the server computer is the control center of our parking management system. It has a web based interface now! Simply open a web browser at the server computer or through a remote computer, login with a valid account, then you are ready to monitor and control the entire parking system with just a few finger clicks even from the other side of the world. Just that simple! Note: If it is your first time try to connect and login to the IPMS2000 web interface right after completing server installation, then please reboot the server computer first or manually execute DBServer.exe (refer to section 2.7 in IPMS2000_InstallationGuide_EN.pdf for the file location) © 2001 - 2010 Parktron Technology Ltd. -4- 2. Login: Using a web browser program such as FireFox or Windows IE with the URL specified as the IP address of the server computer (Default IP address: 192.168.0.80 - refer to IPMS2000_InstallGuide_EN.doc section 1.3.2). The IPMS2000 web interface (Figure 2-1) will pop up for login. Input a valid user ID and password and click on “Login” to login. (First time default login ID = admin; and password = 123456) Note: Remote login is available from inside the intranet with the same server IP address, and login from outside internet please consult networking professionals or our technicians. Important: If your web browser shows blank or an error code 500 when first time trying to connect IPMS2000 webpage, then you must replace the “ntwdblib.dll” file in PHP installed folder “C:\PHP\” with the same file found in the installation CD with the version: 2000.80.194.0. Fig. 2-1 User Login © 2001 - 2010 Parktron Technology Ltd. -5- 3. IPMS200 homepage: After login, IPMS2000 homepage (Figure 3-1) contains a main function menu with large graphic icon buttons on top of the page, and 3 page frames: 1. Left side menu frame - System tree diagram. 2. Top main frame - Occupancy pie chart. 3. Lower main frame - Alarm table. 2 1 3 Fig. 3-1 IPMS2000 Homepage © 2001 - 2010 Parktron Technology Ltd. -6- 3-1. System tree diagram: Parking area(s) are listed on the first level of the system tree diagram. Expend to see all the linked parking device(s) under the parking area. Green means connected and red means disconnected. First level: Parking area Second level: Parking device(s) connected Figure 3-2 System tree diagram © 2001 - 2010 Parktron Technology Ltd. -7- 3-1-1 System device status: Click on a device item at the second level of system tree diagram (Figure 3-2) to monitor current device status. Example pages as follows: 3-1-1-1. Entry Terminal monitor page: When reloading tickets, fill in the number of tickets reloaded and click [Reload] button to add the number to current ticket quantity. Figure 3-3 Entry Terminal Status Page 3-1-1-2. Exit Terminal monitor page: Click [Reset to 0] after physically removed the recycled tickets from an Exit Terminal. Figure 3-4 Exit Terminal Status Page © 2001 - 2010 Parktron Technology Ltd. -8- 3-1-1-3. Cashier Station monitor page: Figure 3-5 Cashier Station Status Page 3-1-1-4. Auto Pay Station monitor page: Figure 3-6 Auto Pay Station Status Page © 2001 - 2010 Parktron Technology Ltd. -9- 3-2. Occupancy pie chart: The pie chart of selected parking area in the system tree diagram is shown on the top main frame of the homepage. It shows current parking occupancy rate divided by hourly and season parking space(s). Figure 3-7 Parking Space Pie Chart 3-3. Alarm table: Displaying real time alarm(s) sent back from all parking device(s) on the system. Check the box in front to delete an alarm item from the table after problem taken cared. (The alarm item deleted is still saved in system database for auditing) Figure 3-8 Alarm table © 2001 - 2010 Parktron Technology Ltd. - 10 - 4. Configuration: Click on the function button at the main function menu on top of the page. Select a target category from the menu list on the left side page frame (Figure 4-1) for the configuration page to be shown in the right main frame. Figure 4-1 Configuration menu list © 2001 - 2010 Parktron Technology Ltd. - 11 - 4-1. System configuration: 4-1-1. Overall (Configuration default page): The configuration items in this page are applied to all devices on the system. Figure 4-2 Overall config page © 2001 - 2010 Parktron Technology Ltd. - 12 - 4-1-1-1. Time: Figure 4-3 Time setting box Start screen saver in (min) – The sustained idle time before activating screen saver of a display on system devices. This function can extend product life time of a display. System maintaining time – The time for daily system data synchronizing operation, in 24 hours time format. Season data broadcasting time – The time for daily season card data broadcasting operation, in 24 hours time format. Daily report dividing time – In 24 hours time format. Apply buffer time for every payment operation – Check to apply buffer time not only to the first time payment operation but also for any later payment operation for one ticket. 4-1-1-2. Rate: Figure 4-4 Rate setting box Daily max. charge – The max. charge for parking within 24 hours, parking time after the 24 hours is charged according to regular hourly rate. Weekly max. charge – The max. charge for a parking within 7 days, parking time after the 7 days is charged according to regular daily and hourly rate. Daily max. charge limited to the same day – Check to limit daily max. charge applies to the parking time in the same day (divided at mid-night 00:00). © 2001 - 2010 Parktron Technology Ltd. - 13 - 4-1-1-3. Discount: Figure 4-5 Discount setting box Max. number of disc. allowed – The max. number of discounts can be applied to one ticket. Max. discount hours – The max. discount hours can be applied to one ticket. Discount code 1~3 – Discount coupons must have either one of the discount code encoded for a successful validation. Max. disc. coupon accepted – the max. discount coupons can be accepted to a recycle bin in a system device. Apply full discount hours – Check to extend full usage of original discount hours applied to a ticket after conducting a payment operation before exiting. Enable online disc. validation – Check to enable instant discount validation with server. 4-1-1-4. License plate recognition: Figure 4-6 LPR setting box Check to enable license plate recognition system on different card items. © 2001 - 2010 Parktron Technology Ltd. - 14 - 4-1-1-5. Value card: Figure 4-7 Value card setting box Value card related settings to all device(s). Only appears when the system has value card system integrated. Value point vs. money amount - The value point amount equals to one dollar value. Value low alarm – the value amount to trigger low alarm. 4-1-2. APS/POS: The configuration items applied to Auto Pay Station and Cashier Station (POS) on the system. 4-1-2-1. APS – Auto Pay Station: The configuration items applied to Auto Pay Station only. Coin hopper setup – To setup 4 coin hoppers for an Auto Pay Station: Denomination – different hoppers with same denomination accepted. Max. capacity – Maximum coin storage capacity, when reached, full alarm will be triggered and APS will stop providing service. Min. capacity – Minimum coin storage capacity, when reached, empty alarm will be triggered and APS will stop providing service. Safty amount – the minimum retaining/maintaining coin amount in each coin hopper after every revenue settlement. Coin full pre-alarm amount – the number of coins to trigger a coin full pre-alarm before actually reaching coin full. Bill validator setup : Denomination – Max. 4 different denominations. Max. bill cassette capacity – Max. number of bill a validator can accept, bill full alarm will be triggered if reached. Bill dispenser setup: Denomination – 1~ 3 from large to small denomination, Max. 3 denominations can be setup. © 2001 - 2010 Parktron Technology Ltd. - 15 - Safety amount – the minimum retaining/maintaining bill amount in each dispenser after every revenue settlement. Low alarming alarm – The number of bill remained to trigger a bill low alarming. Figure 4-8 APS setting box © 2001 - 2010 Parktron Technology Ltd. - 16 - 4-1-2-2. POS – Cashier Station: The configuration items applied to Cashier Station only. Enable search for lost ticket – To enable the lost ticket search function on the POS program. Verification required for receipt re-printing Figure 4-9 POS setting box 4-1-2-3. APS/POS: The configuration items applied to both Auto Pay Station and Cashier Station (POS). Receipt printing – Three options to select, [Yes]: print out receipt every time, [No]: No receipt printing, and [Ask]: Prompt a question to ask user. Use certified receipt – Check to identify device using government certified receipt. Allow payment when out of receipt paper – Check to allow payment activity even when out of government certified receipt paper. Allow payment when receipt printer malfunction – check to allow payment activity even when government certified receipt printer is broken and not functional. Print out tax ID – check to confirm certified receipt printing with customer tax ID provided. Certified receipt low alarm – to setup the number of certified receipt paper for low alarming. Figure 4-10 APS/POS setting box © 2001 - 2010 Parktron Technology Ltd. - 17 - 4-1-3. Entry/Exit: The configuration items applied to Entry and Exit Terminals on the system. Figure 4-11 Entry/Exit config page 4-1-3-1. Entry: The configuration items applied to Entry Terminal only. Automatic ticket dispensing – Check to enable automatic ticket dispensing when a car detected by loop detector (no ticket request button pushing required). Allow entering when parking FULL – Check to allow car entering even when parking is full. Space counting enabled when free parking – Check to enable free parking, but still keep space counting system continue to work. 4-1-3-2 Entry/Exit: The configuration items applied to both Entry and Exit Terminals. Staff parking allowed – Check to allow staff parking. Note: Remaining items in this box are device hardware related setting, suggested to keep with manufacture default value or consult with our technician for modification. © 2001 - 2010 Parktron Technology Ltd. - 18 - 4-2. Facility configuration: Figure 4-12 Facility configuration page 4-2-1. Facility name: Click [Edit] for facility name editing. After editing, click [update] to complete editing or [Cancel] to ignore edition. Figure 4-13 Facility editing box © 2001 - 2010 Parktron Technology Ltd. - 19 - 4-2-2. Parking area setup: Figure 4-14 Parking area configuration page [Add] & [Delete] – Click [Add] for adding new parking area, fill out required information and save; and when deletion, highlight the parking area and click [Delete] to proceed. Parking area name – Name of the parking area selected on the left side window. Can be edited here. Spaces configuration: Total no. of parking spaces – to setup the total number available for the parking area. No. of vacant spaces – Not configurable! It is automatically calculated with all the space numbers (= total – reserved – occupied). Hourly parking spaces – Number of spaces currently occupied with hourly parking. Season parking spaces – Number of spaces currently occupied with season parking. No. of reserved spaces – Number of reserved spaces will be deducted from total number of parking spaces. It is generally used to adjust total parking spaces numbers to provide buffer or reserved spaces for special usage. Reserved season spaces – Number of reserved spaces for season parking. To ensure season parking will always have spaces to park. (not shown in the pie chart) General settings: Grace time for free parking – to setup a time limit for entering the parking facility and leave without paying. © 2001 - 2010 Parktron Technology Ltd. - 20 - Grace time to exit after payment – to setup a buffer time for driver to leave the parking facility after conducting payment. Free parking buffer minute(s) – the buffer minute(s) will be deducted from actual parking time before payment calculation. Allow hourly parking – Check to allow hourly parking in the parking area. Allow season parking – Check to allow season parking in the parking area. Parking closed – Check to close down the parking area. [Update] –Click to update modification in the page to the system. 4-3. Device configuration: Figure 4-15 Device configuration page All devices in the system are listed in the left side window. [Add] & [Delete] – Click [Add] for adding new parking area, fill out required information and save; and when deletion, highlight the parking area and click [Delete] to proceed. © 2001 - 2010 Parktron Technology Ltd. - 21 - 4-3-1. Device information: Figure 4-16 Device information box Device name – Name of the parking device selected on the left side window. Can be edited here. Device type – Select a device type from a drop down menu: IN – Entry Terminal. OUT – Exit Terminal. APS – Auto Pay Station. POS – Cashier Station. Server – IPMS2000 Central Management Software server. VAR – License Plate Recognition System server. Mobile POS – Handheld Cashier Device. Parking area – Select the parking area where the device is located in. IP Address – To configure the device IP address in the parking system. Communication ID – To configure the device communication ID. Device number – To appoint an unique device number for every device. License plate recognition – Check to enable LPR system for the device and a configuration box will appear for setup (Figure 4-17). [Update] – Click to update modification in the page to the system. © 2001 - 2010 Parktron Technology Ltd. - 22 - 4-3-2. License plate recognition: Check [License plate recognition] at the device information box for the LPR configure box to show up. Figure 4-17 Device LPR configuration box LPR server station – Select the server where license plate recognition system is installed from the existing device list. Drive lane no. – Appoint the drive lane number where the device is enabled with LPR system. LPR camera no. – Appoint the camera number of the LPR system used by the device. No recognition delay time – To setup system reaction delay (in second) when recognition result is not received. Fully, Partial or No recognition – Check to decide recognition option. [Update] – Click to update modification in the page to the system. © 2001 - 2010 Parktron Technology Ltd. - 23 - 4-4. Parking rate configuration: Figure 4-18 Parking rate configuration page © 2001 - 2010 Parktron Technology Ltd. - 24 - [Add] & [Delete] – Click [Add] for adding new a parking area with new parking rate configuration, fill out required information and save; and when deletion, highlight the parking area and click [Delete] to proceed. Note: Adding a rate configuration to a parking area already configured will result old configuration overwritten by new configuration. 4-4-1. Fee calculation simulator: Figure 4-19 Parking fee calculation simulator box To simulate and calculate a parking fee required with the new parking rate configuration, simply select the enter time and exit time and click [Calculate] to have the required parking fee amount showed up in the following box. 4-4-2. Time zone setup: Figure 4-20 Time zone setup box Parking area – Select a parking area from the dropdown menu to setup its time zone configuration. Single rate will only have one time zone parking rate configuration. Multiple Rate – when selected, the number of time zones can be assigned to have parking rate configured. © 2001 - 2010 Parktron Technology Ltd. - 25 - 4-4-3. Parking rate configuration by time zone: Figure 4-21 Parking rate configuration box by time zone Start & End time – Only available for multiple time zones to divide one day into different time zones. Single time zone has the whole day as one time zone. Max. 4 different secondary time zones can be configured with different rate under 1 time zone. Parking rate configuration – Rate can be configured for each weekday, and with max. 4 secondary time zones configured above. Compound rate – When checked, the actual parking rate is accumulated as configured. (For example: Rate 1 = $10, Rate 2 = $5 and Rate 3 = $5, if compound rate checked, Rate 1 = $10, Rate 2 = $10 + $5 = $15 and Rate 3 = $10 + $5 +$5 = $20) Per entry – When checked, the rate configured is used for per entry one time charging fee. Secondary time zone – When checked, secondary time zone is defined and divided by the start and end time of rate 1 ~ 4. Parking rate is applied according to which secondary time zone in a day when a car is entered and parked. Otherwise, parking rate is applied from rate 1 to rate 4 right from the beginning of entry time. © 2001 - 2010 Parktron Technology Ltd. - 26 - 4-5. Holiday configuration: Figure 4-22 Holiday configuration page [Add] – Click to add a new holiday item. Date – Click button to select a date for a holiday setup. Description – Type in the description of the holiday. [Delete] – Select and highlight the holiday item and click to delete. [Update] – Click to update all holiday data to server. © 2001 - 2010 Parktron Technology Ltd. - 27 - 4-6. Discount configuration: Figure 4-23 Discount configuration page [Add] – Click [Add] for adding new discount item, fill out required information and save. [Disable] & [Enable] - Highlight the discount item and click [Disable] to move the discount item to disable list at the bottom of the discount list; Highlight the disabled item and click [Enable] to move it back to the activated discount list. 4-6-1. General discount settings: Discount name – To assign a name to the discount item. Discount number – To assign a number to the discount item; a unique number under the same parking area. Parking area – The parking area where the discount item can be applied. Group number – Discount items with same group umber can NOT be applied to one parking ticket at one time. Card no. verification required – If configured, discount would require card number verification before applying. Password – Optional; if configured, discount would require password verification before applying. Vendor number – For accounting purpose, to record discount activities under different vendor numbers. No. of days per usage – If not zero, in the number of day(s) the discount type is allowed to be used for one time to one same card. Discounted by discount time unit – The number of discount units to be applied for the discount item. © 2001 - 2010 Parktron Technology Ltd. - 28 - Discount time unit – The time base of a discount unit; only available in “one hour” or “half an hour”. Discounted by money amount – Discount on the exact money amount configured. Discounted by percentage (% off) – Discount on the configured percentage of total payment amount. Money amount spent / 1 disc. time unit – Discounted by consuming money amount versus discount time unit. (Example: when configured $100, and the discount time unit is 1 hour, then every $100 of from the total consuming amount will have 1 hour free parking discount) Money amount spent / 1 dollar disc. – Discounted by consuming money amount versus 1 dollar of parking fee. (Example: when configured $100, then every $100 of from the total consuming amount will have $1 dollar free parking discount) Coupon no. required – Require input of a coupon number to apply the discount item when checked. Receipt no. required – Require input of a receipt number to apply the discount item when checked. Receipt total amount required – Require input of total amount of a receipt to apply the discount item when checked. Multiple applying allowed – Check to allowed the discount item to be applied to one card more than one time. 4-6-2. Special discount setup: Provide configuration interface for special discount items. Currently 5 special discount items provided. Click on the [Help] button for description. © 2001 - 2010 Parktron Technology Ltd. - 29 - 4-7. Season card configuration: Figure 4-24 Season card configuration page [Add] & [Delete] – Click [Add] for adding a new season card type, fill out required information and save; and when deletion, highlight the season card type and click [Delete] to proceed. [Update] – Click to update new or modified data to server. 4-7-1. Card type: Two(2) card types to select: Season card – It has general settings and time zone setup. Value card – When checked, value card settings box will show up beside general settings and time zone setup. © 2001 - 2010 Parktron Technology Ltd. - 30 - 4-7-2. General settings: Figure 4-25 Card type name – To assign card type name. Parking area – To select a parking area from a drop down menu for the season card type to be used in. Card cost – The money amount to pay for a lost card. Discount on non-season parking hours (% off) – To configure a percentage discount on regular parking rate for this season card type when parking time is outside of its legitimate parking time zone. 4-7-3. Value card: Settings for value card only. Figure 4-26 Top-up money amount – Four boxes to setup 4 top-up amounts shown in Auto Pay Station top-up program page for users to select when conducting a top-up operation. Initial value point – To setup an initial default value points in a newly issued value card. Value point : Money amount = 1 : – The money value amount of 1 value point. Extend expiration date after top-up (month) – To setup a default number of month(s) extension of expiration date for the value card after completed a top-up operation. © 2001 - 2010 Parktron Technology Ltd. - 31 - 4-7-4. Time zone setup: To setup the legitimate parking time zone of the season card type configured by different weekdays. Figure 4-27 4-8. Customer account management: Only provide a data management interface to the season card customer account list in system database. New card issuing or anything require payment operation can only be handled at a Cashier Station (POS). Figure 4-28 Customer account management page © 2001 - 2010 Parktron Technology Ltd. - 32 - 4-9. Staff account management: Only provide a data management interface to staff accounts in the system database. Employee card issuing can only be handled at a Cashier Station (POS). Figure 4-29 Staff account management page 4-10. Administration level configuration: Figure 4-30 Administration level configuration page © 2001 - 2010 Parktron Technology Ltd. - 33 - [Add] & [Delete] – Click [Add] for adding a new administration level, fill out required information, select authorized rights and click [save]; and when deletion, highlight the administration level item and click [Delete] to proceed. Admin level number – To assign a number for the administration level configured. Admin level name - To assign a name of the administration level configured. [Update] – Click to update new or modified data to server. 4-11. Alarm setting: To setup if the Alarm Message Table & Alarm Report in the IPMS2000 [Home] page would display alarm message content. Figure 4-31 [HighLight]: If checked, the alarm message item line in the Alarm Message Table at IPMS2000 Homepage will be highlighted. [NoSound]: If checked, the alarm message item will not caused a buzz warning sound when showed up in the Alarm Message Table at IPMS2000 Homepage. [Device – Disable]: If checked, all alarm messages sent from the device will not be shown in the Alarm Message Table at IPMS2000 Homepage. [Report – Disable]: If checked, all alarm messages sent from the device will not be shown in the Alarm Message Report. 5. Ticket: Click on the function button at the main function menu on top of the page. © 2001 - 2010 Parktron Technology Ltd. - 34 - 5-1. Blacklist management: Figure 5-1 Blacklist management page [Add] & [Delete] – Click [Add] for adding an item to the blacklist; fill out number (ID), select ticket or coupon and click [save]; and when deletion, highlight the item and click [Delete] to proceed. © 2001 - 2010 Parktron Technology Ltd. - 35 - 6. Remote control: Click on the function button at the main function menu on top of the page. This page provides an interface to send remote commands to system devices and monitor device status. Figure 6-1 Remote control interface page © 2001 - 2010 Parktron Technology Ltd. - 36 - 6-1. Remote control: Select [Parking Area] -> select [Parking device] -> select [Command] -> Push [Send command], and the system will send the selected command to control the remote device(s) selected. 6-2. Device status: Drive lane – Drive lane status on Entry or Exit Terminals. Lane open: Lane closed: Gate arm – Barrier gate arm status on Entry or Exit Terminals. Gate arm in open position: Gate arm in closed position: Payment – To identify if the parking system is under free or charged payment mode. Free parking: Charged parking: Connection – To identify current device connection status to the system. When disconnected, the drive land, gate arm and payment status will not be available. Connected: Disconnected: © 2001 - 2010 Parktron Technology Ltd. - 37 - 7. Report: Click on the function button at the main function menu on top of the page. This page provides an interface to make report inquiry of all kinds. Note: Simply use the printing function of the browser to print out a report after preview. 7-1. Daily report: Figure 7-1 Daily report inquiry page Area – Select the parking area(s) to inquire a daily revenue report. Note: Daily report divided time is configured in section 4-1-1-1. Date – Click on the icon to select a date. [Preview] – Click to preview daily report inquired. Figure 7-2 Daily revenue report example © 2001 - 2010 Parktron Technology Ltd. - 38 - 7-2. Shift report: Figure 7-3 Shift report inquiry page Date – Click on the icon to select a date. [Search] – Click to search for all the shift items in the day. Figure 7-4 Shift report search result page [Preview] – Check the shift item(s) from the search result and click to preview. © 2001 - 2010 Parktron Technology Ltd. - 39 - Figure 7-5 Shift report example 7-3. Monthly report: Figure 7-6 Monthly report inquiry page Area – Select the parking area(s) to inquire a monthly revenue report. Start date / End date– Click on the icon to select a start date and an end date for the report. [Preview] – Click to preview monthly revenue report inquired. © 2001 - 2010 Parktron Technology Ltd. - 40 - Figure 7-7 Monthly report example © 2001 - 2010 Parktron Technology Ltd. - 41 - 7-4. Traffic report: Report content can be categorized by different parking area or different parking device. 7-4-1. By parking area: Figure 7-8 Traffic report inquiry page - by parking area Area – Select all area or any particular parking area for the traffic report inquiry. [Adjust Overnight Car Quantity] – Provide the adjustment function to the quantity of overnight cars (the occupied hourly and season space number from the report begin time) in the parking area(s) before report generation. (Details please refer to the following section 7-4-2.) Select date(s) – Click on the icon to select a date for a daily report, or a start date and an end date for monthly report. [Preview] – Click to preview the traffic report inquired. © 2001 - 2010 Parktron Technology Ltd. - 42 - 7-4-2. By parking device: Figure 7-9 Traffic report inquiry page - by parking device Device – Select all device (means all entry and exit devices) or any particular parking entry or exit for the traffic report inquiry. Select date(s) – Click on the icon to select a date for a daily report, or a start date and an end date for monthly report. [Preview] – Click to preview the traffic report inquired. © 2001 - 2010 Parktron Technology Ltd. - 43 - 7-4-3. Adjust overnight car quantity: Figure 7-10 Overnight car quantity adjustment page Date – Click on the icon to select a date. Area – Select a particular parking area. Hourly / Season Card – After parking area(s) selected, the initial occupied hourly and season spaces number in the report will be shown for modification. [Update] / [Cancel] – Click to update the modification or leave without updating. 7-5. Alarm history: Figure 7-11 Alarm history inquiry page By Area / By Device – Check to inquire by parking area(s) or device(s). Multiple devices can be selected (use mouth click with Ctrl and Shift keys to select). Select date(s) – Click on the icon to select a start date and an end date for an alarm history. [Preview] – Click to preview the alarm history inquired. © 2001 - 2010 Parktron Technology Ltd. - 44 - 7-6. Other reports: 7-6-1. Ticket usage report: The page provides an interface to search and generate a report of inquired ticket detailed usage information. Figure 7-12 Ticket usage report inquiry box Select inquiry criteria and date range – Detailed usage information of tickets matching the inquired criteria and within the inquiry date range will be listed in the report. [Preview] – Click to preview the inquired ticket usage report. 7-6-2. Barrier manual open report: The page provides an interface to search barrier manually opened record items in the system, with certain date range, for report generation. Figure 7-13 Barrier manual open report inquiry box Select inquiry and date range – Detailed records of barrier opened by manual operation within the inquired date range will be listed in the report. [Preview] – Click to preview the barrier manual open report inquired. © 2001 - 2010 Parktron Technology Ltd. - 45 - 7-6-3. Overnight cars report: The page provides an interface to search and manage all the overnight parking car data in the system, and report generation. Figure 7-14 Overnight parking inquiry page Select inquiry criteria to search overnight cars – Overnight car items matching the inquired criteria will be listed in the search result box below. [Delete] – Click to delete the overnight car item highlighted. © 2001 - 2010 Parktron Technology Ltd. - 46 - 7-6-4. Payment detail report: The page provides an interface to search and generate report of the inquired payment activity detail information on all devices. Figure 7-15 Payment detail report inquiry box Select inquired device(s) and date range – Detailed records of payment activity on device(s) within the inquired date range will be listed in the report. [Preview] – Click to preview the payment detail report inquired. 7-6-5. Discount Usage Report: Figure 7-16 1. [By time selected]: Discount details reported by the time range selected: © 2001 - 2010 Parktron Technology Ltd. - 47 - Figure 7-17 2. Select date range – Detailed records of discount usage items within the inquired date range will be listed in the report. [Discount Detail List] – Click to generate a report with all discount items within the inquired date rang. [Statistics of Discount Type] – Click to generate a discount report categorized by each discount type. [By shift time]: Discount details reported by the shift account selected: Figure 7-18 Same as searching for shift report (see section 7-2 above), after date selected, all shift items are listed for selection. Check the one for reporting. [Discount Detail List] – Click to generate a report with all discount items within the inquired date rang. [Statistics of Discount Type] – Click to generate a discount report categorized by each discount type. © 2001 - 2010 Parktron Technology Ltd. - 48 -