1
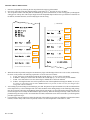
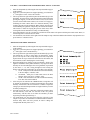
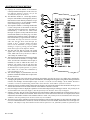
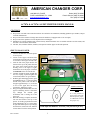
AMERICAN CHANGER CORP.
1400 NW 65TH PLACE
FORT LAUDERDALE, FL 33309
www.americanchanger.com
Sales: (800) 741-9840
Parts & Service: (888) 741-9840
Fax: (954) 917-5204
AC7076 & AC7076.1 AUDIT PRINTER USER’S MANUAL
FEATURES:
♦
♦
♦
♦
♦
Keeps track of all bills entered into the machine. Several tallies are maintained, including quantities per validator, and per
each bill denomination.
Keeps count of the amount of change entered into the machine (if equipped with a Coin Acceptor).
Keeps count of the quantities of coins dispensed from each hopper.
Maintains two separate running totals of entered money in dollar amounts. One is resettable with the rest of the counts, and
the other is non-resettable, but lockable.
The date, time, machine number (settable), and sequence number appear on all audit printouts.
HOW TO LOAD PAPER:
1.
2.
3.
4.
5.
6.
7.
Turn the machine ON, so that the printer
receives power.
Locate a roll of paper, and un-stick the
end from the rest of the roll; give yourself
8-10 inches of loose paper to work with.
Feed the end of the paper into the slot
formed at the top of the printer between
the green circuit board and the metal
housing (refer to the figure at right).
Position the roll so the paper is fed from
the underside of the roll into the slot.
Continue feeding the paper straight into
the slot, keeping it pressed against the
circuit board, until it can go no further.
With the paper held in this position, press
the FEED button (#3, 3rd from left) on the
bottom of the printer. This will draw in
the paper approximately 1/8”, or one line
of text. If the paper does not move,
reposition it, and then try again.
Keep pressing the FEED button, once the
paper is advancing, until it is fed all the
way through the internal print
mechanism, and is coming out of the
paper exit.
When the feeding is complete, mount the
roll onto the bracket at the top of the
printer. To do this, grip the bracket at the
points indicated by the ‘A’s in the figure
at right. Pull them apart to open the gap
between them, slide in the roll, and then
release them to lock the roll in position.
Rev. 01/2007
PAPER
EXIT
A
A
INSERT
PAPER
HERE
INSERT PAPER IN
THIS ORIENTATION
ONLY!
It is only possible to
print on one side of the
thermal printer paper,
so it MUST be inserted
the proper way.
Printer Paper Part Numbers: AC7070-P (1 roll), AC7070-01 (pk. of 5)
1
ENTERING THE SETUP MODE:
The Audit Printer includes a “Setup Mode” that can be
entered to make changes to the different settings that
control the operation of the printer, and the information
contained on the printout. These settings are:
1.
2.
3.
4.
5.
Machine Number
Current Time
Current Date
Locking / Unlocking the non-resettable Total
counter
Print Intensity (darkness of the printed
characters)
Printer Button Locations
Perform the following steps to enter the printer’s Setup Mode:
1.
2.
3.
4.
Turn OFF power to the printer by moving the power switch on
the machine’s Main Logic Board to the OFF (‘O’) position.
Press and hold both the FEED and OK buttons (#3, #4).
With both buttons being held down, turn the power switch on the
Main Logic Board back ON (‘I’). Continue to hold the buttons
down until the printer receives power, which is indicated by the
lighting of the green LED at the bottom of the printer, and begins
printing. They may be released as soon as the printing starts.
The printer is now in the Setup Mode, and a short receipt listing
the five options, and the buttons to push to select each, is printed
out (shown at right). Read the following sections in this manual
for details on how to make each setting.
*** Set up Mode ***
Sw #1 Set Machine #
Sw #2 Set Time
Sw #3 Set Date
Sw #4 Lock Total Counter
Sw #5 Print Intensity
NOTE: In case you do not have this manual with you when servicing the machine, please note that the button combination to
enter the Setup Mode (#3 + #4) is indicated on the white label on the front of the printer, just above the buttons.
SETUP MODE OPTIONS:
SETTING THE MACHINE NUMBER
1.
2.
3.
4.
Enter the Setup Mode by following the four steps described above.
Once there (when the printer has stopped printing), press button #1
(far left) to select “Set Machine #”.
The receipt shown at right will then print out automatically up to the
first dotted line, in order to help guide you through the setting
process. The top line of the receipt simply shows the Setup Mode
Option chosen in step 2, the second line shows the current Machine
Number setting (“123” in the sample at right), and the next four lines
list the buttons, and their functions, used in modifying the current
setting.
When the last line has printed, setting the Machine Number may
begin. The first digit of the three-digit number is to be set first, as
indicated by the arrow on the printout. The following explains how to
use the four active buttons:
a. #5 UP – Each press of this button increments the current
digit by 1.
b. #6 DOWN – Each press of this button decrements the
current digit by 1.
c. #4 OK – Press this button to save the current digit after it
has been modified.
Rev. 01/2007
2
* Set machine # *
Machine #:
123
Sw
Sw
Sw
Sw
#2
#4
#5
#6
Print
OK
UP
DOWN
1st Digit:
123
#5 x 2,
#4 x 1
2nd Digit:
323
5.
6.
#2 Print – Pressing this button once will re-print the line, but
with an updated current digit. In case you are unsure as to
how many times the UP or DOWN buttons were pressed,
use this to review your changes to the current digit before
saving it with the OK button.
After making any desired changes to the first digit, press OK. The
printer will print out another line (to the next dotted line in the sample
receipt), so the second digit of the Machine Number can be modified.
The same thing for the third digit. After the third digit is modified,
and OK pressed, a line showing the new Machine Number will be
printed for your review. If a mistake was made, and the number is not
what was intended, you must begin this procedure again from step 1.
For clarification, note the four boxes along the right side of the
sample receipt. These are added here to indicate the button numbers,
and how many times each were pressed, in order to change the
example Machine Number from 123 to 350.
(…continued)
d.
#5 x 4,
#2 x 1
2nd Digit:
363
#6 x 1,
#4 x 1
3rd Digit:
353
#6 x 3,
#4 x 1
Machine #:
350
SETTING THE CURRENT TIME
1.
2.
3.
4.
5.
6.
Enter the Setup Mode by following the four steps described on page 2
of this manual.
Once there (when the printer has stopped printing), press button #2
(2nd from left) to select “Set Time”.
The receipt shown at right will then print out automatically up to the
first dotted line, in order to help guide you through the setting
process. The top line of the receipt simply shows the Setup Mode
Option chosen in step 2, and the next four lines list the buttons, and
their functions, used in modifying the current setting.
When the printing stops, setting the current Time may begin. The first
digit of the Hour is to be set first, as indicated by the arrow on the
printout. The following explains how to use the four active buttons:
a. #5 UP – Each press of this button increments the current
digit by 1.
b. #6 DOWN – Each press of this button decrements the
current digit by 1.
c. #4 OK – Press this button to save the current digit after it
has been modified.
d. #2 Print – Pressing this button once will re-print the line, but
with an updated current digit. In case you are unsure as to
how many times the UP or DOWN buttons were pressed,
use this to review your changes to the current digit before
saving it with the OK button.
The Time format used by the Audit Printer is the 24-Hour Clock, also
known as “Military Time”. Rather than 1-12 AM and 1-12 PM, this
format uses the hours of 00-23, with 00:00 being equivalent to
12:00AM (Midnight), and 23:00 being equivalent to 11:00PM.
After making any desired changes to the first digit, press OK. The
printer will print out another line (to the second dotted line in the
sample at right), so the second digit of the Hour can be modified.
When OK is pressed this time, a heading will print, “Set Minutes”,
indicating that it is time to set the Minutes of the current Time. After
both Minutes digits are set, a line showing the newly set Time will be
printed for your review. If a mistake was made, and the Time is not
what was intended, you must begin this procedure again from step 1.
For clarification, note the five boxes along the right side of the sample
receipt. These are added here to indicate the button numbers, and how
many times each were pressed, in order to set the example Time to
15:21 (3:21PM).
Rev. 01/2007
3
** Set 24 Hour Time **
Sw
Sw
Sw
Sw
#2
#4
#5
#6
Print
OK
UP
DOWN
Set Hour:
01:00
#5 x 1,
#4 x 1
Set Hour:
11:00
#5 x 5,
#2 x 1
Set Hour:
16:00
#6 x 1,
#4 x 1
** Set Minutes **
Set Minute: 15:00
#5 x 2,
#4 x 1
Set Minute: 15:20
#5 x 1,
#4 x 1
Time
: 15:21
SETTING THE CURRENT DATE
1.
2.
3.
Enter the Setup Mode by following the four steps described on page 2 of this manual.
Once there (when the printer has stopped printing), press button #3 (3rd from left) to select “Set Date”.
The receipt shown below will then print out automatically up to the first dotted line, in order to help guide you through the
setting process. The top line of the receipt simply shows the Setup Mode Option chosen in step 2, and the next four lines list
the buttons, and their functions, used in modifying the current setting.
(…continued)
**** Set Date ****
Sw
Sw
Sw
Sw
#2
#4
#5
#6
#4 x 1
Print
OK
UP
DOWN
Set Day
#5 x 1,
#4 x 1
Set Day
Set Year
#5 x 2,
#2 x 1
Set Day
#6 x 1,
#2 x 1
Set Day
:JAN
4.
5.
6.
:12
#4 x 1
#5 x 11,
#2 x 1
Set Month
:13
: 2005
#5 x 1,
#4 x 1
Set Month
:11
: 2005
#4 x 1
Set Year
:01
Date
:DEC
:12-DEC-2006
When the last line has printed, setting the current Date may begin. The third digit of the Year is to be set first, as indicated by
the arrow on the printout. The following explains how to use the four active buttons:
a. #5 UP – Each press of this button increments the current digit by 1 (or moves to the next Month).
b. #6 DOWN – Each press of this button decrements the current digit by 1 (or moves to the previous Month).
c. #4 OK – Press this button to save the current digit (or Month) after it has been modified.
d. #2 Print – Pressing this button once will re-print the line, but with an updated current digit (or Month). In case you
are unsure as to how many times the UP or DOWN buttons were pressed, use this to review your changes before
saving them with the OK button.
After making any desired changes to the third digit, press OK. The printer will print out another line (to the second dotted line
in the sample above), so the fourth digit of the Year can be modified. After making changes to the fourth digit, and pressing
OK, the next setting will be the current Month, followed by the current Day. Use the same buttons and procedure that were
used in setting the Year to modify the Month and the digits of the Day. When the final digit of the day is OK’d, a line will be
printed showing the newly set Date. If a mistake has been made, and the Date is not what was intended, you must begin this
procedure again from step 1.
For clarification, note the eight boxes along the right side of the sample receipt. These are added here to indicate the button
numbers, and how many times each were pressed, in order to set the example Date to December 12, 2006.
Rev. 01/2007
4
LOCKING / UNLOCKING THE NON-RESETTABLE ‘TOTAL’ COUNTER
1.
2.
3.
4.
5.
Enter the Setup Mode by following the four steps described on page 2
of this manual.
Once there (when the printer has stopped printing), press button #4
(3rd from right) to select “Lock Total Counter”.
#1=Yes #2=No
The receipt shown at right will then print out automatically up to the
#1 x 1
dotted line, in order to show you the options for this setting. When the
or
printing has stopped, you can choose to either Lock (Yes), or Unlock
#2 x 1
Done
(No) the non-resettable Total counter (refer to letter ‘H’ on page 6).
Unlocking the Total counter allows it to function normally, while
locking it prevents it from counting up. When “locked”, the Total will
remain unchanged, regardless of any money entered into the machine.
This feature is useful for keeping the previous Total count, while
entering bills into the machine for testing or troubleshooting.
Press either button #1 to Lock, or button #2 to Unlock the Total counter. The printer will then print out the word “Done”, to
acknowledge that a selection has been made.
For clarification, note the box on the right side of the sample receipt. It has been added to show that the only option here is to
press button #1 or button #2 once.
ADJUSTING THE PRINT INTENSITY
1.
2.
3.
4.
5.
6.
7.
Enter the Setup Mode by following the four steps described on page 2
of this manual.
Once there (when the printer has stopped printing), press button #5
(2nd from right) to select “Print Intensity”.
The receipt shown at right will then print out automatically up to the
first dotted line, in order to help guide you through the setting
process. The top line of the receipt simply shows the Setup Mode
Option chosen in step 2, and the next three lines list the buttons, and
their functions, used in modifying the current setting.
When the printing stops, changes to the print intensity, which is the
lightness or darkness of the printed characters, may begin. The Print
Intensity can be varied through a series of 12 gradations, represented
by the values 1 – 12, with 1 being the lightest, and 12 being the
darkest. The following explains how to use the three active buttons:
a. #5 UP – Each press of this button moves the Print Intensity
to the next higher, or darker, value.
b. #6 DOWN – Each press of this button moves the Print
Intensity to the next lower, or lighter, value.
c. #4 OK – Press this button to save the current Print Intensity
level after it has been modified.
After each press of either the UP or DOWN button, a single line will
be printed out, the darkness of which representing the current Print
Intensity value shown at the end of that line. Continue to adjust the
setting up or down until the printed line is as light or dark as you want
all future printing to be.
Press OK to save the value. A final line will then be printed to show
the Print Intensity value that was selected. If OK was pressed
inadvertently, and this value is not what was intended, you must
begin this procedure again from step 1.
For clarification, note the four boxes along the right side of the
sample receipt. These are added here to indicate the button numbers,
and how many times each were pressed, in order to change the
example Print Intensity from 10 to 7.
Rev. 01/2007
5
** Print Intensity **
Sw #4 OK
Sw #5 UP
Sw #6 DOWN
#6 x 1
Print Intensity 9
#6 x 1
Print Intensity 8
#6 x 1
Print Intensity 7
#4 x 1
Print Intensity 7
AUDIT RECEIPT DESCRIPTION:
A) Displays the revision number of the Firmware
currently installed in the printer. NOTE: There are
two different Firmware versions, one for the
AC7076, and one for the AC7076.1.
A
B) The Machine Number is a three-digit number,
American Changer Corp.
unique to each machine, and assigned by the user,
B
ccPRT_C14
that identifies which machine printed the receipt.
Machine #:
123
Instructions on how to set the Machine Number
C
Sequence#: 0016
can be found on page 2 of this manual.
Date
:12-DEC-2006
C) The Sequence Number is a four-digit number that
D
Time
: 15:21
is used to keep track of the number of times the
Change $:000001.25
counts have been reset back to zero. The number is
Ones
:000002
E
incremented by 1 when the two “Reset Count
Twos
:000000
Receipts” are printed, so they both show the same
Fives
:000001
incremented number (refer to the page 7 for more
Tens
:000000
F
information on resetting the counts). The number is
Twenties :000000
then incremented by 1 again when the counts are
Fifties :000000
reset. NOTE: To clarify, the counts are reset at the
Hundreds :000000
same time that the Reset Count Receipts are
Sum
$:000008.25
G
nd
printed, so the 2 Sequence Number increment
will be seen the NEXT time a receipt is printed.
Total
$:007208.25
Printing a receipt by pressing only the PRINT
H
button has no effect on the Sequence Number.
Hopper 1 :000017
D) The date and time that the receipt was printed
Hopper 2 :000016
I
appears here. The printer maintains an internal
Hopper 3 :000000
clock, which can be set by the user, in order to
Hopper 4 :000000
‘time-stamp’ the Audit Receipts.
E) This line shows the amount of coin change that has
Valid. 1 :000003
been entered into the machine, as a single, dollar
Valid. 2 :000000
J
value. As each coin is fed into the coin acceptor (if
Valid. 3 :000000
installed), its value is added to this count. For
Valid. 4 :000000
$5 $1 $1
Example: The sample receipt at right shows that
K
___Last Bill In
$1.25 in change has been entered. This means that
the machine has accepted 5 quarters, or 1 quarter
and 1 dollar coin, or some other combination of
coins that add up to $1.25.
F) This section displays, by denomination, the total
quantities of Bills the machine has accepted since
the last count reset.
G) The Sum is the total of all of the money entered into the machine since the last reset. It is a dollar value, calculated by
multiplying the quantities in section F by their denominations, and adding them all together, along with the Change amount in
section E. For Example, from the sample receipt, 2 x $1.00 + 1 x $5.00 + $1.25 in change = $8.25. NOTE: The Sum is
resettable, so it IS reset to $0.00 along with the other counts when the “Print & Reset” function is selected.
H) Total shows the non-resettable, dollar-amount total of all money entered into the machine. This amount does NOT get reset
with the Sum and the rest of the counts when the “Print & Reset” function is selected.
I) Here, the Hopper counts are displayed as quantities of coins/tokens dispensed per each hopper. NOTE: The printout for the
AC7076 Audit Printer shows four hoppers, while the printout for the AC7076.1 shows only two hoppers.
J) Similar to section F, this part of the receipt displays the total quantities of Bills the machine has accepted, but here they are
separated by which validator received them. If the counts were reset the last time the bill boxes were emptied, these counts
should reflect the number of bills in each validator’s bill box. NOTE: The printout for the AC7076 Audit Printer shows four
validators, while the printout for the AC7076.1 shows only two validators.
K) The final two lines of the Audit Receipt show the denominations of the last three bills that were entered into the machine. The
most recent bill denomination is on the left, with the second-most recent in the middle, and the third-most on the right. For
Example: The sample receipt shows that the last three bills accepted were a $1, followed by another $1, followed by a $5.
Rev. 01/2007
6
TO PRINT AN AUDIT RECEIPT:
With the machine ON, so the printer will have power, press the PRINT button (#2, 2nd from left) on the bottom of the printer.
Pressing this button once will print out one copy of an Audit Receipt, an example of which appears on the previous page, showing
the current status of all of the counts.
TO PRINT AND RESET THE COUNTS:
Turn the machine ON, if necessary, so the printer will have power. Hold down button #1 (far left), and then press the OK button
(#4, 3rd from right). Release both buttons once OK has been pressed. This will initiate the “Print & Reset” function. When “Print &
Reset” is chosen, two copies of the standard Audit Receipt will automatically print out, one after the other, and all of the counts
will be reset to zero. The receipts will be identical to the Audit Receipt printed by pressing the PRINT button (#2), except they will
both have the title “Reset Count Receipt” printed across their tops. In addition, the Sequence Number will be incremented, first by
1, to give the two “Reset Count Receipts” their own unique Sequence Number, and then once again after the printing, so the next
Audit Receipt that gets printed will begin from a new Sequence Number. NOTE: This results in standard Audit Receipts having
even numbered (or zero) Sequence Numbers, and “Reset Count Receipts” having odd numbered Sequence Numbers. The order of
events for the “Reset & Print” function is as follows:
1.
2.
3.
4.
When buttons #1 and #4 are pressed simultaneously, the Sequence Number is incremented by 1, and printing begins.
Two identical Audit Receipts are printed out showing the current counts (before reset) and the new Sequence Number.
When printing is complete, all of the counts, except the non-resettable total, are reset to zero.
Finally, the Sequence Number is again incremented by 1.
NOTE: In case you do not have this manual with you when servicing the machine, please note that the button combination to start
this function (#1 + #4) is indicated on the white label on the front of the printer, just above the buttons.
INDICATOR LIGHTS:
GREEN
-
The green LED indicator is located near the bottom of the printer, directly above Button #3 (3rd from left). This
light indicates when the printer has power (it receives power from the Main Logic Board).
ON Solid =
OFF
=
RED
-
The red LED indicator is located near the bottom of the printer, directly above Button #4 (3rd from right). This
light indicates when the printer is operating normally.
ON solid =
OFF
=
Blinking
Rev. 01/2007
Printer power is ON
The printer is not receiving power. Check that the Main Logic Board power switch is in the ON
(‘I’) position, and ensure that all wiring harnesses are connected properly.
=
Error – the printer has an internal software malfunction, and must be replaced.
Error – this can mean that either the printer has an internal software malfunction, and must be
replaced, or that the power is OFF. Check the status of the GREEN LED indicator.
The printer is operating normally. The red LED blinks approximately once per second when the
internal software is functioning properly. If it is blinking, but still will not print, then the printer
may have a hardware problem; please contact our Service Department.
7