1
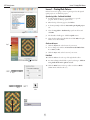
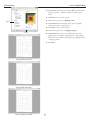
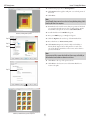
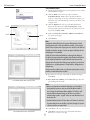
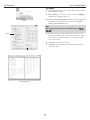
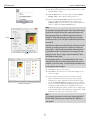
EQ7 Printing Lessons
Lesson 1: Printing Block Patterns
• Opening the Log Cabin - Traditional Quick Quilt
• Checking out the Layout
• Printing the Block
• Printing a Foundation Pattern
• Printing Templates
• Printing Rotary Cutting
The Electric Quilt Company
419 Gould Street, Suite 2 | Bowling Green, Ohio 43402
www.electricquilt.com | [email protected]
1
Lesson 1: Printing Block Patterns
EQ7 Printing Lessons
Lesson 1 – Printing Block Patterns
In these lessons we’re going to focus on printing and use the Quick
Quilt projects as our “finished projects.”
Open the Log Cabin – Traditional Quick Quilt
1
Double-click the EQ7 icon on your desktop to open the
program. You’ll see the EQ7 splash screen.
2
When the Tip of the Day appears, click Close.
3
In the Project Helper click the Start with a quick-quilt project
tab.
4
Select the Log Cabin – Traditional project from the list and
click OK.
5
The Sketchbook will appear. Click the Quilts section.
6
Select the first quilt in the Sketchbook and click Edit. The quilt
will be sent to the worktable.
Step 4
Check out the Layout
Step 5
7
Click the Layout tab at the bottom of your screen.
8
Do not change any numbers. Look at the Finished Block Size.
It is 8.000 by 8.000.
9
Click the Layer 1 tab at the bottom of your screen.
Print Block
10 Click the Select tool at the top of the right-hand toolbar.
11 You must tell EQ7 which block to print by selecting it. Click on
a Log Cabin block in the quilt to select it.
Step 6
12 Click the Print button in the top toolbar and choose Block.
(FILE > Print > Block works too.)
Step 7
Step 8
Step 9
Step 10
Select
Step 12
Step 11
2
Lesson 1: Printing Block Patterns
EQ7 Printing Lessons
13Under Printing Style, choose Outline drawing.
14Click Preview at the bottom of the Print Block window. Outline
drawing is just that… a black and white line drawing of the
block.
15Click Close at the top of the preview.
16Under Printing Style, choose Quilting stencil.
Step 13
17Click Preview. Any block in EQ7 can be used as a quilting
stencil and printed as a Quilting stencil.
18Click Close at the top of the preview.
19Under Printing Style, choose As applique pattern.
Step 14
20Click Preview. You won’t notice any difference between As
applique pattern and Outline drawing when it’s a pieced block.
You’ll only notice a difference when printing an appliqué that has
overlapping patches.
21Click Close.
Print block, Outline drawing preview
Print block, Quilting stencil preview
Print block, As applique pattern preview
3
Lesson 1: Printing Block Patterns
EQ7 Printing Lessons
22Under Printing Style, choose Showing fabrics.
23Click Preview. Showing fabrics will print out a colored picture of
the block.
24Click Close.
Note
You will usually always want to choose Use size from quilt when printing a block
from the quilt. Here’s one exception:
25 Print Block can be used for more than just a picture of the block
as it is used in the quilt. Let’s see how to make gift tags. Under
Finished Block Size put the dot next to Custom block size.
26 Double-click the size for Width and type 2.
Print block, Showing fabrics preview
27 Press your TAB key to go to Height and type 2.
Step 28
28 Click the Options tab near the top of the Print Block box.
29 Put a check next to “Print as many as fit.”
Step 26
30Click Preview. Imagine if you had a really cute birthday or
holiday block designed. You could print this on card stock,
cut out the blocks, punch holes in the corners and tie them to
presents with ribbon.
Step 25
Note
You may want to click to remove the check from Print as many as fit while you
still remember it was checked now that we’ve tried it out
31Click Close at the top of the preview screen.
32Click Close in the bottom corner of the Print Block box to
return to the quilt.
Step 29
Step 30
Print block, Custom block size, print as many as fit
4
Lesson 1: Printing Block Patterns
EQ7 Printing Lessons
Print Foundation Pattern
33 The block should still be selected in the quilt. If it is not, click it
with the Select tool again.
34 Click the Print button in the top toolbar and choose
Foundation Pattern. (FILE > Print > Foundation Pattern
works too.) Depending on the type of foundation pattern, you
will either start on the Numbering or Sections tabs. There is also
an Options tab.
Step 34
35 Click the Options tab at the top of the Print Foundation
Pattern window. Notice how Use size from quilt is already
selected and the grayed-out numbers are the numbers from our
Layout tab (8.000 by 8.000).
Step 35
Step 35
36 Make sure Grayscale is checked and Mirror is unchecked in
the options at the right.
Step 36
37Click Preview.
Note
Your printout will most likely tile over two pages. When printing an 8 inch
by 8 inch pattern with a ¼ inch seam allowance around it, you are trying to
print 8½ inches of pattern total. If your paper size is only 8½ inches wide and
absolutely needs printer margins, of course your pattern will always tile onto
multiple pages. It is unavoidable.
Step 37
Luckily, EQ7 prints a dashed and dotted line at the page break. When you
line up the two pages and tape them together, they will make the full pattern.
Use the dashed and dotted lines as well as the black seam lines and seam
allowance lines all as guides when lining up pages together. If you don’t have
a light box to use, try taping patterns to a large window or sliding glass door
during the day.
As long as you line up all the guides, you will get the perfect pattern as if you
printed it on a wide format printer or plotter.
38 Pay attention to the side of the block on the left is dark gray.
Click Close.
39 Put a check next to Mirror and click Preview again. Now the
gray has flipped horizontally.
Print Foundation Pattern, Mirror unchecked preview
Notes
•Mirror is very important to understand. Depending on your foundation
piecing technique you may or may not need to have Mirror checked. If
you’re doing a directional pattern (like an alphabet “R” block), it could
mean the difference between having your block turn out correctly or
suddenly ending up with a “rag quilt” where your seam allowances are on
the incorrect side.
•Foundation Piecing also has a “Print as Many as Fit” feature. It works best
for patterns that print in one unit (like a Log Cabin, Pineapple, or Square in
a Square), when they are printed small.
40Click Close at the top of the preview.
Print Foundation Pattern, Mirror checked, preview
5
41Click Close in the bottom corner of the Print Foundation
Pattern box to return to the quilt.
Lesson 1: Printing Block Patterns
EQ7 Printing Lessons
Print Templates
42 The block should still be selected in the quilt. If it is not, click it
with the Select tool again.
43 Click the Print button in the top toolbar and choose Templates.
(FILE > Print > Templates works too.)
44 Notice how Use size from quilt is already selected and the grayed
out numbers are the numbers from our Layout tab (8.000 by
8.000). Click the Preview button.
Step 43
Note
RULE #1: When printing a pattern from a quilt, ALWAYS leave it on “Use size
from quilt.”
45 Templates will give you each unique piece of the pattern. The
dotted line around the patch is your seam allowance line (where
you would cut). The black solid line is your sewing line (where
your seam would be).
Step 44
46Click Close at the top of the preview.
47Click Close in the bottom corner of the Print Template box to
return to the quilt.
Step 44
Print Templates preview
6
Lesson 1: Printing Block Patterns
EQ7 Printing Lessons
Print Rotary Cutting
48 The block should still be selected in the quilt. If it is not, click it
with the Select tool again.
49 Click the Print button in the top toolbar and choose Rotary
Cutting. (FILE > Print > Rotary Cutting works too.)
50 Notice how Use size from quilt is already selected and the
grayed-out numbers are the numbers from our Layout tab
(8.000 by 8.000). Notice also how you can round to the nearest
1/8th or 1/16th inch. Click the Preview button.
Step 49
Notes
The chart updates according to how the quilt is colored. If you decide to change
the quilt to blue and purple, all those fabric swatches would update as well.
Rotary Cutting is great when you use blocks in quilts at the size they were
designed for. This log cabin is based off a grid of 8 (three logs on each side
and the center counts as 2, 3+2+3=8). That’s why the block in the quilt on the
Layout tab is 8.
Step 50
Seam allowance is added around each patch. Then those dimensions are found
on the ruler. If a number is not on the ruler, the number is rounded (to the
nearest 1/8th or 1/16th). You will not have problems with rounding for this
Log Cabin block at 8 inches. There would, however, be rounding if your tried
printing it at 7 inches. Please see Chapter 10 in the User Manual for “How to
Avoid Rounding in Rotary Cutting.”
Step 50
If a complex pattern (with 5-, 6- or many-sided patches) ever skips a rotary
cutting patch in the chart, that’s because the patch would be most accurate as
a template. So, print rotary cutting… if a patch is skipped, print Templates and
use the template for the missing patch.
51Click Close at the top of the preview.
52Click Close in the bottom corner of the Print Template box to
return to the quilt.
53 Great job! Those are all the options for printing out block
patterns. Stay tuned for how to print patterns for the quilt
and images too. If you would like to practice this lesson again,
choose the Sawtooth Chain quick-quilt project in step 4. That
way you can see how templates, foundation patterns, and rotary
cutting charts differ when there are triangular patches. If you
need help deciphering how many patches to cut, see Chapter 10
in the User Manual for “Printing a Rotary Cutting Chart.” Click
the X in the top-right corner to close the program.
Print Rotary Cutting preview
Note
If you just want to print a pattern, you don’t need to design a whole quilt. In
EQ7 click VIDEOS on the top menu bar and watch video #8, “What if I just
want a pattern?”
7