1
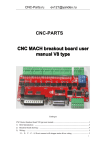
- 1 CNC Machine User Manual For CNC Warnings and Cautions: - 2 1. The operating staff must undergo a rigorous training, and must pay attention to their personal safety and the safety of machine in the operating process; besides they should operate the engraver machine in strict accordance with the operating rules and regulations. 2. The demand for voltage supply is 220V/50Hz.if the power supply is unstable or any other big power electric equipments are used around, we need to add stabilized power supply. 3. To avoid strong electric, magnetic and other equipments that affect transmission signals of engraver machine seriously, such as: welding machine, transmission towers, etc. 4. Engraving machine, control box and the computer must be safely grounded to prevent static interference. 5. Don not unplug or plug the signal lines and NC-swappable cards electrified, in order to prevent the burn of NC card and other electronic components. Please unplug the power plug when the machine is not in use for a long-term. Please turn off the power timely when the machine does not work. 6. Do not frequently start control box in a short period in order to prevent the burn of converter or other electronic components. 7. Check whether the plugs loose frequently. If there is a certain loosening, please cut off the power at first and then get it fixed. 8. Ensure the cycle of cooling water flows smoothly in the processing and no impurities in the bucket, the water temperature will not exceed 40 degrees and regular replacement of circulating water. 9. Do cleaning work regularly to maintain no debris on ball screw and rail. wipe with a clean cotton cloth and add lubricants. 10. The graver is very sharp, so it is prohibited to hand-to-machine when it is running in order to prevent the injury. Do not use handkerchiefs, scarves access to the machine to prevent the involvement or damage equipment. 11. Proficiency in the use of a variety of gravers and accurate method of setting as well as the correct installation method of graver. Re-tighten the nut to bear a little better, when replace the graver. 12. To master engraving software installation method and the setting method skillfully in order to facilitate the installation in the future. 13. Do not dismantle to repair or modify the machine privately without the authorization of original company, so as to avoid damage caused by man-made or warranty failure. Contents Chapter I Mechanical Engraving Machine Summary - 3 Chapter II Mechanical Engraving Machine Instructions 1. Engraver and Computer Connection 2. Introduction about distribution box Chapter Ⅲ Mechanical Engraving Machine Operation Steps 1. Artcut software for path generation A. Two-dimensional sculpture of the generated path 1) Female engraving and male engraving 2) Engraving depth 3) Carving method 4) Tool selection 5) Re-processing method B. Generation of three-dimensional path 1) Female engraving and male engraving 2) Engraving depth 3) Tool selection C. Cutting path generation 1) Output mode of contour lines 2) Tool selection 3) Engraving depth 4) Edge enhancement direction 2. Output and processing of the NC studio software 1) Boot-strap 2) Unloading, load engraving file 3) Simulation and cancel simulation 4) Define processing origin 5) Slow down, open and adjust the spindle speed to start processing 6) Adjust the processing speed 7) Finish processing Chapter Ⅳ Common Problems and Solutions Appendix I Common Tools and Application Appendix II Common Material and Processing Parameter Chapter I Mechanical Engraving Machine Summary Mechanical Engraving Machine: RS-3040 Relevant Parameters - 4 Worktable Size (mm):400 X300 XYZ Working Area (mm):400x300x80 Max Moving Speed(mm):4000 Max Engraving Speed (mm/min):4000 Resolutions (mm):0.03 Repeatability (mm):0.03 Max Feed Height (mm):90 Drive Type: Mico-step stepper motor Spindle Power: 0.8 KW Spindle Speed (rmp):0—24000 Spindle Tools: ф3.175 Command Code: G-code Performance Features: Three –axis all adopt the imported ball screw with original package, working steadily, ensures high precision The adoption of high subdivision drive ensures high speed and high precision. Water cooling variable frequency and brushless high power spindle, good speed adjustable performance, wide range, high running efficiency, smaller noise, powerful cutting capacity, can work for a long time with mass production, user-friendly design can be disassembled, and easy to installation and transportation. - 5 Chapter II Mechanical Engraving Machine Instructions First. Engraving machine and computer connection Engraver machine and computer connection (pictures) Please ensure that your computer has PIC slots, insert the CNC control card into computer in the condition of shutdown. Watch out when insert and pull out it, and ensure the control card was inserted completely.(software and CNC control card driver must be installed beforehand, details refer to instruction.) After the installation of CNC control card, use data cable to connect engraving machine and computer. One end of the data cable links to the back serial port of engraver distribution box, the other links to the CNC control card of computer. Notes: do not bend and break the pins when plug in and pull out the data cable. Distribution box CNC Numerical Control Card Date Cable Connect with the distribution box Connect with CNC control card - 6 2. Engraving machine summary (1)Engraver machine specification Z - a x i s X - a x i s Distribution box Fuselage Work table Y - a x i s indle motor (2)Distribution box specification Z-axis motor plug Y-axis motor plug X-axis motor plug Cooling fan Total power indicator Power plug Data Cable Plug Spindle Motor Plug Total power switch - 7 Chapter Ⅲ Mechanical Engraving Machine Operation Steps In artcut software( CorelDraw、AutoCAD、type 3、ArtCAM、other Graphics software, etc.),finish the processing graphics well, and place the graphics on the lower-left corner of the page to generate the path. First. the generation of artcut software Three-dimension engraving path Two –dimension engraving path Output of Line Path Cancel path Not used Check Graphic error A. the generation of two-dimension Select the path that will be generate, then click 1 3 5 2 4 Save engraving path - 8 1:Female Engraving and Male Engraving Effcet of female engraving ---engraving inside the graphic Above picture shows female engraving effect Follow graphic shows male engraving effect Effect of male engraving---processing outside the graphic Male engraving method:add a closed outer frame to the processing project, then put together both ,still select male engraving in 2D.the outcome is male engraving effect. 2:Engraving Depth According to your requirements to set up depth 3:Engraving Method - 9 The Level of End milling Edge Enhancement 4:Tool storage Conical Flat 5:Re-processing method generally "edge enhancement" This is used in the combination with carving method, but note that: the selection of tool must be the same as the tool which is used in the carving method. B: the generation of three-dimension 1: Female engraving 2: Engraving depth 3: Tool selection all female engraving 1/2 of material thickness centre knife C: generation of cutting path 1: output ways of contour line - 10 Width of Carving Tool Inner contour Outer contour Output of original line The arrow lines in the figure are the moving path of tool center. When output of inner contour, the processing size is the preset size minus the size of tool diameter; When output of outer contour, the processing size is in accordance with preset size; When original line output, the processing size is preset size minus the half size of tool diameter; 2: Tool selection, straight tool 3: Engraving depth When cutting words, the carving depth can be set to zero, machine tool(Z-axis)to the table as a reference point for cutting (this method is not easy to damage table) 4: Edge enhancement direction When selecting the inner contour and outer contour, you can select edge enhancement direction. select clockwise direction in cutting hibiscus plate and PVC plate, counter-clockwise in cutting acrylic plate. Hibiscus plate Acrylic PVC - 11 Second .Tools Management 1:Tool classifications V-Bit Mill 1. Application : V-Bit Mill : Conical flat End Mill 3D Conical flat : 2D(two-layer plastic board,class brand sculpture) End Mill: cutting Application of Tools: Five kinds of Tool: 1、Conical flat:used in shallow depth cutting two-layer board, organic board, wood, metal(special use for metal).(Note: the smaller tool edge, the slower processing speed; when cutting metal, slow down the speed and add some cooling liquid; or else it is easy to break the tool; especially engraving metal with a layered approach as - 12 much as possible. 2、Thread cutter:Mainly used in organic board, PVC material 3、End Mill:Cutting two–layer plastic board, thin PVC, wood board, Styrofoam 4、V-Bit Mill:Cutting ABS board and Aluminum board used in construction model. it can not be used in milling engraving 5、3D Tool:used in three-dimension trajectory angle words, three-dimension engraving is the most common method in carving. mainly for organic board and wood material engraving. Selection of the tool was primarily based on the thickness of strokes and the depth of engraving 2:Parameter Setting V-Bit Mill :W1,H1,A three parameters W1 is the sewing part diameter A is half angle Conical Flat:W1,W2,H1,A four parameters W2 is tool tip width W1 is diameter of sewing part, A is half angle End Mill:W1,H1 two parameters H1 is blade height W1 diameter of sewing part 3:Tool Addition After filling in parameter, single click “tool addition” button to add a new tool (if uncertain about The parameters, amount the scale directly) Click “OK” button after selecting appropriate tool Third , save engraving path 1: Code Format Code Format selection “standard G code” - 13 2: Save Path Click “search” to select save path, and then make a name for file 3:Save Type: set the save type to“G-Code Files (*.nc)” 4: Tool up Height According to the situations, the higher the tool, the slower the processing speed. After saving file, you can enter into the operating part of engraver. You can refer to artcut Help file to see deign part. After finishing the processing path, tightening material to worktable table (thin material, like double-color board、organic plate, etc. use double-adhesive to stick material on the table, use board to suppress thick material),enter into Ncstudio™ system to output processing. Four: Motion control system Ncstudio™ V5.5.60 operating steps - 14 Install Ncstudio software at first,refer to details in the software manual, open Ncstudio software interface as follows: 1: Boot reset (optional, if there is no limit switch, please do not choose this) Click on the manu Operation Back to mechanical origin reset tip, click the all-axis can also reset After resetting, click close (after the machine stopped operating) 2:unload,load engraving file - 15 3:Set processing origin When the tip at left cornerof the material,set X、Y coordinates to zero. 4:Tool setting Make the Z-axis Downward movement manually, set the Z coordinate to zero when the tip contacts the surface of the material.( start the spindle when seting the origin of Z-axis in order to prevent damaging the tool). - 16 5:Simulation, cancel Simulation <shortcuts F8> (to view whether the document is correct or not in the processing path window, the document could not exceed the green box of the software, then cancel simulation after confirming the accuracy) - 17 6:To slow down feed rate, open and adjust the spindle speed (Note: to ensure the cooling water cycle of the spindle is normal) 7:click the start button(F9) to processing; Pause(F10) Stop (F11) Chapter III Common Problems and Solutions Fault phenomeno n Fault Reason 1. NC card loosening or fault 2. Drive failure corresponds to the axis The axis does not move around or move abnormally Solutions Re-inserted or replaced NC card Replacement of the motor driver corresponds to the axis 3. Stepper motor failure corresponds to Replacement of the stepper motor the axis corresponds to the axis 4. Shaft coupling corresponds to the Tighten or replace shaft coupling axis break out or loose corresponds to the axis 5. Screw fracture or failure of screw nut Replacement of the corresponds to the axis corresponds to the axis 6. Linear Bearing corresponds to the Replacement Linear axis failure corresponds to the axis screw Bearing 7. Drive failure or electric current Adjust the drive parameters and sub-set error corresponds to the software settings - 18 Z-axis out-of-contr ol Rotating spindle abnormal voice 1. NC card loosening or fault Re-inserted or replaced NC card 2. Z-axis electrical line failure Check Z-axis electrical line 3. The path is wrong Import the correct file path 4. Inverters or electrostatic interference Check the ground wire 5. Computer virus or system problems Reinstall or replace the computer system 1.Inverter settings error Reset inverter parameters 2. Spindle does not turn Check the spindle motor line 3. There are problems with the main Replacement of the spindle motor axis 1. NC card fault Replaced NC card Spindle stop 2. Inverter parameter setting switch incorrect, or their own fault 3. The main short-circuit axis or data is Reset inverter parameters line Inspection or replacement of data lines to connect 4. Spindle short-circuit Repair or replacement of the spindle motor 1. Spindle does not perpendicular to the Adjust spindle perpendicular to the Wash at the surface, need correction. surface end of 2. There are problems with tool Inspection or replacement of tool injustice 3. There are problems with NC card Replacement NC card Output error 1. NC card loosening or fault Re-inserted or replaced NC card 2. Drive failure replacement of the driver 3. Stepper motor failure Replacement of the stepper motor 4. Drive failure or electric current Adjust the drive parameters and sub-set error corresponds to the software settings 5. Shaft coupling corresponds to the Tighten or replace shaft coupling axis break out or loose corresponds to the axis 6. Data line fault Replacement of data line 7. The path is wrong Import the correct file path 8. Computer virus or system problems Reinstall or replace the computer system Pressure level or replacement of materials Re-inserted or replaced NC card Replacement of the stepper motor 1. Material grievances 2. NC card loosening or fault Different 3. Stepper motor failure - 19 engraving depth, too deep or too shoal 4. Drive failure or electric current sub-set error 5. Z-axis electrical line failure 6. Spindle motor failure 7. Inverter Interference or incorrect data set 8. Electrostatic interference 9. Computer virus or system problems Adjust the drive parameters and corresponds to the software settings Check Z-axis electrical line Check Spindle motor Inspection or re-set the parameters of inverter Check the ground wire Reinstall or replace the computer system - 20 Appendix I Common Tools and Application Common cutting tools includes 3 types: Conical flat, End Mill, V-Bit Mill (for 3D working) Through clicking any one selection elements of artcut software,like 2D,3D,Cutting,and step into it will finish the creation of engraving tools. 2. Conical flat W1: diameter of handle of cutting tools, commonly used :∮3.175,∮4,∮6, etc W2: diameter of tool point, it affects the engraving result directly. So make it exactly when sets A: half of the angle made by the two lines; if use 30° tools, A should be 15, by parity of reasoning. Rules for tool using: use W2 type tool or smaller than it when engraving small letters and try to use bigger tool when engraving bigger letters in order to improve speed; choosing cutting tools depends on the thinnest line of the letter; if necessary, in the condition of not affecting letter effect, using “Node Edit” to modify the strokes is benefit to pass big tool path. 30°angle tool is normally used in engraving badges cutting tools. if the letter is too small, change to single line to count path. Materials for engraving: double-layer plastic board, PVC board, plexiglass, ABS board, etc. Materials for cutting: double layer plastic board, ABS board, etc 2. End Mill W1: the width of tool front-end. Common tool holder diameter likes ∮3.175,∮4,∮6; If the cutting material thickness is less than 10 mm small words, we’d better use ∮3.175 tools. if the words become deformed, sometimes the tool holder diameter ∮2 or∮1.5 can be used for cutting. - 21 H1: refers to the cutting part; material thickness should be less than H1; common H1 length is different according to different material thickness, for example: 12mm: cut less than 10mm thickness material 17mm: cut less than 15mm thickness material 22mm: cut 20mm thickness material (∮3.175 for PVC and ∮4 for acrylic) Common engraving material: PVC, plexiglass, wood, etc Common cutting material: PVC, plexiglass, wood, etc Rules for using tools: we do not suggest cutting less than 10mm materials with 22mm tools, as it may break the tools; when you want to cut 22mm material but without 22mm tools, we can use 17mm tool temporarily and finish it by different layers. 3. 3D(V-bit) Such tools are different from those engraving tools we normally use which are made by a alloy material; it is made through welding processing to weld various tool heads under ∮6 tool holder; it is used to engrave different kinds of special shapes files, so it is also called big-end bit or V-bit. W1: the diameter of the big-end; random accessory is 32mm which is used to cut small 3D letters A: half value of the angle made by the two lines of knife point; standard tool is 90°, then A should be 45°(like Conical Flat) W2: width of the knife point; when calculate 3D path specifically, it is required to pass directly, so W2 means not too much, then normally we set it as 0.1 or 0.2. Tools Application: three-dimension clearance angle word (calculate path with 3D function), Engraving acrylic from backside, or the letters similar with the one made by writing brush---such letter looks like the tip of a writing brush 4. Other cutting tools: tools for relief carving, lace tools for making various lace, etc. - 22 5. Tools Creation: Ways for adding a cutting tool: we suggest deleting all default tools in artcut software after installing well; then set up new tools according to detailed requirements. we take a Conical flat knife of 30°×0.1 for example now 1) Choose 2D, 3D, or cut in artcut software, then click “Tools Storage” 2) Click conical flat, then filling in tool parameters; W1=3.175 A=15 W2=0.1 3) Click tool preview add tool confirm---then we can add a new tool. Statement: Thank you for using our products, we reserves the right to modify products specifications without notice in advance. The product is subject to change without notice.