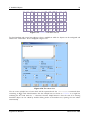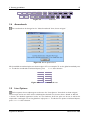
1
LaTeXPiX
User Manual
N.J.H.M. van Beurden
.
LaTeXPiX
User Manual
N.J.H.M. van Beurden
Monday 28 December 2009
Version CTAN
CTAN 29
c All rights reserved. Reproduction or cataloging, in whatever way, of this publication in whole or in part for
°
commercial purposes is prohibited without the written consent of the author.
.
Abstract
I
Abstract
This is the user manual of LaTeXPiX, a LATEX drawing program that runs under all 32 bit Microsoftr
WindowsTM operating systems. This user manual will show you how to work with the software, gives
you some tips and other relevant information. Please read this user manual before you start working
with LaTeXPiX.
Please correct me if you find any errors/typos in this document. For questions, remarks, bugs, et cetera
you can reach me by e-mail. I hope you will like LaTeXPiX and have a lot of fun creating drawings with it !
To indicate important changes or additions made in this version of the manual, compared to the previous
release, a changebar (like currently in the margin) will be displayed. Clickable links to webpages or email
addresses will be indicated in blue.
N.J.H.M. van Beurden
[email protected]
http://www.beurden.cjb.net/latexpix.htm
Disclaimer
LaTeXPiX is distributed as freeware. This means:
1. All copyrights to LaTeXPiX are exclusively owned by N.J.H.M. van Beurden.
2. LaTeXPiX may be freely distributed, with exceptions noted below, provided the distribution package
is not modified. No person or company may charge a fee for the distribution of LaTeXPiX without
written permission from the copyright holder. LaTeXPiX may not be bundled or distributed with any
other package without written permission of the copyright holder.
3. LaTeXPiX IS DISTRIBUTED ”AS IS”. NO WARRANTY OF ANY KIND IS EXPRESSED OR IMPLIED.
YOU USE AT YOUR OWN RISK. N.J.H.M. van Beurden WILL NOT BE LIABLE FOR DATA LOSS,
DAMAGES, LOSS OF PROFITS OR ANY OTHER KIND OF LOSS WHILE USING OR MISUSING
THIS SOFTWARE.
4. You may not use, copy, emulate, clone, rent, lease, sell, modify, decompile, disassemble, otherwise
reverse engineer, or transfer the licensed program, or any subset of the licensed program, except as
provided for in this agreement. Any such unauthorised use shall result in immediate and automatic
termination of this license and may result in criminal and/or civil prosecution. All rights not expressly
granted here are reserved to N.J.H.M. van Beurden.
5. Installing and using LaTeXPiX signifies acceptance of these terms and conditions of the license.
6. If you do not agree with the terms of this license you must remove the LaTeXPiX files from your
storage devices and cease to use the product.
N.J.H.M. van Beurden
28 December 2009
II
28 December 2009
Abstract
N.J.H.M. van Beurden
Preface
III
Preface
Why LaTeXPiX ?
Many people use LATEX to typeset their documents. Using LATEX’s picture environment, drawings can be
added. The environment offers several basic shapes, hereafter called ’objects’, like lines, ellipses, vectors,
text, polygons, Bezier curves and so on. The drawings can be generated by writing flat LATEX code, using
low level commands like \ellipse, \path, etc.
Creating drawings by writing flat LATEX code can be quite hard and time consuming. Moreover, it is not
very interactive as the resulting drawing can only be viewed after compilation of the written LATEX code.
Therefore, several programs provide the possibility to create drawings in a visual way. Using a user interface
these programs show a preview of the actual LATEX drawing and create the LATEX code for you. Some of the
available drawing programs are:
XFig: A very popular program working under UNIX.
JFig: Works under all operating systems supporting JAVA. http://tech-www.informatik.unihamburg.de/applets/jfig/
JPicEdt: Very complete editor which also works under all operating systems supporting JAVA.
http://jpicedt.sourceforge.net/
LaTeXCAD: Program written by John Leis which works under Windows. The program is very
popular but has some limitations, e.g. there is no colour support.
TexCad32: A Windows version made by Peter Furlan of the very popular MS-DOS program. Has
a lot of limitations but is still under development.
QFig: Works under MS-DOS and there are also Windows versions available but this program offers
very few possibilities. The development has ended a long time ago.
WinTpic: A program by Masashi Horii that works very well for simple drawings.
LaTeXDraw: Works in unix.
LaTeD:
A
drawing
program
working
in
MS-DOS.
http://www.ctan.org/tex-archive/systems/msdos/lated/
These are all great programs but none of the programs offer all the functionality and I personally wanted.
Some functions I missed in several programs were:
Colour support on objects like rectangles (squares), ellipses (circles), polygons, dots, text et cetera.
Shaded (filled with different grey scales) and colour filled objects.
Bold and italic texts.
Inclusion of images (JPEG and PNG).
Arrows in any direction with different arrowheads possible instead of the restricted \vector
command in standard LATEX.
Elliptical arcs instead of just circular arcs.
Splines.
Support for many output languages as EEPICS, PGF and PSTRICKS.
So I started writing LaTeXPiX to create a program, unfortunately only working under Windows (sorry to
all Linux lovers), to have all the functionality of these programs combined in one single executable.
Acknowledgements
Without the help of several persons, LaTeXPiX would not have been as it is now:
N.J.H.M. van Beurden
28 December 2009
IV
Preface
CTAN: Thanks for your addition, support and tips.
Ignacio Peñarrocha Alos: Thanks for the tips.
Jaime Quintanilla Benavente: Thanks for the Spanish translations of the main menu.
Robert Rutten: Thanks for giving me tips and detecting numerous bugs and doing good beta testing.
Joseph Hilferty: For the Catalan and extended Spanish translations.
Charles B. Cameron: For the bugs and suggested improvements.
Tim Alderson: For the suggestions and reporting of several bugs.
ATK Slawek: For the Polish translations.
Lars Borchert: For the very good and complete German translations.
Hoa Thai: Many thanks for your Vietnamese translation of the complete LaTeXPiX manual.
Leonidas Enrique de la Rosa: Thanks for the great tips which helped improving the program a lot.
Jens Linden: Thanks for the great tips and feedback which solved a lot of bugs.
Paul Klein: Thanks for reporting a number of box in the text editor.
Adhi Hargo: For all the usefull suggestions to improve the program.
John Leis: For creating LaTeXCAD, which was basis of my ideas for LaTeXPiX.
And last but not least, I want to thank all the users of LaTeXPiX and all people who added a link to my
website or offer LaTeXPiX on their servers.
28 December 2009
N.J.H.M. van Beurden
Table Of Contents
V
Table Of Contents
Chapter 1: Introduction
1.1 System Requirements
1.2 User Interface
1.3 EPIC and EEPIC
1.4 PSTRICKS
1.5 DVIPDFM
1.6 PGF
1.7 Important Notes For Windows 95/98/ME Users
1.8 Target
1.9 Style Files
1.10 Commands Needed
1.11 Menus & Keyboard Shortcuts
1.12 Uninstalling
1
1
1
2
3
3
3
3
4
4
6
6
6
Chapter 2: Available Objects
2.1 Lines
2.2 Vectors
2.3 Arrows
2.4 Bezier Curves
2.5 Elliptical & Circular Arcs
2.6 Rectangles
2.7 Squares
2.8 Polygons
2.9 Splines
2.10 Ellipses
2.11 Circles
2.12 Ovals
2.13 Dots
2.14 Normal Text
2.15 FrameBox Text
2.16 Images
7
7
7
7
8
8
9
9
9
10
10
11
11
12
12
12
14
Chapter 3: Drawing possibilities
3.1 Coordinates
3.2 Colour
3.3 Shade
3.4 Arrowheads
3.5 Line Options
15
15
15
16
17
17
Chapter 4: File Handling
4.1 File Extensions
4.2 Advised Way Of Working
4.3 File Associations
4.4 Shortcut Creation
4.5 WinEdt Additions
19
19
19
20
20
20
N.J.H.M. van Beurden
28 December 2009
VI
4.6
4.7
4.8
4.9
4.10
4.11
Table Of Contents
Open File
Save File
Merge Files
Converting To LaTeX
Saving Log File
Exception Handling
20
21
21
21
21
21
Chapter 5: Object Handling
5.1 Draw Mode / Edit Mode
5.2 Drawing Objects
5.3 Selecting / Grouping Objects
5.4 Moving Objects
5.5 Resizing Objects
5.6 Copying Objects To Clipboard
5.7 Pasting Objects From Clipboard
5.8 Duplicating Objects
5.9 Deleting Objects
5.10 Rotating Objects
5.11 Sending Object To Front/Back
5.12 Redraw All Objects
5.13 Recompile LaTeXPiX script
5.14 Search & Delete Redundant Objects
5.15 Advanced Polygon / Spline Handling
5.16 Previewing
23
23
23
23
24
24
25
25
25
25
25
25
26
26
26
26
26
Chapter 6: Configuration
6.1 Set Local Unitlength
6.2 LaTeXPiX GUI Fonts
6.3 Preferences
29
29
29
30
Chapter 7: Future Development
35
Chapter 8: Registering LaTeXPiX & Language Translations
8.1 Requesting A Registration Key
8.2 Updates & Registry Keys
8.3 Language Translations
8.4 Registered Users
37
37
38
38
39
Chapter 9: History List & Known Bugs
9.1 Known Bugs
9.2 History List
41
41
41
Bibliography
51
Appendix A: LaTeXPiX Keyboard Shortcut Keys
53
Appendix B: Registered Users
57
28 December 2009
N.J.H.M. van Beurden
Table Of Contents
VII
Appendix C: LaTeXPiX Script Language (lpx format)
C.1 Global Line
C.2 Global Tags
C.3 Object Lines
C.4 Object Tags
63
63
63
63
63
About The Author
65
List Of Figures
67
List Of Tables
69
Glossary
71
Index
71
N.J.H.M. van Beurden
28 December 2009
VIII
28 December 2009
Table Of Contents
N.J.H.M. van Beurden
1. Introduction
1
Chapter 1:
Introduction
In this chapter a brief introduction to LaTeXPiX will be given.
1.1
System Requirements
To be able to work with LaTeXPiX, you will need a system with a Microsoftr WindowsTM and a
LATEX1 installation. A windows port of LATEX (preferably MiKTeX) is most suitable for LaTeXPiX. LaTeXPiX is
freeware like most TEX products. You do not need a very up-to-date computer to be able to work with
LaTeXPiX though very slow computers could cause some flickering.
1.2
User Interface
After installing, LaTeXPiX should start automatically. After a splash screen you are asked to set some
options. An explanation of all the options is given in section 6.3. You can also change the preferences
later on by clicking the OK button. After the preference screen is closed the LaTeXPiX user interface will
become visible. You will see a canvas which you can draw on, a main menu on top of the canvas, some
scrollbars to move the canvas, a tool bar on the left side and a statusbar at the bottom. There are also
horizontal and vertical rulers. To switch from cm to inches (vice versa) and to increase/decrease the grid
distance, the button on the crossing of both rulers can be used. By pressing the button on the top left the
cm/inch scale can be controlled. The bottom left and top right buttons let you control the grid distance.
A screen shot of LaTeXPiX is shown in figure 1.1. Mind that the interface shown could have been altered
because this screen shot might not be updated every time a new version of LaTeXPiX comes out.
1
On every occurrence of LATEX, actually LATEX2e is ment.
N.J.H.M. van Beurden
28 December 2009
2
1. Introduction
Figure 1.1: LaTeXPiX user interface
1.3
EPIC and EEPIC
LATEX provides a basic but limited picture drawing capability. To expand the drawing possibilities the epic
”extended picture” macro package was written by Sunil Podar. It provides a simpler and more powerful
interface that the standard picture environment of LATEX. New commands are offered for drawing solid
lines, dotted lines, dashed lines et cetera. However, epic still inherited many of the limitations of LATEX in
picture drawing and hence some of the functions either took a long time to accomplish or the output was
not very nice looking.
tpic is preprocessor program for use with TEX. It uses a set of \special (direct postscript) graphics
commands for drawing pictures. The eepic, as an extension to both LATEX and EPIC, tries to alleviate
some of the limitations by generating tpic specials. The eepic package is generated by Conrad Kwok.
Extension offered by the eepic package are, amongst others, line drawing in any slope, (filled) ellipses
in any radii, more line thickness options, arcs, splines and polygon drawing. Many LATEX users work with
the eepic command because of their ease of use and compatibility over operating systems and viewers.
LaTeXPiXsupports version 1.1 of EEPIC which is considered as the final version.
28 December 2009
N.J.H.M. van Beurden
1. Introduction
1.4
3
PSTRICKS
PSTricks is a set of macros that allow the inclusion of PostScript drawings directly inside TEXor LATEXcode. It
is originally the work of Professor Timothy Van Zandt and in recent years it has been maintained by Denis
Girou, Sebastian Rahtz and Herbert Voss. PSTricks commands are low level, so many LaTeX packages
have been made in order to ease the creation of several kinds of graphics that are commonly used on
mathematical typesetting. One of them is of course LaTeXPiX.
1.5
DVIPDFM
The dvipdfm package is a DVI to PDF conversion utility, named after its creator Marc Wicks. It has the
following features:
Support for outline entries in PDF also called bookmarks) and annotations (including hyperlinks,
forms and widgets). Nearly every Acrobat Distiller pdfmark is approximated.
Support for standard DVI specials such as HyperTeX (HTML), TPIC, color specials, PSfile and other
PostScript specials.
Native support for inclusion of MetaPost output and inclusion of arbitrary PostScript files with help
from an external program.
Support for PDF thumbnails with a little help from GhostScript to generate the thumbnails.
Ability to include JPEG and PNG bitmapped images as encapsulated objects.
Support for partial font embedding and Flate compression to reduce file size.
Support for font re-encoding to work around encodings that arent fully supported by the Acrobat
suite of products.
Et cetera.
To use dvipdfm as your DVI to PDF translator, allowing inclusion of JPEG and PNG images, you have
to include the option \documentclass[...dvipdfm...]{...} to your document. For more
information see the dvipdfm user manual [2].
1.6
PGF
PGF2 is a drawing package made by Till Tantau. PGF stands for Portable Graphics Format. It is a TEXmacro
package that allows creation of graphics using a special pgfpicture environment and special macros for
drawing lines, curves, rectangles, and many other kinds of graphic objects. Its usage closely resembles the
pstricks package or the normal picture environment of LATEX.
The support for PGF in LaTeXPiX is very basic and only supported until version 0.65 of PGF. After that
version the entire PGF system, including commands were changed. For now there is no support for PGF
versions which came after version 0.65 (i.e. versions 0.95 and higher are not supported). However, the
idea is to offer the possibility to draw and convert the same objects as in EEPIC.
1.7
Important Notes For Windows 95/98/ME Users
If you do not have a NT operating system some graphical functions cannot be used within LaTeXPiX.
During the first run of the program a warning will be given about this. Users of the Microsoft Windows
95/98 and ME operating system cannot see dot/dash separation in LaTeXPiX. However, proper conversion
to LATEX code is performed.
2
See [3] for the user guide of PGF.
N.J.H.M. van Beurden
28 December 2009
4
1.8
1. Introduction
Target
The purpose of LaTeXPiX is to be able to create drawings for LATEX with aid of an easy to use user interface.
The drawing can be converted to LATEX code which represent eepic, pgf or pstrick commands. To
this aim, LaTeXPiX uses a script file (with extension .lpx) to represent objects that were drawn. The
converted code can be written to a file (with extensions .eepic, pgf or .pstricks) which can be
included in the LATEX document. It is also possible to directly copy the converted commands into the
LATEX document.
When your LATEX document is compiled you receive a so-called ”device independent” file. This DVI file can
be converted to several formats like Postscript or Adober ’s Portable Document Format (PDF), see [1].
With the dvipdfm program [2] a DVI file can be converted to a PDF file which can be viewed with
Adober AcrobatTM Reader which is the de facto standard for operating system independent document
exchanging.
So LaTeXPiX’s core purpose is to convert drawings made in a user interface into a set of EEPIC, PGF or
PSTRICKS commands so that these can be used in PDF documents that are typeset by LATEX. The main
advantage of creating figures with the LATEX drawing commands instead of using external drawing programs
or postscript is that the same font can be used in the whole LATEX document, creating LATEX drawings is
relatively simple, costless, requires less hard disk space, et cetera.
Because the eepic package uses tpic specials, it cannot be used in combination with the
PDFLATEX package. If you want to use PDFLaTeX you have to convert your drawing to PGF.
1.9
Style Files
You will need to include some style files (.sty) to your LATEX document when you want to include
LaTeXPiX drawings to your documents. Some style files are required for LaTeXPiX inclusion, other
packages are dependent on which objects you have used in your drawing. The style file requirements
will be indicated for each object type.
Some of the style file which will be listed in this section are already shipped and installed with your
LATEX installation. Mind however that some style files need a specific version to be able to let them function
properly with LaTeXPiX. Some experiments have shown that the results that LaTeXPiX gives differs for
some packages or when using the wrong version it even cannot process processing during the compilation.
So please look through each style file very carefully.
All the required style files can be installed from LaTeXPiX with aid of the ”Style File Installer” menu. To
open this menu, go to Settings→Install LaTeX Files. Figure 1.2 shows the user interface of
the ”Style File Installer”. The most recent versions of all style files should be shown here. If not, please
contact the author so the style files in the menu can be updated to more recent versions. Select all the
updates needed and save them into your local style file tree. See the LATEX manual on more information on
where to install the style files or simply overwrite old versions.
28 December 2009
N.J.H.M. van Beurden
1. Introduction
5
Figure 1.2: Style File Installer
Required style files are:
epic.sty: Extended picture environment style file. Note that there are several versions of
this package available. If you want to be 100% sure to have a version which is compatible with
LaTeXPiX you will have to install this style file from the ”Style File Installer”.
eepic.sty: Extra extended picture environment style file. This package also has several different
versions. It is recommended to install this package from the ”Style File Installer” to be sure that you
are working with the correct version.
Dependent style files are:
bez123.sty and multiply.sty or ebezier.sty and calc.sty: Bezier curve style files.
You only have to include one of these pairs of style files if you use any Bezier curves in your
drawing(s). Both ebezier and bez123 packages should work properly, you can choose between
one of them without any benefits are drawbacks.
curves.sty: Style file for drawing curves, used here to draw arcs. You only have to include this
style file when you have used circular or elliptical arcs in your drawing. Mind that the eepic.sty
package is capable of producing circular arcs but when converting these from DVI to PDF with the
dvipdfm tool, the conversion fails sometimes. Therefore, it was chosen to use the curves.sty
package for drawing both circular and elliptical arcs. Mind that you have to use the modified version
of this package (to be installed from the LaTeXPiX ”Style File Installer”) and not the original package
as supplied with your LATEX environment. The \arc command is defined in both the eepic.sty
and the unmodified curves.sty package. This causes an error when compiling your document to
LATEX for the \arc command is redefined. To overcome this problem, the \arc command in the
curves.sty file was modified to \Arc, preventing a error during compilation to LATEX.
rotating.sty: Style file for text rotation. When you are using frameboxes that have a rotation
(not equal to 0 degrees) you have to include this package.
Optional style files are:
latexpix.sty: In this optional style file the command is present to include LaTeXPiX drawings
into your LATEX documents.
The required command to input LaTeXPiX drawings into your documents can also be copied to the
clipboard and pasted to your document anywhere before the first usage of the command. When doing this
it makes the latexpix.sty file obsolete. Pasting the command by hand can be done by pressing the
N.J.H.M. van Beurden
28 December 2009
6
1. Introduction
button ”Copy LaTeX Command To Clipboard”, present in the ”Style File Installer” menu (see figure 1.2)
and then pasting it at the appropriate position by pressing e.g. CTRL+V in your favourite LATEX editor like
WinEdt.
1.10
Commands Needed
When you have converted your LaTeXPiX file into a LATEX file you will get a file which has a .eepic
or .pgf extension. To include the converted drawing into your document you will have to create a new
command within LATEX. You can use the supplied latexpix.sty file for this (see section 1.9) or you
might want to refine the command by specifying the command by hand. The basic command for inclusion
of LaTeXPiX drawing is:
\newcommand{\LaTeXPiX}[3]{
\begin{figure}[ht]
\begin{center}
\input{#1}
\caption{#2}
#3
\end{center}
\end{figure}
}
The \vspace command can add extra vertical space to the top and the bottom of the figure. Assuming
that you have named your output file latexpix.eepic you can put this file into LATEX by typing:
\LaTeXPiX{latexpix.eepic}
{This is an example of a picture created by LaTeXPiX}
{\label{fig:LaTeXPiX-example}}
1.11
Menus & Keyboard Shortcuts
The most commonly used commands within LaTeXPiX have got keyboard shortcuts. A listing of these
shortcuts can be found in Appendix A. But you can also use the main menu to navigate through the
supplied commands.
1.12
Uninstalling
It is best to remove the complete LaTeXPiX software (except for possible created shortcuts) via
the standard Windows Installer tool. Before uninstalling, LaTeXPiX will be closed. Note that your
LaTeXPiX settings as well as your registration key (when you are a registered user that is) will not be
removed.
28 December 2009
N.J.H.M. van Beurden
2. Available Objects
7
Chapter 2:
Available Objects
This chapter will give an outline of all the possible shapes, also called objects, within
LaTeXPiX. Example figures are given for each object.
2.1
Lines
Lines can be drawn in any direction with several colours, widths and line style options (solid, dotted,
dashed). You are asked to specify two points, being the starting point and the end point of the line.
Figure 2.1 shows a few examples of possible lines:
Figure 2.1: LaTeXPiX lines test
2.2
Vectors
Vectors cannot have just any direction like lines have. Figure 2.2 shows all possible directions of a vector
when bounded by a rectangle. LaTeXPiX will automatically indicate wether a vector can be drawn or not,
so please stick to the vector placement indicators. Vectors can also only be drawn in solid line mode.
You may use arrows instead of vectors to be able to draw any possible slope with different arrowhead
possibilities.
I
o
K
O
6
}
Y
y
Figure 2.2: LaTeXPiX vectors test
2.3
Arrows
Arrows can have any direction (vectors cannot have any slope) and therefore offer big benefits over
vectors. The arrow drawing is customary made by the author and is not part of the standard LATEX drawing
commands. An arrowhead is drawn by putting a polygon with the shape of an arrow at the end of a
line. Arrows can be solid, dotted or dashed, but the arrowhead remains solid. Figure 2.3 shows some
possibilities of the arrow object.
N.J.H.M. van Beurden
28 December 2009
8
2. Available Objects
Figure 2.3: LaTeXPiX arrow test
2.4
Bezier Curves
The Bezier curves you can draw have a starting and an ending point together with two control points.
Figure 2.4 shows some example Bezier curves:
Figure 2.4: LaTeXPiX bezier test
The number of points used to draw the Bezier curve can be specified and edited for each individual
Bezier object. It is impossible to draw Bezier curves that have dotted and dashed lines. It is however
possible to obtain quasi dotted Bezier curves by specifying a relatively low amount of points. Note that the
inter dot distance is not constant for Bezier curves when you want quasi dotted Bezier curves. Figure 2.5
shows the ”Bezier Options” form:
Figure 2.5: Bezier options form
2.5
Elliptical & Circular Arcs
Elliptical arc support is probably one of the most enhanced features of LaTeXPiX which is not present
in the eepic.sty package. In the eepic.sty package only circular arcs are offered but these are not
to be used following the eepic documentation for incompatibility reasons. Therefore, for both circular
and elliptical arcs the package curves.sty has to be used.
You have to include the curves.sty file which is shipped with LaTeXPiX (to be installed via the ”Style
File Installer”) when you want to convert elliptical arcs properly.
28 December 2009
N.J.H.M. van Beurden
2. Available Objects
9
Some modifications to the original file were done to get things working. So arcs can only be converted
to LATEX when the modified version is use, do not use the original style file as shipped with your standard
LATEX environment as it might crash ! Figure 2.6 shows some examples of arcs.
...................................................
.
.............
......
.. ..
..
...
....
.......
.
.............
...................................................
Figure 2.6: LaTeXPiX arcs test
2.6
Rectangles
Rectangles can be drawn in different styles as indicated in figure 2.7. When you draw a colour
filled rectangle you will not get a border. When drawing a plain rectangle or a shaded rectangle this will be
done. Squares can also be drawn in rectangle mode. Mind that shaded and colour filled rectangles cannot
be drawn when the line style is dotted or dashed.
Figure 2.7: LaTeXPiX rectangles test
2.7
Squares
The same rules as for rectangles apply here. But squares have the same horizontal and vertical
length. Figure 2.8 shows some possible squares.
Figure 2.8: LaTeXPiX squares test
2.8
Polygons
A polygon is a set of interconnected lines which can be filled with a certain colour when the
figure is ceiled. Figure 2.9 shows some possible polygons. The number of lines in a polygon is limited, when
the limit is reached LaTeXPiX will automatically close the polygon and create the object. When you want
to close the polygon you can do this by:
N.J.H.M. van Beurden
28 December 2009
10
2. Available Objects
1. Mark the last point at the exact position of the starting point.
2. Press the BackSpace key. LaTeXPiX will then automatically close the object for you.
To keep the polygon open (often called a polyline), press CTRL+BackSpace after you have browsed to
the final point position.
Figure 2.9: LaTeXPiX polygon test
2.9
Splines
A spline is a curves that goes through a number of specified points and which can be filled with
a certain colour when the figure is ceiled. Figure 2.10 shows some possible splines. The number of points
in a spline is limited, when the limit is reached LaTeXPiX will automatically close the spline and create the
object. When you want to close the spline you can do this by:
1. Mark the last point at the exact position of the starting point.
2. Press the BackSpace key. LaTeXPiX will then automatically close the object for you.
To keep the spline open, press CTRL+BackSpace after you have browsed to the final point position.
Figure 2.10: LaTeXPiX spline test
2.10
Ellipses
Ellipses can be drawn in different styles as indicated in figure 2.11. When you draw a coloured
ellipse you will not get a border. Circles can also be drawn in ellipse mode. Mind that shaded and colour
filled ellipses cannot be drawn when the line style is dotted or dashed.
28 December 2009
N.J.H.M. van Beurden
2. Available Objects
11
Figure 2.11: LaTeXPiX ellipses test
2.11
Circles
The same rules as for ellipses apply here. But circles have the same horizontal and vertical
diameter. Figure 2.12 shows some possible circles.
Figure 2.12: LaTeXPiX circles test
2.12
Ovals
Ovals are rectangular boxes with rounded corners. The same rules as for ellipses apply here but with
some extra restrictions. Figure 2.13 shows some possible ovals. Oval can only be plain, so not filled with
colour or shaded. The rounding of the corners can be set.
Figure 2.13: LaTeXPiX ovals test
All the oval options can be set and changed via the ”Oval Options” form, which is shown in figure 2.14:
Figure 2.14: Oval options form
N.J.H.M. van Beurden
28 December 2009
12
2.13
2. Available Objects
Dots
Figure 2.15 shows dots drawn by LaTeXPiX. A dot has a standard diameter of 4 and can be
drawn in all the available colours. The same restrictions as with circles apply.
Figure 2.15: LaTeXPiX dots test
2.14
Normal Text
To add text or formulae to your drawing there are two possibilities. First of all, you can add text by
directly specifying coordinates to start the text. This is called ’Text’. It is also to specify a box in which
you can put text with special properties like the horizontal/vertical position and rotation. These are called
’FrameBox Text’. Mind that all the on screen text is set up to the font size 10, 11 or 12 depending on
the settings within the preferences menu. These possible on screen font sizes correspond to the default
LATEX font sizes of 10, 11 or 12pt. So you can match your LATEX font size settings to LaTeXPiX font size
settings (but not vice versa). For normal text figure 2.16 shows some examples of the different available
styles. The text colour can be changed though no rotation or alignment of the text is possible, therefore
you need frameboxes.
Normal Text
Italic Text
Bold Text
Bold Italic Text
Figure 2.16: LaTeXPiX text test
2.15
FrameBox Text
A framebox is a rectangle with text in it that can be aligned in several ways and the text can be rotated.
You can use this object e.g. when drawing diagrams which contain plain rectangles that need a centred
text in it. By adding a framebox with the same size as the rectangles you can center the text within these
rectangles. The text colour can be changed and the rotation of the text can be configured as well.
To be able to rotate text, please include the rotate.sty file to your LATEX package list. This only has to
be done for rotations inequable to zero degrees. Mind that you have to take the style file from LaTeXPiX in
order to be able to rotate your framebox texts by 180 degrees. The standard style file contains a bug so
when compiling with dvipdfm an error is created. The file supplied by LaTeXPiX does not contain this
bug.
Note further that the text isn’t rotated when viewed in YAP. But when converting to PDF the correct
rotation is shown. Figure 2.17 shows some examples of frameboxes:
28 December 2009
N.J.H.M. van Beurden
CC
RT
RC
RB
LC
CC
CC
LB
CB
CC
CC
CC
CC CC
CC CC CC
CC CC CC
CC CC
RB CB LB
CC CC
RC CC LC
CC
CC
CC
CC CC
CC C
C
CC
CC
CC CC CC
RT CT LT
RB
RC RB
CB
RT
LB
CT CC CB
CC RC
CC CC
LC
LB
RT
LC
CT
LT
LT
CT
13
LT
2. Available Objects
CC CC
CC CC CC
Figure 2.17: LaTeXPiX framebox text test
For the framebox and normal text objects a form is available in which the objects can be configured and
edited. This ”Text Editor” form is displayed in figure 2.18:
Figure 2.18: Text editor form
You can enter multiple lines of text which will be separated with the \shortstack command when
converting to LATEX code. Mind however that the multiple lines are shown in LaTeXPiX as a single line
indicating the line ends with the ”1 ” character. Another helpful feature is that the text of an existing
framebox object can be edited by double clicking within its framebox area, opening the text editor
automatically.
N.J.H.M. van Beurden
28 December 2009
14
2.16
2. Available Objects
Images
JPEG and some types of PNG images can be included to beautify your illustrations. First, you are asked
to specify the left top corner where the image should be put. Next, the actual image file to include can be
selected.
Mind that the filename of the image file to include must be all lowercase.
So a file named e.g. Image.JPG will not be accepted and the file named image.jpg will be accepted.
Note also that JPEG and PNG images need to have a bounding box when included into LATEX. This bounding
box can be created by the freeware program ebb.exe which comes with the dvipdfm package or
be created by LaTeXPiX automatically. To enable automatic bounding box creation in LaTeXPiX, select
”Autocreate Image .bb File” in the preferences menu (see section 6.3). The image you include in your
drawing has to be put in the same directory as the LaTeXPiX output file (extension .eepic or .pgf).
Figure 2.19 gives an example of using images in your LATEX drawings.
PNG
JPG
Figure 2.19: LaTeXPiX image test
Mind that JPEG and PNG images can only be included when using dvipdfm to convert your DVI
documents into PDF documents. See section 1.5 for more information. Also, not all types of PNG and
JPEG images can be included.
28 December 2009
N.J.H.M. van Beurden
3. Drawing possibilities
15
Chapter 3:
Drawing possibilities
This chapter will show you what you can do with the drawing objects.
3.1
Coordinates
To modify the coordinates of an object, select it and press CTRL+F1. The coordinate modification form
will appear as shown in figure 3.1:
Figure 3.1: Coordinate modification form
Only a single object at a time can be modified. From the dropdown box you can select which point of the
currently selected object you want to edit. Mind that after modification of each separate point the changes
have to be set by pressing the apply button. The close button closes the coordinate modification form.
3.2
Colour
To set the global colour press F2, to edit the colour of selected objects you have to press CTRL+F2
after selection. In both cases the colour selection form will appear as shown in figure 3.2:
N.J.H.M. van Beurden
28 December 2009
16
3. Drawing possibilities
Figure 3.2: Colour selection form
Figure 3.3 shows some of the colours that are available in LaTeXPiX though all RGB colours can be used
in your drawings.
Figure 3.3: LaTeXPiX colour test
3.3
Shade
When a object can be shaded it can be filled with a gray scale from 0 to 100%, with an incremental step
of 5%. This can be done in the ”Select Grayscale” form shown in figure 3.4:
Figure 3.4: Grayscale selection form
To set the global shade intensity press F3. To edit the shade intensity of selected objects, press CTRL+F3
after selection. Figure 3.5 shows the different shade levels possible.
28 December 2009
N.J.H.M. van Beurden
3. Drawing possibilities
17
Figure 3.5: LaTeXPiX shade test
3.4
Arrowheads
The arrowhead can be changed in the ”Select Arrowhead” form, shown in figure 3.6.
Figure 3.6: Arrow options form
All the available arrowhead styles are shown in figure 3.7 as an example. To set the global arrowhead press
F4. To edit the arrowheads of selected objects, press CTRL+F4 after selection.
Figure 3.7: LaTeXPiX arrowheads test
3.5
Line Options
The line options of most object types can be set in the ”Line Options” form which is shown in figure 3.8.
The line style can be one of the values solid, dotted or dashed. For the case when a dotted or dashed line
is chosen, the dot/dash separation can be set. The thickness of all line styles can be set as well and is
expressed in unitlengths. To set the global line style press F5. To edit the line options of selected objects,
press CTRL+F5 after selection.
N.J.H.M. van Beurden
28 December 2009
18
3. Drawing possibilities
Figure 3.8: Line options form
28 December 2009
N.J.H.M. van Beurden
4. File Handling
19
Chapter 4:
File Handling
Explanation is given on how the work with files in LaTeXPiX.
4.1
File Extensions
To save the objects in your drawing LaTeXPiX uses a special script language. You can save your drawings
by storing the script commands to file. A file with an extension .lpx will be written. When you want
to insert your drawing into LATEX you must convert the LaTeXPiX script commands into LATEX code. The
resulting LATEX command can again be save to a file with a default .eepic or .pgf extension.
4.2
Advised Way Of Working
To keep your LATEX setup clean it is advised to follow the directory and file setup as described in this
section. In most cases you want to separate the LATEX text files from any inclusions like LaTeXPiX drawings,
JPEG/PNG images or other external non-LATEX source files. From a personal point of view it is advised to
create who subdirectories in the directory where your LATEX text files (.tex) are in:
files: Here all the source files for LaTeXPiX will be put in (extensions .lpx).
pic: Here all the files converted into LATEX code will be put in (extensions .eepic or .pgf).
The given subdirectories files and pic are just examples and may have any other name. By using this
directory structure, the LATEX source files are strictly separated from the external files which are referenced
by the LATEX source code. An example directory structure is:
files/
drawing1.lpx
drawing2.lpx
pic/
drawing1.eepic
drawing2.pgf
chapter1.tex
chapter2.tex
appendix1.tex
maindoc.tex
In this example, drawing1.eepic might be used in chapter1.tex and is referenced there by
(see chapter 1.10): \LaTeXPiX{pic/drawing1.eepic}. The LaTeXPiX script file is present in the
files/drawing1.lpx file.
Important Notes For WinEdt Users: The WinEdt program is able to erase working files from
your current working environment. The current working environment equals the directory where your
LATEX source files (with extension .tex are in. By default, LATEX also creates files with a .eepic or .pgf
extension, used for creating the table of contents. If you put the converted LaTeXPiX files in your current
working environment these might/will get deleted by certain WinEdt versions when doing a clean up of
your working environment. So please follow the advised way of working with the files as described in 4.2
which prevents this issue.
N.J.H.M. van Beurden
28 December 2009
20
4.3
4. File Handling
File Associations
To be able to open a LaTeXPiX file from explorer you can associate the .lpx extension with LaTeXPiX.
Goto Settings→File Association (.lpx) to associate.
4.4
Shortcut Creation
Desktop and start menu shortcuts can be created from LaTeXPiX via Settings→Desktop
Shortcut and Settings→Start Menu Shortcuts. For the start menu, also the PDF help file
will be linked as a shortcut.
4.5
WinEdt Additions
Some accessories for WinEdt are offered to start LaTeXPiX from this very popular LATEX editor. In the
main menu choose Settings→WinEdt Additions to install a main menu item and tool bar icon in
WinEdt. The installation of these items is done fully automatically though newer/older versions of WinEdt
may not be able to cope with the current installation procedure LaTeXPiX offers. Please contact the author
is this is the case for your configuration. Figure 4.1 shows an screen shot of the WinEdt tool bar and main
menu after addition of the LaTeXPiX items.
Figure 4.1: Example of added WinEdt button for LaTeXPiX
If you have WinEdt 5.2 or lower you will have to specify the installation directory of WinEdt when asked.
For WinEdt 5.3 and higher installation should go fully automatically. WinEdt doesn’t have to be running,
if no session is found LaTeXPiX will open WinEdt for you. Note that when you get dialog messages after
starting your WinEdt sessions (e.g. a dialog that reminds you to register your WinEdt copy) the installation
will fail. In such cases you should start WinEdt before doing the installation in LaTeXPiX and click away the
WinEdt dialogs.
4.6
Open File
There are several ways to open a LaTeXPiX file (.lpx).
User Interface: Use File→Open and a file dialog will appear allowing you to browse to the file
you want to open.
Explorer: When you have associated .lpx files you can open a file by starting it from explorer.
Explorer will see that the extension is .lpx and will open LaTeXPiX accordingly. When LaTeXPiX is
already open it will ask if the file you’ve started from explorer must be loaded.
Drag & Drop: From explorer is it also possible to drag the .lpx file to an open LaTeXPiX session.
The dropped file will be opened. Again it will be asked if you want to open the dragged file when a
file is already open.
28 December 2009
N.J.H.M. van Beurden
4. File Handling
4.7
21
Save File
The first time you save a file you will be asked to specify a name for the file. After the first saving a so
called quick save will be done to the filename you specified. To quick save you can select File→Save
As from the main menu. When you are saving for the first time or when you want to change the save
file name of an already saved file you can choose File→Save from the main menu. When pressing save
button on the toolbar or pressing CTRL-S on the keyboard the quick save command will be carried out.
4.8
Merge Files
One or more LaTeXPiX files may be merged by using File→Merge. First a file has to be open. Then
the merge command can be carried out and you will be asked to open a second file which you would like
to see merged with the currently open file. Mind that after merging the save file name is unspecified to
prevent unwanted overwriting of the original unmerged drawing.
4.9
Converting To LaTeX
When your drawing is finished you can convert it into LATEX code. You can either convert it and put the
LATEX code onto the clipboard (SHIFT-.) or you can put it into a file (CTRL-.) which you can include
with the \latexpix command (see section 1.10). You will be asked to specify a directory and filename
to output the converted file to. The default extension of a output file is .eepic or .pgf, if the output
file already exists you will not be asked to confirm the overwriting.
4.10
Saving Log File
When logging is enabled via the preferences menu, a log file can be written out to help with the debugging
process. In the main menu select File→Save Log File to write out the log file to the root of the
program.
4.11
Exception Handling
Whenever a fatal exception occurs, a exception message will be created. An example of such a message
is displayed in figure 4.2. You get the choice to terminate the program or to try to continue. When
you choose to terminate the program by pressing ”Abort”, your current drawing will be saved under
LaTeXPiXcrash.lpx and the program will exit. When choosing ”Ignore”, the program will try to
continue when possible but will not save your current drawing.
Figure 4.2: Example of an exception message
N.J.H.M. van Beurden
28 December 2009
22
28 December 2009
4. File Handling
N.J.H.M. van Beurden
5. Object Handling
23
Chapter 5:
Object Handling
In this chapter it will be elucidated how objects can be drawn, moved, resized, edited and
converted into LATEX code.
5.1
Draw Mode / Edit Mode
LaTeXPiX has two modes being the so called draw mode and the edit mode. The initialisation of the object
is done in the draw mode. After the object has been initiated, you are offered to possibility to edit the
object. This is done in the so called edit mode. There are a number of edit modes:
Edit [Move]: The initiated objects can be moved in this edit mode.
Edit [Resize]: The initiated objects can be resized by modification of the initiated points.
Edit [Select]: Objects can be selected and after selected these can be moved and edited.
Edit [Extend Select]: Objects can be added to an existing (or new) selection and then be moved or
edited.
Edit [Area Select]: Objects within a specifiable area can be selected and after selection these can be
moved and edited.
5.2
Drawing Objects
A large variety of objects can be drawn. If you want to add a object to the drawing canvas you can select
the desired object from the main menu (menu Draw→ . . .), select it from the button panel or use a
shortcut key. It will be indicated in the status bar which kind of object you have selected. Moreover, it will
show how the mouse buttons and other keys can be used during the drawing of the object. Most of the
time the left mouse button we mark a point, the right mouse button will cancel the drawing. By default
the drawing pointer will be snapped to the grid. When holding down the shift you can freely move the
drawing pointer. Releasing the shift key will again active snapping to grid.
By clicking on a selected position on the canvas you can specify points. Depending on the object you are
drawing you will have to specify one or more points on the canvas. During the initiation of some objects,
their temporarily result will be shown. After you have specified all required points of the object it will be
drawn on the canvas. After the initiation of the object you will again be offered the possibility the initiate
another object of the currently selected type. If you want to cancel the drawing or want to start drawing
an object of a different type you have to press the right mouse button of the ESC key. When doing this,
LaTeXPiX will automatically be set to the edit mode.
5.3
Selecting / Grouping Objects
You can select a single object by clicking within its bounding box. For every object you initiate, an enclosing
rectangle is calculated. If you are in edit mode and the left mouse click falls within this bounding box the
object is selected. If the left mouse click falls into the area of multiple object, then LaTeXPiX will calculate
which object is the closest to where you have clicked. It will be visualised if an object is selected by painting
the object surrounding red.
N.J.H.M. van Beurden
28 December 2009
24
5. Object Handling
The object selection can be extended (be grouped) by holding down the ctrl whilst selecting the object
with your left mouse button click. If an object is already within the selected group and the left mouse
button is clicked, it will be removed from the group again. Grouping is also possible by holding down
the shift key and dragging a rectangle around the objects you want to select. When the left mouse
button is then released, whilst still holding the shift key, all the objects within the created rectangle
will become selected. During the selection of multiple objects you can see the selection rectangle you
have dragged so far. Mind however, that previously selected objects are deselected when you specify a
rectangular section to group with the shift key. Also, the possibility is provided to select all objects by
the main menu Edit→Select All. Which is equivalent to pressing CTRL+A. You deselect all objects
by Edit→Deselect All which is equivalent to pressing SHIFT+A.
5.4
Moving Objects
When you have drawn objects you are able to move them along the canvas. To be able to move objects
you have to select one or multiple objects (see section 5.3). Moving objects can then be done in several
ways:
Mouse Drag & Drop: After selecting the objects you can keep the left mouse button pressed and
move the objects freely over the canvas. Note that the selected object(s) will be move with snapping
to the grid. By holding down the shift after you have started moving the object you can freely
move the selected object(s) over the canvas. Note that you have to press the shift key after the
movement has started, else LaTeXPiX will be set to the ’Edit [Area Select]’ mode. When you release
the left mouse button the objects are locked again and cannot be moved until another move action
occurs. During movement you will see a preview of the placement.
Keyboard: When objects have been selected they can be moved by a fixed single step with aid
of the keyboard arrow keys up, down, left, right. When pressing these keys the object will
move over 1 grid distance. When you press the shift key along with the specified arrow keys, you
move the objects by one canvas point instead of one raster point. You have to press the enter key
to do the final placement of the moved objects. Again temporarily results will be shown along the
movement procedure.
5.5
Resizing Objects
Most of the objects which LaTeXPiX generates can be resized after drawing. The following list indicates
which objects can not be resized:
Dots
Vectors
Text (Frameboxes can be resized)
Instances
Only one object can be resized at a time. If you select an object you will be able to see squares around the
points you can resize. Of course, only object types which can be resized show such squares.
When using the keyboard you have to do a left mouse click within the square of the point you want to
resize. After holding down the left mouse button in the square for some time you can release it. You will
see that the square surrounding the point you want to resize is filled. Now you are able to resize the
selected point with your keyboard by holding down the ctrl key and pressing the left, right, up or
down key. Each step made by using the keyboard will comprise a single raster step. When hold down both
the ctrl and the shift keys, you are able to move the corner by a single canvas point. When you are
satisfied with the result you have to press the enter key.
28 December 2009
N.J.H.M. van Beurden
5. Object Handling
25
Resizing with aid of the mouse goes as follows. Again you have to hold down the left mouse button within
the square of the point you want to resize. By keeping the left mouse button down in the square and moving
the mouse you can resize the point. Note that by default the resizing will snap to the grid. When you want
to freely resize the point you selected you have to hold down the shift key during the movement. By
releasing the left mouse button again you finished the resizing.
In the preferences menu you can specify the amount of time you have to keep the left mouse button down
in the square around the point you want to edit. This timing limit is there because else you might incidently
resize a point when you just press the left mouse button.
The aspect ratio can be preserved when resizing the object. This can be very useful for e.g. images which
are only scaled when the aspect ratio is preserved. In order to do this the option in the main menu
Settings→Maintain object aspect ratio has to be toggled to on. This can also be done by
pressing the F11 key.
5.6
Copying Objects To Clipboard
After selection of one or more objects press CTRL-C to copy the objects to the clipboard. A benefit of
copying to the clipboard is that these objects can be pasted in new or loaded drawings.
5.7
Pasting Objects From Clipboard
After a selection of objects has been copied to clipboard you can incrementally paste them into your
current drawing by pressing CTRL-V. After copying the newly added objects will be grouped and selected.
5.8
Duplicating Objects
After selection of one or more objects press ins to copy the objects. The objects will be duplicated and
for visualisation reasons, a default offset will be given to the copied objects. After copying the newly added
objects will be grouped and selected.
5.9
Deleting Objects
After selecting one or more objects they can be deleted by pressing the del key. You be asked to confirm
the deletion of the object, when you have configured this in your preferences.
5.10
Rotating Objects
Some objects can be rotated with a step of 90 degrees clockwise or 90 degrees counter clockwise. This is
still an open issue and not completely working yet.
5.11
Sending Object To Front/Back
You may send an object to the front of other objects. Please select a single object an press pgdn to send
the object to the back and press pdup to bring the current object to the front.
N.J.H.M. van Beurden
28 December 2009
26
5.12
5. Object Handling
Redraw All Objects
It might happen that certain objects are not displayed correctly anymore, e.g. because Windows hasn’t
refreshed the screen in time. In this case, LaTeXPiX can redraw all objects again. Mind that this refreshing
of objects should be done automatically but it could happen that the automatic updates of the canvas aren’t
enough. To refresh, press the F12 function key.
5.13
Recompile LaTeXPiX script
New version of LaTeXPiX might have some modifications done within the script used to store the objects
in the drawings. So when you open a drawing made with an older release of LaTeXPiX it could happen
that the script has to be converted to meet the requirements of the newer release you are working with.
The conversion to a newer script version should occur automatically, but the command is offered for
completeness. The shortcut key is CTRL-\.
5.14
Search & Delete Redundant Objects
It could happen that certain object you have drawn with LaTeXPiX are obsolete. For example, when two
objects with exactly the same properties are placed exactly over each other they are not visible. These
redundant object can be deleted by selecting Edit→Search & Delete Redundant Objects.
5.15
Advanced Polygon / Spline Handling
Closed polygon or spline objects can be opened, vice versa, by selecting a single polygon/spline and pressing
the Backspace key. Also, when having selected a single polygon or spline object points can be deleted
by selecting the appropriate corner and pressing CTRL-DEL.
5.16
Previewing
To be able to observe the early results of your LaTeXPiX drawing you can preview it in two forms:
DVI or PDF. The DVI previewing could be done in packages like YAP, WinDVI et cetera. PDF documents
can best be viewed in Adobe Acrobat Reader.
When viewing a processed LATEX file with a DVI viewer colours may not appear, rotated text may stay non
rotated, shaded objects may not be filled with the applied gray scale etcetera. Figure 5.1 shows the result
when previewing the drawing as seen in figure 1.1 with the DVI previewer YAP:
28 December 2009
N.J.H.M. van Beurden
5. Object Handling
27
Figure 5.1: YAP user interface with preview of figure 1.1
But when converting the DVI file to PDF all of these limitations should fade. The result of PDF previewing
can be seen in figure 5.2:
Figure 5.2: Adobe Acrobat user interface with preview of figure 1.1
When a PDF preview document is already opened the program will automatically close it when viewing
the next PDF output preview.
N.J.H.M. van Beurden
28 December 2009
28
28 December 2009
5. Object Handling
N.J.H.M. van Beurden
6. Configuration
29
Chapter 6:
Configuration
6.1
Set Local Unitlength
Every pixel in your LaTeXPiX drawing will be translated into a certain length in LATEX called the
\unitlength. By decreasing the \unitlength you will get a smaller drawing and by increasing the
\unitlength you will get a bigger drawing. For every LaTeXPiX drawing you can individually set the
scale of your resulting LATEX drawing in the local unitlength menu shown in figure 6.1. This menu can be
found under Settings→Set Local Unitlength.
Figure 6.1: Local unitlength menu
The unitlength can be specified using a lot of different metric systems (i.e. mm, cm, inch, pc, pt). The
value specified will be automatically converted to mm, which is the de facto metric system within the
LaTeXPiX program.
6.2
LaTeXPiX GUI Fonts
This menu allows you to change the font properties for most of the LaTeXPiX Graphical User Interface
(GUI) items. For example, a non-standard Windows font can be chosen together with a different character
set. The option to change the GUI fonts of LaTeXPiX is offered because some languages like Chinese,
Japanese, Korean and so on use non standard Windows fonts with specific charsets. The font to use GUI
can be set via Settings→LaTeXPiX GUI Font. Figure 6.2 shows the GUI font selector menu. To
active the actual usage of the font selected with the menu, the option ”Use User Fonts For GUI” in the
preferences menu has to be checked. See section 6.3 for more information.
N.J.H.M. van Beurden
28 December 2009
30
6. Configuration
Figure 6.2: GUI font selector menu
6.3
Preferences
In the preferences menu (see figure 6.3) you can setup various global setting and options for LaTeXPiX.
You can access the preferences menu via the main menu Settings→Preferences or via the tool
panel icon.
28 December 2009
N.J.H.M. van Beurden
6. Configuration
31
Figure 6.3: Preferences menu
Offered settings are:
Snap Cursor To Grid During Draw: By default, all drawing points are snapped to grid when not
pressing the shift button. If this option is checked, the mouse is snapped to grid too.
Mouse Snap Interval: The mouse is snapped to grid during every time interval specified here. The
time interval can be specified in milliseconds here. If you have a rather slow computer, try setting
the interval to a low value.
Mouse / Resize Time: Individual objects can be selected by clicking in their bounding box. When
an object is moved with aid of the mouse we also have to click in the bounding box of the object and
then drag it. To prevent unwanted movement when individually selecting objects a timer is presented.
The left mouse button has to be kept down for a configurable amount of time before an object can
be moved. So by moving the mouse button up and down quickly you will select an object, and by
holding the mouse button down for an configurable amount of time you will be able to move the
selected object. The time to be specified is represented in milliseconds.
Grid Interspace: The space between two grid points can be configured there. The value specified
represents the number of horizontal and vertical pixels between two grid points.
N.J.H.M. van Beurden
28 December 2009
32
6. Configuration
Default Oval Radius: When drawing ovals, the corners will consist of rounded corners by putting
quarter circles in the corner of a rectangle. Here the default radius of these circles can be specified.
Default Dot/Dash Space: Here the default number of whitespace points between the dotted
and dashed line types can be specified. Windows 95/95/ME users cannot visually see the dot/dash
separation in the LaTeXPiX drawings, see 1.7 for more information on this issue.
Font Size: The size of the font to use for the text in your drawings (so not in the user interface of
the program) can be specified here. It is limited to the default font sizes that LATEX works with, being
10,11 and 12.
Default Unitlength: The default value for the unitlength, as used in the set local unitlength form
can be configured here. See 6.1 for more information.
Language: Here the language for the user interface of the program can be specified. If you want to
translate LaTeXPiX into your language.
Canvas Drawing Font: The name of the font to use in your drawings (so not in the user interface
of the program) can be selected here. You may set this to your default LATEX font to be able to
preview how your resulting drawing will look like in the LaTeXPiX user interface. Note however that
the font is not used when previewing the drawing in DVI or PDF form for here the default LATEX font
is used.
Relative Image Path: When you include image files LATEX has to know where to find these images.
The default folder to put the included images in is the root directory of your .tex source file.
LATEX will therefore expect your images to be in this directory. It you however also be that you have
put your images in a subdirectory of your source document to keep a better overview. This relative
image path can be specified here.
Save / Load / Convert Directories: These are the currently selected directories for the different
file loading and saving dialogs. To be able to start with these shown directories in an new session,
LaTeXPiX will always goto these directories. They will be automatically modified if you goto a new
directory when loading, saving or converting a file.
Autosave: The LaTeXPiX script file can be saved automatically when checking the autosave box.
The file will will be automatically stored every specified interval. The time between two saves is
given in minutes.
Minimise To Tray: Check this box if you want LaTeXPiX to minimise to tray instead of normal
minimisation to the taskbar.
Generate .bak Files: When saving your files, a backup is created of the old saved file when this
setting is on. The old saved file will have a default .bak extension and can be restored again via the
file menu File→Restore old saved file (.bak).
Show Image Names: When images are inserted the location of the image file on the hard disk can
be displayed.
Use Dotted Grid: If you want to have a dotted grid instead of a grid consisting of lines you should
check this option. But note that dotted grids take a bit longer to draw on the canvas, thus slowing
down the drawing procedure.
Confirmation Options: Several settings can be made concerning messages and confirmations. If
you do not want certain in messages and confirmations to appear then you can remove these here.
Ask Save: When active, a message will appear asking if you want to save the current file before
exiting LaTeXPiX. This question will only appear when a new drawing hasn’t been saved yet or
when a file has been modified but the modification haven’t been saved yet.
Confirm Delete Object: When active, it asks for confirmation when deleting an object or a
group of selected objects.
Confirm Make New File: When active, it asks for confirmation when the action has been chosen
to create a new file, deleting the current drawing.
Confirm Exit LaTeXPiX: When active, you are asked if you are sure to exit LaTeXPiX.
28 December 2009
N.J.H.M. van Beurden
6. Configuration
33
Confirm Overwrite Converted File: When a LaTeXPiX drawing is converted into LATEX code
and saved to file you are able to specify the output name of converted code file. Once the
LATEX code file exists and this option is set to active, you will be asked if you want to overwrite
the file each time you save the converted file. This overwrite prompt can be set off be setting
this option to non active.
Autocreate Image .bb File: Images need a so-called bounding box file (.bb file) to indicated
their dimensions in LATEX. These file can be generated by the standard packages ebb.exe which is
shipped with the dvitopdfm packages. Alternatively, these bounding box files can be automatically
generated and updated when inserting and modifying images files in LaTeXPiX. This makes the usage
of the external ebb.exe tool obsolete.
Use User Fonts For GUI: When selected, the font chosen in the ”LaTeXPiX GUI Font” menu is
actually used. Please see section 6.2 for more information. When setting this option from off to on
the user defined GUI fonts are applied immediately. But when setting this option from on to off a
restart of LaTeXPiX is needed in order to use the original Windows font.
Check For An Update Upon Startup: A check for an more up-to-date version of LaTeXPiX will
be performed when this option is set on. If off, only manual checking of possible program updates is
possible.
Log Actions: This options allows the program to keep track of internal messages, as displayed in
the statusbar. All these messages can later be saved to file for program debug purposes.
Alpha Blending (NT Only): The transparency of the entire application can be set by shifting the
bar. When no transparency at all is wanted, uncheck the alpha blending box to speed up the drawing
process. Note that transparency can only be set for NT based operating systems like Windows
NT/2000/XP.
N.J.H.M. van Beurden
28 December 2009
34
28 December 2009
6. Configuration
N.J.H.M. van Beurden
7. Future Development
35
Chapter 7:
Future Development
The following items are still under development are not implemented in LaTeXPiX:
Import functionality to process EEPIC and PGF code into LaTeXPiX.
More ruler support.
Show currently selected arrow style in arrow form or toolbar in a more advanced way.
Advanced editing of coordinates.
Full support for PGF package.
Save window position and restore this position at startup.
Arcs and Bezier curves with arrows at the end.
Including images other than JPEG and PNG like WMF and PostScript.
Ability to fill rectangles, circles, polygons et cetera with some pattern like horizontal lines, vertical
lines, diagonal lines and so on.
Filling FrameBox with a colour and when this is implemented separate the text colour from the
FrameBox fill colour as a parameter.
Automatic line wrapping following framebox boundaries.
Addition of fancy boxes as implemented in the fancybox.sty package.
Grouping of objects.
Interface to YAP. When clicking on an drawing within YAP the drawing should be opened in LaTeXPiX.
More advanced interface with WinEdt.
When starting from explorer, set the conversion directory to the directory where you executed the
file instead of the specified directory or standard LaTeXPiX directory when no specified directory is
set.
Allow relative paths when including images and instances. Now full paths to the image or instance
files has to be specified. When using relative paths the current directory of the LaTeXPiX file is taken
and concatenated with the relative path to find the origin of the image file.
Proper formula for spline drawing while there is still a small discrepancy between the LaTeXPiX view
of the splines and the resulting DVI output.
Better rotation support on all applicable objects.
Please tell me if you miss any points of improvement in the list or if you have good ideas about new items.
N.J.H.M. van Beurden
28 December 2009
36
28 December 2009
7. Future Development
N.J.H.M. van Beurden
8. Registering LaTeXPiX & Language Translations
37
Chapter 8:
Registering LaTeXPiX & Language
Translations
LaTeXPiX can be registered for free. This chapter shows you how to do this.
8.1
Requesting A Registration Key
LaTeXPiX can be registered for free, for non-commercial use, by sending me an email with some
information specified later on. You will then receive registration information via email. If you want to buy
LaTeXPiX for commercial purposes or want to financially support the LaTeXPiX project, please contact
me.
Note that all of the functions within LaTeXPiX can be used in a non-registered version, but when not
registered the number of objects in your drawing that you can convert to LATEX is limited. When registering
this limitation is removed and you can convert an unlimited number of objects. The registration number
can be found under Help→Register of the main menu. The screen that should appear, containing the
required number, is shown in figure 8.1.
Figure 8.1: Key Generator window
You need to send an email containing the following fields (please fill in everything carefully).
Required information:
Generated registry key: This key can be generated within LaTeXPiX (under Help→Register
of the main menu). This should be a 8 digit number (e.g. 98427842).
Name: Your full name, which may not contain more than 30 characters (e.g. ”John McLean”).
Nicknames are not accepted.
Additional information (not required for actual registration process):
N.J.H.M. van Beurden
28 December 2009
38
8. Registering LaTeXPiX & Language Translations
Email address when no reply should be generated: The registration file will be send via email,
by replying your sent email. If you want me to reply to another email address please notice this in
your mail. When no email address is provided I will just reply your sent email.
Notes: What do you like or dislike on LaTeXPiX.
Possible improvements to LaTeXPiX: Even small changes or personal favourites are very
welcome.
Further remarks: Some information about yourself like the country you live in, what you use
LATEX for, profession, questions, what drawing packages you have used before, etc. Just to know a
little bit more about who is using LaTeXPiX and for which purposes.
Send the email containing the specified fields to [email protected] . I will try to process your registration
request a.s.a.p. but please be patient. If you don’t receive an answer within a week, please try to send the
request again because my mailbox could be full or out of order for a while. It will be indicated in the email
you receive how to register your copy of LaTeXPiX.
8.2
Updates & Registry Keys
When you install a new version of LaTeXPiX after you have registered it is not be needed to request
another key. Your key will stay valid for all new versions of the program. If the registration procedure
changes I will notice this so you can request another key.
Please note that the registration procedure has changed and it is no longer needed to request a new key
when reinstalling Windows. The registration request number has changed with respect to older versions
of LaTeXPiX but you should still be registered when using an old key. However, after some time, the new
registration system becomes the default and user that are registered with the old keys will have to request
a new one.
The most recent, stable releases of LaTeXPiX can be found on the CTAN servers:
http://www.ctan.org/tex-archive/systems/win32/latexpix/
Moreover the CTAN versions and beta versions can be downloaded from my homepage:
http://www.beurden.cjb.net/latexpix.htm
When you goto Help→Check For An Update then LaTeXPiX will automatically check if there is a
new version available on the CTAN server. When this is the case you are asked to be redirected to the
LaTeXPiX repository on CTAN for downloading the update.
8.3
Language Translations
LaTeXPiX can be translated to your language. Please help other LaTeXPiX users to be able to work with
the software more easily. Some languages are already present but many could be added.
If you want to contribute to the translation of the program to your language, please contact the author
via email. You will then receive the necessary files and tools to translate. Since the CTAN 18 release of
LaTeXPiX the editor and translation file have been stripped from the install package and will only be send
on request.
A Vietnamese translation of this manual (by Hoa Thai) can be found on the webpage of LaTeXPiXand most
CTAN servers. The file is called: LaTeXPiX_vietnamese.pdf.
28 December 2009
N.J.H.M. van Beurden
8. Registering LaTeXPiX & Language Translations
8.4
39
Registered Users
When you have been registered your name will be placed in tables B.1 and B.2 after some time. See
Appendix B for more information.
N.J.H.M. van Beurden
28 December 2009
40
28 December 2009
8. Registering LaTeXPiX & Language Translations
N.J.H.M. van Beurden
9. History List & Known Bugs
41
Chapter 9:
History List & Known Bugs
The most recent versions of LaTeXPiX can be found on the CTAN servers
http://www.ctan.org/tex-archive/systems/win32/latexpix/ . In this chapter a list is given
containing the changes made to LaTeXPiX is subsequent versions. This chapter may
therefore contain vital information to users how are already familiar with program to see
what has been changed and what’s new.
9.1
Known Bugs
No bugs are currently known.
9.2
History List
The twentynineth CTAN release (Build 3618) has the following improvements:
Graphical facelift.
Added support for PSTRICKS (limited functionality only, still some object types left to do).
Preferences now separated into various categories using tabs.
Faster anti-aliasing implemented, still too slow for usage during drawing. Can be automatically enabled
(see preferences).
Correction on NT detection which was incorrect.
Improvements on dashed and dotted lines.
Fixed errors when zooming out, ruler not correct.
The twentyeight CTAN release (Build 3226) has the following improvements:
Some object which cannot be drawn in PGF mode (like splines) where converted incorrectly.
The twentyseventh CTAN release (Build 3198) has the following improvements:
Lines were not drawn after opening a saved drawing (thanks to Ales Pavelka for reporting !)
Rulers now also zoom when canvas is zoomed.
Improved lpx2tex plugin logging.
Pre and post amble possibility added.
Fixed bug when undo is done during drawing of objects (reported by Matthias Haselberger).
Number of free objects to draw before having to register increased from 25 to 100.
The twentysixth CTAN release (Build 3153) has the following improvements:
Rulers are now scrollable (with middle mouse button).
Saving converted file with save gave errors.
Added support for lpx2tex of Adhi Hargo. See utils in the main menu.
The twentyfifth CTAN release (Build 3085) has the following improvements:
When opening, saving or merging a file, the ’Select File’ or ’Specify File’ will no longer be shown to
prevent confusions amongst users. Suggested by Adhi Hargo.
Reduced redrawing in selection mode.
N.J.H.M. van Beurden
28 December 2009
42
9. History List & Known Bugs
Corrected invalid behaviour when using the program in non-administrator environments. Thanks to
Adhi Hargo for reporting the invalid behaviour.
Added option to deselect all objects as proposed by Adhi Hargo.
Removed object information bug, found by Adhi Hargo.
When exception is raised an email with debugging information can now be sent.
Finished zooming functionality. If you find a bug please report to the author.
Objects are converted to memo before viewing. In the old situation only the saved objects were
shown when viewing the objects. Mind that this is still the case for the converted objects viewing
(the actual code that is generated from the objects). First you have to convert the objects and only
then you are able to view what has been converted (this is for registration reasons).
Minor changes to the GUI.
Editing a coordinate when multiple coordinates are selected gave an exception. Reported by Adhi
Hargo.
Handling of invalid input of the coordinate editor.
Removed instance related items from the preferences menu.
When program update is available, the actual update message is shown.
Code optimisations and executable reduction.
The twentyfourth CTAN release (Build 2786) has the following improvements:
Spline drawing improved. Number of spline points reduced from 500 to 200 for speed up. Removed
a bug in the previewing of splines and removed memory leakage.
Possibility to draw dots in PGF output mode.
Canvas drawing area is now white to better simulate paper.
Used memory shown in statusbar of build 2670 should not have been there since it creates crashes
in Windows 9x/ME. Removed for this build.
Removed invalid image drawing when zooming.
Bounding box was not correct when rotating objects.
Current arrow style is now indicated with text in the style form.
The twentythird CTAN release (Build 2670) has the following improvements:
Major bug solved: tool crashed when not registered.
The twentysecond CTAN release (Build 2668) has the following improvements:
Scientific notation prevented when setting user unitlength. Also a bug in the unit version was solved,
output was always incorrect.
Automatically clears preview directory when output type changes.
Output mode (EEPIC or PGF) now also configurable via Settings menu of main menu.
When deleting polygon or spline point when zoomed in, the figure shrunk. When only one polygon
or spline point remains the whole object is deleted for the remaining single point isn’t visible anyhow.
Also spline drawing when zoomed in was incorrect.
The twentyfirst CTAN release (Build 2640) has the following improvements:
New registration procedure implemented. Registration request number is now less flexible and
formatting of harddisk and reinstalling Windows should have no effect on the number. The old
registration keys still work but will be phased out in half a year. Registered users will have to reregister with the newly generation request number.
Setup program renamed from lpixbeta.exe to lpxsetup.exe. Also the update file has changed from
lpixbeta.updateinfo to lpxsetup.updateinfo.
28 December 2009
N.J.H.M. van Beurden
9. History List & Known Bugs
43
Solved a lot of zooming issues but please mind that the zooming functionality still isn’t finished ! When
zooming in double magnification was done, this is corrected. Zooming with panning possibility added.
Zoom factor till 16 times (was 10 times). When zooming the gridline was not zoomed, dotted grid
was incorrect, drawing dots was incorrect, drawing objects was incorrect when scrollbars had offset.
When editing a single plain text object this was seen as a multiselect edit of the text. Bug found by
Paul Klein.
Unitlength specification can now be done in more types of units (i.e. mm, cm, in, pc, pt). Improvement
suggestion made by Edward Fondis.
In PGF mode the spline drawing possibility was offered whilst this in not possible.
Carriage return not processed during Plain Framebox and Plain Text. Bug found by Jens Linden.
LaTeXPiX log file viewing moved to main menu group ”view”.
Long single lines in the text editor were causing invalid line breaks. Now long single lines are possible.
Problem was found by Paul Klein.
Bezier thickness not taken into account in EEPIC mode preview. The ebezier.sty package (v4)
can handle Bezier thickness and was also updated in the Style Menu. This bug was found by Leonidas
Enrique de la Rosa.
Adobe Acrobat 7 document did not close during regeneration of the preview PDF. This bug was
found together with Jens Linden.
After editing objects were not redrawn.
Colour preview panel added.
Added text fields to quick menu.
Quick edit added for plain line, rectangle, square, circle, dot, vector, Bezier curve.
Coordinates displayed when clicking the mouse in edit mode.
Number of free objects to draw before having to register increased from 10 to 25.
Improved logging messages.
Automatically clears preview directory when exiting the program.
Toolbar menu now also allows editing of colour, lines, shade et cetera. When an object is selected
it is edited. When no object is selected the settings are applied globally (for new object to create).
This enhancement was an idea of Leonidas Enrique de la Rosa.
The twentieth CTAN release (Build 2500) has the following improvements:
When opening or merging files when canvas is zoomed in, the drawing was incorrectly loaded. Bug
reported by Robert Rutten.
When no objects are selected, dragging the when holding the left mouse button enables selecting of
multiple objects. Idea came from Robert Rutten.
Added more information and exception handling when the Windows registry cannot be read/written.
Thanks to Keith Mellinger for testing.
Renamed ”Generate Registration Request Number” to ”Register” and changed register procedure
to name and key only (no registry file will be sent anymore).
Stripped ebb.exe from the style installer.
Version 1.1 of latexpix.sty now in the style installer (changed legal information).
Object resizing with fixed aspect ratio went had a bug.
Undo data now created when moving or resizing objects. Also the program could crash when an
object is selected and undone.
Browsing through object shortcut key moved from CTRL+5 to CTRL+TAB.
The nineteenth CTAN (Build 2452) release has the following improvements:
Zoom functionality started (use + and – keys). Selecting, moving, resizing and drawing objects in
zoomed position is possible.
Open/close polygon/spline worked also on other objects, causing strange behaviour.
N.J.H.M. van Beurden
28 December 2009
44
9. History List & Known Bugs
Offset of horizontal and vertical scrollbars caused wrong preview markers when moving splines.
Logfile automatically saved on exit or exception when logging is put on in the preferences menu.
Program hanged when text form is closed by pressing the close window icon on the form.
Added quick editing for ovals.
Strange resize boxes appearing, bug reported by Robert Rutten.
Line number visible on viewer for script and converted files.
Changed coordinates (via edit coordinates) were not shown and screen was not refreshed. Bug
reported by Steven Harrod.
Opening preview log file had some bugs.
The eighteenth CTAN (Build 2376) release has the following improvements:
Save file as didn’t work properly.
Reduced the install size by stripping the language file and language editor, and remove the example.
Added PGF support for image inclusion.
Possibility to fix the aspect ratio when resizing. This can be toggled on or off by pressing F11. Default
is no fixed aspect ratio.
The seventeenth CTAN (Build 2332/2334) release has the following improvements:
PGF support for plain, shaded and colour ellipses as well as plain, shaded and colour circles.
Added support for WinEdt 5.4 icon addition.
Removed bug when previewing EEPIC. The colour filled ellipses and circles were always black.
The sixteenth CTAN (Build 2295) release has the following improvements:
Shifting of scrollbars from the main menu did not work. Added mousewheel support to scroll the
canvas vertically.
Preview of PGF drawings by using PDFLATEX is now possible.
Added more support for PGF: plain/shaded/color polygons, Bezier curves and arrows.
Coordinate editing added on single object (CTRL+F1).
Transferred cm/inch selection to toolbar.
Added log file viewing of output preview.
The fifteenth CTAN bugfix 2 (Build 2214) release has the following improvements:
Offset of horizontal and vertical scrollbars caused shifting of the converted drawing. This bug was
found by Robert Rutten.
Moving the text form caused an incorrect setting of the object coordinates. The new object got the
same coordinated as the last object drawn. This bug was found by Robert Rutten.
The fifteenth CTAN bugfix 1 (Build 2194) release has the following improvements:
Picture dimensions when converting to EEPIC and PGF were incorrect.
Added some more support for the PGF conversion: colour and grayscale now fully supported,
conversion of plain/shade/colour rectangles, conversion of plain/shade/colour squares, conversion
of plain/shade/colour ellipses, conversion of plain text, conversion of plain lines.
The fifteenth CTAN (Build 2171) release has the following improvements:
Completely rewritten internal database to store objects allowing faster drawing and editing of the
objects with less memory. Thanks to Robert Rutten for early testing and debugging.
PGF output functionality added, though not stable yet. Only added for demonstration purposes.
EEPIC output changed to have extension .eepic instead of .out. The PGF drawings will have the
extension .pgf. This change was moreover done because .out is already an output extension for
LATEX.
Multilevel undo and now working on more stages of the drawing process.
28 December 2009
N.J.H.M. van Beurden
9. History List & Known Bugs
45
All objects selectable with CTRL+A. Arrow drawing used to have this shortcut key and is now
assigned to CTRL+W.
Stripped buggy and more or less useless features like zoom form, instances, anti-aliasing.
When previewing PDF output, now closes all documents when Adobe Acrobat Reader is already
open. The preview PDF file couldn’t be overwritten in previous versions of LaTeXPiX because when
it is opened in Acrobat the file gets a read-only status.
Added rulers with support for centimetres and inches. Moreover, the grid distance is also controllable
from the main drawing grid.
Some preferences were not stored, thanks to Robert Rutten for finding this bug.
Crash occurred when registering manually. Thanks to the various users for pointing this out.
Set unitlength to 0.254 because in EEPIC 1 inch which equals 2.54 cm so 0.254 mm.
Transparency can be set for Windows NT based systems.
Using MDI form for drawing canvas, making toggling of toolbar redundant and offering more stable
user interface.
Using RGB colours instead of CMYK colours. This prevents unnecessary conversions and is
somewhat more accurate.
Option added to snap to grid without forcing the mouse to snap to grid too.
Log file can be save containing all statusbar messages for debugging purposes.
The fourteenth CTAN bugfix 1 release has the following improvements:
Removed some bugs from text editor concerning multiple lines. Empty lines are lines with just white
space are now automatically removed just like LATEX would do.
Removed major bug in pasting from clipboard.
The fourteenth CTAN release has the following improvements:
Added German translations by Lars Borchert.
Lowered unnecessary RGB to CMYK conversion precision for all colours.
Removed several bugs (thanks to Robert Rutten) in the text editor form and added information label
here.
Hopefully fixed the looping automatic upgrading.
The thirteenth CTAN release (Build 1423) has the following improvements:
Multi-line framebox text is now possible though actual line breaking is not applied in LaTeXPiX,
instead the line break is indicated with a symbol.
Registration information can now be entered by hand.
The twelfth CTAN release has the following improvements:
Fixed bug in text editor. When pressing backspace during typing of the text LaTeXPiX crashed.
WinEdt tool bar button and main menu addition for LaTeXPiX is now offered.
Fixed bug in the automatic check for updates when starting LaTeXPiX. This can be set off in the
preferences menu but even when off an check was always done.
The eleventh CTAN release (Build 1284) has the following improvements:
Possibility added to delete points from polygons and splines.
Preview files can now be deleted from the main menu.
Drawing of new objects is now done without dotted lines, improving visibility.
Circular arcs are now available.
The tenth CTAN bugfix 2 release (Build 1234) has the following improvements:
After resizing, drawing of new objects was performed incorrectly. Removed this major bug.
Added message when trying to open two instances of LaTeXPiX.
N.J.H.M. van Beurden
28 December 2009
46
9. History List & Known Bugs
The tenth CTAN bugfix 1 release has the following improvements:
Number of possible polygon/spline points was said to be increased to 50 but in fact only 10 points
were possible. Removed this bug.
Webupdate hung because it wants to be on top always.
Added automatic update check when starting up the program. This option can be set on or off in
the preferences menu.
Removed tips from the help menu.
Added a small section about GUI fonts in the manual.
The tenth CTAN release has the following improvements:
Open polygons and splines are now possible by pressing CTRL+BkSp when last point position has
been chosen. Pressing BkSp closes the polygon/spline.
Bug fixes in the drawing engine.
Bug fixes in the check if objects are not fully visible or invisible within the canvas area.
The ninth CTAN release has the following improvements:
New procedure for drawing and resizing squares and circles which is much more easy to use.
Bug fix in the text editor form when entering text with ’[’ and ’]’.
Now shows the bounding box of inserted images instead of the image itself during preview.
First/last point of closed polygons and spline could not be selected.
Number of polygon/spline points increased to 50.
Bug fix in arc conversion. LATEX even crashed when converting or previewing.
A grayscale of 100 percent resulted into a filling of the object with the border colour. This way
corrected by setting the grayscale to 99 percent when converting to LATEX code.
Added Polish and Japanese translations.
General LaTeXPiX GUI font can be changed, this was mainly implemented to deal with the different
charsets some languages like Japanese, Chinese and Korean use.
Removed bugs and improved the preview functionality.
When converting drawing to LATEX and saving them to a .out file you are asked to confirm the
overwriting of the currently existing converted file. This message can be set on or off by the Confirm
Overwrite Converted File option in the preferences menu.
Warnings are given when objects are outside the canvas region or not fully visible if they are partially
outside the canvas.
The eighth CTAN bug fix release has the following improvements:
On Windows 95/98/ME LaTeXPiX crashed because it could not retrieve a registry value. This
retrieval is removed for now until a good solution is found. This caused the bugfix release.
All preferences are now stored in the registry instead of in a .set file.
Added PDF preview possibility.
It is now possible to set a fixed executable path for your LaTeX executable, DVI preview and
DVI-to-PDF convertor. In the old situation is was assumed that you used latex.exe, yap.exe and
dvitopdfm.exe. Also, these files had to be specified in the Windows ”path” statement. When this
was not the case the preview process failed. Now you can set fixed paths and specify your favoriet
set of executable to use for the previewing.
Added copy and paste to clipboard commands.
The eighth CTAN release has the following improvements:
Oval radius is now editable.
28 December 2009
N.J.H.M. van Beurden
9. History List & Known Bugs
47
So called instances can now be saved and loaded again. They act like grouped objects. A number
of objects can be saved to an instance file (.lpxi) and be inserted as a grouped single object in your
drawings. E.g. a complete two input AND gate can be drawn once, saved to a instance file and be
inserted a lot of times to create a logic scheme.
Added some preferences.
Inclusion of bitmap (*.bmp) images is not possible anymore for it is not fully supported by LATEX.
Improvements made on arc drawing and conversion.
Framebox text rotation can now be specified within a range of -360..360
Movement, resizing and drawing of objects now by default snaps to grid, by holding the shift key you
can move, resize and draw freely without snapping.
Webupdate checker implemented. When a newer version is found on the CTAN server it asks if you
want to be redirected.
Major improvements and additions made to the manual. It is not finished yet but a lot better and
clearer than the previous releases.
Language editor added again. If you feel like translating LaTeXPiX into your language, please help me.
See the manual for details.
Bolditalic texts are possible.
The seventh CTAN bugfix release has the following improvements:
Bug when opening number of Bezier points form and then do further drawing.
The seventh CTAN release has the following improvements:
Changes in the dot separation are now made visible.
Overwrite prompt for conversion to LATEX file is removed.
Added links to webpage and email address in about form.
Now it is possible to specify and edit the number of points used for Bezier curves.
Changed some keyboard shortcut keys.
Added some icons to the drawpanel.
Text and framebox settings can be changed for multiple selected objects.
Removed some bugs when using drawpanel, new file, ALT key, rotate object, deletion of objects,
bitmap conversion.
The sixth CTAN release has the following improvements:
Language files and manual source file no longer shipped, if you want to receive these files contact
me.
Small visual bug removed when drawing ovals.
There was a bug in the movement of dots.
Major bugs removed involving object editing.
Shade level procedure changed, therefore a new script version was needed.
Objects are removed from the group when they are selected and already in the group.
Dotted plain ellipses, circles, oval and arcs were possible. This is not the case for LATEX thus
restrictions were built for LaTeXPiX.
When selecting a language in the preference form, it is now applied immediately. In the older versions
you first had to select the language and close the preferences form to apply the settings. Now you
can read the settings in your own language without having to reopen the preferences form.
Improved arc drawing, though not completely correct yet.
The fifth CTAN release has the following improvements:
Preview possibility added. The drawing can be previewed, LATEX will be executed and a dvi previewer
should execute.
N.J.H.M. van Beurden
28 December 2009
48
9. History List & Known Bugs
Message is shown if file cannot be read from or written to.
There were some mayor bugs in the conversion of vectors.
Question is asked to set on long filenames if this is disabled in the Windows registry. Long filenames
are needed to parse the correct filename when clicking a .lpx file from explorer.
Bug fixed for framebox rotation. When the frameboxed text is not rotated the rotating.sty package
was still required. This was fixed, no rotation now means that rotate.sty is not needed.
Bug fixed in framebox right alignment.
Sometimes the application icon was not present on the task bar.
Polygons weren’t closed properly.
Preview of rectangles and squares had a small bug.
Separate objects can be added to a selection group and can be moved, deleted and copied. The
procedure for selecting, moving and resizing objects was optimised, reducing flickering and improving
performance a lot.
Some bugs in the image insertion, editing and viewing were fixed.
The fourth CTAN release (Build 472) has the following improvements:
A panel is added to the left of the screen with some quick selection icons for drawing and file
management. It can be turned off by pressing F8 or via the main menu.
Added autosave possibility with an adjustable interval which can be specified in the preferences menu.
Removed some bugs for square and circle saving and converting.
When setting line options, colour, arrowhead or grayscale generally these settings were not always
correct anymore after editing an object.
Arrows couldn’t be resized properly at their arrowhead side. Also when arrows were resized and
moved the arrowhead did not move along.
Multiple selected objects weren’t deleted properly.
Italic and bold texts in frameboxes weren’t shown when converting to LaTeX because of an error in
the rotation command for frameboxes.
LaTeXPiX is brought on top of all windows when a .lpx file is clicked. Also the loaded filename
will now always will bear the long filename (verylongfilename.lpx) and not the short filename
(verylo 1.lpx) like was the case.
Standard directories for load, save and convert can now be chosen from the preferences menu (see
button to the right of the directory edit).
Sometimes the clipping rectangle was maintained, even after LaTeXPiX was closed or when not in
drawing mode. This bug was corrected.
General interspace for dotted and dashed lines can now be specified. Interspace per object will be
implemented later.
Added some arrow styles.
When text was entered containing brackets [ or ] an error was present because the LaTeXPiX script
file also uses brackets. This was solved by adding a script file parameter containing the length of the
text for processing.
Separation for dotted and dashed lines can now be specified.
The third CTAN release has the following improvements:
Some colordvi.sty versions caused the drawings made with LaTeXPiX to be shifted. This was
corrected, now colordvi.sty is no longer needed as one of the standard style files you have to
include.
Included build number in about box to be more precise about your current version.
Some vector and arrow related things went wrong.
Drawing canvas is now sizeable, movable and can be set to full screen. Also the snap to grid did not
work correctly in previous releases when changing grid distance.
28 December 2009
N.J.H.M. van Beurden
9. History List & Known Bugs
49
Radically improved resizing of object points.
Optimised moving of single object.
Added an adjustable hold time, preventing unwanted movement of selected objects. During a certain
amount of time the object will not move after a mousedown.
Directories for load, save and convert can now be stored using the preference menu. They will be
used as default directories every time LaTeXPiX is restarted and no directory has yet been specified.
Better rotation support for framebox text. Removed rotation option for plain text. Now rotation.sty
will be used instead of the rotate.sty which was used in previous versions of LaTeXPiX.
Replaced all hacked version of the style files by their original versions. So now you may choose to
include your style file from your LATEX distribution of from the style installer within LaTeXPiX. It
makes no difference anymore because all hacks in the style file should be replaced by other (nonhacking) methods now except for some files like curves.sty !!!.
The second CTAN release has the following improvements:
Polygons were not drawn, converted, copied or editable the right way.
New language support. Now much more can be translated. There is the possibility to translate most
of LaTeXPiX’s user interface with an editor (see help file).
Added Catalan main menu translation and some Spanish additional translations.
Message box centring.
Zoom only when on canvas.
Visual rectangle when selecting multiple objects and better multi-select support.
Merging of files gave errors
Now all possible RGB colour combinations can be used instead of some predefined ones.
Pasting an object when no object is in the memory gave an error.
N.J.H.M. van Beurden
28 December 2009
50
28 December 2009
9. History List & Known Bugs
N.J.H.M. van Beurden
Bibliography
51
Bibliography
[1] Adobe Systems Inc., ”Portable Document Format Reference Manual”, Version 1.2, 1996
http://www.adobe.com
[2] Mark Kettering, ”DVIPDFM User’s Manual”, Version 0.12.4b, September 1999
http://gaspra.kettering.edu/dvipdfm/
[3] Till Tantau, ”PGF User Guide” http://www.ctan.org/tex-archive/graphics/pgf/pgfuserguide.pdf
N.J.H.M. van Beurden
28 December 2009
52
28 December 2009
Bibliography
N.J.H.M. van Beurden
Appendix A: LaTeXPiX Keyboard Shortcut Keys
53
Appendix A:
LaTeXPiX Keyboard Shortcut Keys
Here a list of shortcut commands is given. It might not be fully updated with your current
LaTeXPiX version.
Key Combination
Function
INS
Copy & paste currently selected objects
DEL
Delete current selected object(s)
ESC
Cancel object drawing (return to edit mode)
PGUP
Move canvas up by 1 raster
PGDW
Move canvas down by 1 raster
HOME
Move canvas to top
END
Move canvas to bottom
BKSP
Ceil polygon or spline object
F1
Open PDF help file
F2
Select colour
F3
Select grayscale
F4
Select arrowhead
F5
Select line options
F6
Select text options
F7
Select image options
F8
Select oval options
F9
Select Bezier options
F10
Toggle image preview
F11
Keep aspect ratio
F12
Redraw all objects
CTRL-F1
Edit coordinates
CTRL-F2
Edit colour
CTRL-F3
Edit grayscale
CTRL-F4
Edit arrowhead
CTRL-F5
Edit line options
CTRL-F6
Edit text options
CTRL-F7
Edit image
CTRL-F8
Edit oval options
CTRL-F9
Edit Bezier options
CTRL-A
Draw plain arrow
CTRL-B
Draw plain Bezier curve
CTRL-D
Draw plain dot
N.J.H.M. van Beurden
28 December 2009
54
28 December 2009
Appendix A: LaTeXPiX Keyboard Shortcut Keys
CTRL-F
Draw plain framebox
CTRL-I
Draw plain circle
CTRL-J
Insert JPG/PNG image
CTRL-L
Draw plain line
CTRL-M
Draw plain vector
CTRL-N
Draw plain spline
CTRL-O
Draw plain oval
CTRL-P
Draw plain polygon
CTRL-Q
Draw plain square
CTRL-R
Draw plain rectangle
CTRL-S
Save file
CTRL-V
Paste selected object
CTRL-X
Draw plain arc
CTRL-Z
Undo last operation
CTRL-TAB
Browse objects
CTRL-PGUP
Send current selected object to front
CTRL-PGDW
Send current selected object to back
CTRL-DEL
Delete currently selected polygon/spline point
CTRL-BkSp
Set final polygon/spline point and leave open
CTRL-.
Convert to LATEX & save
CTRL-/
Preview PDF output
ALT-F4
Exit LaTeXPiX
ALT-D
Draw shaded dot
ALT-E
Draw shaded ellipse
ALT-I
Draw shaded circle
ALT-N
Draw shaded spline
ALT-P
Draw shaded polygon
ALT-Q
Draw shaded square
ALT-R
Draw shaded rectangle
SHIFT-D
Draw colour filled dot
SHIFT-E
Draw colour filled ellipse
SHIFT-I
Draw colour filled circle
SHIFT-N
Draw colour filled spline
SHIFT-P
Draw colour filled polygon
SHIFT-Q
Draw colour filled square
SHIFT-R
Draw colour filled rectangle
SHIFT-.
Convert to LATEX & copy
SHIFT-/
Preview YAP output
SHIFT-PGUP
Move canvas left by 1 raster
SHIFT-PGDW
Move canvas right by 1 raster
N.J.H.M. van Beurden
Appendix A: LaTeXPiX Keyboard Shortcut Keys
SHIFT-HOME
Move canvas to left
SHIFT-END
Move canvas to right
55
Table A.1: Keyboard Shortcut Keys
N.J.H.M. van Beurden
28 December 2009
56
28 December 2009
Appendix A: LaTeXPiX Keyboard Shortcut Keys
N.J.H.M. van Beurden
Appendix B: Registered Users
57
Appendix B:
Registered Users
Tables B.1 trough B.6 give an overview of the registered users of LaTeXPiX. Periodically I
will add the names so it could happen that your name is not yet in the list though you have
already registered.
Register#
Name
Register#
Name
001
Ignacio Peñarrocha Alos
002
A.J.A. Rutten
003
Jörn Gruber
004
Masashi Nosaka
005
Renato Basso
006
Viswanath Padmanabhan
007
Joseph Hilferty
008
Brian Davey
009
Anatoliy Malyarenko
010
Charles B. Cameron
011
Jean-Marie Beckers
012
Nguyen Thai Son
013
Karim Bajestani
014
Manfred Beer
015
George Radutsky
016
Vasiliy Sklyarenko
017
Guy Laroque
018
Jan Rubak
019
Stefan Maus
020
John Hillas
021
Jason T.H. Lee
022
Deng Ke
023
Anders Åslund
024
Bayron A. Delgado
025
Marina L. Logares
026
Tim Alderson
027
Corneliu Sochichiu
028
Rosy Atmadja
029
Patsis N. Panagiotis
030
Benjamin Hinrichs
031
Edmundo A. Marques F.
032
Felipe Lora
033
Miguel Hernandez
034
Daniel Nash
035
Daniele Giorgio Degiorgi
036
Qi Yan
037
Bernd Dettmer
038
Robert Rohrkemper
039
Javier Fuentes
040
Mohamed Sobrani
041
Erwin Bruning
042
Claudio Jose Struchiner
043
Annette de Meij
044
Aref Meddeb
045
Alexander Bukhvalov
046
Cheng Lei
047
René van der Heijden
048
Claus Greiber
049
Ratael Torres
050
Henk Kelderman
051
Falko Fecht
052
Pascal Lando
053
Mamoun Gadir
054
Eduardo Costa
055
Eric Leclercq
056
Juan Antonio Vera Lopez
057
Stefan Mecke
058
Daniel Badenhorst
Table B.1: Registered users (part one)
N.J.H.M. van Beurden
28 December 2009
58
Appendix B: Registered Users
Register#
Name
Register#
Name
059
David Pluntze
060
Jorge Cobb
061
Nikolay V. Redko
062
Ronald Fischer
063
Dirk Smits
064
Janos Fodor
065
Ryszard Walentynski
066
Teck Wong Soon
067
Peter Dahms
068
Luis González
069
Alexander Sellerholm
070
Daniel Olaru
071
Lena-Luisa Heß
072
Giuseppe De Arcangelis
073
Karsten K. Krueger
074
Arba Minch
075
Rob Tinch
076
Qing Zhang
077
Atique Malik
078
Sigvald Hansen
079
Toh Wee Teck
080
Gail Rosen
081
Martynas Manstavicius
082
W.R. Johnstone
083
Marcel Neitsch
084
Jason R. Lewis
085
Peter Zimmermann
086
Todor Todorov
087
Cristian Neculaescu
088
Juliana Doshkova
089
Zhao Jiayi
090
Giorgio Fazio
091
Imran Nyazee
092
António Caleiro
093
Omar Seawolf
094
Gert Tamberg
095
Albert Troesch
096
Fabrice Collard
097
Benno Bucher
098
Vaquero F. P. Agustí
099
Steve Vanlanduit
100
Fernando Bastos
101
Dimitri Jeltsema
102
Yanjun Wen
103
Nicolas Marchand
104
Constantin Trushkin
105
R. Ermers
106
Ahmad Khayyat
107
ATK Slawek
108
Haysam I. Dahman
109
Ryan Aycock
110
Peter Rupert
111
Paul Klein
112
Abdelali El Aroudi
113
Hendri Adriaens
114
Milan Sykora
115
Peter Skirka
116
Ignasi Furió
117
Danie Els
118
Arupratan Daripa
119
Janusz Kawczak
120
Adam Kumiszcza
121
Rohit Trivedi
122
Blaz Kmetec
123
Katarina Roskar
124
Bernard Salanie
125
Manfred Kirschhock
126
Rudy Prabowo
127
Alois Krähenmann
128
Heiner Richter
129
Juan Antonio B. Bauzá
130
Joan Miralles Ramis
131
Guillem Femenias Nadal
132
Werner Goldbaum
Table B.2: Registered users (part two)
28 December 2009
N.J.H.M. van Beurden
Appendix B: Registered Users
Register#
59
Name
Register#
Name
133
Egon Alber
134
Ammar Qusaibaty
135
Abdelmajid Hilali
136
Alexandre Leblanc
137
Boulag Mohamed
138
Sabah Pouzet
139
Oscar Campo
140
Costas Drossos
141
Paul Pontikis
142
Frederic Cucotti
143
<Secret>
144
Jusoh Yacob
145
LJ del Pozo
146
Martin Scholz
147
Bryn Jones
148
Arndt Baars
149
Mahdiyar Noorbala
150
Daniel Soll
151
Eugene Danicki
152
J. Antonio Seijas Macías
153
John Stiekema
154
Argyrios Zolotas
155
Mahmud Yunus
156
Theo Tuwankotta
157
Joris Naudet
158
Guillermo Coronado
159
Abdel-Rahman Jaradat
160
Magella Bédard
161
Chris Finch
162
Ruben Manvelyan
163
Eric Chin
164
Greg Georgalli
165
Priscilla Tse
166
Sylvain Leirens
167
Zofia Walczak
168
Kristina Sjösten
169
Eric Swenson
170
Attila Szegedi
171
Adel Bouchareb
172
Philippe Grégoire
173
Lars Borchert
174
Thomas Bonk
175
Samuel Setiyanto
176
Amir Wasim
177
Gerd Richter
178
David Steward
179
Tanczos Andras
180
Pere Mumbrú
181
Bernhard Nessler
182
Georgiy Shevchenko
183
Giorgos Tsapogas
184
Mehdi Chelbabi
185
Reza Danesfahani
186
Massimo Caschili
187
Philippe-Aubert Gauthier
188
Peter Sigmund
189
Charles Varin
190
Vasile Anastasoaei
191
Elefterie Olaru
192
Ivan Loncar
193
Victor Huertas Navarro
194
Otmar Bender
195
Ardi Bozon
196
Bjørn Sandvik
197
Pierre Bach
198
Pirouz Djoharian
199
<Secret>
200
Henning Heinze
201
Michael Bergman
202
J. Rao
203
Ausberto S. Castro V.
204
Ichiro Otsuka
205
Mayuresh Mukadam
206
Gerard Boland
207
Otto Icke
208
Tom Fransson
Table B.3: Registered users (part three)
N.J.H.M. van Beurden
28 December 2009
60
Appendix B: Registered Users
Register#
Name
Register#
Name
209
Steven Harrod
210
Nguyen Anh Minh
211
Addison Rios
212
Jeong-Mo Yang
213
Gustavo Cevolani
214
Lothar Fröhling
215
Tony Harker
216
Giovanni Facchini
217
Paddy Ewer
218
Vladimir Korzhik
219
Ole K. Hardangen
220
Ed Pegg Jr.
221
Louis Hotte
222
Yvon Tharrault
223
Maja Królak
224
Tim Neijens
225
Charalampos Charitos
226
Ioannis Papadoperakis
227
Costel Ionita
228
Erwann Delay
229
Sergio Celani
230
Carla Victoria V. Negret
231
Kim Mittendorf
232
Ondrej Knot
233
Till Priemer
234
Nico Feiertag
235
Pierre Leroy
236
Marko Dräger
237
Farooq Azam
238
Miko Csilla-Borbala
239
Jaime Ide
240
Benoit Chevallier-Mames
241
Swatdipisal Khatathap
242
Roman Zeiß
243
Sungpyo Hong
244
Sotirios D. Hassapis
245
Andrei ???
246
Marc Augier
247
Daniel Hawellek
248
Marc Wendisch
249
Andrea Sorbi
250
Ted Kok
251
Christophe Tartary
252
Jeffrey Olson
253
Yannick Pannier
254
Liu Huikan
255
Henrik Sandler
256
Josep Magell
257
Keith E. Mellinger
258
Winfried Recknagel
259
Aidan Sims
260
Dinesh J. Karia
261
Derek Collis
262
Yazan Hussain
263
Anthony Gerard
264
Umar Mwidu
265
Tusiime Swaleh
266
Zara Field
267
John M. Kihoro
268
Michael K. Nganda
269
Yunjiang Jiang
270
Victor Romanenko
271
Helge Rütz
272
Sebastian Wasiuta
273
Paul Walker
274
Guillermo Montes
275
Ulysses Sodré
276
Antoni Lesniewski
277
Marc Meise
278
Günther Lang
279
Michael Zhukov
280
Arjen Mulder
281
Jose-Victor Rios-Rull
282
Raphael Ruppel
283
Jerald Harris
284
Jos Soeiro de Carvalho
Table B.4: Registered users (part four)
28 December 2009
N.J.H.M. van Beurden
Appendix B: Registered Users
Register#
61
Name
Register#
Name
285
Kris Smolders
286
Jac Romme
287
Art Bleukx
288
Jens Strabo Hummelshoj
289
Sido Jensma
290
Cristina Vila
291
Sunil M. Pande
292
Tim Christoffel
293
Stephan Gaschler
294
Antonio José Ocaña Ávila
295
David Zmiaikou
296
Antonio Jos Ocaa vila
297
Hans-Joerg Schmerer
298
Iris Steenhout
299
Valeriana Colao
300
Greg Johnson
301
Comet Cloudy
302
Wojciech Myszka
303
Latifa Faouzi
304
Dirk Keppens
305
Frank Petitjean
306
Jens Linden
307
Joo Vitor Torres
308
Tihomir Tenev
309
Leonidas E. de la Rosa
310
Valdete Maria da Silva
311
Cornelius Koot
312
Stefan Weigert
313
Kenneth Hong
314
Till Stensitzki
315
Ben Moss
316
Roberto Pesce
317
Allison Piccolo
318
Charles Chimedza
319
Sean Droms
320
Laszlo Toth
321
Ryan C. Platt
322
David Clarke
323
Gardner Marshall
324
Oliver Gaberle
325
Ruben Agapito
326
Julian Russell
327
Ernest Afari
328
Edward Fondis
329
Toomas Hinnosaar
330
Bob Koch
331
Mario Fiorini
332
Geoff Webb
333
Stephan Matos Camacho
334
Zoltan Szabo
335
Jean-Jacques Mathieu
336
Jason Trounce
337
Ayan Kumar Bandyopadhyay
338
Pencho Sabev
339
Maurizio DEliseo
340
Xiang Zheng
341
Lev Glebsky
342
Nguyen Huu Dien
343
Marie-Luise Queeleit
344
Hsiu-Ting Yu
345
Randall Helmstutler
346
Stefan Sjörs
347
Markus Stadler
348
Toan Tran Van
349
Beljith Perunthileri
350
Horst Mischik
351
Bartolome Barcelo
352
Ta Tuan Thanh
353
Miguel de la Torre
354
Adhi Hargo
355
Subiono
356
Matthias Haselberger
357
Nguyen Tien Diep
358
Ilya Shutov
359
Fermin Acosta
360
Bruno Lazarotto Lago
Table B.5: Registered users (part five)
N.J.H.M. van Beurden
28 December 2009
62
Appendix B: Registered Users
Register#
Name
Register#
Name
361
Juan Carlos Del Valle
362
Jonathan Cornell
363
Vu Xuan Dung
364
Karl Gabriel
365
Pascal Picard
366
Markus Lazanowski
367
Andrew Lewis
368
369
Dudley Cooke
370
371
Eugenio Guevara
372
373
Joseph Carilus Ogwel
374
375
Zenon Erendon
376
377
Suraj Shrestha
378
379
Gemma Nicholson
380
381
Moritz Brendel
382
383
Jovan Golic
384
385
Soren Dalsgaard
386
387
Robert Luke
388
389
Alexander Wipfler
390
391
Tim Schnakenberg
392
Table B.6: Registered users (part six)
28 December 2009
N.J.H.M. van Beurden
Appendix C: LaTeXPiX Script Language (lpx format)
63
Appendix C:
LaTeXPiX Script Language (lpx format)
To be able to store objects, a dedicated language was developed by the author called the lpx
format. The description of this format is in this appendix and may be used without warranty
for third party tools and scripting.
C.1
Global Line
The first line of the lpx file is always the so called ”Global command line”. This line is recognised by
the first and last character being a dollar sign $. Moreover, the string ”GlobalOptions” is always used.
Currently there are no global lines other than the ”GlobalOptions”. But in the future the global lines might
be extended, for example to indicate global groups of objects which should be kept together. Example of
the global options tag:
$GlobalOptions[sv]3[uu]0.254[bu]2870$
C.2
Global Tags
Tags used in the global line are:
[sv ]: script version. Indicates the version of the lpx script being used in the file. Currently version 3 of
the lpx format is in place.
[uu ]: user unitlength. Here the unit length as customised by the user is stored. See section 6.1 for more
information.
[bu ]: build number. This indicates the build of LaTeXPiX from which the lpx file was written out.
C.3
Object Lines
Each object drawn in the LaTeXPiX graphical user interface is stored in a single line, called ”Object Line”.
It contains the object type, followed by a series of tags describing the object represented. Each object
has a different class of tags in order to specify the object. When, for example, a rectangle is drawn, only
2 coordinates are required. Whereas, drawing a polygon requires a flexible number of coordinate tags,
depending of the number of points contained in the polygon.
The object lines are recognised by the first and last character of the line, being a hash sign #. Some example
of object lines are:
#PlainRectangle[pc]$000000FF[pw]1[ds]6[ps]psSOLID[x1]234[y1]174[x2]468[y2]402[b1]234[b2]174[b3]468[b4]402#
#PlainFrameBox[pc]$00C08080[fs]fsNORMAL[ta]cc[tr]90[tl]2[tx]CC[x1]216[y1]90[x2]246[y2]120[b1]216[b2]90[b3]246[b4
C.4
Object Tags
[pc ]: pen colour. These represent colours as used by Delphi and C++. Hence you might encounter
a 8 digit string prefixed with a dollar sign (like $00C08080) or a string representing the colour
(e.g. clRed). This might be confusing and I propose to implement only the 8 digit string instead of
using predefined colour strings.
[pw ]: pen width. Digit greater than 0 which indicated the thickness of the objects contours.
N.J.H.M. van Beurden
28 December 2009
64
[ps
[pb
[ds
[x.
[y.
[b.
[tx
[tl
[ta
[tr
[pn
[fs
[sh
[in
[iw
[ih
[as
[or
Appendix C: LaTeXPiX Script Language (lpx format)
]: pen style. Can be a single element of collection psSOLID, psDOT or psDASH.
]: number of points to use for Bezier curves.
]: dot space. When drawing dotted lines this number indicates the space between the dots.
]: x coordinates. The dot indicates a number. Horizontal and vertical coordinates always come in
pairs and are sequential. That means, first [x1], then [y1], then [x2], followed by [y2] et cetera.
]: y coordinates. See x coordinates.
]: bounding box. Indicates the largest enclosing rectangle around a object. A bounding box always
has exactly 4 coordinates which are sequential. Id est, [b1], [b2], [b3] and [b4].
]: text. Contains the text string.
]: text length. This token was included to allow the user to specify brackets in the text string ([tx]
tag) without difficult processing in the LaTeXPiX source code. This tags is always used in combination
with the [tx] tag and always should come before the [tx] tag.
]: text alignment. Is a string of length two. This first character represents the horizontal alignment,
the second character represent the vertical alignment. Possible character values are l (left), r (right)
or c (center).
]: text rotation. Indicates the rotation of the text in degrees. Ranges from 0 to 359 degrees.
]: polygon number. Represents the number of points a polygon contains.
]: font style. Can be one of the following: fsNORMAL, fsBOLD, fsITALIC, fsBOLDITALIC.
]: shade intensity. When drawing shaded objects the intensity of the gray scale is indicated between
a value of 0 (fully white) and 100 (fully black).
]: image name. Indicated the absolute path to the included image file.
]: image width. Represents the width in unitlengths of the inserted image.
]: image height. Represents the height in unitlengths of the inserted image.
]: arrow style. Holds the arrow style as chosen from different predefined styles. The style is a integer
number.
]: oval radius.
28 December 2009
N.J.H.M. van Beurden
About The Author
65
About The Author
N.J.H.M. van Beurden lives in Tilburg, the Netherlands. In 1999 he got
a Bachelor (B.) degree in Electronic & Electrical Engineering from Fontys
Hogescholen Eindhoven and in 2003 he got a Master of Science M.Sc. degree
in Electronic & Electrical Engineering at Eindhoven University of Technology.
Currently he is working at NXP Semiconductors in the Netherlands as a
Integrated Circuit Design Engineer.
N.J.H.M. van Beurden
28 December 2009
66
28 December 2009
About The Author
N.J.H.M. van Beurden
List Of Figures
67
List Of Figures
1.1
1.2
LaTeXPiX user interface
Style File Installer
2.1
2.2
2.3
2.4
2.5
2.6
2.7
2.8
2.9
2.10
2.11
2.12
2.13
2.14
2.15
2.16
2.17
2.18
2.19
LaTeXPiX lines test
LaTeXPiX vectors test
LaTeXPiX arrow test
LaTeXPiX bezier test
Bezier options form
LaTeXPiX arcs test
LaTeXPiX rectangles test
LaTeXPiX squares test
LaTeXPiX polygon test
LaTeXPiX spline test
LaTeXPiX ellipses test
LaTeXPiX circles test
LaTeXPiX ovals test
Oval options form
LaTeXPiX dots test
LaTeXPiX text test
LaTeXPiX framebox text test
Text editor form
LaTeXPiX image test
7
7
8
8
8
9
9
9
10
10
11
11
11
11
12
12
13
13
14
3.1
3.2
3.3
3.4
3.5
3.6
3.7
3.8
Coordinate modification form
Colour selection form
LaTeXPiX colour test
Grayscale selection form
LaTeXPiX shade test
Arrow options form
LaTeXPiX arrowheads test
Line options form
15
16
16
16
17
17
17
18
4.1
4.2
Example of added WinEdt button for LaTeXPiX
Example of an exception message
20
21
5.1
5.2
YAP user interface with preview of figure 1.1
Adobe Acrobat user interface with preview of figure 1.1
27
27
6.1
6.2
6.3
Local unitlength menu
GUI font selector menu
Preferences menu
29
30
31
8.1
Key Generator window
37
N.J.H.M. van Beurden
2
5
28 December 2009
68
28 December 2009
List Of Figures
N.J.H.M. van Beurden
List Of Tables
69
List Of Tables
A.1 Keyboard Shortcut Keys
55
B.1
B.2
B.3
B.4
B.5
B.6
57
58
59
60
61
62
Registered users (part one)
Registered users (part two)
Registered users (part three)
Registered users (part four)
Registered users (part five)
Registered users (part six)
N.J.H.M. van Beurden
28 December 2009
70
28 December 2009
List Of Tables
N.J.H.M. van Beurden
Index
71
Index
A
known bugs
arcs
circular
elliptical
arrowheads
arrows
8
8
17
7
B
Bezier curves
8
C
circles
colour
commands
convert to LATEX
coordinates
11
15
6
21
15
D
dots
draw mode
drawing objects
dvipdfm
12
23
23
3
E
edit mode
eepic
ellipses
epic
exception handling
23
2
10
2
21
F
file associations
file extensions
files
merging
opening
saving
20
19
21
20
21
23
29
H
history list
41
I
images
K
N.J.H.M. van Beurden
L
language translations
line options
lines
local unitlength
log file
38
17
7
29
21
O
objects
copying to clipboard
delete all redundant
deleting
duplicating
move
pasting from clipboard
redraw all
resize
rotating
send to front / back
ovals
25
26
25
25
24
25
26
24
25
25
11
P
pgf
polygons
drawing
editing
preferences
previewing
pstricks
3
9
26
30
26
3
R
recompile LaTeXPiX script
rectangles
registering
26
9
37
S
G
grouping objects
GUI font
41
14
selecting objects
shade
shortcuts
splines
drawing
editing
squares
sty files
system requirements
23
16
20
10
26
9
4
1
28 December 2009
72
Index
T
text
framebox
plain
12
12
uninstalling
user interface
6
1
U
V
vectors
7
W
way of working
win 95/98/ME notes
WinEdt additions
28 December 2009
19
3
20
N.J.H.M. van Beurden