1
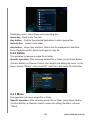
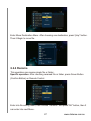
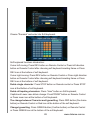
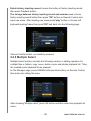
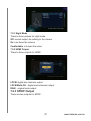
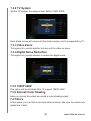
Table of Contents
End user license agreement.......................................1
Precautions..................................................................1
Function introduction..................................................2
USB compatibility........................................................ 2
System..........................................................................3
Getting Started ............................................................6
The main interface.......................................................11
Movies...........................................................................13
Video playback....................................................................................12
View video files....................................................................................15
Document processing..........................................................................18
Photo.............................................................................18
Photo playback....................................................................................19
Browsing photo.................................................................................... 20
File processing.....................................................................................21
Music................................................................................................21
Music playback....................................................................................21
Music files browsing............................................................................22
File management....................................................................... 23
Browse files......................................................................................... 24
Files/folders editing..............................................................................25
System setting............................................................................ 33
System.................................................................................................33
Audio....................................................................................................36
Video....................................................................................................37
Others..................................................................................................39
Product Specification..............................................................41
1. End User License Agreement
Please read this Agreement before using this product. You promise:
1.Do not dismantle this product for unwarrantable reason.
2.Do not read and renovate firmware of this product.
3.Do not apply reverse engineering and disassembling to the related software
and code of this product.
4.This product and license agreement could be transferred to the third party
under the precondition that the third party accept these items and conditions.
Your usage license is invalid automatically once the complete or part of the
product is transferred to the third party.
About user’s manual:
User should read this manual carefully before using. We are not responsible
for the direct or indirect losses caused by hardware damage, program damage,
file lost and system breakdown as a result of improper operation. Please
understand!
Now you must have read this carefully, understood this and agreed to abide
by every item.
2. Precautions
Respectable clients, thank you for purchasing this product. Hope that you
can have fun with our product. Please carefully read the following precautions
before using.
●Do not expose this device in the rain or wet environment so as to prevent
fire or electric shock.
●To reduce fire risk, electric shock or product damage, please prevent it from
rain, humidity, and water.
Safety instruction
1.Do not put the plug near heat resource.
2.Do not put heavy objects on the plug.
3.Do not disassemble and fix the power line.
4.For your safety, do not open this cabinet to expose the inner component.
For maintenance, please ask for professionals.
Maintenance tips
1.Since this device is very complicated, only the professionals could open the
device in order to avoid damage to the device.
2.Users can not disassembly components optionally. Maintenance warranty is
invalid if the machine is opened privately.
3.If it indeed needs fixation, please contact the local maintenance department.
4.If parts or accessories need replacing, repairer must use the accordant
original components.
1
www.dxtreme.com.au
3. Function Introduction
1.Support discs of AVCHD/DVD/DVD+RW/DVD+R/DVD-R/CD/CD-R/DC-RW
format.
2.Play multimedia content stored on storage device inserted in USB, SD/MMC/MS
interface. Acceptable format: mkv, ts, m2ts, tp, trp, avi, wmv. rm, rmvb, mpeg,
mpg, mp4, vob, mov, iso, dat, asf; support H.264(AVC HD), VC-1 (WMV-HD),
MPEG-2 HD,MPEG-1, MPEG-4, Xvid and other video code.
3.Support U hard disc, USB mobile hard disc, SD/MMC.MS card. Copy and
delete files in those storage devices.
4.Support coaxial output, browsing pictures with music; support HDMI, YPBPR
and CVBS video output.
5.Stereo sound output.
6.Support multi-language OSD language.
7.Support various file play.
8.Support external caption:66$60,65768%DŽ
4. USB Compatibility
1)This system supports USB1.1 and USB 2.0 (high speed and low speed)
agreement. USB component includes USB storage devices, such as mobile
hard disc, U hard disc and MP3 player, memory card reader (support SD,
MMC, Memory Stick, MS Pro and mother types of memory cards).
Notes: theoretically it supports most of USB storage devices without driving.
2)File system of USB storage device:
a)Support multi-partition mobile hard disc.
b)Support FAT12/6/32, NTFS. FAT32 is recommended.
Supplement :
Based on USB1.1 Agreement, maybe some video images with especially high
speed can not be played fluently because of data reading speed of the USB
device and fragmentary file in the file system. We suggest using storage device
of USB2.0 High speed interface agreement.
2
www.dxtreme.com.au
SYSTEM
FRONT PANEL
1
Receptor IR
SIDE PANEL
1
86%
2
86%
3
6'00&06
BACK PANEL
7
1
2
3
4
5
6
8
Digital Coaxial Output
HDMI Output
Power
DC IN
Y/PB/PR Output
CVBS Output
Right AudioOutput
Left Audio Output
3
www.dxtreme.com.au
Remote Control
4
www.dxtreme.com.au
No.
Key
Function
Power on or off.
Choose number key.
*272Select playback-place directly.
6/2:Slow the formal play motion.˄ˈˈˈˈ;˅
=220=2203KRWR˖;;;;=2209HGLR˖;;;;;
"-" debase current volume;"+"rise current volume.
3OD\RU3DXVH
6WRS
Fast Rewind;Fast Forward
Left,Right,Up,Down.
0(180(18
7<6<6 Standard Switch.
$8',2Switch among 2 CH,5.1CH and other channel output models.
Red button
Green button
0XWH
,1)2time indication, title indication,chapter indication.
Setup repeat play segment.
5(3($7Repeat play the current chapter.
Skip to the previous file;Skip to the next file.
Skip button: rewind play about 10 seconds; forward play about 30 seconds.
(QWHU
5(78515HWXUQ
237,21Call out the Actions menu。
68%7Select subtitle of disc supply or cancel subtitle.
Open or close disc tray of USB DVD Rom.
5
www.dxtreme.com.au
Getting Started
Installation Requirements
• Standard or with an HDMI or composite audio/video input
• USB storage device with a USB 2.0 connector
Installation Procedure
The media player installation procedure is outlined below:
1. Transfer content from your computer to the USB storage media.
2. Connect the media player to your TV or entertainment unit through the
desired interface option.
3. Connect the power cable and net.
4. Connect the USB device or CARD containing your media content.
Step 1 - Loading Content onto your USB Drive
Transfer your favorite media files to your external USB drive,(external USB
drives not included).
Step 2 - Connecting the Power Cable
1. Connect the power cable to the media player’s DC connector, and
then plug the opposite end into an AC power outlet. The media
player powers up automatically.
6
www.dxtreme.com.au
Wait a few seconds for your TV to detect the media player. If the media
player is not detected, you may need to change the input source on your TV
to HDMI or composite, depending on your connection. Check the user
documentation of your TV for more information.
Once the media player is detected, the splash screen displays to indicate
system bootup, then the home screen of the user interface opens.
Step 3 - Connecting the Media Player
The following figures illustrate the cable connections supported by the
media player. The standard connection uses the included composite AV cables.
Choosing the Best Connection
The quality of the picture produced by your TV depends on the quality of your
TV and its connection to the media player.ConnectionQualityConnectors
Connection
Quality
Connectors
HDMI
Best
Specialized, high-definition connector
Composite
Good
•
Yellow = video
•
Red = right audio
•
White = left audio
7
www.dxtreme.com.au
HDMI (High Definition)
Digital Audio (High Definition)
Composite AV Connection (Standard Definition)
To use a composite connection:
1. Plug the yellow (video), red (right audio), and white (left audio) connectors
into their respective ports on the media player.
2. Plug the opposite ends into the composite input ports on your TV, yellow to
yellow, red to red, and white to white.
3. Select the appropriate TV input source.
HDMI Video and Audio (High Definition)
HDMI combines high-definition video, multi-channel audio, and inter-component
control in a single digital cable. This interface provides video quality resolution
of up to 1080p.
To connect your media player using an HDMI cable:
1. Plug an HDMI cable into the HDMI connector on the media player.
2. Plug the opposite end into the HDMI port on your TV or audio/video system
(if available).
8
www.dxtreme.com.au
As an option, for higher quality multi-channel audio:
3. Plug a coaxial cable into the coaxial connector on the media player.
4. Plug the opposite end into the coaxial digital port on your receiver or home
theater system.
5. Select the appropriate TV input source.
Home Theater (High Definition)
To connect a home theater system:
1. Plug an HDMI cable into the HDMI connector on the media player.
2. Plug the opposite end into the HDMI In port on your A/V receiver.
3. Plug an HDMI cable into the HDMI Out port on your A/V receiver.
4. Plug the opposite end into the HDMI port on your TV (if available).
5. Select the appropriate TV input source.
External drive not included
Step 4 - Connecting a USB Device
9
www.dxtreme.com.au
The media player has two USB ports that supports playback from USB
external drives.
To connect the USB device:
1. Connect the USB device to either of the media player’s USB ports.
External drive not included
External drive not included
2. Wait for a few moments while the media player scans the USB device for
media files.
10
www.dxtreme.com.au
2.The Main Interface
Once turning on device, it will enter into Main Page. Figure: 2-0-1
Figure 2-0-1
In Main Page, press right and left direction button on Remote Control, it can
choose any icons for Main Page. After choosing one icon, press OK button on
remote control and then enter into this icon option. Each icon option instructions
are as following:
Movie: Only display video files in Movie option。
Photo: Only display photo files in Photo option。
Music: Only display music files in Music option。
File Manager: If all external storage devices are connected into unit, all files of
these external storage devices are displayed in File Manager; such as: U-disk,
CARD,USB drive etc. And the unit will scan all external devices after connected
with it, and also classify all scanning files into different options (Movie, photo,
Music). In File Manager, it can take playback,editing etc operation for movie,
photo and music files in U-disk, CARD。
Note: Since we only can read the Disk, the files in Disk can't join in Movie, Photo,
Music option。
System setup: It can do some functions setup in System Setup, such as system,
sound, video, etc。
3. Movies
In the movie option, it can display all video files in external storage device. Here
you can browse and play these video files. Select movie option on main page and
11
www.dxtreme.com.au
press OK to enter into movie option. As shown in figure 4-0-1。
Figure 4-0-1
3.1 Video Playback
In the movie option, select the video you wanted with the arrow keys on remote
control, then press OK key on remote control or play button to play the selected
video with full screen. During playback, you can press the following keys on
remote control to achieve a number of operations, here as follows:
▲
Button
Function
Jump to last 10 seconds。
▲▲
▲▲
▲
▲▲
Jump to the next 10 seconds。
Forward at 1.5x, 2x, 4x, 8x, 16x, 32x times。
Backward at 1x, 1.5x, 2x, 4x, 8x, 16x, 32x times 。
▲
▲
Switch to next chapter or t video。
Switch to previous chapter or video。
Zoom
Zoom in at 2X, 3X, 4X, 8X times。
Stop/return
Stop playing video。
Play/Pause
Pause playback。
Jump to the last 10 seconds。
Jump to the next 30 seconds。
Display the related information for the video under playing. As shown
INFO
in figure3-1-1。
12
www.dxtreme.com.au
Figure 3-1-1
Repeat: Switch repeat playback mode. Or press the "option" key to select repeat
mode。
Skip playing with time or chapter. You can bring up the search menu by
press option on remote control—skip playing. There’re three jumping
ways: time, chapter and section. By using left/right keys on remote control
Search: to select the option you required, up/down keys to adjust the value, then
press OK to jump to the point you set up. If the search menu has been
brought up, press search or return keys can exit the search menu。
Bring up subtitles setting menu. Also you can press” option” button to bring
up the subtitle setting menu. As shown in figure 3-1-2。
In the subtitle setting menu, you can set the types, vertical offset, size,
Subtitles: time migration, coding and colors for subtitles. Use left/right arrow keys to
select setting box, up/down arrow keys to adjust the value or option in
caption box, then press OK to save the setting. You can exit the subtitles
setting menu by press title or return key。
Bring up audio setup menu . Or you can press the "option" key to select
Audio the "audio" option in the settings menu to bring up the audio track. As
shown in figure 3-1-3。
13
www.dxtreme.com.au
Figure 3-1-2
Figure 3-1-3
Use up/down keys on remote control to select the tracks, then press OK to save
the settings. Press audio or return key to exit the audio setup menu。
Press “option” on remote control to select the video setting to enter into video
setting menu. As shown in figure 3-1-4。
Figure 3-1-4
14
www.dxtreme.com.au
In this menu you can set the brightness, contrast, chroma and color phase.
Use up/down keys on remote control to select the item you want to set, left/right
key can be used to adjust the item you selected, press OK or return button to
save it and exit the video setting menu.
DVD menu, when playing DVD (the DVD has DVD menu), you can enter into
DVD main menu page by pressing option on remote control and select the DVD
menu. As shown in figure 3-1-5。 Figure 3-1-5
3.2 View Video Files
In movie menu, you can bring up the operation menu by press option on remote
control. As shown in figure 3-2-1. In operation menu, you can select the files
browsing modes by press up/down keys on remote control, press OK to switch
to the modes you selected. Moreover, by pressing display key can switch among
three modes, such as thumbnails view, list view and preview 。
Figure 3-2-1
Browsing Modes Including: search, view thumbnails, view list, preview, view all
movies, display DVD, browse folder, name, click rate and recently added。
15
www.dxtreme.com.au
During files browsing, you can do the page turning operations by up/down keys.
Also you can switch among thumbnails view, list view and preview via display
key。
3.2.1 Search
Operation: option on remote control-> select "Search" on operation menu。
You can find out the files by search the names of the files. Steps: "Options" ->
select the "Search" -> enter into the soft keyboard. Type the name of the file you
are looking for in soft keyboard-> press play button on remote control or select
the text input box and press OK, then you can search the related files。
3.2.2 View Thumbnails
Operation:"Options" on remote control ->select "view thumbnails" on operation
menu。
There’re some special norms when the movie directory displays in the forms of
thumbnails。
Directory Thumbnail: If there are at least one picture in the directory, then the
thumbnail of the file will be this picture. If there is not any picture in directory,
then the thumbnail will be the one defaulted by system.
File Thumbnail: if one picture name consists with the name of one video, then the
thumbnail of the video will be this picture,; if there is no such picture, then the
thumbnail of the video will be the one defaulted by system.
Thumbnails will be displayed as shown in figure 3-2-3
3.2.3 List View
Operation:"Options" on remote control -> select "View List" on operation menu.
as shown in Figure 3-2-4。
Figure 3-2-3
16
www.dxtreme.com.au
Figure 3-2-4
3.2.4 Preview
Operation: "Options" on remote control -> select " preview" on operation menu.
When preview the video, after you select one video file, you can preview it in
preview box 。
3.2.5 Display All Movies
Operation:"Options" on remote control -> select "display All Movies" on
operation menu. By default, in movie options, all of the video files will be
displayed, i.e., the video files in external storage device (u-disk, card, hard disk)
will added into this directory。 3.2.6 Display DVD
Operation:"Options" on remote control -> select "display DVD" on operation
menu. When use this option, only display the files or folders related with DVD,
each displays in the form of one file, some others like avi, mov, rmvb will not be
displayed。
3.2.7 Video
Operation:"Options" on remote control-> select "Video File" on operation menu.
In the options only display video files (like ts, mpeg)。
3.2.8 Folder Browsing
Operation:"Options" on remote control -> select "Browse folder" remote control.
After selected one video file, when browse the folder, it will enter into the folder
directly of this video, then the page will switch into files management option, and
display it in movie mode。
3.2.9 Name
Operation: "Options" on remote control -> select "Name" on operation menu.
17
www.dxtreme.com.au
After you file for the file name will be displayed sorted。
After this operation, the files will be sequenced with file names。
3.2.10 File Size
Operation:"Options" on remote control -> select "File Size" on operation menu。
After selecting this mode, the files will be displayed in its size, from small to big。
3.2.11 Most Viewed
Operation: “Option” on remote control-> select click rate on operation menu。
After selecting this mode, files with top click rate will be displayed in front。
3.2.12 Recently Added
Operation: “Option” on remote control-> select “ recently added” in operation
menu.After selecting this mode, recently added files will be displayed。
3.3 Document Processing (via the playlist menu)
The playlist menu can be brought up by pressing the red button on the remote
control (document selection key). as shown in Figure 3-3-1。。
Figure 3-3-1
In this menu do some operations on files like copy, move and delete, also you
can create the playlist. The specific method will be introduced in 6.2.5.。
4.Photo
In Photo icon option, it can display all photos of Storage device(U-disk, CARD).
In Main Page, choose PHOTO icon option and press OK button on remote control,
then it enter into Photo option.
Note: In photo, there are some rules which can't display photos as following:
(If reaching any one of four rules, it can't display photo in Photo option.)
Photo is defined into File or Folder miniature photo;
18
www.dxtreme.com.au
Photo has the following prefix “.”、“~”、“_”、“AlbumArt”;
When the photo's size is less than certain photos, it tell it from the size of different
file format.
*.bmp: 90k
*.gif, *.png, *.jpg: 20K
It can't display when using the following character as file name:
cover.*
front.*
back.*
cd.*
Figure4-0-1
4.1 Photo Playback
Operation: After choosing one photo, press "play" or OK button, then it can play
photos with full screen.There are some operations for Remote Control when
playback photos:
▲
▲
▲▲
▲
Button
Function
Change to previous photo and next photo。
▲
Change to previous and next photo。
▲
Clockwise by 90 degree。
▲
Counter-clockwise by 90 degree。
Zoom
Take 2X, 4X, 8X, 16X times to zoom photos。
Stop/return
Stop playing photo。
INFO
Display the information of current photo。
Options
Pop-up the operation menu; figure:5-1-1。
19
www.dxtreme.com.au
Figure 5-1-1
In operation menu, it can do the following setup:
Slide interval timing( slide changing time): "option"->choose "slide interval
timing"->enter into slide timing frame-> using UP and DOWN button to choose
timing ,then press OK button。
Slide changing( Slide transition effect):->"option"->choose"Slide change"->enter
into slide transition effect->using UP and DOWN button to choose transition
effect, and then press OK button。
Repeat playback mode: press REPEAT button by remote control->"option>then
it will display" playback once"."successive playback","random change", after
choosing one of them,press OK button。
Turn on or off the background music: Under having background music, press
"option"->in Operation Menu,choose "turn off music" or "choosing music"->after
pressing OK button, then enter into Music Menu Setup. In this Menu,choose
"OFF" and it means that it turns off background music; Under no background
music, press"option"->"choosing music"->enter into Music menu setup->choose
"ON" or "choosing music" and enter into Music list,then choose music.
Video output setup: "Option"->video output setup->enter Video Output Setup
Menu。
4.2 Browsing Photos
Operation:"option"->pop-up operation menu, and choose one display method
in this Menu。
Specific display methods in Photo Option are as following:
Searching: search the file which is similar with inputing character。
Checking miniature photo:Display photo file by Miniature photo method。
20
www.dxtreme.com.au
View Preview: Checking list: display photo file by list method。
Checking preview: display photo file by preview method。
Photo folder: display pictures of Photo Folder under external device(U-dick,
CARD,HDD) root directory。
Date: Classify pictures by date and put them into temporary folder which is
named by picture date。
Display all photos: all photos in external device。
Album: display photo playback list。
Browse folder: browse folder that file belongs to。
Name: display by file named。
Latest joining: display latest joining files。
Latest playback: display by file playback timing。
4.3 Files Processing
The playlist menu can be brought up by pressing the red button on the remote
control (document selection key)。
In this menu do some operations on files like copy, move and delete, also you
can create the playlist. The specific method will be introduced in 6.2.5。
5. Music
In Music option, it can find all external storage devices(U-disk, CARD) music files.
And also it can play all music files. You can choose MUSIC icons in the main
page, then press OK button to enter into it. Figure5-0-1。
Figure 5-0-1
5.1 Music Playback
Operation: music-> Press "play" or "OK" button。
21
www.dxtreme.com.au
After choosing one music file in Music Option ,press "play" or "OK" button; then
it can play the chosen music file. During playback, it can take the following
operations:
Function
▲
▲
▲
play next music file。
▲
▲
▲
Button
play previous music file。
Vol+-
adjust volume。
Stop
Options
stop playing music。
entering operating menu and choosing "once playback":only play one time
for all music files。
Options
entering operating menu and choosing "repeat file(one)": Repeat playback
current playing music file (only one)。
Options
Options
。
entering
operating menu and choosing" successive
playback":Repeat playback all music files。
entering operating menu and choosing" random playback": Playback all
music files by random method。
Figure 5-1-1
5.2 Music Files Browsing
Operation: "option"->entering all options of operating menu。
In music option, after press "option" button on Remote Control, it can display
operation menu (figure:5-2-1); In operation menu, it can choose the file by up and
down button, then press OK button to chose one file; including the following
operations:
22
www.dxtreme.com.au
Figure 5-2-1
Searching: search and input characters which are related with music file。
View miniature photos: display music file by miniature photos;
View list: display music files by list。
View Preview: display music files by preview。
Browsing folder: browsing all folder directory of music files。
Display all songs: display all music files。
Display album: display all music files by album style。
Display artist: display all music file by artist style。
Display genre: display all music files by genre style。
Display year: display all music files by year style。
Display playback list: display music playback list。
Note: Music files includes the following information: album, artist, genre, year etc.
It can search the music files from the these information; If the music file without
these information, this music file will be classified into other style.
move, delete, create playlists operation。Specific operations specifically
described in 7.2.5.。
6. File Management
If the external storage device receiving the machine, these peripherals will be
displayed document management options, such as: U disk, CARD, USB drives
and so on. And in the peripheral devices connected to these peripheral devices
after the machine will scan the files and will scan to add to classify the different
options (movies, pictures, music)。File management options allow to u disk,
CARD in movies, pictures, music files for playback, editing, and so on。 In the
23
www.dxtreme.com.au
main interface through selected file management options icon press OK key to
access the interface, as in Figure 6-0-1。
Figure 6-0-1
Note:since we can only read the disc, the disc files will not join the movies,
pictures, music options。
6.1 Browse Files
Through remote control "option" key to bring up a menu of actions, through
remote control up or down key options need to be displayed after pressing OK key.
Figure 6-1-1。 Browse mode is included
Figure 6-1-1
View thumbnails: displays thumbnail images of files and folders。Their rule:
If the folder has at least one picture, then the folder will be the folder picture as a
thumbnail of the folder。
View list:the list displays the files and folders。
View Preview:Preview displays the files and folders。
Show all media: show all files (video, music, pictures) and the folder。
Show movie:only display video files and folders。
24
www.dxtreme.com.au
Display pictures:only display picture files and folders。
Show music: only show music files and folders。
In the file browser can be passed up and down a key to turn the page operations。
6.2 Files/Folders Editing
In the document management can be selected to edit the file / folder and press
the green button on the remote control (OK button) call up the file edit menu,
as shown in Figure 6-2-1。In this menu you can file the following: copy, delete,
move, rename, edit the play list, edit phase is thin, check。 Figure 6-2-1
6.2.1 Copy
The operation is a single file or folder for the copy operation。
Specific operations:
Need to copy the selected file or folder -> press the green button remote control
(OK button) -> enter the Edit File menu
Select "Copy" by OK button and select the menu entry Copy destination
25
www.dxtreme.com.au
Destination menu, select Copy some operating tips:
return key:Back to the Top List
play button:Confirm the selected destination to start copying files。
zoom button:create a new folder。
stop button:leave copy interface, returns the file management interface。
Press Playback confirm button and begin to copy file。
6.2.2 Delete
The operation to remove a single file or folder。
Specific operation: After choosing deleted file or folder, press Green Button
(Confirm Button) on Remote Control, then display the editing file menu. In this
menu, choose "Delete", then press"OK", and then it will delete file and folder。
6.2.3 Move
This operation can move single file or folder。
Specific operation: After choosing moved file or folder, press Green Button
(Confirm Button) on Remote Control->enter into editing file Menu->choose
"Move"。
26
www.dxtreme.com.au
Enter Move Destination Menu. After choosing one destination, press "play" button.
Then it Begin to move file。
6.2.4 Rename
This operation can rename single file or folder。
Specific operation: After choosing renamed file or folder, press Green Button
(Confirm Button) on Remote Control。
Enter into file editing Menu, then choose "Rename" and press"OK" button, then It
can enter into next Menu。
27
www.dxtreme.com.au
Choose "Rename" and enter into Soft keyboard。
Soft keyboard functions introduction:
Cursor left moving: Press REV button on Remote Control or Press left direction
button on Remote Control after choosing soft keyboard inserting frame or Press
REV icon at the bottom of soft keyboard。
Cursor right moving: Press REV button on Remote Control or Press right direction
button on Remote Control after choosing soft keyboard inserting frame or Press
REV icon at the bottom of soft keyboard。
Delete single character: Press STOP button on Remote control or Press STOP
icon at the Bottom of soft keyboard。
Delete all inputing characters: Press "clear" button on Soft keyboard;
Capital and Lower case letters change: Press"ZOOM" button on Remote Control
or Press zoom icon at the bottom of soft keyboard。
The change between Character and typewriting: Press RED button (file choice
button) on Remote Control or Red icon at the bottom of the soft keyboard。
Change typewriting: Press GREEN button (Confirm button) on Remote Control
or Press GREEN icon at the bottom of the soft keyboard。
28
www.dxtreme.com.au
Delete history inputing record: choose the button of history inputing record,
then press Playback button。
The change between history inputing record and common use: choose
history inputing record button,then press "OK" button on Remote Control and
input new name. After inputing new name,press"play" button or choose soft
keyboard inputing frame,then press"OK" and back into the following page。
Choose Confirm button, successfully renamed。
6.2.5 Multiple Select
Multiple select function can take the following creation or editing operation for
multiple files or folders: copy, move, delete, music and photos playback list. Take
the created music playback list as example:
In File Manager page, press GREEN button(confirm button) on Remote Control,
then enter into editing file menu。
After choosing"Multiple select",press OK button and then enter into playback list
menu。
29
www.dxtreme.com.au
The Remote Control usage are as following in playback list menu:
Back: leave the playback list menu, and will back into File Manager page.
Left and right button: Change the left and right window in playback list menu.
Play/pause button: At the Left side of the frame, users is to remove the files to
the frame Right side; at the Right side of the frame, from where users can delete
the selected files.
Previous song and next song: UP and DOWN turning page
STOP: delete all files on the right frame
GREEN button(confirm button): enter next operation, enter into the following
menu: copy, delete,creating playback list operation.
Back into previous directory: click the UP icon at the top of playback list menu
left frame. Press"play" button, users can remove music files into right frame.
Press GREEN button (OK button) on Remote Control,and enter into Multiple file
editing menu。
30
www.dxtreme.com.au
Enter Storage playback list menu。
If users want to change the name of playback list, press "Rename", then press
"OK" button and enter into soft keyboard, which can change name in playback list。
After finished inputing name,press"play" button or choose soft keyboard inputing
frame,then press"OK" and back into storage playback list menu。
31
www.dxtreme.com.au
Choose Confirm button,then press "OK" button and back into the following page。
Press back button to go away from this page, the playlist creation is finished。
6.2.6 Album Editing
It can edit the album, also some other functions can be achieved here。
select the album-press green button (confirm button) on remote control—press
OK button after enter into files editing menu and choose album editing—enter
into playlist page. The next operation is the same as that of playlist which
introduced above. “key thinly” - > to enter the broadcast detailed list contact
surface, the following operation introduces with above is same in the broadcast
detailed list operation。
6.2.7 Edit File Play List
It can edit the playlist, also come other functions can be achieved here,
Select the playlist-press green button (confirm button) on remote control—press
OK button after enter into files editing menu and choose playlist editing—enter
into playlist page. The next operation is the same as that of playlist which
introduced above。
32
www.dxtreme.com.au
7. System Setting
Choose setup icon in the main menu and press OK, then enter into system setting
menu.
In system setting menu, it can set up the system, audio ,video and some others.
7.1 System
In this option, it can set the whole system such as menu language, time,
screensaver. etc.
7.1.1 Menu Language
Operation: main menu-system setting-system-menu language Mainly set up the
menu language.
33
www.dxtreme.com.au
In language menu, select the language you wanted with the up/down button on
remote control, then press OK。
7.1.2 Test Encoding
Operations: main menu-system setting- system –text encoding。
Different languages have different text encoding formats. Choose the encoding
format required with the up/down button on remote control, then press OK。
7.1.3 Play Disc Automatically
Operation: main menu-system setting-system-play disc automatically。
Here you can set whether to play the DVD automatically when DVD connected,
34
www.dxtreme.com.au
when setas on, it will play DVD automatically, otherwise, play the DVD manually。
7.1.4 Screensaver
Operations: main menu-system setting-system-screensaver
Here you can set the screen saver, on means the screen saver has been
activated, while off means not。
7.1.5 Keyboard Language
Operations: main menu-system setting-system-keyboard language。
Here you can set the default input method when enter into soft keyboard, there’re
four keyboard languages: lowercase English, Chinese PINYIN, Chinese
traditional, simplified Chinese。
7.1.6 Scan Storage Device
Operation: main menu-system setting-system- scan storage device。
This option can set whether to scan the storage device automatically when power
on, there’re four choices:
Turn on auto scan: scan the storage device automatically when power on, and
the video, music and pictures files will be classified into its options。
Turn off auto scan: not scan the storage device automatically when power on,
no contents in film, music and picture files (if has been scanned, it will not be
blank). Re-scan the storage device。
Stop scanning storage device: it can stop the act of undergoing scanning, the
auto scan will be set as turn off after stopped。
35
www.dxtreme.com.au
7.1.7 Restore Playing
Operation: main menu-system setting-system-restore playing。
Here you set whether to support restore playing when playing the video。
7.1.8 Restore Factory Settings
Operation: main menu-system settings-system-restore factory settings。
This option can restore the factory settings, when restore factory setting, it can
reset the menu language in initial setup menu。
7.2 Audio
Here you can set the system audio output, including night mode, HDMI output
and SPDIF output。
36
www.dxtreme.com.au
7.2.1 Night Mode
There’re three options for night mode
Off: normal output, do nothing to the volume
On: turn down the volume
Comfortable: cut down the noise.
7.2.2 HDMI Output
There’re three outputs for HDMI:
LPCM: digital two channels output。
LPCM Multi-CH:digital multi-channels output。
RAW:original code output。
7.2.3 SPDIF Output
There are two outputs for SPDIF:
37
www.dxtreme.com.au
LPCM: digital two channels output。
RAW:original code output。
7.3 Video
Here you can do some basic settings on the video, such as aspect ratio, TV
system, video zoom, digital noise reduction and 1080P 24HZ。
7.3.1 Aspect Ratio
Here you can set the aspect ratio, there’re four kinds mainly, such as Pan Scan
4:3、Letter Box 4:3, widescreen 16:9 and 16:10。
38
www.dxtreme.com.au
7.3.2 TV System
Set the TV system: the range is from 480i to 1080P 60HZ。
Note: blank screen will come out if the output system can’t be supported by TV。
7.3.3 Video Zoom
This option is to control whether to zoom out the video on show。
7.3.4 Digital Noise Reduction
This option is to control whether to reduce the digital noise。
7.3.5 1080P 24HZ
This option will be activated if the TV support 1080P 24HZ。
7.3.6 Normal/ Color Shading
Here you can set the output as normal or color shading output。
7.4 Others
In this option, you can find or set some other functions, like view the version info,
update the U-disk。
39
www.dxtreme.com.au
Update the U-disk: store the update file”install.img” into U-disk, and then insert
the U-disk into USB interface of unit, after the U-disk read by the unit, enter into
system setting---U-disk updating- confirm. Then the unit will be updated
automatically. It will enter into main menu after updating finished。
40
www.dxtreme.com.au
Product Specification
Interface
Audio/Video: RCA scoket
YPBPR: RCA scoket
USB 2.0
HDMI:Connect TV
Three in one card seat
Coxical
AC adapter output
9$
AC adapter onput
Dimension
a9
PP
Weight
NJ
41
www.dxtreme.com.au