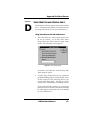
1
Vidiola User’s Manual for models: Vidiola Vidiola Pro Vidiola Premium ORCHID 3 1994, Orchid Technology. This manual is copyrighted. All rights reserved. This document may not, in whole or part, be copied, reproduced, reduced or translated by any means, either mechanical or electronic, without prior consent in writing from Orchid Technology, Incorporated. Vidiola, Vidiola Pro, Vidiola Premium, SuperZoom and Orchid are trademarks of Orchid Technology. All other products mentioned in this manual are trademarks of their respective manufacturers. Orchid Technology 45365 Northport Loop West Fremont, CA 94538-9973 Vidiola User's Manual TABLE OF CONTENTS Introduction About This Manual Important - Before You Begin 4 5 6 SECTION 1 - INSTALLING VIDIOLA 9 Quick Install Hardware Installation Software Installation Figure 1.1: Vidiola Diagram 9 9 10 11 Figure 1.3: Vidiola S-Video Sub card 12 13 Figure 1.4: Vidiola Premium Daughtercard 13 Figure 1.2: Vidiola Pro Diagram Step 1: Preparing Your Computer 14 Step 2: Preparing Your Vidiola 14 Jumper Settings JP1: IRQ Address JP2: Base Address JP15: VGA Compat. (Vidiola) 14 15 16 16 JP15: VGA Compat. (Vidiola Pro & Premium) 17 JP4 & JP3: Compressor Base Address 17 Step 3: Installing Your Vidiola Vidiola Premium Daughtercard Installation Using S-Video (S-VHS) Vidiola User's Manual 18 20 20 1 SECTION 2 - VIDIOLA DRIVER INSTALLATION Before You Begin Installing the Vidiola Drivers SECTION 3 - USING VIDIOLA 23 23 25 The Vidiola Configuration Program 25 Align Configuration 25 Source Configuration 26 SuperZoom Configuration 27 Picture Configuration 27 Hardware Configuration 28 Using Video Capture Applications 29 Video Format Configuration 29 Video Source Configuration 31 Video Display Configuration 31 Video Capture Guidelines 2 23 32 Motion Video 32 Still Image Grab 32 Vidiola Live Video 33 Quick Start 33 NTSC Video Output 33 PAL Video Output 34 JPEG Video Compression Guidelines 36 Running in High Resolutions 38 Vidiola User's Manual APPENDIX A - TECHNICAL INFORMATION 39 CompuServe 39 Troubleshooting Vidiola 39 Avoiding Address Conflicts 46 Vidiola Technical Specifications 47 Memory Upgrade 49 Memory Upgrade Software Changes 50 Vidiola VGA-OUT Pin-Out Specifications 51 Feature Connector Pin-Outs 52 APPENDIX B - TECH SUPPORT TIPS 53 From the Trenches: Tech Support Tips 53 System Configuration Chart 57 APPENDIX C - PLAYING AVI FILES Playing AVI Files on non-Vidiola Systems APPENDIX D - USING VIDEO DIRECTOR Video Director and Vidiola Pro/C 59 59 61 61 FCC NOTICE 62 INDEX 63 Vidiola User's Manual 3 Introduction Vidiola™ is a high-performance digital video card for 386, 486 and Pentium systems. It features SuperZoom™ digital video playback, which incorporates advanced scaling techniques and allows digitized video clips to be played back up to full screen without affecting the frame rate. Three versions of Vidiola are available: Vidiola, Vidiola Pro and Vidiola Premium. Vidiola is a video overlay card that allows graphics to be "overlaid" on top of video. Overlay modes are 640x480 up to 65K colors and 800x600 up to 256 colors, however, actual capture ability is graphic card dependent. For higher resolutions, Vidiola's built-in VGA loop-thru is enabled. Depending on system performance, motion video capture is 30 fps at 160x120 and 15-30fps at 320x240. The software included allows Vidiola to provide you with a total video capture, editing and presentation solution for Microsoft Video for Windows. By making use of the feature connector on a standard VGA card, video is displayed in full color without the need for a high-performance VGA Windows accelerator. To record audio as well as video, you need a compatible audio card installed in your computer. Thank you for purchasing Vidiola. Care has been taken to ensure that your card will provide you with years of trouble-free operation. We believe you will be pleased with your purchase. 4 Vidiola User's Manual About This Manual This manual presumes that you are already familiar with your IBM PC compatible computer. While Vidiola has been designed to be easy to install, we recommend that you refer to your computer’s reference manual when terminology or installation steps are unfamiliar to you. This manual has been organized to help you set up and install Vidiola as quickly as possible. Each section is divided into short, easy-tofollow steps, to help you understand the installation and function of Vidiola. Section 1: Installing Vidiola Whether you are a beginner or an experienced user, this section will give you important information on the proper installation of Vidiola. Section 2: Vidiola Driver Installation Here you will be given the information needed to install Vidiola drivers. Section 3: Using Vidiola This section covers using the Vidiola configuration program and video capture applications. Appendix A: Technical Information If you are experiencing installation difficulties or require troubleshooting information, this appendix gives you checkpoints to look at to ensure that your Vidiola is operating properly. This appendix also includes the Vidiola technical specifications, and gives you instructions for upgrading the memory. Appendix B: Tech Support Tips Here you are provided with a list of the most common issues to help you get up and running with your new Vidiola card. Appendix C: Playing AVI Files This section gives you instructions on how to play Vidiola compressed files on non-Vidiola systems. Vidiola User's Manual 5 Important! - Before You Begin This manual contains information for the products listed below. All references to "Vidiola" will refer to all these products, unless otherwise noted. Vidiola Vidiola provides full motion capture and playback of digital video. Text and graphics overlay on top of full screen live video. The hardware design provides features such as SuperZoom playback and real time compression (3:1). Vidiola Pro Vidiola Pro is the same as Vidiola and adds NTSC output and S-Video output. Two configurations are available for Vidiola Pro; the hardware is the same, but the software is different. Vidiola Pro/D offers digital video capture and editing with transitions and video output. Vidiola Pro/C offers full screen "cuts-only" video editing and titling utilizing camcorder control and overlay without storing video to hard disk. Vidiola Premium Vidiola Premium is the same as Vidiola Pro/D and adds real-time Motion JPEG compression with ratios up to 56:1. 6 Vidiola User's Manual This manual will familiarize you with the features, installation and use of your Vidiola. There are several symbols and conventions used throughout this manual which will help to draw your attention to a feature or to focus on important information: When you see the Magnifying Glass, it means the text is referring to something you should take a closer look at before proceeding further. When you see the Exclamation Mark, it gives important information on avoiding damage to property. Common Names AVI Audio/Video Interleaved PC Refers to the family of IBM PC, PC/XT or PC/AT compatible computers JPEG Joint Photographic Experts Group NTSC National Television Standards Committee PAL Phase Alternate Line VGA Video Graphics Array Vidiola User's Manual 7 8 Vidiola User's Manual Section 1: Installing Vidiola Section 1 INSTALLING VIDIOLA Vidiola is designed to be easy to use and easy to install. Before installing Vidiola into your computer, make sure that it will not conflict with existing components. See Appendix A for help on checking for potential conflicts. There are three fundamental steps to the installation, which are explained in detail on the following pages. To get up and running quickly, see the quick installation steps; otherwise skip to "Step 1: Preparing Your Computer." Quick Install (for experienced users only) Hardware Installation STATIC! Before handling Vidiola, be sure to guard against electrostatic discharge. Be properly grounded by touching the power supply housing, or you may want to buy a Ground strap from your local computer store. 1. Check your Vidiola jumper settings to make sure there are no conflicts with existing cards (see "Step 2: Preparing Your Vidiola"). 2. Install Vidiola into a 16-bit expansion slot. 3. Connect the ribbon cable between the Vidiola's feature connector and your VGA card's feature connector (see Figure 1.10 or 1.11). 4. Connect the external VGA loop-thru cable between your Vidiola's 6-pin connector, and your VGA card's 15-pin connector (see Figure 1.12). 5. Connect your monitor cable to the 15-pin connector on Vidiola. 6. If you want to use S-Video input or output with your Vidiola Pro or Premium, see the section "Using S-Video (S-VHS)." Vidiola User's Manual 9 Software Installation 1. First you must install the bundled software that comes with Vidiola. The software includes Video For Windows, which is required by Vidiola. See the software documentation for installation instructions. 2. After installing the bundled software, install the Vidiola software drivers. From Microsoft Windows, run the SETUP.EXE program from the Vidiola software disk. 3. Follow the instructions. Restart Windows after the installation is complete. 10 Vidiola User's Manual Vidiola Compatibility JP15 JP1 JP2 Feature Connector JP5 1 SUPER ZOOM VGA Out (to monitor) VGA In (from graphics card) S-Video In Composite Video In Section 1: Installing Vidiola Figure 1.1: Vidiola Diagram Vidiola User's Manual 11 Vidiola Pro Compatibility JP15 JP1 JP2 Feature Connector JP5 ZOOM SUPER 12 JP9 JP8 JP12 VGA Out (to monitor) VGA In (Loop-Thru Cable) (from graphics card) Composite Video Output Composite Video Input (VCR, Camcorder) Section 1: Installing Vidiola Figure 1.2: Vidiola Pro Diagram Vidiola User's Manual Section 1: Installing Vidiola S-Video Input S-Video Output Figure 1.3: Vidiola S-Video Sub card ORCHID Figure 1.4: Vidiola Premium Daughtercard Vidiola User's Manual 13 Section 1: Installing Vidiola Step 1: Preparing Your Computer 1. Your VGA card must have a feature connector, and be configured for one of the following resolutions: • 640x480 resolution up to 65K • 800x600 resolution up to 256 If you are not sure about your VGA resolution, use the default Windows VGA driver. To set up the driver, follow the instructions below: For best results, we recommend running your VGA card at a refresh rate of 60Hz. a. Change to your Windows directory. b. The Windows Setup screen is displayed by typing: SETUP c. Highlight the Display option and press ENTER. From the menu select the VGA display driver and press ENTER. Save your configuration and exit to DOS. 2. Turn off the power to your computer and disconnect all of the power cords and cables from the computer. 3. Remove the screws that secure the computer chassis cover and slide the cover off and keep the screws in a safe place. Step 2 : Preparing Your Vidiola Jumper Settings There are several jumper blocks used in the configuration of Vidiola, Vidiola Pro and Vidiola Premium. If the default settings are OK for your Vidiola card, skip to "Step 3: Installing Your Vidiola." 14 Vidiola User's Manual To configure the resolution, colors and refresh rate, refer to your VGA card user's manual. Section 1: Installing Vidiola The following information details the proper setting of each jumper. (All jumpers apply to all cards unless otherwise noted.) Jumper JP1: IRQ Address The interrupt address on the Vidiola card must match the interrupt address in the Hardware Configuration program (refer to Section 3: Using Vidiola). Jumper JP1 sets the interrupt level for Vidiola. The default setting is IRQ10. If you encounter a conflict with another device in your system, you can select IRQ 5, 6, 7, 11, 12, 14 or 15. IRQ 10 (default) 1 2 3 4 5 6 7 8 1 2 3 4 5 6 7 8 1 2 3 4 5 6 7 8 1 2 3 4 5 6 7 8 1 2 3 4 5 6 7 8 1 2 3 4 5 6 7 8 1 2 3 4 5 6 7 8 1 2 3 4 5 6 7 8 IRQ 5 IRQ 6 IRQ 7 IRQ 11 IRQ 12 IRQ 14 IRQ 15 Figure 1.5: IRQ Addresses Vidiola User's Manual 15 Section 1: Installing Vidiola Jumper JP2: Base Address Jumper JP2 sets the base address for Vidiola. The default address is 700 Hex. To change the base address to 600 Hex, connect the jumper. 1 2 1 2 700 Hex (default) 600 Hex Figure 1.6: Base Address Jumper JP15: VGA Compatibility For Vidiola only. Jumper JP15 is used for VGA compatibility. The default setting is normal VGA operation. If you experience display problems, try one of the two VGA compatibility options available. Normal VGA Operation (default) 1 2 3 4 Compatibility Option 1 1 2 3 4 Compatibility Option 2 1 2 3 4 Figure 1.7: VGA Compatibility 16 Vidiola User's Manual The base address on the Vidiola card must match the base address in the Hardware Configuration program (refer to Section 3: Using Vidiola). Section 1: Installing Vidiola Jumper JP15: VGA Compatibility For Vidiola Pro and Premium only. Jumper JP15 is used for VGA compatibility. The default setting is normal VGA operation. If you experience display problems, try one of the four VGA compatibility options available. Normal VGA Operation (default) 1 2 3 4 5 6 1 2 3 4 5 6 1 2 3 4 5 6 1 2 3 4 5 6 1 2 3 4 5 6 Compatibility Option 1 Compatibility Option 2 Compatibility Option 3 Compatibility Option 4 Figure 1.8: VGA Compatibility Jumpers JP4 & JP3: Compressor Base Address For the Vidiola Premium daughtercard only. The Hardware section of the Vidiola Configuration program includes a setting for "Compressor Base Address." These options, when set, must match the two jumpers on the daughtercard. Base Address JP4 JP3 380-387 3A0-3A7 3C0-3C7 3E0-3E7 Figure 1.9: Compressor Base Address Vidiola User's Manual 17 Section 1: Installing Vidiola Step 3 : Installing Your Vidiola If you are connecting a Vidiola Premium daughtercard to the Vidiola Pro, go to the section "Vidiola Premium Daughtercard Installation," otherwise continue. Once you have checked your Vidiola jumper settings, you are ready to install Vidiola and any external devices. 1. Select a 16-bit expansion slot for your Vidiola card. Select a slot as close to your VGA card as possible. 2. Remove the rear slot cover bracket if it is present and keep the screw for future use. 3. Connect one end of the ribbon cable to the feature connector on your Vidiola. Be sure to match the colored stripe to Pin 1 on the feature connector. Refer to Figure 1.1 or 1.2. 4. Carefully hold Vidiola by the top edges and lower it into its expansion slot. Ensure that Vidiola seats firmly into the slot, and that it aligns properly with the computer's backplane. 5. Secure Vidiola in place by fastening its metal bracket to the computer backplane (use the screw you removed). 6. Connect the other end of the ribbon cable to the feature connector on your video card (similar to Figures 1.10 or 1.11). Refer to your VGA card user's manual for the location of the feature connector. VGA Vidiola Figure 1.10: Connect ribbon cable 18 Vidiola User's Manual For pin-out information on the feature connector and the 15-pin VGA connector, see Appendix A. Section 1: Installing Vidiola VGA Vidiola Pro or Premium Figure 1.11: Connect ribbon cable 7. Connect the 6-pin connector end of the VGA loop thru cable to the VGA loop thru connector on your Vidiola card (see Figure 1.12). 8. Connect the 15-pin end of the VGA loop thru cable to the 15-pin VGA connector on your VGA card (similar to Figure 1.12). 9. VGA Vidiola VGA Vidiola Pro or Premium Figure 1.12: Connect VGA loop-thru cable Connect your monitor cable to the 15-pin monitor connector on your Vidiola card. 10. If you want to use S-Video input or output with your Vidiola Pro or Premium, see the section "Using S-Video (S-VHS)." Vidiola User's Manual 19 Section 1: Installing Vidiola 11. Reconnect previously removed cables and power cords and replace the cover of the computer. Vidiola installation is complete. Vidiola Premium Daughtercard Installation 1. Carefully remove Vidiola Pro from your computer and place it on a flat surface. 2. Locate the daughtercard connectors on Vidiola Pro. The connectors are at locations JP8 and JP9 (see Figure 1.2). 3. Verify the jumper settings on the daughtercard. Refer to the "Jumper Settings" section for more information. 4. Position the daughtercard over the connectors. Use your thumbs to press evenly on the top and bottom of the daughtercard so it seats completely down into the connectors. 5. You are now ready to install the Vidiola Premium. Go to "Step 3: Installing Your Vidiola" and begin at step 3. Using S-Video (S-VHS) For Vidiola Pro and Premium only. If you have an SVHS or Hi-8 video source and want to take advantage of its S-Video capability, you must install the Vidiola S-Video Sub card (see Figure 1.3). The Vidiola S-Video Sub card provides S-Video input and output. Follow the steps below: 1. Carefully hold the S-Video Sub card by the top edges and lower it into an expansion slot close to the Vidiola Pro or Premium. 2. Secure the S-Video Sub card in place by fastening its metal bracket to the computer backplane. 20 Vidiola User's Manual CAUTION: Make sure the Orchid logo on the daughtercard is facing the same direction as the Orchid logo on the Vidiola Pro card. Section 1: Installing Vidiola 3. Connect the internal S-Video 5-pin cable to connector JP12 on the Vidiola Pro or Premium (see Figure 1.13). Connector JP12 is located at the far right of the card near the metal bracket. Connect the other end of the cable to connector HDR1 on the Sub card. NOTE: The cable is keyed and must be connected to match Pin 1 on the cable to Pin 1 on both cards. Connect the two-pin side of the 5pin cable connector to Pin 1 of Jumper JP12 on Vidiola Pro or Premium. Connect the other end of the cable connector to Pin 1 of HDR1 on the Sub card. 4. Reconnect previously removed cables and power cords and replace the cover of the computer. JP 12 S-Video Input S-Video Output Vidiola Pro or Premium Sub card Figure 1.13: Connect S-Video Cable Vidiola User's Manual 21 Section 1: Installing Vidiola 22 Vidiola User's Manual Section 2: Vidiola Driver Installation Section 2 VIDIOLA DRIVER INSTALLATION The SETUP.EXE program automatically installs the Vidiola Capture and Vidiola Compression drivers. Before You Begin This manual presumes that you are already familiar with the basics of Microsoft Windows. Please refer to the Microsoft manual when terminology or installation steps are unfamiliar to you. Before installing the Vidiola drivers, you must install the bundled software that comes with Vidiola. This software includes Video For Windows, which is required by Vidiola. Verify that you have setup your VGA card for one of the supported resolutions by following the instructions in Section 1 "Preparing Your Computer." Be sure your VGA card is set to use a vertical refresh rate of 60Hz. The following instructions assume you are using a floppy drive designated as Drive A:, and a hard drive designated as drive C:. Please substitute the correct drive letter if your computer is configured differently. Installing the Vidiola Drivers 1. Insert the Vidiola software disk into your floppy drive. 2. Start Microsoft Windows by typing: WIN 3. From the Program Manager File menu, click on RUN and type: A:\SETUP Follow the instructions to complete the installation. You must restart Windows after the installation. Vidiola User's Manual 23 Section 2: Vidiola Driver Installation For the Vidiola Premium daughtercard only. If you have just connected the Vidiola Premium daughtercard to Vidiola Pro, see the following instructions. 1. After installing the Vidiola Premium software you must remove the older "Vidiola Pro Init" icon from the Startup group. 2. You should also erase the Vidiola Pro program group and Vidiola Pro directory (Vidpro). Once these changes are completed you must restart Windows to implement the changes. 24 Vidiola User's Manual Section 3: Using Vidiola Section USING VIDIOLA 3 The Vidiola Configuration Program NOTE: Before you begin, make sure that your VGA card is configured properly. If you are not sure how to check your resolution, go to Windows Setup or check your VGA card's documentation. After installing the Vidiola software, the Orchid Vidiola Software program group appears on the desktop. Double-click on the Vidiola Configuration icon and the following menu appears: Figure 3.1: Vidiola Configuration Main Menu Before you begin configuring Vidiola, click on the "ON" button to display a live video window. If you have a video source connected to the Vidiola, turn it on and you should see the Live Video window. This will be very helpful when setting the Alignment Configuration values. If you are unable to see a live video window, refer to the "Source Configuration" and "Hardware Configuration" options in this section. Align Configuration You will need to set up the graphics/video alignment when you first install the Vidiola card and when you change resolutions or colors. Click on the Align button and a menu appears for your Vidiola: Vidiola User's Manual 25 Section 3: Using Vidiola Figure 3.2: Video Alignment Menu (Vidiola & Vidiola Pro) For Vidiola Premium only. The Vidiola Premium has special crop settings that have to be observed when capturing video at 320x240 resolution. On the Align Configuration screen there is a check box labeled "320x240 Capture." This check box forces the value of the bottom crop value minus the top crop value to be 480 lines. If you try to capture at 320x240 without checking this box, the capture window will be forced into the proper setting automatically. Figure 3.3: Video Alignment Menu (Vidiola Premium) Source Configuration This option allows you to select your video input source. Vidiola supports S-Video and Composite formats and NTSC or PAL television standards. Click on the Source button and the following menu appears: 26 Vidiola User's Manual Section 3: Using Vidiola Figure 3.4: Source Configuration Menu SuperZoom Configuration Digital video can be played back with SuperZoom through Vidiola, or played back through the VGA card. For best performance, we recommend selecting "Accelerated digital Video playback through Vidiola." Click on the SuperZoom button and the following menu appears: Figure 3.5: SuperZoom Configuration Menu Picture Configuration Click on the Picture button to adjust the brightness, contrast, saturation and hue controls for the best display. The following menu appears: Figure 3.6: Picture Configuration Menu Vidiola User's Manual 27 Section 3: Using Vidiola Hardware Configuration The interrupt and base address settings in the Hardware Configuration program must match the interrupt (JP1) and base address (JP2) jumper settings on the Vidiola card. For the Vidiola Premium, the "Compressor Base Address" option is added (see Figure 3.8). Click on the Hardware button and a menu appears for your Vidiola: Figure 3.7: Hardware Configuration Menu (Vidiola & Vidiola Pro) Figure 3.8: Hardware Configuration Menu (Vidiola Premium) Select one of the following memory base settings if your PC has LESS than or equal to 8MB of RAM: 12MB, 13MB, 14MB or 15MB. Select one of the following memory base address settings if your PC has MORE than 8MB of RAM: D000H, D800H, E000H or E800H. 28 Vidiola User's Manual When using any of the memory base address settings, you must also exclude the same 32K address from your memory manager program. Section 3: Using Vidiola Using Video Capture Applications For information on the capture program, refer to "Video Capture Guidelines" in this section. Software is provided to capture and edit video with Vidiola, Vidiola Pro/D and Vidiola Premium. Using the video capture software program provided, you can set up your video format, source and display parameters. There are three configuration menus: • Video Format • Video Source • Video Display Video Format Configuration The Video Format Configuration allows you to set the window size and the video recording format. For Vidiola and Vidiola Pro/D only. For motion video capture, you will get the best quality and capture performance by selecting "Vidiola 1 Compressed" for the Image Format. If you only want to capture a still frame, set the Image Format to 24-bit RGB. Figure 3.9: Video Format Menu (Vidiola & Vidiola Pro/D) For Vidiola Premium only. For motion video capture, you will get the best quality and capture performance by selecting "Vidiola Premium JPEG Compressed" for the Image Format (see Figure 3.10). When you select this format, you have the opportunity to vary the amount of compression applied to the video during capture. Vidiola User's Manual 29 Section 3: Using Vidiola Figure 3.10: Video Format Menu (Vidiola Premium) Click on the "Setup" button and the following screen appears: Figure 3.11: JPEG Compressor Setup Screen Adjusting the Quality control will affect the picture quality, file size and compression ratio. As you drag the slider, the change in Quality value produces the following results: <<<— Lower Higher —>>> Lower Image Quality Smaller File Size Lower Data Rate Higher Compression Ratio Higher Image Quality Larger File Size Higher Data Rate Lower Compression ratio 30 Vidiola User's Manual Section 3: Using Vidiola Video Source Configuration The Video Source option allows you to select your video input source. Vidiola supports S-Video and Composite formats and NTSC or PAL television standards. Figure 3.12: Video Source Menu Video Display Configuration This option allows you to configure the XY position of video in relation to graphics overlay. From the following menu, click on the Align button to set up the graphics/video alignment. Click on the Picture button to adjust the brightness, contrast, saturation and hue controls for the best display. Figure 3.13: Video Display Main Menu Vidiola User's Manual 31 Section 3: Using Vidiola Video Capture Guidelines Motion Video ✍ For Vidiola and Vidiola Pro/D only. We recommend that you capture video at a window size of 160x120 using the "Vidiola 1 Compressed" Image Format. This gives the best capture performance and quality. Depending on your system performance, you can achieve 30 frames per second capture at this window size. For full screen video playback, capture at 160 x 120 and use the SuperZoom feature to playback at full screen. For Vidiola Premium only. We recommend that you capture video at window sizes up to 320x240 using the "Vidiola Premium JPEG Compressed" Image Format. Depending on your system performance, you can achieve 30 frames per second at this window size. For full screen video playback, capture at 320x240 and use the SuperZoom feature to playback at full screen. ✍ We recommend that you capture to memory instead of directly to disk (there is an option to do this in your capture application). Even if you only have a small amount of memory, Vidiola will use that memory as a buffer for the disk, resulting in better performance. Still Image Grab ✍ To capture a still frame, set the Image Format to 24-bit RGB. ✍ Configure the capture program for Single Frame capture or Step Frame capture. ✍ Select the desired capture window size. 32 Vidiola User's Manual Section 3: Using Vidiola Vidiola Live Video For more information on OLE, refer to your Microsoft Windows User's Guide. The Vidiola Live Video feature enables you to add a live video window for playback to Windows application files, such as presentations, spreadsheets and wordprocessing documents. The Live Video feature works with any Windows application that supports Object Linking and Embedding (OLE). Quick Start 1. Start Microsoft Windows. 2. From the Orchid Vidiola Software group, doubleclick on the Vidiola Live Video application. 3. Click on EDIT from the Media Player menu bar and select the Copy Object option or press CTRL+C. 4. Start the OLE application in which you wish to add a live video window and position the cursor at the appropriate place. 5. Click on EDIT, which is located on the menu bar, and select the PASTE command or press CTRL+V. An outlined box will appear with the Media Player icon. Whenever you double-click on this box, a live video window appears that will play directly from your video source. NTSC Video Output For Vidiola Pro and Premium only. For NTSC video output, you must configure your VGA card for 640x480 resolution at 60Hz refresh rate. The 640x480 resolution is supported in 16, 256, and 65,536 colors. Once the software is installed, an additional application called "Video Output" appears in the Vidiola program group. Double-click on the Video Output icon and the following screen appears: Vidiola User's Manual 33 Section 3: Using Vidiola Figure 3.14: Video Output Menu (Vidiola Pro & Premium) Flicker Filter Select "ON" if you are displaying an image with single pixel horizontal lines. Select "OFF" if you are displaying full screen graphics or video. Experiment with the Flicker Filter control to get the best results for your application. PAL Video Output For Vidiola Pro and Premium only. To view PAL video output, your VGA must be running in 640x480 resolution at 60Hz refresh rate. It must also be running in a valid overlay resolution (256 or 65,536 colors when used with a suitable VGA card). Important: Please note that unlike NTSC, video output is not available when running your VGA card in 16 colors, when using PAL output. In addition, the video output display will be distorted or corrupted when you are not running Windows; this is normal operation. Once the software is installed, an additional application called "Video Output" appears in the Vidiola program group. Double-click on the Video Output icon and the following screen appears: 34 Vidiola User's Manual Section 3: Using Vidiola Figure 3.15: Video Output Menu (Vidiola Pro & Premium) Flicker Filter Select "ON" if you are displaying an image with single pixel horizontal lines. Select "OFF" if you are displaying full screen graphics or video. Experiment with the Flicker Filter control to get the best results for your application. Output Sync This option is used to set the horizontal synchronization of the output signal from your graphics card. Some graphics cards send out 640 pixels, while others send out 640 pixels plus an 8-pixel border on either side (656 pixels). Horizontal Sync1 refers to output of 656 pixels and Horizontal Sync2 refers to output of 640 pixels. When an invalid Horizontal Sync is selected, your video output will not synchronize properly. Apply Picture Enhancement Select "Composite Output" if you are using the Composite Video output. Select "S-Video Output" if you are using the S-Video output. Vidiola User's Manual 35 Section 3: Using Vidiola JPEG Video Compression Guidelines For Vidiola Premium only. The quality and data rate of JPEG compression varies considerably based upon the content of the video; however, here are some general guidelines: Quality Setting File Size (bytes) Data Rate (bytes/sec) Single Frame Size (bytes) Approximate Compression ratio* (N:1) 245 235 225 215 205 195 185 175 165 155 135 125 115 105 95 85 75 65 55 45 35 25 15 5 3,352,888 2,521,432 2,066,760 1,696,056 1,521,992 1,280,312 1,210,680 1,218,888 991,560 915,784 915,784 915,784 915,784 915,784 915,784 893,256 778,568 651,592 612,680 612,680 612,680 612,680 612,680 612,680 670,578 504,286 413,352 339,211 304,398 256,062 242,136 243,778 198,312 183,157 183,157 183,157 183,157 183,157 183,157 178,651 155,714 130,318 122,536 122,536 122,536 122,536 122,536 122,536 22,353 16,810 13,778 11,307 10,147 8,535 8,071 8,126 6,610 6,105 6,105 6,105 6,105 6,105 6,105 5,955 5,190 4,344 4,085 4,085 4,085 4,085 4,085 4,085 10 14 17 20 23 27 29 28 35 38 38 38 38 38 38 39 44 53 56 56 56 56 56 56 * Based on a 320x240, 24-bit still frame of approximately 230 bytes. The JPEG Video Compression data shown in the preceding guidelines was produced by repeatedly capturing the identical video clip with these attributes: Window size: Frame rate: Audio: Clip length: Capture to: 36 320x240 30fps No audio 5 secs. Disk Vidiola User's Manual Section 3: Using Vidiola By plotting these results on a graph, you can better understand the nature of JPEG compression: This graph shows that when the Quality Setting is above 165, small increases (of approximately 10 units) will greatly affect the data rate. However, when the Quality Setting is below 165, changes barely affect the data rate. Important: Remember that JPEG compression can vary considerably depending on the video content. This information is provided simply as a guide; your results may differ. Vidiola User's Manual 37 Section 3: Using Vidiola Running in High Resolutions If you would like to run your graphics card in a resolution higher than those supported by Vidiola, drag the "Vidiola Init" icon out of the StartUp group into the Orchid Vidiola group. Restart Windows for your changes to take effect. You can now use your graphics card in any resolution it supports. To enable Vidiola again, drag the "Vidiola Init" icon out of the Orchid Vidiola group into the StartUp group. Restart Windows for your changes to take effect. 38 Vidiola User's Manual Appendix A: Technical Information Appendix A TECHNICAL INFORMATION Orchid Technology is known for its responsiveness to its customers. This section will give you helpful hints for troubleshooting Vidiola. CompuServe In addition to calling Orchid technology, technical support is now available through the CompuServe Information System (CIS). You can also download drivers and get new product information. To find us on CompuServe, follow the instructions below: 1. Log onto CompuServe. All commands can be typed in lower or upper case letters. 2. Type GO MULTIBVEN to get into the Multimedia Vendor Forum B. Once you are in this forum, select Message Section #10. The message and library sections are labeled Orchid . . . or You may type GO ORCHID to get immediate access to the Orchid section. 3. If you would like to leave private mail for Orchid, type GO MAIL. Address your letters to our technical support account number 72662,2672. Troubleshooting Vidiola The following information will help you diagnose problems you may have with Vidiola. Following these simple steps serves a twofold purpose: You may be able to fix your problem and avoid having to contact the Orchid Technology Technical Support Department, Vidiola User's Manual 39 Appendix A: Technical Information or if these steps do not help you solve your problem, the results will most certainly give you a better handle on what to tell Technical Support once you do contact them. The information provided here is in symptom/ response form. That is, a symptom is given, and a check point response is provided for you. Symptom 1 The computer does not power-up or respond after installing the Vidiola card. Check 1. Is the Vidiola properly installed in the slot? Is the edge connector inserted all the way into the expansion slot? Is the Vidiola properly aligned with the motherboard’s backplane? 2. Are your computer and monitor plugged in? Check the power cables to your computer and monitor. Symptom 2 My computer boots up, but there is no picture or a scrambled screen. Check 1. Is the VGA loop-thru cable connected properly to the Vidiola card? See Section 1 for proper connections. 2. Is the monitor cable connected to the Vidiola card? 3. Is the feature connector ribbon cable connected properly between Vidiola and your VGA card? 40 Vidiola User's Manual Appendix A: Technical Information Symptom 3 I am experiencing distorted colors in Windows. Check 1. Change the configured setting for the VGA compatibility jumper (JP15) for your Vidiola card. Refer to Section 1 for alternate settings. 2. If you are using a VL-BUS graphics card, run Vidiola's VGAUTIL.EXE program and change the BUS setting to VL. To run the VGAUTIL.EXE program: a. Open the Windows File Manager program, then open the directory where the Vidiola software is installed. b. Double-click on VGAUTIL.EXE and the following screen appears: 3. Check your graphics card manual or README file for any changes needed for your configuration when using a video overlay card. Vidiola User's Manual 41 Appendix A: Technical Information Symptom 4 My captured movies do not contain any audio. Check 1. Verify the settings in your software application to make sure it is configured to capture audio. 2. Are the sound drivers for your audio card installed in Windows? Consult the audio card's manual. 3. Check to make sure that the Audio Out connector of your video source is connected to the Line In connector of your audio card. Consult your video source and audio card manuals for proper connections. 4. Check to make sure that your audio card is installed and configured properly. Symptom 5 The capture rate is not very good. Check You can improve the performance by following the suggestions below: 1. Record to a RAM disk (if you have enough memory). 2. Capture to memory. Even if you do not have a lot of memory, Vidiola will still use it as a buffer, and should improve performance. 3. If you have the Windows SMARTDRV.EXE program loaded, try removing it from your CONFIG.SYS file. 4. If you have the Windows SMARTDRV.EXE program loaded in your AUTOEXEC.BAT file, disable the write caching option. Refer to your Microsoft Windows User's Guide. 42 Vidiola User's Manual Appendix A: Technical Information 5. Defragment your hard disk drive with a disk maintenance/optimizer program. You can purchase a disk optimizer program from your local computer store. Symptom 6 Video capture seems to work fine but the playback is distorted, or vice versa. Check 1. Lower the refresh rate of your graphics card to the following: 60Hz for 640x480 resolution 56Hz for 800x600 resolution Symptom 7 My video display freezes during capture, or no frames were captured. Check 1. Check to see whether another card in your system is using the same IRQ or memory address as Vidiola. If you need to change Vidiola's IRQ address, use Jumper JP1. Make sure the new setting matches the setting in the Hardware Configuration section of the Vidiola Configuration Program. If you need to change the memory address setting, use the Vidiola Configuration Program (refer to Section 3). 2. For Vidiola Premium only. The data rate is too high. Try decreasing the Quality Setting. Initially, decrease it to a very low value and then gradually increase until you find the threshold point. Vidiola User's Manual 43 Appendix A: Technical Information Symptom 8 The capture program only captures the first video frame. Check 1. Check to see whether another card in your system is using the same IRQ or memory address as Vidiola. If you need to change Vidiola's IRQ address, use Jumper JP1. Make sure the new setting matches the setting in the Hardware Configuration section of the Vidiola Configuration Program. If you need to change the memory address setting, use the Vidiola Configuration Program (refer to Section 3). Symptom 9 The video window color is magenta. I cannot see any video. Check 1. Make sure your source device is connected properly to the composite or S-Video connectors. Refer to Figure 1.1 or 1.2. 2. Check the Video Source Configuration and make sure you selected the correct source device. Refer to Section 3. 3. Your graphics card must be set in one of Vidiola's supported resolutions. The resolutions are: 640x480 up to 64K colors at 60Hz 800x600 up to 256 colors at 60Hz 4. Disable the Vidiola assisted playback. Open the Vidiola Configuration program, click on the SuperZoom button and turn SuperZoom OFF (refer to Section 3: Using Vidiola). 44 Vidiola User's Manual Appendix A: Technical Information Symptom 10 The Live Video window displays vertical bars or is distorted with multicolored lines. Check 1. Try changing the base address setting. Refer to the Hardware Configuration program in Section 3. 2. Refer to "Avoiding Address Conflicts" in this section. Symptom 11 When using Adobe Capture, I receive the error message "No video was captured, possibly because of insufficient memory, or because your capture card wasn't connected to a video source." Check 1. Check to see whether another card in your system is using the same IRQ or memory address as Vidiola. If you need to change Vidiola's IRQ address, use Jumper JP1. Make sure the new setting matches the setting in the Hardware Configuration section of the Vidiola Configuration Program. If you need to change the memory address setting, use the Vidiola Configuration Program (refer to Section 3). Symptom 12 I receive the error message "Cannot save the captured bitmap. The destination disk may be full." Check 1. You are trying to do single frame capture using the Vidiola Compressed Format option. Change the format to either "16-bit RGB" or "24-bit RGB." Refer to "Video Capture Guidelines" in Section 3. Vidiola User's Manual 45 Appendix A: Technical Information Avoiding Address Conflicts A conflict may occur if you have another card in your system using the same IRQ or memory addresses as Vidiola. Resolve the conflict by selecting another available address. When selecting a different address, please note the following information: ☞ A BUS mouse commonly uses I/O address 240H ☞ Network cards commonly use the following addresses: IRQ 10 or 11 I/O 300H, 320H, 340H or 360H ☞ Other devices such as SCSI cards, hard disks and CD-ROM drives commonly use the following addresses: IRQ 10, 11, 14 or 15 I/O 330H or 340H ☞ I/O and DMA conflicts will normally lock up your system. ☞ The memory base address used must also be excluded in your memory manager program. For example, to exclude the D000H to DFFFH address segment in the EMM386 memory manager program, the following syntax is used: C:\EMM386.EXE NOEMS X=D000-D7FF or X=D800-DFFF Refer to your memory manager program user's manual for details on using an exclusion statement. 46 Vidiola User's Manual Please write down all address settings for future reference. Appendix A: Technical Information Technical Specifications This section includes the technical specifications for all Vidiola products, and provides software installation information for upgrading memory. Features • Full-motion video capture • SuperZoom playback • Graphics Overlay • NTSC or PAL input Memory Configurations Vidiola - 1.0MB DRAM (upgradeable to 1.5MB) Vidiola Pro - 1.5MB DRAM Vidiola Premium - 1.5MB DRAM Computers Supported ISA machines: 386, 486 and compatibles Pentium-based systems Card Size 7" x 3.25 (Vidiola) Full-length (Vidiola Pro & Premium) External Connectors S-Video Sub card (S-Video input and output) (Vidiola Pro & Premium) 4-pin mini din (S-Video input) (Vidiola) 6-pin mini din (VGA input) 15-pin D-Shell VGA Composite video (RCA) NTSC or PAL composite video output (RCA) (Vidiola Pro & Premium) NTSC or PAL S-Video output (mini-din) (Vidiola Pro & Premium) Vidiola User's Manual 47 Appendix A: Technical Information Cables VGA loop thru (external) VESA standard feature connector Additional Features Video-in-a-Window • Y:U:V video • 640x480 overlay up to 65K colors • 800x600 overlay up to 256K colors • 1024x768 (I) overlay up to 256K colors (Vidiola Pro & Premium only) • Control of brightness, contrast, saturation, hue and color keying Video Capture (capture software supplied w/ Vidiola, Vidiola Pro/D and Vidiola Premium only) • Still image grab • Motion grab - 160x120 at 30 frames per second* (fps ) - 240x180 at 15fps* - 320x240 at 15fps* - 320x240 at 30fps* (Vidiola Premium only) Formats • AVI (Audio/Video Interleave) 8-bit, 16-bit, 24-bit, and compressed YUV • Motion JPEG (Vidiola Premium only) Video Playback • SuperZoom - up to four times interpolated zoom (makes a 160x120 movie full screen) * Depends on system performance. 48 Vidiola User's Manual Appendix A: Technical Information Memory Upgrade Vidiola comes configured with 1MB of DRAM (Dynamic Random Access Memory). The additional memory is automatically detected by Vidiola and must meet the following specifications: • 256K x 16 DRAM • Operate at 70 nanoseconds access time or faster. The access time is indicated on the chip as follows: -7 = 70 nanoseconds access time To add .5MB of memory to your Vidiola, you will need to install one 256K x 16 DRAM chip into BANK 1 (refer to Figure 1.1). Follow the steps below. NOTE: Avoid electrostatic discharge when handling the memory chips. Be properly grounded by touching the power supply housing or by using a Ground Strap. 1. To install a memory chip, position it over the empty socket. Make sure the writing on the chip is facing the same direction as the memory chips already installed. 2. Place the memory chip down into the socket. Once you have finished installing the memory, you must make software changes. See "Memory Upgrade Software Changes." 3. Use your thumbs to press evenly each side of the memory chip down into the socket. You will hear a small "snap" as the chip is fully installed. Vidiola User's Manual 49 Appendix A: Technical Information Memory Upgrade Software Changes Once you have finished installing DRAM memory on your Vidiola card, you will need to make the following software changes. These instructions assume that the Vidiola software installation has already been done. Software Configuration Instructions 1. Start Microsoft Windows. 2. Click on the File option from the menu bar. Select the Run option and type AVWIN.INI on the command line. This will open the Notepad program and display the Vidiola configuration file. 3. Scroll down to the [AVSETTINGS] section and locate the line that reads: Interleave = 2 change to read: Interleave = 4 4. To save your changes, click on the File option on the menu bar, then select the Save option. You have successfully completed the memory upgrade. 50 Vidiola User's Manual Appendix A: Technical Information Vidiola VGA OUT Pin-Out Specifications The VGA OUT pin-out specifications are the same as the standard 15-pin D-shell connector. The pin-outs are as follows: 1. Red video 2. Green video 3. Blue video 4. Monitor ID Bit 2 5. Ground 6. Red return 11. Monitor ID Bit 0 7. Green return 12. Monitor ID Bit 1 8. Blue return 13. Horizontal sync 9. No connection 14. Vertical sync 10. Sync return 15. Not used Figure A.1: Vidiola 15-pin Pin-Outs Vidiola User's Manual 51 Appendix A: Technical Information Feature Connector Pin-Outs (VESA Standard) The VESA standard Feature Connector (or Auxiliary Video Connector as it is sometimes called) is located at the top of the Vidiola (see Figure 1.1 or 1.2). The feature connector permits third party add-on accessories to both share signals and share control of the VGA circuitry. The following table lists the feature connector’s pin-out specifications: Vidiola Feature Connector Pin-Outs Pin Function Pin Function Pin Y1 Pixel Data 0 Y8 Pixel Data 7 Z2 Function Ground Pin Z9 Function Ground Ground Ground Y2 Pixel Data 1 Y9 Pixel Clock Y3 Pixel Data 2 Y10 Blanking Z3 Z4 Ground (See Note 1) Z10 Z11 Y4 Pixel Data 3 Y11 Hor. Sync Y5 Pixel Data 4 Y12 Vert. Sync Y6 Pixel Data 5 Y13 Ground Z5 Z6 Z7 (See Note 2) (See Note 3) No Connect Z12 No Connect Z13 No Pin (Key) Y7 Pixel Data 6 Z1 Z8 Ground Ground Table A.1: VESA Feature Connector Pin-Outs NOTES: (1) Low Enable External Pixel Data Input to the motherboard DAC. (2) Low Enable External Sync and Blanking Inputs to the motherboard DAC. (3) Low Enable External Pixel Clock Input to the motherboard DAC. 52 Vidiola User's Manual Appendix B: Tech Support Tips Appendix B FROM THE TRENCHES: TECH SUPPORT TIPS Although we would love to talk to you personally, we are sure that you would rather not have the need to call us! So, we have created this list of the most common issues to help you get up and running with your new Vidiola card. If you have further questions, please feel free to contact us. Cabling Make sure that all of the cables are hooked up correctly. Refer to the user manual for more information. Software installation (this point is not applicable for the Vidiola Pro/C card) It is very important to install the Adobe Premiere Software first. This is because it includes Microsoft Video for Windows, which is required for your Vidiola card to capture video correctly. Vidiola Initialization To ensure that the Vidiola INIT has initialized, listen to the click upon entering windows coming from your Vidiola board. Also, notice that the screen brightness will change. Video Standards There are two video standards supported by Vidiola: NTSC and PAL. NTSC runs at 30 frames per second and PAL runs at 25 frames per second. NTSC is used in the USA and PAL is used in Europe and the Pacific Rim. If you are unsure which standard applies to your video input source, inspect the device and somewhere on it there is usually a label that says what standard it is. Vidiola User's Manual 53 Appendix B: Tech Support Tips Once you have decided which standard your video input device supports, you must set it up correctly in the Source Configuration section of the Vidiola Configuration program. Also, you must select the appropriate number of frames per second (fps) in the capture program. If you attempt to capture 30fps with a PAL video source, five frames are dropped for each second captured because those frames are not there! Vidiola Configuration Program Settings Upon entering windows, confirm that your address settings and Vidiola options are set properly in the Vidiola Configuration program. Confirm that your software settings match your hardware settings on your Vidiola board, and that your video source is playing and can be viewed through the Live Video window. Video Capture Issues (this point is not applicable for the Vidiola Pro/C card) If you fail to capture properly in Adobe Capture, recheck your capture options or try changing the settings in the "Hardware" section of the Vidiola Configuration program. As a quick test, you can switch off the overlay inside the Adobe Capture program. To do this, uncheck the Overlay setting from the Capture pull-down menu. If your Memory Base setting is correct you will see the video, but it will be running at a slower frame rate. If your settings are not correct, you will see multicolored bars; this means that your Memory Base setting is wrong and you should try a different setting. You can change the setting without having to restart Windows, however, you must restart the Adobe Capture Program after each change to reinitialize the capture driver. NOTE: Recheck the Overlay setting before attempting capture. 54 Vidiola User's Manual Appendix B: Tech Support Tips NTSC Video Output (Vidiola Pro and Vidiola Premium only) If you do not get an output signal make sure you are running your VGA at 640x480, 60Hz refresh rate. If this fails, configure your windows desktop again using the Microsoft VGA driver and confirm that the Vidiola INIT has been initialized. Base Memory Setting If your motherboard has over 8MB of system memory installed, please remember to configure your Vidiola software for a hexadecimal memory base. Also, remember to exclude the appropriate memory range from your memory management (this pertains to EMM386, QEMM, Netroom, and 386MAX). Refer to your memory management documentation if you are unfamiliar with the appropriate exclude syntax required. Hex Address Exclusion Required D000H D800H E000H E800H D000-D7FF D800-DFFF E000-E7FF E800-EFFF For example, if you are using EMM386 and you have selected a Hex Address of D000H, the line in your CONFIG.SYS file would read: DEVICE=C:\DOS\EMM386.EXE X=D000-D7FF VGA Compatibility Your Vidiola card is designed to connect to a VGA card using the feature connector. This connector is an industry standard endorsed by VESA (Video Electronics Standards Association). Orchid Technology has performed extensive testing to ensure that the feature connector on the Vidiola card con- Vidiola User's Manual 55 Appendix B: Tech Support Tips forms to this standard. Unfortunately, there are a number of VGA and VGA accelerator cards that do not conform to this specification correctly. These boards will not work with your Vidiola card. If you experience any VGA compatibility issues, follow these steps to help determine the problem: 1. Use Microsoft Windows standard VGA (640x480x16 color) driver prior to attempting to run Vidiola using your video card's enhanced drivers. Select this driver through the Windows SETUP program. 2. Confirm that your video card is configured for a vertical refresh of 60Hz at the resolution you are attempting to capture. NOTE: Vidiola only captures at 640x480 up to 65K colors and 800x600 up to 256 colors, depending on the capability of your video card. 3. If your Windows desktop displays color palette distortions, run Vidiola's VGAUTIL.EXE program and change the BUS setting to VL. Refer to "Symptom 3" in Appendix A. Once you have tried these suggestions, and you still have problems with VGA compatibility, you may want to consider purchasing Orchid’s own graphics card, Kelvin. This product line is fully tested with Vidiola to ensure complete compatibility. Should you need to call us, it would help us greatly if, before calling, you complete the following "System Configuration" chart. Thank you. 56 Vidiola User's Manual Appendix B: Tech Support Tips System Configuration Chart (If possible, please complete before calling Technical Support) HARDWARE DMA VIDIOLA IRQ BASE ADDRESS MEMORY BASE N/A GRAPHICS BOARD SOUND CARD SoundBlaster Support Midi Support Windows Sound System Support CD-ROM DRIVE HARD DRIVE NETWORK BOARD SCANNER OTHER Vidiola User's Manual 57 Appendix B: Tech Support Tips 58 Vidiola User's Manual Appendix C: Playing AVI Files Appendix C AVI FILES ON NON-VIDIOLA SYSTEMS If you want to play AVI files captured using the Vidiola compressed format, on a system that does not have a Vidiola card installed, follow the steps below: 1. Copy the following files from the WINDOWS\SYSTEM directory of the Vidiola system, to the WINDOWS\SYSTEM directory of the target system: AVCODEC.DRV AVWIN.DLL 2. Add the following three lines to the [drivers] section of the SYSTEM.INI file on the target system: VIDC.AURA=AVCODEC.DRV VIDS.DRAW=AVCODEC.DRV VIDS.FULL=AVCODEC.DRV The target system also needs to have a runtime version of Microsoft Video for Windows. (A runtime version is available from Microsoft's Bulletin Board Service.) Many popular MPC software applications install Microsoft Video for Windows as part of their installation, so the target system may already have it installed. Vidiola User's Manual 59 Appendix C: Playing AVI Files 60 Vidiola User's Manual Appendix D: Video Director Appendix D VIDEO DIRECTOR AND VIDIOLA PRO/C Video Director software comes only with the Vidiola Pro/C. The information below provide instructions for using Video Director with your Vidiola Pro/C. Using Video Director 2.0 with Vidiola Pro/C 1. The Video Director's video output option must be set up correctly. To do this, select Video Output from the Video Director Setup menu option. The following screen appears: Figure D.1: Video Output Setup From this screen select the "MCI Overlay with Video Output" option. 2. If while using Video Director you experience problems relating to the Live video display, check for the existence of the following file on your system: DIGITALV.MCI. This file is usually located in the \WINDOWS\SYSTEM directory. If you locate this file, rename it to a name like DIGITALV.OLD. This file is sometimes installed by other digital video boards, but is not needed by your Vidiola Pro/C. Vidiola User's Manual 61 FCC FCC NOTICE FCC# DDS7EF1093-VI-BAS * Vidiola Certified compliant with FCC Class B limits, part 15 To meet FCC requirements, shielded cables are required to connect the unit to a Class B certified device “This device complies with Part 15 of the FCC Rules. Operation is subject to the following two conditions: (1) this device may not cause harmful interference, and (2) this device must accept any interference received, including interference that may cause undesired operation.” This equipment generates and uses radio frequency energy and, if not installed and used properly in strict accordance with the manufacturer’s instructions, may cause interference to radio or television reception. This device has been tested and found to comply with the limits for a Class B computing device in accordance with the specifications in Subpart J of Part 15 of FCC Rules, which are designed to provide reasonable protection against such interference in a residential installation. Only equipment (computer input/output devices, terminals, printers, etc.) certified to comply with the Class B limits may be attached to this product. If this equipment causes interference to radio or television reception, which can be determined by turning the equipment off and on, the user is encouraged to try and correct the interference by one or more of the following measures: 1. Reorient the receiving antenna. 2. Relocate the computer with respect to the receiver. 3. Move the computer away from the receiver. 4. Plug the computer into an outlet which resides on a different circuit breaker than the receiver. 5. If necessary, consult your dealer, or an experienced radio or television technician for additional suggestions. You may find the booklet How To Identify and Resolve Radio-TV Interference Problems helpful. It was prepared by the Federal Communications Commission and is available from the U.S. Government Printing Office, Washington, DC 20402. Refer to stock number: 004-000-00345-4. Orchid Technology is not responsible for any radio or TV interference caused by unauthorized modifications to this equipment. It is the responsibility of the user to correct such interference. Operation with non-certified equipment is likely to result in interference to radio and TV reception. The user must use shielded interface cables in order to maintain the product within FCC compliance. * For Vidiola. For Vidiola Pro and Vidiola Premium the FCC number is DDS7EF1094-VI-PRO. 62 Vidiola User's Manual Index INDEX A Address Conflicts - 46 AVI Files - 59 C Cables Connections - 18, 19, 21 Ribbon cable - 18, 19 S-Video cable - 21 VGA loop-thru cable - 19 CompuServe - 39 Configuration Program - 25 Connectors - 11, 12 D Diagram Vidiola - 11 Vidiola Premium Daughtercard - 13 Vidiola Pro & Premium - 12 Vidiola S-Video Sub card - 13 Drivers Installation - 23 F Feature Connector - 11, 12, 52 H Help Tips to use - 39 Vidiola User's Manual 63 Index High Resolutions - 38 I Installation Connecting cables - 18, 19 , 21 Installing the Vidiola - 18 Preparing your Computer - 14 Preparing your Vidiola Pro - 11 J Jumpers Jumper JP1 (IRQ Address) - 16 Jumper JP2 (Base Address) - 16 Jumper JP4 & JP3 (Compressor Base Address - 17 Jumper JP15 (VGA Compatibility) - 16, 17 L Live Video - 33 M Memory Address Setting - 16, 17, 28 Configuration - 21 Software Changes - 50 Upgrade - 49 N NTSC Video Output - 33 64 Vidiola User's Manual Index P Pal Video Output - 34 Pin Out Specifications - 51, 52 Q Quick Install Hardware - 9 Software - 10 R Refresh Rate - 14 Resolutions supported - 14 S Software Installation - 23 S-Video (S-VHS) connections - 20 T Technical Help - 39 Technical Information - 39 Troubleshooting - 39 V Vertical Refresh Rate - 14 VGA OUT Pin-Out Specifications - 51 Video Capture Applications - 29 Video Capture Guidelines - 32 Vidiola Live Video - 33 Vidiola User's Manual 65