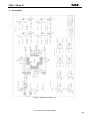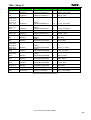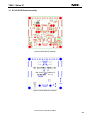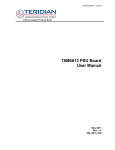
1
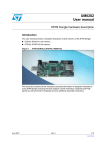
User’s Manual
78K0 - Shine It!
Demonstration Board for NEC
Electronics µPD78f8024 High-CurrentDrive/LED Microcontroller
Document No. U19610EE3V0UM00
Date Published May 2009
© NEC Electronics (Europe) GmbH
78K0 - Shine It!
•
The information in this document is current as of June, 2008. The information is subject to change
without notice. For actual design-in, refer to the latest publications of NEC Electronics data
sheets or data books, etc., for the most up-to-date specifications of NEC Electronics products.
Not all products and/or types are available in every country. Please check with an NEC Electronics
sales representative for availability and additional information.
•
No part of this document may be copied or reproduced in any form or by any means without the prior
written consent of NEC Electronics. NEC Electronics assumes no responsibility for any errors that may
appear in this document.
•
NEC Electronics does not assume any liability for infringement of patents, copyrights or other intellectual
property rights of third parties by or arising from the use of NEC Electronics products listed in this
document or any other liability arising from the use of such products. No license, express, implied or
otherwise, is granted under any patents, copyrights or other intellectual property rights of NEC Electronics
or others.
•
Descriptions of circuits, software and other related information in this document are provided for
illustrative purposes in semiconductor product operation and application examples. The incorporation of
these circuits, software and information in the design of a customer's equipment shall be done under the
full responsibility of the customer. NEC Electronics assumes no responsibility for any losses incurred by
customers or third parties arising from the use of these circuits, software and information.
•
While NEC Electronics endeavors to enhance the quality, reliability and safety of NEC Electronics
products, customers agree and acknowledge that the possibility of defects thereof cannot be eliminated
entirely. To minimize risks of damage to property or injury (including death) to persons arising from
defects in NEC Electronics products, customers must incorporate sufficient safety measures in their
design, such as redundancy, fire-containment and anti-failure features.
•
NEC Electronics products are classified into the following three quality grades: "Standard", "Special" and
"Specific".
The "Specific" quality grade applies only to NEC Electronics products developed based on a customerdesignated "quality assurance program" for a specific application. The recommended applications of an
NEC Electronics product depend on its quality grade, as indicated below. Customers must check the
quality grade of each NEC Electronics product before using it in a particular application.
"Standard": Computers, office equipment, communications equipment, test and measurement
equipment, audio and visual equipment, home electronic appliances, machine tools,
personal electronic equipment and industrial robots.
"Special":
Transportation equipment (automobiles, trains, ships, etc.), traffic control systems,
anti-disaster systems, anti-crime systems, safety equipment and medical equipment
(not specifically designed for life support).
"Specific": Aircraft, aerospace equipment, submersible repeaters, nuclear reactor control
systems, life support systems and medical equipment for life support, etc.
The quality grade of NEC Electronics products is "Standard" unless otherwise expressly specified in NEC
Electronics data sheets or data books, etc. If customers wish to use NEC Electronics products in applications
not intended by NEC Electronics, they must contact an NEC Electronics sales representative in advance to
determine NEC Electronics' willingness to support a given application.
(Note)
(1) "NEC Electronics" as used in this statement means NEC Electronics Corporation and also includes its
majority-owned subsidiaries.
(2) "NEC Electronics products" means any product developed or manufactured by or for NEC Electronics (as
defined above).
M8E 02. 11-1
User’s Manual U19610EE3V0UM00
2
78K0 - Shine It!
CAUTION
This is a Test- and Measurement equipment with possibility to be significantly
altered by user through hardware enhancements/modifications and/or test or
application software. Thus, with respect to Council Directive 89/336/EEC
(Directive on compliance with the EMC protection requirements), this equipment
has no autonomous function. Consequently this equipment is not marked by the
CE-symbol.
EEDT-ST-005-10
CAUTION
This equipment should be handled like a CMOS semiconductor device. The
user must take all precautions to avoid build-up of static electricity while
working with this equipment. All test and measurement tool including the
workbench must be grounded. The user/operator must be grounded using
the wrist strap. The connectors and/or device pins should not be touched
with bare hands.
EEDT-ST-004-10
For customers in the European Union only
Redemption of Waste Electrical and Electronic Equipment
(WEEE) in accordance with legal regulations applicable in the
European Union only: This equipment (including all
accessories) is not intended for household use. After use the
equipment cannot be disposed of as household waste. NEC
Electronics (Europe) GmbH offers to take back the equipment.
All you need to do is register at http://www.eu.necel.com/weee
User’s Manual U19610EE3V0UM00
3
78K0 - Shine It!
Regional Information
Some information contained in this document may vary from country to country. Before using any NEC
product in your application, please contact the NEC office in your country to obtain a list of authorized
representatives and distributors. They will verify:
•
•
•
•
•
•
Device availability
Ordering information
Product release schedule
Availability of related technical literature
Development environment specifications (for example, specifications for
third-party tools and components, host computers, power plugs, AC supply
voltages, and so forth)
Network requirements
In addition, trademarks, registered trademarks, export restrictions, and other legal issues may also vary
from country to country.
NEC Electronics Inc. (U.S.)
Santa Clara, California
Tel: 408-588-6000
800-366-9782
Fax: 408-588-6130
800-729-9288
NEC Electronics Hong Kong Ltd.
Hong Kong
Tel: 2886-9318
Fax: 2886-9022/9044
NEC Electronics (Europe) GmbH
Duesseldorf, Germany
Tel: 0211-65 03 0
Fax: 0211-65 03 1327
NEC Electronics Hong Kong Ltd.
Seoul Branch
Seoul, Korea
Tel: 02-528-0303
Fax: 02-528-4411
Sucursal en España
Madrid, Spain
Tel: 091- 504 27 87
Fax: 091- 504 28 60
NEC Electronics Singapore Pte. Ltd.
Singapore
Tel: 65-6253-8311
Fax: 65-6250-3583
Succursale Française
Vélizy-Villacoublay, France
Tel: 01-30-67 58 00
Fax: 01-30-67 58 99
NEC Electronics Taiwan Ltd.
Taipei, Taiwan
Tel: 02-2719-2377
Fax: 02-2719-5951
Filiale Italiana
Milano, Italy
Tel: 02-66 75 41
Fax: 02-66 75 42 99
NEC do Brasil S.A.
Electron Devices Division
Guarulhos, Brasil
Tel: 55-11-6465-6810
Fax: 55-11-6465-6829
Branch The Netherlands
Eindhoven, The Netherlands
Tel: 040-244 58 45
Fax: 040-244 45 80
Branch Sweden
Taeby, Sweden
Tel: 08-63 80 820
Fax: 08-63 80 388
United Kingdom Branch
Milton Keynes, UK
Tel: 01908-691-133
Fax: 01908-670-290
User’s Manual U19610EE3V0UM00
4
78K0 - Shine It!
Revision History
Date
28-01-2009
17-04-2009
11-05-2009
Revision
V1.00
V2.00
V3.00
Chapter
--Chap 1, 2
Chap 7
Description
First release
Description of external LED board corrected
Updated to Applilet EZ for HCD V3.50
User’s Manual U19610EE3V0UM00
5
78K0 - Shine It!
Table of Contents
1.
Introduction ........................................................................................................................11
1.1
1.2
1.3
1.4
Package contents............................................................................................................................ 11
Features ........................................................................................................................................... 11
System requirements...................................................................................................................... 12
Trademarks ...................................................................................................................................... 12
2.
Hardware.............................................................................................................................13
2.1
2.2
2.3
2.4
2.5
2.6
2.7
2.8
2.9
2.10
2.11
2.12
2.13
Power Supply .................................................................................................................................. 13
LED Drivers...................................................................................................................................... 13
On-board LUXEON Rebel LEDs..................................................................................................... 14
External LED Board ........................................................................................................................ 16
LED Light Engine Connector ......................................................................................................... 16
RS-485/DMX-512 Interface.............................................................................................................. 17
RS-232 Interface .............................................................................................................................. 17
Expansion IO Connector ................................................................................................................ 17
USB Programming and Debugging Interface............................................................................... 18
Ambient Light Sensor................................................................................................................... 18
Temperature Sensor ..................................................................................................................... 18
DIP Switch...................................................................................................................................... 18
Reset Switch.................................................................................................................................. 18
3.
Shine It! installation and operation ..................................................................................19
3.1
3.2
3.3
Getting started................................................................................................................................. 19
CD-ROM contents ........................................................................................................................... 19
Pre-programmed Demo-Application ............................................................................................. 19
4.
Hardware installation.........................................................................................................20
5.
Software installation..........................................................................................................20
5.1
5.2
5.3
5.4
5.5
5.5.1
5.5.2
5.6
Applilet EZ for HCD Controller installation .................................................................................. 20
IAR Systems Embedded Workbench for 78K installation .......................................................... 21
Device file package of µPD78F8024 for IAR Embedded Workbench installation..................... 21
WriteEZ3 installation....................................................................................................................... 21
USB Driver Installation ................................................................................................................... 21
Installation on Windows 2000 ........................................................................................................ 21
Installation on Windows XP............................................................................................................ 25
Confirmation of USB Driver Installation ....................................................................................... 27
6.
Applilet EZ for HCD Controller .........................................................................................29
7.
Using the Applilet EZ for HCD Controller ........................................................................30
7.1
Exercise 1 – Applilet EZ for HCD Controller settings.................................................................. 30
User’s Manual U19610EE3V0UM00
6
78K0 - Shine It!
7.2
7.3
7.4
7.5
Exercise 2 – Fix dimmer program ................................................................................................. 32
Exercise 3 – Variable dimmer program......................................................................................... 34
Exercise 4 – Analog input program............................................................................................... 37
Exercise 5 – UART0 serial command program ............................................................................ 39
8.
Flash Programmer WriteEZ3.............................................................................................45
8.1
8.2
Device Setup.................................................................................................................................... 45
Using WriteEZ3................................................................................................................................ 46
9.
Set up a IAR C-SPY debug session..................................................................................47
9.1
9.2
9.3
Flashing the Debug monitor .......................................................................................................... 47
Changing the EXEC communication DLL..................................................................................... 47
Debugging the project within the IAR Embedded Workbench .................................................. 48
10.
Cables ...............................................................................................................................51
10.1
USB interface cable (Mini-B type) ............................................................................................... 51
11.
Schematics .......................................................................................................................52
12.
Bill of materials ................................................................................................................54
13.
EV-K0-HCD Board Assembly ..........................................................................................56
14.
Board Layout....................................................................................................................57
User’s Manual U19610EE3V0UM00
7
78K0 - Shine It!
List of Figures
Figure 1: EV-K0-HCD Board (Top View).....................................................................................................13
Figure 2: EV-K0-HCD Board (Bottom View) ...............................................................................................13
Figure 3: Driving the On-board LEDs ..........................................................................................................15
Figure 4: Driving External LED Boards .......................................................................................................16
Figure 5: Driving the Dialight Light Engines ................................................................................................16
Figure 6: Shine It! CDROM autorun.exe .....................................................................................................20
Figure 7: Found New Hardware Wizard (Windows 2000)...........................................................................21
Figure 8: Search Method (Windows 2000)..................................................................................................22
Figure 9: Driver File Location (Windows 2000) ...........................................................................................22
Figure 10: Address Specification 1 (Windows 2000) ..................................................................................23
Figure 11: Address Specification 2 (Windows 2000) ..................................................................................23
Figure 12: Address Specification 3 (Windows 2000) ..................................................................................24
Figure 13: Driver File Search (Windows 2000) ...........................................................................................24
Figure 14: USB Driver Installation Completion (Windows 2000) ................................................................24
Figure 15: Found New Hardware Wizard 1 (Windows XP).........................................................................25
Figure 16: Found New Hardware Wizard 2 (Windows XP).........................................................................25
Figure 17: Search Location Specification 1 (Windows XP).........................................................................26
Figure 18: Search Location Specification 2 (Windows XP).........................................................................26
Figure 19: Windows XP Logo Testing (Windows XP) .................................................................................27
Figure 20: USB Driver Installation Completion (Windows XP)....................................................................27
Figure 21: Windows Device Manager .........................................................................................................28
Figure 22: Applilet EZ for HCD Controller Main Window ............................................................................30
Figure 23: Applilet EZ for HCD Controller Setting.......................................................................................30
Figure 24: Applilet EZ for HCD Controller CPU settings .............................................................................31
Figure 25: Applilet EZ for HCD UART settings ...........................................................................................31
Figure 26: Applilet EZ for HCD Controller Compiler selection ....................................................................32
Figure 27: Applilet EZ for HCD Controller Folder Settings..........................................................................32
Figure 28: Applilet EZ for HCD Controller Dimmer Program settings (Fix).................................................32
Figure 29: Applilet EZ for HCD Controller Save File as (fix.xml) ...............................................................33
Figure 30: Applilet EZ for HCD Controller All Program button ....................................................................33
Figure 31: Applilet EZ for HCD Controller compilation progress.................................................................33
Figure 32: Applilet EZ for HCD Controller Start Flash programming ..........................................................34
Figure 33: Applilet EZ for HCD Controller Flash programming status ........................................................34
Figure 34: Applilet EZ for HCD Controller Save File as (variable.xml) .......................................................35
Figure 35: Applilet EZ for HCD Controller Dimmer Program selection (Variable) ......................................35
Figure 36: Applilet EZ for HCD Dimmer Programming Window .................................................................35
Figure 37: Applilet EZ for HCD Controller Wave Editor (set) ......................................................................36
Figure 38: Applilet EZ for HCD Controller Variable Dimmer Control settings (set).....................................37
Figure 39: ADC potentiometer connection ..................................................................................................38
Figure 40: Applilet EZ for HCD Controller Save File as (ADC.xml) ............................................................38
Figure 41: Applilet EZ for HCD Controller Dimmer Program settings (Analog Input) .................................39
Figure 42: Applilet Ez for HCD Controller Save File as (uart0.xml) ............................................................40
Figure 43: Applilet EZ for HCD Controller Dimmer Program settings (Serial Command) ..........................40
Figure 44: Microsoft HyperTerminal Connection Description .....................................................................41
Figure 45: Microsoft HyperTerminal Connect to .........................................................................................41
Figure 46: Microsoft HyperTerminal COM1 Properties ...............................................................................42
Figure 47: Microsoft HyperTerminal ASCII settings (1/2) ...........................................................................42
Figure 48: Microsoft HyperTerminal ASCII settings (2/2) ...........................................................................43
Figure 49: Microsoft HyperTerminal Command Window ............................................................................43
Figure 50: WriteEZ3 Startup........................................................................................................................45
Figure 51: WriteEZ Device Setup Dialogue ................................................................................................45
Figure 52: WriteEZ3 Device Menu ..............................................................................................................46
Figure 53: WriteEZ3 Open file.....................................................................................................................47
Figure 54: IAR Embedded Workbench Startup...........................................................................................48
Figure 55: IAR Embedded Workbench Open Workspace ..........................................................................49
Figure 56: IAR Embedded Workbench Debugger Options .........................................................................49
Figure 57: IAR Embedded Workbench Linker Options ...............................................................................50
Figure 58: IAR Embedded Workbench .xcl file selection ............................................................................50
User’s Manual U19610EE3V0UM00
8
78K0 - Shine It!
Figure 59: USB interface cable (Mini-B type)..............................................................................................51
Figure 60: EV-K0-HCD schematics 1 / 2.....................................................................................................52
Figure 61: Ev-K0-HCD schematics 2 / 2 .....................................................................................................53
Figure 62: EV-K0-HCD Top Assembly ........................................................................................................56
Figure 63: EV-K0-HCD Bottom Assembly...................................................................................................56
Figure 64: EV-K0-HCD Top Layer...............................................................................................................57
Figure 65: EV-K0-HCD Layer 1...................................................................................................................57
Figure 66: EV-K0-HCD Board Layer 2 ........................................................................................................58
Figure 67: EV-K0-HCD Bottom Layer .........................................................................................................58
User’s Manual U19610EE3V0UM00
9
78K0 - Shine It!
List of Tables
Table 1: LED Light Engine Connectors .......................................................................................................16
Table 2: RS-485/DMX-512 Connectors ......................................................................................................17
Table 3: RS-232 Connector.........................................................................................................................17
Table 4: Expansion IO Connector ...............................................................................................................17
Table 5: Board Configuration Options .........................................................................................................18
Table 6: Shine I t! CD-ROM directory structure .........................................................................................19
Table 7: WriteEZ3 action buttons ................................................................................................................46
Table 8: Bill of materials EV-K0-HCD board ...............................................................................................55
User’s Manual U19610EE3V0UM00
10
78K0 - Shine It!
1. Introduction
The Shine it! evaluation kit for NEC Electronics’ highly integrated, general-purpose µPD78F8024
microcontroller (MCU) with high-current drive allows you to demonstrate the MCU’s capabilities and
easily develop intelligent code for emerging high-power LED lighting applications. Compact yet flexible
and functionally versatile, the board can be used to drive four channels of single or multiple high-power
LEDs in any of three different configurations:
•
With the on-board LUXEON® Rebel™ LEDs
•
Example for Use of External LED Board
•
Using off-the-shelf LED lighting engines such as the Dialight linear engine
The board also can be used to control and dim individual LED channels by means of analog and digital
sensor inputs, such as temperature, light and color. Various serial communication protocols are
supported by this board, including I2C, SPI, RS-232, and RS-485/DMX-512. Users can program, change,
and debug code easily and free of charge using the on-board USB programming and debugging interface
(available June 2008).
1.1 Package contents
•
EV-K0-HCD board
•
15VDC/1A power supply
•
USB cable
•
One set of plastic stands and screws
•
CD-ROM with Applilet EZ software and an evaluation copy of the IAR Embedded Workbench
for 78K with 4Kbyte code size limitation
Please verify that you have received all parts listed in the package contents list attached to the
Shine it! package. If any part is missing or seems to be damaged, please contact the dealer from whom
you received your Shine it!.
1.2 Features
•
NEC Electronics µPD78F8024 high-current-drive (HCD)/LED MCU
•
NEC Electronics µPA2756 dual N-channel MOSFETs
•
Four channels of constant high-current LED drivers
•
Buck topology
•
Up to 700 mA per channel
•
Supply voltage from 10 to 24 VDC
•
On-board LUXEON Rebel LEDs (red/green/blue/white)
•
Four External LED Board Connectors
•
Four LED light engine connectors
•
USB programming and debugging interface
User’s Manual U19610EE3V0UM00
11
78K0 - Shine It!
•
RS-232 interface
•
RS-485/DMX-512 interface
•
Expansion IO connector
•
On-board temperature sensor
•
On-board ambient light sensor
•
DIP switch for board configurations
•
Reset switch for uPD78F8024 device reset
1.3 System requirements
HOST PC
Host interface
Note:
A PC supporting Windows 2000, Windows XP or Windows Vista is
required for the IAR Systems Embedded Workbench demo-version.
A Pentium processor with at least 1 GHz CPU performance, with at least
256 Mbytes of RAM, allowing you to fully utilize and take advantage of the
product features. 500 Mbytes of free disk space and an additional 10
Mbytes of free disk space on the Windows system drive.
A web browser and Adobe Acrobat Reader to be able to access all the
product documentation.
USB interface that enables communication based on USB (Ver1.1 or
later)
Updates of the IAR Embedded Workbench for 78K, documentation and/or utilities for the Shine
it! Starter Kit, if available, may be downloaded from the NEC WEB page(s) at
http://www.eu.necel.com/SHINEIT
1.4 Trademarks
IAR Embedded Workbench, visualSTATE, IAR MakeApp and C-SPY are registered trademarks of IAR
Systems AB. Microsoft, Windows and HyperTerminal are registered trademarks of Microsoft Corporation.
Adobe and Acrobat Reader are registered trademarks of Adobe Systems Incorporated.
All other product names are trademarks or registered trademarks of their respective owners.
User’s Manual U19610EE3V0UM00
12
78K0 - Shine It!
2. Hardware
The EV-K0-HCD board measures 3.15 × 3.15 inches or 80 × 80 millimeters (mm). This small form factor
is enabled by the use of components such as inductors that are small in size thanks to the µPD78F8024
MCU’s constant-current drives with high switching frequency.
The board is designed with four layers. The top layer contains most of the components, the first middle
layer serves as the power plane, the second middle layer adds additional space for traces, and the
bottom layer serves as the ground plane and assembly for the temperature sensor and high-power LEDs.
The heat generated by the LEDs is dissipated through the pads and vias surrounding the LEDs, and LED
temperature is sensed by the temperature sensor mounted on top of the dissipation pad.
Figure 1: EV-K0-HCD Board (Top View)
Figure 2: EV-K0-HCD Board (Bottom View)
2.1 Power Supply
The EV-K0-HCD board requires a 10 to 24 VDC power supply with output wattage of at least 5 watts (W)
to light the high-power LEDs. The barrel-type power jack mounted on the board accepts a 2.1 mm center
pole connector (center positive).
2.2 LED Drivers
The board’s four-channel LED drivers are set in buck topology for 350 milliamps (mA) of constant output
current. However, you can increase output current up to 700 mA by changing the current sensor’s
User’s Manual U19610EE3V0UM00
13
78K0 - Shine It!
resistor values using the following formula (refer to R1, R2, R3 and R4 in the schematics). Please note
that you
need to change the inductors (refer to L1, L2, L3 and L4 in the schematics) current rating accordingly if
you wish to drive at more than 350mA.
RS = 0.115
I LED
Fomula 1
Where RS = current sensor’s resistor value and ILED = LED current. When driving the LEDs at 350 mA, the
current sensor’s resistor value should be set to 0.33 ohm (Ω).
The number of LEDs that can be used in series per channel is determined by the supply voltage and the
LED forward voltage using this formula:
N MAX ≤
VIN
VF
Fomula 2
Where VIN = supply voltage, VF = LED forward voltage current, and NMAX = maximum number of LEDs in
series per channel.
Generally, the sum of LED forward voltages must be less than the supply voltage for buck mode
operation. For a 24V power supply, for example, a maximum of six LEDs with 3.5V forward voltage may
be used in series per channel.
LED driver outputs can be connected in one of three configurations:
•
To the on-board LUXEON Rebel high-power LEDs
•
To LED boards with LUXEON K2 high-power LEDs
•
To LED light engines
2.3 On-board LUXEON Rebel LEDs
There are four LUXEON Rebel high-power LEDs mounted on the back of the EV-K0-HCD board, one red
(R), one green (G), one blue (B) and one white (W). By default, the board is set to drive the LEDs with
jumper wires inserted into the four Tyco six-position receptacle connectors (refer to J1, J2, J3 and J4 in
the schematics).
User’s Manual U19610EE3V0UM00
14
78K0 - Shine It!
Figure 3: Driving the On-board LEDs
User’s Manual U19610EE3V0UM00
15
78K0 - Shine It!
2.4 External LED Board
The EV-K0-HCD board can connect and drive commercially available external LED boards. To do so, you
must first remove the jumper wires inserted into the four Tyco receptacle connectors (J1, J2, J3 and J4)
before installing the LED boards. You can then cascade multiple LED boards in one channel as long as
the number of LEDs meets the requirement specified by Formula 2.
Figure 4: Driving External LED Boards
2.5 LED Light Engine Connector
The EV-K0-HCD board has four LED light engine connectors (refer to J5, J6, J7 and J8 in the
schematics) to the 4-pin terminal block. The following table describes the function of each pin.
Pin Number
1
2
3
4
Function
Analog input
Ground
LED anode
LED cathode
Table 1: LED Light Engine Connectors
They can be used to drive up to four off-the-shelf LED light engines, for example, the POWERWHITE™
linear light engine modules from Dialight. Before installing the modules, you must first remove the jumper
wires inserted at the four Tyco receptacle connectors (J1, J2, J3 and J4).
The analog inputs (pin 1 & 2) on the connectors are mainly for connecting to off-board thermister on the
light engine module but can be used for any analog inputs, such as potentiometer, light sensors, etc.
Please not that each analog input is biased with a 10kohm resistor (refer to R11, R12, R13 and R14).
Note:
There are six LUXEON Rebel high-power LEDs in series in one POWERWHITE light engine
module. Therefore the power supply must be a 24VDC/1.5A with a 2.1mm center pole
(center positive) Jack connector to meet the requirement specified by Formula 2.
Figure 5: Driving the Dialight Light Engines
User’s Manual U19610EE3V0UM00
16
78K0 - Shine It!
2.6 RS-485/DMX-512 Interface
The EV-K0-HCD board supports DMX-512 protocol over RS-485 using the MCU’s UART0 port. The RS485/DMX-512 connector is a 3-pin terminal block connector that accepts up to 24 American Wire Gauge
(AWG) wires.
Pin Number
1
2
3
Function
Ground
DD+
Table 2: RS-485/DMX-512 Connectors
The µPD78F8024 MCU’s UART0 port is shared between the RS-485 and RS-232 connectors through a
Maxim level shifter (refer to U7 in the schematics). By default, the RS-485 connector is enabled and the
RS-232 one is disabled.
If required, an on-board 110Ω resistor can be inserted between D+ and D- of the RS-485/DMX-512 port
as a terminating resistor. By default, the resistor is disconnected. To connect it, insert a jumper into the
JMP1 header (refer to JMP1 in the schematics).
2.7 RS-232 Interface
A DB9 male connector is used for the RS-232 interface. By default, RS-232 function is disabled. To
enable it, place DIP switch (refer to SW1 in the schematics) position 4 in the “ON” position.
Pin Number
2
3
5
1,4,6,7,8,9
Function
TX
RX
Ground
Not connected
Table 3: RS-232 Connector
2.8 Expansion IO Connector
A dual-row 10-pin header footprint in 2mm-pitch is available on the EV-K0-HCD board (refer to CN3 in
the schematics), the uPD78F8024 device’s UART0/CSI and I2C signals are pulled out on this connector.
The following table shows the pin out connections.
Pin Number
1
2
3
4
5
6
7
8
9
10
Pin Name
GND
VDD
RX/SI
TX/SCK
SO
IO
SCL
SDA
GND
VDD
Description
Ground
Logic power supply
UART0 RX signal / CSI data input signal
UART0 TX signal / CSI clock signal
CSI data output signal
P0.0 / Timer TM00 capture input
I²C clock signal
I²C data signal
Ground
Analog voltage reference
Table 4: Expansion IO Connector
The expansion IO connector pin outs are compatible with the NEC Electronics ZigBee sticks interface;
users can add ZigBee / 802.15.4 wireless capability to LED lighting applications.
User’s Manual U19610EE3V0UM00
17
78K0 - Shine It!
2.9 USB Programming and Debugging Interface
The EV-K0-HCD evaluation board implements an on-board USB programming and debugging interface
using the NEC Electronics µPD78F0730 USB MCU. You can download code to the µPD78F8024
HCD/LED MCU from a host computer via a mini-USB cable, and then proceed to debug that code (for
information about debugging refer to the regarding chapter).
2.10 Ambient Light Sensor
The EV-K0-HCD board populates a miniature surface-mount light sensor, part number APDS-9005 from
Avago Technologies, to sense the intensity of ambient light. By default, this sensor is disconnected from
the µPD78F8024 MCU’s A/D converter input. To connect to it, place DIP switch (SW1) position 5 in the
“ON” position.
2.11 Temperature Sensor
The EV-K0-HCD board populates a negative temperature coefficient (NTC) 10 kΩ thermistor to sense the
temperature of the on-board LEDs. By default, the thermistor is disconnected from the µPD78F8024
MCU’s A/D converter input. To connect to it, place DIP switch position 6 in the “ON” position.
2.12 DIP Switch
The EV-K0-HCD board uses a 6-position DIP switch (SW1) for configuration purposes. The following
table shows the various configuration options.
Switch No.
SW1-1
SW1-2
SW1-3
SW1-4
SW1-5
SW1-6
OFF
USB programming mode
Don't Care
User-defined
RS-485 enabled / RS-232
disabled
Ambient light sensor disabled
Temperature sensor disabled
Setting
ON
Normal operation
Self-flash programming mode
User-defined
RS-232 enabled / RS-485 disabled
Ambient light sensor enabled
Temperature sensor enabled
Table 5: Board Configuration Options
2.13 Reset Switch
The on-board reset switch (refer to SW2 in the schematics) can be used to reset the µPD78F8024 MCU.
User’s Manual U19610EE3V0UM00
18
78K0 - Shine It!
3. Shine it! installation and operation
3.1 Getting started
The Applilet EZ for HCD Controller allows a GUI based program building and downloading application
programs to the EV-K0-HCD board. Therefore it is necessary to have a valid IAR Embedded Workbench
for 78K installation on the PC host system. As communication interface between the PC host system and
the EV-K0-HCD board a standard USB interface line is needed. Before you can download and run a
program, software and hardware have to be installed properly.
3.2 CD-ROM contents
The CD-ROM shows following directory structure:
CD-ROM ROOT
- Acrobat Reader for 32Bit Windows OS
Shine It!
Acrobat
Applilet
-
Applilet EZ for HCD controller
Device file package
-
µPD78F8024 Device file package
Doc
-
Documentation
dotnet
-
Microsoft dotnet package
Driver
-
EV-K0-HCD driver files
IAR Embedded Workbench
-
IAR Embedded Workbench for 78K
samplehex
-
Example program for the Shine it! Starter Kit
WriteEZ3
-
Flash Programmer WriteEZ3 incl. PRM file for
µPD78F8024
Table 6: Shine it! CD-ROM directory structure
3.3 Pre-programmed Demo-Application
The EV-K0-HCD board is pre-programmed with a demonstration code that cyclically dims the four on-board
high-power LEDs. To run the demo application, make sure that the DIP switch SW1-1 is set to ON when
connecting the power supply or the USB cable to the EV-K0-HCD board.
User’s Manual U19610EE3V0UM00
19
78K0 - Shine It!
4. Hardware installation
After unpacking the 78K0 Shine it! Starter kit, connect the board via connector CN1 to your host computer
using the provided USB interface cable. When EV-K0-HCD board is connected, the USB driver needs to be
installed on the host machine. Please refer to the following CHAPTER 5 SOFTWARE INSTALLATION.
5. Software installation
The Shine it! package comes with the following software packages:
•
Applilet EZ for HCD Controller
•
IAR Systems Embedded Workbench for 78K 4Kbyte code size limited, including C compiler,
assembler, linker, librarian and IAR C-SPY debugger / simulator
•
Device file package of µPD78F8024 for IAR Embedded Workbench for 78K
•
WriteEZ3 flash programmer including the PRM file for µPD78F8024
Figure 6: Shine it! CDROM autorun.exe
5.1 Applilet EZ for HCD Controller installation
To install the Applilet EZ for HCD Controller just press the regarding button from the Autorun of the CD-ROM
provided within the Shine it! package. The setup dialogues will guide you through the installation process.
The installation can also be started by executing the AppEZHCD.msi in the directory “\Applilet” of the
CDROM.
User’s Manual U19610EE3V0UM00
20
78K0 - Shine It!
5.2 IAR Systems Embedded Workbench for 78K installation
To install the IAR Systems Embedded Workbench for 78K including C-SPY debugger / simulator press the
regarding button from the Autorun of the CDROM provided within the Shine it! package. The setup dialogues
will guide you through the installation process. The installation can also be started by executing the
Autorun.exe program in the directory ”\IAR Embedded Workbench\” of the CDROM. For further
information about the IAR Embedded Workbench installation refer to the InstallationGuide.ENU.pdf
in the directory of the CDROM.
Note:
Please make sure to install the device file package of the µPD78F8024 for the IAR Embedded
Workbench, as explained below, before using the Applilet EZ for code generation and
download to the target device.
5.3 Device file package of µPD78F8024 for IAR Embedded Workbench installation
To install the device file package of the µPD78F8024 for the IAR Embedded Workbench just press the
regarding button from the Autorun of the CD-ROM provided within the Shine it! package. The setup
dialogues will guide you through the installation process. The installation can also be started by executing
the dev_install.exe in the directory ”\Device file package” of the CDROM.
5.4 WriteEZ3 installation
To install WriteEZ3 for the IAR Embedded Workbench just press the regarding button from the Autorun of
the CD-ROM provided within the Shine it! package. The setup dialogues will guide you through the
installation process. The installation can also be started by executing the setup.exe in the
directory ”\WRITEEZ3” of the CDROM.
5.5 USB Driver Installation
In order to use the EV-K0-HCD board the USB driver needs to be installed on the host machine. Install the
driver according to the following procedure:
Installation on Windows 2000
Installation on Windows XP
Page 21
Page 25
5.5.1 Installation on Windows 2000
1.
When the EV-K0-HCD board is connected with the host machine, the board is recognized
by <Plug and Play>, and the wizard for finding new hardware is started. Click Next>.
Click.
Figure 7: Found New Hardware Wizard (Windows 2000)
User’s Manual U19610EE3V0UM00
21
78K0 - Shine It!
2.
Following the window below is displayed. So, check that "Search for a suitable driver ..." is
selected, then click Next>.
Check that "Search for a
suitable driver ..." is selected.
Click.
Figure 8: Search Method (Windows 2000)
3.
Check the "Specify a location" check box only, then click Next>.
Check that "Specify a
location" only is checked.
Click.
Figure 9: Driver File Location (Windows 2000)
4.
Locate to the folder "CDROM:\Driver\EV-K0-HCD”.
User’s Manual U19610EE3V0UM00
22
78K0 - Shine It!
Locate to “CDROM:\Driver\EV-K0-HCD”
Figure 10: Address Specification 1 (Windows 2000)
5.
The setup information file “MQB2ALL.inf” is automatic selected, then click Open to proceed
within driver installation.
Figure 11: Address Specification 2 (Windows 2000)
Click.
6.
After the location of the USB driver has been specified click OK to proceed.
User’s Manual U19610EE3V0UM00
23
78K0 - Shine It!
Click.
Figure 12: Address Specification 3 (Windows 2000)
7.
Click Next>.
Figure 13: Driver File Search (Windows 2000)
Click.
8.
Click Finish to complete the installation of the USB driver.
Click.
Figure 14: USB Driver Installation Completion (Windows 2000)
User’s Manual U19610EE3V0UM00
24
78K0 - Shine It!
5.5.2 Installation on Windows XP
1.
When the EV-K0HCD board is connected with the host machine, the board is recognized by
Plug and Play, and the wizard for finding new hardware is started. At first the hardware
wizard will ask if windows should search on the windows update web, check "No, not this
time" and then click Next>.
Check that "No, not this time"
is selected.
Click.
Figure 15: Found New Hardware Wizard 1 (Windows XP)
2.
Check that "Install from a list or specific location (Advanced)" is selected, then click Next>.
Figure 16: Found New Hardware Wizard 2 (Windows XP)
User’s Manual U19610EE3V0UM00
25
78K0 - Shine It!
3.
Check that "Search for the best driver in these locations." is selected. Select the "Include
this location in the search:" check box and then click Browse.
<1> Check that "Search for the
best driver in these locations."
is selected.
<2> Check "Include this
location in the search:"
only.
<3> Click.
Figure 17: Search Location Specification 1 (Windows XP)
4.
Locate the folder "C CDROM:\Driver\EV-K0-HCD” and click OK.
Figure 18: Search Location Specification 2 (Windows XP)
5.
As shown below, "NEC Electronics Starter Kit Virtual UART has not passed Windows Logo
testing to verify its compatibility with Windows XP." is displayed. Click Continue Anyway.
User’s Manual U19610EE3V0UM00
26
78K0 - Shine It!
Click.
Figure 19: Windows XP Logo Testing (Windows XP)
6.
After the installation of the USB driver is completed the window below is displayed. Click
Finish to close the hardware wizard.
Click.
Figure 20: USB Driver Installation Completion (Windows XP)
5.6 Confirmation of USB Driver Installation
After installing the USB driver, check that the driver has been installed normally, according to
the procedure below. When using the EV-K0-HCD board the “NEC Electronics Starter Kit
Virtual UART” should be present like in the figure below.
Please check in the Windows "Device Manager" within the Windows Properties (“Hardware”
tab), that the driver is installed normally.
User’s Manual U19610EE3V0UM00
27
78K0 - Shine It!
Check that "NEC Electronics
Starter Kit Virtual UART (COM?)"
is present.
Figure 21: Windows Device Manager
User’s Manual U19610EE3V0UM00
28
78K0 - Shine It!
6. Applilet EZ for HCD Controller
Applilet EZ for HCD Controller is a tool used to automatically generate software for microcontroller
µPD78F8024, which is used to control the high current driver, and write programs.
Software can be easily generated by specifying the setting and operation of the µPD78F8024 on the GUI.
The generated software can be directly written to the flash memory of the µPD78F8024 via a USB cable and
an operation check can be performed by using the EV-K0-HCD evaluation board.
By using Applilet EZ for HCD Controller, an application system that uses the µPD78F8024 can be introduced
without requiring a detailed knowledge of complex programming languages. Furthermore, labor for software
development for microcontrollers, which used to take a long time, and operation checking can be
significantly reduced.
For a further information please refer to the Applilet EZ for HCD Controller User’s Manual
(U19178EJ4V0UM00.pdf) which can be found in the “CDROM:\Doc\Applilet EZ\” folder.
User’s Manual U19610EE3V0UM00
29
78K0 - Shine It!
7. Using the Applilet EZ for HCD Controller
In the following chapter the different functionalities will be explained in short exercises. Exercise 1 and 2 can
be used as short quick start example to light up the LEDs mounted to the EV-K0-HCD board. The exercise 3
to 5 will give a further description of the possibilities in usage of the Applilet EZ for HCD Controller.
7.1 Exercise 1 – Applilet EZ for HCD Controller settings
This exercise will go through the Applilet EZ for HCD controller’s general settings.
1.
Open the Applilet EZ EZ for HCD. Click Start → All Programs → Applilet EZ for HCD →
AppEzHCD.
Figure 22: Applilet EZ for HCD Controller Main Window
2.
Under the Project menu all of the MCU settings will be listed for configuration. Select CPU.
Figure 23: Applilet EZ for HCD Controller Setting
User’s Manual U19610EE3V0UM00
30
78K0 - Shine It!
3.
In the CPU settings you have to select the Target EV-K0-HCD. Under the clock setting you
can choose between the internal 8 MHz and external clock/oscillator setting. Make sure the
clock is on External 8 MHz and then click OK. Furthermore you can select the active LED
channels.
Figure 24: Applilet EZ for HCD Controller CPU settings
4.
The uPD78F8024 device contains two UART peripherals. Applilet EZ allows configuration
these peripherals for the simple control programs. We will take a look at UART0. Select
Project → UART0.
Figure 25: Applilet EZ for HCD UART settings
5.
In the UART0 setting you can configure the baud rate or “Speed” and the “Parity” type.
Click OK to leave the setting at 9600bps and odd parity.
6.
The Applilet EZ is able to use the NEC Compiler for 78K0 as well as the IAR Embedded
Workbench for 78K. To select click Setting → Compiler and choose the IAR compiler when
using the Applilet EZ for HCD Controller with the Shine It! starter kit.
User’s Manual U19610EE3V0UM00
31
78K0 - Shine It!
Figure 26: Applilet EZ for HCD Controller Compiler selection
Note:
Make sure that you have installed the selected compiler correctly to your PC host system
before building the project.
7.
Now let’s take a look at the output folder option, select Setting → Folders... These
locations will specify the output paths of the generated files. Enter in your desire destination
but keep in mind that Applilet EZ will create subdirectories under this folder for each Applilet
EZ project. Click OK.
Figure 27: Applilet EZ for HCD Controller Folder Settings
7.2 Exercise 2 – Fix dimmer program
This program set a fixed duty value for each channel of the 4 LED channels. Make sure that all settings like
explained in Exercise 1 are still correctly set for this exercise.
1.
Make sure “Fix” is still selected as the dimmer program and input “10” to all the channels so
they are not too bright.
Figure 28: Applilet EZ for HCD Controller Dimmer Program settings (Fix)
2.
Now let’s save the Applilet EZ project (.xml). We will resave the new Applilet EZ project
name to fix.xml. Select File → Save as.. and input “fix.xml” and then click Save.
User’s Manual U19610EE3V0UM00
32
78K0 - Shine It!
Figure 29: Applilet EZ for HCD Controller Save File as (fix.xml)
3.
Make sure to remove the power cable. Click the All P. Button. Make sure that SW1.1 of the
Switch Dip is in the OFF position which is the programming mode and then insert the USB
connector.
Figure 30: Applilet EZ for HCD Controller All Program button
4.
You will be informed about the progress of the compilation.
Figure 31: Applilet EZ for HCD Controller compilation progress
5.
Next click OK when prompt to start flash programming.
User’s Manual U19610EE3V0UM00
33
78K0 - Shine It!
Figure 32: Applilet EZ for HCD Controller Start Flash programming
6.
During the flash procedure you will be informed about the actual status of the download
Figure 33: Applilet EZ for HCD Controller Flash programming status
7.
Click CLOSE to exit the “Build” window. Remove the USB and change SW1.1 to the on
position for run mode. Insert the power connector or the USB cable to the board and you
should see the LEDs light up to finish this exercise.
I.
II.
III.
IV.
HP-LED1(channel 1) = Red
HP-LED2(channel 2) = Green
HP-LED3(channel 3) = Blue
HP-LED4(channel 4) = White
7.3 Exercise 3 – Variable dimmer program
This program sets the duty value for each channel given by drawing pattern data.
1.
Make sure that you have set all the settings as explained in Exercise 1.
2.
Save the new Applilet EZ project name to variable.xml. Select File → Save as.. and input
“variable.xml” and then click Save.
User’s Manual U19610EE3V0UM00
34
78K0 - Shine It!
Figure 34: Applilet EZ for HCD Controller Save File as (variable.xml)
3.
Now we have a new Applilet EZ project file and we will change the dimmer program to
“Variable”.
Figure 35: Applilet EZ for HCD Controller Dimmer Program selection (Variable)
4.
Click on the “Edit” button under “Variable” and the “Variable Dimmer Control” window will
open. Enter “600” for the data points and enable the “Cyclic” check box. Select Ch.1
for the RED LED channel an activate the Graph Button.
Figure 36: Applilet EZ for HCD Dimmer Programming Window
User’s Manual U19610EE3V0UM00
35
78K0 - Shine It!
5.
window.
6.
Using your mouse pointer you can draw the PWM duty cycle versus time in the Black
Draw something close to the sinusoidal wave below.
Figure 37: Applilet EZ for HCD Controller Wave Editor (set)
8.
Repeat the same process for the red channel to the rest of the 3 channels. When done,
click on the close button to exit the variable dimmer control window.
User’s Manual U19610EE3V0UM00
36
78K0 - Shine It!
Figure 38: Applilet EZ for HCD Controller Variable Dimmer Control settings (set)
9.
Make sure that the EV-K0-HCD board is in programming mode (SW1.1 set to OFF) and the
USB cable is connected correctly. Click the save button and afterwards the All P. button.
After downloading the application disconnect the USB and set the EV-K0-HCD board in the
run mode as described in Exercise 2 point 7. You should now see the LEDs on the board
running the variable dimming application based on the wave table drawn.
7.4 Exercise 4 – Analog input program
This program controls the duty value for each channel by looking at the A/D conversion result. In order to
perform this exercise you will need to have a 2-pole 100KΩ potentiometer attached the J5 connector which
is the ADC channel 0 of the MCU.
User’s Manual U19610EE3V0UM00
37
78K0 - Shine It!
Figure 39: ADC potentiometer connection
1.
Make sure that you have set all the settings as explained in Exercise 1.
2.
We will resave the new Applilet EZ project name to adc.xml. Select File → Save as.. and
input “ADC.xml” and then click Save.
Figure 40: Applilet EZ for HCD Controller Save File as (ADC.xml)
User’s Manual U19610EE3V0UM00
38
78K0 - Shine It!
3.
Change the Dimmer Program to “Analog Input”
Figure 41: Applilet EZ for HCD Controller Dimmer Program settings (Analog Input)
4.
Use the “each channel” selection and choose a moving average of 6.
5.
Make sure that the EV-K0-HCD board is in programming mode (SW1.1 set to OFF) and the
USB cable is connected correctly. Click the save button and afterwards the All P. button.
After downloading the application disconnect the USB and set the EV-K0-HCD board in the
run mode as described in Exercise 2 point 7. Turning the potentiometer clockwise will dim
the LEDs and counter-clockwise will increase the brightness the LEDs.
7.5 Exercise 5 – UART0 serial command program
This program controls the duty value for each channel based on the given serial communication command.
The serial command programs support either binary or ASCII communication format. For this exercise we
will use UART0 with the ASCII command set. A straight DB9 female to female cable is required for this
exercise.
Host (PC) → target (EV-K0-HCD)
ch
Comma(0x2C)
cmd
Comma(0x2C)
data
LineFeed(0x0D)
ch
Comma(0x2C)
cmd
Comma(0x2C)
data
LineFeed(0x0D)
2 bytes
1 byte
3 bytes
1 byte
1 byte
1 byte
CarriageReturn(0x0A
)
CarriageReturn(0x0A
)
1 byte
1.
Make sure that you have set all the settings as explained in Exercise 1.
2.
We will resave the new Applilet EZ project name to uart0.xml. Select File → Save as.. and
input “uart0.xml” and then click Save.
User’s Manual U19610EE3V0UM00
39
78K0 - Shine It!
Figure 42: Applilet Ez for HCD Controller Save File as (uart0.xml)
2.
Change the dimmer program to “Serial Command”. Select UART0 as the interface and
ASCII type.
Figure 43: Applilet EZ for HCD Controller Dimmer Program settings (Serial Command)
3.
Make sure to deselect the “All Channel Synchronize” check box. Configure the board into
programming mode (SW1.1 set to OFF) and attached the USB cable. Click the save
button and then click the All P. button.
4.
Remove the USB cable and now change the SW1.4 to ON in order to change the Maxim
RS232/485 device to be in RS232 mode.
5.
Attached the DB9 cable to the board and then apply power to the board.
6.
Open a text terminal application. We will use Windows HyperTerminal as an example. Click
Start → Programs → Accessories → Communications → HyperTerminal.
7.
Enter the connection name “EV-K0-HCD” and click OK.
User’s Manual U19610EE3V0UM00
40
78K0 - Shine It!
Figure 44: Microsoft HyperTerminal Connection Description
8.
Specify the appropriate COM port for your connection and click OK.
Figure 45: Microsoft HyperTerminal Connect to
9.
Input 9600 for baud rate, 8 bit, odd parity, and no flow control. Click OK.
User’s Manual U19610EE3V0UM00
41
78K0 - Shine It!
Figure 46: Microsoft HyperTerminal COM1 Properties
10.
Click File → Properties → Settings tab. Click on the ASCII Setup button.
Figure 47: Microsoft HyperTerminal ASCII settings (1/2)
User’s Manual U19610EE3V0UM00
42
78K0 - Shine It!
11.
Enable the check box for “Send line ends with line feeds” and “Echo typed characters
locally”. Next click OK to close the ASCII Setup window.
Figure 48: Microsoft HyperTerminal ASCII settings (2/2)
12.
Click OK to exit the communication port properties.
13.
Type “1,wd,100” and hit the Enter key in HyperTerminal. Make sure to type it correctly
and that you don’t use the backspace key if you mistyped. If you mistyped hit the enter key
to re-enter the command.
Figure 49: Microsoft HyperTerminal Command Window
14.
The red LED should light up with this command.
User’s Manual U19610EE3V0UM00
43
78K0 - Shine It!
15.
Here’s the command list for the ASCII input.
“1,wd,000”
Duty: 000-255
Status: 128 – shutdown
000 – enable driver
”wd”
”rd”
“ws”
“rs”
Set Duty
Read Duty
Set Status
Read Status
- Write duty cycle from channel number
- Read duty cycle from channel number
- The status of the target is set.
- The status of the target is demanded
Channel number from 1 to 4
16.
Try to set the other channels using the ASCII command set.
User’s Manual U19610EE3V0UM00
44
78K0 - Shine It!
8. Flash Programmer WriteEZ3
The WriteEZ3 is flash programming software to flash hex files to the related device. For installation
information refer to the chapter WriteEZ3 installation.
Figure 50: WriteEZ3 Startup
8.1 Device Setup
To provide all necessary information about the device to be programmed, only the corresponding flash
parameter file must be loaded. The parameter file (*.prm) for the µPD78F8024 is located on the CDROM, in
the same folder as the WriteEZ3 setup file. Please use the menu “Device -> Setup…“ to open the following
dialogue and the button “PRM File Read” to select the parameter file.
Figure 51: WriteEZ Device Setup Dialogue
User’s Manual U19610EE3V0UM00
45
78K0 - Shine It!
Please check that the correct host communication port is selected. The used communication port can be
seen in the Windows Device Manager.
8.2 Using WriteEZ3
After a successful device selection the internal flash memory can be blank-checked, erased, programmed or
verified. WriteEZ3 can be controlled either by menu or by buttons
Figure 52: WriteEZ3 Device Menu
device setup button
load file button
blank check button
erase button
program button
verity button
erase / program / verify button
Table 7: WriteEZ3 action buttons
WriteEZ3 supports Intel-Hex and Motorola S-record file formats as input file.
User’s Manual U19610EE3V0UM00
46
78K0 - Shine It!
9. Set up a IAR C-SPY debug session
The following chapter describes the necessary steps to set up an IAR C-SPY debug session using the EVK0-HCD board.
9.1 Flashing the Debug monitor
Unlike to other 78K OCD-Debug-Interfaces the debug monitor program is not automatically downloaded by
the C-SPY Driver to the target device. To be able to start a debug session this debug monitor has to be
downloaded by an additional tool, WriteEZ3.
Please use following configuration to make sure that the flash programming of the debug monitor works as
expected.
1.
Select the right .prm file as explained in chapter 8.1 Device Setup. The regarding
78F8024.prm file can be found on the CDROM in the folder “CDROM\WRITEEZ3\PRM
files\78K0”
2.
Set the Supply Oscillator frequency to 8MHz
3.
The next step is to load the debug monitor .hex file. File → Load… and select the
“K0_MF2_UART6_MON.hex” from the CDROM folder “CDROM\WRITEEZ3”
Figure 53: WriteEZ3 Open file
4.
Click the erase / program / verify button.
5.
If the procedure was successfull the debug monitor is now correctly flashed to the device.
9.2 Changing the EXEC communication DLL
The next step to establish a debug session is to change the regarding debug communication DLL of the IAR
Embedded Workbench.
Note: Please make sure that the IAR Embedded Workbench for 78K is closed during this procedure.
1.
Locate the “exk032o.dll” in the C:\Program Files\IAR Systems\Embedded Workbench
Kickstart 5.0\78k\config\nec
User’s Manual U19610EE3V0UM00
47
78K0 - Shine It!
2.
Create a backup of this file, for example “exk032o_backup.dll”
3.
Copy the new EXEC communication DLL “exk032ou.dll” from the CDROM folder
“CDROM\IAR Embedded Workbench” to the folder C:\Program Files\IAR
Systems\Embedded Workbench Kickstart 5.0\78k\config\nec.
4.
Rename the “exk032ou.dll” into “exk032o.dll”
9.3 Debugging the project within the IAR Embedded Workbench
1.
Start the IAR Embedded Workbench for 78K. Start → All Programs → IAR Systems →
IAR Embedded Workbench Kickstart for NEC 78K
2.
Click the “Open existing workspace” button
Figure 54: IAR Embedded Workbench Startup
3.
Open your with Applilet EZ for HCD Controller created IAR workspace file .eww.
User’s Manual U19610EE3V0UM00
48
78K0 - Shine It!
Figure 55: IAR Embedded Workbench Open Workspace
4.
Select the MINICUBE as debugger driver. Project → Options → Debugger → Driver
Figure 56: IAR Embedded Workbench Debugger Options
5.
Exchange the linker command file. Project → Options → Linker → Config → Override
default and then push the “…” button
User’s Manual U19610EE3V0UM00
49
78K0 - Shine It!
Figure 57: IAR Embedded Workbench Linker Options
5.
Select the lnk78f8024_EV-K0-HCD.xcl linker command file. This file can be found in the
IAR Embedded Workbench folder C:\Program Files\IAR Systems\Embedded Workbench
Kickstart 5.0\78k\config
Figure 58: IAR Embedded Workbench .xcl file selection
Note:
If you have changed the install location of the IAR Embedded Workbench during
installation please refer to the selected location “IAR installation folder”\78K\config
7.
Start a Debug session. Project → Debug Now you should be connected to the target
device using the IAR C-SPY debugger.
Note:
Make sure to set back the original debug communication DLL from the backup file
after finishing the debug session.
User’s Manual U19610EE3V0UM00
50
78K0 - Shine It!
10. Cables
10.1 USB interface cable (Mini-B type)
Figure 59: USB interface cable (Mini-B type)
User’s Manual U19610EE3V0UM00
51
78K0 - Shine It!
11. Schematics
Figure 60: EV-K0-HCD schematics 1 / 2
User’s Manual U19610EE3V0UM00
52
78K0 - Shine It!
Figure 61: EV-K0-HCD schematics 2 / 2
User’s Manual U19610EE3V0UM00
53
78K0 - Shine It!
12. Bill of materials
Name
U1
HCD/LED MCU
U2, U3
U4
U5
MOSFETs
Voltage regulator
Light sensor
U6
U7
Q1, Q2
D1, D2, D3,
D4
D5
R1, R2, R3,
R4
USB MCU
RS-232/485 tcrv
MOSFETs
Manufacturer / Part #
NEC Electronics /
μPD78F8024GK
NEC Electronics /
μPA2756GR
TI / UA78M05CDCYR
Avago / APDS-9005-020
NEC Electronics /
µPD78F0730MC
Maxim / MAX3161EAG+
NEC / 2SJ461
Schottky diode
Schottky diode
ST / STPS140A
Diodes / B0520LW-7-F
4
1
Current sensor
KOA / SR732BTTER332F
Lumileds/ LXML-PD010040
Lumileds / LXML-PM010050
Lumileds / LXML-PB010023
Limileds / LXML-PWC10070
TDK / SLF6028T470MR59-PF
4
1A/40V, SMA footprint
500 mA, 0.385 Vf, SOD-123
0.332Ω, 1/4W, 1206 SMD, 1%,
100 PPM
1
LUXEON Rebel Red
1
LUXEON Rebel Green
1
LUXEON Rebel Blue
1
Tyco / 5535676-5
Phoenix Contact /
1727036
CUI / PJ-102A
4
LUXEON Rebel White
47 µH ±20%, 590 mA, 210mΩ,
6028 SMD
6-position receptacle, 0.1" pitch
dual dip
4
1
Hirose / UX60A-MB-5ST
1
Tyco / 1734352-1
Hirose / DF11-10DS2DSA(05)
Phoenix Contact /
1727023
1
4 POS 3.8 1 MM PCB GRN
2.1 mm barrel, internal switch
Mini-USB, type B, 5-position
SMD
DB9-M, through-hole right
angle
1
2 × 5 , 2 mm pitch
1
1
1
1
3POS 3.81MM PCB GRN
2POS 0.1" pitch
SMD
6-position, SMD, 1.27 mm pitch
1
1
1
1
8 MHz, radial
HC-49 SMD, 16 MHz, ± 50
ppm, 18 pF
0603 SMD, green
0805 footprint
3
0603 footprint
2
18 pF, 0603
3
1 µF, 10V, 0603
HP-LED1
High power LED
HP-LED2
High power LED
HP-LED3
High power LED
HP-LED4
L1, L2, L3,
L4
High power LED
J1, J2, J3, J4
J5, J6, J7, J8
J9
CN1
CN2
CN3
CN4
JMP1
SW1
SW2
Y1
Y2
LED1
SB0
SB1, SB2,
SB3
Inductor
LED board
connector
Light engine
connector
Power Jack
USB connector
RS-232
connector
Expansion IO
RS-485
connector
Jumper
Tactile switch
DIP switch
Ceramic
resonator
Crystal
Indicator LED
Solder bridge
Omron / B3FS-1012
Omron / A6H-6101
Murata / CSTLS8M00G53B0
Citizen / HCM49
16.000MABJ-UT
Dialight / 598-8070-107F
Solder bridge
C21, C22
Capacitor
C3, C24, C25
Capacitor
Kemet /
C0603C180J5GACTU
Kemet /
C0603C105K8PACTU
Qty.
Description
1
64-pin LQFP
2
1
1
8-pin SOP, dual-N FET
SOT-223, 5V, 500 mA
6-pin miniature SMD
1
1
2
30-pin SSOP
24-pin SSOP
SC-59, PFET
4
User’s Manual U19610EE3V0UM00
54
78K0 - Shine It!
Name
C4, C5, C6,
C7
C8
C9, C11,
C12, C13,
C14, C15,
C17, C19,
C20, C23
C10, C16,
C18, C31,
C32
C26
C27, C28,
C29, C30
R5, R6, R7,
R8
R9
R10, R11,
R12, R13,
R14, R22,
R23, R27
R15, R26,
R28
R16, R17,
R24, R25,
R30
Capacitor
Manufacturer / Part #
Kemet /
C0603C221K5RACTU
Kemet /
C0603C101J5GACTU
Capacitor
Kemet /
C0603C104K5RACTU
Capacitor
Capacitor
Capacitor
Capacitor
Resistor
Resistor
Resistor
Resistor
Resistor
R18
Resistor
R19
Resistor
R20, R21
R31
Resistor
Resistor
RT1
Thermistor
Kemet /
C0805C475K8PACTU
TDK / C1608X7R1E473K
Kemet /
C0603C334K8PACTU
Bourns / CR0603-J/000ELF
Vishay /
CRCW060311K0FKEA
Vishay /
CRCW060310K0FKEA
Vishay /
CRCW06031K00FKEB
Vishay /
CRCW0603100KFKEB
Vishay /
CRCW0603470RJNEA
Vishay /
CRCW06031K50FKEA
Vishay /
CRCW060333R0FKEA
KOA / RK73B2ETTD111J
Murata /
NCP21XV103J03RA
Qty.
Description
4
220 pF, 50V, 0603
1
100 pF, 0603
10
0.1 µF, 50V, 0603
5
1
4.7 µF, 10V, 0805
0.047 µF, 0603
4
0.33 µF, 0603
4
0Ω, 0603
1
11 kΩ, 0603
8
10 kΩ, 1%, 0603
3
1 kΩ, 1%, 0603
5
100 kΩ, 0603
1
470Ω, 0603
1
1.5 kΩ, 0603
2
1
33Ω, 0603
110Ω, 1210, 1/2 watt
1
NTC, 10 kΩ, 0805
Table 8: Bill of materials EV-K0-HCD board
User’s Manual U19610EE3V0UM00
55
78K0 - Shine It!
13. EV-K0-HCD Board Assembly
Figure 62: EV-K0-HCD Top Assembly
Figure 63: EV-K0-HCD Bottom Assembly
User’s Manual U19610EE3V0UM00
56
78K0 - Shine It!
14. Board Layout
Figure 64: EV-K0-HCD Top Layer
Figure 65: EV-K0-HCD Layer 1
User’s Manual U19610EE3V0UM00
57
78K0 - Shine It!
Figure 66: EV-K0-HCD Board Layer 2
Figure 67: EV-K0-HCD Bottom Layer
User’s Manual U19610EE3V0UM00
58
78K0 - Shine It!
[MEMO]
User’s Manual U19610EE3V0UM00
59