1
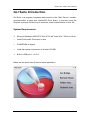
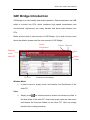
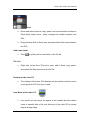
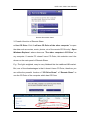
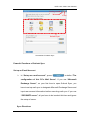
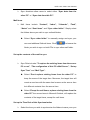
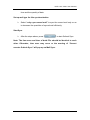
USB DATA Link Cable USER MANUAL (Model: DA-70011-1) GO! Suite Quick Start Guide - GO! Suite Introduction GO! Bridge Introduction Remote Share Introduction Folder Sync Outlook Sync GO! Bridge for Mac Quick Start Guide - GO! Bridge for Mac Introduction DATA Link Cable User Manual GO! Suite Quick Start Guide V1.7 2 GO! Suite Quick Start Guide 2208-V1.7 Launch GO! Suite Before you use GO! Suite, you have to launch GO! Suite application. If you only use GO! Finder, you can connect the USB device to this computer to launch this application. If you want to use other applications of GO! Suite, you have to connect to both PCs via the USB device and transfer cable. Follow the ways to launch GO! Suite under the operation system of your computer. WINXP: When the device is inserted, it will launch GO! Suite automatically. If not, users have to double click the GO! Suite icon of the removable device on “My Computer” to launch the program. Vista: When the device is inserted, users have to click “Launch GO! Suite” on auto-play window to launch GO! Suite. If User Account Control window pops up, click on "Allow" to continue it. If auto-run is not launched, users have to double click the GO! Suite icon of the removable device on “My Computer” to launch the program. 1 DATA Link Cable User Manual Go! Suite Introduction Go! Suite is a program integrated data search in the Flash Device, transfer, synchronization of data and Internet/CD Drive share. It provides users the simplest and most efficient way to meet the need of data transfer of their life. System Requirements Microsoft Windows 2000 SP3/ Win XP 32-bit/ Vista/ Win 7 32-bit or 64-bit Intel® Pentium®II Processor or later 512MB RAM or higher Hard disk space requirement of at least 100 MB Built-in USB port 1.1 or 2.0 Below are the quick start Guides of each application. 2 DATA Link Cable User Manual GO! Bridge Introduction GO! Bridge is a user-friendly and simple operation. Data transmission via USB cable to connect two PCs, which combines high speed transmission and non-technical requirement can easily transfer and share data between two PCs. Below are the brief of each function of GO! Bridge. If you wish to know more about the details, please read the user manual of GO! Bridge. Active Information Desktop of the other PC Option Minimize Exit Add a Folder File List Screenshot of GO! Bridge Window Mode It allows users to simply check and transfer the files/folders of the other PC. View: Simply press on window mode to browse the folders and files in the disk drives of the other PC. Users can simply open the view menu and browse the files and folders on the other PC. User can simply transfer files via drag-and-drop. 3 DATA Link Cable User Manual Dock Dock area allows users to copy, paste, and remove/select all data on Dock which helps users easily manage file transfer between two PCs. Drag and drop files to Dock area and paste batch files once between two PCs. Add a new folder Click “ ”to quickly add a new folder on the file list. File List Right click on the file of File list to open, add to Dock, copy, paste, and delete the files selected on the file list Desktop of the other PC The desktop of the other PCs displays on the window mode for users to recognize the PC they are in used. Icon Mode of the other PC Icon mode not only saves the space of the window but also allows users to transfer files to the root directory of the other PC by simply drag and drop steps. 4 DATA Link Cable User Manual Remote Share Introduction Remote Share is a user-friendly application which allows you to share and use Internet or data on the CD Drive with the other computer via a simple high-speed USB transfer cable connecting to both computers. How to use Remote Share After GO! Suite is connected successfully to both PCs, you can simply click “Remote Share” on the operation panel of GO! Suite. A warning window will pop up to remind you to close the antivirus program of your computer first and then execute “share and use Internet or data on the CD/ DVD-ROM with the other computer”. The steps are as followings: 1. Press “Remote Share” to start the communication with the other computer and waiting for the response. 2. Once Remote Share is connected to both PCs, you can press use CD Drive or share/use Internet of the other computer. 5 DATA Link Cable User Manual Remote Share Main Panel 3. Powerful function of Remote Share a. Use CD Drive: Click “I will use CD Drive of the other computer” to open the data such as movies, music, photos, etc of the remote CD Drive by “ Open Windows Explorer“ where shows as “The other computer’s CD Drive” on my computer. If remote PC doesn’t have CD Drive, this selection won’t be shown on the main panel of Remote Share. E.g. :The light- weighted, easy to carry Netbook hits the traditional NB market. But, one of the disadvantages is that it doesn’t have CD Drive, therefore you can utilize the powerful function of “CD Drive Share” of “Remote Share” to use the CD Drive of the computer which has CD Drive 6 DATA Link Cable User Manual b. Share Internet : If your computer is connected to Internet, you can press “I will share my Internet” to share Internet with the other computer which disconnects to Internet. If your computer doesn’t connect to Internet, the other computer is connected to Internet, and its OS is higher than Windows 2000, press “I will use remote Internet resource” to use Internet of the other PC which is connected to Internet. If the computer which is connected to Internet is Windows 2000,it doesn’t support Internet share, so that the other computer cannot use Internet share feature, either. When Internet is sharing, the system tray will show the status of Internet sharing. Once Internet share is launched successfully, the selection of “Internet resource” will disappear. E.g.: If you travel with your NB and wish to use Internet without wireless services nor LAN cable, Internet Resource Share of Remote Share can help you easily use the other computer’s Internet resource via the connection between two PCs. 4. About Remote Share Click on the top right corner of the main panel of Remote Share, the version of Remote Share is shown here. 5. Minimize Click on the top right corner of the main panel of Remote Share, Remote Share will be hided to system tray to standby. You can click its icon to launch it again. 7 DATA Link Cable User Manual 6. Exit Remote Share Click “X” on the the top right corner of the main panel of Remote Share, a dialogue window will pop up” Do you want to exit Remote Share?”. Click “Yes” to close Remote Share. Then, both computers will switch to GO! Suite main panel; meanwhile, a dialogue window will pop up “You are ready to use GO! Suite now”. If the main panel of GO! Suite does not open automatically, please re-plug in the cable or open “My Computer” and double click “GO Suite” drive to start it. 7. Supplementary 7.1 If both computers have connected to each other, unplug USB transfer cable, Remote Share will close promptly. 7.2 If both computers haven’t connected successfully, re-plug in the USB transfer cable, a pop-up window of “Try to recover the connection with the other computer” will remind you. 7.3 If it fails to connect to both PCs, Remote Share will ask you to re-plug in the USB transfer cable. Make sure the panel of Remote Share disappear first and then re-plug in the USB transfer cable to both PCs. 7.4 If either of or both computers are restarted or re-logged in, two conditions may occur: a. The USB transfer cable still connects to both computers; a warning window “resume connection” will pop up. b. If the transfer cable disconnects to both computers, Remote Share will exit automatically. 8 DATA Link Cable User Manual Folder Sync Introduction Folder Sync is an application for two PCs to synchronize data in the shortest time via a USB Cable. The followings are the brief of each function of Folder Sync. If you wish to know more about the details, please read the user manual of Folder Sync. How to execute Folder Sync? Below are the features of Folder Sync which helps you quickly understand the functions of Folder Sync and use it easily. Add Task Settings Sync All Task List Screenshot of Folder Sync Powerful Functions of Folder Sync Add Task Press “ Minimize ” to create a task to synchronize. Task Items 9 Close DATA Link Cable User Manual In “Task items”, user can name for the Task, and assign folder path, select task type and sync direction. Task Types: Task types include “Folder Sync” and “IE My Favorites Sync”. Sync Contents: Include sync directions and folder paths of both PCs. Sync Directions: Press “Sync directions” to designate the priority of the sync task to synchronize data between two PCs including three options for users to select. The descriptions are as followings. Keep the contents consistent in both folders. If there are any two files with the same name, synchronize the latest one to the other. Copy all the files from the local folder to the remote folder. If there are any two files with the same name, overwrite the remote file with the local one. Copy all the files from the remote folder to the local folder. If there are any two files with the same name, overwrite the local file with the remote one. Folder Path: Click “ ” to browse the folder path you wish to sync folders on both PCs. Sync Items: Sync items include “Sync all” and “Sync this Task”. Press to sync all the tasks on the task lists for one time. 10 DATA Link Cable User Manual Press “ ” on main window of Folder Sync to synchronize single task only. Remove this task: Select “ ” to remove the synchronized task directly. 11 DATA Link Cable User Manual Outlook Sync Introduction Outlook Sync is an application for two PCs to synchronize Outlook mail and folders including “Contact”, “Inbox”, “Calendar”, “Journal”, “Tasks”, “Notes” and “Sent Items” via a USB Cable. By Outlook Sync, users can synchronize mail and other selected items between two PCs in a shortest time. To follow the advantage of easy to use of GO! Suite series, Outlook Sync not only allows the beginners easily to use this program but also meets the need of advanced users. The followings are the brief of each function of Outlook Sync. If you wish to know more about the details, please read the user manual of Outlook Sync. How to execute Outlook Sync? Below are the features of Outlook Sync which helps you quickly understand the functions of Outlook Sync and use it easily. 12 DATA Link Cable User Manual Setting s Minimize Close Default Sync Screenshot of Outlook Sync Powerful Functions of Outlook Sync Set up an E-mail Account In “Set up an e-mail account”, press “ ” to define “The configuration of this PC’s Mail Server”. If you use “Microsoft Exchange Server”, on your first time to open Outlook Sync, you have to set up mail sync to designate Microsoft Exchange Server and input user account information before executing mail sync. If you use “POP/SMTP server”, all you have to do is select this item and ignore the setup of server. Sync Directions 13 DATA Link Cable User Manual Sync directions allow users to select either “Sync data from the other PC” or “Sync data from this PC”. Mail Items Mail Items include “Contact”, “Inbox”, “Calendar”, “Task”, “Notes” and “Sent Items” and “Sync other folder”. Simply select the folders above you wish to sync outlook folders. Select “Sync other folder” to manually assign and sync your own and additional Outlook items. Click to browse the folder you wish to sync on both PCs to sync other mail folder. Set up the contents of the mail to sync . Sync Rule includes “To replace the existing items from the source PC or not”, “The configuration of this PC’s Mail Server”, “Set up Sync Time” and “Mail Type”.. Select “Don’t replace existing items from the other PC” to keep the name of the target item. Moreover, the target item will create a new item with the same item’s name as the source item but different contents from the source item. Select “Except for mail items, replace existing items from the other PC” the source items in Microsoft Outlook, will replace the contents of the target items, except for mail items. Set up the Time Rule of this Synchronization Select the time you wish to synchronize the folders to save your sync 14 DATA Link Cable User Manual time and the quantity of data Set up mail type for this synchronization Select “only sync unread mail” to sync the unread mail only so as to decrease the quantities of synced mail efficiently. Start Sync After the steps above, press “ ” to start Outlook Sync. Note: The time zone and time of both PCs should be identical to each other. Otherwise, time error may occur or the warning of “Cannot execute Outlook Sync” will pop up on Mail Sync. 15 DATA Link Cable User Manual GO! Bridge for Mac Quick Start Guide V1.2 16 DATA Link Cable User Manual System Requirements System Requirements on Mac: Mac OS X 10.4 or later PowerPC G4 processor or later RAM: 512 Mbytes or higher Hard disk space: at least 100 MB Built-in USB port 1.1 or 2.0 System Requirements on Windows: Microsoft Windows 2000 SP3/ Win XP 32-bit/ Vista/ Win 7 32-bit or 64-bit Intel® Pentium®II Processor or later 512MB RAM or higher Hard disk space requirement of at least 100 MB Built-in USB port 1.1 or 2.0 17 DATA Link Cable User Manual GO! Bridge for Mac Introduction GO! Bridge for Mac is a user-friendly and simple data transmission (Windows to Mac or Mac to Mac) application via a USB transfer cable to connect two computers. It combines high speed transmission and non-technical requirement which help easily transfer and share data between two computers. Before using GO! Bridge 1. Connect to both computers via the USB transfer cable before using GO! Bridge 2. Execute GO! Bridge according to the operation system of your computer. On Mac operation system: Open GO! Suite CD on desktop and then double click GO! Bridge icon to execute the application. On Windows operation system: Follow the ways below to launch GO! Suite under the Windows operation system of your computer. 18 DATA Link Cable User Manual WINXP: When the device is inserted, it will launch GO! Suite automatically. If not, double click the GO! Suite icon of the removable device on “My Computer” to launch the program. Vista: When the device is inserted, click “Launch GO! Suite” on auto-play window to launch GO! Suite. When User Account Control window pops up, click on "Allow" to continue it. If auto-run is not launched, users have to double click the GO! Suite icon of the removable device on “My Computer” to launch the program. Below is the introduction of each function of GO! Bridge. Settings Forward Back Open Add a new Folder Dock File List Screenshot of GO! Bridge Window Mode It allows users to simply check and transfer files of the other computer. 19 DATA Link Cable User Manual View files on the other computer Simply click the disk you wish on DEVICES or select PLACES on window mode to browse the folders and the selected folder’s file list on the other computer will be shown. User can simply transfer files via drag-and-drop. Dock On Window mode, click to open Dock area .Right click the files on the file list and select “Add to Dock”, the files will be added on the Dock area. Right click the file on Dock area to copy,remove from Dock and select all items on Dock which helps users easily manage file transfer between two computers. Drag and drop files to Dock area and paste batch files once between two computers. Press” Clear” button to remove all items on Dock. Add a new folder Click to quickly add a new folder on the file list. File List Right click on the file of the file list to open, add to Dock, Rename, copy, paste, and move to trash the files selected on the file list. Settings: Settings of GO! Bridge can be also be edited and selected under the function menu on the top of the window; from left to right are GO! 20 DATA Link Cable User Manual Bridge, File, Edit, View, Window and Help. Below is the quick introduction of each menu. Click GO! Bridge, the pull-down menu shows “About GO! Bridge”(the version of GO! Bridge), Preferences (you can select “Keep icon mode on top of the other window” or “Show warning before deleting items), Services”, “Hide GO! Bridge”, “Hide Others”, “Show All” and “Quit GO! Bridge”. Select File, you can create a new folder or execute “Open”, “Close” or “Move to Trash” of the selected file on the pull-down menu. Click Edit, the pull-down menu show “Cut”, “Copy”, “Paste”, “Select All” and “Special Characters” to edit the selected files. Choose View option, you can select “Refresh the window”, “Show/Hide Path Bar”, ”Hide Status Bar”, ”Hide Toolbar” , “Customize Toolbar” and “Show View Options” on the pull-down menu. Select Window option, the pull-down menu shows Minimize, Zoom, GO! Bridge Main Window and Show Dock. Select Help option to search for the help from Mac. Wallpaper of the other computer The wallpaper of the other computer displays on the top left corner of window mode for users to recognize the computer they are use now. Icon Mode of the other computer Click the wallpaper icon of window mode to switch to icon mode of the other computer. Click icon mode once to switch to window mode. 21 DATA Link Cable User Manual Icon mode not only saves the space of the window but also allows users to transfer files to the root directory of the other computer by simply drag and drop steps. 22