1
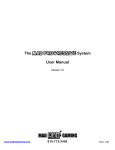
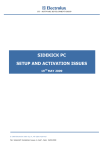
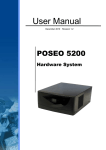
PCS Retail Version 4.5 Installation Manual For Windows XP Professional and Windows 2000 Professional Copyright & Confidentiality All intellectual property rights including copyright subsisting in this document are owned or controlled by PCS Technology Ltd. This document and any information it contains is submitted for the purpose of operating the PCS Retail applications. It is to be treated as confidential and shall not be used for any other purpose. The work shall not be copied or disclosed to third parties in whole or in part without the prior written consent of PCS Technology Ltd. All Trademarks are hereby acknowledged. PCS Technology Ltd http://www.pcs-technology.com http://support.pcs-technology.com Prepared by: Date of First Issue: Manual Version: Last Revised on: George F Randolph 27/07/2002 V4.5.0 08/12/2006 Table of Contents Table of Contents ...................................................................... 2 System Architecture ................................................................. 3 System Requirements ............................................................... 4 PCS Retail Installation ............................................................... 5 Software Activation ................................................................ 12 Database Manager Configuration ............................................... 13 Database Manager for Microsoft SQL ....................................... 14 Hardware Specific Installations ................................................. 23 Aures Technologies POSLigne Till Setup .................................. 23 XN700 Till Setup ................................................................. 23 EPSON / Epson Clone Printer Setup using Direct Drive (Preferred Method for the POS Printer) ................................................... 24 EPSON Printer Setup using OPOS ........................................... 24 Citizen CBM1000 Printer Setup ............................................... 26 System Architecture Central Site Master SQL Database PC Tills Workstation / HeadOffice User Ethernet EFT Server (Credit Card Clearance) Router INTERNET (Alternate Credit Card Clearance) The Banks Router Remote Site Ethernet Remote MSDE Database PC Tills Workstation / BackOffice User System Requirements Master / HeadOffice Server running Separate Core Database Pentium III 1Ghz PC or greater 1GB RAM or greater 7200rpm Hard Disk or SCSI Disk Windows 2000 Server / Windows XP Professional or Windows Server 2003 SVGA Monitor with a minimum resolution of 600 * 800 Lines Mouse or other pointing device Network card Backup Device Store / BackOffice Server running Database (and BackOffice Application) Pentium III 1Ghz PC or greater 512MB RAM or greater 7200rpm Hard Disk or SCSI Disk Windows 2000 Server / Windows XP Professional or Windows Server 2003 SVGA Monitor with a minimum resolution of 600 * 800 Lines Mouse or other pointing device Network card (Backup Device) Till running PCS Retail EPOS Terminal or PC with 1Ghz CPU or greater 256MB RAM or greater (at least 512MB if database is also running on till) Windows 2000 Professional SP4 or Windows XP Professional SP2 SVGA Monitor with a minimum resolution of 600 * 800 (Flat 12.1” Touch panel recommended) Mouse or other pointing device Network card OPOS or EPSON Compatible Till Printer OPOS, EPSON Compatible or Flytech Customer Display OPOS or EPSON Compatible Barcode printer (for barcode printing) Keyboard wedge barcode scanner Metrologic MS7120 Orbit recommended OPOS, Flytech Serial or Keyboard Wedge Card swipe PCS HOT Direct This application runs on the Master HeadOffice Server PCS Retail Installation First Copy the PCSRetail-MSSQL.exe and your chosen database platform to the following directory on your local computer: C:\PCS. 1. Double click on „PCSRetail-MSSQL.exe‟ to lunch the setup program. The installer will then extract the relevant files for installation. Please note that this process also updates the computer to use the Microsoft .Net Version 2. Therefore this process may take some time. 2. Follow the on screen instructions to install the application by clicking next. 3. Accept the licence agreement by clicking the check box next to „I Accept‟ and then click next. 4. You will then see a warning to make sure that your database is set to the correct level. For new installations, click next. For existing installation make sure your database is this level or greater and then click next. 5. Enter your name into the relevant boxes. Level the check box on „Anyone who uses this computer‟ and then click next. 6. Use the default installation directory and path by clicking next. 7. Now select the relevant features that you require. For standard installations with the database server running on the same machine, select the following options (as in above picture). PCS Retail Core Application Database Manager Core Database Manager for Microsoft SQL Microsoft SQL Server 2005 Express Alternatively… For installations where the database server is on another PC, select the following options (as in above picture). PCS Retail Core Application For the options that you do not require, you need to click on the dropdown and choose „Entire feature will be unavailable‟. (see picture below) Now click next to continue. 8. Select the required shortcuts and click next 9. For new installations select one set of registry settings. Please do not select any settings if you already have some installed. Click next on each page to continue with the installation. New installations require one of these registry settings to work. However you should NOT select any registry options if you have already installed the system and are simply upgrading. 10. Now the installer will have the required information to begin copying files. Simply click next to commence the file copying. 11. Once the installation is complete, you will need to setup the database connectivity for new installations. Note that single machine installations will not require any alterations to the database connectivity. To setup the database connectivity Click on START, ALL Programs, PCS Applications, „System Config‟ This will then load the system configuration screen for PCS Retail. The configuration screen allows you to change the look and feel of the till system. There are many settings that can be entered on this screen. Click on the Plus next to Database Connections, this will expand the database connections. Then scroll down to and click on „ServerDataSource‟. This will display the name of the database server on the screen. In the Value box enter the correct IP address and instance name of the database server and click save i.e. 192.168.1.10 for the full versions of Microsoft SQL Server and 192.168.1.10\SQLExpress for the Microsoft SQL Express database. If the till application is being installed onto the Database Server, then the Value can remain as „localhost‟ or in the case of the Microsoft SQL Server 2005 Express database as „localhost\SQLExpress‟. If you do not have a keyboard attached, but have a touch screen, then you can double click on the value box to open the on screen keyboard. (Or click on the picture of the keyboard, next to the save button) Click on ServerUser and enter „sa‟ in to the Value box and click save. You may wish to use an alternative account, if you created one, when installing the database. Now click on ServerPassword and enter the Password for the sa user account into the Value Box (Default of PcSt3cH). Click on the minus next to „Database Connections‟, this will close the database connections. Now click on the Plus next to „General‟. Alter both the StoreNumber and the TillNumber values in the same way that you altered the other values. (The StoreNumber is the Site Number). Now close the configuration application by clicking the close button at the bottom left of the screen. For Master Tills / Database Machines, you will need to follow the steps for installing Database Manager and SQL Express. (Next Page) However the Slave tills do not require Database Manager or SQL Express. Instead you can simply install the SQL Native Client Software. To Install the SQL Native Client on the Slave tills, simply do the following: Navigate to C:\PCS\SQLExpress\ Run SQLNCLI.MSI and choose to install the full application. Software Activation To Activate the PCS Retail software, you need to have an Internet Connection and a CD Key (the CD key should be provided when you purchase the software). Note that un-activated, PCS Retail will run for 14 Days in trial mode, however some features, such as credit card clearance will only run for 3 days without activation. Click on: START All Programs PCS Applications Software Activation Click the relevant options in the top number boxes, so that the required options show in blue (note that a key for these options is shown at the bottom of the activation screen). Now enter the CD Key provided when you purchased the software. If you do not have a CD key, please call your software provider for assistance. Click Internet Activation and the system will activate your software. If for any reason this fails please try a second time. If this still fails you will need to contact you software provider for assistance. Database Manager Configuration The next stage of installation is to install and configure the core database. Again this only applies to new installations. The Microsoft free version of SQL Server 2005 is call Microsoft SQL Server 2005 Express Edition. By Default this database is included with „PCSRetail-MSSQL.exe‟. Database Manager for MSSQL will then install this. This free database does have some limitations. Maximum Database Size of 4GB Supports 1CPU but can be installed on any Server Maximum 1 GB Addressable RAM For a list of the other limitations, please visit the Microsoft Website http://www.microsoft.com/sql As an estimate an average site with 2 tills and one back office terminal, processing sales, purchase orders, customers etc would use about 2GB every 3 years and therefore this 4GB limit would not get reached for about 6 years. Near this time you can then decide to either delete some historical data or to upgrade to the Current Version of Microsoft SQL without Database Size limitations. This is currently Microsoft SQL Server 2005 Workgroup Edition. Database Manager for Microsoft SQL To load the Database Manager for Microsoft SQL, click on: START All Programs PCS Applications Database Manager for MSSQL There are two ways to setup the database. The most common method is to use one of the Yellow setup wizards. Simple click on the wizard and then answer yes to the „are you sure‟. Next you will be asked if you wish to install the SQL Server 2005 Express Database. The default answer is YES. You would only say no if you already have the database installed and just wish to add a new PCS Retail Database. Once the installation is complete, you will see the following message. (Now Skip to Windows Firewall Settings for SQL Express) __________________________________________________________________ Alternatively you can setup the system manually (ONLY do this if you need to) Firstly if you do not already have Microsoft SQL Server installed, click on the button labelled „Install SQL Server 2005 Express Database‟. This will install the Microsoft SQL database application (a cut down version the Microsoft SQL Server 2005). Answer YES to the „Are you sure‟ question and then make sure that the path name is the location of the CD installation files. Once installed, choose to „Configure Database Services‟ this will configure and start the database ready for use. NB The current version of the till application requires that the DTS service in / SQL server is turned OFF. This is done automatically by the configure option. The next option is to „Add or Change Standard SQL Password‟. You can choose this option to change the existing „sa‟ password from “password” to a password of your choice. The user „sa‟ is the standard administration account created when you first install Microsoft MSDE or Microsoft SQL server. Level the username „sa‟ and the SQL server name „localhost\SQLExpress‟ as the default. Then enter the new password and confirm this in the box labelled „Confirm New Password‟. Enter the „OLD Password‟ (“password”. Click the „Change Password‟ button. And if successful a message will appear stating that the password has been changed. Click the X to close the window. For Single Store or Central (Master) store installations Enter the „sa‟ password in the box labelled „SQL Server Password‟ (if you have not altered the password then it will be “password”. Leave the SQL database name as „PCSRetail_Master‟ then click the button labelled „Create Master Database’. This option will build the master database. For Remote Store installations Enter the „sa‟ password in the box labelled „SQL Server Password‟. Change the SQL database name to „PCSRetail_Store‟ then click the button labelled „Create Store Database‟. This option will build the Store database. Once complete click the button labelled „Import / Export Default Data‟. This will setup the data defaults for the database. Click on the Browse for Import button. Either choose the Retail or to Hospitality folder and then select a relevant data template. Click „OK‟ to select the file. Click the button labelled „Import Default Data‟ to run the import‟. Once complete, click the ‘EXIT‟ button to return to the menu. Now click the button labelled „Shrink Selected Database Now‟. This process will optimize the database ready for use. For Both types of installation - OPTIONAL Once the database has been installed, you can optionally create users to access the system. Please note that the default user is sa and this is normally sufficient, however if you do require additional specialised users, then click the button labelled „Add / Delete Users on SQL database.‟ Enter a valid user name for your windows system, for example if you are running a Windows Domain make sure the user name has been previously added to the domain and that the PC is a member of the domain. User Name - TillUser Where you are running a Windows Domain NT Domain Name – MyDomain Where you DO NOT run a Windows Domain NT Domain Name – MyComputerName (i.e. local domain name) Choose a role from the drop down list. Either: Counter – This is for tills BackOffice – This is general users Administrators – This is for Managers. In the SQL Server User Name, leave the default - „sa‟ In the SQL Server Name, leave the default – „localhost‟ In the SQL Server Password, enter the password you selected when you altered the „sa‟ password. Click create user. This operation will allow the user access to the database. Repeat this operation for each Windows user, you wish to allow access to the database. Click the X to close the window. To Schedule the daily Backup you need to click on „Setup Scheduled Database Backup. This will then show the default time for the backup. Alter the time if desired or leave as is. Then click Accept to confirm the time. To Schedule the daily Data Cleanup you need to click on „Setup Scheduled Stored Procedures‟. Once again enter a time (this should be in the early hours of the morning and not before midnight.) or just leave the default time. then click on Accept to confirm the time. Once complete your database is configured for use. Click the large button labelled „Exit‟ to close the „DBManager‟ program. __________________________________________________________________ Windows Firewall Settings for SQL Express If you are using the Windows Firewall (Windows XP Service Pack 2), then you will need to create a firewall exception. Go to the Windows Control Panel by clicking Start and Control Panel Open the Windows Firewall dialog box by double clicking on Windows Firewall and then click the Exceptions tab. Click Add Program and Browse to find sqlbrowser.exe and click OK. (Normally located at C:\Program Files\Microsoft SQL Server\90\Shared\) Click Add Program and Browse to find sqlservr.exe. Click OK. (Normally located at C:\Program Files\Microsoft SQL Server\MSSQL.1\MSSQL\Binn) Click Add Port and enter "SQL Service" for Name, 1433 for Port number, and select the TCP radio button. Click OK on the Windows Firewall dialog This should then allow remote connections to the database (Now Skip to Autoload in this manual for completing the installation) __________________________________________________________________ Autoload It is now time to run the Autoload program, to import the server data. Click on START, ALL Programs, PCS Applications, „Autoload‟. This will then import the server data into the local till database. If the connection shows „Local‟ and a message appears saying „Unable to Open Server Database‟, then you may not have entered the Server IP address or password correctly. When Autoload is complete, it will automatically close. Autoload imports a subset of the server data onto the local till. This enables the till to work offline when not connected to the server. Menus and Fast Menus are always run from the local table and therefore any changes to these, will only take effect once Autoload has been run. Autoload is normally run on a nightly basis on each till (This is done from the lock screen at 4am). However the server does not usually run the lock screen and you may therefore wish to schedule a windows task to run Autoload on a nightly basis. You need to set the task to run at a suitable time in the early hours of the morning, when the Tills are not is use, at for example 4am. This is done by using the Windows Task Scheduler. The Windows Task Scheduler can be found in the Control Panel. If the control panel is displayed in „Category View‟ then click on „Performance and Maintenance‟ then choose Scheduled Tasks. Double Click on Add Scheduled Task. Click next and then choose Autoload from the list of applications. If Autoload cannot be located then click on Browse and then go to „Program Files\PCSRetail‟. Choose a suitable time to run Autoload, for example 4am. Enter an existing user account and password to run Autoload. (NB Blank passwords are not permitted). You should also choose in the advanced options to end the task after 1 hour, if still running. Hardware Specific Installations For Standard PC installation, please jump to the next section („Installing the Till application‟) Aures Technologies POSLigne Till Setup 1. First your required version of windows should be pre-installed. a. If not part of the installation, apply the latest Service Pack for Windows XP (Currently SP2) b. Now apply all of the latest Microsoft Hotfixes and available patches from the Windows Update Website. XN700 Till Setup 1. First install Windows XP Professional onto the till If not part of the installation, apply the latest Service Pack for Windows XP (Currently SP1) Now apply all of the latest Microsoft Hotfixes and available patches from the Windows Update Website. 2. Install all of the Windows Drivers for the XN 700 (Graphics, Touch Screen, Network, etc) 3. From the C:\OPOS Layer1 Layer2 Layer3 installation CD Copy the XN OPOS Directories and Files to (ie c:\OPOS\Layer1) (ie c:\OPOS\Layer2) (ie c:\OPOS\Layer3) 4. Install the OPOS CCO‟s by double clicking on OposCCOs-1_6_001.EXE – These are the Common control objects required to make the XN drivers function correctly. OposCCOs-1_6_001.EXE 5. Install the XN OPOS Drivers From Layer1 click on install1.bat When complete RE-BOOT Windows as requested From Layer1 click on install1.bat When complete RE-BOOT Windows as requested From Layer1 click on install1.bat When complete RE-BOOT Windows as requested EPSON / Epson Clone Printer Setup using Direct Drive (Preferred Method for the POS Printer) 1. Open the PCS Retail Configuration program, by clicking on Start, Programs, PCS Applications and then System Config. a. Expand Till Printer Options by clicking on the + b. In the OPOSPOSPrinterName select DIRECT c. Change POSPrinterUsesFontType to False (the default) d. Change PrinterCCOModule to PCSR_Till.POSPrinter (the default) e. Check the PPDirectPort is set to the same port number as the printer is plugged in to. The default is 1 f. Check the PosPrinterRecLines before Cut. g. Check the PosPrinterRecCutCommand. Epson printers are a 66 and some other printers use a 1. h. Under the section labelled PORTS, make sure that the port settings are correct. Defaults are 9600 Baud, 8 Data Bits, No Parity and No Flow Control. EPSON Printer Setup using OPOS 2. Install the EPSON OPOS Software – a. Either EPSON_ADK195E.exe or the newer version b. Add the POS Printer TM-T88II Printer c. Add a logical device name of PP d. Configure Printer and Test 3. For the Server add a POS Printer (Kitchen Printer) – TM-U230E a. Add a logical device name of PP2 b. Configure Printer and Test 4. Open the PCS Retail Configuration program, by clicking on Start, Programs, PCS Applications and then System Config. i. Expand Till Printer Options by clicking on the + j. In the OPOSPOSPrinterName type the Logical device name of your printer (PP) k. Change POSPrinterUsesFontType to False (the default) l. Change PrinterCCOModule to PCSR_Till.POSPrinter m. Check the PosPrinterRecLines before Cut. n. Now close the configuration program by clicking CLOSE. o. Your EPSON printer configuration is now complete. Citizen CBM1000 Printer Setup For this example we are using the CBM1000 printer. 2. Install the Citizen OPOS Software a. Add the POS Printer CBM1000 Printer b. Add a logical device name of PP or CBM1000 c. Configure Printer 3. Open the PCS Retail Configuration program, by clicking on Start, Programs, PCS Applications and then System Config. a. Expand Till Printer Options by clicking on the + b. In the OPOSPOSPrinterName type the Logical device name of your printer (either PP or CBM1000) c. Change POSPrinterUsesFontType to True d. Change PrinterCCOModule to PCSR_TillPPCit.POSPrinter e. Check the PosPrinterRecLines before Cut. f. Now close the configuration program by clicking CLOSE. g. Your Citizen printer configuration is now complete. Manager Logins The initial Manager login for any of the PCS Retail applications is User: 999 Password: 12345 Once logged in, you can create user logins. Please refer to the user manual for more detailed information. The Default users on the system are users 1 to 5. The PCS Retail System installation should now be complete.