1
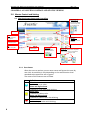
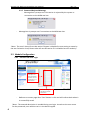
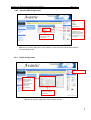
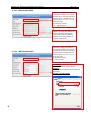
Avantis
AXI
WEB SERVER MODULE
USER MANUAL
Avantis AX1 Web Server Module User Manual
Rev 1.0
Avantis AX1 Web Server Module User Manual
Rev 1.0
CONTENTS
CHAPTER 1: SYSTEM LOGIN AND WEB PAGE LAYOUT
1.0
ACCESSING THE WEB PAGE
1.1
USER AUTHORITY
1
1
2
1.1.1 MASTER USER
2
1.1.2 USER/ GUEST SETTING
2
1.1.3 INSTALLER ACCESS CONTROL
3
1.2
REAL TIME CLOCK
3
1.3
SYSTEM LAST STATE STATUS
3
CHAPTER 2: AX1 SYSTEM CONTROL AND STATUS VIEWING
2.0
MASTER CONTROL AND SETTING
2.1
2.2
CHECKING SYSTEM STATUS AND CONTROLLING
4
4
4
2.1.1 ZONE STATUS
4
2.1.2 ARM
5
2.1.3 DISARM
5
2.1.4 IO STATUS
5
2.1.5 CLEAR ALARMED MEMORY
5
2.1.6 COMMAND REJECTED MESSAGE
6
MODULE CONFIGURATION
6
2.2.1 SITE INFO AND USER LOGIN
6
2.2.2 DYNAMIC DNS CONFIGURATION
7
2.2.3 TCP/IP CONFIGURATION
7
2.2.3.1 WHEN ENABLE DHCP
8
2.2.3.2 WHEN DISABLE DHCP
8
Avantis AX1 Web Server Module User Manual
Rev 1.0
2.3
MISCELLANEOUS SETTING
9
2.4
SYSTEM TROUBLE
9
2.5
EDIT TIMER
2.5.1 ARM TIMER
10
2.5.2 DISARM TIMER
10
2.5.3 IO ON TIMER
11
2.5.4 IO OFF TIMER
11
2.5.5 REAL TIME CLOCK
12
CHAPTER 3: LOGOUT FROM WEB SERVER SYSTEM
3.0
10
LOGOUT FROM SYSTEM
13
13
3.1
MANUAL LOGOUT
13
3.2
AUTO LOGOUT
13
Avantis AX1 Web Server Module User Manual
Rev 1.0
CHAPTER 1: SYSTEM LOGIN AND WEB PAGE LAYOUT
1.0 Accessing the Web Page
Access to Login Page
1. Open the Internet browser and key in the Host Name “WSM” at the address bar of
the internet browser and press Enter.
OR
1. Enter the IP address of the web server module at the address bar of the internet
browser and press Enter. The internet browser will direct it to the Login page and
follow the instructions as below:
Login Page
Enter ‘Master’ into
username textbox
for first time login.
The user can
change the
username in the
site info & user
login page
Click ‘Login’ to
access the page
after username and
password is entered
Enter ‘111111’ into
password textbox
Click ‘Cancel’ to
clear the entered
username and
password.
*Note: The user should not access the website within half minute after the system is switch
on as its need some times to standby. The interruption may cause login failed or no data in
the webpage.
1
Avantis AX1 Web Server Module User Manual
Rev 1.0
1.1 User Authority
1.1.1 Master User
- Redirect to system status and control page after login succeeded.
User able to click
and access system
status and system
setting items
1.1.2 Users/ Guest setting
- Master user must set the username for users/ guest in the ‘site info and user
login’ page.
- Redirect to system status and control page after login succeeded.
Only able to click
and access system
status and control
page.
2
Avantis AX1 Web Server Module User Manual
Rev 1.0
1.1.3 Installer Access Control
- Master user must set the username for installer in the ‘site info and user login’
page.
- Redirect to installer home page after login succeeded.
Only able to click
and access items in
Installer setting.
1.2 Real Time Clock
-
The following is the System Time which indicates the current Time, Date & Day.
1.3 System Last State Status
Viewing the last
alarm status.
Tamper,
Emergency, Fire,
Panic, Phone line
loss and zone and
partition of alarm
triggered.
3
Avantis AX1 Web Server Module User Manual
Rev 1.0
CHAPTER 2: AX1 SYSTEM CONTROL AND STATUS VIEWING
2.0 Master Control and Setting
2.1 Checking System Status and Controlling
Arm/Disarm All
Mouse over the
text then dropdown
menu is drop, clicks
to arm/disarm all.
Partition
Zone
Click To Bypass/
Unbypass.
Clear Alarm
Memory
Click to clear alarm
memory.
Zone Description
IO
Click To On/ Off
IO Description
On/Off All
Mouse over the
icon then clicks to
on/off all.
Arm/Disarm
Mouse over the icon then dropdown
menu is drop, clicks to arm/disarm.
Current state
Arm
Disarm
2.1.1 Zone Status
Allow the user to monitor current zone status and bypass the zone by
one-click. Accessibility is fully depending on the authorization level
awarded to the particular user or guest.
The menu of this features are as follow.
Icon
4
Definition
Close State
-Indicate by cyan color.
Close and Bypass State
-Indicate by cyan color with blinking.
Open State
-Indicate by yellow color.
Open and Bypass State
-Indicate by yellow color with blinking
Alarmed State
-Indicate by red color with blinking.
Avantis AX1 Web Server Module User Manual
Rev 1.0
2.1.2 Arm
This feature allows the user to monitor current arming status.
Allow the user to arm all the partitions or particular partition.
Accessibility is fully depending on the authorization level awarded to the
particular user or guest.
The menu of this features are as follow.
Icon Definition
Auto Arm
-Indicate that current partition is in auto arm state
Day Arm
-Indicate that current partition is in day arm state
Force Arm
-Indicate that current partition is in auto arm state
Night Arm
-Indicate that current partition is in night arm state
Away Arm
-Indicate that current partition is in away arm state
2.1.3 Disarm
This feature allows the user to monitor current disarming status.
Allow the user to disarm all the partitions or particular partition.
Accessibility is fully depending on the authorization level awarded to the
particular user or guest.
The menu of this features are as follow.
Icon
Definition
Disarm
-Indicate that current partition is in disarm state
2.1.4 IO Status
Allow the user to monitor the current IO status and On/Off the IO by oneclick on the icon.
Icon Definition
On
-Indicate that IO is on
Off
-Indicate that IO is off
2.1.5 Clear Alarmed Memory
This feature allows the user to clear the alarmed memory.
Icon Definition
Clear Alarmed Memory
-Allow the user to clear the alarmed status.
5
Avantis AX1 Web Server Module User Manual
Rev 1.0
2.1.6 Command Rejected Message
- Message box is prompt out if the action is rejected by the system or
connection to the WSM was lost.
-
Message box is prompt out if connection to the WSM was lost.
*Note: The zone’s icon will not take action if bypass is disabled in zone setting or cause by
the user limitation. Arm/ Disarm also will not take action if it is disabled as user authority.
2.2 Module Configuration
2.2.1 Site Info and User Login
Enter the
description for
Site Info, Master,
and User 2 to 12
and Guest 1 to 4
and Installer.
Click ‘Save Config’ to
save all the entered
information.
-
Redirect to success page after ‘Save’ button is click and will redirect back when it
is successfully saved.
*Note: The entered description is needed during user login. It works as the user name.
For the password, user needs to set it in the alarm keypad.
6
Avantis AX1 Web Server Module User Manual
Rev 1.0
2.2.2 Dynamic DNS Configuration
Select Any DDNS
Service:
-No-IP
-DynDNS
-DNS-O-Matic
Click ‘Save Config’ to
save all the entered
information.
-
Username and
password are the
registered in the DDNS
service page (www.noip.com). The host is set
in the page.
Redirect to success page after ‘Save’ button is click and will redirect back when it
is successfully saved.
2.2.3 TCP/IP Configuration
Key in the Host Name
Tick to enable
DHCP. Un-tick to
disable DHCP and
enter the IP
address, Gateway,
Subnet mask,
primary and
secondary DNS
Click ‘Save Config’ to
save all the entered
information.
- Redirect to reboot page after ‘Save’ button is click
7
Avantis AX1 Web Server Module User Manual
Rev 1.0
2.2.3.1 When Enable DHCP
Name that is assigned to a device
connected to network. Can only be
use when direct connect and LAN. If
the host name is changed, the user
need to http:// ‘new host name’ to
access the page.
Eg: Hostname: avantis,
So, http://avantis
If DHCP is enabled, Mac Address, IP
Address, Gateway, Subnet Mask,
Primary DNS, Secondary DNS are
disabled. By this the IP address is
assigned automatically.
2.2.3.2 When Disable DHCP
Name that is assigned to a device
connected to network. Can only be
use when direct connect and LAN. If
the host name is changed, the user
need to http:// ‘new host name’ to
access the page.
Eg: Hostname:avantis,
http://avantis
MAC Address
Hardware’s Address. Always disable.
IP Address
The users able to assigned the IP address for
the devices.
Gateway and Subnet Mask
8
Avantis AX1 Web Server Module User Manual
Rev 1.0
2.3 Miscellaneous Setting
Current Status of
Phone Line Loss
Detection
Click To Enable /
Disable Phone
Line Loss
Detection.
Current Status of
Installer Setting
Click To Enable /
Disable Installer
Setting.
Current Status of
15 Minutes Auto
Logout
Click To Enable /
Disable 15 Minutes
Auto Logout
*Note: Toggle Method is use in this page. If current status is ‘Disabled’, the user can only
enable the setting and vice versa.
2.4 System Trouble
Color of the
‘Trouble’ will
become red if
system
trouble is
detected.
Display the system trouble like
AC Loss, DC loss,
Bell/Strobe/Siren loss, Short
circuit, Tamper and External
communication failure
9
Avantis AX1 Web Server Module User Manual
Rev 1.0
2.5 To Edit Timer
2.5.1 Arm Timer
Click
‘Save’ to
save the
setting
Select the Timer
Type:
- Not In Use/Delete
- Daily
- Schedule
Select the Timer
Setting:
- Year (01-99)
- Month (01-12)
- Date (01-31)
- Hour (00-23)
- Minute (00-59)
-
Select the partition
to apply this
Redirect to success page after ‘Save’ button is click and will redirect back when it
is successfully saved.
2.5.2 Disarm Timer
Select the Timer
Type:
- Not In Use/Delete
- Daily
- Schedule
Click
‘Save’ to
save the
setting
Select the Timer
Setting:
- Year (01-99)
- Month (01-12)
- Date (01-31)
- Hour (00-23)
- Minute (00-59)
-
10
Select the partition
to apply this
Redirect to success page after ‘Save’ button is click and will redirect back when it
is successfully saved.
Avantis AX1 Web Server Module User Manual
Rev 1.0
2.5.3 IO ON Timer
Click
‘Save’ to
save the
setting
Select the Timer
Type:
- Not In Use/Delete
- Daily
- Schedule
Select the Timer
Setting:
- Year (01-99)
- Month (01-12)
- Date (01-31)
- Hour (00-23)
- Minute (00-59)
-
Select the IO to
apply this setting.
Redirect to success page after ‘Save’ button is click and will redirect back when it
is successfully saved.
2.5.4 IO OFF Timer
Click
‘Save’ to
save the
setting
Select the Timer
Type:
- Not In Use/Delete
- Daily
- Schedule
-
Select the Timer
Setting:
- Year (01-99)
- Month (01-12)
- Date (01-31)
- Hour (00-23)
- Minute (00-59)
Select the IO to
apply this setting.
Redirect to success page after ‘Save’ button is click and will redirect back when it
is successfully saved.
11
Avantis AX1 Web Server Module User Manual
Rev 1.0
2.5.5 Real Time Clock
Click
‘Save’ to
save the
setting
Select the Timer
Setting:
- Year (01-99)
- Month (01-12)
- Date (01-31)
- Hour (00-23)
- Minute (00-59)
- Day
-
12
Synchronize the
system time with
the PC
Redirect to success page after ‘Save’ button is click and will redirect back when it
is successfully saved.
Avantis AX1 Web Server Module User Manual
Rev 1.0
CHAPTER 3: LOGOUT FROM WEB SERVER SYSTEM
3.0 Logout from the System
3.1 Manual Logout
- Click on the ‘Logout’ and message box is prompt out
-
Click on the ‘OK’ to confirm and the Logout message box is prompt out
3.2 Auto Logout
- For the safety purpose, the webpage will auto logout if no action within 15
minutes and message box is prompt out.
-
However, if user would like to continue login for more the 15 minutes, user can
disable the auto logout feature (refer to the Miscellaneous setting at page 9) and
it must be logout manually by clicking the ‘Logout’ link.