1
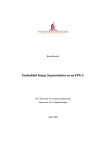
Development of Remote FPGA Lab and FPGA based web browser Nina Drozd B.E. Electronic & Computer Engineering Project Report BP1 March 2010 Supervisor Dr. Fearghal Morgan Co-Supervisor Dr. Martin Glavin Statement of Originality I hereby declare that this is my original work except where stated. Signature: __________________________ Date: ______________________________ Nina Drozd --ii-- Acknowledgements I would like to thank my project supervisor Dr. Fearghal Morgan, for all the advice and support given throughout this project. His help with continuously structuring my goals for each period of the project research has contributed hugely to the project progress. I would also like to thank Dr. Martin Glavin for giving me valuable feedback about project work and evaluating my progress throughout final year. I greatly appreciate all the help and information about the existing lab given to me by developer, Frank Callaly. Also, I would like to thank Martin Burke and Myles Meehan. They always had time to give me advice on any problems during my four years in college. Finally, I would like to thank Dr. Des Chambers and computer society committee for advice with SMTP server set up and external access to remote lab. --iii-- Abstract Xilinx, Inc. is the world’s largest supplier of programmable logic devices, the inventor of the field programmable gate array (FPGA) and the first semiconductor company with a fabless manufacturing model. FPGA microcontrollers, such as Diligent Nexys and Spartan-3 can be controlled using VHDL. This language is a fairly general-purpose and not case sensitive, and it doesn’t require a simulator on which to run the code. The Spartan-3 Starter Board can be used as it provides a powerful, selfcontained development platform, featuring 200K or 1000K gate Spartan-3, on board I/O devices (i.e. eight toggle switches, four push buttons, eight LED’s and four 7segment displays) and 1MB fast asynchronous RAM. The board is fully compatible with all versions of Xilinx ISE tools, where the written VHDL code can be checked for syntax errors, synthesized and an RTL schematic can be viewed. Also, a timing diagram can be created using ModelSim to check that the signals are changing in accordance with the task given. However, to properly check the written VHDL code, a bit stream file is generated which can then be downloaded to the Spartan-3 board. This created the need for user-friendly, easy to manage remote lab. It also had to be easily manipulated by administrator and demonstrational to a potential user. Such remote lab was created, where a board is accessible during all hours to the students of National University of Ireland, Galway along with any other registered users. As connecting the Spartan-3 board is also time-consuming, a single Spartan-3 board is set up in a secure location but accessible to everyone online. The purpose of this project is to develop and document the existing remote lab in order to make it more interactive with user and to give administrator some statistics and feedback on its use. The user is provided with easier and more intuitive registration process as well as ability “to press physical buttons” and hence reconfigure the board and code being tested by using the GUI of the website. --iv-- Table of Contents Development of Remote FPGA Lab and FPGA- based web browser .................. i Statement of Originality ....................................................................................... ii Acknowledgements ............................................................................................. iii Abstract................................................................................................................ iv Table of Contents ................................................................................................. v List of Figures..................................................................................................... vii List of Acronyms ............................................................................................... viii Chapter 1. Introduction ............................................................................................. 1 1.1. Project Overview ......................................................................................... 1 Chapter 2. System Overview ..................................................................................... 2 2.1. Introduction ................................................................................................. 2 2.2. System Overview......................................................................................... 3 2.3. Architecture of remote lab ........................................................................... 4 2.3.1. Application Framework - TurboGears ........................................... 5 2.4. Model – SQL Class Controller .................................................................... 6 2.5. View – GUI Manager .................................................................................. 9 2.6. Controller – View Manager ....................................................................... 11 2.7. Hardware Connector .................................................................................. 13 2.8. Locations of Important Files...................................................................... 14 2.8.1. Architecture files .......................................................................... 14 2.8.2. Python packages ........................................................................... 15 2.8.3. Files for connecting to hardware .................................................. 15 Chapter 3. System Development ............................................................................. 16 3.1. Introduction ............................................................................................... 16 3.2. Development of GUI ................................................................................. 16 3.2.1. GUI remote/local switch access ................................................... 17 3.2.2. Guest Page .................................................................................... 20 3.3. Admin Control Development .................................................................... 21 3.4. Development of Registration ..................................................................... 23 3.4.1. Retrieving user input from the form ............................................. 24 3.4.2. Sending registration request to Admin ......................................... 24 3.4.3. Using reCaptcha ........................................................................... 26 Chapter 4. Conclusion.............................................................................................. 28 4.1. Work Review ............................................................................................. 28 4.2. Possible Future Work ................................................................................ 30 4.2.1. Migration to different Windows Edition ...................................... 30 4.2.2. Further database development ...................................................... 30 4.2.3. Remote Lamp ............................................................................... 30 --v-- Chapter 5. Website Troubleshooting ...................................................................... 31 5.1. Bad Gateway.............................................................................................. 31 5.2. No video on webpage ................................................................................ 31 5.1. CSR/switch not working............................................................................ 31 Chapter 6. Deliverable material .............................................................................. 32 6.1. Remote FPGA Lab, Demo 1...................................................................... 32 Testing process of this demonstration: ...................................................... 32 6.2. Remote FPGA Lab, Demo 2...................................................................... 34 Process of CSR and RAM Access: ............................................................ 34 Testing process of this demonstration: ...................................................... 35 References ................................................................................................................. 36 --vi-- List of Figures Figure 1 - System Overview ........................................................................................ 3 Figure 2 - Architecture of the System .......................................................................... 4 Figure 3 - Access to system database........................................................................... 6 Figure 4 - SQLite database........................................................................................... 7 Figure 5 - Visit Identity table ....................................................................................... 8 Figure 6 - Kid language template ................................................................................. 9 Figure 7 - Cygwin FPGA App Window .................................................................... 12 Figure 8 - Connection to Hardware ............................................................................ 13 Figure 9 - File locations ............................................................................................. 14 Figure 10 - Python package files location .................................................................. 15 Figure 11 - Cygwin hardware connection files .......................................................... 15 Figure 12 - Default configuration for remote switch access ...................................... 18 Figure 13 - GUI Remote Switch Access .................................................................... 19 Figure 14 - Guest page ............................................................................................... 20 Figure 15 - Permissions of different user groups ....................................................... 21 Figure 16 - Administrator Control ............................................................................. 22 Figure 17 - Registration Form .................................................................................... 23 Figure 18 - reCaptcha Operation (as described on reCaptcha website) ..................... 26 Figure 19 - Remote switch access .............................................................................. 33 --vii-- List of Acronyms JPEG Joint Photographic Experts Group (compressed image) GUI Graphical User Interface DTD Document Type Declaration FPGA Field-programmable Gate Array CAPTCHA Completely Automated Public Turing test to tell Computers and Human Apart VHDL VHSIC Hardware Description Language VHSIC Very high-speed integrated circuits CSR Control Status Register RAM Random Access Memory PDF Portable Document Format --viii-- Chapter 1. Introduction 1.1. Project Overview This project is mainly concentrated on developing the existing remote lab, making it more user-friendly by providing a user guide and downloadable explanations of the way system works. The existing user interface is enhanced with remote/local toggle switches and push buttons, giving a more practical virtual experience of FPGA-board programming. Existing image processing using Spartan-3 board is reviewed. Administrator control is also enhanced, giving him/her the ability to confirm user registration and manipulate the registered users. The development of administrator privileges is concentrated hugely on providing him/her with more information about the use of website (i.e. amount of visits by registered user and last time user visited the website); hence giving the administrator some needed feedback about the use of remote lab. Guest account is also created as enhancement feature of the existing lab, providing unregistered programmers with access to restricted amount of remote lab. The guest account provides user with certain demos of the system, familiarizing him/her with FPGA board architecture and VHDL programming. Documentation in form of pdf files is used to explain some features of the website to the guest and therefore increase general interest in becoming a registered user of the website. Packaged VHDL template project is provided to the user so that the video and USB connections are connected properly into the VHDL project and therefore the generated bit stream file. This is extremely important for proper use of the remote lab system, as without these connections the bit stream file cannot be tested. Development of Remote FPGA Lab and FPGA-based Web Browser The secondary aim of this project is to document the existing remote FPGAbased lab for use by administrator and easier access for further development. The system structure is documented, complete with description of framework used and components of architecture used as a result of selected framework. Locations of important files and documents (for model, view and controller components, database locations, video file, etc) are also included for ease of further development. A login manual is provided for developer of the system, specifying program requirements and accounts needed (i.e. developer account on Linux sharkdog server). User manual is available to user online, describing steps to follow while using the website as well as some troubleshooting solutions. Following research can then be used to implement similar systems on other servers. Chapter 2. System Overview 2.1. Introduction This chapter gives a brief overview of the system, describing the physical set up of the system as well as the software used in it and how it interacts to provide a working remote lab. --2-- Development of Remote FPGA Lab and FPGA-based Web Browser 2.2. System Overview As seen on Figure 1, the system is based on two servers, Linux relay server (1) controlling the Windows 2000 “remote lab server” (2). This was originally done for extra security but the relay server can be extracted from the system. Some hardware is then connected to the server, including a USB webcam (3), Serial LED (4) for latency testing and the microcontroller board itself (5.2). The board has to be connected through USB. Therefore, a connector circuit (5.1) was built to transform the serial port input on microcontroller Spartan-3 starter board to connect to the SQLite database remote lab server via USB cable. Figure 1 - System Overview --3-- Development of Remote FPGA Lab and FPGA-based Web Browser 2.3. Architecture of remote lab This chapter concentrates on architecture and main components of the remote lab. The system is of MVC (Model-View-Controller) architecture, where model component (2.1 in Figure 1) initialises the SQLite database objects (2.5). View component (2.3) defines the user interface; therefore, any changes to the visual appearance of the website are made here. The main connector between view for user and the database objects of the system is represented by controller component (2.2), which contains methods to access and modify database. In that case the response of each method in controller component is sent back to the view and can sometimes be displayed in a pop-up window to the user. Controller component also contains some methods to send and request information to and from the microcontroller board. XML RPC (Extensible Markup Language Remote Procedure Call) is used to connect hardware to Python handler methods. This file (2.4) contains all the low level methods to manipulate and receive data from the hardware via USB cable. TurboGears Framework SQLClassCtrlr 2.1 Initialise Python modify ViewMgr 2.2 Python modify Call method GUIMgr 2.3 Kid Language response Figure 2 - Architecture of the System --4-- Development of Remote FPGA Lab and FPGA-based Web Browser 2.3.1. Application Framework TurboGears A software framework is an abstraction in which common code providing generic functionality can be changed by user code providing specific functionality and methods needed. Remote lab system uses TurboGears, which is a Python web application framework, which is designed around the model-view-controller architecture to make rapid web application development in Python easier and more maintainable. TurboGears 1.x components are used in this system: SQLObject (Model) - data backend that can create a database or interface with existing data on many database servers. Kid (View) - XHTML frontend templating engine where all templates are valid. Such files are usually made in a way that allows opening these templates as simple XHTML files to check the design. At the same time features are provided to embed snippets of Python in an XML-like manner. These files are also compiled to Python files automatically after being modified by developer. CherryPy (Controller) - middleware that allows web applications to be programmed by writing event handlers that return data to (in TurboGears case) templates. The same data can also be received in Ajax fashion as a JSON data stream. MochiKit is the preferred, but optional JavaScript library for TurboGears 1.x. It is a designed to make programming in JavaScript more Pythonic. It is mostly used for implementing Ajax features and widgets as it provides an interface to get JSON data streams in asynchronous manner. --5-- Development of Remote FPGA Lab and FPGA-based Web Browser 2.4. Model – SQL Class Controller This is a SQLite database model used for storing relevant data in the system. SQLite is a simple and very reliable approach to database modelling. It is small and fast and is the most widely used type of database. SQLite is simple to administer, operate, embed in a larger program, maintain and customise. This type of database requires little or no administration but provides all the needed information for the administrator to monitor the remote lab system. The SQLite database can be viewed inside the system using a Mozilla Firefox plug-in, already installed and enabled for ease of access. In order to do that, open Firefox window and click: Tools -> SQLite Manager as described in Figure 3. Figure 3 - Access to system database The database is divided into separate tables for different types of data, called entities, i.e. user, bitstream, permissions. The tables for separate entities then not only collect the data into tables according to primary key, e.g. user ID, but also can be accessed and modified by the developer. These tables are initialised in the data model. The model file firstly imports some basic SQL Object classes and then defines the data model of the system, complete with class definitions and some methods for manipulating data. --6-- Development of Remote FPGA Lab and FPGA-based Web Browser The data model consists of definitions for: Config class: o This stores administrator’s input for configuration of the system, i.e. administrator can change maximum amount of bitstream files per user from default of 5 to some other integer value. o This is also linked to a foreign key “user” to notify who has currently locked the board. The concept of maintaining foreign keys is known as “referential integrity” and is used in this case because tg_user_id exists in a child entity and is used here in a parent entity. Bitstream class: o Table, as shown in Figure 4, holds information about bitstream files uploaded to the system, i.e. the date on which bitstream file was uploaded, the user who uploaded the file, comment by user, etc. The ‘shared” column, as seen below, is defaulted to value of “0”, and changed to value of “1” if a bitstream is shared among all users of remote lab, i.e. if bitstream file is used for demo purposes. Figure 4 - SQLite database o Bitstream class also contains some Python handler methods. These include “bitstreamPath” (where the path for storing bitstream files is defined), “destroy self” to delete the specified SQL bitstream object from the database, etc. --7-- Development of Remote FPGA Lab and FPGA-based Web Browser Visit class: o Specifies the class data for visit of each user, complete with “lookup visit” method to return the visit according to given “visit key” entry. Visit Identity class: o This class assigns a unique “visit key” to each visit of registered user. This way, it connects visit class to user class. Figure 5 - Visit Identity table Tg_group class: o Names like “Group”, “Order” and “User” are reserved words in SQL, so another name is set for group. This class is a collection of all users and permissions for users of the group. Tg_user class: o This is a user definition class, with characteristics like “user name”, “email address”, etc. Tg_user class is also connected to particular group that the user is a member of and to bitstream class, specifying the bitstream files available to the user. o Important handler methods like “get permissions” and ‘set password” are also included into this class. Permission class: o A relationship that determines what each group can do. --8-- Development of Remote FPGA Lab and FPGA-based Web Browser 2.5. View – GUI Manager GUI Manager (2.3 on Figure 2) provides the visual side of the remote lab. A major advantage is that it makes a connection between user of the website and the remote lab system, thus making the system available online publicly. The GUI manager component consists of Kid language files with extension .kid, which can be compiled to .pyc (compiled python) files. Kid is a simple XML based template language that uses embedded Python for handling GUI. Unlike PHP, kid documents must be well-formed XML. This requires more discipline, but has the big advantage that output is guaranteed to be wellformed XML as well. Kid is an attribute language and takes advantage of XML namespaces in order to embed Python code into HTML and XML as tag attributes which are not recognized by HTML tools and browsers. Each instance of view component is a .kid file which corresponds to each page of the website group. Each file has to define a DTD file (Document Type Definition) to define the document type for the webpage. An html tag of kid extension is also specified as in Figure 5. Figure 6 - Kid language template Although, the view files are written in Kid language, Mochikit library is imported into them. Mochikit is a light-weight JavaScript library written and maintained by Bob Ippolito. It uses the concept of deferred execution to allow asynchronous behaviour. It is used for development of interactive web pages like ones in remote FPGA-based lab, which maintain a dialog with the web server. --9-- Development of Remote FPGA Lab and FPGA-based Web Browser Mochikit forms the foundation of the client-side functionality of the TurboGears Python web-application and can easily load and modify JSON-encoded data sets. JSON (JavaScript Object Notation) is a lightweight computer data interchange format. It is text-based format for representing simple data structures and associative arrays. In remote lab system, JSON is used to import SQLite objects, such as group, user and permission, and then convert them into lists and dictionaries which can be read by the view component of the system. --10-- Development of Remote FPGA Lab and FPGA-based Web Browser 2.6. Controller – View Manager Controller component is configured using Cherrypy, which is an objectoriented web application framework using Python programming language. It is designed for rapid development of web applications by wrapping the HTTP protocol but stays at low level. Controller component connects to some turbogears template libraries (i.e. controllers template, expose and flash), as well as connecting to model file and importing Cherrypy framework library. It consists of methods used for handling interaction between client GUI and server-side database objects (i.e. methods like “register” and “submitConfig”, which can access and modify objects in SQLite data model). The controllers file also contains some methods which interact with XML RPC file, which then connects to hardware. These are developed for writing/reading data to/from CSR’s, RAM, etc. Some new features in controllers.py file include remote/local switch access using virtual switches. The response from each controller method is returned to view component and also recorded in a command prompt window “Cygwin FPGA App”, which starts automatically with system re-boot and can be used by developer as testing tool (i.e. printing out system messages and database object variables for debugging the code written). Cygwin is a Unix-like environment and command-line interface for Microsoft Windows. It provides native integration of Windows-based applications, data and other system resources with applications, software tools, and data of the Unix-like environment. In this particular system, Cygwin allows Windows 2000 applications to run on Linux relay sharkdog.nuigalway.ie server. --11-- Development of Remote FPGA Lab and FPGA-based Web Browser Figure 7 - Cygwin FPGA App Window This response window can greatly contribute to any troubleshooting and modification of controller component. It provides feedback on any errors in the file (i.e. wrong indent in “controllers.py” file or any other major Python-based system files). It is important to notice that Python does not tolerate simple syntax errors like indent errors. Therefore, it is strongly advised that any Python file modifications are made in an appropriate compiler program (i.e. PythonWin located in Start > Programs > Python 2.5). --12-- Development of Remote FPGA Lab and FPGA-based Web Browser 2.7. Hardware Connector The Spartan-3 microcontroller board is accessed by website handler and hence by controller component of the system via XML-RPC. This is a Remote Procedure Call method that uses XML passed via HTTP as a transport. With it, a client can call methods with parameters on a remote server and get back a response with proper data. The file ‘serXMLRPC.py” acts as a server and listens to responses and requests from client “controllers.py” file. The connection between server and client is implemented by calling xmlrpclib (XML-RPC library) methods “ServerProxy” in the client code and “SimpleXMLRPCServer” on the server side. The host is defined as “localhost” with port 2000 which is configured to be a connection to Spartan-3 microcontroller board. This is because hardware is connected to the same server as controller file (i.e. localhost or Windows 2000 server) via port number 2000 as seen on Figure 8 below. Figure 8 - Connection to Hardware --13-- Development of Remote FPGA Lab and FPGA-based Web Browser 2.8. Locations of Important Files This chapter contains diagrams for locations of important system files. As seen in Diagram 9, this folder contains all the important architecture files of the system. 2.8.1. Architecture files Figure 9 - File locations --14-- Development of Remote FPGA Lab and FPGA-based Web Browser 2.8.2. Python packages These are python packages used within the system. C:\Python 2.5.2 Lib Logging (libs to import for logging) Site-packages Visit (creates visit_table) Site packages must be installed into python directory before being used, e.g. TurboGears, TurboKid, pysqlite2 turbogears Identity (check against dB) Figure 10 - Python package files location 2.8.3. Files for connecting to hardware These are files used to connect to hardware, Spartan-3 and perform operations. C:\cygwin\home\ NUIG .ssh (known hosts, e.g. Sharkdog) Bmp to raw funcs & files serXMLRPC.py Interact with h\w Shutdown.exe appliedVHDLUSB VB (DSP, CSR, SRAM funcs) Figure 11 - Cygwin hardware connection files --15-- Development of Remote FPGA Lab and FPGA-based Web Browser Chapter 3. System Development 3.1. Introduction This chapter specifies the development done to the remote FPGA lab during the project. Three main areas of this are: Development of GUI. Development of Administrator control of website. Development of Registration process. 3.2. Development of GUI Most important part of GUI development is the need for remote switch access provided for registered user of remote lab website. This access encapsulates virtual access to board configuration so that the properties of toggle switches and push buttons can be tested. This feature is very important to make online testing possible for microcontroller Spartan-3 boards, and indeed for other microcontroller boards. For the purpose of this virtual configuration, two CSR’s (Control Status Registers) are dedicated as default storage space for configuration of virtual switches. This switch access is enabled for guest, user and admin demo page and is displayed originally as a “hidden field” on view of page. Once the remote switch is pressed and handler method toggles CSR 8 bit 0 to 1, remote access is available and switches can be viewed on web page. CSR 8 is dedicated for configuration of virtual buttons (bits 7:4) as well as remote/local switch used to differentiate if board is set to be controlled remotely or locally in the lab (bit 0) and bits 3, 2 and 1 are unused, as seen in Table 1. --16-- Development of Remote FPGA Lab and FPGA-based Web Browser Table 1 - Configuration Data Byte CSR 8 (7:0) 7 Btn(3) 1 6 Btn(2) 1 5 Btn(1) 1 4 Btn(0) 1 3 X 0 2 X 0 1 X 0 0 Remote 1 CSR 9 is used to describe virtual configuration of toggle switches. As there are eight toggle switches on Spartan-3 board, all bits of CSR 9 are used. Note that on Table 2, when user presses “tgl(1)” toggle switch representation button 1 on website, that button corresponds to most significant bit 7 in CSR location. This can then be viewed in Demo 1 as eight LED’s correspond to toggle switches. This data inversion technique is necessary when working with FPGA boards, as signals are assigned from most significant to least significant bit. This configuration has to be implemented in website view and controller, as well as in packaged VHDL template file. Table 2 - Configuration Data Byte CSR 9 (7:0) 7 Tgl(1) Sw(7) 1 6 Tgl(2) Sw(6) 1 5 Tgl(3) Sw(5) 0 4 Tgl(4) Sw(4) 1 3 Tgl(5) Sw(3) 0 2 Tgl(6) Sw(2) 1 1 Tgl(7) Sw(1) 0 0 Tgl(8) Sw(0) 1 3.2.1. GUI remote/local switch access Graphical User Interface has to provide user with interactive and userfriendly implementation of remote switch access. For this, jpg photos of a single button and toggle switch on the board are used, they are then imbedded into kid language view files using Python ‘for’ loop, thus justifying the choice of Kid language for view component of the system. Firstly, a remote/local switch button is used to control whether the user can view the remote switches. This switch is defaulted to “0” at page refresh, making sure that the board is defaulted to local access, i.e. only physically in the lab room. --17-- Development of Remote FPGA Lab and FPGA-based Web Browser At initial remote assignment of switches, CSR’s 9 and 8 are defaulted to “0”, except for bit 0 of CSR 8, as shown on Figure 9. This is very important, because if CSR’s are not defaulted, the switch access will not work properly, as CSR read and write operations could have been used prior to switch access or CSR’s might have been modified by previous logged in user. Figure 12 - Default configuration for remote switch access When remote access is selected, user can view the toggle switches and push buttons on webpage. Each button and toggle switch has an “onClick” handler method, and is able to manipulate data on hardware using similar method to that described in Figure 9. The button/switch number is sent to an internal view handler method, where button image is changed in accordance with changed configuration i.e. ‘not pressed’ to ‘pressed’ state. The view handler then calls corresponding controller method specifying button number and CSR number. Controller uses single method for toggle switch and button access and calls a corresponding method in serXMLRPC.py file. Here, data is retrieved from particular CSR, calling an executable CSRRead.exe file. This data is now ready to parse as developed and tested during this project: 1. Data read from the hardware is stored in temporary csr.txt file. This file is opened and read. 2. Resulting data is then converted to decimal format and parsed into a list object of binary bits. --18-- Development of Remote FPGA Lab and FPGA-based Web Browser 3. If list has less than 8 entries, zeros are added onto the start of the list to make it an 8 bit binary data format. 4. The specified button number is defined as the number of button pressed on view of webpage minus 1, in order to correspond to bits of list, which starts at bit 0 and ends at bit 7. 5. The entry at button number is then found in the list and toggled, i.e. if zero – change to one, and vice versa. 6. The list is then reversed to correspond to “most significant to least significant” assignment of signals in VHDL. 7. Data is converted back to decimal value, and then to hexadecimal value. CSRWrite.exe is called to write changed data to specified CSR. As a result, a fully automated remote switch access is enabled for user, as seen on Figure 10. Using a proper bitstream file template, remote switch access can be enabled, and switches and push buttons can be tested. In this particular case, while remote access is enabled, when button is pressed corresponding 7-segment display shows its bus assignment value otherwise shows “F”, LED’s correspond to toggle switches. Figure 13 - GUI Remote Switch Access --19-- Development of Remote FPGA Lab and FPGA-based Web Browser 3.2.2. Guest Page Guest account was created to familiarize unregistered users with website and its advantages and uses. Guest is specified as an instance of user with username: “guest” and password: “guest”. This account has a permission to view only one page – “guestHome”, which contains several demos where defined bitstream files are downloaded and remote switch, CSR and RAM access can be tested and is explained in pdf files. As seen in Figure 11, guest can test these features of remote FPGA lab, as well as viewing the video stream of microcontroller board. The demo files are configured to show guest interaction between remote switches and display it out. The CSR access in demo 2 is also displayed to guest, specifying control and data bytes sent during CSR read and write operations. Figure 14 - Guest page --20-- Development of Remote FPGA Lab and FPGA-based Web Browser 3.3. Admin Control Development As seen in Figure 12, the Administrator is a separate class extending the group class, so is the user class, which is divided into guests and registered users. Administrator has permission to view all pages available to registered user, as well as having an administrator page. Figure 15 - Permissions of different user groups Administrator page is used for control of registered users and configuration of the remote lab system by administrator. A new configuration can be submitted to be used for website, e.g. more bitstream files available to download by user and whether registration key is used during registration. Administrator also has privileges to add system bitstream, in which case its ‘shared” attribute will be set to “1” to allow all users access to that bitstream file. --21-- Development of Remote FPGA Lab and FPGA-based Web Browser Added database attributes for user allow for easier manipulation and control of remote lab system. Along with existing user name and email address attributes for each user, administrator is provided with his/her full name, address and institution if entered during registration. The use of website can also be reviewed on administrator page, where a table of user information is shown to administrator. Amount of visits and last visited time by each user is recorded as can be seen in Figure 13, giving the administrator needed statistics and allowing him/her to delete users which haven’t used website for long time or warn the user about possible account deletion and if a reply was not received during some period of time, delete the particular account. Figure 16 - Administrator Control --22-- Development of Remote FPGA Lab and FPGA-based Web Browser 3.4. Development of Registration Registration Process in existing remote lab system was concentrated on registration key, which can be set in control configuration form by administrator. The enhanced user registration form is shown on Figure 14, where optional attributes like address and institution are added to provide extra information about users. ReCaptcha tool is used to make sure that registration is performed by human (not by some automated code). Figure 17 - Registration Form However, to make the system more user-friendly, the development of registration page concentrates on form mail concept. Form Mail is a generic HTML form to e-mail gateway that parses the results of any form and sends them to the specified users (in this case, administrator’s email address). --23-- Development of Remote FPGA Lab and FPGA-based Web Browser 3.4.1. Retrieving user input from the form In order to implement the form mail technique in the remote lab system, the form action is defined as connecting to register method in controllers.py file. This method contains normal arguments as well as “kw” or keyword arguments. “KW” acts as a repository for arguments that aren’t otherwise recognized in Python. These “kw” arguments can then be accessed like a tuple or dictionary. In order to check for and access user input in controller component of the system Python methods: kw.has_key (“<particular user input>“) and kw [“<particular user input>“] are used. Firstly, the password attribute is checked, user must provide password for future login into the system and confirm that password by typing it in again. If entered passwords match, a user SQLite object belonging to group of users is defined and initialised with values from user. It is important that proper names of user attributes are used when assigning them to values from user input. The new attribute “visits” is set to zero, as user didn’t visit the website yet, later it will be incremented with each successful login of user into the system. “Confirmed” attribute is also set to zero. This is used as confirmation of user registration by administrator, hence giving him/her control over registered users and more interaction with user registration. Once the administrator receives registration form, SQLite database can either be manually changed or automatically changed by providing user with ability to confirm registration (i.e. user is given activation link for account). The latter is preferred and used in this project as it provides more automated and independent registration process. 3.4.2. Sending registration request to Admin Administrator is given further privileges of confirming or declining user registration. The controller component of the system compiles an email from entered user information and using SMTP (Simple Mail Transfer library), sends this to administrator. In order to implement this in Python file, smtplib.py must be imported. This module defines an SMTP client session object that can be used to send mail to any Internet machine with an SMTP or ESMTP listener daemon. --24-- Development of Remote FPGA Lab and FPGA-based Web Browser Firstly, SMTP server must be set up: Install and configure IIS (Internet Information Services): o In Start Menu, click Control Panel, Add/Remove Programs and Add/Remove Windows Components. o Double-click Internet Information Services. o Continue as specified in References [9]. o IIS for Windows 2000 Server is already set up and configured. Set up SMTP: o SMTP server is configured on Windows 2000 server. For further information, references [10] and [11] can be consulted. o In this system, special port was open to send/receive SMTP emails through NUIG firewall, because otherwise emails were not allowed outside of internal network and stuck in a queue. Now, SMTP server is ready for use, “telnet <host used> 25” can be used in command prompt to test the connection. Once SMTP server is set up and the controller file imports needed SMTP library, a simple python code is used to define server, sender, recipient and message itself: Server defined as “evs1.nuigalway.ie” with default port to use for sending email. This server was set up after a request for SMTP. Recipient is a list of recipient objects (e.g. administrator email). Sender email is defined as internal virtual email account because Python doesn’t allow relaying. An open mail relay is an SMTP server configured so that it allows anyone on the Internet to send e-mail through it. It can be exploited by spammers and worms, so is not used in this remote lab system and is not allowed by Python. Message contains of header and body. Header is then compiled of from, to addresses and Subject. --25-- Development of Remote FPGA Lab and FPGA-based Web Browser 3.4.3. Using reCaptcha CAPTCHA is defined as “Completely Automated Public Turing test to tell Computers and Human Apart”. It is a security measure designed to prevent computer from hacking into a website. There are a few implementations of Captcha validation for different programming languages, like JavaScript. There are also a few suggestions on Captcha algorithms: like asking user to calculate a result of simple mathematic problem. However, the most efficient and widely used free Captcha service is ReCaptcha. It is used by many websites to prevent abuse from “bots”, or automated programs usually written to generate spam. No computer program can read distorted text as well as humans can, so bots cannot navigate these sites. ReCaptcha operates as shown in Figure 15. Figure 18 - reCaptcha Operation (as described on reCaptcha website) ReCaptcha provides a client Python package, which is used in controller component of remote lab system. This Python package can also generate html to display Captcha tool on web page. Because the view of remote lab web browser is not written in JavaScript (rather in Kid language), reCaptcha tool can be embedded in the registration page, otherwise a different type of CAPTCHA (e.g. jCap) must be used. --26-- Development of Remote FPGA Lab and FPGA-based Web Browser Steps for reCaptcha validation: Register on reCaptcha website and download needed reCaptcha packages. Create reCaptcha key for your domain. Here domain name is provided, i.e. “appliedvhdl.com”, if “global key” option is selected, reCaptcha validation can be used on all domains. Take note of public and private keys provided by reCaptcha. Run displayHTML method using Python IDLE compiler or in your python controller file (public key provided as input here). This can then be embedded in non-JavaScript view of web page. In controllers.py import reCaptcha library. Define private key. This use of key pair ensures a secure connection between reCaptcha server and fpga-lab server, as only the developer with recognized account on fpga-lab server has access to private key. Captcha is then submitted in controller file, using built-in method from captcha.py library. Challenge and response field are provided along with private key and localhost IP address. To verify that captcha was interpreted correctly by user, captchaResponse method is used, which returns is_valid response and error_code if any. Once captcha is true, user registration can proceed to sending mail to administrator. --27-- Development of Remote FPGA Lab and FPGA-based Web Browser Chapter 4. Conclusion 4.1. Work Review As specified in the first chapter, the main aims of this project are development of the existing remote FPGA lab and documentation of its architecture and set up. The primary purpose of this project – development of remote lab, is described and explained in Chapter 3, along with techniques and programs used, software installed and configuration needed. Development was concentrated overall on enhanced user interface, easier registration and generation of statistics for administrator. More attributes and hence data are added to user SQL object to provide more statistics to administrator. Added ReCaptcha validation tool ensures that website and system overall is more secure and no spam is generated. SMTP email form is added to provide more information to administrator on use of the website and for easier manipulation of users. These techniques were interesting to discover and even though they created a challenge of understanding new programs and packages and implementing extra features into the existing remote lab, the end result has contributed a lot to system development. Documentation of the remote lab is provided in this report, and also in pdf format files for use by future developers of the system and users of the website. The user guide is available online to users and any troubleshooting problems and queries can be sent to administrator’s email. --28-- Development of Remote FPGA Lab and FPGA-based Web Browser Documentation on system overview was provided in Chapter 2 Section 1, where system set up is described visually and explained. This consists of servers involved and their configuration, along with descriptions of physical connections made to hardware. Chapter 2 Section 2 describes the architecture of remote lab system. Programs, languages and packages used in remote FPGA-based lab are stated and explained. The interaction between different components of architecture is also described to developer for future modifications of the system. The understanding of remote lab system and how it works was the most challenging part of this project as the system consists of several components and is spread over two servers which interact with both hardware and external user/client. However, once full understanding of it was reached, development of the system became fast and precise. Some problems were also initially present with modifying the controller component in Python files. These were caused by syntax mistakes but had a huge impact on system, as without a properly compiled and working controller file, the system is not working too and website gets invalid response from remote lab server. A solution to these problems is to use proper Python compiler and check the code written for any mistakes, also Cygwin FPGA App command window can be used to view mistakes present in python component files. SMTP server set up also created the need for a lot of research on virtual servers and their configuration, as well as Internet Services installation and configuration. The knowledge gained during SMTP set up is very valuable and contributed to understanding of virtual servers and the way they may be used in college or workplace. Added difficulty was bypassing NUIG firewall, after which understanding of the details of NUIG internal network was reached. With some help from college technitians, Martin Burke and Myles Meehan, a ticket for SMTP port was raised with college authorities to implement SMTP form mail on remote lab website. Overall, research and development done in this project will hopefully contribute to further development of the system and to current use of the website. --29-- Development of Remote FPGA Lab and FPGA-based Web Browser 4.2. 4.2.1. Possible Future Work Migration to different Windows Edition It was recently discovered that all support for currently used Windows 2000 edition is will be terminated on 13 July 2010. This is undesirable for a working remote lab system. However, since this was discovered so late in the progress of project, the migration to a newer Edition of Windows is yet to be performed. Documentation on this can be found in reference 14 link. 4.2.2. Further database development Database was developed as part of this project, were statistics about user visits are stored in database and can be viewed by administrator. If more information about users is needed, the database can be easily modified to include extra attributes and will give administrator even more control and feedback about the system. 4.2.3. Remote Lamp Remote USB-controlled lamp is needed for good video quality even during the night. However, after some research done, this has proven to be very costly. Therefore, alternative methods of constructing a USB-controlled power switch are provided in references. --30-- Development of Remote FPGA Lab and FPGA-based Web Browser Chapter 5. Website Troubleshooting 5.1. Bad Gateway When user tries to log in, he/she gets the following error: The proxy server received an invalid response from an upstream server. This means that Cygwin FPGA App is non-responsive or shut down, therefore the system is also shut down and not initialised. To user: The server is undergoing reboot or modification, please log in again later. To developer: If no reboot is performed, system files have errors, please re-check any recently modified files or open Cygwin FPGA App to see the error. 5.2. No video on webpage User cannot see video of the board on webpage. This is because Java Platform is not installed or out of date. The video file uses Java plug-in to display the video. To user and developer: Java platform is not installed or out of date. Please install the latest Java updates on: http://www.java.com 5.1. CSR/switch not working The user tries to access CSR’s or remote switches for testing, images appear as expected. However, commands don’t seem to work as read/write do not get proper responses. To user: This system is not compatible with some internet browsers, i.e. Internet Explorer. Please use Mozilla Firefox or a similar browser for access. --31-- Development of Remote FPGA Lab and FPGA-based Web Browser Chapter 6. Deliverable material 6.1. Remote FPGA Lab, Demo 1 Please note that this website is not completely compatible with Internet Explorer. Please use Mozilla Firefox or similar browser! The purpose of this demonstration is to show how this remote lab website can be used. The remote switch access can be tested and is displayed out for ease of understanding. Testing process of this demonstration: 1. Press “Demo 1” button to download the demo bit-stream to the Spartan-3 board. This step is very important, as board can be configured with another bit-stream file from earlier use of website. 2. Wait for “Board configured” pop-up window, to make sure that board configuration was successful before accessing remote switches. 3. CSR 8 (Control Status Register) is used to hold information about push button configuration and remote/local flag, as shown below. Table 1 - Configuration Data Byte CSR 8 (7:0) 7 Btn(3) 0 6 Btn(2) 0 5 Btn(1) 0 4 Btn(0) 0 3 X X 2 X X 1 X X 0 Remote 0/1 4. CSR 9 holds information about toggle switch configuration as shown below: Table 2 - Configuration Data Byte CSR 9 (7:0) 7 Tgl(1) 0 6 Tgl(2) 0 5 Tgl(3) 0 4 Tgl(4) 0 3 Tgl(5) 0 2 Tgl(6) 0 1 Tgl(7) 0 0 Tgl(8) 0 5. Now the board is ready for access. Press remote/local switch image to set switch access to “remote” mode. --32-- Development of Remote FPGA Lab and FPGA-based Web Browser 6. Toggle switch images can be pressed on website, which correspond to physical switches (11) on Figure 1. The state of remote toggle switches is displayed to user by eight LED’s (12) on developer board. 7. Push button images can be pressed to toggle push button configuration of the board. The configuration of these is displayed on four 7-segment displays (10) in Figure 1. Once remote access is selected, 7-segment displays are defaulted to “F”, if button is pressed the number of the button is displayed (most significant to least significant bit), as shown on Figure 16. Figure 19 - Remote switch access --33-- Development of Remote FPGA Lab and FPGA-based Web Browser 6.2. Remote FPGA Lab, Demo 2 Please note that this website is not completely compatible with Internet Explorer. Please use Mozilla Firefox or similar browser! The purpose of this demonstration is to show how this remote lab website can be used. The CSR and SRAM are access is enabled in this demonstration. CSR’s (Control Status Registers) and RAM (Random Access Memory) are used to store data in Xilinx FPGA microprocessor. Process of CSR and RAM Access: In order to properly access and perform write operations to CSR’s and RAM, following two bytes have to be sent to the microcontroller board. 1. Control byte: Unused csrAdd(2) csrAdd(1) csrAdd(0) DSP RAM CSR R/W X Input CSR address here. This is 3 bit 1 for 1 for 1 for 1-read binary number from ‘000’ to ‘111’ or DSP DSP DSP 0-write decimal 0 to 7 for 8 CSR’s task task task 2. Data byte: Bit(7) Bit(6) Bit(5) Bit(4) Bit(3) Bit(2) Bit(1) Bit(0) Data to be written to CSR’s. This is 8-bit binary number, which is converted from 2-bit hexadecimal number inputted by user CSR and RAM read operations only require control byte to be sent and response is collected from the board. --34-- Development of Remote FPGA Lab and FPGA-based Web Browser Testing process of this demonstration: 1. Press ‘Demo 1’ button to download the demo bit-stream to the Spartan-3 board. This step is very important, as board can be configured with another bit-stream file from earlier use of website. 2. Wait for ‘Board configured’ pop-up window, to make sure that board configuration was successful before accessing CSR’s and RAM. 3. Click ‘right arrow’ image to access CSR and RAM control. 4. For CSR access: a. Any of 8 CSR’s can be selected by clicking ‘down arrow’ on CSR number drop-down list. b. Click on ‘read’ button to read particular CSR. Note that when command is performed, data is displayed in text box near the button, as well as on FPGA board. c. FPGA board is configured to display selected CSR number on first 7segment display, CSR read configuration for control byte on second display, and data byte shown on third and fourth 7-segment displays. Control byte for CSR read operation is always ‘3’ because CSR task and read operation are asserted. d. For write operation, input 2-bit hexadecimal data into a text box near ‘Write’ button, then click the button. 5. For RAM access: a. To read memory stored in particular RAM address, input 6 hexadecimal characters, first two in range 00-03, e.g. ‘021F2D’. b. Click ‘read’ button. 8-bit hexadecimal data stored in selected data address will be displayed in text box. c. For memory write operation, insert 6-bit hexadecimal number for RAM address and 8-bit hexadecimal data to be written. Then press ‘write’ button. --35-- Development of Remote FPGA Lab and FPGA-based Web Browser References [1] Mark Pilgrim, “Dive into Python”, May 2004. [2] “Kid Language Documentation” http://www.webwareforpython.org/KidKit/Docs/UsersGuide.html [3] “Send mail with image attached” http://www.pynokio.org/sendmail.py.htm [4] “Send email via Linux server” http://stackoverflow.com/questions/73781/sending-mail-via-sendmailfrom-python [5] “TurboGears documentation” http://en.wikipedia.org/wiki/TurboGears [6] “Kid language templating guide” http://en.wikipedia.org/wiki/Kid_%28templating_language%29 [7] “CherryPy Definition and Help” http://en.wikipedia.org/wiki/CherryPy [8] “Information about Cygwin” http://en.wikipedia.org/wiki/Cygwin [9] “Setting up Internet Information Services” http://www.noip.com/support/guides/web_servers/setting_up_iis.html [10] “Setting up SMTP server on Windows 2000” http://support.microsoft.com/kb/308161 --36-- Development of Remote FPGA Lab and FPGA-based Web Browser [11] “Configuring SMTP server” http://www.skybuilders.com/Users/Jesse/Docs/howToSMTP.html [12] “Send mail using SMTP library” http://bytes.com/topic/python/answers/774774-how-send-mails-usingpython-smtp http://www.mkyong.com/python/how-do-send-email-in-python-viasmtplib/ [13] “ReCaptcha documentation and Downloads” http://recaptcha.net/ [14] “Documentation of Windows 2000 Migration” http://support.microsoft.com/ph/1131 [15] “USB-controlled Plug” http://www.instructables.com/id/A_USB_Power_Controled_Plug_Stri p_With_Isolation/ [16] “USB-controlled socket” http://www.alfersoft.com.ar/blog/2008/07/08/usocket-usb-controlledsocket-with-pic18f4550/ [17] “Implementing TurboGears” http://docs.turbogears.org/1.0/AutoCompleteField [18] “About Mochikit” http://mochikit.com/demos.html --37-- Development of Remote FPGA Lab and FPGA-based Web Browser [19] “SMTP troubleshooting” http://www.issociate.de/board/post/265460/Email_stuck_in_Queue_fo lder.html http://social.technet.microsoft.com/Forums/enUS/exchangesvrtransport/thread/369dbea0-3300-4371-95595d801e3a28e6 [20] “XML-RPC Client” http://docs.python.org/library/xmlrpclib.html [21] “Data types in databases” http://sqlite.org/datatype3.html [22] “Using Putty for fpga external access” http://the.earth.li/~sgtatham/putty/0.53b/htmldoc/Chapter3.html#3.7 [23] “XML-RPC How To” http://www.tldp.org/HOWTO/XML-RPC-HOWTO/index.html [24] “Using reCaptcha with Python” http://k0001.wordpress.com/2007/11/15/using-recaptcha-with-pythonand-django/ [25] “Kid package installation” www.kid-templating.org/ --38--