1
STATUS
ZONES
CONTROLS
FIRE
FIRE
1
2
3
BUZZER
5
4
6
7
8
SILENCE
1
TEST
FAULT
FAULT
DISABLED
DISABLED
1
5
TEST
2
6
SUPPLY
3
7
SYSTEM FAULT
4
8
RESET
2
LAMP TEST
3
SOUNDERS
FAULTS
SUPPLY FAULT
BATTERY FAULT
AUX. SUPPLY FAULT
ACTIVATE/
SILENCE
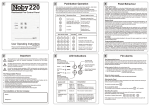
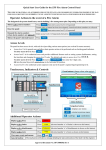
INSTRUCTIONS FOR CONVENTIONAL FIRE ALARM PANEL
General User ( Access Level 1)
To silence internal buzzer press BUZZER SILENCE.
To override active delays, during an alarm condition,
press DELAYS ACTIVE.
Authorized User ( Access Level 2 )
To enter this level enter 4 digit code.
Consult Manual for more details.
EVACUATION
Enter Authorised User Code (Access Level 2).
Press SOUNDER (Activate/Silence).
Repeat last step to SILENCE sounders.
Fire Events
Internal Buzzer sounds.
System Status Fire LED is lit.
Zones on Fire will have their respective Fire LED lit.
To silence fire alarms:
First enter authorised user code (Access Level 2).
Press SOUNDER (Activate/ Silence) button.
Fault Events
Internal Buzzer Sounds.
System Status Fault LED is lit.
Each fault will be shown by its own LED being lit.
Call service engineer.
DISABLEMENTS
OUTPUTS
AUXILIARY
DISABLE
SOUNDERS
SELECTED
ZONES
DELAYS
ACTIVE
EARTH FAULT
MANUFACTURED IN THE E.U. TO THE
REQUIREMENTS OF EN54 Pt 2 & Pt 4 1999
2, 4, 8 Zone
Fire Alarm Control Panel
Operating
Manual
4
G
LOBAL
FIRE EQUIPMENT
The Panel Buttons
STATUS
ZONES
CONTROLS
FIRE
FIRE
1
2
3
BUZZER
5
4
6
7
8
SILENCE
1
TEST
FAULT
FAULT
DISABLED
DISABLED
1
5
TEST
2
6
SUPPLY
3
7
SYSTEM FAULT
4
8
RESET
2
LAMP TEST
3
SOUNDERS
FAULTS
ACTIVATE/
SILENCE
INSTRUCTIONS FOR CONVENTIONAL FIRE ALARM PANEL
General User ( Access Level 1)
To silence internal buzzer press BUZZER SILENCE.
To override active delays, during an alarm condition,
press DELAYS ACTIVE.
SUPPLY FAULT
BATTERY FAULT
AUX. SUPPLY FAULT
Authorized User ( Access Level 2 )
To enter this level enter 4 digit code.
Consult Manual for more details.
EVACUATION
Enter Authorised User Code (Access Level 2).
Press SOUNDER (Activate/Silence).
Repeat last step to SILENCE sounders.
Fire Events
Internal Buzzer sounds.
System Status Fire LED is lit.
Zones on Fire will have their respective Fire LED lit.
To silence fire alarms:
First enter authorised user code (Access Level 2).
Press SOUNDER (Activate/ Silence) button.
Fault Events
Internal Buzzer Sounds.
System Status Fault LED is lit.
Each fault will be shown by its own LED being lit.
Call service engineer.
4
DISABLEMENTS
OUTPUTS
AUXILIARY
DISABLE
SOUNDERS
SELECTED
ZONES
DELAYS
ACTIVE
EARTH FAULT
MANUFACTURED IN THE E.U. TO THE
REQUIREMENTS OF EN54 Pt 2 & Pt 4 1999
STATUS
Fire
LED used to indicate any FIRE ALARM condition present on panel.
Fault
LED used to indicate any FAULT condition present on panel.
Disabled
Disabled Status LED used to indicate that the panel has features that have been
disabled in either Access Level 2 or 3 modes.
Test
This LED is active whenever panel is in TEST MODE. Only LIT when in
Engineering Mode and TEST mode has been selected.
Supply
Multi function indicator used to indicate the presence of supply. When in Access
Level 1 this LED is permanently lit. If in Access Level 2 (enter this mode using
USER CODE) this LED will flash at a rate of once per second. And finally if in
Access Level 3 mode (enter using ENGINEERING CODE) this LED will flash
faster at a rate of once every 0,5 seconds.
System FaultThis LED will be lit whenever there is a processor failure or corruption of the
panel firmware.
Installation, Operating and Maintenance ManualVersion 1.0 (Sep. 28, 2005)
ORION 2, 4, 8 Zone Fire Alarm Control Panel
G
LOBAL
FIRE EQUIPMENT
FAULTS
Supply Fault
This LED will be ON whenever the Main Supply has been
removed or has dropped below 20 Volts.
Battery Fault
Indicates that there is low voltage level on the batteries or the
battery charger circuit has failed.
Aux. Supply Fault Indicates that the Auxiliary Supply has a fault.
Earth Fault
When this indicator is ON there is leakage current flowing from the earth
connection/ wiring and any conductor in coming into the panel.
Sounder Fault
If there is a conventional sounder circuit fault, the General Fault LED will
be lit and the Disable Sounders LED in the disablements section will also be lit and flashing.
Zone Indicators
Individual zone indicators are provided for both FIRE and FAULT conditions.
If any zone is disabled then its FAULT LED will also be used to indicate the disablement of that
particular zone. The Zone LED will be ON along with the Disabled status LED. Flashing Zone
Fault LED along with General fault LED indicates fault on that zone.
CONTROLS
These four keys can have more than one function.
They are numbered to indicate that they are used to enter digits from 1 to 4 for code entry.
BUZZER SILENCE ( 1 )
At Access Level 1 this button is used to silence the panel's internal
buzzer. Access level 3 used to confirm/accept changes in
programming.
RESET ( 2 )
Press this button to reset the panel at access level 2 or 3.
LAMP TEST ( 3 )
Press this button at access level 1 or 2 to test all LED indicators
and the panel's internal buzzer. Release when test is finished.
SOUNDERS ( 4 )
Press once to activate/silence sounders. If sounders are active,
for example, during a FIRE condition or in the event of an
Evacuation action, pressing this button will stop the sounders.
Auxiliary Relays are not affected by this action. Used in Access
level 3 programming to select Zones
DISABLEMENTS
These buttons are only active at access levels 2 or 3.
Installation, Operating and Maintenance ManualVersion 1.0 (Sep. 28, 2005)
ORION 2, 4, 8 Zone Fire Alarm Control Panel
G
LOBAL
FIRE EQUIPMENT
They can perform different functions depending on the present panel mode of operation.
At Access Level 2 (USER MODE)
These buttons have a toggle action. One press will disable the particular feature being
selected another press of the same actuator will re-enable the function.
When a particular function is disabled, its associated LED will be active and OFF otherwise.
OUTPUTS AUXILIARY
Pressing this button will ENABLE/ DISABLE the auxiliary relays.
DISABLE SOUNDERS
The user can use this button to enable/ disable the conventional
sounder circuits. Note: Disables both sounder circuits
SELECTED ZONES
Use this button to select the zone disablement feature. Press
once, associated LED will light up and by using the GREEN (1)
button select the zone to be disabled. Selected zone will have its
FAULT/DISABLED LED ON. Confirm selection by pressing RED
(4) button. Zone Disablements will only be active after RESET.
Once the disablement procedure is finished press again this
button to exit.
DELAYS ACTIVE
(Day/Night)
Pressing this button will enable the previously programmed delay.
The corresponding LED will be ON during this time. In access
level 1, during the delay time which started due to a FIRE alarm,
pressing this button over rides the delay timer and the sounders
and Fire relay will be activated immediately.
For information regarding special functions associated with these buttons, in access level 3
(Engineering Mode), please consult the Programming section of this manual.
Installation, Operating and Maintenance ManualVersion 1.0 (Sep. 28, 2005)
ORION 2, 4, 8 Zone Fire Alarm Control Panel
G
LOBAL
FIRE EQUIPMENT
Troubleshooting - Fault Indications
Troubleshooting work of any fault on the panel should only be carried out by qualified
technicians.
General Fault
The General fault LED is illuminated whenever there is a fault on the
system. It is always lit along with at least one other fault indicator which
gives more detail relating to the fault.
Zone Fault
This type of fault will indicate that there is either a short or open circuit
condition on zone circuit. Revise wiring.
Power Supply Faults
Supply Fault
Associated with a low voltage (below 20 V) present at the input of the
power supply or the removal of the main power supply. Measure voltage
levels and verify electrical mains fuse.
Battery Fault
This fault is present when there is a low voltage below 20 V DC at the
battery terminals or if there is a battery charger problem. Charger
problems can be caused by panel's hardware failure or batteries that
have not been connected in the specified manner as indicated in this
manual, on the installation section. Verify if batteries are properly
connected. Measure the voltage at the battery terminals. If it is below
21V DC replace batteries. Remember to verify also the main electrical
fuse.
DON'T EVER SHORT CIRCUIT BATTERY TERMINALS IN ORDER TO VERIFY BATTERY CHARGE
ONLY USE BATTERIES WHICH ARE LEAD ACID VRLA TYPE 12 V DC
Aux Supply Fault
This fault will show when the voltage at the auxiliary supply output is
below 20 Volts DC. This can be caused by the current limit for this output
being exceeded. This output is limited to 300 mA. Other causes for faults
on this point are short circuits on the wiring or faulty hardware attached to
this supply output. Verify voltage, if below the required acceptable level
remove wiring connected to this output. If voltage now returns to normal
this confirms that connected equipment or cable is damaged.
Earth Fault
This FAULT will indicate that there is some level of current leakage
between any of the wire conductors and the EARTH connections.
VERIFY WIRING.
System Fault
This FAULT indicates that there is a fault at the main processor level. In
this particular fault, the panel's main board needs to be replaced or
repaired.
Installation, Operating and Maintenance ManualVersion 1.0 (Sep. 28, 2005)
ORION 2, 4, 8 Zone Fire Alarm Control Panel