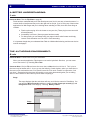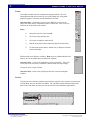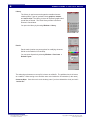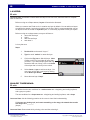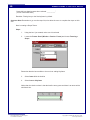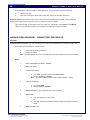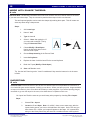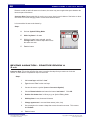
1
Multimedia Module
FLASH 5 PART I
INSTRUCTOR MANUAL
For information and permission to use these training modules, please contact:
Limell Lawson - [email protected] - 520.621.6576
or
Joe Brabant - [email protected] - 520.621.9490
Modules available online at http://mll.arizona.edu/workshops.shtml?tutorialpdfs
Flash5_I_Instructor.pmd
Last modified: 04/30/02
2
FLASH 5 PART I: Instructor Manual
TABLE OF CONTENTS
Instructor Setup ............................................................................................................................. 3
Introduction ................................................................................................................................... 5
A Better Understanding ................................................................................................................. 6
The Authoring Environment .......................................................................................................... 6
Creating Animation - Keyframes and Motion Tweening ............................................................... 9
Animation Basics - Practice Review 1 ........................................................................................ 11
Layers ......................................................................................................................................... 12
Shape Tweening ......................................................................................................................... 12
Animation Basics - Practice Review 2 ........................................................................................ 14
More With Shape Tweens ........................................................................................................... 15
Importing ..................................................................................................................................... 15
Publishing ................................................................................................................................... 16
Second Hour Objectives ............................................................................................................. 16
Symbols ...................................................................................................................................... 16
Creating a Button ........................................................................................................................ 17
Beyond Animation - Practice Review 3 ...................................................................................... 18
Buttons - The Hit State ............................................................................................................... 19
Beyond Animation - Practice Review 4 ...................................................................................... 20
Adding Sound to a Button ........................................................................................................... 21
Beyond Animation - Practice Review 5 ...................................................................................... 21
Scenes ........................................................................................................................................ 21
Action Script ................................................................................................................................ 22
Beyond Animation - Practice Review 6 ...................................................................................... 25
Movie Clips ................................................................................................................................. 25
Criterion Test ............................................................................................................................... 26
File name: Flash5_I_Instructor.pmd
Last modified: 04/30/02
Copyright Arizona Board of Regents, 2002
University of Arizona
3
FLASH 5 PART I: Instructor Manual
INSTRUCTOR SETUP:
Materials:
♦
♦
♦
♦
Flash 5 Part I Instructor Manual
Flash 5 Part I User Manual (1 copy per student)
Job Aids - 2 (1 copy per student)
Flip chart, or board and markers
♦
♦
♦
♦
♦
♦
Electronic Classroom
PC or Mac workstations (1 per student)
Flash 5 installed on all workstations
Instructor workstation with all of the above
Overhead projector connected to instructor workstation
Ensure sound is functioning
Equipment::
Setup:
♦ Session length is approximately 2 hours
♦ Instructor should be familiar with all aspects/components of this Flash 5 Part I training
♦
♦
module
Check that all computers function and that the projector functions as well
The Instructor Manual is set up so that you can see the corresponding User Manual
page next to it. To make copies of the User Manual for the participants of the workshop,
print out the PDF version from http://mll.arizona.edu/workshops.shtml?tutorialpdfs
Flip Chart Setup:
♦ Page #1: Introduction to Flash 5
First Hour Objectives
♦ A better understanding
• What Flash is
• What it can do
♦ Animation Basics
• Create artwork
• Create shape-tween
• Create motion-tween
• Import media
• Save
• Publish
♦ Page #2:
♦ Dreamweaver
FrontPage
Director
File name: Flash5_I_Instructor.pmd
Last modified: 04/30/02
GoLive
PowerPoint
HTML
Copyright Arizona Board of Regents, 2002
University of Arizona
4
FLASH 5 PART I: Instructor Manual
♦ Page #3: The Three Forms of Artwork
(make sure the shape is full of small white dots)
♦ Page #4: Second Hour Objectives
♦ Beyond Animation
• Buttons
• Sound
• Scenes
• Basic ActionScript
• Movie Clips
♦ Page #5:
♦ A symbol is a reusable image, animation, or button. There are three kinds of
symbols ( all stored in the Library)
• Button- used to control interactivity and navigation
• Movie Clip- used for complex animations
• Graphic- when you import graphics, Flash turns them into symbols
Notes:
♦ Not all of the information in your Instructor Manual is in the User Manual, so be sure to go
through all items carefully. Demonstrate all points on screen where appropriate. When
you get to the steps, go through them so the users can see, then allow them to complete
the steps on their own.
♦ In this Instructor Manual, any Instructor notes or things that you should do during the
lectures are noted in italics.
File name: Flash5_I_Instructor.pmd
Last modified: 04/30/02
Copyright Arizona Board of Regents, 2002
University of Arizona
5
FLASH 5 PART I: Instructor Manual
INTRODUCTION:
2 min
Instructor Note: At this time, pass out the User Manual to the students. At the beginning of the workshop, welcome the class, introduce yourself, then continue with the rest of this Instructor Manual. Turn
the Flip Chart to page #1 to display the first hour objectives.
This workshop aims to give you a solid foundation in the most essential skills needed to assist a
beginning Flash 5 user. It is not meant to teach you the entire program.
The first hour objectives are:
♦
♦
A better understanding
• What Flash is
• What it can do
Animation Basics
• Create artwork
• Create shape-tween
• Create motion-tween
• Import media
• Save
• Publish
All these terms will be explained as they are dealt with.
The second hour:
♦
♦
gets deeper into the interface of Flash 5 covering Buttons, Sound and simple
navigation
Finally, just a glimpse at Movie Clips
The module moves quickly so pay attention. You will be asked to watch while the steps are explained.
After you have been shown what to do, you will then have the opportunity to practice the steps on your
own.
At the end of this workshop, you will be given a Criterion Test which will test you on what you have
learned.
File name: Flash5_I_Instructor.pmd
Last modified: 04/30/02
Copyright Arizona Board of Regents, 2002
University of Arizona
6
FLASH 5 PART I: Instructor Manual
A BETTER UNDERSTANDING:
1 min
Instructor Note: Turn the Flip Chart to page #2.
Flash has been marketed lately as a Web Development tool, but it’s not easy to learn because of a
counter intuitive interface and may not be the right tool for the job. If you’re using any of these other
applications for Web Pages and you’re thinking about switching to Flash, there are some things to
consider.
♦
♦
♦
Flash requires a plug–in for the viewer to see your site. (These plug-ins now come with
all new browsers)
Accessibility is an issue. (Some progress has been made)
For best results, you can always keep your pages in these other formats and simply
insert a Flash animation movie to make it more interesting.
It is important though that you understand that Flash is a Multimedia Authoring tool that can also be
used for web pages.
THE AUTHORING ENVIRONMENT:
6 min
Instructor Note: Launch Flash 5 on your workstation.
When you start the application, Flash opens a new movie by default. After that, you can create
more “new movies” by choosing File > New
Instructor Note: Click on File and move the cursor down to New but do not click on it. This is just so
the users may be familiar with it. As you go over the following 5 main windows, when you show them to
the users on the overhead be sure to use specific terms like “look at the Timeline” as opposed to “look
over here”. Remember that throughout the module you are to be demonstrating what you are talking
about on the overhead so the users may know where everything is.
Stage:
The stage displays what the end viewer will see, much like the canvas in PhotoShop. You
can open the Movie Properties window to modify the size, frames per second (fps) and
background color of the stage by choosing Modify > Movie.
Stage
File name: Flash5_I_Instructor.pmd
Last modified: 04/30/02
Copyright Arizona Board of Regents, 2002
University of Arizona
7
FLASH 5 PART I: Instructor Manual
Toolbar:
The toolbar contains tools for creating and changing artwork. The Line,
Rectangle and Oval tools function as you would expect from using other
graphic programs. The stroke and fill are different in Flash.
Instructor Note: Remember, have the users WATCH you go over the
steps, then allow them to complete the steps on their own. This is how you
should do all of the steps in the module.
Steps:
1.
Using the oval tool, create a circle
2.
Click once using selection tool
3.
Click once on shape to select the fill
4.
Drag fill to the side to show that stroke has been left behind
5.
To select both stroke and fill, double click, or drag the selection
tool around object
Different tools have different modifiers. Note: they are called modifiers in all
lessons, but on the toolbar they are labeled as “Options”
Instructor Note: Click on the rectangle tool, point to modifiers. Then click
on the pencil tool and point to modifiers to demonstrate how they change.
The pencil tool is unique to Flash.
Instructor Note: Draw a box quickly and show the users the straighten
modifier.
Timeline:
The left side of the timeline contains Layers used to organize movie content. Like the layers
in PhotoShop, they can be locked or hidden. The right side contains Frames and the playback head in the same way that you may have seen in other animation applications.
File name: Flash5_I_Instructor.pmd
Last modified: 04/30/02
Copyright Arizona Board of Regents, 2002
University of Arizona
8
FLASH 5 PART I: Instructor Manual
Library:
The Library is used to store and organize reusable elements
called symbols. Types of symbols include graphics, buttons,
and movie–clips. The Library is where all imported graphics and
sound files are stored. The Flash Library window is similar to
Director’s Cast window.
You open the Library by choosing Window > Library.
Panels:
Panels make it easier to access options for modifying elements.
Similar to the Palette’s in PhotoShop.
You can open all panels by selecting Window > Panel sets >
Default Layout
The authoring environment or source file is known as a .fla file. The published movie is known
as a .swf file. When saving a new file Mac users must include the .fla extension (in the name)
Instructor Note: Save the movie to the desktop (even if you have deleted the circle) and call it
“motion.fla”
File name: Flash5_I_Instructor.pmd
Last modified: 04/30/02
Copyright Arizona Board of Regents, 2002
University of Arizona
9
FLASH 5 PART I: Instructor Manual
CREATING ANIMATION - KEYFRAMES AND MOTION
TWEENING:
8 min
Instructor Note: Turn the Flip Chart to page #3.
You’ll find it easier to troubleshoot if they make note of the visual cues, and the order in which
things are done.
Flash has unlimited “undo’s” (Deletes). You can undo an action you made by selecting Edit >
Undo.
Instructor Note: Demonstrate how to do this by drawing something and then undo it. Also demonstrate how to delete several pieces of artwork from the stage by selecting all of it and hitting the delete
key.
Using a “tween” is a simple way to achieve animation. The two kinds of tweens in Flash are
Motion tweens and shape tweens. For a Motion tween there are two conditions that need to
be met:
♦
♦
a beginning and ending keyframe
your object must be a group or symbol.
Instructor Note: Have the users watch the timeline for the visual cue for the first keyframe, as you
create a circle using the Oval tool. Point our the black dot (the keyframe) in the first frame and make
sure they see this visual cue.
That’s a Keyframe. A keyframe is a frame that signifies a beginning
or an ending. Flash gives you the first one by default, but it doesn’t
appear as a black dot until you put an object on the stage, otherwise, it’s known as an Empty keyframe.
If I choose any drawing tool, and create something on the stage, the artwork that results will always
be a shape.
Instructor Note: Select the circle you have already drawn so they may see the “white dots.” Then flip the
chart to page #3 and quickly introduce the chart
The object that I just created is a shape. I know it’s a shape because when I select it, I can see that
it is full of white dots.
♦
Shapes
♦
♦
Anything you draw with flash except text
Visual cue – appearance of small white dots when selected
♦
Groups
♦
♦
Any shape that has been grouped, or any imported graphic
Visual cue – surrounded by blue bounding box when selected
♦
Symbols
♦
Any object can be converted into a symbol. All symbols are stored
in the Library.
♦
Visual cue – surrounded by a blue bounding box with a crosshair
in the center
File name: Flash5_I_Instructor.pmd
Last modified: 04/30/02
Copyright Arizona Board of Regents, 2002
University of Arizona
10
FLASH 5 PART I: Instructor Manual
Instructor Note: Remember, go over the steps first, then allow the users to complete the steps on their
own.
Creating a Motion Tween:
Steps:
1.
Draw a circle and make sure it is selected
2.
Select Insert > Create Motion Tween.
Notices that the circle, which is a shape full of white dots, changes. Now
my circle is surrounded by a blue bounding box with a cross hair in the
middle. It is no longer a shape. What is it?
It is now a symbol. Flash has changed the shape into a symbol. Remember, the two conditions for a Motion Tween are: beginning and
ending keyframes and a group or a symbol.
So now I have one keyframe that was given to me by default, and a symbol that was created by
Flash when I indicated that I wanted to create a Motion Tween. The last condition to be met is an
ending Keyframe.
Creating an Ending Keyframe:
Steps:
1.
Select frame 20
2.
Select Insert > Keyframe from top menu.
3.
Click on the second keyframe
4.
Move the circle with the move tool
5.
Hit return to show the animation
Preview in Test Mode:
Steps:
1.
Select Control > Test Movie
Notice how the movie loops when tested. Stopping the loop will be covered in the 2nd hour.
Instructor Note: Ask the following question to the users as a check for understanding.
The two conditions for a Motion Tween are: __________________and______________.
(beginning & ending keyframes, and a group or a symbol.)
File name: Flash5_I_Instructor.pmd
Last modified: 04/30/02
Copyright Arizona Board of Regents, 2002
University of Arizona
11
FLASH 5 PART I: Instructor Manual
ANIMATION BASICS - PRACTICE REVIEW 1:
2 min
Instructor Note: This is a practice review so the users may put to work what they have learned thus
far. They should try to complete this on their own, but you may assist those who are stuck.
Steps:
1.
Open new document and save to desktop as “review.fla”
2.
Draw your object
3.
Create Motion Tween
♦
♦
4.
using Arrow tool select object
choose Insert > Create Motion Tween. Hint: Flash turns your shape into
a symbol
Insert you second keyframe in frame 20. Hint: Your first keyframe is automatically put in for you by default.
♦
♦
♦
click on frame 20
choose Insert > Keyframe
with second keyframe still selected, move object to different place on
stage Hint: you should see an arrow with a solid line in blue shaded area
on time line. If line is broken you may have completed steps in the wrong
order. If you add the second keyframe before adding the motion tween,
your object will still be a shape. Remember that motion tweens can only
be done on a Group or Symbol.
5.
Alter position of object in 2nd keyframe. (Drag object to different place on
stage)
6.
Preview in Test Mode by selecting Control > Test Movie. Hint: Flash
exports the .fla as a .swf file and opens it in a new window.
File name: Flash5_I_Instructor.pmd
Last modified: 04/30/02
Copyright Arizona Board of Regents, 2002
University of Arizona
12
FLASH 5 PART I: Instructor Manual
LAYERS:
2 min
Instructor Note: Remember to demonstrate the steps for the users first, then allow them to complete
them on their own.
Before moving on to Shape tweens, Layers will need to be discussed.
When you create a new Flash movie, it contains one layer by default. You can add more layers
to organize the artwork. Layers do not add to your file size, and it is recommended that you put
all objects as well as sounds on separate layers. It is extremely important to label your layers!
Before moving on to shape tweens, everyone will have to:
♦
name their first layer
♦
hide it
♦
add a second layer
♦
and name it
Let’s try that now.
Steps:
1.
Double-click on the words “Layer 1”
2.
Type the word “motion” to name this layer
3.
Click on the Eye icon to hide this layer. Note:
Clicking on the Eye icon hides all layers that
you have. If you had multiple layers and only
wanted to hide one of them, click on the bullet
of that layer that is in the Eye icon column.
4.
Select Insert > Layer to add a new layer. You
may more quickly add a new layer by clicking
on the New Layer button.
5.
Name the new layer “shape”
SHAPE TWEENING:
5 min
Remember that the two conditions for a motion tween are: a beginning and ending keyframe,
and a group or symbol.
The two conditions for a shape tween are: a beginning and ending keyframe, and a shape
Instructor Note: Ask the following questions to the users to check their understanding.
If I choose any drawing tool, and create something on the stage, the artwork that results
will always be a ________.
(shape)
Instructor Note: Demonstrate this by drawing a box and then selecting it.
File name: Flash5_I_Instructor.pmd
Last modified: 04/30/02
Copyright Arizona Board of Regents, 2002
University of Arizona
13
FLASH 5 PART I: Instructor Manual
“I know this is a shape because when selected, __________”
( it’s full of little white dots)
Reminder: Flash gives you the first keyframe by default
Instructor Note: Remember to go over the steps first, then allow the users to complete the steps on their
own.
Next is creating a Shape Tween.
Steps:
1.
Using the box I just created, make sure it is selected
2.
Locate the Frames Panel (Window > Panels > Frame) and choose Tweening >
Shape
Remember that the last condition to be met is an ending Keyframe.
3.
Select frame 20 in the timeline
4.
Select Insert > Keyframe
Notice that the visual cue here is that the timeline turns green and there is an arrow with a
solid black line.
File name: Flash5_I_Instructor.pmd
Last modified: 04/30/02
Copyright Arizona Board of Regents, 2002
University of Arizona
14
FLASH 5 PART I: Instructor Manual
If you wanted to alter the shape in either keyframe, you would have to do the following:
♦
♦
deselect the box
then alter it using the arrow tool to click and drag at an the edge of the box.
Instructor Note: Demonstrate to the users how to do this by deselecting the shape, then clicking and
dragging the edge of the box with the arrow to show how it can be altered.
Let’s now Preview in Test mode to test our movie out. Remember it is Control > Test Movie.
Notice we can see the first layer even though in the authoring mode it is hidden.
ANIMATION BASICS - PRACTICE REVIEW 2:
4 min
Instructor Note: Remember, go over the steps for the users, then allow them to complete on their own.
Remember the conditions for a Shape tween:
♦
beginning and ending keyframes
♦
must be a shape
Hint: grouped objects have to be ungrouped and text and symbols must be broken apart
Steps:
1.
Make a new layer and label it “review”.
2.
Draw your object
3.
Create shape tween:
♦ with shape selected, locate the Frames panel
♦ choose Tweening > Shape
Hint: if Frames panel cannot be seen choose Modify > Frame
4.
Insert 2nd keyframe
♦
♦
click in frame20
choose Insert > Keyframe
5.
Deselect shape by click anywhere other than the shape
6.
Alter shape:
♦
♦
7.
click and drag at one of it’s sides
or
with 2nd keyframe still selected, delete shape and replace with new
shape
Save and test movie
File name: Flash5_I_Instructor.pmd
Last modified: 04/30/02
Copyright Arizona Board of Regents, 2002
University of Arizona
15
FLASH 5 PART I: Instructor Manual
MORE WITH SHAPE TWEENS:
4 min
Instructor Note: The following information will not be in the Criterion Test, but it will be useful to the Users
if you went over these steps. They do not need to practice these steps on their own however!
Text and imported graphics can be made into shapes by breaking them apart. This will create one
extra step when doing a shape tween.
Steps:
1.
Add a new layer
2.
Name it “text”
3.
Type the letter A
4.
Select it. Note: after typing the “A”
you may need to enlarge it. Do by
using the Character Panel
5.
Choose Modify > Break Apart.
Notice the little white dots in the A
after we break it apart.
6.
Choose Shape tweening in the Frames Panel
7.
Insert 2nd keyframe
8.
Replace the letter A with the letter Z in the second keyframe
9.
Break the Z apart (Modify > Break Apart)
10.
Save and Test the movie
Tip: Use the Info Panel to get the X and Y coordinates if they want the letters to be in the same
location.
IMPORTING:
2 min
Instructor Note: Instruct the Users to turn to their Job Aid and open to the Importable File Formats for a
list of what file types can be imported. Quickly go over those. Unless you have your own images available
to import, this section is just to show them the similarity to other programs. If you will be importing images,
remember to go over the steps for the users, then allow them to complete on their own.
You import into Flash the same as you would many other program by choosing File > Import.
Steps:
1.
Choose File > Import.
2.
Locate the file and Open. Note: On a MAC, there are two extra steps, after the
import window opens, you have to click add then click import. On the PC once you
have chosen File > Import, you image will appear on the stage. All imported files
also go to the Library where they are stored as reusable elements called symbols.
File name: Flash5_I_Instructor.pmd
Last modified: 04/30/02
Copyright Arizona Board of Regents, 2002
University of Arizona
16
FLASH 5 PART I: Instructor Manual
PUBLISHING:
2 min
Instructor Note: Remember to go over the steps for the users, then allow them to complete on their own.
The Published file goes into same folder or area as the saved file. Because of this, it is important
to know where your saved file is.
Steps:
1.
Choose File > Publish Settings to find the publish settings
Instructor Note: Have the users look at their job aides as you explain the correct extensions for desired
outcomes.
After you have gone over this, ask the Users if they have any questions. After you have answered the
questions, if any, allow them a 10 minute break before resuming with the module.
SECOND HOUR OBJECTIVES:
Instructor Note: Turn the Flip Chart to page 4 to and go over the second hour objectives.
In this second hour of the Flash 5 Part II module, we will go beyond simple animation and cover
the following:
♦
♦
♦
♦
♦
Buttons
Sounds
Scenes
Basic Action Script
Movie Clips
SYMBOLS:
2 min
Instructor Note: Turn the Flip Chart to page 5.
A symbol is a reusable image, animation, or button ( all stored in the Library).
The 3 kinds of symbols in Flash are:
♦
Buttons used to control interactivity, and navigation
♦
Movie Clips used for complex animations
♦
Graphics (when you import graphics, flash turns them into symbols)
File name: Flash5_I_Instructor.pmd
Last modified: 04/30/02
Copyright Arizona Board of Regents, 2002
University of Arizona
17
FLASH 5 PART I: Instructor Manual
Common Libraries:
Instructor Note: Open a new blank Flash movie. Show the Users the Common Library of
buttons by Choosing Window > Common Libraries > Buttons. Locate the pre–made pill
button in the Library and drag it onto the stage. Double click it to get into Symbol Editing
mode.
Notice the difference of the screen, as we are in symbol editing mode as opposed to the
main timeline of a scene.
The buttons have their own layers, and can have multiple layers. The visual cue at the top
left corner of the timeline that shows the button icon and the button name as well as the
scene icon.
You can get back to the main timeline by choosing Edit > Edit Movie or you could simply
click on the Scene 1 icon as we only have one scene anyway.
Instructor Note: Scenes have not been covered yet, if they ask about them, tell them we will
be covering that soon. Before moving on delete the pill button form the stage.
CREATING A BUTTON:
4 min
Instructor Note: Just demonstrate these steps to the users, do not have them complete them as the
upcoming review section will allow them to do that.
When you select the button behavior for a symbol, Flash creates a Timeline with four frames. The
first three frames display the button’s three possible states; the fourth frame defines the active
area of the button (where the user could click) called the hit state. These states refer to the
corresponding state of the user’s mouse.
Steps:
1.
Choosing Insert > New Symbol
2.
Choose Button behavior
3.
Name it “Shape button” and click OK
File name: Flash5_I_Instructor.pmd
Last modified: 04/30/02
Copyright Arizona Board of Regents, 2002
University of Arizona
18
FLASH 5 PART I: Instructor Manual
4.
Draw a button
5.
Add keyframes to over and down states
6.
Change appearance in over and down states (color, size). To change the size of
the button choose Modify > Transform > Scale and Rotate and type in 80%. This
helps keep the center of the button aligned to itself.
7.
Navigate back to the main timeline by choosing Edit > Edit Movie or clicking on
the Scene 1 icon
Note: when creating a button using Insert > New Symbol, the button will not appear on
the stage until you drag an instance of the button to the stage.
Instructor Note: Ask the following questions to the class to check their understanding.
Where can I find the button I just created?
All Symbols are stored in the Library
How do you open the Library?
Choose Window > Library
Instructor Note: Place an Instance of the button on the stage. Test the button by choosing Control > Test
Movie. Move the cursor over the button to show visual cue of hand and color change and click on the
button to reveal the size change.
BEYOND ANIMATION - PRACTICE REVIEW 3:
3 min
Instructor Note: Since you already demonstrated this in the last exercise, you do not have to go over it for
them now. Just allow them to complete the practice review on their own.
Steps:
1.
Create a new movie and save it as “buttons.fla” to the desktop
2.
Create a button Symbol
♦
♦
♦
♦
choose Insert > New Symbol
choose button behavior
name your button “shape button”
click OK
3.
Draw a button
4.
Add keyframes to over and down states
5.
Change appearance in over and/or down state (color, size)
6.
Place Instance of Button on Stage. Hint: to get back to the main timeline choose
Edit > Edit Movie
♦
♦
6.
File name: Flash5_I_Instructor.pmd
Last modified: 04/30/02
select button in library
drag button to Stage
Test button by choosing Control > Test Movie
Copyright Arizona Board of Regents, 2002
University of Arizona
19
FLASH 5 PART I: Instructor Manual
BUTTONS - THE HIT STATE:
4 min
Instructor Note: For this section, simply demonstrate the steps to the users, you do not have to have them
complete the steps after you go over them. The upcoming review section will allow them to practice these
steps on their own.
When a button is made out of text, the hit state becomes more important. Let’s try making a new
button out of text now.
Steps:
1.
Make sure the first layer is labeled “shape”
2.
Add a new layer and label it “text”
3.
Type the word “Text” on the new layer
Now we will convert this text into a button:
Steps:
5.
Select text and choose Insert > Convert to Symbol
6.
Choose button behavior
7.
Name button “text button”
8.
Click OK.
Since we converted the word “text” into a button by choosing Insert > Convert to Symbol, when we
click OK, we are not put into symbol editing mode as we were when we created the button by using
Insert > New Symbol. We must get into symbol editing mode ourselves by:
Steps:
9.
Locate button in Library
10.
Double click on button icon, (not name) to open into Symbol editing mode
11.
Add keyframes to over and down states
12.
Change appearance of button in over and down states (color, size)
13.
Select Edit > Edit Movie to get back to the main timeline.
Instructor Note: Test the movie to see how the button works. You want to have trouble getting the
text button to work correctly. The purpose of this section is to show them how to fix it.
File name: Flash5_I_Instructor.pmd
Last modified: 04/30/02
Copyright Arizona Board of Regents, 2002
University of Arizona
20
FLASH 5 PART I: Instructor Manual
Because we did not add a hit state to our button, the cursor may not recognize the space between the
letters as part of the button.
Instructor Note: Demonstrate this by moving your cursor slowly over the letters of the button to show
the visual cue of hand changing back to cursor when between letters.
Let’s now add a hit state to the button by:
Steps:
14.
Get into Symbol Editing Mode
15.
Add a keyframe in hit state
16.
With the hit state frame selected, use the
rectangle tool to create a shape that covers
the entire text area.
17.
Test the button
BEYOND ANIMATION - PRACTICE REVIEW 4:
3 min
Instructor Note: This review will allow the users to practice the steps that you went over in the last
section, so allow them to complete the steps on their own.
Steps:
1.
Add a new layer and label it “text”
2.
Type the word “Text” on the new layer
3.
Convert the text to a symbol (Insert > Convert to Symbol)
4.
Choose Button behavior and name the button “text button”. Click OK.
5.
Double click button icon in Library to go to Symbol Editing Mode
6.
Add keyframe in over, down and hit states
7.
Change appearance in over and down states (color, size)
8.
Use rectangle tool to create a shape that covers the entire text area. This creates
the Hit State.
10.
Test the button
File name: Flash5_I_Instructor.pmd
Last modified: 04/30/02
Copyright Arizona Board of Regents, 2002
University of Arizona
21
FLASH 5 PART I: Instructor Manual
ADDING SOUND TO A BUTTON:
2 min
Instructor Note: For this section, simply demonstrate the steps to the users, you do not have to have
them complete the steps after you go over them. The upcoming review section will allow them to
practice these steps on their own.
Sound can be added to the over or down state of a button. Keep in mind that sound must be in
its final form before importing it into Flash.
Let’s practice adding sound now by:
Steps:
1.
Double click instance of “shape” button on Stage (to open into Symbol Editing
Mode)
2.
Select “Over” State
3.
Locate a sound file from the common Library (sound) and drag it onto the stage.
4.
Test button
BEYOND ANIMATION - PRACTICE REVIEW 5:
2 min
Instructor Note: This review will allow the users to practice the steps that you went over in the last
section, so allow them to complete the steps on their own.
Steps:
1.
Double click instance of “shape” button on Stage (to open into Symbol Editing
Mode)
2.
Select “Over” State
3.
Locate a sound file from the common Library (sound) and drag it onto the stage.
4.
Test button
SCENES:
2 min
Scenes are one way to organize your movie. You can add, delete,
duplicate, rename, and change the order of scenes.
Instructor Note: Show the users how to add scenes by choosing
Insert > Scene to create a new scene. Also demonstrate how to
move from scene to scene and know which scene you are on by
using the Edit Scene icon in the upper right corner of the timeline.
File name: Flash5_I_Instructor.pmd
Last modified: 04/30/02
Copyright Arizona Board of Regents, 2002
University of Arizona
22
FLASH 5 PART I: Instructor Manual
ACTION SCRIPT:
7 min
Flash has a scripting language called ActionScript. It’s used to add sophisticated interactivity.
We will cover only basic ActionScript today.
Actions can be added to a frame, button or movie clip. Button actions can be used to jump from
scene to scene. Actions are added to the instance of the button on the stage, not in the button
itself. When you add an action to a button, you will be working in the Object Actions Window
(as opposed to adding an action to a frame, where you work in the Frame Actions Window)
Instructor Note: Demonstrate the following steps to the users. They are not to do the steps
right now, make sure they just watch, as in the upcoming review section they will have the
opportunity to complete these steps on their own.
Steps:
1.
Place “shape” button instance on the stage in scene 2
2.
Choose Window > Actions.
This opens up the Object Actions Window. There are two modes in the Actions Window: normal mode (default), expert mode. You can make sure you are in normal mode by clicking on
the small black arrow in the upper right corner of the Object Actions Window and choosing
normal mode.
Instructor Note: Demonstrate how to check if you are in normal mode.
3.
In Actions Window, click and hold on the “+” sign to reveal the drop down menu
4.
Choose Basic Actions > Go To
5.
Choose Scene 1, Frame 1
File name: Flash5_I_Instructor.pmd
Last modified: 04/30/02
Copyright Arizona Board of Regents, 2002
University of Arizona
23
FLASH 5 PART I: Instructor Manual
The small box at the bottom left of the Object Actions Window is checked by default as “Go to and
Play”. Whenever there is more than one scene, you will need to put a “stop action” in the last frame of
each scene to keep the movie from looping back and forth uncontrollably.
6.
Control > Test Movie. This shows this looping without a stop action.
7.
In Scene 2, name the first layer “button”
8.
Create a New layer and name it “stop action”
Note that the first keyframe is already there. You would need to add a keyframe if this scene had more
than one frame in it. Also, the Object Actions window heading changes to Frame Action.
9.
Select frame 1 in “stop action” layer
10.
In Frame Actions window, click and hold on “+” sign
11.
Choose Basic Actions > Stop
We have added a button to take us from Scene 2 to Scene 1, as well as a stop action in Scene 2, now
the same will need to be done for Scene 1.
12.
Navigate to Scene 1 using the Edit Scene icon in the upper right corner of the
timeline.
13.
Select “text button” instance on stage
14.
In Object Actions window, click and hold on “+” sign
File name: Flash5_I_Instructor.pmd
Last modified: 04/30/02
Copyright Arizona Board of Regents, 2002
University of Arizona
24
FLASH 5 PART I: Instructor Manual
15.
Choose Basic Actions > Go To
16.
Choose Scene 2, Frame 1
17.
Create New Layer and name it “stop action”
18.
Select frame 1 in “stop action” layer
19.
Add keyframe to last frame of new layer
20.
In Frame Actions window, click and hold on “+” sign
21.
Choose Basic Actions > Stop
22.
Test movie
File name: Flash5_I_Instructor.pmd
Last modified: 04/30/02
Copyright Arizona Board of Regents, 2002
University of Arizona
25
FLASH 5 PART I: Instructor Manual
BEYOND ANIMATION - PRACTICE REVIEW 6:
4 min
Instructor Note: This review will allow the users to practice the steps that you went over in the last
section, so allow them to complete the steps on their own.
Steps:
1.
Add a new scene (Insert > Scene)
2.
Place “shape” button instance on the stage in scene 2
3.
In Actions Window, click and hold on the “+” sign to reveal the drop down menu
4.
Choose Basic Actions > Go To
5.
Choose Scene 1, Frame 1
6.
In Scene 2, create a New layer and name it “stop action”
7.
Select frame 1 in “stop action” layer
8.
In Frame Actions window, click and hold on “+” sign
9.
Choose Basic Actions > Stop
10.
Navigate to Scene 1
11.
Select “text button” instance on stage
12.
In Object Actions window, click and hold on “+” sign
13.
Choose Basic Actions > Go To
14.
Choose Scene 2, Frame 1
15.
Add Stop Action to Scene 1
16.
Test Movie
MOVIE CLIPS:
5 min
We will not be covering how to make a movie clip, but here is an example of one so you may
be familiar with them.
Instructor Note: Open the biplane example by choosing Window > Common Libraries > Movie Clips.
Drag an instance of the biplane movie clip to the stage, then Test the movie.
Unlike the motion tweens, movie clips cannot be tested by hitting return or scrubbing back
and forth with the playhead, the only way to really test them is to publish or preview in test
mode.
Instructor Note: Ask if there are any final questions regarding the material before you move on to the
Criterion Test.
File name: Flash5_I_Instructor.pmd
Last modified: 04/30/02
Copyright Arizona Board of Regents, 2002
University of Arizona
26
FLASH 5 PART I: Instructor Manual
CRITERION TEST
20 min:
Instructor Note: Instruct the students to turn to the last page of their User’s Manuals. Inform the
students they have 20 minutes to complete the Criterion Test, which should be more than enough time.
At the end of the time allowed, check the students’ final products to ensure they have passed
successfully.
This is the criterion test for the Flash 5 Part I module. It is going to test your comprehension of the
workshop you just participated in or allow you to test out of the Flash 5 Part I module.
♦
Open a new document and save to the desktop as “(YourName).fla”
♦
Create a circle that moves from the left side of the stage to the right side
♦
On a second layer create a shape tween of a box that turns into a circle
♦
On a third layer create a button of out of your name, make it red and put a sound
on the over state. ( don’t forget to create the hit state)
♦
Publish for the web.
File name: Flash5_I_Instructor.pmd
Last modified: 04/30/02
Copyright Arizona Board of Regents, 2002
University of Arizona