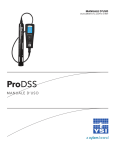
1
ProDSS Quick Start Guide
This Quick Start Guide is a quick reference in operating the ProDSS. It is not intended to replace the
information found in the User Manual. For your convenience, this Quick Start Guide will enable you to
unpack your instrument and get to the field quickly. An electronic version of the User Manual is located
on the USB flash drive included with the instrument. Please refer to the ProDSS Battery Pack Quick Start
Guide, also located on the USB flash drive, for battery safety warnings and precautions.
Powering on the ProDSS
The ProDSS comes with a lithium-ion battery pre-installed. The battery ships at ~50% full capacity and
there is no need to charge the instrument before first use. To power on the instrument, simply press the
green power key. To power off, press and hold the power key for 1.5 seconds.
Menu Functions
The ProDSS has a menu-based interface. Press the “hot keys” to access the System
, Probe
,
, and File
menus (from left to right at the top of the keypad). To navigate through
Calibration
the menus, use the up ▲ and down ▼ arrow keys to highlight a desired menu option with the
highlight bar, and press the Enter
key to activate the selection. Use the left arrow ◄ key to go back
key to return to the run screen or to exit an alpha/numeric entry screen.
one screen. Press the Esc
The Run screen will appear when powering on the instrument.
Setting the Date and Time
1. Press the System
key.
2. Highlight Date/Time and press the Enter key.
3. Highlight Date Format and press the Enter key. Select the desired time format, press the Enter
key, and press the left arrow ◄ key.
4. Highlight Date and press the Enter key. Use the keypad to enter the correct date, highlight ENTER
on the display, and press the Enter key.
5. Highlight Time Format and press the Enter key. Highlight the correct format, press the Enter key,
and press the left arrow ◄ key.
6. Highlight Time and press the Enter key. Use the keypad to enter the correct time, highlight ENTER
on the display, and press the Enter key
7. Press Esc
to return to the Run screen.
Installing Sensors and Connecting Cable
Install sensors by referencing the ProDSS Sensor Installation sheet included with each new sensor.
1. Inspect the sensor port for contamination. If dirty or wet, clean with compressed air.
2. Apply a thin layer of Krytox® o-ring lubricant to the sensor o-rings.
3. Align the connectors and push the sensor in towards the bulkhead until you feel the sensor firmly
seat in its port. The bulkhead ports are not sensor-specific, allowing for installation of any ProDSS
sensor into any open sensor port.
4. Once seated, finger-tighten the titanium sensor nut by hand. DO NOT continue to tighten if cross
threading is suspected.
5. Tighten with the sensor installation/removal tool until snug. Approximately ¼ to ½ turn may be
needed. DO NOT over tighten.
6. Install a port plug in any unused sensor port.
7. Align the keys on the cable connector with the slots on the instrument connector. Push together
and twist to lock into place.
Installing Sensor Guard and Calibration Cup
Install the calibration cup when storing or calibrating sensors. ProDSS weight(s) should not be installed
on the sensor guard when the calibration cup is used.
1. Place the sensor guard over the sensors and attach to the bulkhead.
2. Ensure the calibration cup gasket is correctly seated in the plastic retaining nut.
3. Loosely install the retaining nut on the calibration cup and slide the cup over the sensor guard.
4. Tighten the retaining nut to clamp/seal the cup onto the guard.
Sensor Setup
ProDSS sensors are automatically recognized by the instrument, eliminating the need to enable each
sensor under the Sensor Setup menu. However, some sensor specific settings (e.g. pH automatic buffer
recognition mode) can be set in the Sensor Setup menu, found by pressing the Probe
key.
Setting Displayed Measurement Units
Measurement units that appear on the Run screen for each sensor can be selected under the Sensor
Display menu. The units chosen to be displayed will also appear on the data logging file. To set
displayed measurement units:
key.
1. Press the Probe
2. Highlight Display and press the Enter key.
3. Highlight the sensor of interest and press the Enter key.
4. Select the units you would like to display on the Run screen by using the Enter key. Check boxes
indicate that more than one measurement unit can be displayed for the sensor (e.g. Nitrate can be
displayed as NO3-N mg/L and NO3 mV). Circles indicate that only one measurement unit can be
displayed for the sensor (e.g. temperature can’t be displayed as °C and °F).
5. Press the left ◄ arrow key to return to the previous screen or press Esc to return to the Run screen.
Barometer Calibration
The barometer has been calibrated before shipment. We suggest you check the barometer by following
step one below. If the instrument displays the correct reading, no further action is required. If incorrect,
please continue with step two below.
1. Determine your local barometric pressure (BP) in mmHg from a mercury barometer, an
independent laboratory, or from a local weather service. If the BP reading has been corrected to
sea level, use the following equation to determine the true BP in mmHg for your altitude:
True BP = (Corrected BP in mmHg) – {2.5 * (Local Altitude in feet/100)}
key.
2. Press the Cal
3. Highlight Barometer and press the Enter key.
4. Highlight Calibration Value and press the Enter key to adjust.
5. Use the Alpha/Numeric screen to enter True BP, then highlight ENTER and press the Enter key.
6. Highlight Accept Calibration and press the Enter key to finish the calibration.
Depth Calibration
When calibrating the depth sensor, ensure that the sensor is clean and in air. Keep the bulkhead still
while calibrating.
1. Press the Cal
key, highlight Depth, and press the Enter key.
2. Allow the readings to stabilize by observing the graph on the measurement screen.
3. Once stable, highlight Accept Calibration and press the Enter key to calibrate.
Optical Dissolved Oxygen (ODO) Calibration
The ProDSS offers three options for calibrating dissolved oxygen. The first is an air calibration method in
DO % saturation. The second, calibration in mg/L, can be completed using a solution with a known DO
concentration (usually determined by a Winkler Titration). Calibration in either DO % or mg/L will
automatically calibrate the other. The third option is a zero calibration, commonly completed in a
sodium sulfite solution. You must perform a DO % calibration following a zero calibration. For ease of
use and accuracy, YSI recommends performing the following 1-point DO % calibration:
1. With a clean sensor guard attached, place a small amount of water (1/8 inch) in the calibration cup
and slide the calibration cup over the sensor guard. Tighten the calibration cup retaining nut, but
disengage a thread or two to ensure atmospheric venting. Make sure the DO and temperature
sensors are not immersed in the water and there are no water droplets on the sensors.
2. Wait approximately 5 to 10 minutes for the calibration cup to become saturated.
3. Press the Cal
key, highlight ODO, and press the Enter key.
4. Highlight DO %, then press the Enter key.
5. Verify the barometric pressure displayed is accurate. Once DO % and temperature are stable,
highlight Accept Calibration and press the Enter key.
pH, ORP, ISE, Conductivity, and Turbidity Calibration
Please consult the ProDSS User Manual for additional calibration procedure details.
1. Ensure the equipment used for calibration is clean and rinsed.
Note: The sensor guard and calibration cup are required for turbidity. Other containers (e.g.
beaker) can be used for pH, ORP, ISE, and conductivity calibrations as long as care is used to
protect the sensors from damage.
2. Fill the calibration container with enough fresh standard to cover the temperature sensor and the
sensing end of the sensor to be calibrated. Completely submerge the top vent hole when
calibrating the conductivity sensor. If using the calibration cup, fill to the first line for pH, ORP, and
turbidity calibration. Fill to the second (i.e. top) line for conductivity.
Note: First calibration point for turbidity must be 0 NTU. Deionized or distilled water can be used.
3. Press the Cal
key.
4. Highlight the parameter you wish to calibrate and press the Enter key. For Conductivity, a second
menu will offer the option of calibrating Specific Conductance, Conductivity, or Salinity.
Calibrating one automatically calibrates the other two. Specific conductance is recommended.
5. Allow at least one minute for the temperature to stabilize. Calibration solution values for pH and
ORP standards are temperature dependent (e.g. pH 7 buffer calibration solution value is 7.02 at 20
o
C and 7.00 at 25 oC).
6. Enter the calibration solution value by highlighting Calibration Value, pressing the Enter key, and
then using the alpha/numeric keypad to enter the known value for the standard. Once you have
entered the value of the calibration standard, highlight ENTER and press the Enter key.
7. Allow the readings to stabilize by observing the white line on the graph located at the bottom of
the calibration screen. Once stable, highlight Accept Calibration and press the Enter key to
calibrate.
8. For pH, ISEs, and turbidity, continue with the next point by placing the sensor in a second standard
solution and following the procedure previously described. To complete the calibration, highlight
Finish Calibration and press the Enter key. Up to 3 calibration points can be completed for these
sensors.
Logging and Viewing Data
The ProDSS features two methods of logging data. Only one data point will be saved at a time when
using Single point logging, while the instrument will log multiple data points at user-defined intervals
with Continuous logging. To set the method and log data:
1. Press the System
key. Use the arrow keys to highlight Logging and press the Enter key. For
continuous logging, enable Continuous Mode and adjust the time interval. To enable Single
point logging, simply disable Continuous Mode.
2. Once the logging method is set, return to the Run screen using the Esc key.
3. To log data, press the Enter key.
4. To stop Continuous logging, simply press the Enter key again.
There are two different methods of displaying data on the Run screen. With Auto Sampling, the
measurements on the Run screen are continuously updated. Manual Sampling “locks” the
measurements on the display when stability is reached, resulting in the conservation of power and an
increase in battery life. These methods can be set by pressing the System key and adjusting the
sampling mode.
Data can be “tagged” on the ProDSS using two different descriptors, Site and Data ID. Site contains GPS
information connected with a site while Data ID is a method of tagging the data (e.g. project number or
day of the week). Press the System key to add/modify these options under the logging menu.
When taking measurements, insert the sensor into the sample and briefly move the sensor up and down
to release any air bubbles. Continuous sensor movement is not required. Allow measurements to
stabilize and press the Enter key to log data. Press the File key to view, delete, or backup logged data or
the GLP file. Data can be filtered by date/time and by user-created site and data ID.
Uploading Data to KorDSS
The ProDSS User Manual, located on the USB flash drive provided with the instrument, provides
thorough instructions on installing KorDSS and the USB driver for the ProDSS. The HTML help file,
located under the File tab of KorDSS, provides a more complete description of KorDSS features.
1. Make sure KorDSS and the USB drivers are installed on the PC (KorDSS and the USB drivers are
included on the USB flash drive provided with the ProDSS).
2. Use the USB cable to connect the instrument to the PC. If connecting for the first time, Windows®
may prompt you through a Wizard in order to complete the USB driver installation.
3. Open KorDSS on the PC and turn on the ProDSS.
4. Choose the desired instrument in KorDSS under the Instrument Connection Panel. Once you’ve
highlighted the correct instrument, click Connect.
5. If the settings of KorDSS are set to not automatically download data upon instrument connection,
click Start Download from Device, also under the Instrument Connection Panel.
6. After data download, the data is available for viewing, printing, and exporting from KorDSS.
7. Press the File
key and choose Delete Data if you no longer need the data on the ProDSS.
Contact Information
YSI
1725 Brannum Lane
Yellow Springs, OH 45387
Tel: 800-765-4974 (937-767-7241)
E-Mail: [email protected]
Website: Ysi.com
For Sales & Service Contact
2650 E. 40th Ave. • Denver, CO 80205
Phone 303-320-4764 • Fax 303-322-7242
1-800-833-7958
www.geotechenv.com
Item # 626972REF
Drawing # 626972
Revision A
September 2014