1
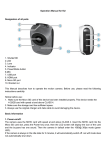
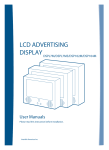
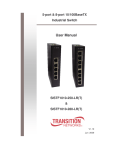
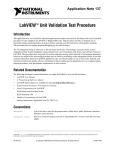
User Manual
Section 1 Product appearance
① Power switch
⑥ Base board
⑪ Back
② Power Interface (Mini USB)
⑦ Microphone
⑫ Directional key key
③ Camera body
⑧ Front Indicator
⑬ Back Indicator
④ Camera
⑨ SD card slot(rubber cover)
⑭ Loudspeaker
⑩ LCD screen
⑮ OK ( Enter )
⑤
Infrared body detector
①Antenna
②Remote control indicator
③Arm key
④Disarm key
⑤Remote control video key
Section 2 Terms Explanation
Arm/Auto video
Arm is making the remote camera in alarm status, the camera will automate take video once
1
infrared sensor actived.
Disarm
Disarm is disable the alarm function of camera. The camera won’t action even infrared sensor
actived .
Section 3 Load / Unload SD card
Remove the rubber cover from card slot ( left side). Press SD card into the card slot and make sure
lock the SD card ( Click sound ).
Just press the SD card in card slot, the SD card will pop up automatically and take it out.
Section 4 Preparation
Push the switch button to 【ON】 position, start the camera. When the front indicator turns green,
it means camera start successfully.
Press back
key,the LCD screen will work and camera in
Preview
status. You can see
images of camera shooting space via the LCD screen. Adjust and fix the camera installing place so
that the camera can shoot the place as you want.
2
Section 5 Taking video
No matter which video mode you choose, the video record time is fixed each time. The video record
time can change at “System setting - Video setting - Video time”.
For example, Setting Video time at 60 seconds, the camera will save a file every 60 seconds. The
video is stored in sections. When the memory is full, the camera will auto delete the oldest file to
save the latest video file.
1.
Taking video by remote control
After turn on the camera and keep the LCD screen off, you can press “Remote control video
key” on remote control device, the camera will take video automatically. Press that key again,
the camera will stop videoing.
2.
Automatic taking video
Pressing “Arm” key of the remote control, the camera will be under arm (defense) status. If
infrared sensor detects body signal, the camera will begin taking video. ( if the camera was on by
battery power alone , the automatic video will delay 3 seconds.)
3.
Taking video Manually
ON the camera and press back key
right-side
, the LCD screen will work. Press directional key
key, the camera will begin videoing, you can see
“●REC” flash on the left hand
side of LCD screen, video time will be displayed on the right hand side, the video will stop when
you press back
key.
Section 6 Check video
ON the camera and press back key
right-side
, the LCD screen will on ,then press directional key
key, all stored video file can be checked, played or deleted.
First of all, you can see all the folders, each folder is named by 8 digital as date and sequence
3
number, the first six numbers is date and the last two numbers is sequence number. Naming rules
is as following:
For example, the folder name “08010400” stands for the first batch of video for 4th Jan. 2008. If
there is more than 500 files in total at the same day, the folder name “08010400” represents the
second batch of video and so on.
When you select the folder, all the video Thumbnail pictures in this file will be seen. On the left
down side of the file, it shows video time, like “08:13:05” means video which recorded at time
08:13:05.
Select the file, press
key, the video Thumbnail picture will be enlarged, then you can do
more operation on this file.
1.
Play video:
Press right
2.
key, start to play video, press
key, the video will stop playing.
Control volume:
During the video playing , you can control the volume through keys “▲”and ”▼”,with “▲” pressed,
the volume will go up,with “▼” pressed, it will go down. During the adjustment, volume indictor
will show on LCD screen.
3.
Other operations:
Press
key, it will pop up following menu:
1) Previous file:play previous video.
2) Next file:play next video.
3)
File deleting:delete the video, press
key, menu will be displayed. If you are sure to delete the
video, please select “ OK”, press
key. If you
choose “ Cancel”, it will return to previous rank menu.
4
Section 7 Parameter setting
Either Check Video or parameter setting need to be fulfilled by menu. On the camera and LCD
screen , press
key, it will enter menu operation. Main menu interface is as bellows:
Use directional key to select and more operation . ,
the right
key stands for next level menu, the
left
key represents back to previous level
menu. The top ▲ and bottom ▼ key means
moving up and down. The back
represents
withdrawing from the menu.
1.
Check video
Select Check video ,press “OK” key to confirm. Further operation details ,please check
“ Section 6 Check video”.
2.
Manual capture
Select “ Manual capture ”,press “OK” key, the camera will begin taking video. More details
please check “Section 5 Taking video - Taking video manually”
3.
Arm / Disarm
Select “ Arm / Disarm” , press “OK” key, enter next level menu, it shows:
he mark“√” in front of letters stands for current status.
As the picture shows, the camera is under “Disarm”
status, you can choose the status and press “OK” key
to confirm.
Remark:If the LCD screen is in closed status, you can set Arm /Disarm by remote control.
4.
System setting
The initial interface of system setting is as picture
(right):
You can set and modify system parameter any time .
5
4.1. System Time
System time is the memory time of the camera, the video files are named by this time. In order to
check the video files conveniently, you need to set up the correct time. Choose
“System
Time”, then enter next level menu as follow:
1)On :The recording date and time will be shown on
video files.
2)Off :The recording date and time will not be
shown on video files .
3)Set date:Select this item, following menu will be popped up:
Each unit time is revised by the up and down▲▼key of directional key. The
switch on different parameter is changed by the left and right
key of
directional key.”
4.2. Video setting
Video setting gets three parameters: video time, frame rate, resolution . Select “Video Setting”,
then enter next level menu as following:
1)
“ Video Time ” setting
Video time is how much time you need for each video. You can
choose according to your need, default video recording time is 30
seconds.
2) “Frame rate”setting
Frame rate is how many frames are recorded every second.
There are 10, 15, 30 three options, the larger the number is, the
smoother the video is, and more memory space is needed. You
can choose the frame rate according to your application need,
default frame rate is 15 pictures per second.
6
3)
“Resolution”setting:
“Resolution” is recording megapixel, there are VGA
( 640*480 ) and QVGA ( 320*240 ) two options. By
resolution, VGA is the better than QVGA .but VGA need
more memory space to save. default video definition is VGA.
4.3. Remote control
Remote control needs to be bound with camera when it is used for the first time; therefore, we
need to take remote control binding operation.
Select “Remote Control” , enter next level menu, remote
control list is shown, camera can be bound with 5 remote
controls at most, and accept the controls by 5 remotes. Select
one remote control, press
1)
to enter next rank menu as:
Binding
Choose “Binding” option, the LCD screen will remind “Press any key on the remote control”, you
need to press any key within 15 seconds. And indicator on remote control will turn on, the LCD
screen will show “ succeed to bind” after camera receives remote control signals. If the
camera failed to receive remote control signals due to overtime operation or any other reasons, the
LCD will display “Remote control failed to bind”.
2) Delete
For the binding remote-controls, you can delete the corresponding remote control from the list.
Select “Delete” option, it will pop up “YES” “NO” option, if you are sure to delete it, move to
“YES” and press “OK” key to confirm.
4.4. Indicator setting
Select “Indicator” to enter next level menu as:
The camera has two indicators; you can open or
close the indicators according to your need.
Indicator status:
Disarm—flash slowly in green;
Arm—constant green light;
recording—flash slowly in red.
7
4.5. Language
Select “Language” to enter next level menu as:
The camera support English and Chinese menu, you can
choose which language you need .
4.6. Formatting
When you format the memory card, all the saved recording and
files will disappear, please make this choice carefully.
Select “Formatting” and it will pop up two options , if you are
sure to format the memory card, please select “ OK” and press
OK key to confirm.
4.7. Reset the camera
This function reset all settings to their original values, it will clean all setting including, camera
time is also changed, please make this choice cautiously.
Select “Reset” , it will pop up the option manu as follow, if you need to reset the camera, please
move your mouse on“ OK” option, and press OK key to confirm.
Section 8
Connect to PC
After ON the camera, press back
key, the LCD screen will light up. Meanwhile, connect
camera with computer by USB cable, pop-up menu is as bellows:
If you choose “OK” option in 5 seconds, the camera will be
recognized as an USB disk by the computer, and you can
play the video with installed video-supporting software in
your computer.
If you operate overtime or choose “Cancel” option, camera will be charged by the computer.
8