1
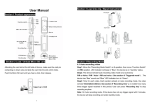
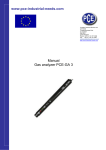
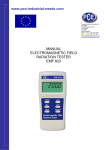
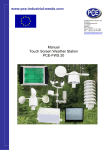
www.pce-industrial-needs.com
Tursdale Technical Services Ltd
Unit N12B
Tursdale Business Park
Co. Durham
DH6 5PG
United Kingdom
Phone: +44 ( 0 ) 191 377 3398
Fax: +44 ( 0 ) 191 377 3357
[email protected]
http://www.industrial-needs.com/
Manual
Video endoscope PCE-VE
320, 330, 340
[email protected]
CONTENT
1.
2.
3.
4.
5.
6.
7.
8.
9.
10.
Parts function ................................................................................................................. 3
Interface Overview.......................................................................................................... 3
Operation function ......................................................................................................... 3
Menu ................................................................................................................................ 4
Operation ........................................................................................................................ 4
SD Card Routes .............................................................................................................. 6
Troubleshooting ............................................................................................................. 6
Caution ............................................................................................................................ 6
Specification ................................................................................................................... 6
Specification ................................................................................................................... 6
2
[email protected]
1. Parts function
A.
B.
C.
D.
E.
F.
G.
H.
I.
J.
K.
L.
M.
N.
Power button
PHOTO button
REC button
PREV button
NEXT button
Multi-selector
Escape
Light switch
SD jack
AV jack
USB jack
DC IN jack
Main unit
Probe / cable
2. Interface Overview
This handy, easy-to-use device is designed with simple operational functions and
Commonly used by both amateurs and professionals. There are 3 basic modes for easier operations as follows:
PREVIEW Mode
Displays summarized optional functions such as ; picture taking, video taking etc.
SURFING Mode
Allows user to survey photos and videos in the memory card and maintain files.
MENU Mode
Includes file maintenance, settings etc.
PS: If the menu mode is not operated for 10 seconds, the system will automatically switch back to the preview
mode.
3. Operation function
All the buttons of this scope have different functions under each mode as cross referenced below:
Button
Preview Mode
Acts as “Backward / Reverse” function
Acts as “Forward” function
To enter into the Menu mode
To take photograph
To start / stop video recording
Surfing Mode
Back to previous photo or video
Switch to next photo or video
To delete photos or videos
To return to the Preview mode
“NEXT“(under the Preview mode)
“Start / Stop”(under the REC mode)
To return to the Preview mode
Menu Mode
Selecting the previous function or option.
Selection the next function or option
Confirms selected function or option
To return to the Preview mode
Displays information on the software version for technical repairs and maintenance
To return to the Preview mode
3
[email protected]
4. Menu
Main Menu
Under the preview mode: Press MENU button to display the various optional functions as follows:
DELETE ALL
VIDEO OUTPUT
DATE / TIME SETUP
LANGUAGE
VIDEO FORMAT
AUTO POWER OFF
DELETE ALL set up
Displays a frame which includes two options as in picture 2.
Use ”PREV” and “NEXT” to select “Yes” or “No” and press OK to confirm.
VIDEO OUTPUT order
Once you insert the video cable, select this function to transfer the viewing screen from the main unit to
television screen, the main unit screen will turn black. You can transfer the screen back to the main unit by
selecting the same function.
Menu
DATE/TIME SETUP
Press PREV button & NEXT button to select year/month/day or hour/minute/second, and press SEC button for
increasing numbers and press PHOTO button for reducing number.
If the “Date/Time” set up indicates “ON” status, the photo taken will include the Time/Date of occurrence.
LANGUAGE SETUP
To select language. (2 optional language)
VIDEO FORMAT SETUP
To setup the TV output format
AUTO POWER OFF SETUP
To setup time for auto power off
5. Operation
Installing (Getting started)
Step 1
Connect the probe with the main unit. Place the main unit facing inward and
Connect the probe (marked with an arrow) by inserting it to the main unit and screwed on (refer to picture 1)
Step 2
Press POWER button for 3-5 seconds to turn it on, then displays the sign as the one in pic 2 that will disappear
in 5 seconds and then you can start the use.
(Capacity of SD card
Capacity of battery)
Step 3
Press POWER button for 3-5 seconds to turn it off.
Operation
PHOTO
Touch or press to display the picture continually.
Status: After taking picture, the system automatically switch back to preview mode.
REC
1. Press for video recording.
Status: Displays the sing in the lower-left corner to indicate recording status.
2. Press to stop recording.
Status: The sign in the lower-left corner disappears to indicate end of recording.
P.S.: The video is saved automatically when you press to stop recording and proceed with next action (picture
taking of video recording.)
To view photos and videos
1. In the preview mode press or
Status: Will displays the latest picture.
2. And press or to survey the first photo / video taken and the second photo / video taken.
Status; Files are organized by date sequence.
P.S.: Shows the previous or next actions (either taking photograph or video recording).
4
[email protected]
Operation
DATE / TIME SETUP
1. Press OK to select
2. Press or to set Date (YY/MM/DD), Time (HR/MIN/SEC).
3. Press for adding or for decreasing the numbers (date / time) and further pressing will go to “DISPLAY”
option and press or for “ON ” / “OFF” DISPLAY option.
Display date
Conceals date
Operation
Input / Output pictures into external viewing screen
1. Connect the black AV cable with the main unit to the AV jack on the right side of the main unit. (P.S.: make
sure the other side of the AV cable is well connected with the external viewing screen.)
2. Press OK to select
3. Press or to transfer to “Video Output” option.
4. Press OK again
Status: Picture will output to external viewing screen
PS. The function will detect automatically if AV cable already inserted in the AV jack. If not but inserted, the
image of screen will be switched back the main unit.
To regulate output viewing
1. Press OK
2. Press or to select video format option.
3. Press OK
4. Press or to select NTSC or PAL
5. Press OK
Operation
DELETE SINGLE FILE(LIMITED TO VIEWING MODE )
1. Press or to go to the required file
2. Press OK to go to the delete option
3. Press or for “Yes” or “No” option
4. Press OK to confirm
DELETE ALL FILES
1. Press OK to go to “DELETE ALL” in the Main Menu
2. Press or for “Yes” or “No” option
3. Press or to confirm
Operation
Auto Power On/Off Setting
1. Press Ok
2. Press or to go to the Auto Power Off option
3. Press OK
4. Press or to set up the time options (5min/10min/15min/30min) or DISABLE option (if you choose not to have
this function)
5. Press OK
6. PS. The system will still automatically switch off without prior setting.
ACCESSORIES
USB Cable – enables connection to PC for convenient file transfer and maintenance.
Video Cable – connects screening to television when required.
Adaptor – enables power charging when low power is indicated.
SD card – Please refer to the picture for direction when inserting to the unit.
Beware of the direction that SD card should be.
5
[email protected]
6. SD Card Routes
When you get the product, recommend you set up the time and date for the future management of the files.
The product press time is YEAR 2007, January 1st. If file name shows first two codes are 11, it indicates the
time is preset time.
The file name is defined not by sequence ID, but by photoing time.
Picture file and video file are defined by the same way, but extension is different. Picture file is .ASF.
7. Troubleshooting
No image on the LCD monitor after turn power on:
If battery is exhausted, turn power on and then on action, please charge battery or use AC adapter.
No image but words on the LCD monitor after turn power on :
Please check connector if connected well.
Cannot take picture and video
No SD card inserted, no photo taking and videoing.
If SD card is out of order, data cannot be saved to the card.
Shut down;
When all the function freeze or fail, please insert an insulated needle to the hole on the back of the main unit.
The system will restart automatically.
Back
RESET
8. Caution
Do not remove the SD Memory Card while data is being saved to the card while photographing or videoing, as
this may cause the data to be lost or the card to be damaged. While videoing it need storage mass data, we
recommend using more than 80X SD card to catch batter quality.
Important:
Use cotton buds soaked in alcohol to clean the lens.
Don’t use the product in dangerous environment such as oil tank.
Don’t use chemical liquid to clean off the surface of the product.
Don’t open the product unit, the action might damage the product.
When storing the product, be careful when bending the probe. Don’t bend the probe 180 degree.
Please use original spare parts, if not, it might damage the product.
Don’t use the product in an aircraft and medical field.
Don’t use the product under the direct sunshine.
Please keep the product in dry and adequately ventilated environment.
9. Specification
Specification
Handle Working Temperature -20 – 60℃
Probe Working Temperature -20 - 70℃
Total Storage Temperature -20 - 60℃
While Battery in charge 0 - 40℃
10. Specification
Insertion Tube & light Source SPEC.
Image Sensor
MOS Image Sensor
Resolution (Dynamic / Static)
320(H)*240(V)640(H)*480(V) ~30M
Size
Tip (Insertion Tube ) Diameter
5.5mm
Frame rate
~30 fps
S/N Ratio
42dB
Exposure
Automatic
White balance
Fix
Field of View (FOV)
67º
Depth of Field (DOF)
1.5cm~10cm
Light Source
4 White LED
6
[email protected]
System SPEC.
Power
Display
Interface
Battery
Video Out Format
Recording medium
Compression Format
Still Image Storage Format
Video Recording Format
Language
DC5V
3.5”TFT LCD Monitor 320*240 Pixels
Mini usb 1.1/ AV out / AV in/
Rechargeable Li-Polymer Battery (3.7V)
NTSC & PAL
SD card (the capacity can be used up 2G)
MPEG4
JPEG (640*480)
ASF (320*240)
English + option (one language)
Function
Quick Snap
Quick Video Recording
Quick Review
AV Out
Video\Picture Viewer
In this direction will find a vision of the measurement technique:
http://www.industrial-needs.com/measuring-instruments.htm
NOTE: "This instrument doesn’t have ATEX protection, so it should not be used in potentially explosive
atmospheres (powder, flammable gases)."
7