1
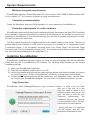
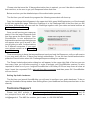
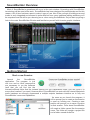
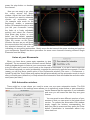
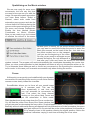
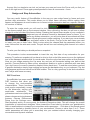
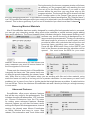
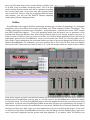
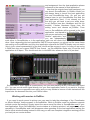
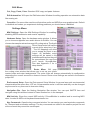
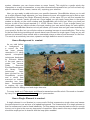
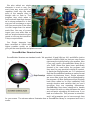
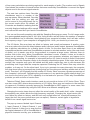
Sound Builder Owner’s Manual
Software by: Riccardo Mazza
Manual by: Riccardo Mazza
Graphics: Alberto de Stefani, Sabrina Agostini
The HD Libraries
by: Riccardo Mazza
assistant engineer: Daniele Giario
Acknowledgements
Luigi Agostini, Roberto Lajolo, Ron MacLeod,
Daniela Ovazza, Carola Ovazza, Andrea Valassina, David Zicarelli.
Distribuited by A&G Soluzioni Digitali
http://soundbuilder.aegweb.it - [email protected]
tel. +39 0586 211526
Index
Introduction
4
Considerations and Conclusion
5
System Requirements 6
Minimum Computer Requirements 6
Computer Recommendation 6
Computer Requirements for Audio Hardware
Installing SoundBuilder.
Copy Protection
6
6
Technical Support 7
SoundBuilder Overview
Getting Started
8
8
Start a new Session
8
Hardware and Setup
9
Routing I/O Mixer 10
Working with Movies
10
Key Commands
11
Surround Formats 11
Importing Audio
11
Playback
11
Adding Elements 12
Adjust Levels and Positioning
Spatializing 12
Automating
13
Listen at your Movements
14
Edit Automation Window
14
Spatializing on the Movie Window
Focus
15
Nudge and Step Automation 16
LFE
17
Bounce and Downmixes 17
Bouncing Musical Materials
19
Advanced Features
19
12
15
6
MIDI Support 20
Saving 21
Transport and Navigation
21
ReWire 22
Working with Movies in ReWire
Working with MIDI in ReWire 24
23
Reference Manual 25
File Menu
25
Edit Menu
27
Settings Menu
Movie Menu 28
Window Menu 28
27
Key Commands Shortcuts 28
Menu Key Shortcuts
29
Appendix A
30
Principle of Operation: The Libraries
Analisis of a Background Environment
The SoundBuider libraries
30
How a Background is created 31
How a Single Element is created
32
SoundBuilder Libraries Format
32
Appendix B
33
Surround Speaker Setup 33
Surround Monitoring
33
Appendix C
34
Advance Audio Settings 34
Copyright.
37
30
30
Copyright ©2005 Riccardo Mazza Interactive Sound From the creator of the X-Techniques and
the RenaissanceSFX surround library…
Riccardo Mazza
presents:
SoundBuilder™
The first tool to create your own backgrounds and Foleys in surround!!!
Introduction
SoundBuilder (SB) is a powerful tool designed for building backgrounds, foley and soundscapes
in surround. Mainly aimed to film, television and multi purpose video soundtracks production, SB
may also be used to create your own sound SFX library independently from the video sequence.
Besides, SB uses a strong and
complex algorithm structure so to
guarantee a professional sound
quality. Its interface is extremely
simple and functional, requiring
very little experience in order to
achieve excellent results.
SB allows you to create full
dimensional
“Soundscapes”
building and layering elements
that will move or simply occupy a
static position in the space over
a main surrounding background
environment.
You may work upside down in any format required, from mono to 7.1 and switching among all
those different formats in real time. Once satisfied you may then bounce your sound in the current
output mode.
Supported formats are: Mono, Stereo, LCR, Quad, LCRS, 5.0, 6.0, 7.0 with the possibility to
enable the LFE channel (.1) independently.
SB is best used with its own optimized sound libraries, but of course you may import your
own sound files (most popular format and SR are supported). The software may be launched as
standalone application or in “ReWire” mode sync’ed with all those programs that support ReWire
technology.
SB has been thought for professional needs and for this reason sound quality is a mandatory
issue. Spatialization is obtained trough complex processes that are the results of many years of
research in the acoustic and psycho-acoustic field developed by Riccardo Mazza. All distance
and space controls have been achieved using only dynamic variations of amplitudes according
the human psychoacoustic curves. No comb filtering or delay has been applied at any stage of the
signal path, thus guaranteeing maximum quality and phase coherence.
It is important to understand that SoundBuilder has
been designed to be used with special dedicated
sound libraries. The basic library that comes with the
package covers many useful environments to start
right away and create high definition soundscapes
in the dimensional space. The SoundBuilder
libraries have been created disassembling complex
environments into its basic elements. You will then
build your sound effect at your needing dynamically
positioning in the surrounding space only those
elements that are required (see next section).
Considerations and Conclusion
This is a very experimental project and it’s an
adventure also for us as developers. We are
discovering always new possibilities and ideas day
by day. We expect to release, in the near future, an
increasing number of libraries for SoundBuilder also
produced by third party sound designers. With this
spirit we support you as much as we can providing
know-how, procedures and the trademark to print
on the library for free. If you are planning to create
and to commercialize a library for SoundBuilder,
please ask for our third party developers form and
we’ll be happy to support you within our possibilities. The sound for video market is growing as
fast as technology grows through all new wide band broadcast media ranging from telephones
to satellite. SoundBuilder simplicity of use is a key point also for professionals that belong to the
video world , even with little experience in the audio field. On the other side also professional and
experienced sound designers may find an invaluable tool in creating perfect surround soundscapes
in minutes.
System Requirements
Minimum computer requirements
SoundBuilder requires a Power Macintosh G4 1Ghz or above with 512MB of RAM and Mac OSX
10.4 or higher. A 17” inch monitor (or larger) is highly recommended.
Computer recommendation
Faster the Macintosh, and more RAM installed in it, more responsive SoundBuilder is.
Computer requirements for audio hardware
SoundBuilder supports third party audio hardware products that support the Mac OSX CoreAudio
driver standard. However depending the number of audio outputs you will be able to use surround
capability of SoundBuilder. In surround terminology you will have 2 numbers indicating the number
of outputs required for that format.
The first number indicates the outputs required for the spatial image for that format. The second
number after the dot indicates if a LFE channel is required. For example a 5.1 configuration needs
6 individual outputs . 5 for the spatial surround circle (Left, Center, Right, Left Surround, Right
Surround) and .1 for the subwoofer channel (LFE). We recommend a 8 outputs interface to satisfy
any surround format supported by SoundBuilder (7.1).
Installing SoundBuilder.
SoundBuilder installation process requires you have the original package with the SoundBuilder
Install disk and the 4 SoundBuilder’s HD Libraries. The following steps illustrate you the simple
installation process.
1) Insert your SoundBuilder install disk
2) Copy the SoundBuilder Installer file to your HD.
3) Launch the installer and follow all the steps required (please note that the installer will require
you to verify all your 4 DVDs of SoundBuilder’s HD library, so keep them close at hand)
4) A folder named InteractiveSound will be created into your Application folder. Into that folder
you will find your SoundBuilder program. You can move it to a different location if you like.
Copy Protection
SoundBuilder uses Challenge/Response copy protection scheme. In order to let you work
right out of the box or in the
case you need to install it to a
different location and you do not
have the time to wait for your
Response
authorization,
the
installation process will provide
you automatically with a 15 days
authorization for that machine.
During this time it is supposed
you will register and get your
permanent authorization code.
Please note that once the 15 days authorization time is expired, you won’t be able to reauthorize
that machine, so be sure to get your Response before that time.
Below we show you the detailed steps of the authorization process.
The first time you will launch the program the following screenshot will show up.
Copy the challenge that will appear in the upper text field, press WebPage button you’ll be brought
to the web registration page. Paste the Challenge it in the Challenge field of the form that you will
find there. Alternatively you can mail the Challenge together with your data and serial number at
[email protected].
Once you will receive your response
paste it into the lower Response field
and then press the Save button. Your
SoundBuilder is now authorized for
that machine and no more dialog boxes
will appear when you’ll launch it. We
can provide you with 2 authorizations
for 2 different computers. If you need
more please contact us at support@s
oundbuilder.net
Thus we are trying to be as fast as possible and send you back the Response, until you will receive
it, you may work with the 15 days time limited authorization. To use the time limited authorization
press the Cancel button when the Challenge/Response dialog box shows up.
The Tempo limited authorization dialog box will appear. In the upper right field of the box you see
how many days you left before expiring. In order to activate your SoundBuilder session it is also
required to insert one of your 4 original SoundBuilder’s HD library DVDs so keep them all close at
hand. Insert the requested DVD, wait until the disk is mounted and than press OK. SoundBuilder
will now launch.
Setting Up Audio hardware.
The first time you launch SoundBuilder you will need to configure your audio hardware. To do so
open the Hardware Setup window from Setting Menu (see Hardware and Setup section later on the
manual).
Technical Support
Please visit A&G website at http://www.aegweb.com/html/html_interne/support.html and fill
the prompted form with all the information requested. Send it or send an equivalent email to
[email protected]. The A&G fax number, just in case, is +39 0586 887453.
SoundBuilder Overview
Most of SoundBuilder’s operations will occur in the main window. Orientating with SoundBuilder
terminology will do most of the work . SoundBuilder has been designed for professionals and for this
reason a lot of time has been spent in make it easy of use. Also if the concept of building surround
tracks in such integrated environment is quite different from many traditional editing software you’ll
be surprised how flat will be your learning curve when using SoundBuilder. So just start up giving a
look to the main SoundBuilder Window and familiarize yourself with its main graphic interface.
Getting Started
Start a new Session
Launch
the
SoundBuilder
application. The program is just
one icon and no other components
are necessary to run the software
itself that you will find into the
InteractiveSound folder that the installer placed into your Application folder (you can move it in
some other location if you want). However also if SoundBuilder can work with the internal Macintosh
audio hardware we strongly recommend a multiple outputs hardware interface so to fully use
SoundBuilder’s surround capabilities.
As soon as you launch the program, it
will be prompt you to create a new session
or open an existing one. Creating a new
session will prompt you to save a location
for that session. Once done SoundBuilder
will create a folder named like the session
name. The folder will contain a project file
and a folder named AudioFile.
The file is the SoundBuilder session and will save all your SoundBuilder settings including
output routings, all automation data etc. The session file may be moved, copied, renamed etc. The
AudioFile folder must not be renamed or moved since it will contain all the used audio files for that
session. Actually the session itself will reference to its AudioFile folder. When you load an audiofile
into one of your SoundBuilder tracks, the source file will be copied into the AudioFile folder. In this
way you will always work on the copies
of the originals and also you will have
a folder with all your elements for that
session.
As we said, the session file will
reference its audio files to the AudioFile
folder, so what happens if you will move your AudioFiles folder to a different location? (Like for
example working in a different studio etc).
Well if you will open a session file that will not find the corresponding audio files, the Locate
AudioFiles dialog box will show up. All you have to do is to press choose browse to your moved
AudioFiles folder. Once founded and chosen
the session will be loaded with all its audiofiles
correctly assigned. Save the session so that it
will be referenced to the new location. The next
time you will try to open that session, the files
will be recognized and normally loaded.
Please note that in the File menu you can
also manually open the Locate AudioFiles
dialog and choose for a different AudioFile
folder, so that you can for example use multiple
AudioFiles folders for different versions of your
SoundBuilder session or simply to anticipate the
next launch if you moved the session folder for
backups etc.
Hardware and Setup.
The first time you launch the application you
will need to choose the hardware ASIO that the
software will use. From the Settings menu choose
Hardware Setup. The DSP status window will show
your currently supported core audio devices.
SoundBuilder can work in any format from mono to 7.1. So for example you could even choose
the internal speakers and work in stereo with your headphones while on the airplane and then go
5.1 when back in studio. If you plan to use SounBuilder in ReWire mode you will have to choose the
ad_ReWire driver. Please note that SoundBuilder saves the chosen driver in its preference file so
the next time you’ll launch the software it will automatically set-up with the latest chosen driver. In
case of ReWire you will have to launch the mixer ReWire application first (like ProTools, DP, Logic
etc.) See the ReWire section later on for mode details.
If no driver can be found an alert box will show up asking you to choose for a new driver. Pressing
the HW Setup button will open the Hardware Setup window where you can set a supported driver
from the list.
Routing I/O Mixer.
You will need to configure your
outputs routings so to match your
current studio speaker setup. This will
be saved in the session file, but not in
the preferences (like it happens in PT)
so after you did an initial configuration
you may want to save an initial empty
session.
From the Setting menu choose Route Mixer. This will be the routing
output and final stage mixer. Its default will be standard ITU. If you
work with a different configuration (i.e. DTS or Film Standard) you will
just need to configure your audio outputs to conform to your system
choosing from the pop menu in the lower part of the mixer window,
the physical interface output connected to your studio speakers. On
the upper part you will see the input signal (L, R, C, Ls, Rs etc.).
When changing format everything will be automatically reassigned.
So just assign the outputs once and a reference level. SoundBuilder
supports up to 8 outputs (allowing you to work from mono to 7.1).
The ST-2 item allows you to assign the output to stereo pair. Doing
so you’ll be able to manually downmix at your needs (i.e. center to
stereo, surround to stereo etc.).
Working with movies.
From the Movie menu choose Import Movie and than browse into your hard drive and import a film
to work with. SoundBuilder
supports
any QuickTime
format
depending
the
QuickTime version installed
in your Operating System.
When importing a movie,
the film will be opened in
floating window and it will
be synchronized with your
audiofiles.
SoundBuilder
has been created mainly for professional use and especially for creating backgrounds for film and
video production. In fact the internal synchronization clock of the program is tied to the frame rate
set for that session. It is important if you need to work with movies to set the right frame rate in
SoundBuilder transport. SoundBuilder automation as well as tracks start points will be calculated on
it and actually the frame rate is the native internal SoundBuilder time unit. If you choose a different
frame rate other than the native movie one, you won’t
have the right SMPTE matching between the session and
the movie. On the other hand you may change frame rate
so to match times among different movies.
Note that for now just the automation speed and starting audio points will be recalculated on
current frame rate. On future releases of SoundBuilder it will be implemented an automatic sample
rate conversion in order to match the audiofiles length as well. In this way you may for example work
independently with a 24 fps of film shots and a 29.94 NTSC video copy work.
Key Commands.
SoundBuilder allows you to assign a number
of key commands. Assign a couple of keystroke
commands for a better navigation. Choose Key
Commands from the Settings menu. From the
Key Commands window click on the grayed
Play label. The assign window will appear. Press
spacebar on your computer keyboard and than
click on the assign button. Now the spacebar
will control your transport play-stop buttons
(PT style). Repeat the procedure for all other
keystroke you like. Modifier key will automatically
be indicated on the check boxes when you will
press them.
Surround Formats.
Now you are ready to go. First of all choose
a working format from the Format pop-up menu in the main
window. Try for example 5.0 and leave LFE Off in the LF
mode and Discrete on the Output pop-up menus. You will be
able to change all those formats in real time and on the fly at
any point during your production anyway.
Importing audio.
As first action you need to import a
Background file from your SoundBuilder
library. Background files are plain
environments disassembled from their
complex elements and they are the
starting base from where to rebuild
your soundscapes or Foley tracks.
Background files should be placed in a folder apart and they are a
5 channel interleaved files. You may import also a different format
file as background (i.e. a stereo or mono file). SoundBuilder will
route it to all its inputs anyway (but not spatialized). For example
press the small Load button under the leftmost fader on the main
window, browse into your library and load a soundfile from any of
the background folders. This will be your background spatialized
texture that will serve as main layer for your elements. You will
see a gradient appearing in the space window indicating that a
background texture has been loaded.
Playback.
Turn on a little bit the BKG fader and than press spacebar (or click on the play button on the
transport window) to start playing. If you are working in surround you
should hear a very gentle environmental surrounding sound. Adjust
the level until you feel comfortable. You are now ready to add more
single elements so to build your environment. You may give a proper
name to your track clicking on the BKG box under the fader.
Adding Elements.
Add your first element. Under Channel A press the Load button and browse your
SoundBuilder library. This time look for a sound from
any of the single elements folders. These files have
been specifically designed to fit over a background. They will be
spatialized by the program and they have been all edited to act as
endless looping sounds with sufficient variation on it so that you
won’t have any repeating sound sensation. Give a proper name to
the channel as you did for background track.
Adjust levels and positioning.
Rise a bit the Channel A fader and select the channel strip clicking on the letter over the
dB level indicator (channels are marked with capital letters from A to H) . You will need
to select a channel in order to spatialize it or to use the automation. You will see the dB
value.
The M button is the mute button and the S is the solo. The pop-up menu labeled ShotLoop will allow to playback the loaded sample as single shot or in looping (default) so
not to have an end. If you are loading a Single Element from the provided library the
loop mode will be the most used since most of SoundBuilder’s Single Elements from
the libraries have been designed to loop forever. When you load a sound into one of the
SoundBuilder’s channel a red dot close to the load
button will lit indicating the file has been loaded. You
can discard the file if you want clicking on the red dot.
The discard audio file box will show up. Please note
the discarding an audio file will not clear the channel
automation data. To clear automation data use the Edit Automation Window in the Settings
menu (see later on the manual). All the time will be calculated as if the looped file was an
entire endless file. Doing so the chasing will always occur at the right point among different
samples.
The horizontal little slider is the individual send to the LFE engine (see later on). Double
click on channel name field to open the channel name dialog box where you can give a
name to your track.
Now you are ready to play and spatialize your sample.
Spatializing.
Place the cursor around the space window and than
click. The channel dot will appear at that position with
the name you gave on the channel (this is an option that
can be changed in the preferences menu).
Now press your spacebar to start playback.
You will hear your element sound over the background
sound. Move gently the mouse clicking on the space
window and try different positions. Adjust the fader as
well until you feel you reach the right balance. During
positioning you will see just the dot without the name to
indicate you which channel you are operating on. Once you deselect the channel, the name you
gave for that channel will appear close to the dot. This feature is very useful when you have many
active pans moving around.
Unless you are automating one o or more channels, all the soundfiles will start
from the 1st frame calculated from the offset indicated in the offset number field
above the frame rate pop-up menu. The situation is different if you write a movement
using automation. In this case the background track will always begins at frame 1
(always starting from the offset) while the individual channel sounds will start exactly at the frame
that occurred when you pressed the mouse button during the automation writing, either on the fly or
in step mode (see automation and nudge and step automation chapters below). To stop the audiofile
playback at a certain location, when in automation writing just press the backspace keystroke on
your computer keyboard. The audio channel will stop playback at the desired destination frame. This
kind of flexibility allows you to spot for Foleys as well as generate generic soundscapes textures for
backgrounds applications.
Automation.
Now let’s perform some automation on your
SoundBuilder’s session.
Click the Load button of the channel you want
automate and browse into the Single Elements
directory of your SoundBuilder’s library until you
find a sound you like. You may want to start to automate some dynamic movements with this sound.
SoundBuilder supports automation in a Pro-Tools like style. In order to start the automation you will
need to enable a parameter and an automation mode.
SoundBuilder 1.0 allows you to automate pan and faders for channels A to H, fader only for
Background track and Range (dragging the mouse on the Range number box). You can enable
fader, pan or both clicking on the 2 buttons on the transport placed on the right of the play button.
In this way you can decide for example to write a pan movement in write mode without overwriting
a pre recorded fader movement.
SoundBuilder supports 5 different automation modes. To change the automation mode click
on the pop-up menu labeled auto that is placed to the right of the automation parameters enable
buttons. Off mode disable all automation behaviors allowing you to freely move pans and faders also
if you have pre recorded some automation movements. Read mode reads automation if present. In
this mode also if you will select a channel and a parameter button is enabled, you won’t be able to
write any automation. If no automation is present on a selected channel you can freely move pan
and/or faders like if you were in off mode. If some automation is present the read mode will prioritize
automation reading and you won’t be able to move the parameters unless you switch to Off mode
or you overwrite automation in one of the write modes (note that read automation is parameter
independent, so if you for example wrote only pan movements you will able to freely set faders
positions and vice versa). Write mode will overwrite any movements, so be sure to use this mode
for example at the beginning of a track or if you really want to substitute an automation portion. Use
the parameter enable buttons so that you will write only the parameters you want to. Enabling both
pan and faders buttons will overwrite pan and faders movement at the same time for the selected
channel. Touch mode is a safest mode that allows you to overwrite portions of automation tracks only
when pressing the mouse button. When you will release the mouse button, the parameter will jump
to the present automation score if some data are still present. Latch mode is a very useful mode if
you need to rewrite portions of automation from one position on. Latch acts like Touch mode, but
instead of jumping in read mode when releasing the mouse button, it will continue to write until you
press the stop button or deselect
the channel.
Now you are ready to go, place
the cursor around the space
window. Adjust the level fader for
the channel you want to automate,
choose an automation mode
(for example write mode for the
beginning), enable a parameter
button (for example the pan to write
just the pan movement leaving
the fader at a freely adjustable
setting) and select the channel.
Now press play button, or even
better use the default spacebar
key assignment and start playback.
Place the mouse on the Space
Window. As soon as you will press
the mouse button the colored dot of
the selected channel will turn red
indicating you are writing automation. Gently move the dot around the space window and perform
your movements. Repeat the above procedure for some more channels choosing different Single
Elements from the library.
Listen at your Movements.
When you have done, press again spacebar to stop
playback. The movements have now been saved. Before
starting playback again to listen at your movements make
sure you either are in read or touch mode or the channel is unselected. If you are in write mode with
the channel selected you could accidentally overwrite the previously recorded movements. For this
reason you will find some useful option in the Preferences window (File menu -> Preferences ->
Auto&Trig tab) like Touch follow write option that will automatically set the automation mode to touch
after your write pass (default on) or Stop release Rec Automation that will disable the rec button after
each pass (see later).
Edit Automation window.
There might be a case where you need to erase one ore more automation tracks. The Edit
Automation Window in the settings menu allows you to selectively erase faders or pan automation
tracks. Beware that the operation is not undoable
and once you will erase the data they are gone
forever.
You may want to save different versions of your
session so that you can revert to the latest saved
version. To operate the Automation Edit window
simply toggle the buttons corresponding the
data you want to erase and then press the Clear
button. Cancellation is immediate without any
other alert box.
Spatializing on the Movie window.
We are now ready for some more
movements, but let’s say this time
we need to be more on sync with the
image. So repeat the same procedure
you have done before. Select a
channel, select write mode from
automation pop-up menu and rise the
volume fader a bit. Before placing the
mouse on the space window go to the
File menu and choose Preferences.
Enable the item labeled Mouse
Coordinates on Movie Window.
Now you are ready to go, but instead
of pointing the mouse in the space
window, point it directly on the movie window, before that
you may want to move little further the movie to avoid the
black few seconds on the head of the film. Just click drag
the offset number box on the transport
until you see the beginning of the video.
So now you are ready to automate as you
already did before, the only difference is
that now you’ll click and move the mouse on the movie
window instead. The program will scale automatically the coordinates depending the movie size.
When you done, press spacebar to start playback and listen at all your movements written so far.
Try to automate some faders as well or correct any movement on the fly setting the automation to
touch mode. In this case you’ll overwrite movements only when clicking the mouse.
Focus.
At this point you are pretty much satisfied with your dynamic
movements, but watching at the movie you will notice that the
camera moves slowly toward the riverside.
SoundBuilder allows you to focus all your sound image
to a narrower area. This can be
done dynamically in real time and
you can automate its movements as
well. First select the focus channel
clicking on the yellow label Focus and
put the automation in Write mode.
Start playback and slowly drag down the Focus number box.
You will see the yellow focus area of the Space window that
will get narrower as decreasing the focus value. So what happens when you decrease Focus value?
Basically all level relationship among all channels will trim themselves so to be focused as the space
area gets reduced. So if a point will be on the circle peripheral it will sound as
if it is actually closer to the speaker referring its angular position. Notice the
positions Ledmeters varying in real time according the focus value.
Anyway this is a simple-to-use tool, so just use your ears and move the Focus until you feel you
are on the right mood. Once again press spacebar to hear all movements + focus.
Nudge and Step Automation.
One very useful feature of SoundBuilder is the way you can nudge frame by frame and even
perform step automation. This mode allows you to insert frame accuracy effects making them
appear and disappear at exact locations or to correct single automation data on a specific frame or
on a series of frames.
To enter the nudge mode you will need to click
on the frame number box on the transport window. Once clicked on the box you will see a yellow
triangle lit on the left side of the frame number. Pressing the Up and Down arrows of your computer’s
keyboard you will advance forward or backward frame by frame. If you
have any written automation, you will notice how all movements will slow
down following the exact nudge matching. If you want you can automate
pan and faders while in this mode. First go to the start frame you want
to insert your pan or fader value. While in stop select the channel and the parameter button you
want. Now select the write auto mode. The pan dot will turn red indicating that channel is in record
mode.
To write your first data you should perform a snapshot.
This procedure is also recommended to insert the very first data of any automation for your
session. To perform a snapshot all you have to do is to click on the little camera icon on the rightmost
end of the transport window while in record mode. Now the value has been written at that position.
Now you can nudge pressing the Up arrow key and you will forwarded writing new data at that
position. Proceed frame by frame at any subsequent position to write or substitute with new data
(you don’t have of course to press the snaphot button each time). To end the sound when reached
a specific destination simply stop nudging and press the backspace key on you keyboard. The dot
will disappear and the sound will end at that location. This is a very good way to ins and outs effects
and Foleys with frame accuracy.
DSP Functions.
SoundBuilder has some useful
DSP functions that allow you
to change the environmental
characteristics. These functions
work psycho acoustically, except
for the subwoofer, varying only
amplitudes relationship. This
guarantees maximum quality and
phase coherence during downmix
process. Choose Environment
Setup from the Settings menu.
Start playback and try to move gently the Ambient Dimension slider. This will change the overall
impression of environment wideness. Move toward the Close label to simulate your spatialization
like in a small ambient or toward Far to simulate a wide open space… Click also on the Sound speed
response to simulate a humidity factor of your environment. Choose a value from 0 to 5. Those
useful parameters will allow you to accurately trim your ambient without actually changing your
movements and dynamic relations.
LFE.
SoundBuilder allows you to
generate SubWoofer contents directly
from the actual loaded audiofiles. Two
different algorithms are provided LFE
and LFX. Both use psycho acoustic
principles coming from Fundamental Tracking phenomenon.
LFE is a natural generation from actual
harmonic contest, while LFX will allow
you to tune the fundamental frequency. To
choose the algorithm you want click on the
Lf mode pop-up menu on the main window. Try LFE at first. Now increase the
Background LF Presence knob in the Environment Set window, this will generate
low frequency signal from the background channel. The signal will be outputted from the LFE output
fader in the I/O Routing Mixer Window. You may now adjust individual channels LF generation setting
the horizontal little fader above each channel. This will act as a send to the LF engine allowing you to
decide if and how much each of the individual channels will generate low frequency content. Remember
the LF engine acts as a single processor where you can send background (Background LF Presence
knob) and/or single channels signals. In our case for example you may want to send just some water
sound to the LF while birds and leafs will not make sense to generate such low frequencies etc.
Choosing the LFX algorithm all sends will be adjusted in the same way, but the fundamental
frequency from where LF signal will be generated can be tuned. Try the LFX algorithm and adjust
while in playback the LFX Freq Shift parameter click dragging with the mouse on the number box.
Note: if you don’t have a dedicated subwoofer you can still use LFE assigning the LF
output channel to the stereo speakers. To do so just set ST-2 from the output pop-up
menu on the LFE output channel in the Mixer window.
Bounce and Downmixes.
Now that you done with your job you may decide to write your soundfile to disk so to import it later
in your DAW and use it in your production. SoundBuilder will let you work and listen in real time in
any format either discrete (multichannel surround etc.),
stereo or even mono downmixes. You can switch either
a different format (i.e. LCRS, 5.1, 6.1 etc.) and decide
to bounce in discrete (multichannel) or downmixed
(stereo or mono). Lets say that you are actually working
in 5.1 and you want to listen (and eventually bounce
to disk) a stereo downmixed version of your session.
Just choose Stereo Mix from the Output pop-up menu
in the main window. Now you are listening at the stereo
downmix of your 5.1 session in real time and in phase.
Try also Mono Mix. In this case all your session will
be mixed in mono in
phase and outputted
out
your
central
speaker.
You
can
switch back and forth
among those mixes
while in playback,
once back on discrete
you will listen at your original multichannel session. You will notice
that when choosing a downmix format the output assignment in the
routing Mixer I/O window will automatically change to fit the right studio configuration. If for example
your studio setup has left speaker on out 1 right speaker on out 2 , surround speakers on 3 and 4
and center and sub on 5 and 6, choosing Stereo Downmix will set up your output as in the figure.
You will also notice that subwoofer in this case gets included in the stereo downmix. This is an
option that can be set in the Preferences window (see later). You can also manually change your
output assignment. The item ST-2 in fact assigns the selected channel to the currently set stereo
speakers. Beside the automatism of SounBuilder set up in downmix process, you may still have
any flexibility for manually output and re-assignment.
Just keep in mind that SoundBuilder references all
downmix output assignment based on Discrete output
initial assignment. So if you will change your studio
configuration, just choose Discrete from output pop-up
menu and reassign your outputs. All downmixes will be
now automatically reassigned to your new setup. Now
your production asks for an LCRS mix too. Just choose
LCRS from the Format pop-up menu and instantly you
will get a Dolby Surround mix. Notice that either speaker
configuration in the space window and output routing in
the Mixer window will change to fit the format. So once
choosen the format and downmix option you are ready
to bounce to disk. To do so choose Bounce to Disk from
the File menu. The Bounce to Disk window will appear.
Notice that the Bounce to Disk window will reflect your
actual Format, Output and LFE options. Basically
Bouncing process acts as a real time recording, what
you ear is what actually will be bounced. Choose the
audio format you need among sd2, aiff, wav and raw and bit depth (16, 24 or 32). The bounce
window will allow you to choose start and end
point for your bounced file. The start point will
by default reflect your offset start frame. You can
edit start and end point either setting the frame
number box or the SMPTE box. To change value
simply click on a number field and either drag the
mouse as slider or digit numerically the entry and
press return key.
So once chosen file and format options you
will press the Bounce button, it will be prompted
a save dialog. By default the file name will report
the SMPTE start time position followed by the
session name and the file format extension, in
this way you may later on import your bounced effect in the exact frame position into your movie
editing software. You may of course change the file name. SoundBuilder will save an interleaved
file of the right number of channel depending the current chosen format. You can choose between
Pro Tools compatibility or standard ITU. So if for example you are bouncing a 5.1 file (5.0 with LFE
ena and Discrete output) the result will be a 6 file interleaved depending the channel mapping you
choose (L, C, R, Ls, Rs, LFE for ProTools or L, R, C, LFE, Ls, Rs for ITU). Bouncing in Pro Tools
mode when importing such file in Pro Tools you will instantly have the right conversion with the
right surround extensions (.L, .R, .C, etc.). If on the other way you will bounce a 5.1 mix with stereo
downmix option you will get a stereo interleaved file. If you bounce a mono output downmix you will
get a mono file and so on. When you will press the Save
button bouncing will occur, since bounce to disk is a real
time operation you will hear playback of your session.
During bouncing the bounce progress window will shows
up showing you the progress bar until reaching the end
time set up on the Bounce Window. If you want to stop
bounce before the end time you may press stop on the
progress window. The bounced file will be closed until that
point. Another option in the Format Type pop-up menu is
the Save as Background item. In this case the saved file (named as dafault as “Bg_Session Name”)
is a 5.0 SoundBuilder background file type, ready to be imported in your SoundBuilder’s Background
channel. This is also a good way if you run out of tracks and you need more than 8 channels.
Bouncing Musical Materials
Also if SoundBuilder has been mainly designed for creating film backgrounds tracks in surround,
you can get very interesting results using music style materials or sound textures maybe adding
more synth effects etc. The Sound Imaging Library has been design for that purpose. Building music
textures may involve bouncing as background so to
layer more and more materials. To help you calculating
the frame length for a bounce in music metric unit we
provided a basic utility calculator that will set the end
bouncing frame according your current frame rate.
Press the little BPM button close to the SMPTE end
field in the Bounce window and the calculator will be
opened. You must know the BPM for your music
material. Once set the BPM you can choose how
many measures you want to bounce based on
the time signature of the track.
Please note the internal clock of SoundBuilder
is actually the frame rate. This means that it runs
at different speeds depending the chosen frame
rate. While this is a very cool feature when you are working with film and video material, using
audio the frame unit can be a too long unit for a precise calculation. In most cases you won’t have
problems, but in case of very fast or rhythm tracks that might become a problem. A partial solution
is to set 30 fps. This is the maximum SoundBuilder rate and it should provide you enough accuracy
in most cases.
Advanced Features.
SoundBuilder offers some advance features
that will be very useful to the professionals. This
includes downmix dB attenuation, LFE inclusion
etc. Choose Preferences from the File menu
for setting some advanced features. Besides
downmix options you will also find some useful
settings like Space Window appearance, channel
naming, the already seen Mouse Coordinates
on Movie Window and more to come. Stop
release, Rec automation and Touch follow write
are safety option while using automation so not to
overwrite accidentally your movement while in write
mode. More advance feature involve video settings.
From the Movie menu choose Movie settings. The
Movie settings window will appear, SoundBuider
support external component video streaming. In the
output component pop-up menu you will automatically
find any external video board currently installed on
your mac. So if for example you have a fiReWire
output converter you may decide to stream your video
out on an external monitor. In this case you can also
compensate the delay introduced by some FiReWire converters. Just set the milliseconds of delay
clickin on the FW Offset number box. We didn’t fixed a limit so that you paradoxally could use this
feature as a specialized type of offset. Choose your component and then check the Enable/Disable
checkbox. You may choose codec quality, Output mode and movie size. If you want to discard your
movie choose the Clear Movie item from the movie window. Closing the movie window with the
standard close button will not actually discard the movie, but it will only hide it) . You can recall the
movie window again choosing Movie Window from the Movie menu. This will be useful when using
for example an external monitor and you don’t want to have an qt open movie window on your main
monitor or to prioritize redraw or audio response on slower machines.
MIDI Support.
SoundBuilder supports MIDI input and output
control. In this way you may choose to control it using
a physical controller or using an external sequencer for
writing automation. Please note that SoundBuilder’s
automation internal resolution is actually higher than 0127 MIDI one. All values will be anyway automatically
remapped. For the moment the Control Change
assignment is fixed so you will have to assign the right
control change values on your transmit page of your controller. SoundBuilder MIDI implementation
at the moment support Channel A-H XY coordinates and Faders, BackGround Fader, Focus and
Midi notes for triggering Background and Channel A-H samples. All assignment either in receive or
transmit mode will occur on the same MIDI channel. You may choose your core MIDI device and
MIDI channel on the MIDI Settings window from The Settings menu. MIDI assignment is as follows:
Fader volume assignment
B
k
CC 0
Fader
Fader
CC 1
ChA
Fader
CC 2
ChB
Fader
CC 3
ChC
Fader
CC 4
ChD
Fader
CC 5
ChE
Fader
CC 6
ChF
Fader
CC 7
ChG
Fader
CC 8
ChH
Focus value assignment
Focus
CC 25
X-Y coordinates on space window
Coord. ChA
CC 9
CC 10
Coord. ChB
CC 11
CC 12
Coord. ChC
CC 13
CC 14
Coord. ChD
CC 15
CC 16
Coord. ChE
CC 17
CC 18
Coord. ChF
CC 19
CC 20
Coord. ChG
CC 21
CC 22
Coord. ChH
CC 23
CC 24
Note assignment for triggering samples
Background
C3
Channel A
D3
Channel B
E3
Channel C
F3
Channel D
G3
Channel E
A3
Channel F
B3
Channel G
C4
Channel H
D5
You can monitor MIDI activity from the MIDI monitor window from Setup menu. Please note
that also if SounBuilder has an “anti-loop” routine you should avoid to set the same MIDI device
as input and output for the program, since doing so you will cause to send and receive the same
MIDI message at the same time for that parameters. The MIDI Activity window can also act as
MIDI trasmit MIDI keyboard. Clicking on the small keyboard you will actually trigger MIDI notes and
SoundBuilder’s tracks.
Saving.
To save your current session you choose Save or Save As from the File
menu. This will save a single file containing all program settings and all
automation data. All loaded audio files and the movie file will be referenced
from the actual location of your HD. As we mentioned before the Audio files
and the Movie file are referenced to their Hard Drive location and they are
not saved within the session file. The AudioFiles are actually copied into the
AudioFile folder when you load them into your SoundBuilder’s channels. The
Movie file is referenced instead to its absolute position on the disk. In case
you are going to move your folder session the Locate AudioFiles feature will
allow you to reference the AudioFile folder to the new path, while if you move
the Movie file to another location the session won’t find the Movie anymore. In this case simply
manually locate and reload the Movie.
Transport and navigation.
The transport window in SounBuilder will let
you navigate in your session. Beside the familiar
play, stop, pause buttons you will have few more
navigation options. You can navigate frame by frame
click dragging the green number labeled frame. In
this way you can advance or backward scrubbing video and automation. Clicking on the light blue
arrow (>) labeled “In” it will set a “in” marker point. From then on playback will start from that point.
You can do that on fly too just click on the arrow while in playback and the point will be set. Clicking
over the SMPTE display will open the SMPTE Navigation Bar (you can open it also from the Setting
menu). The navigation Bar beside displaying large SMPTE format allows you to navigate in SMPTE
time, just click and drag on the numeric fields or simply click
on a field, enter a number and press return. This is a spot
mode and the frame number box will be updated according
the current frame rate. In fact you may also change frame
rate in real time. While in stop try to change different frame
rate formats, you will see the SMPTE display adjusting
recalculating its new display position.
ReWire.
SoundBuilder fully support ReWire technology allowing you to take full advantage of a complete
integration with your editing environment (providing your DAW supports ReWire Tecnology). This
include bidirectional transport and navigation, synchronization, multichannel audio, MIDI control
and MIDI AudioFiles triggers… This is an amazing facility that will permit you to generate a fully
professional Surround session also with editing systems that do not directly support surround. In
order to work in ReWire mode you have to launch your ReWire Mixer application first (the hosting
application that will host SoundBuilder). Once you launched your DAW you should create one or
more Audio Tracks depending the surround format you want to work and assign the ReWire plug-in
labeled SoundBuilder. For example if your are working with a Pro Tools LE that does not support
Surround Audio Tracks and you need to work in 5.1 you can simply create a couple of stereo audio
track and a couple of mono ones and then assign the SoundBuilder plug in on all of them. Once you
assigned the SoundBuilder receiver plug in, you will need to set SoundBuilder’s outputs to match
your studio setup. Tip: If the SoundBuilder plug-in does not appear the first time you launch your host
application, it may be that SoundBuilder ReWire driver has not been yet registered by the system. If
this happens launch one time SoundBuilder and choose ad_ReWire driver from the Hardware Setup
settings and then quit. Now Open your host application and you should find the plug-in. From now
on and also using future SoundBuilder versiosn you should always find the ReWire plug-.in because
now it has been registered by the system see also Appendix C for details. Note: for ReWire use
and assignment from the host application please
reference to the manual of that application.
Now that the outputs have been assigned, you
can launch SoundBuilder (in ReWire mode you
will always have to launch the host application
first and SoundBuilder then. On quit you will
always have to quit SoundBuilder first and the
host application then). If not already set the
first time you will have to set your audio driver
to ad_ReWire (see also Hardware and Set Up
section). Choose Hardware Setup from the
setting menu and choose ad_ReWire. From
now on SoundBuilder will be synced to the host
application and slaved to its SampleRate. From
now on you are tied to your
ReWire application and
you can independently
work either in SoundBuilder or in the application each one will control the
other. Note: depending the host application SMPTE format support you should set the same frame
rate setting on SoundBuilder and your host application otherwise the SMPTE display may not match
(this is just a visual representation of the time, the file will be anyway in sync). In case you are using
a DAW that does not support SMPTE time format , set SoundBuilder frame rate 24 and the host
application at 60 bpms. This should work due to the MIDI ticks reference that is 24 per beat.
SoundBuilder’s audio signal is routed directly into your host tracks just like if SoundBuilder is part
of it. You can record audio signal directly into your host application tracks if you want to. Anyway
SoundBuilder bounce operations are active and you may decide to bounce to disk instead and the
import later the bounced files into your DAW’s tracks.
Working with movies in ReWire.
If you need to work synced to picture you may want to take the advantage of the “Coordinates
on Movie Window” feature present in SoundBuilder. While in ReWire mode the software supports
multiple movie file handling. Simply import the same move file either in SoundBuilder and in your
host application. Since SoundBuilder’s movie window is a floating window it will appear only when
operating in SoundBuilder and it will disappear when operating on the host application leaving the
host’s movie window floating instead. In this way you will have complete integration working just like
you had just one movie window.
Working with MIDI in ReWire.
One of the advantage of working
in ReWire is the SoundBuilder
capability to trig its audiofiles
using MIDI notes.
In this way you can drag,
copy, paste notes in your host
application MIDI editor and control
SoundBuilder’s
tracks
while
retaining its internal automation
capabilities. If you prefer to use
your
sequencer
automation
capabilities you can use MIDI
control changes to move x-y
coordinates and recording to your
host MIDI tracks.
Note: Since SoundBuilder automation works with
a better resolution than MIDI, we suggest you to use
it instead of using MIDI control changes. Flexibility is
complete and you can choose the best way that will fit
your needs. To work with MIDI in ReWire you will have
to enable MIDI receive and/or transmit option in the
SoundBuilder’s MIDI Setting dialog box and choose
ReWire MIDI driver.
A good way to work is to control SoundBuilder
audio files entirely from the host application. To
do so enable the “When MIDI Enabled Transport
Disabled” option in the Preferences. In this way you
will use MIDI notes to control either Background and
Channels tracks. Other features in this preferences
pane set the way MIDI is transmitted when pressing
the mouse button like note on when mouse click and
note off when releasing the button, or retrig with a new
note on etc. If your host application includes a graphic
piano roll style editor you can imagine MIDI notes as
the actual audiofile length on SoundBuilder.
Tip: If you are working in ReWire with SoundBuilder transmitting MIDI messages as well as
receiving you may want to disable your sequencer MIDI thru option to avoid MIDI looping.
In this mode playback will run SoundBuilder’s internal
automation but it will not trig the audiofiles that will be
controlled in their start point and length by the MIDI notes.
Also if this is the most powerful way in ReWire, the same
procedure may be applied using an external sequencer or
just a MIDI keyboard to spotting effects on the fly in real time
etc.
Reference Manual
File Menu
Close. This will close front most opened window.
New . Create a new project session. You’ll
be prompt to save or don’t save your current
session. You will then browse a location where
to save the new session. A folder named as the
session will be created. Inside it will be created
the project session file and the AudioFile folder where any loaded file will be copied and referenced
from there on.
Close Session. Will close the current
session. You’ll be prompt to save the current
session before closing it. Initialize will initialize at
the default settings the current session without
closing it.
Save. Will save the current project session including all parameters and automation data. Audio
and Movie files will not be saved in this file, but they will be referenced to their AudioFiles folder and
the absolute path for the Movie file.
Save As. It will be prompt to save with a name and location.
Load. Will open a saved project session
Preferences. Will open the preference panel.
On the upper part of the panel you will choose on 3
different groups of options.
A) General
Mouse Coordinates on Movie Window:
Allows direct automation on Movie Window
Draw Grid on Space Window. Will draw or
not the grid on Space Window
Channel Names on Space Window. Will draw
the name you provided on Channel Name box or
will draw A to H letter representing the Channel.
B)
Auto & Trig
- Mouse Click on part plays sound. When in MIDI transmit
mode clicking on the Space window with a selected channel
will trig notes on.
- Mouse Click retrig sound. When in MIDI transmit mode
clicking on the Space window with a selected channel will trig
a note on each time you press the mouse button
- Mouse release stop play on part. Will provide a note off
when you’ll release the mouse button.
- When MIDI enabled transport disabled. Will enable just
external notes on-off to trig part leaving transport clock for
automation data only.
- Stop Releases rec automation. Safe feature, when pressing the stop button any parameters
enable automation button will be disabled.
- Touch follows write. Safe feature, if in write mode
any time you press the stop transport button will
automatically switch to touch auto mode.
C) DownMix Options
Sets in dB the attenuation for stereo, center and
surround channels when in downmix mode. LFE
enable allows to mix LFE generated channel in the
stero mix or not.
Bounce to Disk. Will open the Bounce to Disk window for bouncing operation.
Locate Audiofiles. Will open the locate AudioFiles window to relocate the AudioFiles folder for
the current session. This window will also open automatically if you attempt to load a session with
unreferenced audiofiles.
Edit Menu
Cut, Copy, Paste, Clear. Standard OSX copy and paste features.
Edit Automation. Will open the Edit Automation Window for editing operation on automation data
like erasing etc.
Overdrive. On some older machine will prioritize audio and MIDI flow over graphics task. Default
is disabled and unless you experiment drawing problems you should leave it disabled.
Settings Menu
Midi Settings. Open the Midi Settings Window for enablingdisabling MIDI transmission and receive capability.
Hardware Setup. Open the hardware setup window. It allows
you to choose supported core audio drivers or ReWire. You can
choose also sample rate and arrange I/O routing setup. The Audio
Driver Setup button will call the
current driver setup box if any
. The I/O Mappings will allow
you to remap any input to any
output. All hardware setup
settings will be saved in the
preferences file and so they will
be remembered the next time
you’ll launch SoundBuilder.
See also Appendix C for in
deep details.
Route Mixer. Will open
the routing mixer window that allows you to set up your studio
master levels and output assignments. The route mixer will change automatically its configuration
depending the current surround or downmix format. Route mixer settings are saved in the session
project file.
Environment Setup. Open the Environment Setup Window for general acouystic environmental
characteristics like space size, LFE etc. All parameters works in real time and they can be changed
anytime and in any surround or downmix setting.
Navigation Bar. Open the floating Navigation Bar window. You can spot SMPTE time and
navigate using this window instead of frame number box in the transport.
Midi Activity. Show the current MIDI activity if SoundBuilder is enabled and is receiving MIDI
data. It works as MIDI mini keyboard transmission too.
Key Commands. Open the key command window. You can assign your own keystroke commands
for Transport and automation settings. The key commands are saved in the session project file and
at the moment they cannot be saved apart.
Movie Menu
Import Movie. Open browser to import a QuickTime movie to work with
Movie Settings. Open the advance movie settings
window.
Enable/Disable: Enable or disable external video out.
Output Component: Lists all active video out components.
FW Offset: Set a delay in ms. To compensate fiReWire
delay when decoding video on an external monitor.
Output Mode: Resize the movie window.
Codec Quality: Sets QuickTime codec quality.
Movie Window. Open the Movie window if users closed it.
Clear Movie. Discard Movie.
Window Menu
All Window Active. Deafult. All windows are active and will react without having to activate them
first.
Key Commands Shortcuts
Backspace key. When automating or performing coordinates movements on the space window
pressing the Backspace key it will move out the coordinate point and it will stop the sound.
Clicking on the dB indicators it will set faders at 0dB nominal position
Spacebar. Default for play-stop transport control (can be changed from the Key Command
Window)
Enter. Default for stop transport control (can be changed from the Key Command Window)
Period. Default for pause transport control (can be changed from the Key Command Window)
Zero. Default for Return to Zero transport control (can be changed from the Key Command
Window)
*. Default record parameters (all) automation (can be changed from the Key Command Window)
q Default for auto off mode (can be changed from the Key Command Window)
w Default for auto read mode (can be changed from the Key Command Window)
e Default for auto write mode (can be changed from the Key Command Window)
r Default for auto touch mode (can be changed from the Key Command Window)
l Default for auto touch mode (can be changed from the Key Command Window)
s Default for snapshot automation (can be changed from the Key Command Window)
Menu Key Shortcuts
Command-W. Close Front window
Command-N. New Session
Command-S. Save Sesson
Command-O. Load Session
Command-X. Cut
Command-C. Copy
Command-V. Paste
Command-R. Open the Route Mixer Window
Command-E. Open the Environment Setup Window
Command-T. Open the Navigation Bar
Appendix A
Principle of Operation: The Libraries
The whole idea behind SoundBuiler is to create a tool that allows you to build your own library of
backgrounds. textures and Foleys. Thus the program itself is powerful enough to create a complete
track, it is best suited to generate specific soundscapes possibly in surround to import later in your
DAW being mixed and edited with all other elements of your film (dialogs, music etc.).
So why to use SoundBuider and not simply import an effect from your standard sound effects
libraries?
Analisis of a background environment
If you think for a moment of how a background track for an image is composed, you will realize that
unless you will record on the field the exact surrounding environment during the camera shooting,
you will always have to deal with sounds that do not belong in space and time with that sequence.
In fact when you look for background textures into your standard libraries for matching a specific
image, you will often find incomplete or unwanted elements in the tracks. This is normal due to the
extreme complexity and variability of environments that may include many different elements like for
example in naturalistic or urban soundfileds.
So most of the time you will have to edit your sounds, eq unwanted frequencies, add missing
elements etc.
The SoundBuider libraries
Also if SoundBuilder allows you to import
your own audiofiles it has been designed to
be used with its own libraries.
A SoundBuiled library is composed of 2
different types of sounds:
1) Backgrounds
2) Single Elements.
The idea is that a complex surrounding
environment is composed of a basic
background texture that has no added
elements, but that represents just the
impression of a dimensional space. Over the
background you will add all and just those
elements that are needed for the picture.
The program will handle all the necessary
spatialization routines layering and balancing
all elements at once.
Let’s say you will have to create a soundscape in 5.1 for the following picture. First of all you will
look in your Natural Environment CD (one of the libraries included with the program) and browse into
the background folder. There you will find a list of soundfiles that will have names like “AirPressure_
dry”, “Rainy”, “Windy”, “HotDay” etc. Once loaded in the Background channel in SoundBuuilder (see
below) you will hear a sensation of the chosen space in 5.1 (providing you have a 5.1 monitoring
system, otherwise you can choose stereo or mono format). This might be a gentle windy day
impression or a rainy nite sensation, or any other dimensional impression but you will not hear any
specific elements (birds, leaves, insects etc.) capturing your attention.
Now you are ready to add and move your specific elements. SoundBuilder allows you to add
up to eight different single elements (you may however bounce all complete sound to disk as new
background). Browsing the Single Elements directory of the same CD you will find sounds like
leaves. birds. insects, sands, grounds etc. Once loaded you will simply move them in the space
window or directly on the movie window and SoundBuilder will do the rest. When you done just
bounce to disk in the format required (5.1, LCRS, Stereo, Mono etc.). From a single library you
will be able create an infinite number of sounds creating your own sound library for each specific
production. SoundBuilder libraries not only will allows you to save time and gain exact matching of
your sound to the film, but you will also notice an amazing increase in sound definition. This is due
to the fact that during recordings all sounds have been focused for single types. Doing so you will
achieve an extremely clean sound with no unwanted noises or other sound elements on the floor.
The result is an extremely low noise, dynamic and high definition sound in surround.
How a Background is created.
As we said before
a
background
is
a sound file that
has been already
recorded in 5.1 using
special
microphone
techniques developed
by Riccardo Mazza
in the past years to
create his famous
Dolby
Surround
Encoded Renaissance
sfx library. Those
techniques
have
been evolved for the
SoundBuiler project
and a whole new
surround on location
recording tour have
been
accomplished
to capture the right
material either for background and single elements.
For more detail on X-Techniques and Mazza’s researches see Mix article “Surround on Location”
by Larry O on: www.riccardomazza.com on int’ press section.
How a Single Element is created.
A single element in our libraries is a mono audio file that represents a single clean and narrow
focused element to use as layer of a loaded background. The characteristic of a single element is
that it’s endless and it can be used indefinitely. For this reason we recorded each sound for enough
time so not to give to the user any impression of repetition. When used in this way a single element
should be employed on its channel with the loop option enabled.
We also edited our single
elements in such a way you
won’t hear any cross point or
repetition that’s why the start
point of the sample often is
straight with no fade in. The
program time clock when in
loop mode will treat that channel
as a unique endless file. In this
way you will be always on sync
with your movie also if the video
is much longer than the actual
audio files. You may of course
import your own audio files or
edit our single elements at your
needs or use one shot mode for
Foleys or spot effects.
Our Single elements has
been recorded at 24bits with
higher possible quality so to
give you the most precise and pristine sound.
SoundBuilder libraries format
SoundBuilder libraries are standard audio. We provided 16 and 24bit on 44.1 and 48Khz (native
format is 48KHz 24bit) so that you may choose
right away the right format for your session. Also
if you may import a SoundBuilder library file in
your DAW, those files have been specifically
created to be used within the program and
they won’t be very practical outside its contest.
In particular Backgrounds are 5.0 interleaved
files that SoundBuiled handles as native format
without de-interleave them. Single elements
are mono files since they will be spatialized by
the program. All files (background and Singles)
have been edited so to loop indefinitely with
enough duration and variation that you won’t
recognize they are repeating themselves.
SoundBuilder have been designed to handle
this looped file with no delay between the start
and end point calculating its timeline as if you
load an endless file. This process is automatic
and it will guarantee you to have enough time
for your scene. The scheme above illustrates how a SoundBuiler library is composed and how it
works.
Appendix B
Surround Speaker Setup
The figure below illustrates the speaker arrangements of each surround format. Speaker position
for each format is approximate. For proper placement, alignment, and calibration of surround
monitoring systems, consult the documentation that came with your speakers and other monitoring
equipment. Setup and position of speakers is crucial to accurate monitoring of any mix, but this is
especially true with multichannel mixing for surround sound.
Number of
Channels
Mixing Channel
Format
Surround Format
Standard Channels Layout
1
Mono
C
2
Stereo
LR
3
LCR
Cinema Stereo
LCR
4
Quad
Quadrophonic
L R Lr Rr
4
LCRS
Dolby Prologic (Surround)
LCRS
6
5.1
Film for Dolby Digital
(default Pro Tools)
L C R Ls Rs LFE
6
5.1
SMPTE/ITU
L R C LFE Ls Rs
6
5.1
DTS (default ProControl)
L R Ls Rs C LFE
7
6.1
Dolby Surround EX
L C R Ls Cs Rs LFE
8
7.1
SDDS
L Lc C Rc R Ls Rs LFE
Surround Monitoring
In order to monitor your current multichannel mix in a given surround format (such as DTS or
Dolby Digital), encoding and decoding equipment for that format is required.
SounBuilder does not provide direct support for surround format processing, but encoding/
decoding hardware or software is available from thirdparty manufacturers. Contact your dealer for
information.
Proper speaker placement, studio calibration, additional surround processors, monitors, and a
properly calibrated system can lessen the variables that your mix will be subjected to when the
audience eventually hears it in the theater, in their home, or elsewhere. It is very important that your
surround monitor system be installed and configured correctly. Proper speaker placement, angling,
and level calibration are necessities for surround mixing, so consult the manufacturer of your monitor
system. Several surround formats (especially all of those from Dolby as well as DTS) have very
specific speaker and monitoring recommendations, so take the time to locate this information and
adhere to the suggestions they provide.
In the next page you can find an example of a 5.1 monitor system.
Appendix C
Advance Audio Settings
ReWire audio driver. The ad_ReWire driver allows you to use SounBuilder as a ReWire Device,
where audio outputs will be routed into a ReWire Mixer application such as ProTools, Digital
Performer, Logic, Cubase etc. Both SoundBuilder and the mixer application must be running at the
same time in order to take advantage of ReWire’s services. The mixer application should be also
compatible with ReWire 2 or later for best results.
When the ad_ReWire driver is selected from SoundBuilder’s Hardware Setup Window, it can be
routed to any of 8 interapplication ReWire channels which will appear as inputs in ReWire mixer
host applications. The first time ad_ReWire is selected it will register itself with the ReWire system.
Subsequent launches of ReWire Mixer applications will then offer SoundBuilder as a ReWire
device.
For example, after the SoundBuilder ReWire Device is registered, ProTools will have a
SoundBuilder menu item in the Plug-ins menu. When you choose it you will see a list of the audio
outputs from SopundBuilder. They will default to the off state. Click on any of the buttons to activate
that channel. Once activated you will hear SoundBuilder audio out of your Pro Tools track outputs.
Inter-application Synchronization and MIDI in ReWire. ReWire supports sending
synchronization, transport, and tempo information both to and from ReWire Devices. ReWire 2 also
supports MIDI communication to and from ReWire Devices. The number of midi ports dedicated to
ReWire can be changed using the MIDI Ports option in Hardware Setup Window.
For example, you can choose one of the SoundBuilder ReWire MIDI ports as a MIDI output device
in ProTools and then use standard MIDI messages to control your SoundBuilder. Likewise, you can
send MIDI into ProTools using the ReWire MIDI ports from SoundBuilder, and recorded the results
to a track for further manipulation or playback (disable in this case the MIDI thru option of your
sequencer in order to avoid MIDI loop).
The Hardware Setup Window. All global
audio parameters in SoundBuilder
are
displayed in the Hardware Setup window. To
open the Hardware Setup window, just choose
Hardware Setup from the Settings menu.
The Hardware Setup window is arranged as
a group of menus and checkboxes that set all
of the parameters of the audio input and output in SoundBuilder. At the very top of the Hardware
Setup window is a pop-up menu for turning the audio in SoundBuilder on and off, when you launch
SoundBuilder it will be automatically set to on. If you use another method to turn the audio on or off,
the menu will update to reflect the current state.
The second pop-up menu allows you to view and select an audio driver for SoundBuilder. The
specific audio drivers will be discussed later in this chapter. A brief summary will suffice for now:
- None This setting shuts off SoundBuilde audio processing.
- Core Audio This is the default audio driver for SoundBuilder on Macintosh. It interfaces with the
system’s built-in Core Audio system and can be used with the built-in audio of the computer,
or, with the proper software support, a third-party hardware interface, such as ASIO.
- ad_ReWire This driver supports a standard developed by Propellerhead Software that allows
sound generating applications (ReWire Devices) to send multiple channels of audio and midi
to other applications (ReWire Mixers) that process and output it. Selecting the ad_ReWire
driver enables SoundBuilder to function as a ReWire Device to route audio from MSP into
applications that support ReWire (such as Pro Tools, Digital Performer, Logic or Cubase).
- NonRealTime This driver enables SoundBuilder to work in non real-time mode, allowing you to
Bounce to disk your audio without any real-time processor performance limitations. Real-time
audio input and output are disabled under this driver.
Only one audio driver can be selected
at any given time. SoundBuilder saves the
settings for each audio driver separately
and will recall the last used audio driver
when you restart SoundBuilder.
The next two pop-up menus are active only when using the Core Audio driver on Macintosh
or ASIO drivers, an additional pop-up menu lets you choose whether or not audio playthrough is
enabled. These settings can also be changed using the Audio MIDI Setup application on Macintosh.
When ASIO is in use, the pop-up menus allow you to set the clock source for your audio hardware
and whether or not to prioritize MIDI input and output over audio I/O.
The next three fields in the Hardware Setup window monitor the amount of signal processing
SoundBuilder is currently doing. The CPU Utilization field displays a rough estimate of the how
much of your computer’s CPU is being allocated for crunching audio in SoundBuilder. The Poll
checkbox turns on and off the CPU Utilization auto-polling feature (it will update automatically four
times a second when this is checked). If you turn off auto-polling, you can update the CPU readout
manually by clicking on the Update button. The number of Function Calls gives an approximate idea
of how many calculations are being required for each sample of audio. The number next to Signals
Used shows the number of internal buffers that were needed by SoundBuilder to connect the signal
objects used in the current signal network.
The next two sections have Override
checkboxes next to a number of the
pop-up menus. When checked, Override
means that the setting you pick will
not be saved in the preferences file for
the current audio driver. By default, all
Overrides are disabled, meaning that the
currently displayed settings will be saved
and restored the next time you launch SoundBuilder.
You can set the audio sampling rate with the Sampling Rate pop-up menu. For full-range audio,
the recommended sampling rate is 44.1 kHz. Using a lower rate will reduce the number of samples
that SoundBuilder has to calculate, thus lightening your computer’s burden, but it will also reduce
the frequency range. If your computer is struggling at 44.1 kHz, you should try a lower rate.
The I/O Vector Size may have an effect on latency and overall performance. A smaller vector
size may reduce the inherent delay between audio input and audio output, because SoundBuilder
has to perform calculations for a smaller chunk of time. On the other hand, there is an additional
computational burden each time SoundBuilder prepares to calculate another vector (the next chunk
of audio), so it is easier over-all for the processor to compute a larger vector. However, there is
another side to this story. When SoundBuilder calculates a vector of audio, it does so in what is
known as an interrupt. If SoundBuilder is running on your computer, whatever you happen to be
doing (word processing, for example) is interrupted and an I/O vector’s worth of audio is calculated
and played. Then the computer returns to its normally scheduled program. If the vector size is large
enough, the computer may get a bit behind and the audio output may start to click because the
processing took longer than the computer expected. Reducing the I/O Vector Size may solve this
problem, or it may not. On the other hand, if you try to generate too many interrupts, the computer
will slow down trying to process them (saving what you are doing and starting another task is hard
work). Therefore, you’ll typically find the smaller I/O Vector Sizes consume a greater percentage of
the computer’s resources. Optimizing the performance of any particular signal network when you
are close to the limit of your CPU’s capability is a trial-and-error process. That’s why SoundBuilder
provides you with a choice of vector sizes.
Technical Detail: Some audio interface cards do not provide a choice of I/O Vector Sizes. There
are also some ASIO drivers whose selection of I/O Vector Sizes may not conform to the multipleof-a-power-of-2 limitation currently imposed by SoundBuilder’s ASIO support. In some cases, this
limitation can be remedied by using the ASIO driver at a different sampling rate.
Changing the vector sizes does not affect the actual quality of the audio itself, unlike changing
the sampling rate, which affects the high frequency response. Changing the signal vector size
won’t have any effect on latency, and will have only a slight effect on overall performance (the
larger the size, the more performance you can expect). However, certain types of algorithms
benefit from a small signal vector size.
The pop-up menus labeled Input Channel
1, Input Channel 2, Output Channel 1, and
Output Channel 2 allow you to map the first
two logical channels of I/O in SoundBuilder to
physical channels used by your audiodriver.
Different audio drivers give you different options. To map additional logical channels, use the I/O
Mappings window, which you can view by clicking the I/O Mappings button at the bottom of the
Hardware Setup window.
The Optimize pop-up menu allows you to select whether G4 (Altivec) vector optimization will be used
by SoundBuilder when computing audio. Vector optimization allows four samples to be processed
within the space of a single instruction. However, not all audio signal processing algorithms can be
optimized in this way (for example, recursive filter algorithms are substantially immune from vector
optimization). Leaving this option on when using MSP on a G4 machine will enhance CPU utilization
and performance, although the exact performance gain depends on the algorithm you are using. If
you are using a pre-G4 Macintosh turning the option on will have no effect. The CPU Limit option
allows you to set a limit (expressed in terms of a percentage of your computer’s CPU) to how much
signal processing SoundBuilder is allowed to do. SoundBuilder will not go above the set CPU limit
for a sustained period, allowing your computer to perform other tasks without SoundBuilder locking
them out. The trade-off, however, is that you’ll hear clicks in the audio output when the CPU goes
over the specified limit. Setting this value to either ‘0’ or ‘100’ will disable CPU limiting.
http://www.soundbuilder.net/
Copyright.
This User Manual is subject to copyright ©2005 A&G Soluzioni Digitali S.r.l., (from now
on A&G). All rights are reserved. According to copyright regulations, this manual cannot be
duplicated in parts or as a whole, without written authorization by A&G. SoundBuilder is a
trade mark registered by Interactive Sound. X-Spat, X-spat boX, See'n'Sound, Spatialisation
and A&G Soluzioni Digitali are trade marks registered by A&G. All the other trademarks
are registered by their respective owners. All features and specifications can be modified
without warning.