1
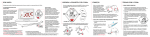
Offset Calibration
Training
Important Information
The Polar LOOK Kéo Power system calibrates itself automatically
each time the transmitters wake up and a receiving Polar device
is found. Calibration takes a couple of seconds.
Starting a training session
Changing Batteries
Technical Specification
1. Wake up the transmitters and turn on the training wait
mode in your receiving device. Let the system calibrate.
It’s recommended that you change both transmitter batteries at
the same time.
Kéo Power Transmitters
2. Start the training session with your receiving device to get
information about power, cadence, efficiency and pedaling
balance.
Changing Transmitter Sealing Rings
Training temperature has an effect on the calibration
accuracy, so make sure your bike’s temperature has become
stable before you start the offset calibration.
1. Wake up the transmitters and turn on the training wait
mode in your receiving Polar device to start the calibration.
2. Keep the bike upright and cranks in place until calibration
is completed.
3. Complete the calibration as guided by your receiving device.
To ensure the calibration is done properly:
»» don’t put any weight on the pedals during calibration.
»» don’t interrupt the calibration.
If you’re unsure whether the calibration succeeded or the
temperature changes by more than 10 °C / 18 °F, do it again
manually.
You can start the manual calibration with your receiving device
also during a training session.
You can find information on offset calibration with other than
Polar devices at www.polar.com/support.
For more instructions, see the user manual of your receiving
device.
Stopping a Training session
After you’ve stopped the training session with your receiving
device, the transmitters go to sleep after 90 seconds of inactivity.
Force Vector Measurement
The Polar LOOK Kéo Power system comes with force vector
measurement. The feature enables the Polar training computer
to analyze your pedaling more precisely and helps you to learn
more efficient pedaling technique.
You can take the feature into use in the receiving device.
You received additonal sealing rings for the transmitters in the
product package.
Remove the old sealing rings carefully with tweezers. Place the
new sealing rings into the grooves on the transmitters. Handle
the transmitter with extra care.
Maintenance
Before every ride, check the pedals and cleats to be sure they
are free of dirt and that they are operating properly. Check your
cleats daily for excessive wear, and replace them if needed. Worn
cleats may come loose without noticing and cause you to crash.
Replace them only with genuine LOOK Kéo cleats. Do not drill,
paint or refinish them. Keep pedals and cleats away from any heat
source. Spindle: LOOK spindles are subjected to a rotation test of
two million cycles at 100 revs / minute, with a load of 90 kg on the
pedal and off centered rotation (which creates an impact at each
rev). This test exceeds the toughest known standard EN 14781.
High pressure cleaners are not recommended.
Battery type
Battery life
Operating temperature
Storage temperature
Material
Water resistance
LOOK Kéo Power Pedals
Operating temperature
Storage temperature
Distance crank/middle of the pedal
Pedal float
Water resistance
Measurement ranges
Average power
L/R balance
Cadence
Maximum load
Pedal Tension Adjustment
CR2354
5 months (2 h/day, 7 days/week)
-10 °C to +50 °C / 14 °F to 122 °F
-20 °C to +60 °C / -4 °F to 140 °F
Aluminium, PA+GF
IPX7 (splash proof )
-10 °C to +50 °C / 14 °F to 122 °F
-20 °C to +60 °C / -4 °F to 140 °F
55 mm
0 (black cleats), 4.5 (grey cleats), or 9 (red cleats) degrees
IPX7 (splash proof )
0-2000 W
0-100%
30-199 rpm
1800 N
1.
LOOK pedals are always delivered preset to a minimum tension.
You can adjust them with a 3 mm Allen key at the rear of
the pedal on the lever. By turning the key in the + direction
(clockwise), you increase the amount of stress necessary for cleat
release. Allow tension to remain minimal until you’ve become
perfectly familiar with the system. Adjustment can’t be carried
out when the cleat is engaged in the pedal. You will hear a “click”
when the maximum adjustment is reached. Once you hear the
click, stop screwing as it may damage the pedal.
Find product support at
www.polar.com/support/keo_power_sensor_
bluetooth_smart and at www.lookcycle.com.
facebook.com/
polarglobal
twitter.com/
polarglobal
youtube.com/
polar
instagram.com/
polarglobal
Stay tuned with LOOK CYCLE
Engagement / Release
Engagement: Insert the cleat in the pedal in accordance with
picture 1 and press down on the pedal to lock the cleat.
Release: Turn your heel outwards as in picture 2 and the cleat will
disengage. Do not tilt your foot towards the bike, as the heel may
touch the spokes and cause a crash.
Stay tuned with Polar
LOOK Cycle
2.
Polar Look Kéo Power
velolook
Manufactured by
Polar Electro Oy
Professorintie 5
FI-90440 KEMPELE
Tel +358 (0)8 5202 100
Fax +358 (0)8 5202 300
www.polar.com
LOOK Cycle International
27, rue du Dr Léveillé
CS 90013
FR-58028 NEVERS Cedex
Tel +33 (0)3 86 71 63 00
Fax +33 (0)3 86 71 63 10
www.lookcycle.com
17952253.00 ENG 05/2014
Lookcycletv
User Manual
English
Introduction
Installing Polar Look Kéo PoweR
Congratulations on your great purchase! In this handy guide we’ll
walk you through the first steps in starting to use Polar LOOK Kéo
Power (with Bluetooth® Smart), the innovative pedal-based cycling
system that helps you boost your performance and improve your
cycling technique.
Polar LOOK Kéo Power gives you detailed information about your
power output, left and right balance (depending on the set version)
and your cycling cadence and efficiency. It works best with Polar
V650, state-of-the art bike computer for the most ambitious cyclists,
but it’s a great match also for many other Polar products and other
Bluetooth Smart compatible devices. To see the full list of compatible
Polar devices, go to Products > Accessories at www.polar.com.
You will benefit even more from Polar LOOK Kéo Power when you
use it together with the Polar Flow web service. Plan your sessions,
get guidance to achieve your targets, analyze results and enjoy your
achievements with other training fans just like you.
It’s is important that you follow the installation instructions
carefully to get accurate measurement.
1. Turn the battery cover counterclockwise to open it.
Compatibility Checklist
Before installing the system, check that the product is compatible
with your bike.
Make sure that:
10:45
132
SPEED [km/h]
DISTANCE [km]
100%
00:32:15
34.8
ALTITUDE [m]
68.25 114
»» the chain clearance is at least 5 mm when the chain is
on the outer chainring and the smallest pinion.
»» the cranks are less than 16 mm thick
»» the cranks are less than 40 mm height
»» the cranks have standard 9/16 x 20 BSA threading.
You can find the latest version of this user manual, support material and videos at www.polar.com/support.
You can also find user manual, support material and videos at www.lookcycle.com.
2. Place a battery (CR2354) inside the cover with the positive
(+) side facing the cover.
Mounting Pedals
To install the pedals, you will need a thin 18 mm wrench, an 8
mm Allen key and the pedal installation tool (provided in product
box).
3. Put the cover back in place. Turn the cover clockwise to close
it.
1. Clean the crank contact surfaces and threads to avoid
damage.
4. Repeat for both transmitters.
2. If there’s a groove on the crank or if the cranks are made
of carbon fibre, place a spacer onto the pedal axle so that
metal touches metal (picture 1). If you are unsure, mount the
pedals with a spacer.
3. Tighten the pedal onto the crank. Make sure the pedal axle
does not stick out (picture 2) and the mark on the pedal axle
points downwards when the crank points forward (picture 2).
4. Place the pedal installation tool into the pedal axle so that its
shaft is in line with the crank (picture 3).
5. Hold the tool in place and tighten the pedal locknut with a
18 mm wrench (picture 4). The recommended tightening
torque is 35 Nm / 25.8 lbf-ft.
What’s in the Box?
In the product box you’ll find LOOK Kéo Power pedals and cleats, and Polar Power transmitters. Pedal installation tools,
spacers, sealing rings and other important small pieces also come with the product. Depending on the product version, the set includes
either one or two transmitters. Please note that the Essential version´s right and left spindles are not identical.
Installing Batteries
6. Repeat for both pedals.
5 mm
The left pedal (marked with a line on the axle) has left-hand
threads and needs to be installed counterclockwise. The
right pedal has right-hand threads and needs to be installed
clockwise.
Installing Transmitters
1.
2.
1. Remove the protective cap from the transmitters.
1.
2. Place a transmitter into the pedal axle. Make sure the shape
of the transmitter matches with the shape inside the pedal
axle (picture 1). Push the transmitter firmly but without too
much force to avoid damage.
4.
4. Pass a cable tie through the hole in the transmitter. Keep
the transmitter in place and tighten the cable tie around the
crank (picture 2). Cut off excess ends.
5. Repeat installation for both transmitters.
6. When rotating the cranks, make sure the transmitters do not
hit any part of the bike or the chain while the chain is on the
largest crank gear and the smallest cassette gear.
The transmitters are marked with letters R (right) and L (left).
When the crank points forward, the transmitters should be
pointing down (picture 2).
Pairing Transmitters With
Receiving Device
The receiving device informs about the transmitters’ status but
there are also status led lights on transmitters.
The Polar LOOK Kéo Power system is compatible with
devices that support Bluetooth Smart technology and two
simultaneously connected power transmitters.
Blinking magenta
The transmitter is awake but the transmitter has to be paired or
connected with a receiving device.
Blinking blue
The transmitter is connected to a receiving device. The offset
calibration has not been completed yet. Keep the bike upright
and cranks in place until calibration is completed.
3. Make sure the transmitter is positioned correctly (picture 2).
Position it again if needed.
3.
Led Indicators
2.
Blinking green
The offset calibration has been
completed. You are ready for a
ride. The led is turned off while
pedaling to save battery.
Blinking red
Something has gone wrong. See
the receiving device for more
information.
Visit www.polar.com/support for a list of compatible Polar
devices.
Using a Polar device allows you to get the most out of training
with analysis and follow-up tools in the Polar Flow web service.
Pair the transmitters with the receiving device before going for
your first ride.
You can find a device ID printed on the backside of the
transmitter. There’s a different device ID for each transmitter.
1. Rotate the cranks to wake up the transmitters.
2. Pair the power transmitters one at a time with the receiving
device. See the user manual of the receiving device for
further instructions.
The power transmitters wake up automatically when the
cranks are rotated, and go to sleep after 90 seconds of
inactivity after a receiving device is no longer found.