1
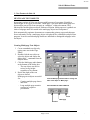
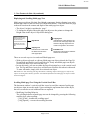
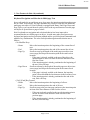
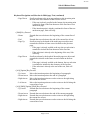
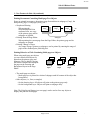
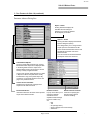
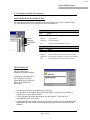
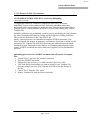
408 12/4/98
Solo 4.0 Release Notes
February 12, 1999
Solo 4.0 Release Notes
Axon is pleased to announce the release of Solo 4.0.
This release contains a number of new and unique features, as well as enhancements to
the user interface and overall performance. Together these changes help make Solo 4.0
the most powerful report production application available on the market today.
We have worked hard to make this our best release ever. Please forward your comments
to: [email protected] as soon as possible.
We thank you in advance for your assistance and continued support,
The Solo 4.0 Development Team
New Feature Highlights
Improved User Interface:
Facilitates learning Solo's powerful feature set. New and
revised command icons and other interface improvements
make Solo even easier to use.
Multipage Text Objects:
Allows narrative text to flow across multiple printed pages. A
single Storyboard "cell" can now contain an unlimited amount
of continuous text. Great for longer Executive summaries as
well as regular correspondence documents.
Document Abstracts:
Automatically create an abstract containing message lines and
other key document information for any Solo report. The
abstract can be exported and used in a document management
system for effective knowledge sharing and archiving of
completed work.
Page Identifiers:
Use unique page ID's to track individual pages and documents
during revision cycles.
Import RTF and Plain Text: Import text files created by other applications with formatting
intact. In conjunction with Multipage Text objects you can
have an unlimited number of pages per cell and up to 10,000
cells in the Storyboard.
Stationary Templates:
New letter, fax and memo stationary templates (which utilize
the Multipage text feature) make it easy to keep all
correspondence in a single file. The Find command provides
full text search capabilities across all your correspondence.
Kanji Script Support:
Solo for Windows 95/NT now supports the Japanese, 2-byte
character Kanji script system.
Solo Viewer Application:
The Solo Viewer will be distributed free of charge and
available from our web site. The Viewer allows anyone to
view and print Solo documents.
Other Enhancements:
Over 100 additional productivity and performance
enhancements.
Page 1 of 24
-
408 12/4/98
Solo 4.0 Release Notes
Table of Contents
Topics
Page
1 - New Features in Solo 4.0
1
Multi-page Text Objects
Creating Multi-page Text Objects
Displaying and Scrolling Multi-page Text
Scrolling Multi-page Text Using the Vertical Scroll Bar
Keyboard Navigation and Selection in Multi-page Text
Page Breaks
Document Pagination, Storyboard Cells and Multi-page Text
Objects
Printing Documents Containing Multi-page Text Objects
Printing Behavior of Cells Containing Multi-page text
Objects
Print Special Command
RTF & Plain Text File Import Capabilities
New Application Preferences
Solo Viewer Program
Document Abstracts
Page Identifiers
Page Editor Navigation Icons
Tip Of The Day
Customizing Template Files - Preference Embedding
- For Expert Users Only
2 - Changes / Improvements / Fixes in Solo 4.0
Revised Storyboard Command Palette
Revised Page Editor Tool Palette and Attribute Pop-ups
Revised Storyboard Miniature Interface
Simplified Text <Placeholder> Selection
Improved Table Functionality
Modified Find & Replace Command
Modified Paragraph Dialog Box
Revised Page Number Dialog Box
Revised Menu Commands
Kanji Support
Template File Improvements
General Improvements and Fixes...
Tips and Techniques...
3 - Contacting Axon
Operating System Keyboard Differences
1
1
2
2
3
5
Page 2 of 24
5
6
6
7
7
8
9
9
11
12
12
13
15
15
15
16
16
16
17
17
18
18
18
19
20
20
21
21
-
408 12/4/98
Solo 4.0 Release Notes
1 - New Features in Solo 4.0
MULTI-PAGE TEXT OBJECTS
In previous versions of Solo, text objects could have one of two states, Variable or
Fixed Height. A new type of text state, "Multi-page", has been added. Multi-page text
objects allow text to flow from one page to “subpages” within a document. They
function like fixed height text objects with one exception. Multi-page text is printed as a
chain of subpages until all content in the multi-page object has been printed.
Solo automatically paginates documents to accommodate primary pages and subpages.
In text edit mode, text in a multi-page object is displayed like a standard word processor
program. It can be scrolled and page breaks are indicated to distinguish subpages in the
text object.
Creating Multi-page Text Objects
1
2
3
4
Create a standard text object by
typing some text in the Page
Editor.
Double-click the text object or
select the object and choose the
Object Info… command from the
Objects menu.
Click the Multi-page radio button
at the bottom of the dialog box.
- The text object can now be
resized to any height
regardless of its content.
Resize the depth of the text
object as desired.
Multi-page text objects are useful
for:
- Creating multiple page letters
and faxes.
- Long multiple page narrative
sections in a report or
presentation.
Click the Multi-page Radio button to change the
state of the object to "Multi-page".
THE 3 STATES OF TEXT OBJECTS
Fixed
Multi-page
Variable
Page 3 of 24
-
408 12/4/98
Solo 4.0 Release Notes
1 - New Features in Solo 4.0 (continued)
Displaying and Scrolling Multi-page Text
Multi-page text objects, like their fixed height counterpart, display clipping icons at the
bottom right corner of the text block (see illustrations below). Text flows from one page
to the next based on the content and depth of the multi-page text object.
• The object’s height is considered a “page”.
• To change the height of the multi-page text object use the pointer or change the
Height value in the object’s Object Info dialog box.
No one would have
believed in the last years
of the nineteenth century
that this world was
being watched keenly and
closely by intelligence's
greater than man's and
yet as mortal as his own;
that
Clipping Icon
Indicates there is text above the top
bounds of the multi-page object OR
that the multi-page object does not
contain enough text to be scrolled.
Page Break
Clipping Icon
Indicates there is text below
the bottom bounds of the
multi-page object.
Edit Mode Icon
Displayed in edit mode and indicates
that text can be scrolled.
There are several ways to view and scroll Multi-page text.
• With no objects selected, or with any Multi-page text object selected, the Page Up/
Down/Home and End keys will scroll the text. If only non-Multi-page text objects
are selected, these keys will scroll the view.
• In text edit mode, you can use either the Page Navigation keys, or the vertical scroll
bar. The Up and Down Arrow keys will also auto-scroll the text when in edit mode.
To enter edit mode, simply click on a selected text object.
Macintosh User Note: Working with large documents containing complex multi-page text objects may
require increasing Solo's memory partition. For detailed information on multi-page text objects contact
Axon Tech Support.
Scrolling Multi-page Text Using the Vertical Scroll Bar
The document window’s vertical scroll bar is used to scroll the content of multi-page
text objects when in text edit mode. Upon reaching the top/bottom limit of the object,
the text is scrolled to reveal additional lines as required.
• Modifying Scrolling Behavior
The scrolling behavior of multi-page text can be changed by pressing the following
modifier keys when scrolling:
- [Ctrl] [Cmd] – doubles the scrolling speed
- [Alt] [Option] – reverses the scrolling direction
Page 4 of 24
-
408 12/4/98
Solo 4.0 Release Notes
1 - New Features in Solo 4.0 (continued)
Keyboard Navigation and Selection in Multi-page Text
In text edit mode the up and down arrow keys move the insertion point through text one
line at a time. As necessary, the page automatically scrolls to reveal the text within the
multi-page text object. If your keyboard is equipped with Home, End, Page Down and
Page Up keys you can use them to quickly scroll to the top and bottom of a multi-page
text object or up and down a page at a time.
Solo's keyboard text navigation and selection behavior has been improved to
accommodate the new Multi-page text object. As with many other word processors,
keyboard navigation and text selection methods utilize special keyboard commands and
modifier key combinations. The rules for keyboard navigation and selection are as
follows:
• No Modifier Keys
- Home
Moves the insertion point to the beginning of the current line of
text.
- End
Moves the insertion point to the end of the current line of text.
- Page Up
Scrolls text up by the depth of the multi-page text object (one
screen page) and keeps the insertion point in the same screen
location.
- If the page is already scrolled to the top of the object, the
insertion point is moved in front of the first character in the
first line of text.
- If the insertion point is already positioned at the beginning of
the text, Solo will beep.
- Page Down
Scrolls text down by the depth of the multi-page text object (one
screen page) and keeps the insertion point in the same screen
location.
- If the page is already scrolled to the bottom, the insertion
point is moved behind the last character in the last line of text.
- If the insertion point is already positioned at the end of the
text, Solo will beep.
• [Ctrl] [Cmd] Key Pressed
- Home
Moves the insertion point to the beginning of all text.
- End
Moves the insertion point to the end of all text.
- Page Up
Scrolls text up to the previous page and moves the insertion point
in front of the first character in the first line of text.
- If the text is already scrolled to the top, the insertion point is
moved in front of first character in the first line of the
previous page.
- If the insertion point is already positioned at the beginning of
the text, Solo will beep.
Page 5 of 24
-
408 12/4/98
Solo 4.0 Release Notes
Keyboard Navigation and Selection in Multi-page Text (continued)
- Page Down
Scrolls text down to the next page and moves the insertion point
in front of the first character in the first line of text.
- If the text is already scrolled to the bottom, the insertion point
is placed in front of the first character of the first line of text
on the next page.
- If the insertion point is already positioned in front of the text
on the next page, Solo will beep.
• [Shift] Key Pressed
- Home
Extends the text selection to the beginning of the current line of
text.
- End
Extends the text selection to the end of the current line of text.
- Page Up
Scrolls text up by the depth of the multi-page text object and
extends the selection to same screen location on the previous
page.
- If the page is already scrolled to the top, the text selection is
extended to include the first character in the first line.
- If the selection is already at the beginning of the text, Solo
will beep.
- Page Down
Scrolls text down by the depth of the multi-page text object and
extends the selection to the same screen location on the next
page.
- If the page is already scrolled to the bottom, the text selection
is extended to include the last character of the last line.
- If the selection is already at the end of the text, Solo will
beep.
• [Alt] [Option] Key Pressed
- Up Arrow
Moves the insertion point to the beginning of a paragraph.
- Down Arrow Moves the insertion point to the end of a paragraph.
- Right Arrow Moves the insertion point one word at a time to the right along
the current line of text.
- Left Arrow
Moves the insertion point one word at a time to the left along the
current line of text.
• [Alt] [Shift] [Option] [Shift] Keys Pressed
- Up Arrow
Extends the text selection to the beginning of the current
paragraph.
- Down Arrow Extends the text selection to the end of the current paragraph.
- Right Arrow Extends the text selection one word at a time to the right along
the current line of text.
- Right Arrow Extends the text selection one word at a time to the left along the
current line of text.
Page 6 of 24
-
408 12/4/98
Solo 4.0 Release Notes
1 - New Features in Solo 4.0 (continued)
Page Breaks
Page breaks are indicated by dotted
lines that span the width of the
multi-page text object. There are
two types, automatic and manual.
No one would have
believed in the last years
of the nineteenth century
that this world was
No one would have
believed in the last years
of the nineteenth century
that this world was
being watched keenly and
closely by intelligence's
greater than man's and
yet as mortal as his own;
that
being watched keenly and
closely by intelligence's
greater than man's and
yet as mortal as his own;
that
• Automatic page breaks are
based on the depth of the
Automatic
Manual
object. They are indicated by a
Page Break
Page Break
light gray dotted line that spans
the width of the text object.
• Manual page breaks allow the user to control the pagination of subpages in a multipage text object. They are indicated by a dark gray dotted line that spans the width
of the text object.
Insert manual page breaks by selecting the Insert Page Break command from the
Text menu while in text edit mode.
The keyboard command for inserting a manual page break is:
- [Ctrl] [Shift] [Return]
Windows
- [Cmd] [Shift] [Return]
Macintosh
Document Pagination, Storyboard Cells and Multi-page Text Objects
Documents are paginated based on the
number of cells in the document and the
use of any multi-page text objects.
In the Storyboard, cells which contain
multi-page text objects are indicated by
hyphenated page numbers at the bottom
right corner of the Storyboard page
miniature.
The Storyboard can display both Cell
numbers and Page Numbers. Cell numbers
are positioned in the bottom-middle of the
Storyboard Page miniature. Cell and Page
number display are controlled using the
Page Numbers dialog box.
The number of cells allowed in a single
document has been increased from 1,000 to
10,000.
Page 7 of 24
1
p 1-3
2
p4
3
p 5-9
4
p 10
Cell Numbers
Cells containing multi-page text
objects with several subpages of text.
-
408 12/4/98
Solo 4.0 Release Notes
1 - New Features in Solo 4.0 (continued)
Printing Documents Containing Multi-page Text Objects
Pages are printed in sequence, the primary page first and then its subpages (if any), the
next primary page, it’s subpages (if any), etc.
• Storyboard Printing
Primary
Primary
Primary
When using the
etc.
Page
Page
Page
1-4
5
6-8
Storyboard Quick Print
command icon, one copy
of the primary page and its
subpages are printed.
Subpages
• Printing from the Page Editor
When printing the current page from the Page Editor, the primary page and its
subpages are printed.
• Printing a Range of Pages
Any range of pages, primary or subpages, can be printed by entering the range of
pages in the standard print job dialog box.
Printing Behavior of Cells Containing Multi-page text Objects
When using multi-page text objects
you can control what objects are
printed on the primary page and
subpages. This is done by placing
the various elements that comprise
the page on the Drawing and
Background layers in the Page
Editor.
Drawing
Layer
Guide
Layer
Background
Layer
• The multi-page text object
- Multi-page text is printed in a chain of subpages until all content of the object has
been printed
• Other objects (i.e., lines, rectangles)
- On the drawing layer: All objects will print on the primary page only.
- On the background layer: Objects will print on subpages only.
Note: The Print Special feature (see next page) can be used to force any object to
display and print on all subpages.
Page 8 of 24
-
408 12/4/98
Solo 4.0 Release Notes
1 - New Features in Solo 4.0 (continued)
Print Special Command
For additional printing control of cells containing multi-page text a new "Print
Special..." command has been added to the Page Editor's Objects menu. This command
allows you to override the standard printing behavior of cells containing multi-page text
described in the previous topic.
If an object on the Drawing layer should be printed on all subpages, use the Print
Special dialog to specify this condition. The command is easy to use by following the
steps below.
1
2
3
4
Select the object (or objects) that
should be printed on all subpages.
Choose the "Print Special..." command
from the "Objects" menu.
Turn the "Print On All Subpages"
checkbox On.
Click the OK button to close the
dialog.
All of the selected objects will be printed on the primary page and all subpages.
You can also use the command to check or change the "printing state" of an object (or
objects).
RTF & PLAIN TEXT FILE IMPORT CAPABILITIES
Added support for Importing text files saved in Microsoft's Rich Text Format (.rtf) and
plain text file formats (.txt) by using the Import command in the File menu. RTF and
plain text can be copied and pasted through the clipboard. RTF text is imported/pasted
with all character and paragraph formatting intact from the original source file.
Importing RTF or Plain Text Files
1
2
3
In the Storyboard View, choose the Import command from the File menu.
Use the File Type pop-up menu at the bottom of the dialog box to select the type
of file to import. "Rich Text Format (*.RTF)" for RTF files, "Plain Text (*.TXT)"
for plain text files.
Note: Macintosh users should click the Text radio button in the Import dialog box.
Use the dialog box to navigate and select the file to be imported.
Page 9 of 24
-
408 12/4/98
Solo 4.0 Release Notes
1 - New Features in Solo 4.0 (continued)
NEW APPLICATION PREFERENCES
Three application preferences have been added.
• Double Width Insertion Point
- Specifies that the text editing insertion point is two pixels wide instead of one.
This option is On by default.
• Hide Objects When Viewing Scrolled Text
- Specifies that objects on the Drawing layer are temporarily hidden from view
when viewing scrolled text in multi-page text objects. This improves the display
of pages containing drawing layer components, such as faxes and letters, that
might ordinarily "shine through" multi-page text making it difficult to view.
This option is On by default.
• Remember Spell Checker “Ignore” Word List Until Solo Exits
- Specifies that the “Ignored” word list (also called the exception list), which is
stored in RAM, is kept in memory until the user Exits (Quits) Solo.
When this option is Off, the “Ignored” word list is removed from memory each
time the spell check dialog box is closed. This ensures that documents are
thoroughly searched each time they are spell checked including “ignored” words
from any previous spell check session(s).
This option is Off by default.
New Preference Settings
Page 10 of 24
-
408 12/4/98
Solo 4.0 Release Notes
1 - New Features in Solo 4.0 (continued)
SOLO VIEWER PROGRAM
Released with Solo 4.0 is a new Solo Viewer program, available free of charge which
can be downloaded from Axon's Web Site at "www.axoninc.com". The purpose of the
Solo Viewer is to allow Solo users to share their work with people who don't have a
copy of Solo.
The Solo Viewer allows you to:
• Rearrange pages
• Place templates
• Edit message box text
• Print Pages
• Add pages
• Import and Export pages
DOCUMENT ABSTRACTS
The document Abstract command (File menu) allows you to export a plain text file
(.txt) which contains information about a document. The text file can be imported into
Document Management or Archive database systems for document tracking purposes.
The Abstract information can be entered either in the Document Abstract dialog box or
using a set of ten content linked Named text objects that are part of the document.
A sample “Doc Info” template has been included in these Release Notes. It can be
found using the following pathway in the Templates dialog box: Text -> Other -> Doc
Info.
The following page illustrates the Document Abstract dialog box and its components.
Information about Document Abstracts can be found in the Solo User Manual or by contacting Axon Tech
Support.
Page 11 of 24
-
408 12/4/98
Solo 4.0 Release Notes
1 - New Features in Solo 4.0 (continued)
Document Abstract Dialog Box
Export... button
Clicking this button displays the
standard Save file dialog box
allowing you to name the abstract
file and specify it's location.
Options... button
Clicking this button displays the Abstract
Options dialog box (below).
This dialog allows you to change several
output options for the abstract text file.
These include the Date label controls and
the delimiter characters used in the
abstract text file.
You can rename the associated Named
text objects used in the document.
Linked Named Objects
The text in these fields is linked to ten content
linked Named text objects and is displayed both
in the dialog fields and in the copies of the
Named Objects used in the document. Use the
Tab key to easily navigate the fields.
A typical use of these named objects is to create
a “Report Info Sheet” template that is usually
included with a copy of the printed report. By
convention, it is generally either the first or last
page in the printed document.
Content Control Checkbox
Specifies if the document's message text is
exported to the abstract text file.
Document Statistics
Delimiter Controls
Information about the document that is exported
as part of the abstract text file.
Pop-up menus allow you to Controls for specifying the
specify the delimiter
date format and special
characters used to
character handling.
separate Fields, Message
Lines and Labels. They
are:
- Null
- Tab
- CR (carriage return)
- CR/LF (carriage return and line feed)
- Soft Return
Page 12 of 24
Date & Character Controls
-
408 12/4/98
Solo 4.0 Release Notes
1 - New Features in Solo 4.0 (continued)
PAGE IDENTIFIERS - Storyboard
Page Identifiers (Storyboard menu) allow you to specify and control the display/printing
of document and page specific information. In large organizations it is common to mark
entire reports and individual pages with a unique identifying piece of information. This
information is used to track the report (or pages) for later revision or incorporation in
other documents.
The Page Identifiers dialog box provides the controls necessary to uniquely mark
individual pages in a document. The diagram below highlights the available controls.
Detailed information about Page Identifiers can be found in the Solo User Manual or by contacting Axon
Tech Support.
Page Identifiers
Checkbox
Text Attributes
Turns the use of Page
Identifiers Off and On.
Controls for
specifying the font,
size, style and color
of the identifiers.
Position Radio Buttons
Specifies the location of the
eight possible page identifiers.
Formatting Controls
Controls for specifying
the orientation, location
and line spacing of the
identifiers.
As each location button is
clicked you “attach” an
identifier(s) to the location using
the identifier checkboxes below.
Identifiers Type Checkboxes
Prefix And Suffixes Fields
Specify a location using the Position radio buttons.
Then select any combination of the eight identifiers
using the checkboxes to turn them On or Off.
Each identifier can have a unique prefix or
suffix attached to it.
The order the identifiers appear is governed by the
order in which the checkboxes are turned On or Off.
A number next to the checkbox indicates the order.
Print Checkboxes
Print checkboxes allow you to specify if an identifier is printed
on the pages in the document.
For example, if the File Name order checkbox is On and it's
corresponding Print checkbox is Off, the File Name identifier
is displayed on screen but is not printed.
Page 13 of 24
-
408 12/4/98
Solo 4.0 Release Notes
1 - New Features in Solo 4.0 (continued)
PAGE EDITOR NAVIGATION ICONS
Four navigation icons have been added to the Page Editor view. They are Home, Page
Up, Page Down and End. The table below lists icon behavior.
Working with Objects
Icon
Action
Home
Page scrolls to reveal top left corner
Home
Page Up
Page scrolls up
Page Up
Page Down
Page scrolls down
Page Down
End
Page scrolls to reveal bottom right corner
End
Working in Text Edit Mode
Icon
Action
Home
Moves insertion point to the beginning of the line of text
Page Up
Moves the insertion point up 1 page of text (or to top)
Page Down
Moves insertion point down 1 page of text (or to bottom)
End
Moves insertion point to the end of the line of text
TIP OF THE DAY
The Tip of the Day is
displayed at program startup.
Clicking the radio buttons in
the dialog box to switch
between the three categories:
Basic, Intermediate and
Advanced.
• Use the Next and Previous buttons to view the tips.
• The checkbox at the bottom of the dialog box allows you specify if the dialog is
displayed every time Solo is started.
• You can display the dialog box anytime by choosing the "Tip of the Day..."
command from the View menu.
• Clicking the Reference button opens the electronic version of the Solo Manual (Solo
Manual.pdf) if it and Adobe's Acrobat Reader program have been installed on the
machine.
Page 14 of 24
-
408 12/4/98
Solo 4.0 Release Notes
1 - New Features in Solo 4.0 (continued)
CUSTOMIZING TEMPLATE FILES - Preference Embedding
- For Expert Users Only
To support the creation of customized Template file files a new "Preference
Embedding" feature has been added to Solo. Preference embedding means that
preferences can be stored as part of a document's data. If the document is turned into a
Template File, its custom embedded preferences are used when running Solo with the
Template File.
Normally, preferences are permanently saved by pressing and holding the [Alt] [Option]
key when clicking the OK button in a dialog box that supports recording preferences.
This records the preferences to the "Solo Prefs2" file.
Ideally, custom preferences are embedded in template SOURCE documents. This
allows a template file designer to maintain a consistent set of preferences across several
generations of a Template File. SOURCE documents are standard documents which
contain the Named Paragraphs, Named Objects and Templates that comprise a report
format. SOURCE documents are always made into Template Files for distribution to
end users.
Embedding preferences in a SOURCE document that will become a Template
File...
1 Launch Solo 4.0 and close the "untitled" document.
2 Open the SOURCE document.
3 Engage the [Caps Lock] key (i.e. make sure that Caps Lock is ON).
4 Visit each dialog which settings you want to include in your Template File,
enter the settings you want, press [Alt] and click OK to store the settings in
the file.
5 Choose "Save" from the "File" menu.
6 Make a Template File from the Source document.
Page 15 of 24
-
408 12/4/98
Solo 4.0 Release Notes
Customizing Template Files - Preference Embedding (continued)
Embedding preferences in an existing Template File...
1
2
3
4
5
6
Launch Solo 4.0 and close the "untitled" document.
Press and hold the [Alt] key while choosing "Open" from the "File" menu.
This opens the Template file and allows you to edit it.
In the "Files of type" field, use the pop-up to select: "Solo Template Files (*
.X1F)" and then navigate and open the Template file you want to modify.
When the file opens, it should display "[ TEMPLATE ]" to the right of the
file name in the application Title Bar.
Engage the [Caps Lock] key (i.e. make sure that Caps Lock is ON).
Visit each dialog which settings you want to include in your Template file,
enter the settings you want, press [Alt] and click OK to store the settings in
the file.
Choose "Save" from the "File" menu, and close the file.
Removing Preferences...
If you need to REMOVE a preference, for any reason, simply repeat the above
procedure, but in steps 4 & 5 above (respectively) press [Alt] [Shift] and click OK.
NOTE: This feature is only intended for use in documents that will be turned into
Template Files.
Preferences embedded in standard documents are not supported.
Information about Embedding Preferences can be found in the Solo User Manual or by contacting Axon
Tech Support.
Page 16 of 24
-
408 12/4/98
Solo 4.0 Release Notes
2 - Changes / Improvements / Fixes in Solo 4.0
Revised Storyboard Command Palette
The Storyboard command
palette has been improved.
New command icons have
been added and older icons
rearranged.
Switches between
Storyboard and
Page Editor
Opens Template
Dialog Box
Selects Text
Placeholders
The illustration at right
details the revised
command palette.
Slideshow Quick Look
Print Selected Pages
Inserts new page
Remove empty pages
Select first page
Select last page
Go to current page
Sort selected pages
Enlarges view
Reduces view
Normal view
Shrink To Fit
Deletes Selected Pages
Revised Page Editor Tool Palette and Attribute Pop-ups
The Page Editor Tool palette has been revised with the addition of several shared
command icons from the revised Storyboard command palette. The illustration below
details the revised Page Editor palette.
Switches between
Storyboard and
Page Editor
Opens Template
Dialog Box
Selects Text
Placeholders
Slideshow Quick Look
Pointer
Rounded Rectangle
Arc
Perpendicular Lines
Freehand
Print Current Page
Fill Color/Pattern
Text
Line Thickness
Rectangle
Oval
Angled Line
Arrowhead Options
Line Style
Previous Page
Next Page
Polygon
Power Tools:
Arrow, Multigon,
Star, Bracket
Frame Tools:
Chart, Table and
Target frames
Border Color/Pattern
Page Indicator / View Scale
(toggles between 100% and Shrink-to-Fit)
Deletes Selected Objects
Page 17 of 24
-
408 12/4/98
Solo 4.0 Release Notes
2 - Changes / Improvements / Fixes in Solo 4.0
Revised Storyboard Miniature Interface
The Storyboard interface for placing Messages and Templates has been improved. <
Placeholders> which can be clicked have been put into the Message Box and
Storyboard Miniature areas. The diagram below illustrates the new Storyboard
miniature interface.
• Clicking the <Click here to enter message> placeholder automatically switches to
text edit mode allowing you to quickly enter a page message.
• Clicking the <Click here to Place Template> opens the Templates dialog box
allowing you to quickly place a template.
<Click
<Click here
here to
to enter
enter message>
message>
Click the placeholder to
quickly enter a page message.
<Click
<Click here
here to
to Place
Place Template>
Template>
Click the placeholder to open
the Templates dialog box.
Simplified Text <Placeholder> Selection
Text placeholders can be selected by clicking on them. The new command icon, <…>,
in both the Storyboard and Page Editor palettes and the standard keyboard equivalent
[Ctrl] [Tab] can be used to find and select placeholders.
Improved Table Functionality
To improve the ease of use of our table tool we have implemented the following new
functionality:
• Table Dimensions dialog box - opens immediately after creating a table with the
table tool.
• Formatting Table cells - Empty table cells can now be formatted allowing easy
generation of tables "on the fly". Select the table or cells and use the text menu to
format your character and paragraph settings.
• Newly added rows will clone the paragraph and character settings of the row
directly above.
• Newly added columns will clone the paragraph and character settings of the column
to the left.
Page 18 of 24
-
408 12/4/98
Solo 4.0 Release Notes
2 - Changes / Improvements / Fixes in Solo 4.0
Modified Find & Replace Command
The Find and Replace commands have been improved. It is now possible to search for
special characters by using a pop up menu to insert the desired character. The table
below lists the special characters and the search strings used to find them. All search
strings use a "^" caret prefix followed by another character. The caret symbol is
generated by pressing Shift-6 on US English systems.
Target Search Character
Search Command String
Paragraph Return
^p
Tab
^t
En Dash
^=
Em Dash
^+
Soft Return (line break)
^l
Manual page break
^m
Non breaking space
^s
Caret (^)
^^
Modified Paragraph Dialog Box
The Paragraph dialog box contains a
new pop-up menu next to the Marker
field that allows 4 types of symbols
commonly used in paragraphs to be
entered by selecting them in the pop-up
menu. This simplifies the creation of
commonly used paragraph styles.
Page 19 of 24
-
408 12/4/98
Solo 4.0 Release Notes
2 - Changes / Improvements / Fixes in Solo 4.0
Revised Page Number Dialog Box
The Page Numbers dialog box has been modified to accommodate multi-page text. Two
new options have been added to control the display of Storyboard cell numbers and
document pagination. The default font for Page numbers has been changed for Times 12
pt from Palatino 12 pt.
Display Checkbox
Specifies that cell numbers are
displayed in the Storyboard. Cell
numbers appear at the bottom
center of the page miniature.
Page One Checkbox
Specifies that the document is
paginated restarting from "page 1"
for every cell in the document.
This is used for sectional pagination
in multi-page text documents.
Revised Menu Commands
The following menu commands have been changed.
Menu
Storyboard
View
Old Command
Current Page
New Command
Current Cell
Insert Pages...
Insert Cells...
Mark As Slide
Include In Slideshow
Unmark
Exclude From Slideshow
Previous Page
Previous Cell
Next Page
Next Cell
Kanji Support
Solo 4.0 supports Kanji under the Windows operating system. Work for hangul and
Chinese character support is in progress.
Page 20 of 24
-
408 12/4/98
Solo 4.0 Release Notes
2 - Changes / Improvements / Fixes in Solo 4.0
Axon Template File improvements
Several new chart templates have been added to the standard Axon Template file. These
include:
• RANGE
- Bar Stack
- Bar Stack.s
- Col Stack
- Col Stack.s
- Bar Mult.s
- Col Mult.s
• BAR
- Paired Stack
- Paired Stack.s
• BUILD UP
- bar.seg/sub.s
- col.seg/sub.s
• BUILD DOWN
- bar.seg/sub.s
- bar.seg/sub.s
All text templates have been modified to utilize the new Multi-page text feature. Several
new multi-page text stationery templates have been added:
- Letter
- Memo
- Fax
Page 21 of 24
-
408 12/4/98
Solo 4.0 Release Notes
2 - Changes / Improvements / Fixes in Solo 4.0
General Improvements and Fixes...
Many Solo functions have been modified to accommodate the new multi-page text feature.
•
•
•
•
•
•
•
•
Unlimited number of pages per cell
Seamless "smart" scroll bar and keyboard scrolling support
Optimization of document pagination (operates in the background)
New Storyboard Status Display (like the Page Editor display at bottom left corner of
window)
Go To Page and Printing commands handle subpage specifications
Slideshow treats subpages as separate slides
Existing text objects can be converted to multi-page text objects
Complete backward document compatibility
Other general improvements and changes...
• Users are now alerted two times when attempting to delete master Named objects
• Chart Shading - the default shading patterns for chart now use gray scales instead of
patterns
• Drop Shadowed Text - Text can be drop shadowed using the Drop Shadows... command
from the objects menu
• The command palettes in the Storyboard and Page editor share common buttons for
Quick Print, Quick Look, Place Templates and Find Placeholder
• The Insert and Delete keys present on an extended keyboard will insert a new cell or
deletes selected pages
• All dialog boxes have been updated with a new more mainstream look and feel
• Improved printing support for non-postscript printers (specifically in tables and charts)
• Improved support when working with documents stored on file servers
• Solo now correctly prints to Postscript files when instructed in the print job dialog box
• Arrowheads are now correctly recognized in older documents
• Under Windows EPS objects now print correctly
• When editing text in a table cell, ruler changes can now be applied to all other selected
cells by pressing the [Ctrl] key while making the change
• Improved the use of tabs and display of invisible characters when using Kanji fonts
• Improved checksum handling when rescuing documents
• The "Cancel" button is now the default button when deleting pages in the Storyboard
view or objects in the Page Editor views. In the Page Editor view the display of the
object deletion warning dialog can now be suppressed.
• The "Forward" Delete key now deletes objects when not in text edit mode
• Improved text selection when clicking and dragging to select text
• Improved overall printing speed and printing of rotated text with Postscript printers
Page 22 of 24
-
408 12/4/98
Solo 4.0 Release Notes
•
•
•
•
•
Custom color palettes can now be added to Template files
Improved the processing of the Slide Settings dialog box
Improved the selection of text in the chart data window
Improved the printing of line charts
Improved the importing of PICT files when multiple documents are open
Tips and Techniques...
Sharing Solo documents by creating PDF documents from Solo documents
• Solo documents can be easily shared with others using Adobe System's PDF file format.
Solo documents can be turned into PDF Files using Adobe's Acrobat™ PDFWriter
printer driver. This allows anyone with a copy of the free Acrobat Reader program to
view the Solo document.
Page 23 of 24
-
408 12/4/98
Solo 4.0 Release Notes
3 - Contacting Axon
Axon, Inc.
21 Walmsley Road
Darien, CT 06820 USA
Sales:
Phone: 203-357-9701
Fax:
203-324-5085
E-mail: [email protected]
Support:
Phone: 203-357-9701
Fax:
203-324-5085
E-mail: [email protected]
Axon Internet Web site: http://www.axoninc.com
Operating System Keyboard Differences
While both the Macintosh and Windows 95/NT operating systems are similar, the two
systems use different keyboards and keyboard conventions. The table below illustrates
equivalent keys used in the two systems. In reading these notes users should note the
following modifier keyboard equivalents.
Macintosh key
Command [Cmd]
Delete
Enter
Option (Alt)
Return
Keypad clear
Windows 95/NT key
Control [Ctrl]
Backspace
Keypad Enter
Alt
Enter
Num Lock
Page 24 of 24
-