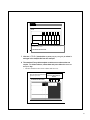
1
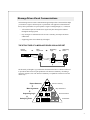
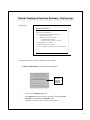
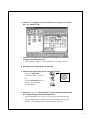
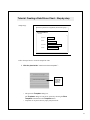
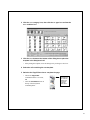
Message Driven Visual Communication
Axon Incorporated
Getting Started
VISUAL COMMUNICATION
Table of Contents
Section I - Going Solo ........................................... 1
A brief introduction to the underlying concepts of
Message Driven Visual Communications
Solo Rationale .......................................................... 3
Message Driven Visual Communication .................. 4
Logical Storyline ...................................................... 5
Solo Visual Vocabulary ........................................... 6
Screen Views ............................................................ 7
Solo 3-Step Approach .............................................. 9
Section II - Tutorial .............................................. 11
Step-by-step examples that guide you through
constructing four different types of pages
Creating an Executive Summary ............................ 13
Creating a Table ..................................................... 17
Creating a Concept Page ........................................ 21
Creating a Data Driven Chart ................................. 24
Copyright ©1999 - 2001 Axon Incorporated
No part of this publication may be reproduced, transmitted, transcribed, stored in a retrieval system, or translated into
any language in any form by any means without the written permission of Axon Incorporated.
Going Solo
Reading this section will provide an understanding of the concepts behind Solo and of the
elements required to produce clear, concise, visually oriented documents (proposals,
progress reports, marketing plans).
1
Solo Rationale
Business success is measured in terms of action taken by others. Persuasive business
reports are designed to move an audience to action. Effective communication of ideas and
recommendations to an audience is core to business success.
Powerful computer graphics hardware and software tools are widely available, but they
don't ensure that the graphics will be effective. Solo was specifically designed to help
people rapidly plan and draft concise, effective reports and presentations.
•
Solo's overall framework helps develop a report or presentation which is coherent
and compelling.
•
The Storyboard helps organize your thoughts into a logical structure.
•
The Template library makes it easy to illustrate your messages graphically.
•
The consistent professional graphic format helps your audience understand each
message.
•
Solo's tool integration speeds production and improves quality of output.
2
Message Driven Visual Communications
Solo's Message Driven Visual Communication approach provides a framework that helps
you structure a logical, coherent report or presentation. The approach is founded on the
theory that a presentation or report explains a single overriding thought, i.e., conclusion.
•
All excellent reports are anchored in a logical storyline that steps the audience
through the message points.
•
Key messages are summarized in the executive summary, and major and minor
subdivisions.
•
Supporting points form a hierarchy of thoughts.
THE STRUCTURE OF A MESSAGE DRIVEN VISUAL REPORT
Report
Summary
Cover
Main
Arguments
Supporting
Logic
Underlying
Facts
Executive
Summary
3.
Major
Subdivisions
.
2
.1
Minor
Subdivisions
The hierarchy of thought is a pyramid where the detail at the base is refined at each level
to provide the final result of report production: The Executive Summary. In reading a
report the opposite is true: The Executive Summary is expanded at each level to tell the
whole story.
Report Summary
Executive Summary
Main Arguments
Major Subdivisions
Supporting Logic
Underlying Facts
Minor Subdivisions
3.
.1
.
2
Exhibits/Data
3
Logical Storyline
Solo's Storyboard helps you develop your logical storyline. Each Storyboard cell contains
a message box used to express the single thought you want to illustrate.
Summary narrative pages will typically have titles such as "Executive Summary" or
"Marketing Analysis".
Messages are expressed as a dynamic assertion vs. a descriptive statement. A typical
message line presents the situation, the complication and a resolution. For example:
Declining profits (the situation), due to increased labor costs (the complication) direct us
toward offshore production (the resolution).
SOLO STORYBOARD
4
Solo's Visual Vocabulary
Once a message is determined, illustrating it graphically can add to its impact and
conciseness. Solo contains a library of hundreds of professionally designed consultingtype templates to illustrate quantitative, conceptual and text messages.
This library comprises the "Visual Vocabulary" of Solo. It expands your ability to visually
articulate your thinking.
Solo's template library is organized into three categories: Text (for narrative), Chart (for
quantitative), and Concept (for conceptual messages). Each category has tens of Types
and hundreds of Variations. A set of page layout templates and a library of clip art
augment these categories.
CATEGORY
TYPE
Text
Chart
Concept
Narrative
Pie
Filters
Organization
Covers
Bar
Flow Basic
Overlaps
Contents
Column
Flow Circle
Processes
Bullet
Line
Flow Extend
Pyramids
Text Tables
Area
Flow Iterative
Pyramids i
Scatter
Flow Subdivided
Relationships
XY
Forces
Segments
Frameworks
Time Lines
Hierarchies
Trees
Cost Curve
Leverage
Words
Bubble
Maps
Other
Range
I
Mix
a
Ii
3.
Build Up
VARIATION
.1
.
22
Matrix Point
Build Down
Matrix Text
Combination
Obstacles
Browse this User Guide to preview the template variations
5
Storyboard View
The Storyboard view lets you work on the entire report. You can enter message lines,
move pages to any location in the Storyboard to sequence your thoughts, insert new
pages, delete pages, place templates and scale your view.
The message box is for entering the
main point of the page.
The Storyboard
Command Palette
provides command
icons for the most
common activities.
To move pages in the
Storyboard click on them and
use the Grabber Hand to drag
them to another location...
Switches between
Storyboard and Page Editor
... the large arrow insertion
point indicates their destination.
Opens Template Dialog Box
Selects Text Place holders
Slideshow Quick Look
Inserts new page
Select first page
Go to current page
Enlarges view
Normal view
Print Selected Pages
Remove empty pages
Select last page
Sort selected pages
Reduces view
Shrink To Fit
Deletes Selected Pages
6
Page Editor View
The Page Editor View lets you work on individual pages. You can scale the view from
12.5% to 800%, modify templates and add any graphic elements you require.
The Page Editor
Tool Palette
provides tools for
the common
drawing and
editing activities.
Switches between
Storyboard and Page Editor
Text
Pointer
Rectangle
Rounded Rectangle
Oval
Arc
Opens Template Dialog Box
Angled Line
Perpendicular Lines
Selects Text Placeholders
Polygon
Freehand
Slideshow Quick Look
Print Current Page
Power Tools:
Arrow, Multigon,
Star, Bracket
Frame Tools:
Chart, Table and
Target frames
Fill Color/Pattern
Deletes Selected Objects
Border Color/Pattern
Line Thickness
Arrowhead Options
Line Style
Previous Page
Next Page
Page Indicator / View Scale
(toggles between 100% and Shrink-to-Fit)
7
Solo's 3 Step Approach
Solo is designed to help you develop a completed report that is professional, logical and
coherent as quickly as possible. A three-step approach is used which helps you work out,
visualize and convey your thinking. The tutorial on the following pages will instruct you
in the use of Solo.
Creating a Solo Report
Enter Message
Select Illustration
Fill in the Blanks
• Develop your storyline
by entering messages
in the message box
and tabbing to the
next page
• Use the Template
Manager to select the
appropriate illustration
for the message
• Enter the page editor
and add the necessary
data by filling in the
blanks
• Creating a logical
storyline up front
focuses your thinking
on the end product
you want
• For complex graphics,
you can place more
than one template on
a page
• You can edit/annotate
the page using the
drawing, text and table
tools.
<Click here to enter message>
Storyboard
Message Box
Message text
on an individual
page
<Click here to Place Template>
<Message>
<TITLE>
<Subtitle>
* <footnote>
Source: <source>
8
Tutorial
This section is a tutorial on how to construct four types of pages using Solo. It is intended
to give quick, easy instructions for creating pages in a Solo document. Solo opens initially
in its Storyboard view, which is where this tutorial begins. Some terminology to become
familiar with:
Select - means to click on an object
Text placeholder - any text surrounded by the "<" and ">" symbols
For greater detail on all Solo functionality, consult the User Manual.
9
Tutorial: Creating an Executive Summary – Step-by-step
Sample Page
Executive Summary
The preliminary review of ABC's marketing activities
revealed several deficiencies.
• Customer needs are not well understood
– No current survey data
– Sales force reports inconclusive
+Conflicting needs analysis
+Feature set survey results vary widely
• Segmentation is incomplete
• Channel margins are in conflict
• Advertising does not tie to product value proposition
Follow the steps below to create the sample executive summary:
1 Click the placeholder “<Click here to Place Template>”.
<Click
<Click here
here to
to enter
enter message>
message>
<Click
<Click here
here to
to Place
Place Template>
Template>
Click the
placeholder
to open the
Templates
dialog box.
• This opens the Templates dialog box.
The Templates dialog box can also be opened by choosing the Place
Templates command from the Templates menu.
• Templates can be placed into any empty Storyboard cell.
10
2 Click the Text category icon, then click the Narrative type icon and last
the Major variation icon.
3 Click the Place button at the bottom of the dialog box to place the
template in the Storyboard cell.
• After placing the template, close the dialog box by clicking it's close box.
4 Select the cell containing the new template.
5 Switch to the Page Editor view to complete the page.
• Choose the Page Editor
command from the View menu,
OR
• Click the View Switcher icon at
the top of the Storyboard
command palette.
licking the
iew Switcher
con switches
etween the
toryboard
nd Page
ditor views.
6 Select the <Major Title> text placeholder and click on the text to edit.
• This will highlight the text. Any text you type replaces the placeholder text.
• Text placeholders can be selected by pressing and holding down the [Ctrl]
(Windows) or [Cmd](Macintosh) key and pressing the Tab key.
7 Type “Executive Summary" into the text placeholder.
11
<Major Title>
<Major
Title>
<Narrative Text>
Sample Text
Executive Summary
The preliminary review of ABC's marketing activities
revealed several deficiencies.
•Customer needs are not well understood
8 Click the "<Narrative Text>" placeholder or press [Ctrl] or [Cmd][Tab] to
select it and type in the sample sentence from the example above.
9 To add the bullet points, place your cursor at the end of the sample
sentence and choose the Apply Paragraph command from the Text
menu.
• This opens the Named Paragraphs dialog box illustrated below.
• Click the “2 Narr Bullet •” entry.
• Click the Insert button and type in your bullet points.
12
10 To add additional bullet points, dash points or plus points, place the
blinking insertion point at the end of any line of text and use the
Named Paragraphs dialog box to insert the type of paragraph style
required.
• This is not the only method for working with Named paragraph styles. There
are several alternatives available.
As your experience with Solo increases you will want to learn the many
shortcuts available to speed up the process of entering text and formatting
paragraphs.
Chapter 5 - Working with Text in the Solo User Manual provides information
on working with the different types of text objects, Named Paragraphs and
using the text formatting capabilities available in Solo.
The Named paragraphs used in this example are illustrated and labeled below.
Executive Summary
1 Narr Normal
2 Narr Bullet •
3 Narr Dash –
4 Narr Plus +
The preliminary review of ABC's marketing activities
revealed several deficiencies.
• Customer needs are not well understood
– No current survey data
– Sales force reports inconclusive
+Conflicting needs analysis
+Feature set survey results vary widely
• Segmentation is incomplete
• Channel margins are in conflict
• Advertising does not tie to product value proposition
13
Tutorial: Creating a Table – Step-by-step
Sample Page
There are three major elements in the marketing change program
that have open issues.
EW MARKETING INITIATIVES
pen Issues
Open
Issues
esponsibility
Responsibility
eevaluate customer
eeds
Research approach
Questionnaire
–length
–focus
Review cycle
usan Smith
esegment customer
roups
Segmentation approach
Fit with sales territories
ill Edwards
esign new advertising
ampaign
New agency selection
Redefined value
proposition
afael Curtis
Follow the steps below to create the sample table:
1 Click the placeholder “<Click here to Place Template>”.
<Click
<Click here
here to
to enter
enter message>
message>
<Click
<Click here
here to
to Place
Place Template>
Template>
Click the
placeholder
to open the
Templates
dialog box.
• This opens the Templates dialog box.
The Templates dialog box can also be opened by choosing the Place
Templates command from the Templates menu.
• Templates can be placed into any empty Storyboard cell.
14
2 Click the Text category icon, then click the Text Tbl type icon and last
the Fancy variation icon.
3 Click the Place button at the bottom of the dialog box to place the
template in the Storyboard cell.
• After placing the template, close the dialog box by clicking it's close box.
4 Select the cell containing the new template.
5 Switch to the Page Editor view to complete the page.
• Choose the Page Editor
command from the View menu,
OR
• Click the View Switcher icon at
the top of the Storyboard
command palette.
Clicking the
View Switcher
icon switches
between the
Storyboard and
Page Editor
views.
6 Select the <Message> text placeholder, click on the text to edit and type
the sample message from the example below.
• This will highlight the text. Any text you type replaces the placeholder text.
• Text placeholders can be selected by pressing and holding down the [Ctrl]
(Windows) or[Cmd](Macintosh) key and pressing the [Tab] key.
15
<Message>
<Message>
<TITLE>
<Text>
<Text>
Sample Text
There are three major elements in the marketing change program
that have open issues.
* NEW
<footnote>
MARKETING
Source: <source>
INITIATIVES
7 Click the "<TITLE>" placeholder or press [Ctrl] or [Cmd][Tab] to select it
and type in the sample title from the example.
8 The standard Fancy table template contains more columns than we
require. To delete columns, select them and press either the Delete or
Backspace key.
• The table should now have three columns and four rows.
top program
of each
There are three major elements in theShift-click
marketing the
change
column to select them for
that have open issues.
deletion
EW MARKETING INITIATIVES
<Text>
* <footnote>
Source: <source>
16
9 Press [Ctrl] or [Cmd][Tab] to the next text placeholder and type “Open
Issues”. Click the next cell and type “Responsibility”.
• You can continue to add text to each table cell by clicking on a cell and typing.
Pressing the Tab key will also advance you to the next cell.
10 To create the bullets used in the sample, select the text in a cell and
choose the Apply Paragraph command from the Text menu.
• This opens the Named Paragraphs dialog box.
• Choose “S2 Table Bullet •” entry in the list and click the Apply button.
The Named paragraphs used in the example table are illustrated and labeled below.
There are three major elements in the marketing change program
that have open issues.
EW MARKETING INITIATIVES
pen Issues
Open
Issues
eevaluate
customer
S2 Table
Bullet
•
esponsibility
Responsibility
Research approach
Questionnaire
–length
–focus
Review cycle
usan Smith
esegment customer
roups
Segmentation approach
Fit with sales territories
ill Edwards
esign new advertising
ampaign
New agency selection
Redefined value
proposition
afael Curtis
eeds
S3 Table Dash –
Chapter 8 - Tables in the Solo User Manual provides information on working with the
different features associated with tables.
17
Tutorial: Creating a Concept Page – Step-by-step
Sample Page
The actual process will combine the three elements into an
iterative flow.
ONTINUOUS MARKET FEEDBACK PROCESS
Data Gathering
Revision
Analysis
Follow the steps below to create the concept visual:
1 Click the placeholder “<Click here to Place Template>”.
<Click
<Click here
here to
to enter
enter message>
message>
<Click
<Click here
here to
to Place
Place Template>
Template>
Click the
placeholder
to open the
Templates
dialog box.
• This opens the Templates dialog box.
The Templates dialog box can also be opened by choosing the Place
Templates command from the Templates menu.
• Templates can be placed into any empty Storyboard cell.
18
2 Click the Concept category icon, then click the Flow Circle type icon and
last the 3 Part variation icon.
3 Click the Place button at the bottom of the dialog box to place the
template in the Storyboard cell.
• After placing the template, close the dialog box by clicking it's close box.
4 Select the cell containing the new template.
5 Switch to the Page Editor view to complete the page.
• Choose the Page Editor
command from the View menu,
OR
• Click the View Switcher icon at
the top of the Storyboard
command palette.
licking the
iew Switcher
con switches
etween the
toryboard
nd Page
ditor views.
6 Select the <Message> text placeholder, click on the text to edit and type
the sample message from the example below.
• This will highlight the text. Any text you type replaces the placeholder text.
• Text placeholders can be selected by pressing and holding down the [Ctrl]
(Windows) or [Cmd] (Macintosh) key and pressing the [Tab] key.
19
<Message>
<Message>
TITLE>
<label>
<label>
<label>
* <footnote>
Source: <source>
The actual process will combine the three elements into an
iterative flow.
ONTINUOUS MARKET FEEDBACK PROCESS
NOTE: If there are
parts of a Solo template
you do not want to use,
simply select them and
delete.
Data Gathering
Revision
In this case you would
select and delete the
source and footnote
information at the
bottom of the page.
Analysis
* <footnote>
Source: <source>
7 Click the "<TITLE>" placeholder or press [Ctrl] or [Cmd][Tab] to select it
and type in the sample title from the example.
• Continue to click or [Ctrl] or [Cmd][Tab] to select each text placeholder and
type in the sample text.
• Objects that are not used in an exhibit can be deleted by selecting them and
pressing the Backspace or Delete keys.
20
Tutorial: Creating a Data Driven Chart – Step-by-step
Sample Page
Chromemco's performance is significantly ahead of other groups.
ROUP PERFORMANCE
1 Unit Sales
Broadhurst
Baskins
5
7
Chromemco
Dunskill
68
4
Follow the steps below to create the sample bar chart:
1 Click the placeholder “<Click here to Place Template>” .
<Click
<Click here
here to
to enter
enter message>
message>
<Click
<Click here
here to
to Place
Place Template>
Template>
Click the
placeholder
to open the
Templates
dialog box.
• This opens the Templates dialog box.
The Templates dialog box can also be opened by choosing the Place
Templates command from the Templates menu.
• Templates can be placed into any empty Storyboard cell.
21
2 Click the Chart category icon, then click the Bar type icon and last the
Basic variation icon.
3 Click the Place button at the bottom of the dialog box to place the
template in the Storyboard cell.
• After placing the template, close the dialog box by clicking it's close box.
4 Select the cell containing the new template.
5 Switch to the Page Editor view to complete the page.
• Choose the Page Editor
command from the View menu,
OR
• Click the View Switcher icon at
the top of the Storyboard
command palette.
licking the
iew Switcher
con switches
etween the
toryboard
nd Page
ditor views.
22
6 Click on the Data Window Icon or choose the Data command from the
Chart menu.
• This opens the chart's data window.
Data Window
Icon
• Enter the sample data as illustrated below.
• After you have entered the data, close the window or click anywhere
on the page. The chart will be automatically plotted inside it's frame
and the data window is closed.
23
7 Select the <Message> text placeholder, click on the text to edit and type
the sample message from the example.
• This will highlight the text. Any text you type replaces the placeholder text.
• Text placeholders can be selected by pressing and holding down the [Ctrl]
(Windows) or [Cmd] (Macintosh) key and pressing the [Tab] key.
<Message>
<Message>
TITLE>
Subtitle>
Broadhurst
Baskins
5
7
Chromemco
Dunskill
68
4
* <footnote>
Source: <source>
8 To annotate your chart, use Solo's drawing tools to add arrows, text,
etc. to highlight your message.
Pointer
Rounded Rectangle
Arc
Perpendicular Lines
Freehand
Text
Rectangle
Oval
Angled Line
Polygon
Power Tools:
Arrow, Multigon,
Star, Bracket
Frame Tools:
Chart, Table and
Target frames
Deletes Selected Objects
Chapter 7 - Charts in the Solo User Manual provides information on working with the
charting features and provides illustrative charting examples.
24