1
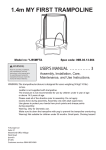
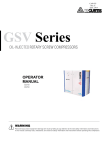
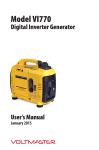
DIESEL DIGITAL INVERTER
GENERATOR SETS
XG-SF5600D
SUPER SILENT
OPERATING INSTRUCTIONS
PLEASE READ THIS MANUAL CAREFULLY
BEFORE USING MACHINE
PREFACE
Thank you for using our generator.
This manual includes the operation and maintenance of XG-SF5600D
All information in this publication is based on the latest product information available at the time of approval for printing. We
reserve the right to make changes at any time without notice and without incurring and obligation. The copyright of this
manual belongs to our company. No parts of this publication may be reproduced without written permission.
This manual should be considered a permanent part of the generator and should remain with it if it is resold.
Pay special attention to statements preceded by the following words:
WARNING
It indicates a strong possibility of severe personal injury or death if instruction is not followed.
CAUTION
It indicates a strong possibility of severe personal injury or death if instruction is not followed.
If a problem should arise, or if you have any questions about the generator, consult an authorized dealer.
BECAREFUL
The generator are designed to give safe and dependable service if operated according to instructions, read and understand
the Owner’s manual before operating the generator. Failure to do so could result in personal injury or equipment damage.
1
1. Safety Instruction
WARNING
The generator is designed to give safe and dependable service if operated according to
instructions. Read and understand this manual carefully before operating the generator or it may
cause serious injury and equipment damage.
WARNING
Exhaust contains poisonous carbon monoxide. Do not operate generator in confined environment
or with an aerator. Only use outdoors and far from open windows doors and vents.
WARNING
The muffler becomes very hot during operating and remains hot for a while after stopping the
engine. Be careful not to touch the muffler while it is hot. Let the engine cool before storing the generator indoor.
The engine exhaust system will be heated during operation and remain hot immediately after stopping the
engine. To prevent scalding, pay more attention to the warning marks attached to the generator.
BE CAREFUL
Do not parallel connect other cables to receptacles, use special jack, or it may cause an
electrical shock.
WARNING
2
Diesel is extremely flammable and is explosive under certain conditions.
Refuel in a ventilated area with engine stopped.
Keep cigarette, smoke and sparks away from the generator when refueling.
Always refuel in a well-ventilated location. Wipe off overload fuel with clean duster cloth
WARNING
Connection for standby power to a building electrical system must be made by a qualified electrician. The
connection must isolate the generator from utility power, and must comply with all applicable laws and
electrical codes. Improper connections to a building electrical system can allow electrical current from the
generator to backfeed into the utility lines. Such backfeed may electrocute utility company workers or others
who contact lines during a power outage and the generator may explode, or cause fires when utility power is
restores.
WARNING
To avoid accidents and equipment damage, check generation system every time before starting engine.
Keep the generator a distance at least 1 meter from other equipment or other equipment during operation.
Keep the generator horizontal when running. If generator tiled, it may cause fuel spillage.
Generator operators must be trained, muse know how to stop the generator quickly and understand the
operation of all controllable parts. Untrained operators should not be allowed to use this equipment.
Keep children and pet away from operation area.
Keep away from rotating parts during operation.
The generator is a potential source of electrical shock when misused. Do not operate it with web hands or in
any wet location.
Do not operate the generator in rain or snow and let it get wet.
3
CONTENT
1. Main Specification and Technical DATA
2. COMPONENT IDENTIFICATION
3. PRE- OPERATION CHECK
4. START GENERATOR SETS
5. GENERATOR SETS USE
6. LOAD
7. STOP GENERATOR SETS
8. MAINTENANCE
9. STORAGE
10. TROUBLESHOOTING
4
Specification
1. Size and weight
XG-SF5600D
Type
L x W x H (mm)
680 x 500 x 620
Net weight (kg)
98
2. Engine
XG186F
Model
4-stroke,1-Cylinder, Forced air cooling, Diesel engine
Type
Displacement (cc)
408
Compression ratio
19
3600rpm (ECO switch is off)
Engine speed
Forced air cooling
Cooling system
Ignition system
Oil capacity (L)
1.3
Fuel tank capacity (L)
16
Noise level (70% load)
68dB(A)/7m
8.5h
Continuous operation(70% load)
3. Generator
XG-SF5600D
Type
110/120/220/230/240
Rated voltage (V)
50/60
Rated frequency (Hz)
AC output
DC output
(for
Rated current (A)
45/42/22.7/21.7/20.8
Rated output (KVA)
Max. Output (KVA)
6.0
7.5
Rated voltage (V)
12
Rated current (A)
8.3
12V
automotiv
e batteries
only)
5
DIESEL DIGITAL INVERTER GENERATOR 5.0KVA
Warning
Read this manual carefully before using the machine, for your own safety.
Your power tool should only be passed on with these instructions.
1 COMPONENT IDENTIFICATION
1. Fuel cap
9. Overload indicator light
2. Fuel level meter
10. Output indicator light
3. Wheel
11. Oil alert indicator light
4. Control panel
12. Eco throttle switch
5. Starting grip
13. Engine switch
6. Fuel valve grip
14. DC socket
7. Maintenance covers
15. DC circuit breaker
8. AC socket
16. Grounding terminal
PICTURE. 1
6
Control panel
PICTUER .2
Economy Switch
Engine speed is kept at idle automatically when the electrical appliance is disconnected and it returns to the proper speed to
power of the electrical load when electrical appliance is connected. This position is recommended to minimize the fuel
consumption while in operation.
SAFETY INSTRTCTIONS
•The generator is designed to give safe and dependable service if operated according to instructions..
•Read and understand the User’s Manual before operating the generator. Failure to do so could result in personal injury or
equipment damage.
•Exhaust gas contains poisonous carton monoxide .Never run the generator in an enclosed area. Be sure to provide
adequate ventilation.
•The muffler becomes very hot during operation and remains hot for a while after stopping the engine. Be careful not to
touch the muffler white it is hot. Let the engine cool before storing the generator indoors.
•The engine exhaust system will be heated during operation and remain hot immediately after stopping the engine. To
prevent scalding, pay attention to the warning marks.
•Diesel is extremely flammable and explosive under certain conditions. Refuel in a well-ventilated area with the engine
stopped.
• Keep away from cigarette, smoke and sparks when re-fueling the generator, Always refuel in a well ventilated location.
• Wipe off spilled diesel at once after refueling.
• Connections for standby power to a building’s electrical system must be made by a qualified electrician and must comply
with all applicable laws and electrical codes. Improper connections can allow electrical current from the generator to back
feed into the utility lines.
7
Main component view
Picture. 3
Control Panel
Picture.4
8
3. PRE- OPERATION CHECK
3.1 SELECTION AND HANDLING OF FUEL
Selection fuel
Only use the light diesel which is most suitable for the diesel engine.
Keep dirt and water out of the fuel
When pump fuel from the fuel barrel, make sure that no dirt and water is mixed in the diesel, otherwise, the fuel
pump and eject nozzle will be damaged badly.
Don’t inject overfull fuel
Inject overfull fuel is dangerous. Don’t fill the tank beyond the top of the red plug inside the fuel filter net.
WARNING
Refuel at a well-ventilated area and with the engine stopped.
The area of store fuel and refuel forbidden closing to spark, fire and smoke.
Don’t inject overfull fuel into the fuel barrel, and tighten the fuel cap after refuel.
Be care, don’t overflow fuel when refuel, if overflow fuel, please clean it with cloth and make sure
the area of overflow is dry before start the engine.
3.2 Check
and fill engine oil
WARNING
Always check the engine oil level let the generator sets on water level ground before start it,
if necessary ,fill engine oil into the crankcase.
Oil shortage will damage the engine, but the engine’s speed will sudden increase with overfull
engine oil.
WARNING
XG FME Generator sets series is equipped with a low oil pressure protection system When oil dropped to
the minimum oil level bit line, the system will shut down the engine automatically, Preventthe occurrence of
incidents such as: bearing stuck.
Selecting the most appropriate oil for engine
Selecting the most appropriate engine oil for the generator sets is very important for ensure the best performance and using life of the
machine. If using of low-grade engine oil or the lack of regular oil changes, there will happen piston block, piston rings
stuck, cylinders, bearings and other parts worn rapidly and shut shorten the generator sets’ using life. XG designates use API classification
CC / CK-grade engine oil, and select the appropriate viscosity of the oil according to the local temperature.
1. Removed the two screws on the left side maintenance using the incidental tools, and remove the left maintenance cover.
2. Spin out the dipstick, and wipe the dipstick with a clean cloth not screwing the dipstick and insert it into the oil bit to check the oil level. If
the oil level below at the bottom of dipstick, filling the recommended oil.
9
PICTURE .5
PICTURE .6
3.3
1.
CHECK THE AIR CLEANER
Remove the 8 screws on the control panel, and remove the control panel.
PICTURE .7
10
2.
Remove the butterfly nut and open the air cleaner cover, take out the air cleaner filter.
Air cleaner
PICTURE .8
Open the air cleaner cover
PICTURE .9
Air filter
PICTURE .10
WARNING
Don’t clean the filter with using detergents.
If find the output drops or exhaust wrong color, in need of replacement filter.
Don’t operate generator sets without filter, otherwise it will create the engine worn rapidly.
3. Fix the air cleaner cover back and tighten the butterfly nut.
4. Fix the control panel back.
3.4 INSTALL THE BATTERY
11
1. Open the right side maintenance cover and find the black grounding wire of the battery.
2. Connect the grounding wire on the terminal of the battery as the picture show, fix up the screw and nut with screwdriver & wrench.
3. Fix the side cover back.
PICTURE .11
WARNING
Connect the black ground wire to negative terminal on the battery, do not take the battery positive
and negative on the contrary, otherwise the battery and generator sets and will be burnt
Don’t connect the positive and negative of battery each other, otherwise the battery will be damaged.
12
3.5 CHECK THE GENERATOR SETS
1.
Turn off the power switch and disconnect the load
WARNING
Turn off all the electric load before start the generator sets.
Generator sets must be grounded to prevent electric shock.
WARNING
Before start the generator sets make sure all the electric load (lighting equipment, motors) shut off,
It is dangerous of sudden load when start the generator sets.
3.6 RUNNING-IN PERIOD OPERATION
The initial 15 hours of engine running-in stage, the operator must comply with the following provisions:
1.
Initial start-up the generator sets let the engine first 5-minute warm-up, low-speed operation of no-load until the engine in heat state.
2. Generator sets can’t be driven high-power load in the running-in stage, XG recommends that low of 50% of rated load in the running-in
stage to run
3. Regular replacement of oil
After 20 hours of engine’s running, drain out the dirty oil when the engine is still in warm state, then fill in new oil.
Start the generator sets
WARNING !!
Don’t connect any tools or loading with generator when the first using.
1. Turn on the fuel switch
PICTURE .12
13
2. Start the generator sets with the switch key
PICTURE .13
3. Press down the decompression wrench completely.
PICTURE .14
4. Start the generator sets
PICTURE. 15
5. OPERATE THE GENERATOR SETS
1. Running
a. Warm the engine for 3 minutes
b. Check the indicator light is normal or not
14
PICTURE .16
WARNING !!
A. When the fuel low pressure and low oil level, the low fuel level system will be stop the engine, if not fill oil into the
engine, the engine still not be started. Please checked the oil level, add oil if necessary.
B. The engine maybe destroyed if oil is not enough
WARNING!!
·The DC receptacle may be used while the AC power is in use.
·An overloaded DC circuit will trip the DC circuit breaker. If this happens, shut off the DC load before pushing in the circuit
breaker to resume operation.
WARNING !!
·The oil alert system is designed to prevent engine damage caused by an insufficient amount of oil in alert system will
automatically shut down the engine (the engine switch will remain in the ON position).
·If the oil alert system shuts down the engine, the oil alert indicator light (red) will come on when you operate the starter, and
the engine will not run. If this occurs, add engine oil.
2. Inspection during the running
a. Check the sound or stroke is normal or not.
b. Check the engine if burning or running unstable.
c.
Check the exhaust gas color (black or much white)
If found these things as above, please stop working engine, contact agent to find the fault.
WARNING !!
A. If the engine has just been running, the muffler will be very hot, be careful not to touch.
B. Do not fill fuel when engine running.
15
Warning!
■To prevent electrical shock from faulty appliances , the generator should be grounded. Connect an electric conductor
(cable) of at least 1.5mm2 between the generator’s ground terminal and an external ground source.
■Connections for standby power to a building’s electrical system must be made by a qualified electrician and must
comply with all applicable laws and electrical codes. Improper connections can allow electrical current from the
generator to back feed into the utility lines. Such back feed may electrocute utility power is restored; the generator may
explode, burn, or cause fires in the building’s electrical system.
■Do not exceed the current limit specified for any one receptacle
■Do not connect the generator to a household circuit . This could cause the damage to the generator or to electrical
appliances in the house.
■Do not modify or use the generator for other purpose than it is intended for . Also observe the following when using the
generator.
—Do not connect generators in parallel.
—Do not connect an extension to exhaust pipe.
When an extension cable is required, be sure to use a rubber sheathed flexible cable,
Limit length of extension cables; 60m for cables of 1.5mm2 and 100m for cables of 2.5mm2.
Keep the generator away from other electric cables or wires such as distribution network.
The DC receptacle can be used while the AC power is in use. If you use both at the same time, be sure not to exceed
the total power for AC and DC.
Most appliance motors require more than their rated wattage for start-up.
6 LOAD
WARNING
Don’t start 2 or more electric load at the same time, start the loads one by one.
Don’t use floodlights with other load at the same time.
6.1
Connect various equipment to the generator sets in order, start the electric motors firstly if load inductive loads. Start-up the low-power
motor after starting the generator sets. Don’t start-up all the electric loads at the same time, if improper operation, which will cause the
generator sets turn or sudden braking lag, in that case, disconnect the loads immediately, and turn off the generators switch to check the
cause of the malfunction
6.2 DC applications
1.
Only for charging 12V automotive batteries.
2. When charge, turn off the air switch, users will be able to connect the DC12V output terminal with charge switch for cut off using.
If you use the battery with an automatic wire-type, be sure to disconnect the negative battery charging wire.
The generator cannot sense an inductive load with the same power, which the manual indicates. It only can sense 40%-70% power, which
3.
the manual indicates.
Loading voltage (V)
Loading
voltage
(V)
16
Loading current (A)
Opening the smart throttle
22
12
6
Closing the smart throttle
27
13
8.5
DC Max. Output power
37
13.5
8.5
WARNING
Connect the battery positive and negative to DC output positive and negative terminal on the generator
sets respectively, don’t take the battery positive and negative anti -, otherwise the generator sets and battery will be burnt.
Don’t contact the DC positive and negative posts each other, otherwise the generator will be damaged.
Don’t contact the battery positive and negative posts each other, otherwise the battery will be damaged.
Charge the large-capacity rechargeable batteries, as a result of excessive current ( Rechargeable batteries may not be
greater than the 6A), the DC current fuse will be burnt easily.
Don’t start the Generator sets if it still connects with the battery.
Do not use 12V output and AC output at the same time.
WARNING
The battery can volatile explosive gases, keep the battery far away from fire, spark and smoke.
In order to prevent sparks near the battery make sure connect the DC charge wire to the battery firstly,
Then connect to generator sets. When disconnect the DC charge wire, make sure disconnect it from the
generator sets firstly.
Service charge in a well-ventilated area
Before charge make sure remove the battery cover firstly.
If the electrolyte temperature exceeds 45 , stop charging immediately.
6.3 AC applications
1. Start the engine and make sure the output indicator light (green) illuminates.
3. Confirm that the appliance to be used is switched off, and plug in the appliance.
PICTURE .17
Substantial overloading that continuously lights the overload indicator light (red) may damage the generator. Marginal
overloading that temporarily lights the overload indicator light (red) may shorten the service life of the generator.
Be sure that all appliances are in good working order before connecting them to the generator, if an appliance begins to
operate abnormally, becomes sluggish, or stops suddenly, turn off the generator engine switch immediately. Then
disconnect the appliance, and examine it for signs of malfunction.
17
Output and overload indicators.
The output indicator light (green) will remain lighted during normal operating conditions.
If the generator is overloaded or of here is a short in the connected appliance, the output indicator light (green) will go OFF,
the overload indicator light (red) will go ON and current to the connected appliance will be shut off.
Stop the engine if the overload indicator light (red) switches ON and investigate the overload source.
PICTURE .18
Before connecting an appliance to the generator, check that it is in good order, and that its electrical
rating does not exceed that of the generator. Then connect the power cord of the appliance, and start the engine.
Be sure all equipment is turned off before plugging in the power cord.
When an electric motor is started, both the overload indicator lights (red) and the output indicator light (green) may go on
simultaneously. This is normal if the overload indicator light (red) goes off after about four seconds.
If the overload indicator light (red) stays on, consult your dealer.
Connect the ground terminal.
PICTURE .19
Start engine according to “START STEPS”
18
When the output indicator light (green) does not light and the overload indicator light (red) lights instead, set
the engine switch to STOP, stop the engine at once and then start the engine again.
Confirm that the equipment to be used is switched off, and insert the plug of the equipment to be used into the AC receptacle
unit.
Check that the equipment to be connected is switch off. When the equipment to be used is switched on, it
will operate suddenly, and injuries or accidents may be caused.
4. Switch on the equipment output indicator light will glitter (light). In case of overload operation or when trouble occurs for
the equipment being used, the output indicator light (green) will go out, the overload indicator light (red) will light
continuously, and no power will be put out. At this time, the engine will not stop, so that the engine must be stopped by
setting the respective engine switch to STOP
PICTURE .20
When equipment requires a large starting power, the overload indicator lights (red) and the output indicator
light (green) may light together for a short time, but this is no abnormality. After start of the
equipment, the overload indicator light (red) will go out and the output indicator light (green) will stay lit.
AC
Power
Electric
Power
Electromotor
lamps
tools
1
0.8-0.9
0.4-0.7(efficiency 0.86)
0-5.0KVA
0-4.5KVA
0-3.5KVA
DC battery
factor
Rated voltage 12V
Rated
current
Canada)
XG-SF5600D
6A (for
8.3A(except
Canada)
Oil alert system
·The oil alert system is designed to prevent engine damage caused by an insufficient amount of oil in alert system will
automatically shut down the engine (the engine switch will remain in the ON position).
·If the oil alert system shuts down the engine, the oil alert indicator light (red) will come on when you operate the starter, and
the engine will not run. If this occurs, add engine oil.
19
PICTURE .21
Electrical equipment, especially when the inductive load in the start-up needs a lot of starting current. When the users connect these devices
to the generator sets, the table as below for a reference
Type
Incandescent lamps, Heating device
Fluorescent lamps, Power tools
Motor-driven device, Metal halide lamps
Power: Wattage
Typical device
Start-up
Rated
1
1
Incandescent lamps, Electric boiler
0.5
0.75
Fluorescent lamps
0.2~0.3
0.5
Fridge, Fans
High altitude operation
At high altitude, the standard carburetor air –fuel mixture will be excessively rich.
Performance will decrease, and fuel consumption will increase.
High altitude performance can be improved by installing a smaller diameter main fuel jet in he carburetor and readjusting the
slow tempo screws. If you always operate the generator at altitudes higher than 1,500 m (5,000 feet) above sea level, have
your dealer perform these carburetor modifications.
Even with suitable carburetor jetting, engine horsepower will decrease approximately 3.5% for each 300m (1,000 feet)
increase in altitude. The effect of altitude on the horsepower will be greater than this if no carburetor modification is made.
Operation of the generator at an altitude lower than the carburetor is jetted for may result in reduced
performance, overheating, and serious engine damage caused by an excessively lean air/fuel mixture.
7 STOP THE GENERATOR SETS
1.
2.
Disconnect the loads from generator sets.
Spin the switch key to “ STOP” position.
20
PICTURE .22
3. Spin the fuel switch to “ OFF” position
PICTURE .23
WARNING
Don’t stop the generator sets with loads, make sure disconnect all the loads, then stop generator sets.
8. PERIODIC CHECKS AND MAINTENANCE
Regular inspection and maintenance is very important to maintain a generator sets in good working condition.
PLS inspect the items follow this tabulation as below
WARNING
Shut down the engine before any maintenance, if need run the engine in maintenance, but the
operation must be carried out in well-ventilated area because of exhaust toxic carbon monoxide.
In order to prevent the generator sets form corrosion, clean the generator sets with a cloth immediately
and sediment discharge after used it.
21
WARNING
PLS use the genuine parts from XG, if use of poor-quality parts and components, the engine will be damaged
Periodic check and maintenance
Interval
Item
Oil
Each
Each month
Each 3 months or
Each 6 months or
Each
use
or 20HRS
50HRS
100HRS
200HRS
●
●
●
●
Replace
Oil leaking
Nozzle
Check
Fuel pipe
●
●
Clean
●
Check
●
● if necessary
Replace
Battery
or
●
Check
Check
year
●
Check
Each month
electrolyte
Fuel
injection
Check
clearance
Check
●
pump
Adjust
●
of intake exhaust
First
valve
Time
●
Grind
intake/exhaust
valve
Replace
●
piston
ring
Combustion
●
Clean
chamber
Valve clearance
Check
●
&
adjust
Fuel tank and
●
Clean
filter tank
Check insulated
●
The generator sets has been stored more than 10 days
Check
Every 2 years (replace if necessary)
resistance
Fuel line system
NOTE: “●” mark needs specialized tools, PLS contact the authorized dealer from XG.
NOTE: (1) Long hours of operation to determine proper maintenance.
(2) Service more frequently when used in dusty areas.
(3) These items should be serviced by an authorized dealer, unless the owner has the proper tools and is
mechanically proficient. See the Shop Manual.
Temperature ( )
Time for changing oil (hour)
Recommended power factor
.25
Normal
100%
30
18
95%
35
15
85%
40
12
70%
22
8.1 Check
and replace oil
WARNING !!
C. Put the generator in horizontal line when start the engine each time. And checked the oil level, fill oil if necessary.
D. The engine maybe destroyed if oil is not enough
Note:
1. XG series inverter generator sets have low oil protect system, the engine will stop by itself when the oil level lower than
the level line.
2. Please choose the appropriate oil for the engine.
Replace oil
Remove the dipstick drain out the dirty oil when the engine is still in warm state. The discharge bolt lies at the bottom of the engine as picture
show, spin tighten the discharge bolt after drain out the dirt oil, then fill new engine oil into the crankcase.
PICTURE .24
Dipstick measures the remained oil. Refill with suitable oil into it when there are less of oil.
PICTURE .25
23
Oil capacity: 1.3 L
PICTURE .26
8.2 Clean the oil filter
Time
Each 6 months or 500 hours
Replace the oil filter, if necessary.
PICTURE .27
8.3 Replace the air cleaner filter
Don’t clean the filter with detergents
Time
Each 6 months or 500 hours
1. Take off the 8 sets of screws from the control panel, see pictures:
Picture. 28
2. And then see the Air Filter back of panel, there is a butterfly nut above of Air Filter cover, and take off the nut, take out
the Air cleaner case. See Picture:
24
Picture. 29
3. Put back the Air cleaner case, screw down the nut.
Picture.30
Clean the air filter element. Replace the air filter element if necessary.
WARNING !!
Never run the generator without air filter element or using defective air filter element.
TRANSPORTING AND STORAGE
To prevent fuel spillage when transporting or during temporary storage, the generator should be secured upright in its
normal operating position, with the engine switch OFF.
Tighten the fuel cap
Allow the engine to cool well before tighten the fuel cap
When transporting generator:
·Do
not overfill the tank.(There should be no fuel in the filler neck).
·Do not operate generators while it is on a vehicle. Take the generator off the vehicle and use it in a
well-ventilated place.
·Avoid a place exposed to direct sunlight when putting the generator on a vehicle. If the generator is left in an
enclosed vehicle for many hours, high temperature inside the vehicle could cause fuel to vaporize resulting in a
possible explosion.
·Do not drive on a rough road for an extended period with the generator on board. If you must transport the
generator on board. If you must transport the generator on a rough road, drain the fuel from the generator
before hand.
Before storing the unit for an extended period:
1. Be sure the storage area is free of excessive humidity and dust.
25
2. Drain the fuel
TROUBLESHOOTING
The cause of the malfunction
Corrective measures
The engine can’t start, low fuel
Refuel
The fuel switch is turn off
Turn on the fuel switch
Injection pump and injector nozzle can’t inject fuel or just inject less fuel
Removed the fuel injector, test and maintenance it on test stand
Speed adjust handle not at "start" position
Turn the speed adjust handle to “ start” position.
Check the oil level
The oil level must keep the position from Min. level to Max. level
Injection nozzle is dirt
Clean the injection nozzle
Battery no power
Charge or replace new battery
The generator sets no power output the main switch is turn off
Turn on the main switch
Sockets poor contact
Check and repair the sockets
The equipment that connects generator not starting
Is the output indicator on?
Is the overload indicator
No
on?
Bring the generator to an authorized
dealer.
Is the electrical equipment
No
work when plugged directly?
Restart after turning off the overload
indicate
Bring the generator to an authorized
dealer.
Yes
1)
Replace the electric equipment.
2)
Repair the electric equipment
There is no power in the DC electric outlet.
Is there electric circuit breaker
Replace the electric circuit breaker
intact?
bring the generator to an authorized dealer
26
Deficient AC output
Deficient output
dirty
Check air filter
Check fire net of
Clean or replace air filter element
dirty
Clean or replace fire net
muffler
Check the gasoline
Yes
Replace gasoline
is bad
Return the generator to an authorized dealer
Engine will not start:
NO
Enough fuel
Add fuel
Yes
NO
Are the engine switch and fuel valve
Turn them to the “on” position
“on”?
Yes
NO
Enough lubricating oil?
Add more qualified oil
Yes
YES
Clean the nozzle
Is the nozzle dirty
No
Is the battery available
NO
Charge the battery
NO
Send the generator to an
or
authorized dealer
Replace it
·Shake
the generator several times to make the float rise if the generator cannot start after adding oil for
the first time and the oil alarm indicator stays on when start the generator sets.
·If the engine still doesn’t start, have the generator repaired by a licensed repair person.
INSPECTION:
·Check the nozzle is dirty or not, clean the nozzle.
·Fuel injection pump and nozzle does not spurt fuel or spurt less fuel, PLS send the generator sets to
the maintenance center after selling service.
27
WIRE DIAGRAM
28
EXPLODED PARTS VIEW
29
PARTS LIST
No.
1
2
3
4
5
Name
Diesel Engine assembly
Stator assembly
M6 X 25 Screw
Flywheel assembly
6
7
8
9
10
11
12
13
14
15
16
Quantity
1
1
3
1
1
No.
46
47
48
49
Name
Decompression Lasso sleeve
Step motor holder
50
M6 X 12 Bolt
Quantity
1
1
1
1
1
Connect pipe, air cleaner
1
51
Step Motor
1
M6 X 20 Screw
3
52
M4 X 8 “ ” Screw
2
Air cleaner box
1
53
Right fan cover
1
M6 Nut
Air cleaner filter
Air cleaner box cover
2
1
54
55
56
M6 X 12 Screw
Right side cover
M6 X 10 Screw
2
1
57
58
59
Maintenance cover
M6 big head screw
60
61
Fan
M10 X 30 Screw
62
Start motor
M16 Nut
M8 butterfly nut
Fan cover
M6 X 12 Screw
ST 4.8 X 25 Screw
Fan
1
1
1
4
4
1
Handle, Decompression
M5 X 12 Bolt
M8 X 15 Screw
6
2
4
4
1
1
17
18
Anterior housing
Handle bar
1
2
19
Stopple, handle
4
63
64
Muffler cover
Muffler cover connect patch (1)
1
20
M6 X 16 Screw
6
65
M6 X 12 Screw
2
21
Fuel Switch
66
Muffler
1
22
Control Panel
67
M8 Nut
2
23
Indicator lights
1
1
1
1
68
Muffler cover hull
1
24
Eco switch
1
69
ST 4.2 Screw
8
DC output socket
1
70
Rear housing
1
DC current breaker
ST 3.2 Screw
1
1
1
1
1
1
4
1
71
72
Exhaust Cover
M6 X 10 Screw
73
74
75
76
Left fan cover
M5 Nut
Muffler cover connect patch (2)
M6 X 12 Screw
77
78
79
Left side cover
M6 X 10 Screw
M6 X 12 Screw
1
4
1
1
1
2
1
6
25
26
27
28
29
30
31
32
33
34
Engine switch
AC current breaker
AC output socket (1)
AC output socket (2)
M8 Nut
Engine chassis
Shock absorber
35
36
37
38
Battery
M5 screw
4
1
1
8
80
81
Holder
Fuel switch
Battery pressing board
Tighten bolt, battery
1
2
1
2
82
83
Fuel switch gimbal
Fuel Tank
1
1
1
1
39
Inverter assembly
1
84
Top cover
1
40
Inverter holder
1
85
M6 X 40 Screw
4
41
Chassis
1
86
Fuel level indicator cover
1
42
43
44
M8 Nut
Brake wheel
Wheel
4
1
3
87
88
89
Fuel level indicator sleeve
Fuel cap sleeve
Fuel cap
1
1
1
45
Decompression Lasso
1
30
31