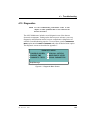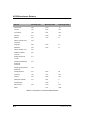
1
AD25 ABSORBANCE DETECTOR OPERATOR'S MANUAL © 1999 Dionex Corporation Document No. 031611 Revision 01 November 1999 ©1999 by Dionex Corporation All rights reserved worldwide. Printed in the United States of America. This publication is protected by federal copyright law. No part of this publication may be copied or distributed, transmitted, transcribed, stored in a retrieval system, or transmitted into any human or computer language, in any form or by any means, electronic, mechanical, magnetic, manual, or otherwise, or disclosed to third parties without the express written permission of Dionex Corporation, 1228 Titan Way, Sunnyvale, California 94088-3603 U.S.A. DISCLAIMER OF WARRANTY AND LIMITED WARRANTY THIS PUBLICATION IS PROVIDED “AS IS” WITHOUT WARRANTY OF ANY KIND. DIONEX CORPORATION DOES NOT WARRANT, GUARANTEE, OR MAKE ANY EXPRESS OR IMPLIED REPRESENTATIONS REGARDING THE USE, OR THE RESULTS OF THE USE, OF THIS PUBLICATION IN TERMS OF CORRECTNESS, ACCURACY, RELIABILITY, CURRENTNESS, OR OTHERWISE. FURTHER, DIONEX CORPORATION RESERVES THE RIGHT TO REVISE THIS PUBLICATION AND TO MAKE CHANGES FROM TIME TO TIME IN THE CONTENT HEREINOF WITHOUT OBLIGATION OF DIONEX CORPORATION TO NOTIFY ANY PERSON OR ORGANIZATION OF SUCH REVISION OR CHANGES. TRADEMARKS AutoSuppression® and SRS ® are registered trademarks of Dionex Corp. CHROMELEON™ and DX-LAN™ are trademarks of Dionex Corp. Teflon ® and Tefzel® are registered trademarks of E. I. du Pont de Nemours & Co. PRINTING HISTORY Revision 01, November 1999 Contents 1 • Introduction 1.1 Overview . . . . . . . . . . . . . . . . . . . . . . . . . . . . . . . . . . . . . . . . . . . . . . . .1-1 1.2 About This Manual . . . . . . . . . . . . . . . . . . . . . . . . . . . . . . . . . . . . . . . .1-2 1.2.1 Typefaces . . . . . . . . . . . . . . . . . . . . . . . . . . . . . . . . . . . . . . . . .1-3 1.2.2 Safety Messages and Notes . . . . . . . . . . . . . . . . . . . . . . . . . . .1-3 1.2.3 Symbols . . . . . . . . . . . . . . . . . . . . . . . . . . . . . . . . . . . . . . . . . .1-4 2 • Description 2.1 Front Control Panel . . . . . . . . . . . . . . . . . . . . . . . . . . . . . . . . . . . . . . . .2-1 2.1.1 Control Panel Keypad . . . . . . . . . . . . . . . . . . . . . . . . . . . . . . .2-1 2.2 Rear Panel . . . . . . . . . . . . . . . . . . . . . . . . . . . . . . . . . . . . . . . . . . . . . . .2-5 2.3 Electronics . . . . . . . . . . . . . . . . . . . . . . . . . . . . . . . . . . . . . . . . . . . . . . .2-7 2.4 Optical Bench . . . . . . . . . . . . . . . . . . . . . . . . . . . . . . . . . . . . . . . . . . . .2-8 2.5 2.4.1 Tungsten Lamp . . . . . . . . . . . . . . . . . . . . . . . . . . . . . . . . . . . . .2-9 2.4.2 Deuterium Lamp . . . . . . . . . . . . . . . . . . . . . . . . . . . . . . . . . . .2-10 2.4.3 Flow Cells . . . . . . . . . . . . . . . . . . . . . . . . . . . . . . . . . . . . . . . .2-10 2.4.4 Photodiode Assemblies . . . . . . . . . . . . . . . . . . . . . . . . . . . . .2-11 Functional Description . . . . . . . . . . . . . . . . . . . . . . . . . . . . . . . . . . . .2-12 2.5.1 Operating and Control Modes . . . . . . . . . . . . . . . . . . . . . . . .2-12 2.5.2 Local and Remote Modes . . . . . . . . . . . . . . . . . . . . . . . . . . . .2-14 2.5.3 Method Control . . . . . . . . . . . . . . . . . . . . . . . . . . . . . . . . . . .2-15 Doc. 031611-01 11/99 i AD25 Absorbance Detector 2.6 2.5.4 Direct Control . . . . . . . . . . . . . . . . . . . . . . . . . . . . . . . . . . . . 2-16 2.5.5 Rise Time and Data Collection Rate . . . . . . . . . . . . . . . . . . . 2-16 Theory of Operation . . . . . . . . . . . . . . . . . . . . . . . . . . . . . . . . . . . . . . 2-17 3 • Operation and Maintenance 3.1 Operating Guidelines . . . . . . . . . . . . . . . . . . . . . . . . . . . . . . . . . . . . . . 3-1 3.1.1 Wavelength Selection . . . . . . . . . . . . . . . . . . . . . . . . . . . . . . . 3-1 3.1.2 Mobile Phases . . . . . . . . . . . . . . . . . . . . . . . . . . . . . . . . . . . . . 3-1 3.1.3 Solvent Delivery System . . . . . . . . . . . . . . . . . . . . . . . . . . . . . 3-2 3.2 Initial Screens . . . . . . . . . . . . . . . . . . . . . . . . . . . . . . . . . . . . . . . . . . . . 3-4 3.3 Running Under Direct Control . . . . . . . . . . . . . . . . . . . . . . . . . . . . . . . 3-5 3.4 3.3.1 Remote Direct Control . . . . . . . . . . . . . . . . . . . . . . . . . . . . . . 3-5 3.3.2 Local Direct Control . . . . . . . . . . . . . . . . . . . . . . . . . . . . . . . . 3-6 Running Under Method Control . . . . . . . . . . . . . . . . . . . . . . . . . . . . . . 3-6 3.4.1 Creating a New Method . . . . . . . . . . . . . . . . . . . . . . . . . . . . . . 3-8 3.4.2 Editing an Existing Method . . . . . . . . . . . . . . . . . . . . . . . . . . . 3-9 3.4.3 Running a Method . . . . . . . . . . . . . . . . . . . . . . . . . . . . . . . . . 3-10 3.4.4 Changing the Running Method . . . . . . . . . . . . . . . . . . . . . . . 3-11 3.5 TTL/Relay Control . . . . . . . . . . . . . . . . . . . . . . . . . . . . . . . . . . . . . . . 3-11 3.6 DX-LAN Remote Operation . . . . . . . . . . . . . . . . . . . . . . . . . . . . . . . 3-11 3.7 Routine Maintenance . . . . . . . . . . . . . . . . . . . . . . . . . . . . . . . . . . . . . 3-12 4 • Troubleshooting 4.1 ii No Detector Response . . . . . . . . . . . . . . . . . . . . . . . . . . . . . . . . . . . . . 4-1 Doc. 031611-01 11/99 Contents 4.2 Noisy Baseline . . . . . . . . . . . . . . . . . . . . . . . . . . . . . . . . . . . . . . . . . . . .4-2 4.3 Drifting Baseline . . . . . . . . . . . . . . . . . . . . . . . . . . . . . . . . . . . . . . . . . .4-4 4.4 High Background Absorbance . . . . . . . . . . . . . . . . . . . . . . . . . . . . . . .4-5 4.5 Peaks Too Large or Small . . . . . . . . . . . . . . . . . . . . . . . . . . . . . . . . . . .4-6 4.6 Detector Does Not Autozero . . . . . . . . . . . . . . . . . . . . . . . . . . . . . . . . .4-6 4.7 Lamp Does Not Light . . . . . . . . . . . . . . . . . . . . . . . . . . . . . . . . . . . . . .4-7 4.8 Power-Up Wavelength Calibration Fails . . . . . . . . . . . . . . . . . . . . . . . .4-7 4.9 Faulty DX-LAN Communication . . . . . . . . . . . . . . . . . . . . . . . . . . . . .4-8 4.10 Diagnostics . . . . . . . . . . . . . . . . . . . . . . . . . . . . . . . . . . . . . . . . . . . . . .4-9 5 • Service 5.1 Liquid Leaks . . . . . . . . . . . . . . . . . . . . . . . . . . . . . . . . . . . . . . . . . . . . .5-1 5.2 Cleaning the Cell . . . . . . . . . . . . . . . . . . . . . . . . . . . . . . . . . . . . . . . . . .5-2 5.3 Removing Trapped Air from the Cell . . . . . . . . . . . . . . . . . . . . . . . . . .5-2 5.4 Replacing the Main Power Fuses . . . . . . . . . . . . . . . . . . . . . . . . . . . . .5-3 5.5 Replacing the Deuterium Lamp . . . . . . . . . . . . . . . . . . . . . . . . . . . . . . .5-4 5.6 Replacing the Tungsten Lamp . . . . . . . . . . . . . . . . . . . . . . . . . . . . . . . .5-6 A • Specifications A.1 Electrical . . . . . . . . . . . . . . . . . . . . . . . . . . . . . . . . . . . . . . . . . . . . . . . A-1 A.2 Environmental . . . . . . . . . . . . . . . . . . . . . . . . . . . . . . . . . . . . . . . . . . . A-1 A.3 Physical . . . . . . . . . . . . . . . . . . . . . . . . . . . . . . . . . . . . . . . . . . . . . . . . A-1 A.4 Display and Keypad . . . . . . . . . . . . . . . . . . . . . . . . . . . . . . . . . . . . . . A-1 A.5 Detector . . . . . . . . . . . . . . . . . . . . . . . . . . . . . . . . . . . . . . . . . . . . . . . . A-2 Doc. 031611-01 11/99 iii AD25 Absorbance Detector A.6 Flow Cells . . . . . . . . . . . . . . . . . . . . . . . . . . . . . . . . . . . . . . . . . . . . . . .A-3 A.7 Heat Exchanger . . . . . . . . . . . . . . . . . . . . . . . . . . . . . . . . . . . . . . . . . .A-3 B • Installation B.1 Facilities Required . . . . . . . . . . . . . . . . . . . . . . . . . . . . . . . . . . . . . . . .B-1 B.2 Unpacking . . . . . . . . . . . . . . . . . . . . . . . . . . . . . . . . . . . . . . . . . . . . . . .B-1 B.3 System Configuration . . . . . . . . . . . . . . . . . . . . . . . . . . . . . . . . . . . . . .B-2 B.4 Installation . . . . . . . . . . . . . . . . . . . . . . . . . . . . . . . . . . . . . . . . . . . . . .B-2 B.4.1 Power . . . . . . . . . . . . . . . . . . . . . . . . . . . . . . . . . . . . . . . . . . . .B-2 B.4.2 Flow Cell . . . . . . . . . . . . . . . . . . . . . . . . . . . . . . . . . . . . . . . . .B-4 B.4.3 Heat Exchanger . . . . . . . . . . . . . . . . . . . . . . . . . . . . . . . . . . . .B-5 B.4.4 Waste Line . . . . . . . . . . . . . . . . . . . . . . . . . . . . . . . . . . . . . . . .B-5 B.4.5 Detector Output (Analog). . . . . . . . . . . . . . . . . . . . . . . . . . . . .B-5 B.4.6 Relay/TTL Control . . . . . . . . . . . . . . . . . . . . . . . . . . . . . . . . . .B-6 B.4.7 DX-LAN Network Connection (Optional). . . . . . . . . . . . . . . .B-8 C • User Interface C.1 iv Operational Screens . . . . . . . . . . . . . . . . . . . . . . . . . . . . . . . . . . . . . . .C-2 C.1.1 Menu of Screens . . . . . . . . . . . . . . . . . . . . . . . . . . . . . . . . . . . .C-2 C.1.2 Main Screen . . . . . . . . . . . . . . . . . . . . . . . . . . . . . . . . . . . . . . .C-3 C.1.3 Detail Screen . . . . . . . . . . . . . . . . . . . . . . . . . . . . . . . . . . . . . .C-5 C.1.4 Method . . . . . . . . . . . . . . . . . . . . . . . . . . . . . . . . . . . . . . . . . . .C-6 C.1.5 Module Setup Screen . . . . . . . . . . . . . . . . . . . . . . . . . . . . . . . .C-8 C.1.6 Analog Output Setup . . . . . . . . . . . . . . . . . . . . . . . . . . . . . . . .C-9 Doc. 031611-01 11/99 Contents C.1.7 C.2 Time Function In . . . . . . . . . . . . . . . . . . . . . . . . . . . . . . . . . . C-10 Diagnostic Screens . . . . . . . . . . . . . . . . . . . . . . . . . . . . . . . . . . . . . . C-11 C.2.1 Diagnostic Menu . . . . . . . . . . . . . . . . . . . . . . . . . . . . . . . . . . C-11 C.2.2 Power-Up Screen. . . . . . . . . . . . . . . . . . . . . . . . . . . . . . . . . . C-12 C.2.3 Elapsed Time. . . . . . . . . . . . . . . . . . . . . . . . . . . . . . . . . . . . . C-13 C.2.4 Diagnostic Tests . . . . . . . . . . . . . . . . . . . . . . . . . . . . . . . . . . C-14 C.2.5 Leak Sensor Calibration and Status. . . . . . . . . . . . . . . . . . . . C-16 C.2.6 Wavelength Verification . . . . . . . . . . . . . . . . . . . . . . . . . . . . C-17 C.2.7 Signal Parameters . . . . . . . . . . . . . . . . . . . . . . . . . . . . . . . . . C-19 D • Common Mobile Phases D.1 UV Cutoffs . . . . . . . . . . . . . . . . . . . . . . . . . . . . . . . . . . . . . . . . . . . . . D-1 D.2 UV Absorbance Wavelengths . . . . . . . . . . . . . . . . . . . . . . . . . . . . . . . D-1 E • Reordering Information Doc. 031611-01 11/99 v AD25 Absorbance Detector vi Doc. 031611-01 11/99 1 • Introduction 1.1 Overview The AD25 Absorbance Detector is a dual-beam, variable wavelength photometer. Spectral capability from 190 nm to 800 nm is provided by two light sources: a deuterium lamp for ultraviolet detection and a tungsten lamp for visible wavelength operation. The AD25 contains a built-in holmium oxide filter for wavelength verification. The AD25 can be controlled locally, from the front panel, or remotely (via the Dionex DX-LAN™ interface), from a host computer running one of these Dionex chromatography software products: _ PeakNet 5.11 (or later), for ion chromatography (IC) applications, _ PeakNet 6, for ion chromatography (IC) applications, or _ CHROMELEON™ 6, for high-performance liquid chromatography (HPLC) applications NOTE PeakNet 6 and CHROMELEON 6, Build 435 (or later) support the AD25. Check the About box in the software (via the Help menu); if the Build number is below 435, the AD25 driver must be installed separately. Contact Dionex for ordering information. Doc. 031611-01 11/99 1-1 AD25 Absorbance Detector 1.2 About This Manual Chapter 1 Introduction Provides a brief overview of the AD25. Explains safety messages and icons that appear in the manual. Chapter 2 Description Describes the AD25 front panel controls, rear panel connections, electronics, and flow cells. Describes the operating modes and control modes. Includes a brief theory of absorbance detection. Chapter 3 Operation and Maintenance Chapter 4 Troubleshooting Chapter 5 Service Appendix A Specifications Appendix B Installation Appendix C User Interface Appendix D Common Mobile Phases Appendix E Reordering Information 1-2 Explains how to create, edit, and run methods. Lists routine preventive maintenance procedures. Lists problems that may occur, along with step-by-step instructions for resolving them. Contains step-by-step instructions for routine service and parts replacement procedures. Lists the AD25 specifications and installation site requirements. Describes how to install the AD25. Illustrates and describes all menus and screens available for AD25 operation and diagnostics. Lists the UV cutoff values (in nm) for selected absorbance mobile phases. Lists spare parts for the detector. Doc. 031611-01 11/99 1 • Introduction 1.2.1 Typefaces _ Capitalized bold Helvetica indicates a front panel button: Press Enter to begin running the method. _ Uppercase bold Helvetica indicates the name of a menu or screen, or a field on a screen: Go to the METHOD screen. Move the cursor to the EDIT field. 1.2.2 Safety Messages and Notes The AD25 meets European, EMC, and safety requirements per Council Directives 73/23/EEC and 89/336/EEC, EN 61010-1:1993 (safety), EN 50082-1:1992 (susceptibility), and EN 55011:1991 (emissions). The TUV/CE and GS safety label on the AD25 attests to compliance with these standards. The AD25 is designed for use with IC and HPLC application systems and should not be used for any other purpose. If there is a question regarding appropriate usage, contact Dionex before proceeding. This manual contains warnings and precautionary statements that, when properly followed, will prevent personal injury to the user and/or damage to the AD25. Safety messages appear in bold type and are accompanied by icons, as shown below. Indicates an imminently hazardous situation which, if not avoided, will result in death or serious injury. Indicates a potentially hazardous situation which, if not avoided, may result in death or serious injury. Indicates a potentially hazardous situation which, if not avoided, may result in minor or moderate injury. Doc. 031611-01 11/99 1-3 AD25 Absorbance Detector Indicates that the function or process of the instrument may be impaired. Operation does not constitute a hazard. Informational messages also appear throughout this manual. These are labeled NOTE and are in bold type: NOTE NOTES call attention to certain information. They alert you to an unexpected result of an action, suggest how to optimize instrument performance, etc. 1.2.3 Symbols The symbols below appear on the AD25, or on AD25 labels. b Alternating current Protective conductor terminal (earth ground) Power supply is on Power supply is off 1-4 Doc. 031611-01 11/99 2 • Description 2.1 Front Control Panel The AD25 Absorbance Detector is housed in a single-height Dionex enclosure. The control panel is on the front door of the enclosure (see Figure 2-1). The control panel includes the liquid crystal display (or screen), the membrane keypad, and the actuator for the main power switch. Screen Visibility Three adjustments are available for improving screen visibility: _ Adjust the screen contrast with the knurled knob in the recess below the Help and Menu buttons (see Figure 2-1). _ Adjust the brightness of the display panel backlight by selecting a different option on the MODULE SETUP screen (see Section C.1.5). _ Adjust the control panel to one of four different positions by supporting the front door at the left side (to prevent it from opening) and lifting firmly on the tab in the recess below the Help and Menu buttons (see Figure 2-1). To return the panel to the vertical position, push on the tab. Power Switches The actuator for the main power switch is on the front door, although the power switch itself is on a bulkhead inside the detector. The actuator functions only when the door is fully closed; when the door is open, press the main power switch to turn the AD25 on and off. To open the door, pull on the tab beside the power switch actuator (see Figure 2-1). 2.1.1 Control Panel Keypad Use the front panel keypad to control AD25 operation directly, or to create and modify methods (programmed series of timed events). _ Press Menu to display a list of screens available for display. _ Only fields shown in reverse video on a screen can be edited or selected; other fields display information. Doc. 031611-01 11/99 2-1 AD25 Absorbance Detector A D 25 A b so rb a n ce D e te cto r M ENU of SCREENS 1 2 3 4 M A IN SCREEN DETAIL SCREEN M ETHOD ___ 5 6 7 8 M OD ULE SETUP ANALO G OUT SETUP TIME FUNCTIO N IN DIAG NO STIC ME NU Help M essage O ffset H o ld /R u n 7 8 9 M ark R eset 4 5 6 1 2 3 In sert Select H elp D elete M ain Po w er Sw itch A ctuato r M enu Select Tab (fo r o pening the doo r) 0 K n ob (fo r adju sting screen con trast) En ter Tab (fo r tiltin g the panel) Figure 2-1. AD25 Front Panel _ Use the four arrow buttons to position the cursor in a field. _ Use the numeric buttons to enter variable values in a field. Use the Select ∆ or Select ∇ button to choose from predetermined options. Pressing a Select button increases (or decreases) a numeric value by one. Holding down a Select button increases (or decreases) the numeric value continuously. _ 2-2 Pressing Enter or a cursor arrow button usually saves and executes a selected value in a field. See Table 2-1 for details about exceptions to this feature. Doc. 031611-01 11/99 2 • Description Button O ffs e t M a rk Function Returns the analog (recorder) output to a predetermined baseline, balances the sample and reference circuits, and zeros the display. Offset forces new digital data stored for DX-LAN retrieval to go to zero. This function can be programmed in a method. Sends a 10% positive event mark to the analog (recorder) output. (A mark typically indicates a sample injection.) Mark does not affect digital DXLAN data. This function can be programmed in a method. Inserts a new step into a method. Move the cursor to the TIME field and press Insert; the new step is added after the cursor position. Enter a time value for the new step and press Enter or a cursor arrow button. (If you move the cursor out of the field before entering a time value, the new step disappears.) Insert steps in any order; when you press Enter or an arrow button, the AD25 Moduleware automatically organizes all steps in the correct chronological order. Delete performs the following functions: H old/R un _ _ _ Cancels an entry that is in progress and restores the previous value. _ Deletes a method step. Move the cursor on the METHOD screen to the TIME field for the step to be deleted and press Delete twice. To restore the original time and step parameters, press any button except Delete. _ Deletes an entire method. Move the cursor on the METHOD screen to the EDIT field and press Delete twice. Returns a field to its default value (if an entry is not in progress). “Blanks” the parameter value for a method step. Move the cursor to a step entry field on the METHOD screen, press Delete once, and move the cursor out of the field. The field remains blank, indicating that the value entered for the previous step is still in effect. Turns the method clock off (Hold) and on (Run). This button functions only when the detector is under Method control (see Section 2.5.3). When the method clock is in Hold, pressing Hold/Run starts the clock at the initial step of a new method or, if resuming an interrupted method, at the time at which the clock was put in Hold. When the method clock is in Run, pressing Hold/Run stops the method clock, thereby “holding” the method and freezing the current conditions. Table 2-1. AD25 Front Panel Buttons Doc. 031611-01 11/99 2-3 AD25 Absorbance Detector Button R eset Function Changes the method clock time to INIT, causing the initial conditions specified in the method to be executed. This button functions only when the detector is under Method control (see Section 2.5.3). The Select buttons cycle through predetermined options in entry fields. To confirm the selected value, press Enter or a cursor arrow button. In fields with predetermined numeric choices, pressing Select ∆ increases the value by one unit and pressing Select ∇ decreases the value by one unit. Holding down a Select button increases (or decreases) the value continuously. The arrow buttons perform the following functions: _ Pressing an arrow button moves the cursor, in the direction of the arrow, to the next entry field (if one exists). At the end of a line, the left arrow wraps the cursor around to the next entry field on the line above; the right arrow wraps the cursor to the next entry field on the line below. The up and down arrows do not wrap around. _ Pressing an arrow button immediately after entering or selecting a new value in an entry field saves and/or executes the new value (just as pressing Enter does), except when the cursor is in these locations: DIAGNOSTIC TEST screen fields, SAVE TO and RUN fields on the METHOD screen, CALIBRATION screen fields, and Menu fields. Displays a Help screen with context-sensitive information. When an operational screen is displayed, pressing Menu displays the MENU of SCREENS. When a diagnostic screen is displayed, pressing Menu once opens the DIAGNOSTIC MENU; pressing Menu a second time opens the MENU of SCREENS. 1 E n te r Enters numeric values into the current entry field. When a menu is displayed, pressing a numeric button opens the corresponding screen. Saves and/or executes changes made in entry fields, except on the METHOD screen. To save editing changes on the METHOD screen, move the cursor to the SAVE TO field, enter the method number, and press Enter. When a menu is displayed, pressing Enter opens the highlighted screen. Table 2-1. AD25 Front Panel Buttons (continued) 2-4 Doc. 031611-01 11/99 2 • Description 2.2 Rear Panel The AD25 rear panel includes various connectors, as well as the fuse holder and main power receptacle (see Figure 2-2). ANALOG OUT Connector The ANALOG OUT connector is a standard BNC connector. This is a 0 to 1 volt output; full-scale range can be selected. RELAY/TTL Connectors The 12-pin connector includes two Relay outputs that can be programmed to switch any low-voltage control. The switched current must be less than 200 mA and 42 V peak. See Section B.4.6 for installation instructions and a list of the Relay and TTL connector pin assignments. TTL functions are defined on the TIME FUNCTION IN screen (see Section C.1.7). DX-LAN Connector The DX-LAN connector is a standard BNC connector. Connect a BNC tee connector (P/N 921914) and a DX-LAN cable (P/N 960404) here if you plan to control operation of the AD25 with Dionex chromatography software. See Section B.4.7 for installation instructions. A N A LO G O UT D X-LA N Relay/TTL Connectors Fan Fuse Holder M ain Power Receptacle Drain Tube Figure 2-2. AD25 Rear Panel Doc. 031611-01 11/99 2-5 AD25 Absorbance Detector Power Entry The power entry is socketed for a modular power cord (IEC 320 C13). The AD25 may be operated from 85 to 270 Vac, 47 to 63 Hz power and requires a grounded, single-phase power source. The input power is 130 watts, maximum. The line voltage is automatically selected, so no adjustment is required. SHOCK HAZARD—To avoid electrical shock, a grounded receptacle must be used. Do not operate or connect to an AC power main without an earthed ground connection. The power cord is used as the main disconnect device. Make sure the socket-outlet is located near the detector and is easily accessible. Operation at AC input levels outside of the specified operating voltage range may damage the detector. Fuses The AD25 uses two 3.15 A slow-blow fuses (IEC127 type 1, P/N 954745). See Section 5.4 for fuse replacement instructions. For continued protection against risk of fire or shock, replacement fuses must be the same type and rating specified in this manual. 2-6 Doc. 031611-01 11/99 2 • Description 2.3 Electronics The AD25 electronics include the Controller card (printed circuit board), TTL and Relay connections, and analog (recorder) connections. All connections are made to the rear panel. Do not attempt to access the AD25 electronics. The electronics cannot be serviced by users; if servicing is required, it must be performed by qualified personnel following appropriate electrostatic discharge (ESD) handling procedures. Power Supply The power supply module contains connections to the AC mains and provides regulated, low-voltage power for the AD25. The power supply is rated at 130 watts. The power entry components are shielded and filtered to prevent electromagnetic interference (EMI). SHOCK AND FIRE HAZARD—The power supply module operates at line potentials. Refer all servicing to qualified personnel. Lamp Power Supply The lamp power supply controls the deuterium and tungsten lamps; it also supplies power to the fan that cools the optical bench. SHOCK HAZARD—Components used to ignite and operate the deuterium lamp are at high potentials. Doc. 031611-01 11/99 2-7 AD25 Absorbance Detector Controller Card The Controller card provides the signal processing used when absorbance is measured. Two photodiode assemblies in the optical bench are connected to the Controller card via BNC connectors and coaxial cables. The photodiode outputs are amplified for subsequent log ratio conversion to absorbance by the preamp circuit. The preamp gain is automatically adjusted to compensate for system variables, such as the lamp output. The preamp requires no calibration. A BNC connector on the Controller card is the analog (recorder) output. The output scale, polarity, baseline offset, and filter rise time can be set from the ANALOG OUTPUT SETUP screen (see Section C.1.6). The AD25 Moduleware and BIOS also reside on the Controller card. A 60-pin ribbon cable assembly links the CPU logic to the front panel display and keypad. 2.4 Optical Bench The optical bench contains the optical hardware, flow cell, and photodiode assemblies. The optical bench is housed in a compartment behind the front door of the detector. This allows easy access to the lamp connectors and flow cell (see Figure 2-3), so that these components can be replaced without dismantling the detector. To open the front door, pull on the tab beside the power switch actuator (see Figure 2-1). Leak Management To ensure thermal stability and minimize sensitivity to vibration, the flow cell is located behind a cover. Because the cell is hidden from sight, leaks may not be immediately visible. To prevent damage to detector components, a leak tray is built into the bottom of the optical bench. A sensor in the sump of the leak tray responds to changes in thermal dissipation when wet and triggers an alarm in the detector. If the AD25 is connected to a Dionex data system via the DX-LAN interface, an alarm signal is also sent to the chromatography software. A drain tube connected to the rear of the leak tray should be directed into a waste container. Check periodically to verify that the drain tube is not clogged or bowed upward, and that the tubing remains routed below the leak tray. The drain tube must remain routed below the drain port. If the drain tube is above the drain port, the drip tray may overflow inside the detector. 2-8 Doc. 031611-01 11/99 2 • Description ws re c S ) L (3 t in a c o ) (2 s P g s e g n u T p m a L n t e to n o C p m a L rc ws re c S ) (3 tL in a c o ) (2 s P g e to n o C p m a L rc t iu u e D p a L m r Ce w lo F l Screws (3) s lp C g n tin u o M Locating Pins (2) Tungsten Lamp Lamp Connector Screws (3) Lamp Connector Locating Pins (2) Deuterium Lamp Flow Cell Mounting Clips Leak Detector Figure 2-3. Connections to the Optical Bench (Inside the Front Door) 2.4.1 Tungsten Lamp The tungsten lamp (P/N 054158) is a halogen lamp that provides visible and near-IR performance. Allow 30 minutes for the lamp to stabilize before beginning operation. The ELAPSED TIME screen reports for how long the lamp has been on (see Section C.2.3). The lamp has a service life of 1000 hours. See Section 5.6 for instructions on how to install a new lamp. The lamp housing and base may be hot to the touch, especially after the lamp has been in operation for a long time. Wait until the lamp cools before handling it. Doc. 031611-01 11/99 2-9 AD25 Absorbance Detector 2.4.2 Deuterium Lamp The deuterium lamp (P/N 054157) provides light that is optimized for performance in the UV range (190 nm to 380 nm). Allow 30 minutes for the lamp to stabilize before beginning operation. The ELAPSED TIME screen reports for how long the lamp has been on (see Section C.2.3). The lamp has a service life of 1000 hours. See Section 5.5 for instructions on how to install a new lamp. The lamp housing and base may be hot to the touch, especially after the lamp has been in operation for a long time. Wait until the lamp cools before handling it. 2.4.3 Flow Cells The AD25 flow cell is available in PEEK and stainless steel. The flow cell material must be specified when the AD25 is ordered. Additional cells (PEEK, P/N 055900; stainless steel, P/N 055901) may be ordered separately. The cell path length is 10 mm. The volume is either 10 µL (the PEEK cell) or 13 µL (the stainless steel cell). The flow cell handle contains a heat exchanger (see Figure 2-4). The heat exchanger helps stabilize the baseline by minimizing temperature fluctuations before mobile phase enters the flow cell. Do not use a PEEK flow cell with applications employing normal phase or chlorinated solvents; these solvents will damage the cell. Do not operate the flow cell at backpressures greater than 1.38 MPa (200 psi). 2-10 Doc. 031611-01 11/99 2 • Description Cell Inlet Cell O utlet Flow Cell Heat Exchanger Handle Figure 2-4. AD25 Flow Cell Assembly 2.4.4 Photodiode Assemblies Two photodiode assemblies are mounted directly on the optical bench. The signal cables are connected to the Controller card (see Section 2.3) via BNC connectors and coaxial cables. Doc. 031611-01 11/99 2-11 AD25 Absorbance Detector 2.5 Functional Description 2.5.1 Operating and Control Modes The operating mode determines how the AD25 receives operating commands: _ In Local mode, the AD25 receives commands from the front control panel buttons and screens. _ In Remote mode, PeakNet 5.11 (or later) software sends commands from the host computer via the DX-LAN interface. _ In Locked Remote mode, PeakNet 6 and CHROMELEON 6 software send commands from the host computer via the DX-LAN interface. The control mode determines when operating commands are executed: 2-12 _ In Direct control, the AD25 executes commands immediately. _ In Method control, the AD25 executes commands according to the timed steps in a method. The method is programmed from the AD25 front panel or in PeakNet 5.11 (or later). Doc. 031611-01 11/99 2 • Description The table below summarizes the options for operating and control mode configurations. Select the operating and control modes from the MAIN screen (see Section C.1.2), DETAIL screen (see Section C.1.3), or chromatography software. Operating/Control Mode Detector Operation Local/Direct Control Commands are entered from the AD25 front control panel and executed immediately after being entered. Local/Method Commands are entered from the AD25 front control panel and executed by running a method programmed from the front panel. Remote/Direct Control Commands are sent from PeakNet 5.11 (or later) and executed immediately when received. Locked Remote/Direct Control Commands are sent from PeakNet 6 or CHROMELEON 6 and executed immediately when received. Remote/Method Commands are sent from PeakNet 5.11 (or later) and executed by running a method programmed in PeakNet 5.11 (or later). Doc. 031611-01 11/99 2-13 AD25 Absorbance Detector 2.5.2 Local and Remote Modes Local Mode When the AD25 is powered up, it is always in Local mode. In Local mode, the detector accepts operating commands from two sources: _ Direct input from the front panel keypad and screens. All operating functions are available. _ TTL inputs from a remote controller (for example, a Dionex gradient pump module or an integrator). The TTL signals can be used to offset the recorder, run a method, and turn the lamps on and off. Remote Mode and Locked Remote Mode The AD25 accepts remote operating commands, via the DX-LAN interface, from a Dionex data station. PeakNet 5.11 (or later) can operate the detector in either normal Remote or Locked Remote. In contrast, PeakNet 6 and CHROMELEON 6 treat all remote control as Locked Remote. _ In normal Remote mode, all front panel buttons except Hold/Run function. Operating parameters can be changed, provided that the changes do not interfere with any method that is running at the time. If you select Remote mode while the AD25 is running a method, the method continues running unless an Abort command is issued from the PeakNet 5.11 (or later) Run program. _ In the Locked Remote mode, the front panel keypad is disabled to prevent any changes to operating parameters. The only way to return the AD25 to Local mode is to select the Disconnect command from the software or turn off the AD25 power. To operate in Locked Remote when running PeakNet 5.11 (or later), select the Locked Remote Start Option in the Run program. To return the AD25 to Local mode, clear the Start Option, or turn off the AD25 power. When running PeakNet 6 and CHROMELEON 6, selecting the Connect command immediately locks the front panel keypad and selects the Locked Remote mode. For more information, refer to the online Help or user’s manual. 2-14 Doc. 031611-01 11/99 2 • Description 2.5.3 Method Control In Method control, commands are executed according to the time-based steps specified in a method. Methods are created, edited, and saved on the METHOD screen. See Section 3.4 for instructions. Here is a summary of basic information about methods: _ Each method can contain up to 32 time-based steps, including the INITial conditions and time zero (TIME = 0) steps. The first step of every method is an initial conditions step with INIT in the TIME field. The second step is a time zero step with 0.00 in the TIME field. These steps cannot be deleted, but their parameters can be changed. _ A maximum of 100 methods (00 through 99) can be stored in detector memory. Methods are retained in memory even after the power is turned off. The total number of methods that can be stored in detector memory depends on the length of each method and the amount of available memory; thus, the actual total may be less than 100. _ Pressing Run starts the method clock. From the INITial conditions, the time 0.00 step is executed as soon as Run is pressed. The remaining steps are executed according to their programmed times. _ The detector can run under Method control while a method is being either entered or edited. _ When changes to the currently running method are saved, only the parameter changes that affect the method after the current time will be implemented in the current run. _ While in Method control, the following parameters cannot be changed from the AD25 front panel: analog range, offset, mark, wavelength, lamp settings, or relays and TTLs. _ After PeakNet 5.11 (or later) downloads a method to the AD25, the computer sends a command to activate the method number and execute the INITial conditions step. Doc. 031611-01 11/99 2-15 AD25 Absorbance Detector 2.5.4 Direct Control In Direct control, commands are executed immediately when entered. Because there is no time-based program, the method clock is not used and Hold/Run and Reset do not operate. PeakNet 6 and CHROMELEON 6 operate in Direct control. 2.5.5 Rise Time and Data Collection Rate Rise time is defined as the time it takes the AD25 to respond to a change in signal. For example, a rise time of 0.5 second indicates a faster detector response than a rise time of 2.0 seconds. The selected rise time should be 25% or less of the narrowest peak at halfheight. For smoother baselines with little degradation in signal, select a longer rise time. Select the rise time (0.1, 0.2, 0.5, 1.0, 2.0, 5.0, or 10.0 seconds) from the AD25 front panel or Dionex chromatography software. The rise time applies to both digital and analog output. The data collection rate, or storage rate, is the rate (in Hz) at which digital data is stored. Failure to collect or store enough data points may result in lower peaks and higher RSDs, due to inaccurate peak representation. For fast, sharp peaks, select a faster rise time and higher data collection rate (for example, 1.0 second and 5.0 Hz, respectively) to ensure peak integrity. Select the data collection rate (0.2, 0.5, 1.0, 2.0, 5.0, or 10.0 Hz) from the Dionex chromatography software. Example: Peak width = 5 seconds (0.25) (5) = 1.25 seconds Select the rise time that is ≤ 1.25 seconds: 1 second 2-16 Doc. 031611-01 11/99 2 • Description 2.6 Theory of Operation Photometric detection is based upon the absorption of monochromatic light. The degree of absorption depends on the sample molecule, its concentration, the sample path length, and the wavelength. The definition of absorbance is Beer-Lambert's Law: Ir A = εcl = log --- and is dimensionless I s where: ε c l Ir Is = molar absorptivity of the sample (L • mol-1 • cm-1) = concentration (mol/L) = cell path length (cm) = reference beam intensity = sample beam intensity Detection can be made by direct native absorption of a chromophore in the sample, or by indirect and post-column reactions. For a list of wavelengths for the absorption maxima of various chromophores, see Appendix D. In the AD25 optical system, the image of the tungsten lamp is focused through the aperture of the deuterium lamp (see Figure 2-5). The combined light then passes through the filter paddle to the diffraction grating. The selected wavelength is partially reflected to the reference photodiode. The remaining light passes through the focus lens of the flow cell to the sample photodiode, where the sample absorbance is measured. Doc. 031611-01 11/99 2-17 AD25 Absorbance Detector Tungsten Lamp Visible Focus Lens Deuterium Lamp Filter Paddle Reference Photodiode Flow Cell Sample Photodiode Slit Grating Focus Lens Beamsplitter Figure 2-5. AD25 Optical System Optical System Component Function Tungsten Lamp The light source for visible wavelengths (381 nm to 800 nm). Deuterium Lamp The light source for UV wavelengths (190 nm to 380 nm). Visible Focus Lens Focuses the visible light from the tungsten lamp to the through hole of the deuterium lamp. Filter Paddle Determines the filter position: open, blocked, second-order filter, or holmium oxide filter. Reference Photodiode Provides a reference signal that compensates for fluctuations in intensity in the light source. Grating Separates the light beam into its component wavelengths. Beamsplitter Splits the light beam to the sample and reference optical paths. Slit Limits the bandwidth of the light that enters the flow cell. Focus Lens Focuses the light at the slit through the flow cell. 2-18 Doc. 031611-01 11/99 2 • Description Optical System Component Function Flow Cell The measurement site for sample absorbance. Sample Photodiode Measures the light intensity that is transmitted through the flow cell. Doc. 031611-01 11/99 2-19 AD25 Absorbance Detector 2-20 Doc. 031611-01 11/99 3 • Operation and Maintenance 3.1 Operating Guidelines 3.1.1 Wavelength Selection There are two key criteria for determining the wavelength for an analysis: _ Sample components should absorb strongly at the selected wavelength. _ The mobile phase should be “transparent,” showing little or no absorption, at the selected wavelength. For a list of wavelengths for the absorption maxima of various chromophores, refer to Appendix D. 3.1.2 Mobile Phases Solvent quality significantly affects detection limits and instrument performance. To ensure optimal performance of the AD25 Absorbance Detector, follow these precautions: _ Prepare all mobile phases with spectroscopy-grade solvents, reagentgrade chemicals, and ASTM Type I (or better) filtered, deionized water. _ Degas all mobile phases before use and maintain them in a degassed state. _ Strong bases can etch the silica windows of the flow cell. If the mobile phase is a base, make sure the mobile phase concentration does not exceed 0.1 M. If the concentration of the base is greater than 50 mM, disconnect the separator column and flush the system with deionized water for 5 minutes at 1.0 mL/min immediately after the analysis. _ Mobile phase pH affects not only the retention time of the separation, but the sample absorbance and the background absorbance of the mobile phase. If an analysis employs chemical suppression and Doc. 031611-01 11/99 3-1 AD25 Absorbance Detector compound detection techniques, compare the UV cutoff of the mobile phase before and after the suppressor to see whether it is better to locate the detector ahead of the suppressor. This location also limits suppressor exposure to backpressure. _ 3.1.3 When changing from a buffer to a different operating mobile phase, be sure the solvents are miscible and will not induce precipitation of the buffers. Flush the cell with deionized water immediately after the analysis. Do not allow buffers to remain in the cell for extended periods. Solvent Delivery System The pumping system should deliver continuous flow while maintaining a consistent mobile phase composition (if gradient elution is used). Fluctuations in pump backpressure can cause baseline noise; if the noise is synchronized with the pump stroke, the piston seals or check valves may need maintenance. Refer to the pump user’s manual for instructions. The plastics or rubber present in some solvent delivery systems are not fully compatible with AD25 operation at UV wavelengths, or with the solvents commonly used in reversed phase chromatography. For UV operation, these guidelines are recommended: 3-2 _ The mobile phase reservoir should be glass, as the plasticizers in blow-molded components leach and are strong UV absorbers. _ All tubing connections should be Teflon®, Tefzel, PEEK, stainless steel, or titanium as required for the operating pressures and application. _ Some pump seals incorporate a band spring to energize the seal during the vacuum stroke of the piston. The energizer should be stainless steel, a fluoropolymer (Kalrez or fluorosilicone), or other material of known quality. Solvent contact with EPR or Buna rubbers is incompatible with UV operation. Doc. 031611-01 11/99 3 • Operation and Maintenance Cleanliness is also important. After operating in detection modes that do not require clean reagents (such as conductivity), the solvent delivery system may need to be thoroughly cleaned. Some basic cleaning steps are listed below; for more information, refer to the user’s manual for the pump. _ Passivate stainless steel systems before the initial analysis, when the system loses passivation, or after a major disassembly. For instructions, see Passivation of Stainless Steel Systems and Components (Document No. 031152). _ Remove nonpolar oils and dirt with a dilute soap or surfactant such as sodium dodecylsulfate (SDS), Alconox, or SNOOP. Hot deionized water can also be helpful. To completely remove surfactants, flush the system with methanol or acetone. _ Depending on the polarity of the contaminant, flush the system with acetonitrile or 10% tetrahydrofuran. Doc. 031611-01 11/99 3-3 AD25 Absorbance Detector 3.2 Initial Screens Power-Up Tests Each time the AD25 power is turned on, the detector runs a series of internal diagnostic and wavelength calibration procedures. During these self-diagnostics, the power supplies, CPU, lamps, filter paddle position, DX-LAN communication, and grating initialization are checked and the visible and UV wavelengths are recalibrated. Power-Up Screen While the power-up tests are in progress, the POWER-UP screen is displayed (see Figure 3-1). The POWER-UP screen lists the Moduleware and BIOS revision codes, as well as the identification number and address of the DX-LAN (if connected). AD 25 AB SO RB AN CE D ETECTO R n.nn M O DU LEWA RE REV BIO S R EV n.nn nnnnnn DX-LA N ID# DX-LA N A DD RESS: nn nn nn nn nn nn Help M essage Figure 3-1. Power-Up Screen Diagnostic Tests Screen If a system component fails a power-up diagnostic test, the front panel displays the name of the test that failed, but testing continues. If a critical test fails, the AD25 displays the DIAGNOSTIC TESTS screen, where F (fail) is displayed in the entry field for the test that failed (see Section C.2.4). NOTE The DIAGNOSTIC TESTS screen is also an option on the DIAGNOSTIC MENU and can be selected at any time. 3-4 Doc. 031611-01 11/99 3 • Operation and Maintenance Main Screen If the detector passes all power-up tests, the display changes from the POWER-UP (or DIAGNOSTIC TESTS) screen to the MAIN screen. WAVELENG TH 254 nm +0.3197 LO CAL Help M essage UV O N VIS O FF R ANG E 1.0 AU AU M ETHO D 05 123.45 M IN Figure 3-2. Main Screen NOTE Whenever the detector is turned on, the last settings selected before the power was turned off (including the lamp and wavelength settings) are restored. Press Menu to go to the MENU of SCREENS. There, begin selecting parameters for the Direct control or Method control operating mode. 3.3 Running Under Direct Control When the Direct control operating mode is selected, commands are carried out immediately after you enter them. Changes to operating parameters remain in effect until you issue commands to change them. 3.3.1 Remote Direct Control There are a few key differences in the remote Direct control mode, depending on which chromatography software is operating the AD25: _ Doc. 031611-01 11/99 With PeakNet 5.11 (or later), the detector must be in Remote mode. There are no time-based steps (because the method clock is not used) and the Hold/Run and Reset buttons do not operate. PeakNet 5.11 (or later) monitors the baseline, but does not save data here. To operate the AD25 from PeakNet 5.11 (or later) under Direct Control, first select the Remote mode. 3-5 AD25 Absorbance Detector _ 3.3.2 With PeakNet 6 or CHROMELEON 6, the detector must be in Locked Remote mode, whether you are running a PGM-file or executing commands on demand from the front panel. Selecting the Connect command immediately locks the front panel keypad and selects the Locked Remote mode. Time-based steps for the software are executed on the server, and the software then sends operating commands directly to the detector. Local Direct Control To select local Direct control, go to the MAIN or DETAIL screen (see Figure 3-2). 3.4 _ If DIRECT CNTRL is displayed, the AD25 is already in Direct control mode and no further action is necessary. _ If METHOD is displayed, move the cursor to METHOD and press Select ∆ or Select ∇ to toggle to DIRECT CNTRL. Press Enter or a cursor arrow button to activate the selection. Running Under Method Control In the Method control operating mode, a series of programmed timed events, known as a method, controls the AD25. You can create methods from the detector front panel or from PeakNet 5.11 (or later). Methods are retained in memory even after the detector power has been turned off. To select Method control, go to the MAIN or DETAIL screen (see Figure 3-2). _ If METHOD is displayed, the AD25 is already in Method control and no further action is necessary. _ If DIRECT CNTRL is displayed, move the cursor to DIRECT CNTRL and press Select ∆ or Select ∇ to toggle to METHOD. Type in a method number and press Enter or a cursor arrow button to activate the selection. NOTE If you enter a nonexistent method number, an error message is displayed and the previous method number is restored. Pressing Run starts the method clock. The method begins running, using the INIT condition parameters. From the INITial conditions, the time 0.00 step is executed 3-6 Doc. 031611-01 11/99 3 • Operation and Maintenance as soon as Run is pressed. The remaining steps are executed according to their programmed times. The following sections explain how to create new methods and change existing methods. Remember that the way to save editing changes on the METHOD screen is to move the cursor to the SAVE TO field, enter the method number, and then press Enter. Doc. 031611-01 11/99 3-7 AD25 Absorbance Detector 3.4.1 Creating a New Method A method can be created at any time, provided that the LOCAL and DIRECT CNTRL modes are selected first. M ETHO D EDIT 33 SAVE TO 33 nm RANG E AU O FFSET M RK TIM E 250 1.0 INIT * * 0.00 0.02 4.00 v Help Message TT L 1 2 0 0 RLY 1 2 0 0 1 1 Figure 3-3. Method Screen 1. Go to the METHOD screen (option 3 on the MENU of SCREENS). Enter an unused method number from 0 through 99 in the EDIT field and press Enter. This displays a blank method on the screen. The first step of every method is an initial conditions step with INIT in the TIME field. The second step is a time zero step with 0.00 in the TIME field. These steps cannot be deleted. 2. Enter the parameters for the initial conditions and time 0.00 steps. NOTE You must enter a value in the TIME field. However, other fields in the step do not necessarily require an entry. A blank field indicates that the value selected for that parameter in the preceding step is still in effect. 3. To create a new method step, move the cursor to a blank TIME field, enter the time (in minutes) at which the step is to be performed, and press Enter or a cursor arrow button. Enter a value for each step parameter, if desired, or leave a field blank to have the previously selected value remain in effect. 3-8 Doc. 031611-01 11/99 3 • Operation and Maintenance 4. Repeat Step 3 to add additional steps. Up to 30 steps can be added after the time 0.00 step. The method may eventually contain more steps than the screen can display at one time. To view additional steps, move the cursor to the top or bottom screen entry and then step one more line, as described here: _ When there is a small v next to the time entry at the bottom of the screen, move the cursor down to see the additional steps. _ When there is a caret (^) next to the time entry at the top of the screen, move the cursor up to see the additional steps. 5. To save the new method, move the cursor to the SAVE TO field, enter the number that appears in the EDIT field, and press Enter. 3.4.2 Editing an Existing Method You can modify an existing method by changing, adding, or deleting steps and/or parameters. Changes take effect as soon as they are saved. To edit an existing method, go to the METHOD screen, enter the method number in the EDIT field, and press Enter or a cursor arrow button. Edit the method as described in one of the following sections. Be sure to save editing changes before exiting the METHOD screen; if you do not, the changes will be lost. NOTE After you save editing changes to a method, there is no way to recall the original method. If you want to edit a method but still retain the original method in its unmodified form, save the new method (or a copy of the original method) under a different method number. Changing Method Parameters Move the cursor to the field(s) to be edited and enter a new value, using the front panel buttons. When you finish making changes, move the cursor to the SAVE TO field, enter the method number, and press Enter. Doc. 031611-01 11/99 3-9 AD25 Absorbance Detector Adding a Method Step There are two ways to add a step to a method: _ Move the cursor on the METHOD screen to a blank TIME field. Enter the time and parameters for the new step, and then press Enter or a cursor arrow button. The AD25 Moduleware automatically moves the new step to the correct chronological point in the method. _ Move the cursor on the METHOD screen to the line immediately preceding the intended location of the new step. Press Insert to insert a new, blank line below the cursor location. Enter the time and parameters for the new step, and then press Enter or a cursor arrow button. Deleting a Method Step Move the cursor on the METHOD screen to the TIME field of the step to be deleted and press Delete twice. Deleting an Entire Method Move the cursor on the METHOD screen to the EDIT field and press Delete twice. Saving a Modified Method To replace the original method with the modified version, enter the number of the original method in the SAVE TO field and press Enter. To retain the original method and save the modified version elsewhere in memory, enter an unused method number in the SAVE TO field and press Enter. 3.4.3 Running a Method 1. Go to the MAIN or DETAIL screen. If necessary, toggle from DIRECT CNTRL to METHOD and from REMOTE to LOCAL. 2. In the METHOD field, enter a method number and press Enter. The selected method begins running, using the INIT conditions. 3-10 Doc. 031611-01 11/99 3 • Operation and Maintenance 3.4.4 Changing the Running Method To stop a method while it is running and begin running a different method, enter the new method number in the RUN field on the METHOD screen and press Enter. The new method begins running, using the INIT conditions. 3.5 TTL/Relay Control The AD25 can send a TTL or Relay output signal to another instrument to trigger a function in that instrument. Similarly, another device can trigger these AD25 functions, via a contact closure or pulse: offset recorder, method run, deuterium lamp on/off, and tungsten lamp on/off. The TTLs and Relays can be programmed in AD25 methods, or controlled immediately via Direct control. To select the TTL signal mode that the AD25 responds to, go to the TIME FUNCTION IN screen (see Section C.1.7). 3.6 DX-LAN Remote Operation When a Dionex data station is connected to the AD25 via the DX-LAN interface, you can monitor the detector status and control all detector functions from the host computer. For more information about remote operation, refer to the user’s manual or online Help for the chromatography software. See Section B.4.7 for DX-LAN installation instructions. Doc. 031611-01 11/99 3-11 AD25 Absorbance Detector 3.7 Routine Maintenance The following maintenance procedures may be performed by the user. All other maintenance procedures must be performed by Dionex personnel. _ Periodically check liquid line connections to the cell for leaks and wipe up any spills. _ Tubing and fitting components may eventually become loose and leak, or pinched off and plugged. Periodically check all tubing and replace tubing and fittings as required (see Section 5.1). Look for these symptoms: Decreasing pressure may indicate a leak. A sudden increase in backpressure sometimes indicates plugged tubing. Identify the tubing causing the backpressure and replace it. (A slow increase in backpressure is normal as a column ages.) 3-12 _ Periodically check the drain tube connected to the leak tray in the optical bench. Make sure the tubing is unclogged and is not bowed upward. Also make sure the tubing is routed below the leak tray. _ Replace the lamps when required. The average lamp lifetime is 1000 hours, although lamps often last longer with no deterioration in performance. To check the hours of lamp usage, go to the ELAPSED TIME screen (see Section C.2.3). Also monitor baseline noise; if the noise increases, it may be time to replace the lamp (see Section 4.2). See Section 5.5 or Section 5.6 for replacement instructions for the deuterium or tungsten lamp, respectively. _ Before shutting down the detector for more than 24 hours, flush the system with water for at least 15 to 20 minutes. This rinses corrosive acids, salts, or bases from the flow paths. _ To prevent stains or clogs, do not leave colored reagents, or reagents that may precipitate, in the flow cell. Flush the system with deionized water or alcohol (depending on the reagent) before shutdown. _ Repassivate stainless steel systems periodically, especially after a major disassembly or if the system loses passivation. Operation with extremes of pH shortens the life of the passivation finish. For instructions, see Passivation of Stainless Steel Systems and Components (Document No. 031152). Doc. 031611-01 11/99 4 • Troubleshooting This chapter is a guide to troubleshooting routine problems that may occur while operating the AD25 Absorbance Detector. Turn to the section that best describes the operating problem. There, possible causes of the problem are listed in order of probability, along with the recommended courses of action. For more help, refer to the description of the AD25 diagnostic screens in Appendix C. If you are unable to eliminate a problem, contact Dionex. In the U.S., call 1-800346-6390 and select the Technical Support option. Outside the U.S., call the nearest Dionex office. 4.1 No Detector Response _ Detector output out of range Press Offset on the AD25 front panel or select it from the chromatography software via Direct control. _ Lamp not turned on Turn on the lamp from the MAIN screen (see Section C.1.2), a TTL input (see Section B.4.6), or the chromatography software. _ Analog output range set too high; flat recorder response is observed Select a more sensitive analog output range from the MAIN screen (see Section C.1.2), DETAIL screen (see Section C.1.3), or chromatography software. If the output range is too sensitive, the response may be above it; if so, increase the output range slightly. _ Analog output range set too low; although the display indicates a response, no recorder response is observed If the signal is above the analog output range selected for the detector, no signal appears on the recorder. Select a less sensitive analog output range from the MAIN screen (see Section C.1.2), DETAIL screen (see Section C.1.3), or chromatography software. For example, if the signal is 0.01 AU, select a setting of 0.05 AU. Doc. 031611-01 11/99 4-1 AD25 Absorbance Detector 4.2 Noisy Baseline _ Mobile phase or post-column reagent contains light-absorbing impurities Prepare all mobile phases and reagents with spectro-grade solvents, reagentgrade chemicals, and ASTM Type I (or better) filtered, deionized water. Install a filter on the end of each mobile phase line, inside the reservoir. Endline filters (P/N 045987) are included in pressurizable reservoir Ship Kits. See the Pressurizable Reservoir Installation Instructions for details. NOTE Replace end-line filters regularly. Filters may need to be replaced weekly when using non-solvent mobile phases such as water, because bacteria can build up quickly. _ Air bubbles in flow cell Remove the trapped air (see Section 5.3) To prevent air from becoming trapped in the cell again, take the following action: _ Degas mobile phases and post-column reagents by vacuum degassing or sparging with helium. _ Install a backpressure line. This increases the cell backpressure, thereby shrinking bubbles and allowing them to pass more easily through the cell. The backpressure line should be 1 meter long for a flow rate of 1.0 mL/min, 2 meters for 0.5 mL/min, and so on. The AD25 Ship Kit includes a length of 0.25-mm (0.010-in) ID tubing with fittings on both ends. Cut the tubing to the required length and install it after the cell outlet. Use a union (P/N 042627) to connect the backpressure line to the waste line. _ Insufficient time for system equilibration after turning on lamp(s) or after changing mobile phase strength or composition The lamps typically require 30 minutes to stabilize; however, for extremely sensitive applications (or after installation of a new lamp), the lamp may require up to 2 hours. After changing mobile phases, allow 20 to 30 column volumes for the lamp to stabilize. If the noise is synchronized with the pump stroke, the piston seals or check valves may need maintenance. Refer to the pump user’s manual for instructions. 4-2 Doc. 031611-01 11/99 4 • Troubleshooting _ Leaking fittings Locate the source of the leak. Tighten (or replace) all liquid line connections as needed. If the connections are made with Dionex ferrule fittings, refer to Installation of Dionex Ferrule Fittings for tightening requirements. _ Deuterium lamp is dimming The light output of the lamp decreases over time. The lower light output may increase noise above an acceptable level, especially after the lamp has been in service for more than 1000 hours. If this occurs, replace the lamp (see Section 5.5). NOTE The ELAPSED TIME screen reports for how long the lamp has been on (see Section C.2.3). _ Strongly-retained components from previous analysis are slowly eluting To elute strongly-retained species, use a stronger mobile phase. Re-equilibrate with the standard mobile phases before resuming normal operation. Clean the column as instructed in the column manual. If the problem persists, refer to the troubleshooting section of the column manual for assistance. _ Flow cell installed incorrectly The flow cell must be inserted straight into the optical bench. An audible click indicates that the cell is fully seated. For complete installation instructions, see Section B.4.2. _ Contaminants in flow cell Clean the cell (see Section 5.2). _ Crimped tubing Over time, tubing may become pinched off and plugged. Periodically check all tubing and replace when necessary (see Section 5.1). Doc. 031611-01 11/99 4-3 AD25 Absorbance Detector 4.3 Drifting Baseline _ Fluctuations in ambient temperature Make sure the temperature of the AD25 installation site remains consistent. Also, allow at least 6 cm (2.4 in) clearance behind the AD25 for ventilation. _ Lamp not stabilized The lamps typically require 30 minutes to stabilize; however, for extremely sensitive applications, the lamp may require up to 2 hours. After changing mobile phases, allow 20 to 30 column volumes for the lamp to stabilize. _ New lamp not burned in New lamps typically drift until they are fully burned-in. After installing a new lamp, allow 2 hours for the lamp to stabilize. Before running a sensitive application, allow the lamp to burn in overnight. _ Deuterium lamp is old After the lamp has been in service for more than 1000 hours, drift may increase above an acceptable level. If this occurs, replace the lamp (see Section 5.5). NOTE The ELAPSED TIME screen (see Section C.2.3) reports for how long the lamp has been on. _ Leaking flow cell Tighten fittings. If the cell continues to leak, replace it. Also, make sure the backpressure on the cell does not exceed the specifications (see Appendix A). _ Cell installed incorrectly The flow cell must be inserted straight into the optical bench. An audible click indicates that the cell is fully seated. For complete installation instructions, see Section B.4.2. _ Contaminants in flow cell Clean the cell (see Section 5.2). 4-4 Doc. 031611-01 11/99 4 • Troubleshooting 4.4 High Background Absorbance _ Mobile phase absorbs strongly at wavelength in use Select an alternate detection wavelength. Change the mobile phase composition. _ Impurities in mobile phase or post-column reagent Prepare all mobile phases and reagents with spectro-grade solvents, reagentgrade chemicals, and ASTM Type I (or better) filtered, deionized water. _ Incorrect post-column reagent flow rate and/or concentration Verify that the reagent flow rate is correct. If necessary, remake the reagent and verify the concentration. _ Air bubbles trapped in cell Remove the trapped air (see Section 5.3) To prevent air from becoming trapped in the cell again, take the following action: _ Degas mobile phases and post-column reagents by vacuum degassing or sparging with helium. _ Install a backpressure line. This increases the cell backpressure, thereby shrinking bubbles and letting them pass more easily through the cell. The backpressure line should be 1 meter long for a flow rate of 1.0 mL/min, 2 meters for 0.5 mL/min, etc. The AD25 Ship Kit includes a length of 0.25-mm (0.010-in) ID tubing with fittings on both ends. Cut the tubing to the required length and install it after the cell outlet. Use a union (P/N 042627) to connect the backpressure line to the waste line. _ Film deposited on cell windows Clean the cell (see Section 5.2). Doc. 031611-01 11/99 4-5 AD25 Absorbance Detector 4.5 Peaks Too Large or Small _ An injection-related problem Verify that the correct sample amount was injected. Check the injection valve for liquid leaks. Replace fittings or tubing as necessary. Make sure the proper sample loop size is installed. Make sure the sample loop does not contain an air bubble. Refer to the autosampler or injector manual for more troubleshooting guidance. _ Various minor problems The rise time may be too slow to describe the peak. Select a rise time that is 25% or less of the narrowest peak at half-height. Check the recorder and integrator input voltage. The AD25 provides 1 volt full-scale output. Verify that the selected output range (AU full-scale) is appropriate. Verify that the sample volume or concentration is appropriate. Prepare fresh post-column reagent. Verify that the reagent flow rate is correct. Go to the DIAGNOSTIC TESTS screen (see Section C.2.4) and run the OPTICAL test. If the detector fails the test, contact Dionex for assistance. 4.6 Detector Does Not Autozero _ Lamp is old or burned out Replace the lamp. See Section 5.5 or Section 5.6 for instructions on replacing the deuterium lamp or tungsten lamp, respectively. _ Condensation on cell Clean the cell window or lenses with filtered, dry air. _ Film on cell Flush the cell with methanol, followed by deionized water. For complete instructions, see Section 5.2. 4-6 Doc. 031611-01 11/99 4 • Troubleshooting 4.7 Lamp Does Not Light _ Old or burned out lamp Replace the lamp. See Section 5.5 or Section 5.6 for instructions on replacing the deuterium lamp or tungsten lamp, respectively. 4.8 Power-Up Wavelength Calibration Fails _ Lamp may be defective or require calibration Go to the DIAGNOSTIC TESTS screen (see Section C.2.4) and run the VIS LAMP and UV LAMP tests. If the lamps pass the diagnostic tests, go to the WAVELENGTH screen (see Section C.2.6) and run the wavelength verification test. This procedure places a holmium oxide filter in-line and tests the wavelength accuracy. The detector should be ± 2 nm of the theoretical wavelength. VERIFICATION If a lamp fails one or more diagnostic tests, replace it. When the detector powers up, a wavelength calibration procedure automatically. runs. Verify the wavelength accuracy by running the wavelength verification diagnostic. See Section 5.5 or Section 5.6 for instructions on replacing the deuterium lamp or tungsten lamp, respectively. If the problem persists after the lamp is replaced, contact Dionex for assistance. If the detector passes the VIS LAMP, UV LAMP, and WAVELENGTH CAL tests, go to the WAVELENGTH VERIFICATION screen (see Section C.2.6) and run the wavelength verification test. DELTA values of ± 2 nm are acceptable; if the DELTA values do not meet specification, go to the DIAGNOSTIC TESTS screen and enable lamp calibration (see Section C.2.4). Doc. 031611-01 11/99 4-7 AD25 Absorbance Detector 4.9 Faulty DX-LAN Communication _ DX-LAN interface incorrectly installed Verify the following: _ A BNC tee connector is connected to the DX-LAN connector on the AD25 rear panel. A DX-LAN cable (P/N 960404) is connected to one side of the BNC tee connector. _ The BNC tee connectors on the first module on the DX-LAN are capped with terminator plugs (P/N 921034). Terminator plugs are shipped with the chromatography software. NOTE The DX-LAN cable must be RG58U or RG58AU. Do not use recorder cables; they have the wrong impedance and interfere with signals on the DX-LAN. For complete installation instructions for the DX-LAN interface, refer to Section B.4.7. 4-8 Doc. 031611-01 11/99 4 • Troubleshooting 4.10 Diagnostics NOTE Use the troubleshooting information earlier in this chapter to isolate problems that are not related to the detector electronics. The AD25 Moduleware includes several diagnostic tests of the detector electronics components. Turning on the detector power activates a power-up diagnostics and calibration routine, but more comprehensive diagnostics are available for troubleshooting purposes. To access them, open the DIAGNOSTIC MENU (option 8 on the MENU of SCREENS) and select the desired menu option. The diagnostic screens are described in Appendix C. DIAG N O STIC M ENU 1 PO W ER-UP SCR EEN 2 ELAPSED TIM E 3 D IAG NO STIC TES TS 4 LEAK CAL & STATUS 5 W AV E L E N G T H V E R IF Y 6 S IG N A L PA R A M E T E R S Help M essage Figure 4-1. Diagnostic Menu Screen Doc. 031611-01 11/99 4-9 AD25 Absorbance Detector 4-10 Doc. 031611-01 11/99 5 • Service This chapter describes routine service procedures that the user may perform. All procedures not described here must be performed by Dionex personnel. NOTE The AD25 electronics components cannot be serviced by users; repair of the electronics must be performed by Dionex personnel. The Controller card contains a lithium battery. If the card is replaced, dispose of the used battery according to the manufacturer's instructions. Before replacing any parts, review the troubleshooting information in Chapter 4 to isolate the cause of the problem. To contact Dionex in the U.S., call 1-800-3466390 and select the Technical Support option. Outside the U.S., call the nearest Dionex office. Substituting non-Dionex parts may impair AD25 performance, thereby voiding the product warranty. Refer to the warranty statement in the Dionex Terms and Conditions for more information. 5.1 Liquid Leaks The AD25 is plumbed with the components listed below. For tightening requirements, refer to Installation of Dionex Ferrule Fittings. Component PEEK Flow Cell Stainless Steel Flow Cell Tubing, 0.25-mm (0.010-in) ID P/N 042690 P/N 019245 Union Fittings P/N 055903 P/N 055902 Ferrules P/N 056653 P/N 056652 Nuts P/N 056651 P/N 056650 Doc. 031611-01 11/99 5-1 AD25 Absorbance Detector 5.2 Cleaning the Cell Film deposits on the cell windows cause excessive baseline noise or high absorbance offset. 1. Disconnect the liquid lines from the cell in and out connections. 2. Pump methanol through the cell for 20 to 30 minutes at 1.0 mL/min (for a standard bore system) or 0.25 to 0.5 mL/min (for a microbore system). 3. Flush the cell with deionized water again. 4. Reconnect the cell inlet and outlet lines. If the procedure above does not clean the cell, follow these steps: 1. Disconnect the liquid lines from the cell in and out connections. 2. Connect a luer adapter to the cell in connection. 3. Using a syringe, flush the cell with a succession of deionized water, acetone, and 3 M HNO3. 4. Flush the cell with deionized water again. 5. Reconnect the cell inlet and outlet lines. 5.3 Removing Trapped Air from the Cell Trapped air bubbles in the cell may cause pulsations of the baseline or random noise and low readings. 1. Disconnect the waste line from the cell. Also disconnect the backpressure line, if installed. 2. Using a small syringe, push 3 to 5 mL of methanol through the cell or, bypassing the column, pump methanol through the system at 1.0 mL/min. 3. Reconnect the waste line and backpressure device. 5-2 Doc. 031611-01 11/99 5 • Service 5.4 Replacing the Main Power Fuses 1. Turn off the AD25 main power switch. 2. Disconnect the main power cord from the AD25 rear panel. 3. The fuse holder is part of the main power receptacle (see Figure 5-1). Note the recessed lock on each side of the fuse holder; now, using a small screwdriver (or your fingernails), push one of the locks toward the center to release it. The fuse holder pops out slightly when the lock is released. Repeat for the other lock. When both locks are released, pull the fuse holder straight out of the compartment. 4. Replace the two fuses in the holder with new 3.15 amp fast-blow IEC127 fuses (P/N 954745). Dionex recommends replacing both fuses, even if only one is open. 5. Reinsert the fuse holder into the compartment. (The fuse holder is keyed to fit only in the correct orientation.) Apply pressure evenly against the holder until the locks are engaged. When correctly installed, the fuse holder is flush against the panel. 6. Reconnect the main power cord and turn on the power. F us e H old er F u ses (2) L o ck in g S p rin g L o ckin g S p rin g K ey In sert screw d river an d tw is t to rele ase (eac h sid e) F u se H old er (S id e View ) M ain P o w er R e cep tac le Figure 5-1. Main Power Fuse Holder Doc. 031611-01 11/99 5-3 AD25 Absorbance Detector 5.5 Replacing the Deuterium Lamp 1. Turn off the deuterium lamp from either the AD25 front panel or the chromatography software. 2. Turn off the detector main power switch. The lamp housing and base may be hot to the touch, especially after the lamp has been in operation for a long time. Allow the lamp to cool before continuing. 3. Open the front door by pulling on the tab beside the power switch actuator (see Figure 2-1). 4. Disconnect the UV lamp connector from the front cover of the optical bench (see Figure 5-2). ws re c S ) L (3 t in a c o ) (2 s P g s e g n u T p m a L n t e to n o C p m a L rc w re c S )in (3 e to n o C p m a L rc t s a o L 2 P g t iu u e D p a L m r Ce w lo F l s lp C g n tin u o M Screws (3) Locating Pins (2) Tungsten Lamp Lamp Connector Screws (3) Lamp Connector Locating Pins (2) Deuterium Lamp Flow Cell Mounting Clips Leak Detector Figure 5-2. Lamp Connections to the Optical Bench (Inside the Front Door) 5-4 Doc. 031611-01 11/99 5 • Service 5. Loosen the three screws holding the deuterium lamp in place. Pull the lamp out of the optical bench. 6. Line up the flange of the new deuterium lamp (P/N 054157) with the two locating pins and three threaded holes on the optical bench cover. When the flange is aligned, gently push the lamp into the optical bench. 7. When the lamp is fully seated, tighten the three screws with a screwdriver. To prevent baseline noise, the lamp must be fully seated. 8. Connect the UV lamp connector to the cover of the optical bench. 9. Close the detector front door. 10. Turn on the detector main power. The detector automatically calibrates the wavelength when the power is turned on. 11. Before beginning the wavelength verification procedure, the flow cell must be clear. If the cell contains a colored reagent, flush with water or methanol at 1.0 mL/min before continuing. 12. Go to the WAVELENGTH VERIFICATION screen (option 5 on the DIAGNOSTIC MENU) and run the wavelength verification procedure. NOTE During the wavelength verification procedure, signals are read through the flow cell. After initiating the verification procedure, do not change any system parameters that may affect cell stability. For example, do not turn the pump on or off or change the flow rate. The accuracy should be ± 2 nm. If the accuracy is acceptable, go to the ELAPSED TIME screen (option 2 on the DIAGNOSTIC MENU) and reset the elapsed time for the deuterium lamp to zero. The detector is now ready for operation. NOTE It is normal for the baseline to drift for several hours after a new deuterium lamp is installed. If the accuracy is not ± 2 nm, repeat Steps 11 and 12. If the result is still unacceptable, contact Dionex for assistance. Doc. 031611-01 11/99 5-5 AD25 Absorbance Detector 5.6 Replacing the Tungsten Lamp 1. Turn off the tungsten lamp from either the AD25 front panel or the chromatography software. 2. Turn off the detector main power switch. The lamp housing and base may be hot to the touch, especially after the lamp has been in operation for a long time. Allow the lamp to cool before continuing. 3. Open the front door by pulling on the tab beside the power switch actuator (see Figure 2-1). 4. Disconnect the Vis lamp connector from the front cover of the optical bench (see Figure 5-2). 5. Use a screwdriver to loosen the tungsten lamp screws, and then pull the mounting assembly away from the optical bench. 6. Insert the new tungsten lamp (P/N 054158) into the optical bench and tighten the three screws that secure the lamp to the optical bench cover. (The replacement lamp is pre-aligned in the mount.) To prevent baseline noise, the lamp must be fully seated. 7. Connect the Vis lamp connector to the optical bench cover. 8. Close the detector front door. 9. Turn on the detector main power. The detector automatically calibrates the wavelength when the power is turned on. 10. Turn on the tungsten lamp. 11. Go to the ELAPSED TIME screen (option 2 on the DIAGNOSTIC MENU) and reset the elapsed time for the tungsten lamp to zero. Before resuming normal operation, wait 30 minutes for the lamp to stabilize. 5-6 Doc. 031611-01 11/99 A • Specifications A.1 Electrical Main Power Fuses Analog Output A.2 Operating Humidity User-selectable full-scale output of 1 V 10 ºC to 40 ºC (50 ºF to 104 ºF) 5% to 95% relative humidity (non-condensing) Physical Dimensions Weight Decibel Level A.4 Two 3.15 amp fast-blow IEC127 fuses (P/N 954745) Environmental Operating Temperature A.3 90 Vac to 265 Vac, 47/63 Hz; 150 W maximum, 100 W typical. The auto-sensing power supply requires no voltage adjustment. 22.5 cm W x 17 cm H x 42.0 cm D (8.8 in W x 6.6 in H x 16.4 in D) 6 cm (2.4 in) clearance required behind the detector 13.6 kg (30 lb) 52 db (at “A WEIGHING” setting) Display and Keypad Doc. 031611-01 11/99 Display Liquid crystal display with adjustable backlighting Keypad 26 buttons for entering commands and numeric values for screen parameters A-1 AD25 Absorbance Detector A.5 Detector Optical System Light Sources Deuterium lamp (30 W) for ultraviolet spectrum analysis; tungsten lamp (10 W) for visible spectrum analysis Wavelength Range 190 nm to 800 nm variable; continuous in 1 nm steps Wavelength Accuracy ± 1 nm Bandwidth <5 nm Autozero Capability 3 AU Autozero Accuracy ± 100 µAU Noise ± 10 µAU peak-to-peak at 254 nm, 2-second rise time, flowing deionized water Drift < 100 µAU/hour (after warm-up) Filter Rise Time Analog Output Range Local Operation DX-LAN Operation (Optional) A-2 Dual-beam, reflective beamsplitter and concave holographic diffraction grating Discrete settings of 0.1, 0.2, 0.5, 1.0, 2.0, 5.0, and 10.0 seconds Discrete settings of 0.001, 0.005, 0.01, 0.05, 0.1, 0.5, 1.0, 2.0, and 3.0 AU Front panel controls and display status of all functions. Four detector functions can be controlled via TTL or Relay contacts. All functions controlled by a Dionex data workstation, when connected to the AD25 via the DX-LAN interface. Doc. 031611-01 11/99 A • Specifications A.6 Flow Cells Cell Body Volume and Optical Path Length Maximum Operating Pressure Chemical Compatibility A.7 PEEK or stainless steel PEEK cell: 10 µL volume; 10 mm (0.394 in) optical path length Stainless steel cell: 13 µL volume; 10 mm (0.394 in) optical path length PEEK cell: 2 MPa (300 psi) Stainless steel cell: 3 MPa (500 psi) Dionex recommends not using bases stronger than 0.1 M, as they will etch the silica windows of the flow cells. Do not use normal phase or chlorinated solvents with the PEEK cell; these solvents will damage the cell. Heat Exchanger Volume Doc. 031611-01 11/99 14.5 µL (PEEK and stainless steel flow cells) A-3 AD25 Absorbance Detector A-4 Doc. 031611-01 11/99 B • Installation B.1 B.2 Facilities Required _ Make sure the AD25 installation site meets the electrical and environmental specifications listed in Appendix A. _ Allow at least 6 cm (2.4 in) clearance behind the AD25 for power connections and ventilation. Room air is inducted into the detector to cool the electronics and dissipate the heat generated by the lamps. Do not block air flow to the rear of the detector. _ Install the AD25 on a sturdy table or workbench at a height that ensures convenient viewing of the front control panel. Unpacking When moving or carrying the AD25, lift only from the bottom or side of the module; lifting by the front panel door will damage the door hinges. 1. Carefully remove the AD25 from its shipping container, using the lift strap. Be careful not to tip the detector forward. 2. Two ferrite cores (and installation instructions) are packed on top of the detector. Installing the ferrite cores on the front door cable will reduce electromagnetic emissions. 3. Remove the block of packing material behind the detector front door. Save the shipping container and all packing material for use later, if necessary. 4. Do not turn on the detector unless it is at room temperature (10º C to 40 ºC or 50 ºF to 104 ºF). If the detector is moved from a cold environment to a warm environment, wait at least 1 hour for condensation to evaporate before turning on the power. Doc. 031611-01 11/99 B-1 AD25 Absorbance Detector B.3 System Configuration Dionex chromatography modules are designed to be stacked on top of each other, up to a maximum height of four units (see Figure B-1). (The AD25 is one unit high.) Stacking the interlocking modules creates a compact system, which minimizes the length of tubing and cable connections. All cables are routed through the front slots and rear chases under the modules. Figure B-1. Recommended System Configuration B.4 Installation B.4.1 Power SHOCK HAZARD—To avoid electrical shock, use a grounded receptacle. Do not operate or connect to an AC power main without an earthed ground connection. The power cord is used as the main disconnect device. Make sure the socket-outlet is located near the detector and is easily accessible. B-2 Doc. 031611-01 11/99 B • Installation Operation at AC input levels outside of the specified operating voltage range may damage the detector. The AD25 power supply is auto-sensing, so no adjustment is necessary to select the line voltage. There are two ways to control power to the AD25. _ On/off control from the AD25 To implement: Connect a modular power cord (IEC 320 C13) from the AD25 main power receptacle (see Figure B-2) to a grounded, single-phase power source. Use the AD25 power switch actuator (see Figure 2-1) to turn the detector on and off. _ On/off control from the LC30 Chromatography Oven To implement: Locate one of the IEC jumper cables (P/N 960748) provided in the LC30 Ship Kit. Connect the jumper cable from the AD25 main power receptacle (see Figure B-2) to an IEC auxiliary receptacle on the LC30 rear panel. Leave the AD25 power switch on continuously, and use the LC30 main power switch to turn the detector on and off. AN A LOG O UT DX -LA N R elay/TTL C onnectors Fan Fuse H older M ain P ow er R eceptacle D rain Tube Figure B-2. AD25 Rear Panel Doc. 031611-01 11/99 B-3 AD25 Absorbance Detector B.4.2 Flow Cell Do not touch the cell window. If you touch the window, clean it with denatured alcohol and a clean lens tissue. Do not use normal phase or chlorinated solvents with the PEEK flow cell; these solvents will damage the flow cell. 1. The flow cell inlet and outlet are plumbed with 0.25-mm (0.010-in) ID tubing. Connect the inlet and outlet lines to the union fittings on the heat exchanger tubing (see Figure B-3). Cell Inlet Cell Outlet Flow Cell Heat Exchanger Handle Figure B-3. AD25 Flow Cell Assembly 2. Squeeze the handle and insert the cell straight into the optical bench (see Figure 2-3). Release the handle, and then pull it forward slightly. If there is a click, the cell is properly mounted. If there is no click, rotate the handle slightly just until the cell clicks into place. B-4 Doc. 031611-01 11/99 B • Installation NOTE To help prevent bubbles from forming, the cell outlet connection should provide enough restriction to generate a small amount of backpressure. To achieve this, Dionex recommends installing a backpressure line consisting of 0.25-mm (0.010-in) ID tubing (provided in the AD25 Ship Kit). 3. The backpressure line should be 1 meter long for a flow rate of 1.0 mL/min, 2 meters for 0.5 mL/min, and so on. Cut the tubing to the required length and install the line after the cell outlet. Use a union (P/N 042627) to connect the backpressure line to the waste line. B.4.3 Heat Exchanger The heat exchanger is integral to the flow cell assembly (see Figure B-3). The flow cell inlet and outlet lines are normally connected to the union fittings on the heat exchanger tubing. Operating at backpressures greater than 1.38 MPa (200 psi) will damage the heat exchanger. B.4.4 Waste Line A drain tube is connected to the AD25 rear panel (see Figure B-2). Place the free end of the tubing in a waste container below the level of the lab bench on which the AD25 is installed. The drain tube must remain routed below the drain port. If the drain tube is above the drain port, the drip tray may overflow inside the detector. B.4.5 Detector Output (Analog) Connect a recorder or an integrator to the ANALOG OUT connector on the AD25 rear panel (see Figure B-2). Doc. 031611-01 11/99 B-5 AD25 Absorbance Detector B.4.6 Relay/TTL Control The AD25 Ship Kit (P/N 054107) includes a 12-pin connector for Relay and TTL connections (see Figure B-4). To attach individual wires and twisted pairs to the connector, strip the end of the wire(s), insert into the connector, and use a screwdriver to tighten the locking screw(s). NOTE An optional pre-wired cable (P/N 056458) is available. The cable has 12 inputs and outputs (all labeled) wired into a 12-pin connector. Connection of relay loads and their power sources to the TTL outputs will damage the TTL output stage. If the relay load can source more than 200 mA at 5V or higher, damage to the Controller card may result. SHOCK AND FIRE HAZARD—Inputs and outputs are not rated for connection to an AC power main. DO NOT CONNECT TO 100, 115, 220, 230, OR 240 VAC POWER SOURCES, AS FIRE OR ELECTROCUTION MAY RESULT. T T L 2 O U T (+ ) T T L 1 O U T (+ ) 1 2 3 R LY 1 O U T R LY 2 O U T T T L G N D (-) 4 5 6 7 8 9 1 0 11 1 2 TTL TTL TTL TTL 4 3 2 1 IN IN IN IN (+ ) (+ ) (+ ) (+ ) Figure B-4. Relay and TTL Connector B-6 Doc. 031611-01 11/99 B • Installation The table below describes the pin assignments for the Relay and TTL connectors. Connections 1 and 2 can be programmed to switch any lowvoltage control. The switched current must be less than 200 mA and 42 V peak. See Section C.1.7 for setup instructions. Doc. 031611-01 11/99 Pin Assignment Input Pin Function 1 Relay 1 output Active 2 Relay 1 output Ground 3 Relay 2 output Active 4 Relay 2 output Ground 5 TTL 1 output Active 6 TTL 2 output Active 7 TTL 1 input Active Offset recorder 8 TTL 2 input Active Method run 9 TTL 3 input Active UV lamp on/off 10 TTL 4 input Active Visible lamp on/off 11 TTL input or output Ground 12 TTL input or output Ground B-7 AD25 Absorbance Detector B.4.7 DX-LAN Network Connection (Optional) In order for the AD25 to communicate with Dionex chromatography software (PeakNet 5.11, PeakNet 6, or CHROMELEON 6), you must connect a DX-LAN BNC tee connector and a DX-LAN cable to the DXLAN connector on the rear panel. 1. Install the BNC tee connector (P/N 921914) as follows: a. Note the two small locking pins on either side of the DX-LAN connector on the AD25 rear panel (see Figure B-2). b. Push the tee connector onto the BNC connector and twist until the locking pins are fully engaged in the slots on the tee connector. c. Pull firmly on the tee connector to verify that it cannot move. 2. Install the DX-LAN cable (P/N 960405) as follows: a. Push the metal sleeve on the end of the DX-LAN cable onto one port of the BNC tee connector. b. Twist the metal sleeve until the locking pins on the tee are fully engaged in the slots on the cable's metal sleeve. c. Pull the end of the cable to verify that it cannot move. The DX-LAN cable is a 50 ohm coaxial impedance cable. (Fifty ohm cables are imprinted with “RG-58U” or “RG-58AU.”) Do not substitute an inferior cable, such as a 75 ohm television coaxial cable. Failure to install the correct cable or to lock it into place on the BNC tee connector will cause the detector to lose communication with the chromatography software. 3. If the detector is the last module in the network to be connected, install a terminator resistor plug (P/N 921034) on the remaining port of the BNC tee connector. Terminator resistor plugs are shipped with the chromatography software. If the detector is not the last module, connect the cable from the next module to the BNC tee. Terminator resistor plugs must be installed at each end of the DX-LAN network. The tee connector and cable are shipped with the AD25. B-8 Doc. 031611-01 11/99 C • User Interface This appendix describes and illustrates all of the screens that can be displayed on the AD25 front panel. There are two general types of screens: operational and diagnostic (see Figure C-1). _ Operational screens allow you to create, edit, and run the methods that control AD25 operation, and to select default parameters. Select operational screens from the MENU of SCREENS. When an operational screen is displayed, press Menu to return to the MENU of SCREENS. _ Diagnostic screens allow you to access diagnostic information and tests for the AD25. Select diagnostic screens from the DIAGNOSTIC MENU (option 8 on the MENU of SCREENS). When a diagnostic screen is displayed, press Menu once to return to the DIAGNOSTIC MENU; press Menu a second time to return to the MENU of SCREENS. MENU of SCREENS Operational Screens 1 2 MAIN SCREEN 3 DETAIL SCREEN 5 MODULE SETUP METHOD 6 7 8 ANALOG OUT SETUP TIME FUNCTION IN DIAGNOSTIC MENU METHOD EXTENSION Diagnostic Screens 1 PO W ER-UP SCREEN 2 4 3 ELAPSED TIME DIAGNOSTIC TESTS 5 LEAK CAL & STATUS 6 SIGNAL WAVELENGTH PARAM ETERS VERIFY Figure C-1. AD25 Menu Structure Doc. 031611-01 11/99 C-1 AD25 Absorbance Detector C.1 Operational Screens C.1.1 Menu of Screens Press Menu to display the MENU of SCREENS, which provides top-level access to the menu structure. MENU of SCREENS 1 2 3 4 MAIN SCREEN DETAIL SCREEN METHOD --- 5 6 7 8 MODULE SETUP ANALOG OUT SETUP TIME FUNCTION IN DIAGNOSTIC MENU Help Message Figure C-2. Menu of Screens There are two ways to select a screen from the menu: _ Press the numeric button on the AD25 front panel keypad that corresponds to the screen number. _ Move the cursor to the field containing the screen number and press Enter. To display a brief description of each screen, press Help. C-2 Doc. 031611-01 11/99 C • User Interface C.1.2 Main Screen Use the MAIN screen to: _ Display the status of basic operating parameters. _ Select operating and control modes. WAVELENG TH 254 nm +0.3197 LO CAL Help M essage UV O N VIS O FF R ANG E 1.0 AU AU M ETHO D 05 123.45 M IN Figure C-3. Main Screen Doc. 031611-01 11/99 Field Description WAVELENGTH Displays the selected wavelength (190 nm to 800 nm) for the absorbance determination. The wavelength can be selected from the front panel keypad, a method, or remote control via the DX-LAN. Selecting a wavelength does not turn the lamps on or off (see below). AU Displays the measured absorbance. Absorbance measurements are made relative to an internal offset, which is determined each time the offset autozero function is activated. UV (Lamp) The deuterium lamp has two settings—OFF and ON. The lamp starts after a 20-second warm-up period, but requires at least 30 minutes to stabilize. Measurements made during the warm-up period will drift. The deuterium lamp may be set by Local or Remote inputs. VIS (Lamp) The tungsten lamp has two settings—OFF and ON. The tungsten lamp may be set by Local or Remote inputs. C-3 AD25 Absorbance Detector C-4 Field Description RANGE There are nine discrete settings for the analog output (recorder) range: 0.001, 0.005, 0.01, 0.05, 0.1, 0.5, 1.0, 2.0, and 3.0 AU full-scale. This setting applies only to analog output. For additional analog (recorder) settings, see the description of the ANALOG OUTPUT SETUP screen in Section C.1.6. CONTROL MODE Sets the detector to Local or Remote control. METHOD Displays the number of the method currently running. When using Local control, enter the method number to run in this field. MIN Shows the method clock elapsed time or initial conditions, or is blank. This value can be changed. When you enter a new elapsed time, the method settings corresponding to the new time take effect. Doc. 031611-01 11/99 C • User Interface C.1.3 Detail Screen Use the DETAIL screen to: _ Display detailed information about the status of AD25 operating parameters. This screen displays all the information displayed on the MAIN screen, plus a few additional parameters. NOTE See Section C.1.2 for descriptions of the parameters common to the MAIN and DETAIL screens. _ Set several parameters for Direct Control operation. DETAIL SCR EE N UV ON TTL1 0 VIS O FF TTL 2 1 RA N G E 0.001 A U R LY1 1 R LY 2 0 WAVE LEN G TH 254 nm M ETHO D 05 123.45 M IN O UTPUT - 0. 00001 AU LO CA L Help M essage Figure C-4. Detail Screen Doc. 031611-01 11/99 Field Description OUTPUT The output absorbance measurement is made relative to an internal offset; this is determined each time the autozero function is activated. TTL2 TTL1 Provides TTL control of accessories. In a method, these values occur according to the method timing. In keypad control, select on (1) or off (0). RLY2 RLY1 Provides relay contact-closure control of accessories. In a method, these values occur according to the method timing. In keypad control, select on (1) or off (0). METHOD Selects the method number (0 through 99) to run. C-5 AD25 Absorbance Detector C.1.4 Method Use the METHOD screen to set the initial conditions and default parameters for a method. M E THO D EDIT 33 SAVE TO 33 nm RANG E AU O FFSET M RK TIM E 250 1.0 INIT * * 0.00 0.02 4.00 v Help M essage TT L 1 2 0 0 R LY 1 2 0 0 1 1 Figure C-5. Method Screen C-6 Field Description EDIT Specifies the method number (0 through 99) to edit. SAVE TO Specifies the method number (0 through 99) the current method should be saved to. RUN Specifies the method number (0 through 99) to run. The Hold/Run button controls running the method. TIME Specifies the start time for each step. Times are sorted in chronological order. If you edit a method while it is running, the run time appears above this field. nm Sets the wavelength in nanometers. RANGE Sets the range. OFFSET Stores the offset value. The baseline is set by subtracting the absorbance measured when this step is executed from subsequent measurements. An asterisk (*) indicates that the value is to be stored. MARK Sends a positive pulse to the analog output (recorder) as an event marker. An asterisk (*) indicates that this toggle is set. TTL Sets TTL1 and TTL2 to on (1) or off (0). Doc. 031611-01 11/99 C • User Interface Doc. 031611-01 11/99 Field Description RLY Sets RLY1 and RLY2 to on (1) or off (0). C-7 AD25 Absorbance Detector C.1.5 Module Setup Screen Use the MODULE SETUP screen to select options for the front panel display. M ODULE SETUP D IS P L AY PA N E L B A C K L IG H T: K E Y A C T U AT IO N S O U N D : EN TRY ER R O R S O U N D : HELP LANGUAGE: M E D IU M ON ON ENGLISH H e lp M e s s a g e Figure C-6. Module Setup Screen C-8 Field Description DISPLAY PANEL BACKLIGHT Sets the brightness of the display panel backlight to LOW, MEDIUM, or HIGH. After 2 hours of inactivity from the keypad, the backlight is automatically turned off. Press any button to turn on the backlight again. KEY ACTUATION SOUND Toggles the keypad touch sound on and off. When this option is selected, the detector sounds a beep (880 Hz) when a button is pressed. ENTRY ERROR SOUND Toggles the error sound on and off. When this option is selected, the detector sounds a beep (440 Hz) when an invalid entry is made. HELP LANGUAGE Toggles between English and Japanese for help and error messages. Doc. 031611-01 11/99 C • User Interface C.1.6 Analog Output Setup Use the ANALOG OUTPUT SETUP screen to select parameters for accessories, such as recorders or integrators. AN ALO G O UTPU T S ETUP AU O U TPU T: FULL-SC ALE ZER O PO S ITIO N: 1.00 sec RISE TIM E: + PO LAR ITY: Help M essage Figure C-7. Analog Output Setup Screen Field Description OUTPUT Selects one of the following analog output settings: _ AU sets the output to AUFS (absorbance units full- scale). Doc. 031611-01 11/99 _ ZERO offsets the output by the percentage in the ZERO POSITION field. _ FULL-SCALE sets the output to the full-scale setting. ZERO POSITION Sets the analog (recorder) offset level (0% to 100%). RISE TIME Sets the rise time to 0.1, 0.2, 0.5, 1.0, 2.0, 5.0, or 10.0 seconds. Rise time is a measure of how quickly the detector responds to a change in signal. The selected rise time should be 25% or less of the narrowest peak at halfheight. See Section 2.5.5 for more information about the rise time and data collection rate. POLARITY Determines the output voltage polarity; this is usually set to positive polarity. C-9 AD25 Absorbance Detector C.1.7 Time Function In Use the TIME FUNCTION IN screen to: _ Display the AD25 functions that can be triggered by a TTL input from another instrument. _ Select the TTL signal mode that the AD25 responds to. TIM E FUNCTION IN OFFSET M ETHOD RUN LAM P ON/OFF UV LAM P ON/OFF VISIBLE M ODE: NORM AL EDGE TTL 1 TTL 2 TTL 3 TTL 4 H elp M essage Figure C-8. Time Function In C-10 Field Description MODE Selects NORMAL EDGE (the default), INVERTED EDGE, NORMAL PULSE, or INVERTED PULSE. NORMAL EDGE is compatible with the TTL output signals provided by Dionex modules. Doc. 031611-01 11/99 C • User Interface C.2 Diagnostic Screens C.2.1 Diagnostic Menu The DIAGNOSTIC MENU lists the diagnostic screens. To go to the menu, select option 8 from the MENU of SCREENS (see Section C.1.1). DIAGNO STIC M ENU 1 POW ER-UP SCR EEN 2 ELAPSED TIME 3 D IAGN OSTIC TES TS 4 LEAK CAL & STATUS 5 WAV E L E N G T H V E R IF Y 6 S IG N A L PA R A M E T E R S Help M essage Figure C-9. Diagnostic Menu There are two ways to select a screen from the menu: _ Press the numeric button on the AD25 front panel keypad that corresponds to the screen number. _ Move the cursor to the field containing the screen number and then press Enter. To display a brief description of each screen, press Help. Doc. 031611-01 11/99 C-11 AD25 Absorbance Detector C.2.2 Power-Up Screen Use the POWER-UP screen to display the revision levels of the Moduleware and BIOS code, as well as the ID number and address of the DX-LAN (if connected). This is the same POWER-UP screen that is displayed when the AD25 power is turned on. AD 25 A BSO R BA NC E DETECTO R n.nn M O DU LEWA RE REV BIO S R EV n.nn nnnnnn DX-LA N ID# DX-LA N AD DR ESS: nn nn nn nn nn nn Help M essage Figure C-10. Power-Up Screen C-12 Doc. 031611-01 11/99 C • User Interface C.2.3 Elapsed Time Use the ELAPSED TIME screen to check for how long various AD25 components have been in use. The status is updated in real time. ELAPSED TIM E RESET M O DULE O N: VISIBLE LAM P: UV LAM P: nnnnnn hours nnnnnn hours nnnnnn hours * Help M essage Figure C-11. Elapsed Time Screen Doc. 031611-01 11/99 Field Description MODULE ON Reports the total time the detector has been powered up in its lifetime. VISIBLE LAMP Reports the total time the tungsten lamp has been on. After replacing the lamp, reset this field to zero. To do so, press a Select button to display “*” and then press Enter or a cursor arrow button. UV LAMP Reports the total time the deuterium lamp has been on. After replacing the lamp, reset this field to zero. To do so, press a Select button to display “*” and then press Enter or a cursor arrow button. C-13 AD25 Absorbance Detector C.2.4 Diagnostic Tests Use the DIAGNOSTIC TESTS screen to test the AD25 electronics components. DIAG NOSTIC TESTS _ _ _ _ CPU LEAK LAN WAVELENGTH CAL _ VIS LAM P _ UV LAM P _ O PTICAL Help M essage Figure C-12. Diagnostic Tests At power-up, these tests are run automatically. To run a test manually, position the cursor in the edit field next to the test name, press Select ∆ or Select ∇ to select the asterisk (*), and press Enter. When the test is complete, the entry field displays either P (pass) or F (fail). NOTE The test and calibration procedures disturb detector equilibration while the lamps are cycled on and off and the optical system is cycled through its test modes. After testing, wait until the system is equilibrated before resuming operation. C-14 _ CPU—Checks the internal CPU configuration and Moduleware checksum. _ LEAK—Checks the condition of the leak sensor (correct, open circuit, or short circuit). _ LAN—Checks the configuration and loop-back of the DX-LAN hardware. Doc. 031611-01 11/99 C • User Interface _ WAVELENGTH CAL—Recalibrates the UV and visible wavelengths of the detector. NOTE Before beginning the wavelength calibration procedure, the flow cell must be clear. If the cell contains a colored reagent, flush with water or methanol at 1.0 mL/min before continuing. NOTE During the wavelength calibration procedure, signals are read through the flow cell. After initiating the calibration procedure, do not change any system parameters that may affect cell stability. For example, do not turn the pump on or off or change the flow rate. _ VIS LAMP—Turns on the tungsten lamp and checks the signal level of the photodiode assemblies. _ UV LAMP—Turns on the deuterium lamp and checks the signal level of the photodiode assemblies. _ OPTICAL—Checks the filter paddle position and confirms the lamp functionality. Doc. 031611-01 11/99 C-15 AD25 Absorbance Detector C.2.5 Leak Sensor Calibration and Status Use the LEAK SENSOR CALIBRATION AND STATUS screen to check the status of various leak sensor parameters. LEAK SENSOR CALIBRATIO N AND STATUS M EASURED VALUE: CURRENT CONDITION: CALIBRATIO N VALUE: LO W LEAK THRESHO LD: 2.48 DRY 2.50 2.40 Help M essage Figure C-13. Leak Sensor Calibration and Status Screen C-16 Field Description MEASURED VALUE Reports the measured voltage for the leak sensor installed in the optical bench. CURRENT CONDITION Reports the current state of the leak sensor: DRY if the sensor reading is within the dry range, WET if the sensor reading is within the wet range, or ERR if the sensor is out of range. If the measured value drops 0.02 volts below the calibration value, the current condition is wet. If the measured value is 0.06 volts above the calibration value, the sensor needs to be recalibrated. To calibrate the sensor, press a Select button to select CAL and then press Enter. The current measured value becomes the new calibration value. CALIBRATION VALUE Reports the voltage value saved when the leak sensor was last calibrated. LOW LEAK THRESHOLD Reports the minimum voltage reading that is interpreted as a dry sensor. A reading below this voltage indicates a wet sensor. Doc. 031611-01 11/99 C • User Interface C.2.6 Wavelength Verification Use the WAVELENGTH VERIFICATION screen to verify the wavelength calibration accuracy. WAVELENG TH VERIFICATION TEST READY THEO RETICAL M EASURED DELTA n n n . n nm n . n nm 360.9 n m . n n n .n n . n nm nm 418.7 n m n . n nm n n n . n nm 536.2 nm Help M essage Figure C-14. Wavelength Verification Screen Field Description TEST Toggles between READY and RUN. Select RUN to begin the wavelength verification test. After testing, the field reverts to READY. THEORETICAL Indicates which maxima absorbance of the built-in holmium oxide filter are used to determine wavelength accuracy. MEASURED Reports the maxima absorbance measured during the wavelength verification test. DELTA Reports the deviation between the THEORETICAL and MEASURED values. NOTE Before beginning the wavelength verification test, the flow cell must be clear. If the cell contains a colored reagent, flush with water or methanol at 1.0 mL/min before continuing. NOTE During the wavelength verification test, signals are read through the flow cell. After initiating the verification test, do not change any system parameters that may Doc. 031611-01 11/99 C-17 AD25 Absorbance Detector affect cell stability. For example, do not turn the pump on or off or change the flow rate. C-18 Doc. 031611-01 11/99 C • User Interface C.2.7 Signal Parameters Use the SIGNAL PARAMETERS screen to select operating parameters or view real-time values for the absorbance signal and associated parameters. SIG NAL PARAM ETERS ABSO RBANCE 0 .12345 0 .12345 SAM PLE nA 0 .12345 REF nA TEM PERATURE 45.6 C WAVELENG TH M O TOR STEPS PADDLE CUTO VER 190 nm 1234 H O LM IU M 400 nm Help M essage Figure C-15. Signal Parameters Screen Field Description ABSORBANCE Reports the current absorbance value. For details, see the description of the MAIN screen (see Section C.1.2) or DETAIL screen (see Section C.1.3). SAMPLE nA Reports the sample signal strength in nanoamps. REF nA Reports the reference signal strength in nanoamps. TEMPERATURE Reports the internal temperature of the AD25. WAVELENGTH Reports the currently selected wavelength. MOTOR STEPS Reports the current step of the grating motor. PADDLE Reports the currently selected filter paddle position: OPEN, BLOCKED, 2ND (for second-order filter), or HOLMIUM (for holmium oxide filter). The Moduleware automatically selects the appropriate position. The powerup default depends on the selected wavelength. Never reset the filter paddle position. This field is intended for troubleshooting purposes by Dionex Service Representatives only. Doc. 031611-01 11/99 C-19 AD25 Absorbance Detector C-20 Field Description CUTOVER Reports the wavelength at which the second-order filter should be in place. Doc. 031611-01 11/99 D • Common Mobile Phases D.1 UV Cutoffs The mobile phase composition affects its UV cutoff. In general, mobile phases are mixtures of water and salts such as Na2CO3, NaOH, or HCl. They may also contain acetonitrile or methanol. Hexane sulfonic acid and tetrabutylammonium hydroxide are also used for some applications. The UV cutoffs of these solvents may differ from those predicted by Table D-1. The cutoffs listed in the table apply to spectro-quality grade solvents. D.2 UV Absorbance Wavelengths For a list of wavelengths for the absorption maxima of various chromophores, refer to Table D-2. Doc. 031611-01 11/99 D-1 AD25 Absorbance Detector Solvent UV Cutoff (nm) Refractive Index Selectivity Group Acetic acid 208 1.370 IV Acetone 330 1.356 VIa Acetonitrile 190 1.341 VIb Dioxane 215 1.420 VIa Ethanol 210 1.359 II Hexane sulfonic acid (0.005 M) 230 Isopropyl 205 1.384 II Methanol 205 1.326 II Octane sulfonic acid 230 Sodium carbonate (0.01 M) 210 Sodium hydroxide (0.1 M) 217 Tetrabutylammonium hydroxide (0.005 M) 215 Tetrapropylammonium hydroxide 195 Tetrahydrofuran 212 1.405 III n-Hexane 190 1.372 VII Toluene 285 1.494 VII Methylene chloride 233 1.421 V 1.398 I 1.370 VIa 1.333 VIII Triethylamine Ethyl acetate Water 256 Table D-1. Properties of Common Mobile Phases D-2 Doc. 031611-01 11/99 D • Common Mobile Phases Functional Group Chromophore Wavelength (nm) Ether –O– 185 Olefins C=C– 185 Thioether –S– 194 215 Amine –NH2 195 Thiol –SH 195 Disulfide –S–S– 194 255 Bromide –Br 208 Iodide –I 260 Azido >C=N– 190 Ketone >C=O 270-280 Thioketone >C=S 205 Esters –COOR 205 Aldehyde –CHO 280-300 Carboxyl –COOH 200-210 Nitrite –ONO 220-230 300-400 Oxalic Acid HOOC–COOH 250 Azo –N=N– 285-400 Nitroso –N=O 302 Nitrate –ONO2 270 (shoulder) Benzene 202 255 Diphenyl 246 Naphthalene 220 275 Table D-2. UV Absorbance Wavelengths of Various Chromophores Doc. 031611-01 11/99 D-3 AD25 Absorbance Detector Functional Group Chromophore Wavelength (nm) 312 Anthracene 252 375 Pyridine 195 251 Quinoline 227 270 314 Isoquinoline 218 266 317 Table D-2. UV Absorbance Wavelengths of Various Chromophores (continued) D-4 Doc. 031611-01 11/99 E • Reordering Information Part Number Item Quantity 054157 Deuterium Lamp 1 054158 Tungsten Lamp 1 055990 PEEK Flow Cell 1 055901 Stainless Steel Flow Cell 1 954745 3.15 Amp Fuse (Fast-Blow IEC127) 1 960404 DX-LAN Cable 1 921914 BNC Tee Connector 1 923686 12-Pin Relay/TTL Connector 1 043598 Twisted Wire Assembly 2 m (8 ft) 054107 Relay/TTL Cable (pre-wired) 1 Doc. 031611-01 11/99 E-1 AD25 Absorbance Detector E-2 Doc. 031611-01 11/99 Index A B Absorbance, defined, 2-17 AD25 Absorbance Detector Control by/of another instrument, 3-11 Diagnostics at power-up, 3-4 Dimensions, A-1 Maintenance, 3-12 Parts replacement, 5-1 Power cord, B-3 Regulatory compliance, 1-3 Safety messages, 1-3 Shipping requirements, B-1 Shutdown procedure, 3-12 Theory of operation, 2-17 Time in use, C-13 Tubing connections, 5-1 Unpacking instructions, B-1 Warranty, 5-1 Weight, A-1 AD25 Absorbance Detector manual Safety messages, 1-3 Text conventions, 1-3 Air bubbles in cell Preventing, 4-2, 4-5, B-5 Removing, 5-2 Alconox, 3-3 Analog Output Rear panel connector, 2-5 Analog output, A-2 Range settings, 4-1, C-4 Specifications, A-1 Arrow buttons, 2-2, 2-4 Asterisk, C-6, C-14 Autozero, 4-6 Backpressure, B-5 Backpressure line, 4-2, 4-5, B-5 Beep Front panel buttons, C-8 Invalid entry, C-8 Beer-Lambert’s Law, 2-17 BIOS, 2-8 Revision number, 3-4 Button descriptions, 2-3 – 2-4 Doc. 031611-01 11/99 C Cable, DX-LAN, 4-8, B-8 Installation, B-8 Part number, 4-8 Terminator plugs, 4-8 Cards (printed circuit boards), 2-8 Servicing, 2-7 Cell, 2-10 Air bubble prevention, 4-2, 4-5, B-5 Air bubble removal, 5-2 Backpressure line, 4-2, 4-5, B-5 Chemical compatibility, A-3 Cleaning procedure, 5-2, B-4 Illustration, 2-11, B-4 Operating pressure, A-3 Path length, A-3 Removing condensation, 4-6 Tubing connections, B-4 Volume, A-3 Window, 5-2, B-4 CHROMELEON 6 software, 1-1 Connect/Disconnect commands, 2-14 DX-LAN connections, 2-5 Leak alarm signal, 2-8 Locked Remote mode, 2-14 Index-1 AD25 Absorbance Detector Remote mode, 2-12 – 2-13 Running AD25 methods, 3-6 Control modes, 2-12, 2-16 Controller card, 2-8 Lithium battery disposal, 5-1 Photodiode connections, 2-8 CPU configuration, C-14 Cursor movement, 2-2, 2-4 D Defined, 3-8 Delete Field entries (on screen), 2-3 Front panel button, 2-3 Method steps, 2-3 Description, 3-5 Deuterium lamp, 2-10 See also Lamps Lamp does not light, 4-7 Life expectancy, 2-10 Output waning, 4-3 Part number, 2-10, 5-5 Replacing, 5-4 Time in use, C-13 Turning on and off, C-3 Warm-up period, 4-2, 4-4 Diagnostic Menu, C-11 Diagnostic screens, 2-4, C-1 Exiting, C-1 Selecting, C-1 Diagnostic tests, C-11 Electronics, 4-9 Power-up procedures, 3-4 Dionex data station, 3-11 Dionex systems Enclosures, 2-1 TTL output signals, C-10 Dionex Technical Support, 4-1, 5-1 Direct control mode, 2-16, 3-5 Description, 2-12 With CHROMELEON 6, 2-16 With PeakNet 6, 2-16 Index-2 Display panel Adjusting the screen contrast, 2-1 Backlight settings, C-8 Backlight turns off automatically, C-8 DX-LAN interface, 1-1, 2-5, 2-14 Cable specifications, 4-8, B-8 Communication problem, 4-8 Hardware diagnostic test, C-14 Installation, 4-8, B-8 Rear panel connector, 4-8 Remote operation, 3-11 Terminator plugs for cable, 4-8 E Electrical specifications, A-1 Electromagnetic interference (EMI), 2-7 Electronics, 2-7 Diagnostic tests, 4-9 Servicing, 5-1 Electrostatic discharge (ESD), 2-7 Equilibration (system), 4-2 Error messages Language selection, C-8 Errors See Troubleshooting F Fields (on-screen) Asterisked, C-6, C-14 Blank, 2-3 Reverse video, 2-1 Filter paddle, 2-17 Diagnostic test, C-15 Fittings, ferrule, 4-3, 5-1 Flow cell See Cell Front panel, 2-1 Adjusting the display brightness, C-8 Adjusting the position, 2-1 Button descriptions, 2-3 – 2-4 Doc. 031611-01 11/99 Index Illustration, 2-2 Fuse holder Illustration, 5-3 Fuses, 2-6, A-1 Replacing, 5-3 Help messages, C-8 K Keypad, 2-1 Actuation sound, C-8 H Heat exchanger Backpressure specification, B-5 Cell connections, B-5 Volume, A-3 Help Front panel button, 2-4, C-2, C-11 Help messages Language selection, C-8 Hold/Run Front panel button, 2-3, 2-14 In Direct Control mode, 3-5 Holmium oxide filter, 1-1, C-17 HPLC applications, 1-1 Humidity, operating, A-1 I IC applications, 1-1 Initial conditions, 2-15 Executing, 2-4 Initial conditions step, 3-8 Insert Front panel button, 2-3 Method steps, 2-3 Installation Instructions, B-2 – B-6, B-8 Site requirements, A-1, B-1 Integrators, 2-14, B-5 Analog output setting, C-9 J Japanese Error messages, C-8 Doc. 031611-01 11/99 L Lamps, 1-1 Failure, 4-7 See also Deuterium lamp See also Tungsten lamp LC30 Chromatography Oven, B-3 Leak sensor, 2-8 Diagnostic test, C-14 Status of parameters, C-16 Leak tray, 2-8 Drain tube maintenance, 2-8, 3-12 Leaks Eliminating, 5-1 Lithium battery disposal, 5-1 Local mode, 2-14 Description, 2-12 Locked Remote mode, 2-14 Description, 2-12 With CHROMELEON 6, 2-14 With PeakNet 6, 2-14 M Maintenance procedures, 3-12 Mark Front panel button, 2-3 Menu of Screens, C-2 Menu screens Overview, C-1 Selecting options, C-2, C-11 Method clock Direct control mode, 2-16, 3-5 Resetting, 2-4 Starting, 2-15 Index-3 AD25 Absorbance Detector Method control mode, 2-13, 3-6 Description, 2-12 Selecting, 3-6 Method steps, 2-15 Adding, 3-10 Blank field, 3-8 Chronological order, 3-10 Creating, 3-8 Deleting, 2-3, 3-10 Initial conditions, 2-15, 3-8 Maximum number, 3-9 Restoring the previous value, 2-3 Step "disappears", 2-3 Time 0.0 step, 2-15, 3-8 Time field, 3-8 Viewing additional steps, 3-9 Methods, 2-1, 3-6 Adding a step, 3-10 Changing, 3-9 Creating, 2-15, 3-8 Deleting, 3-10 Deleting a step, 3-10 Editing, 2-15, 3-9 Editing changes take effect, 2-15 Initial conditions, 2-4 Maximum number in memory, 2-15 Relay control, 3-11 Running a method, 3-10 Saving, 3-9 – 3-10 Starting parameters, 3-6 Step maximum, 3-9 Switching to a different method, 3-11 TTL control, 3-11 Mobile phase, 3-2 Absorbs strongly, 4-5 Effect of pH on retention time, 3-1 Lamp warm-up after changing, 4-2, 4-4 Preparation guidelines, 3-1 Reservoir material, 3-2 UV cutoffs, D-1 – D-2 Moduleware, 2-8, 4-9 Checksum diagnostic test, C-14 Revision number, 3-4 Index-4 O Offset Front panel button, 2-3 Operating modes, 2-12, 2-14 Operational screens, 2-4, C-1 Exiting, C-1 Selecting, C-1 Optical bench Components, 2-8 – 2-11 Front cover illustration, 2-9, 5-4 Servicing, 2-8 P Parts replacement, 5-1 See also Service procedures Passivation, 3-3, 3-12 PeakNet 5.11 software, 1-1 Abort command, 2-14 DX-LAN connections, 2-5 Leak alarm signal, 2-8 Locked Remote mode, 2-14 Method control mode, 2-13 Method download, 2-15 Remote mode, 2-12, 2-14 Running AD25 methods, 2-12, 3-5 PeakNet 6 software, 1-1 Connect/ Disconnect commands, 2-14 DX-LAN connections, 2-5 Leak alarm signal, 2-8 Locked Remote mode, 2-14 Method control mode, 2-13 Remote mode, 2-12 Running AD25 methods, 3-6 PEEK systems Tubing connections, 5-1 Photodiodes, 2-8, 2-11 Controller card connections, 2-8 Photometric detection, 2-17 Plumbing (AD25), 5-1 Polarity, C-9 Power cord, B-3 Doc. 031611-01 11/99 Index Power requirements, A-1 Power supply, 2-7, B-3 Power supply module, 2-7 Power switch, 2-1 Actuator, 2-1 Power-up tests Diagnostics, 3-4 Printed circuit boards, 2-7 See Cards (printed circuit boards) Problems See Troubleshooting Fuse replacement, 5-3 Removing trapped air from the cell, 5-2 Tungsten lamp replacement, 5-6 Shutdown procedure, 3-12 SNOOP, 3-3 Sodium dodecylsulfate (SDS), 3-3 Software control, 1-1 See also Product name Spare parts, 5-1, E-1 Stainless steel systems, 3-3, 3-12 Passivation, 3-12 Tubing connections, 5-1 System equilibration, 4-2 R Range settings, A-2 Rear panel Clearance, 4-4, B-1 Description, 2-5 – 2-6 Illustration, 2-5, B-3 Recorders Analog output setting, C-9 Relay control, 3-11 Connections, B-7 Remote Locked mode, 2-14 Remote mode, 2-14 Description, 2-12 Reset Front panel button, 2-4 In Direct control mode, 3-5 Retention time, 3-1 Rise time, 4-6, C-9 Run time, C-6 S Safety icons, 1-3 Screen contrast, 2-1 Select buttons, 2-2, 2-4 Service procedures Cell cleaning, 5-2 Deuterium lamp replacement, 5-4 Electronics components, 5-1 Doc. 031611-01 11/99 T Technical Support, 4-1, 5-1 Temperature, operating, A-1 Time 0.0 step, 2-15 Defined, 3-8 Troubleshooting See also Diagnostics Background absorbance is high, 4-5 Baseline drift, 4-4 Baseline noise, 4-2 – 4-4 Detector does not autozero, 4-6 Detector does not respond, 4-1 Diagnostic tests of electronics, 4-9 DX-LAN communication problem, 4-8 Elution time is slow, 4-3 Lamp does not light, 4-7 Method step "disappears", 2-3 Peak size is wrong, 4-6 Wavelength calibration fails, 4-7 TTL control, 3-11 Assigning functions, 2-5 Connections, B-7 Output signals, C-10 Tubing connections, 3-2 Tungsten lamp, 2-9 See also Lamps Lamp does not light, 4-7 Life expectancy, 2-9 – 2-10 Index-5 AD25 Absorbance Detector Output waning, 4-3 Part number, 2-9, 5-6 Replacing, 5-6 Time in use, C-13 Turning on and off, C-3 Warm-up period, 4-2, 4-4 U UV cutoffs, D-1 – D-2 V Ventilation, 4-4 W Warranty, voiding, 5-1 Waste line installation, B-5 Wavelength Selection, 3-1, C-3 Verification, 1-1 Wavelength calibration, 3-4, C-17 Index-6 Doc. 031611-01 11/99