1
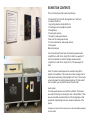
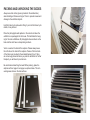
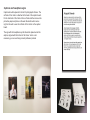
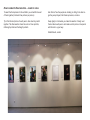
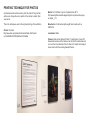
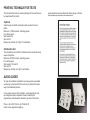
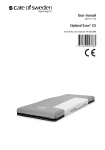
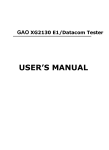
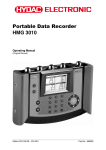
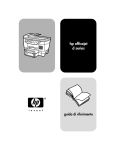
INSTRUCTIONS FOR ACCESSABILITY EXHIBITION
How to assemble the complete exhibition
To live with dignity, regardless of disability, is a human
right according to the UN Convention on the Rights of
Persons with Disabilities. The personal portraits included
in this exhibition can hopefully initiate conversations and
help strengthen international cooperation on accessibility
and disability policies.
The exhibition AccessAbility is based on the everyday
life stories of fourteen people in Sweden. It tells us about
their passions, dreams, hopes, sorrows, joys, jobs,
families and loved ones.
Opening of AccessAbility in St Petersburg.
The exhibition is designed to be accessible for as many
people as possible. It is therefore important to
consider accessibility in all stages, including when
choosing a showroom.
PLANNING THE SHOW
An exhibition about accessibility will naturally attract people with
disabilities, and we should lead by example and make the exhibition as accessible as possible. There are many different types of
disabilities, both mental and physical, and it is important to make
whatever adaptations that local conditions allow for. Following are
some basic guidelines and suggestions:
Floors
provided with handrails on both sides. Information about alternative means of access should be given for those who cannot use
stairs.
Toilets
Choose a location with wheelchair accessible toilets. Provide
clearly visible directions to the toilets.
Avoid rooms with uneven floors and surfaces that slope.
Audio guides
Doors
Provide information about the availability of audio guides, where to
find them and how they are used.
Doors must be clearly visible and preferably of a different colour
from the surrounding walls. Contrast colours are good. Translucent
glass doors should be fitted with adhesive strip or logo 90-150 cm
from the floor so that they can be seen clearly. Automatic doors are
best. If a door is opened by hand, it should be fitted with a clearly
visible sign to ‘Push’ or ‘Pull’. Avoid doorways with high thresholds.
Lights
Both images and text signs must be illuminated from above. It is
important that the lights do not give off a glare on the objects. It is
also important to provide good general lighting for all areas, and
especially where there might be a difference in level or a threshold.
Stairs
Ramps are better than stairs. The best is of course to avoid venues with stairs. If there is a stair without a ramp, see if there are
temporary ramps for rent in your area, or at the very least mark
the bottom and top step with tape in a contrasting colour. Ramps
should also be marked in this way. All stairs and ramps should be
Workshop materials
We have also produced school materials in the form of a teacher’s
guide to be used in connection with the exhibition. This material is
intended to inspire teachers to help prepare the class for the visit,
to help make the visit more meaningful, and also to be used for
further workshops, discussions and classroom topics. This material will be translated into the local language. The material is suitable for students of about 12 years of age and older, but can also
be used for adult groups who are interested in learning more about
the rights of people with disabilities.
EXHIBITION CONTENTS
There are three boxes that contain the following:
15 frames 50x70 cm (14 with photographs and 1 with text)
14 captions 20x30 cm
1 sign with production details 20x30 cm
15 small signs with a headphone symbol
10 headphones
10 audio-guide devices
1 charger for audio-guide devices
Power cord for audio-guide devices
10 cotton necklaces for audio-guide devices
Cotton gloves
Metal loop hangers
Two of the transport boxes have the following measurements:
Length 80 cm, width 60 cm, height 59 cm. Each box weighs 37
kilos. One transport box has the following measurements:
Length 80 cm, width 60 cm, height 20 cm. This box weighs 18
kilos.
About 15 metres of wall space will be needed to hang all the
objects in the exhibition. The boxes also contain 9 empty slots for
locally produced pictures (8 photographs and 1 text). There is also
some extra space for locally produced captions. If 8 photos and 1
text are added, you will need 24 metres of wall in total.
Audio guides
Ten audio-guide devices come with the exhibition. The devices
are used for listening to recordings of texts in the exhibition. There
are also recorded visual descriptions of the photographs so that
people with impaired sight also can create an impression of the
picture.
A simple user manual for the audio guide can be downloaded separately
from the toolkit.
PACKING AND UNPACKING THE GOODS
Always use white cotton gloves (provided in the smallest box)
when handling all frames and signs. This is to prevent smears and
damage to the exhibition objects.
Hold the frame by its sides when lifting. If you hold the frame by its
middle, it may be bent.
Place the photographs and captions in the correct slot when the
exhibition is re-packaged into the boxes. This facilitates the hanging for the next exhibitioner. All photographs have numbers on the
back and the slots have corresponding numbers.
Velcro is used on the back of the captions. Please always leave
the soft side on the back of the captions. Pieces of the hard side
of the Velcro are provided in the smallest transport box. If there
are not enough pieces left when you pack the exhibition for further
transport, you will have to provide more.
Be careful when detaching from wall! When packing, place the
captions with text page to text page, see picture below. This is to
avoid grease stains on the text surfaces.
HANGING
The pictures and captions must always be hung in numerical order. Numbers are found on the back of the pictures and captions.
This is important so that the sound files in the audio guide correspond with the correct images.
The centre of the picture should be 140 centimetres from the floor.
The easiest way to hang the pictures is to put two screws in the
wall, 175 centimetres from the floor. The horizontal distance between the screws should be about 30 centimetres. The frame can
be hung directly on the screws.
If unable to place screws in the wall, you can mount one or two
metal loop hangers on the back of the frames. You will need a
screwdriver for this.
The loops can then be attached to a wire that is attached to the
ceiling or to a rail on the wall. Metal loops are packed in the small
transport box. The holes should face down so the loops are not
visible above the frame.
175 cm
140 cm
Captions and headphone signs
Captions should be placed to the left of photographic frames. The
soft side of the Velcro is attached to the back of the caption board.
Fix the hard side of the Velcro to the soft side and then remove the
protective paper and place on the wall. Be careful when removing from the wall. Leave the soft side of the Velcro on the caption
board.
The sign with the headphone symbol should be placed under the
caption, aligned with the bottom of the frame. Velcro is not
necessary, you can use fixing cement (adhesive) instead.
PRODUCTION OF LOCAL VERSION
Here are a few things to consider if producing a local version of the
exhibition.
plicated words as possible for as many people as possible to be
able to understand.
Select a project manager who is responsible for the production,
including choice of photographer and writer, selection of participants, contact with print lab, framing, workshop, and so on.
The writer must read all texts in the existing version of
AccessAbility from Sweden before starting the work.
To reflect the population, the participants should consist of an
equal number of women and men. These persons should be of
different ages and have different kinds of disabilities and backgrounds. Older people have probably seen an evolution in
society during their lifetime, and younger people may have
completely different dreams and visions about the future. The
disability does not have to be visible or physical.
The available exhibition boxes have room for eight portraits. The
age range could for example be 10-25, 26-40, 40-60, older than
60 years.
Finding people to interview and photograph takes time; expect at
least three months production time in total.
Choice of writer
The writer should be familiar with the topic and should have
written about similar topics in the past. The writer should also be
used to adapt to different situations and used to meet and interact
with people from different backgrounds.
Captions can be no more than 1,100 characters, including spaces.
The introductory text can be no more than 2,000 characters,
including spaces.
Accessibility is important also as regards the texts. Texts should be
written in a logical manner, with short sentences and as few com-
AccessAbility should be written as one word.
Choice of photographer
It is important to find a professional photographer who is used to
adapt to different situations and used to interact with different kinds
of people.
Pictures should be taken according to the instructions by the
photographer Markus Marcetic below to match the Swedish photographs. External flash must be used according to the instructions.
The photographer must also study the existing photos from
Sweden.
Checklist photographer
Make sure the photographer can fulfil the requirements before
starting any collaboration.
• The photographer must be a professional photographer who is used to adapt to different situations and used to interact with different kinds of people. Pictures must be taken according to the instructions by the photographer Markus Marcetic to match the Swedish photographs, see next page.
• External flash must be used according to the instructions from photographer Markus Marcetic, see next page.
• The camera must have minimum 20 megapixels (file size minimum 60 MB, not interpolated, 8 bit colour depth).
• At least three pictures per person must be delivered: one close portrait, one half-length and one full-length, all in
vertical format.
• To make the selection process easier, please use the name of the person followed by 01, 02, 03, et cetera as file name.
• The name of the subject person should be in the
description field in the file information in Photoshop.
• The name of the photographer should be in the
description field as well as in the author field in the file
information in Photoshop.
• The files should have the colour profile Adobe RGB.
• The files must be delivered in maximum quality JPG
format.
•The photographer is responsible for bringing a model
release for each participant to sign.
If any of these requirements are not fulfilled, payment will not be
made.
How to take the portraits – photographer’s notes
about the pictures
The key words in the series have been ‘focus on the person’. I
have tried to avoid seeing the subjects as belonging to a collective
of persons with disabilities. Rather, I have tried to start from each
subject’s personality and consciously tried not to focus too much
on the disability. I have worked in this way, not to hide or try to
avoid showing the disability, but rather to focus more on
personality and create portraits that are more about the individual
than about the disability.
The shoots have taken place in locations suggested by the
depicted, places that are relevant to their stories, such as their
workplace, their homes or anywhere where they usually spend
time and feel comfortable.
Technically, I have photographed all subjects in three different
framings: close portrait, half-length and full-length. All were photographed in both landscape and portrait orientations, but in the final
exhibit only one image in portrait format will be used per person.
The pictures are taken with a relatively shallow depth of field to
emphasise the person rather than the environment. The pictures
are taken in very different places and under different lighting conditions. So to create a sense of unity in the series, I have used the
same lighting on all images. I used an external flash in a soft box
as a key light on the person, together with the
prevailing general light (sun in most cases) that’s illuminating the
rest of the environment.
Markus Marcetic, photographer
How to make the final selection – curator’s notes
To select the final pictures for the exhibition you should first see all
of them together (minimum three pictures per person).
Also think of how the people are standing or sitting, from what angle they are portrayed, their facial expression, et cetera.
Try to find the best picture of each person. See how they match
together. The final selection should be a mix of close portraits,
half-length portraits and full-length portraits.
Keep dignity in mind when you make the selection. Finally, read
the text about each person and make sure the picture corresponds
with the text in a good way.
Sofia Marcetic, curator
PRINTING TECHNIQUE FOR PHOTOS
A professional lab must be used to print the photos! The print lab
will have to change the colour profile of the photos to match their
own printer.
Media: C-Print Matte, Fujicolor Crystal Archive DP II
http://www.fujifilm.se/se/fotopapper/fujicolor-crystal-archive-papier-digital__114
This is the techniques used in the original printing of the exhibition.
Mounted on: 5 millimetres light-weight foam board such as
KAPA® fix
Printer: Chromira
http://www.zbe.com/products/chromira/c5xlab.html?symfony=33a9049bc91235bd8e79ac677229e2af
Lamination: Matte
Frames: black metal, Nielsen Profile 11, matte black, Colour 021.
External dimensions of the frames must be 50x70 centimetres and
no more than 2 centimetres thick for them to fit inside the transport
boxes and match the existing Swedish frames.
PRINTING TECHNIQUE FOR TEXTS
The text should be black on a white background. The text files can
be downloaded from toolkit.
Captions
Caption signs are 20x30 centimetres and mounted on Forex
plates.
Maximum 1,100 characters, including spaces
Font: Arial regular
Size header: 36
Size text: 20
Margins top, bottom, left, right: 2.5 centimetres.
Introduction text
The introduction text is 50x70 centimetres and mounted the same
way as the photos.
Maximum 2,000 characters, including spaces
Font: Arial regular
Size header: 120 and 53
Size text: 30
Margins top, bottom, left, right: 4 centimetres.
AUDIO GUIDES
To make the exhibition available for as many people as possible,
we strongly recommend that the texts are recorded in the same
way for all additional pictures.
In the original version of the exhibition, visual descriptions and
recordings are made in Sweden. Please contact Sylvia
Augustinsson at the Swedish Institute to get more information.
Phone: +46 8 453 79 04 or +46 73 684 20 01
E-mail: [email protected]
Audio-guide devices are ordered at Orpheo group in France.
http://orpheogroup.com/products-services/promotion