1
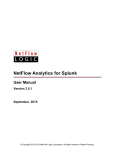
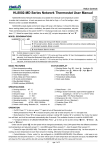
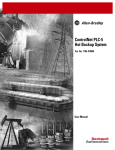
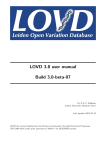
 OpenMIC Installation and Configuration Manual Bibliographic Utility for analog and digital objects Version 1.0 beta
Updated on August 12, 2009 OpenMIC User Manual Bibliographic Utility for analog and digital objects All OpenMIC code is ©2009 by Rutgers University Libraries. The OpenMIC code is free software distributed under the terms of the GNU General Public License v. 3.0 as published by the Free Software Foundation. All terms within the GNU GPL v. 3.0 license apply without reservation. To contact Rutgers University Libraries about OpenMIC, please visit http://rucore.libraries.rutgers.edu/open/projects. © Rutgers University Libraries 47 Davidson Road Piscataway, NJ 08854 2 | P a g e O p e n M I C I n s t a l l a t i o n a n d C o n f i g u r a t i o n M a n u a l Table of Contents I. Introduction ....................................................................................................................................................... 5 II. Using this Manual .............................................................................................................................................. 5 Section 1: OpenMIC Overview Diagram .................................................................................................................... 6 Section 2: Installing and Configuring OpenMIC ......................................................................................................... 7 A. Installation of OpenMIC Bibliographic Utility .................................................................................................... 7 B. Configuring OpenMIC ........................................................................................................................................ 7 Step 1: Manage User Account.................................................................................................................................... 7 Step 2: Digital Workflow Management System ....................................................................................................... 10 1) Metadata cataloging (Figures 2.1.1 to 2.1.22) ..................................................................................................... 10 1.1) Schema Builder ............................................................................................................................................. 10 1.2) Type of Resource or Source Type ................................................................................................................. 14 1.3) Controlled Vocabularies ................................................................................................................................ 18 1.4) Required Elements ........................................................................................................................................ 20 1.5) System Supplied Values ................................................................................................................................ 23 2) Mapping .............................................................................................................................................................. 23 3) Batch Import ....................................................................................................................................................... 23 4) Export .................................................................................................................................................................. 23 3 | P a g e O p e n M I C I n s t a l l a t i o n a n d C o n f i g u r a t i o n M a n u a l Page left blank intentionally 4 | P a g e O p e n M I C I n s t a l l a t i o n a n d C o n f i g u r a t i o n M a n u a l I. Introduction OpenMIC is an open source, web‐based bibliographic utility that can be used as a standalone application or integrated with other repository architectures by a wide range of organizations. It provides a complete metadata creation system for analog and digital materials, with services to export these metadata in standard formats. The bibliographic utility features a METS data architecture which can be used in any METS‐based or METS‐compliant environment. It uses MODS as an underlying metadata schema for descriptive MD, NISO/AES standard for technical MD and PREMIS for source MD and rights MD. It outputs an XML wrapper for the METS components as a single object. The bibliographic utility data model is primarily an event‐based data model, intended to document what happens to a resource at a specific time and place. Preservation and condition events, provenance events, rights events, and descriptive events document what happens to a resource throughout its lifecycle. Details of the events can include associated entities (such as an exhibit curator) and associated objects (such as an exhibit catalog). OpenMIC is a core application for the Moving Image Collections (MIC) initiative developed at the Rutgers University Libraries with funding from the Library of Congress, the Institute of Museum and Library Services, and the National Science Foundation. . II. Using this Manual There are two sections in this manual. Section 1 gives an overview diagram of the OpenMIC modules. Section 2 describes how to configure OpenMIC according to your organization policies. 5 | P a g e O p e n M I C I n s t a l l a t i o n a n d C o n f i g u r a t i o n M a n u a l Section 1: OpenMIC Overview Diagram An overview diagram of the OpenMIC is shown in Figure 1.0. The OpenMIC software consists of several distinct modules, and some of the high level modules are shown here. Figure 1.1: Overview diagram of the OpenMIC
1. Configuration module allows administrators to configure metadata cataloging form, required elements, and default values according to organization or collection policies. 2. Administration module allows administrators and/or users to manage organizations, collections, and to perform database cleanup. 3. Authentication/Authorization module allows users to manage user accounts and the roles according to organization or collection policies. 6 | P a g e O p e n M I C I n s t a l l a t i o n a n d C o n f i g u r a t i o n M a n u a l 4. Metadata and Digital objects module allows users to create, edit, or delete cataloging records, define required elements and create templates for a collection, map schemas, import, and export metadata. 5. Export module allows users to export metadata in METS XML, Marc XML, or MODS xml format. 6. Mapping Utility allows users to map organization’s existing records to OpenMIC database. 7. Batch Import module allows users to batch load records from existing database. Section 2: Installing and Configuring OpenMIC A. Installation of OpenMIC Bibliographic Utility Please refer to the README.txt file which is included in the OpenMIC download package. To download the package, go to: http://rucore.libraries.rutgers.edu/open/dl/index.php?openmic After the installation of OpenMIC is completed, you may either start using the system as delivered or configure the system according to your organization policies. If you are ready to use OpenMIC as delivered, proceed create organization and collection before start creating metadata. Refer to the OpenMIC user manual. http://rucore.libraries.rutgers.edu/open/projects/openmic/openmic‐user‐manual.pdf B. Configuring OpenMIC OpenMIC can be used as delivered or it can be configured according to the organization policies. After the software is installed, the administrator must create a super user account and perform some administrative tasks before using the system. The steps are explained below: Step 1: Manage User Account (Figures 1.1.1 to 1.1.3) The software is delivered with a default user name and password. As soon as the software is installed, the administrator should log in with the delivered user name and password and create a super user account. Once the super user account is created, the delivered user name and password become invalid. Follow the instructions below to create a super user account. a)
b)
c)
d)
Login with the default user name and password. Select Manage User Account from the main menu. Enter User information and click Submit. Next you need to assign super user role for this user. Select the user you have just created and click Assign Role(s). 7 | P a g e O p e n M I C I n s t a l l a t i o n a n d C o n f i g u r a t i o n M a n u a l e) Select Yes to assign super user role and click Submit. f) Select Cancel to go to the OpenMIC initial screen. Figure 1.1: OpenMIC initial screen 8 | P a g e O p e n M I C I n s t a l l a t i o n a n d C o n f i g u r a t i o n M a n u a l Figure 1.2: User account screen Figure 1.3: Role assignment screen 9 | P a g e O p e n M I C I n s t a l l a t i o n a n d C o n f i g u r a t i o n M a n u a l Step 2: Digital Workflow Management System This step is optional. The configuration module allows organizations to select the elements to appear on the cataloging form and to set the system‐wide required elements as well as system‐supplied values according to the organization policies. Go through each of the configuration options and make appropriate selections according to your organization policies. 1) Metadata cataloging (Figures 2.1.1 to 2.1.22) 1.1) Schema Builder The Schema Builder allows you to enable and disable elements and their subelements. Future releases will also allow you to Edit Properties and Add New Element. All the elements and subelements in OpenMIC are enabled by default with no system supplied values. a)
b)
c)
d)
e)
Select Digital Object Workflow Management System from the main menu. Select Configuration. Select Metadata Cataloging. Select Schema Builder. Refer to the data dictionary for element definitions. Select Descriptive. You will see all the top level elements in descriptive metadata section. If you click on the radio button, you will see the next level elements. f) Select the element you want to disable and click Disable. A red X indicates the element is disabled. g) Follow steps (a) – (g) for every metadata section. h) Click Exit to return to the configuration screen. 10 | P a g e O p e n M I C I n s t a l l a t i o n a n d C o n f i g u r a t i o n M a n u a l Figure 2.1.1: OpenMIC initial screen Figure 2.1.2: Administration screen 11 | P a g e O p e n M I C I n s t a l l a t i o n a n d C o n f i g u r a t i o n M a n u a l Figure 2.1.3: Configuration main screen Figure 2.1.4: Metadata cataloging configuration screen 12 | P a g e O p e n M I C I n s t a l l a t i o n a n d C o n f i g u r a t i o n M a n u a l Figure 2.1.5: Metadata form configuration screen Figure 2.1.6: Descriptive metadata form configuration screen 13 | P a g e O p e n M I C I n s t a l l a t i o n a n d C o n f i g u r a t i o n M a n u a l 1.2) Type of Resource or Source Type (Figures 2.1.7 to 2.1.12) The data elements and vocabularies appearing on the metadata input form under Technical Metadata are determined by the value selected in the typeOfResource data element in Descriptive Metadata (labeled ‘Type of Item’ on the form). If your organization uses a different set of terms for typeOfResource than the default terms provided by the system, map your terms to the default types. The data elements and vocabularies appearing on the metadata input form under Source Metadata are determined by the value selected in the sourceType element in Source Metadata. If your organization uses a different set of terms than the default terms provided by the system, map your terms to the default source types. To configure Type of Resource: (figures 2.1.7 to 2.1.10) a)
b)
c)
d)
e)
f)
g)
h)
Select Digital Object Workflow Management System from the main menu. Select Configuration. Select Metadata Cataloging. Select TyoeOfResource/ SourceType. Select TypeOfResource. Select Organization. Select This organization has its own TypeOfResource terms. Enter your organization’s TypeOfResource term one by one in the space provided on the left and map each term to the system supplied terms on the right. If some, but not all, of your terms match OpenMIC terms, map all your terms. If OpenMIC uses a terms your don’t use and for which you have no equivalent, ignore it. See Figure 2.1.10. In this example, the organization has ignored ‘Service,’ as it doesn’t use this term or any equivalent. i) Click Submit. j) Click Exit to return to the configuration screen. To configure Source Type: (figures 2.1.11 to 2.1.12) a)
b)
c)
d)
e)
f)
g)
h)
Select Digital Object Workflow Management System from the main menu. Select Configuration. Select Metadata Cataloging. Select TypeOfResource/SourceType. Select SourceType. Select Organization. Select This organization has its own SourceType terms. Enter your organization’s Source type term one by one in the space provided on the left and map each term to the system supplied terms on the right. If some, but not all, of your terms match OpenMIC terms, map all your terms. If OpenMIC uses a terms your don’t use and for which you have no equivalent, ignore it. See Figure 2.1.10. In this example, the organization has ignored ‘Service,’ as it doesn’t use this term or any equivalent. 14 | P a g e O p e n M I C I n s t a l l a t i o n a n d C o n f i g u r a t i o n M a n u a l i) Click Submit. j) Click Exit to return to the configuration screen. Figure 2.1.7: Configuration main screen Figure 2.1.8: Cataloging utility configuration screen 15 | P a g e O p e n M I C I n s t a l l a t i o n a n d C o n f i g u r a t i o n M a n u a l Figure 2.1.9: Type of Resource configuration screen 1 Figure 2.1.10: Type of Resource configuration screen 2 16 | P a g e O p e n M I C I n s t a l l a t i o n a n d C o n f i g u r a t i o n M a n u a l Figure 2.1.11: Source Type configuration screen 1 Figure 2.1.12: Source Type configuration screen 2 17 | P a g e O p e n M I C I n s t a l l a t i o n a n d C o n f i g u r a t i o n M a n u a l 1.3) Controlled Vocabularies (Figures 2.1.13 – 2.1.16) MODS metadata standard allows two options for inputting geographical subject terms: as a single heading (Piscataway, N.J.) or in a hierarchical form. If you choose to use the hierarchical form, you can load your terms in a batch mode. If you have disabled this element, you may skip this section. Note: To add or edit other controlled vocabularies, refer to the OpenMIC User Manual. Follow the steps below to upload terms for each of the hierarchical geography elements: a) Create a spreadsheet with data in the following four columns. Do not include headers. Note: If terms already exist in the system, newly uploaded terms will replace the old terms. United States|US|1|Marc21 United Kingdom|UK|2|Marc21 b) Save the spreadsheet as a tab‐delimited text file. If you use Microsoft Excel, go to File ‐> Save As, and choose Text (Tab delimited) as file type. c) Select Metadata Cataloging from the configuration main screen. d) Select Controlled Vocabularies. e) Select Country. f) Upload the text file. g) Click Upload Geographical Terms. h) Follow above steps for each element in the hierarchy. 18 | P a g e O p e n M I C I n s t a l l a t i o n a n d C o n f i g u r a t i o n M a n u a l Figure 2.1.13: Configuration main screen Figure 2.1.14: Cataloging utility configuration screen 19 | P a g e O p e n M I C I n s t a l l a t i o n a n d C o n f i g u r a t i o n M a n u a l Figure 2.1.15: Configure Controlled Vocabularies Screen Figure 2.1.16: Configure Controlled Vocabularies Screen 2 1.4) Required Elements (Figures 2.1.17 to 2.1.19) You may specify system‐wide required elements for collection objects as well as resource objects based on your organization policies. The system will check for a value in each required elements. If a required element lacks a value, the system flags the metadata record with “M”. Follow the steps below to specify system‐wide required elements. a)
b)
c)
d)
e)
f)
g)
Select Digital Object Workflow Management System from the main menu. Select Configuration. Select Metadata Cataloging from the Main Configuration Screen. Select Required Elements. Select Collection or Resource. Select Metadata Type (Note: Source and Technical apply to Resource only). Click element name. You will see the element listed under Specified Required Field Entry List. To remove an element from the required list, select the field name on that list and OK the prompt to remove the entry. Refer to the online data dictionary for element definitions. 20 | P a g e O p e n M I C I n s t a l l a t i o n a n d C o n f i g u r a t i o n M a n u a l h) Click Update. i) Repeat steps (e) –(h) for each metadata type. Figure 2.1.17: Configuration main screen 21 | P a g e O p e n M I C I n s t a l l a t i o n a n d C o n f i g u r a t i o n M a n u a l Figure 2.1.18: Cataloging utility configuration screen Figure 2.1.19: System default required elements screen 22 | P a g e O p e n M I C I n s t a l l a t i o n a n d C o n f i g u r a t i o n M a n u a l 1.5) System Supplied Values Not implemented in this version. 2) Mapping Not implemented in this version. 3) Batch Import Not implemented in this version. 4) Export Not implemented in this version. 23 | P a g e O p e n M I C I n s t a l l a t i o n a n d C o n f i g u r a t i o n M a n u a l