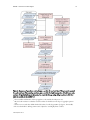
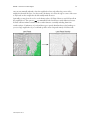
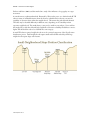
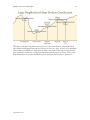
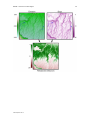
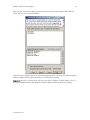
1
Land Facet Corridor Designer corridordesign.org Last updated 9 July 2013 Jeff Jenness Brian Brost Paul Beier Produced with the generous support of USDA Forest Service Rocky Mountain Research Station McIntire-Stennis Cooperative Forestry Program Arizona Board of Forest Research 2 www.corridordesign.org Produced with the generous support of USDA Forest Service Rocky Mountain Research Station and Arizona Board of Forestry/McIntire-Stennis Cooperative Forestry Program 3 Land Facet Corridor Designer http://www.corridordesign.org --------------------------------------------------------------------------------------------OVERVIEW OF LAND FACET CORRIDOR ANALYSIS .......................................................................... 7 Executive Summary .................................................................................................................................... 7 Introduction ............................................................................................................................................... 7 The procedures ........................................................................................................................................... 8 Major Step 1: Define and map land facets .............................................................................................. 9 Major Step 2: Develop Maps of Resistance ........................................................................................... 11 Major Step 3: Least-cost Corridor Modeling ........................................................................................ 12 Major Step 4: Add a riparian corridor if needed.................................................................................... 13 Major Step 5: Join the land facet corridors and corridors for habitat specialist species ........................... 13 Web-based distribution of the tools .......................................................................................................... 17 THE LAND FACET CORRIDOR DESIGNER TOOLS ............................................................................. 18 Installing the Tools ................................................................................................................................... 18 For ArcGIS 9.x..................................................................................................................................... 18 For ArcGIS 10.0 .................................................................................................................................. 18 Viewing the Tools ..................................................................................................................................... 20 Uninstalling Land Facet Corridor Designer............................................................................................... 22 For ArcGIS 9.x..................................................................................................................................... 22 For ArcGIS 10.0 .................................................................................................................................. 23 Copying Land Facet Corridor Designer Tools to Other Toolbars.............................................................. 25 TROUBLESHOOTING ...................................................................................................................... 27 If Any of the Tools Crash.......................................................................................................................... 27 “Object variable or With block variable not set” Error: ............................................................................. 27 RICHTX32.OCX Error: .......................................................................................................................... 27 SAMPLE WORKFLOW ...................................................................................................................... 31 LAND FACET CORRIDOR ANALYSIS TOOLS .................................................................................... 33 Export for R Analysis: ............................................................................................................................... 33 Land Facet Clusters from R: ..................................................................................................................... 36 Density Surface Tool: ............................................................................................................................... 41 Shannon’s Index Tool: .............................................................................................................................. 43 Identify Termini Polygons Tool: ............................................................................................................... 45 4 MANUAL: Land Facet Corridor Designer 5 Invert Raster Tool: .................................................................................................................................... 48 TOPOGRAPHIC POSITION INDEX TOOLS ....................................................................................... 49 Description ............................................................................................................................................... 49 Scales and Neighborhoods: ................................................................................................................... 50 Classifying by Topographic Position: ................................................................................................... 51 TPI Types:................................................................................................................................................ 54 Neighborhood Types: ............................................................................................................................... 55 Using the tools .......................................................................................................................................... 55 Calculate a TPI Raster: ......................................................................................................................... 56 Create a 3-Category Topographic Position Raster: ............................................................................... 57 Create a 4-Category Topographic Position Raster: ............................................................................... 59 Create a 6-Category Topographic Position Raster: ............................................................................... 61 MAHALANOBIS DISTANCE TOOLS ................................................................................................. 63 Discussion of Mahalanobis Distances: ....................................................................................................... 63 General Concepts: ................................................................................................................................ 63 Re-Scaling Mahalanobis Distances using Chi-Square P-values: ............................................................. 67 Applications to Landscape Analysis:...................................................................................................... 68 Mean Vector and Covariance Matrix Tables: ........................................................................................ 70 Statistical Matrix Definitions and Formulae: ........................................................................................ 71 Exact Values vs. Interpolated Values: .................................................................................................... 72 Additional Reading: ............................................................................................................................. 73 Using the Tools: ....................................................................................................................................... 74 Create Mahalanobis Raster Surface ....................................................................................................... 74 Calculating Mahalanobis Values at Sample Points ................................................................................ 78 Generating Statistical Matrices: ............................................................................................................ 82 Chi-Square Raster Transform: .............................................................................................................. 86 R FUNCTIONS FOR DEFINING LAND FACETS ................................................................................ 87 An R Primer ............................................................................................................................................. 87 Using R as a Calculator ........................................................................................................................ 87 Assigning Values to Objects ................................................................................................................. 87 Using R Functions ............................................................................................................................... 88 Isolating Subsets of Data in a Dataframe: ............................................................................................. 89 Installing and Loading R Packages........................................................................................................ 90 Getting Help in R ................................................................................................................................ 90 Last modified 9-Jul-13 MANUAL: Land Facet Corridor Designer 6 Some Suggestions ................................................................................................................................. 90 Overview Of R Functions For Defining Land Facets ................................................................................. 91 Kernel Density Estimation: Function LF.kde ....................................................................................... 92 Identify Outliers: Function LF.outlier ....................................................................................................... 94 Fuzzy c-means Cluster Analysis: Function LF.cluster................................................................................. 95 Exporting Information for Land Facet CorridorDesigner: Function LF.export .......................................... 97 Downloading The R Functions For Defining Land Facets ........................................................................ 98 Workflow For Defining Land Facets ......................................................................................................... 98 ABOUT THE LAND FACET EVALUATION TOOLS AND MANUAL ................................................... 104 Documents Related to Land Facet Analysis ..............................................................................................104 SUGGESTIONS FOR IMPROVEMENTS? ........................................................................................... 105 UPDATES ...................................................................................................................................... 106 LITERATURE CITED...................................................................................................................... 108 --------------------------------------------------------------------------------------------- Last modified 9-Jul-13 MANUAL: Land Facet Corridor Designer 7 Overview of Land Facet Corridor Analysis Executive Summary Land Facet Corridor Designer is a geographic approach to designing wildlife linkages that will be useful in the face of impending climate change. This novel GIS-based procedure identifies the geographic portion of a region that maximizes continuity and diversity of landscape units defined by topographic and soil traits (such as high-elevation north-facing slopes with rocky soils, or lowelevation flats with thick soils) that are expected to facilitate wildlife movement. We refer to these topographic-soil units as land facets. The rationale is that future vegetation (and, indirectly, animal assemblages) and human land uses will be determined primarily by the interaction among land facets (soil and topography) and future climate regimes. The conceptual basis for this approach was recently published (Beier, P., and B. Brost. 2010. Use of land facets to plan for climate change: conserving the arenas, not the actors. Conservation Biology. DOI: 10.1111/j.15231739.2009.01422.x). Land Facet Corridor Designer is explained in detail, and applied to three landscapes in Arizona, by Brost (2010, MS Thesis, School of Forestry, Northern Arizona University; available online). Publications from this thesis, with Brian Brost as senior author, should appear in the peer-reviewed literature in 2011. Until now, practitioners designed corridors to promote movement of focal species through today’s land cover map. Because land cover maps are likely to change in this century, any corridor linkage based on those maps might fail during climate change. By conserving strands of land facets, linkage designs based on our new procedures should preserve the “arenas” that support current and future biodiversity, without relying on the modeled responses of the temporary occupants of those arenas. Conservation practitioners now have a flexible tool to design and map corridors of land facets at high resolution (30-m or 10-m, depending on resolution of the DEM) that have a high probability of allowing for animal movement, including shifts of species’ geographic ranges, during and after climate change. This can enhance the ability to design wildland networks robust to climate change, reducing the impact of climate change on the biota of natural landscapes. These procedures are transparent and do not depend on global or regional circulation models. Introduction In the face of impending climate change, improving connectivity among protected wildlands is the primary conservation strategy (Hannah et al. 2002, Lovejoy & Hannah 2005). Although there are several ways to enhance connectivity, wildlife corridors (e.g., broad, multi-stranded swaths of land connecting National Forests and Grasslands to other nearby protected lands) are appropriate in landscapes increasingly dominated by human uses. However, most existing corridor designs rely on current vegetation maps as the primary driving factor (reviewed by Beier et al. 2008). These corridor designs risk failure because current vegetation and human land uses will change in response to climate change in ways that have proven difficult to predict. Only two efforts (Williams et al. 2005, Phillips et al. 2008) designed corridors to facilitate species’ range shifts caused by climate change. Those efforts depended on 50-year projections of a regional circulation model and produced very coarse corridors (chains of 2.9 km2 cells). Land Facet Corridor Designer is a new approach (finer scale, free of dependence on global and regional climate models) to design corridors robust to climate change. Last modified 9-Jul-13 MANUAL: Land Facet Corridor Designer 8 These GIS procedures produce a linkage design, composed of a multiple swaths that provide high diversity and continuity of land facets (polygons with relatively uniform topographic and soil characteristics, for example high-elevation north-facing slopes on rocky soils, or low-elevation flats with thick soils). The rationale is that future vegetation communities will be determined by the interaction among topographic elements, soil types, future temperature regimes (likely hotter), and future precipitation regimes (wetter or dryer, depending on location). A linkage design with continuous strands of each land facet should provide continuous strands of future vegetation communities, without the need to model climate change and vegetation response directly. Our procedures can also produce a corridor with high interspersion of land facets; such a corridor strand is intended to promote rapid, short movements in response to climate change. The ensemble of about a dozen corridor strands (one for each land facet and one for diversity of facets) constitutes a linkage design for climate change. Because the approach does not in any way depend on global or regional circulation models, emission scenarios, species-specific climate envelope models, or species dispersal models, it avoids massive and compounded uncertainties of approaches that depend on these submodels. Our procedures can be used to make proposed corridors more robust to climate change, or as an alternative useful in areas where no vegetation maps are available (e.g., most of the developing world). The procedures A land facet Linkage Design looks a lot like a focal species Linkage Design (Figure 1). Like linkages designed for multiple focal species, linkages designed for a diversity of land facets contain multiple strands connecting two wildland blocks (the natural landscapes to be connected by the linkage, such as a National Forest and a National Park). Specifically the Linkage Design for land facets includes: o Several (typically 5-15) corridors, each of which is designed to maximize continuity of one of major land facets that occurs in the planning area. Each such strand or corridor is intended to support occupancy and between-block movement by species associated with that land facet in periods of climate quasi-equilibrium. Like each focal species corridor, each land facet corridor is produced by least-cost modeling. o One corridor with high local interspersion of facets to support range shift, species turnover, and other ecological processes relying on interaction between species and environments. The high diversity corridor is also produced by least-cost modeling. o A riverine strand to support aquatic species, nutrient and sediment flows, and uplandwetland interactions. Although such a corridor could be produced by an automated GIS procedure, we believe that hand-drawing the major riverine connection is typically easier, and just as accurate. Last modified 9-Jul-13 MANUAL: Land Facet Corridor Designer 9 Figure 1. Illustration of a multistranded linkage of land facets designed to allow species to shift their range in response to climate change and to support movement between Wildland Blocks during periods of quasi-equilibrium. Area A optimizes continuity for high local diversity of land facets. Other areas provide the best continuity of high-insolation, steep slopes (area B), low-elevation, gentle canyons (area C), and low-elevation, gentle ridges (area D). Area E encompasses the region’s main river and its only perennial tributaries from each wildland block. In practice, a design would include about 10-15 strands, but for clarity fewer are illustrated here. The conceptual approach to using land facets in conservation planning is described by Beier and Brost (2010); we recommend this paper as an accessible introduction to the topic. We describe our procedures in the following narrative in terms of five Major Steps. The details of the first three Major Steps are illustrated in two flow charts (Figures 2 and 3). MAJOR STEP 1: DEFINE AND MAP LAND FACETS Ideally soil attributes should be used along with topographic attributes to define land facets. Unfortunately, soil maps have many limitations (Sanchez et al. 2009). For instance, polygons may lack values for a certain attribute or contain several states of that attribute, indicating the presence of unmapped heterogeneity. In most nonagricultural parts of the western United States, soil maps consist of large, heterogeneous polygons from which inferences about relevant traits, such as moisture, texture, depth, or soil nutrients, cannot be made (Beier and Brost 2010). Therefore, in this Last modified 9-Jul-13 MANUAL: Land Facet Corridor Designer 10 description of the approach, land facets are based only on topographic variables. Because the approach can use both categorical and continuous variables, it can readily be adapted to accommodate categorical soil variables (such as soil type) and continuous soil variables (such as soil depth or moisture). We strongly encourage use of relevant soil data if they are available throughout a planning area. Moore et al. (1991) and Franklin (1995) discuss approximately 20 topographic variables that can be derived from a digital elevation model (DEM). Our procedures allow the user to select up to 5 soil or topographic variables. To maintain easily interpretable and biologically meaningful land facets, Beier and Brost (2010) recommend using four variables to define land facets from 30-m DEM: 1. Topographic position: Each pixel is assigned to one of three classes, namely canyon, ridges, and slopes1 (including flat slopes), by comparing the elevation of the pixel to the average elevation within a 200-m radius (Jenness 2006). 2. Annual solar insolation: Sum of instantaneous radiation at half-hour intervals for one day per month over a calendar year using the 'Solar Radiation' tool in ArcGIS 9.3 (ESRI, Redlands, California). The tool calculates half-hour radiation as a function of latitude, aspect, slope, and topographic shading, but ignores thickness of atmosphere and cloud cover. 3. Steepness, expressed as slope angle (see previous footnote). 4. Elevation. To ensure that the classification represents the land facets of the Wildland Blocks, we use only pixels inside the blocks to define the land facets. Later, pixels in the rest of the analysis area will be assigned to appropriate land facets. Using only the pixels inside the Wildland Blocks, the procedures start with these two steps: 1. Assign each pixel into broad classes of the categorical variable topographic position. This classifies each pixel as a ridge, canyon, or slope pixel. The procedure allows you to choose another categorical variable, such as soil type, or a combination of a categorical soil variable and a topographic position. 2. Characterize each slope pixel based on all three continuous variables (steepness, elevation insolation). Characterize each ridge or canyon pixel based only on steepness and elevation2. Within each topographic position, the procedures involve the following sequential steps: 1 We use the term slopes to refer to the topographic position (a categorical variable) that includes every pixel that is not classified as a canyon bottom or a ridgetop. We use the term steepness (or slope angle) to refer to the continuous variable that can describe any of the 3 topographic positions. This can result in awkward phrases like “steepness of a slope” – sorry about that. If we ever slip up and refer to “slope of a slope” we are very sorry. 2 Insolation is not used to identify subclasses of ridges or canyons, because ridges and canyons are usually symmetrical features, that is, a high-insolation ridge is almost always close to a low-insolation ridge. A classification that used insolation to define land facets within ridges would identify different land facets for their opposing sides, such as north-facing and south-facing ridgelines, despite their otherwise similarity. This unnecessarily complicates corridor design because the opposing sides of canyons and ridges are generally close in proximity and can be treated as a unit for conservation purposes. Splitting ridges and canyons on insolation would produce redundant corridors, such as a “cold, high elevation, steep ridge” corridor that is completely intertwined with a “hot, high elevation, steep ridge” corridor. Last modified 9-Jul-13 MANUAL: Land Facet Corridor Designer 11 1. Identify outliers3, i.e., cells with combinations of values of the continuous variables that rarely occur in the Wildland Blocks, and remove them from the analysis. These cells often occur in isolated patches and are limited to a small portion of the landscape. Outliers produce clusters that span a large fraction attribute space, with a diffuse or diluted ecological interpretation. Extreme cells also shift the position of the cluster centroid to a sparse region of multivariate space. 2. Use fuzzy c-means clustering to classify the pixels into c natural clusters or groups, for each value of c from 1 to 10. For instance, a 3-way split of ridges might include high elevationsteep, low elevation-steep, and low elevation-gentle classes. Beier and Brost (2010) explain why fuzzy c-means cluster analysis (Bezdek 1981, Dimitriadou et al. 2009) is superior to hierarchical cluster analysis, nonmetric multidimensional scaling, and two-step cluster analysis. 3. Identify the number of classes, c, that best corresponds to the natural multivariate “lumpiness” in the continuous variables. This requires examining several goodness of fit metrics, evaluating interpretability of classes, draping maps of facet polygons over a topographic hillshade, plotting facet centroids in multivariate space, and inspection of the proposed class map by someone familiar with the landscape to assess whether the c clusters correspond to natural units or impose artificially discrete categories on a continuous landscape. 4. Use a confusion matrix to identify poorly classified pixels, such as slope pixels that assign with roughly equal probability to the “warm, steep, high elevation” and the “cold, steep, high elevation” classes. Remove poorly classified pixels from the analysis to produce a set of distinctive land facets. These procedures will typically produce a set of 8-16 land facets, such as “high elevation, steep ridges” and “low elevation, gentle, hot, slopes.” MAJOR STEP 2: DEVELOP MAPS OF RESISTANCE In focal species approaches to designing linkages, the resistance of a cell represents the difficulty of movement through that cell for a focal species. For the land facet approach, the resistance of a cell is based on the departure of that cell from the prototypical cell of the focal land facet. Our procedures use Mahalanobis distance as the resistance metric. Mahalanobis distance can be thought of as the number of “multivariate standard deviations” between the attributes of a pixel and the characteristic values4 for the focal land facet type. For each land facet type, the procedures include the following steps: o Calculate Mahalanobis distance for every pixel in the analysis area, using the following characteristic values: 3 By default the procedure (kernel density estimation) identifies the most extreme 10% as outliers, but the user can over-ride this setting. Because outliers are defined relative to cells inside Wildland Blocks, the proportion of cells in the matrix classed as outliers will differ from 10% or other specified value. 4 For most variables used in a Mahalanobis distance analysis, the characteristic value is the mean. But when one of the variables is “% of pixels of this facet type within a moving window,” 100% is used as the characteristic or “ideal” value, even if the 100% value is far above the mean. Last modified 9-Jul-13 MANUAL: Land Facet Corridor Designer o 12 Mean elevation of pixels of the focal land facet within the Wildland Blocks. Mean insolation of pixels of the focal land facet within the Wildland Blocks. Mean steepness of pixels of the focal land facet within the Wildland Blocks. 100% of pixels in a 100-m radius are pixels of the focal facet type. Use aerial photographs to digitize urban or developed areas such as mines that are unlikely to support wildlife movement, even if they otherwise are of a focal facet type. Assign “no data” resistance values (equivalent to infinite resistance) to these pixels. This prevents a corridor from being identified through areas unlikely to support species movements. We caution against wholesale exclusion of agricultural areas, especially if they can be restored to natural vegetation or occupy a large portion of the most productive land facets (those with gentle slopes and high soil moisture). In addition to linkage for individual land facets, you can also design a single corridor with maximum interspersion of land facets. To do so, our procedures produce a resistance map as follows: o Calculate Shannon's index, H', of land facets in a 5-pixel radius (McCune & Grace 2002). Shannon's index incorporates richness and evenness into a single measure. Thus, a high index is achieved by not only maximizing the number of land facets within the neighborhood, but also by balancing representation of those facets. o Calculate resistance of a pixel as 1/(H' + 0.1). This formula5 assigns low resistance to pixels with a high diversity index. o As in designing linkages for individual land facets, remove areas unsuitable for connectivity from the resistance surface. MAJOR STEP 3: LEAST-COST CORRIDOR MODELING The procedures to produce a least-cost corridor for each land facet type are very similar to those used to develop least-cost corridors for focal species (Adriaensen et al. 2002, Beier et al. 2008): o Define corridor termini (potential start and end points) as areas within the wildland blocks that contained the most occurrences of the focal land facet6. o Calculate the cost-weighted distance (cumulative resistance) from each terminus and sum the two resulting raster outputs to produce the corridor results. o Select a “slice” (cost contour) of the corridor output to delineate the least-cost corridor. We suggest selecting the slice with an approximate minimum width of 1 km over its length for corridors < 10 km long, increasing to an approximate minimum width of 2 km for much longer corridors. We chose these minima because they are similar to the widths recommended by Beier et al. (2008) for corridors for focal species. 5 Adding 0.1 precludes undefined values which would occur in the unlikely event that all cells in a neighborhood are outliers. 6 By default, the procedure aggregates all cells with at least one occurrence of the facet within a 3-cell radius into polygons, and retains the largest 50% of these polygons in each respective wildland block as termini. The user can over-ride these settings. In 3 Arizona landscapes, the largest polygons produced by these settings always contained a high density of the focal facet type. Last modified 9-Jul-13 MANUAL: Land Facet Corridor Designer 13 To produce a single corridor with maximum interspersion of land facets, our procedures use the following steps: o To define corridor termini, follow these steps within each Wildland Block separately: Identify the half7 of all cells inside each Wildland Blocks with the highest H’ values and aggregate them into polygons. Retain the largest 50% of the polygons as termini8. o Calculate the cost-weighted distance (cumulative resistance) from each terminus and sum the two resulting raster outputs to produce the corridor results. o Select a “slice” (cost contour) of the corridor output that is approximately 1 km to 2 km wide, as for the least-cost corridors for individual land facets. MAJOR STEP 4: ADD A RIPARIAN CORRIDOR IF NEEDED As stated above, we recommend using soil attributes to define land facets when good soils data are available, but often they are not available. When soil variables can’t be used, we suggest using presence of streams, standing water, or riparian plants to map important moist soils. In arid southwestern United States, for example, typically only 1 or 2 of several watersheds in a potential reserve or linkage area support perennial stream flows. Thus, even without a good soil map, conservation planners can prioritize the impervious soils associated with these watersheds. Similarly, vernal pools and karst lakes are features related to soil and geology that are relevant to biodiversity and identifiable without a soil map. In the long term, better soil maps are needed to ensure rigorous mapping of land facets across the entire planning region. Rivers and ephemeral drainages span elevational gradients in a way that increases interspersion and promotes ecological processes and flows, such as movement of animals, sediment, water, and nutrients. Because mechanical geospatial algorithms may fail to identify important riverine connections that are obvious to a human expert, we recommend manual inclusion of riverine elements if necessary (e.g., Cowling et al. 1999, 2003). MAJOR STEP 5: JOIN THE LAND FACET CORRIDORS AND CORRIDORS FOR HABITAT SPECIALIST SPECIES The preliminary linkage design is the simple union of the least-cost corridors for all land facets, the land facet diversity corridor, and the major riverine or riparian corridors. In cases where corridors cannot be modeled for focal species (due to lack of land cover maps or lack of knowledge about habitat use or movement by potential focal species), this becomes the final linkage design. If you can model corridors for focal species, we recommend that you do so, creating a somewhat larger linkage design. Brost (2010) developed linkage designs based on land facets for three landscapes in Arizona where linkage designs for focal species had previously been produced. Using two variables to measure linkage utility, Brost found that linkages designed for land facets served 25 of 28 focal species as well as or better than the focal species designs in these landscapes. The three species better served by the focal species approach had the most narrowly distributed habitat. Compared to land-facet designs, focal species linkages provided a similar degree for only about half the land facets. 7 The user can select a different threshold. 8 The user can select a different percentage. Last modified 9-Jul-13 MANUAL: Land Facet Corridor Designer These results suggest that a linkage design based on land facets will serve all or most focal species in most landscapes, but it will not serve focal species that have limited habitat available in the study landscape. Therefore, we recommend using the land facet approach to complement, rather than replace, focal species approaches. Because the land facet design tends to be larger than the focal species linkage design, and because the land facet design will serve most focal species, it is more efficient to start with the land facet design, and then overlaying the focal species corridors, and expanding the design to better serve species not well served by the preliminary linkage design. Last modified 9-Jul-13 14 MANUAL: Land Facet Corridor Designer 15 Figure 2. Sequence of operations used to define land facets. The procedures in the first 3 lines (calculation of topographic and soil variables) are conducted in ArcGIS, which exports the values of each variable for each pixel. These values are processed by the statistical package R, which carry out all the other procedures in this flow chart. The outputs from R (land facet code and mean value of each variable for each pixel) are then used by ArcGIS to carry out the procedures in Figure 3. a b c These 4 variables were useful in landscapes we analyzed; the analyst can select other topographic or soil variables. The user can over-ride these default thresholds (10% of cells, 0.6 value of confusion index). We identified outliers (and clusters) with respect to elevation and slope for cells within the canyons and ridges topographic positions. Elevation, slope, and insolation were used for cells within the slopes topographic position. Last modified 9-Jul-13 MANUAL: Land Facet Corridor Designer Figure 3. Sequence of operations used to design a corridor for one land facet. This process is repeated for each land facet. The resulting corridors, plus a corridor for high interspersion of land facets, and a corridor of riparian habitat, are then joined to create the linkage design. All procedures in this flow chart are carried out in ArcGIS 9.3. a b c d The 3 variables are illustrative of the topographic or soil variables the analysts can use. We used solar insolation to calculate resistance surfaces for land facets in the slopes topographic position only. The user can over-ride these default thresholds (radius of 3 cells, largest 50% of polygons, 1-km width). The area threshold for defining termini can be adjusted to avoid highly-linear corridors. Last modified 9-Jul-13 16 MANUAL: Land Facet Corridor Designer 17 Web-based distribution of the tools The materials available for download include: ArcGIS 9.3 tools for designing corridors of land facets, including an on-line User's Manual. These tools must be used in concert with certain statistical procedures outside ArcGIS. Source code for the ArcGIS tools. A package of statistical procedures in R, and an accompanying User’s Manual. These procedures process outputs from ArcGIS to produce new data that can easily be imported back into ArcGIS for the final linkage design. Brian Brost's MS thesis, which describes how the procedures were developed. The thesis also applies the procedures to three landscapes in Arizona, and describes how well the linkage design for land facets matches linkage designs for multiple focal species in the same landscape. PDF reprint of a paper introducing the concept of using land facets to design linkages: Beier, P., and B. Brost. 2010. Use of land facets to plan for climate change: conserving the arenas, not the actors. Conservation Biology. DOI: 10.1111/j.1523-1739.2009.01422.x Last modified 9-Jul-13 MANUAL: Land Facet Corridor Designer 18 The Land Facet Corridor Designer Tools Note: This extension is intended as a companion to CorridorDesigner9 available at http://www.corridordesign.org, and we recommend that you also download and install those tools. The tools in this extension will work fine without CorridorDesigner, but some of the general tasks (such as creating corridor polygons over a habitat suitability raster, or creating patch polygons) require functions from CorridorDesigner. The tools in Land Facet Corridor Designer provide an alternative way to create the “habitat suitability” raster (i.e. the cost surface), but using land facets rather than focal species. Once you have created that cost surface raster, then you can use the standard CorridorDesigner tools to create the corridor polygons. Installing the Tools FOR ARCGIS 9.X First close ArcGIS if it is open. The tools do not install properly if ArcGIS is running during the installation. Install the Land Facet Corridor Designer extension by double-clicking on the file LandFacetCorridor.exe (available at http://corridordesign.org/dl/tools/LandFacetCorridor.exe, or from a link on the page http://corridordesign.org/downloads) and following the instructions. The installation routine will register the extension DLL with all the required ArcMap components. The default install folder for the extension is named “Land_Facet_Corridors” and is located inside the folder “Program Files”. This folder will also include some additional files and this manual. FOR ARCGIS 10.0 Note: This function will only work if you have ArcGIS 10 installed. Warning: As of March 7, 2011, some functions do not run correctly under ArcGIS 10. We know definitely that the “Create Land Facets” function will crash, and we have not run extensive tests to determine if other tools will crash. If possible, we recommend you run these tools under ArcGIS 9.x. 1. First close ArcGIS if it is open. The tools do not install properly if ArcGIS is running during the installation. 2. Install the Land Facet Corridor Designer extension by double-clicking on the file LandFacetCorridor_10.exe (available at http://corridordesign.org/dl/tools/LandFacetCorridor_10.zip, or from a link on the page http://corridordesign.org/downloads) and following the instructions. This installation routine will install the extension DLL and several ancillary files on your hard drive, but will not register the tools with ArcGIS. 9 CorridorDesigner refers to the ArcGIS tools to create linkage designs based on focal spp. Land Facet Corridor Designer refers to the tools described herein. Last modified 9-Jul-13 MANUAL: Land Facet Corridor Designer 19 3. Use Windows Explorer to open your installation folder (if you used the default values, then this folder will be located at “c:\Program Files\Land_Facet_Corridors\”. This folder will also include some additional files and this manual. 4. For Windows XP: Double-click the file “Land_Facet_ArcGIS_10_Installer.bat” to register all the tools with ArcGIS 10.0. For Windows 7/Vista: Right-click the file “Land_Facet_ArcGIS_10_Installer.bat” and click “Run as Administrator” to register all the tools with ArcGIS 10.0. If the registration is successful, then you should see a “Registration Succeeded” notice. Note: For the concerned or curious, the batch file Land_Facet_ArcGIS_10_Installer.bat contains the following single line of text: "%CommonProgramFiles%\ArcGIS\bin\ESRIRegAsm.exe" /p:Desktop "TopoCorridor.dll" /f:"TopoCorridor.reg" It directs the ESRI installer ESRIRegAsm to register the extension DLL TopoCorridor.dll within ArcGIS, using GUID and Class ID values from the registry file TopoCorridor.reg (also located in your installation directory). Both Land_Facet_ArcGIS_10_Installer.bat and TopoCorridor.reg may be opened and viewed using standard text editors such as Notepad or WordPad. 5. Alternative Method if you do not get the “Registration Succeeded” message: If the method above does not work, the reason is probably due to the “%CommonProgramFiles” Last modified 9-Jul-13 MANUAL: Land Facet Corridor Designer 20 environmental variable pointing to the wrong location, and/or Windows Vista or Windows 7 Security settings. The fix is to use a batch file that includes the full pathnames to “ESRIRegAsm.exe” and to the extension DLL and REG files. You may edit the BAT file yourself, or you may use the tool Make_Batch_Files.exe (located in your installation folder) to create new registration and unregistration batch files that are properly formatted to your system. If using Windows XP: Simply double-click on the file Make_Batch_Files.exe to create the new batch files. If using Windows Vista or Windows 7: Right-click on the file Make_Batch_Files.exe and click “Run as Administrator” to create the new batch files. Repeat Step 4 above to register the tools in ArcGIS 10, but this time use the new BAT file Register_Land_Facet_CD.bat. Viewing the Tools This tool requires some functions from the ESRI Spatial Analyst extension so you may need to turn on that extension in ArcMap after you have installed it. Last modified 9-Jul-13 MANUAL: Land Facet Corridor Designer You should see the following new toolbar in your map (it may also be embedded in your standard ArcMap toolbars, rather than as a standalone object): If you do not see this toolbar, then open your “Customize” dialog by: 1) Double-click on a blank part of the ArcMap toolbar, or Last modified 9-Jul-13 21 MANUAL: Land Facet Corridor Designer 22 2) Click the “Tools” menu, then “Customize”. In the “Customize” dialog, click the “Toolbars” tab and check the box next to “Land Facet Analysis”: You should now see the Land Facet Corridor Designer. Uninstalling Land Facet Corridor Designer FOR ARCGIS 9.X. 1) Close ArcGIS if it is open. 2) Click the Start button. 3) Open your Control Panel. 4) Double-click “Add or Remove Programs”. 5) Scroll down to find and select “Land Facet Corridor Tools”. 6) Click the “Remove” button and follow the directions. Last modified 9-Jul-13 MANUAL: Land Facet Corridor Designer 23 FOR ARCGIS 10.0 1) Close ArcGIS if it is open. 2) Use Windows Explorer to open your installation folder (if you used the default values, then this folder will be located at “Program Files\Land_Facet_Corridors\”. This folder will also include some additional files and this manual. 3) For Windows XP: Double-click the file Uninstall_Land_Facet.bat to unregister all the tools with ArcGIS 10.0. For Windows 7/Vista: Right-click the file Uninstall_Land_Facet.bat, then click “Run as Administrator” to unregister all the tools with ArcGIS 10.0. Last modified 9-Jul-13 MANUAL: Land Facet Corridor Designer 24 If the unregistration is successful, then you should see an “Unregistration Succeeded” notice. 4) Alternative Method if you do not get the “Registration Succeeded” message: If the method above does not work, the reason is probably due to the “%CommonProgramFiles” environmental variable pointing to the wrong location, and/or Windows Vista or Windows 7 Security settings. The fix is to use a batch file that includes the full pathnames to “ESRIRegAsm.exe” and to the extension DLL and REG files. You may edit the BAT file yourself, or you may use the tool Make_Batch_Files.exe (located in your installation folder) to create new registration and unregistration batch files that are properly formatted to your system. If using Windows XP: Simply double-click on the file Make_Batch_Files.exe to create the new batch files. If using Windows Vista or Windows 7: Right-click on the file Make_Batch_Files.exe and click “Run as Administrator” to create the new batch files. Repeat Step 3 above to register the tools in ArcGIS 10, but this time use the new BAT file Unregister_Land_Facet_CD.bat. 5) Click the Start button. 6) Open your Control Panel. Last modified 9-Jul-13 MANUAL: Land Facet Corridor Designer 25 7) Double-click “Add or Remove Programs”. 8) Scroll down to find and select “Land Facet Corridor Tools 10”. 9) Click the “Remove” button and follow the directions. Note: For the concerned or curious, the batch file Uninstall_Land_Facet.bat contains the following single line of text: "%CommonProgramFiles%\ArcGIS\bin\ESRIRegAsm.exe" /p:Desktop /u "TopoCorridor.dll" It directs the ESRI installer ESRIRegAsm to unregister the DLL TopoCorridor.dll within ArcGIS. Uninstall_Land_Facet.bat may be opened and viewed using standard text editors such as Notepad or WordPad. Copying Land Facet Corridor Designer Tools to Other Toolbars Because of the way ArcGIS handles toolbars and command buttons, you may add any Land Facet Corridor Designer command buttons to any toolbar you wish. For example, if you would like to keep the Shannon’s Index tool available even when the Land Facet Corridor Designer toolbar is not turned on, you may easily add that tool to any of the existing ArcGIS toolbars. To do this, open your “Customize” tool by either: 1) Double-clicking on a blank part of the ArcMap toolbar, or 2) Clicking the “Tools” menu, then “Customize”. In the “Customize” dialog, click the “Commands” tab and scroll down to select “Land Facet Corridor Tools”: Last modified 9-Jul-13 MANUAL: Land Facet Corridor Designer Finally, simply drag any of the commands out of the Customize dialog up into any of the existing ArcGIS toolbars. Last modified 9-Jul-13 26 MANUAL: Land Facet Corridor Designer 27 Troubleshooting If Any of the Tools Crash If a tool crashes, you should see a dialog that tells us what script crashed and where it crashed. I would appreciate it if you could copy the text in that dialog, or simply take screenshots of the dialog and email them to me at [email protected]. Note: Please make sure that the line numbers are visible in the screenshots! The line numbers are located on the far right side of the text. Use the scrollbar at the bottom of the dialog to make the line numbers visible. “Object variable or With block variable not set” Error: If you open ArcMap and immediately see the error dialog appear with one or more error messages stating that “Object variable or With block variable not set”, then 90% of the time it is because ArcGIS was running when you installed the extension. The “Object” variable being referred to is the “Extension” object, and ArcGIS only sets that variable when it is initially turned on. The solution is usually to simply close ArcGIS and restart it. If that does not work, then: 1) Close ArcGIS 2) Reinstall the extension 3) Turn ArcGIS back on. RICHTX32.OCX Error: If you see a line in the error dialog stating: Component 'RICHTX32.OCX' or one of its dependencies not correctly registered: a file is missing or invalid This is almost always due to the fact that new installations of Windows 7 and Windows Vista do not include a file that the extension expects to find. This file, named “richtx32.ocx”, is actually the “Rich Text Box” control that appears on some of the extension dialogs. The solution is to manually install the missing file (richtx32.ocx) yourself. Here is how to do it: 1) Open Windows Explorer and locate the file richtx32.ocx in your extension installation file. 2) If you are running a 32-bit version of Windows, then copy richtx32.ocx to the directory C:\Windows\System32\ If you are running a 64-bit version of Windows, then copy richtx32.ocx to the directory C:\Windows\SysWOW64\ 3) Open an “Elevated Command Prompt” window. This is the standard Windows Command Prompt window, but with administrative privileges enabled. You need these privileges enabled in order to register the OCX with Windows. Note: The Elevated Command Prompt opens up in the “..\windows\system32” directory, not the “..\Users\[User Name]” directory. The window title will also begin with the word “Administrator:” Last modified 9-Jul-13 MANUAL: Land Facet Corridor Designer 28 a. Method 1: Click the “Start” button, then “All Programs”, then “Accessories” and then right-click on “Command Prompt” and select Run as Administrator. b. Method 2: Click the “Start” button, and then click on the “Search Programs and Files” box. Type “cmd” and then click CONTROL+SHIFT+ENTER to open the Command window with Administrator privileges. For more help on opening an Elevated Command Prompt, please refer to: http://www.sevenforums.com/tutorials/783-elevated-command-prompt.html http://www.winhelponline.com/articles/158/1/How-to-open-an-elevated-CommandPrompt-in-Windows-Vista.html Or simply do a search for “Elevated Command Prompt”. Last modified 9-Jul-13 MANUAL: Land Facet Corridor Designer 4) Register the file richtx32.ocx using the Windows RegSvr function: a. If using a 32-bit version of Windows, type the line regsvr32.exe c:\windows\system32\richtx32.ocx b. If using a 64-bit version of Windows, type the line regsvr32.exe %windir%\syswow64\richtx32.ocx c. Click [ENTER] and you should see a message that the registration succeeded. Last modified 9-Jul-13 29 MANUAL: Land Facet Corridor Designer Last modified 9-Jul-13 30 MANUAL: Land Facet Corridor Designer 31 Sample Workflow A typical Land Facet Corridor analysis might follow these steps10: 1) Select or Create an Initial Classification Raster. These classes are your first pass at classifying your landscape, and each class will be further divided into land facets. a) If you prefer not to use an initial classification raster, then you will still need to use a raster which designates the entire landscape as a single class. A simple way to create this raster would be to use the raster calculator or the “Create Constant Raster” ArcTool (ArcToolbox, Spatial Analyst Tools, Raster Creation, Create Constant Raster) to create a raster of some constant value across the entire study area. Make sure to set the raster to the appropriate cell size and extent. b) If you already have a general classification raster (such as a soil type, landform or topographic position raster) you may use that. c) Alternatively, use one of the Topographic Position Index tools ( , either a 3-class, 4-class or 6-class Topographic Position raster (p. 49). or )to create 2) Use the Export for R Analysis tool (p. 33) to export tables of data, one for each class in step (1) above, to R or some equivalent statistical software package. This tool also allows you to restrict exporting data to only those regions within wildland blocks (or any polygon layer). 3) For each Class from Step (1), do the following: a) Use your statistical software to import the appropriate data table from Step (2), and perform Fuzzy C-Means Clustering to determine the appropriate number of clusters and the cluster centroids for this class. We have provided a set of R tools to assist with this (see R Functions for Defining Land Facets, p. 87). b) Use the Land Facet Clusters from R tool (p. 36) import the statistical output files and classify each original class from Step (1) into multiple land facet categories. c) For each Land Facet category, do the following: i) Use the Calculate Density Surface tool facet within a specified neighborhood. (p. 67) to compute the density of this land (p. 45) to convert the Density surface into ii) Use the Identify Termini Polygons tool polygons and identify the largest polygons in each Wildland Block. (in the Mahalanobis iii) Use the Statistical Matrices, Vector and Raster Inputs tool Distance Tools menu, [p. 82]) to calculate a vector of mean values and a covariance matrix for all your variables. iv) Change the mean value of the “Land Facet Density” variable to “1”, because 1 is the ideal Land Facet Density value. 10 Please read the Overview (above) to understand the rationale for each step in the workflow. Last modified 9-Jul-13 MANUAL: Land Facet Corridor Designer 32 v) Use the Mahalanobis Distances – Create Raster Surface tool (p. 63) to calculate the Mahalanobis Distance value for all cells on the landscape. You will choose the option to use existing mean vector and covariance matrix tables, and you will use the data from steps (ii) and (iii) above. vi) Use the standard CorridorDesigner tools to create land facet corridors between your wildland blocks. Use the Mahalanobis Distance raster from step (iv) above as the cost surface. 4) Use standard ArcGIS tools to combine all land facet categories into a single raster (for example, the Mosaic to New Raster tool in ArcToolbox, Data Management Tools, Raster, Raster Dataset, Mosaic to New Raster). Make sure that all unique land facets from each raster have a unique value before you combine them. 5) Use the Shannon’s Index tool (p. 43) to calculate the diversity of land values within a specified neighborhood around all cells. (p. 45) to convert the Diversity surface from step (5) 6) Use the Identify Termini Polygons tool into polygons and identify the largest polygons in each Wildland Block. 7) Use the Invert Raster tool (p. 48) to invert the Diversity raster from step (5) above. 8) Use the standard CorridorDesigner tools to create a Diversity corridor between your wildland blocks. Use your inverted Shannon’s Index raster from step (6) above as your cost surface. 9) Use standard ArcGIS tools to combine all individual corridors into a single linkage design. Last modified 9-Jul-13 MANUAL: Land Facet Corridor Designer 33 Land Facet Corridor Analysis Tools Export for R Analysis: Land Facet definitions are based on Fuzzy C-Means clustering (often referred to in the literature as FCM clustering), which means that points on the landscape are clustered into relatively homogeneous groups based on the various data layers you are analyzing. For example, if you use slope, elevation and insolation to identify clusters within the “canyon bottom” topographic position, you might find many pixels of high elevation, gentle slope, and low solar insolation. These would become one of your land facets and you might name it “High elevation canyon bottoms.” “Fuzzy” clustering means that all points on the landscape are assigned a “Strength of Membership” value to all clusters, rather than just assigning it to a specific cluster. The cluster assignment would be the one with the highest strength of membership, but we can (and will) exclude pixels that are not strongly identified with any single cluster. This tool does not perform the actual Fuzzy Clustering analysis. Rather, this tool will export one or more tables of data that are suitable for analysis in R or some other statistical software package. Statistical software provides methods for both FCM clustering as well as metrics to help you decide what number of clusters is best. Please refer to the R Functions for Defining Land Facets (p. 87) for a discussion of the R tools provided with this extension. This “Export for R Analysis” tool exports your data in a format appropriate for analysis in your statistical software. Specifically it creates a separate table of data for each unique initial landscape category (such as a TPI-based Slope Classification raster, or possibly a Soil Category raster). Each table contains records for each raster cell from that landscape category in your Wildland Blocks, with an attribute value for each analysis layer (i.e. values for elevation, slope, insolation, etc. at that location). Note: This tool does not require that all of your data have the same cell size and projection. All data will be internally reprojected and resized to match your initial categorical layer before the table is created. This tool should be used in conjunction with the R Functions for Defining Land Facets (p. 87) and then the Land Facet Clusters from R tool (p. 36) to actually create your land facets on the landscape. Click the button to run the tool. Last modified 9-Jul-13 MANUAL: Land Facet Corridor Designer 34 Select Categorical Raster: You must provide an initial categorical raster. This breaks up the landscape into your initial categories (e.g., Topographic Position Classes or Soil Classes). This tool will generate a separate table for each unique category value it finds in your raster. Later you will generate separate sets of land facets within each category. This initial categorical raster is also used as the template for all other data used in the analysis. The output tables produced by this tool will have rows of data reflecting cell locations from this raster. If your other data are in different projections or have different extents or cell sizes, then those other data will be reprojected, resized and rescaled to match this initial raster. If you use any polygon layers, then those polygon layers will be converted to a raster with the same extent, projection and cell size of this initial raster. If you do not wish to use any initial categorization of your landscape (i.e. if you just want to consider the entire landscape as a single category), you still must specify a raster which designates the enter landscape as a single class because the tool needs to use this raster as a template. You can easily create a constant-value raster with the raster calculator or the ArcTool “Create Constant Raster” (ArcToolbox, Spatial Analyst Tools, Raster Creation, Create Constant Raster). Make sure to set the raster to the appropriate cell size and extent. Last modified 9-Jul-13 MANUAL: Land Facet Corridor Designer 35 You can use the Topographic Position Index tools (p. 49) to create topographic position class categorical rasters. Rasters To Export: This list shows all rasters in your active map. Select all the ones you wish to include in the data tables. Feature Class to Export: If you wish, you may also add data from polygon feature classes. Click the ‘Add New’ button to show a list of polygon layers in your map, and select both the layer and appropriate attribute field. Add combined multi-band raster to map: This option will add a multi-band raster layer to your map containing all the analysis layers included as separate bands. This is not necessary for the analysis, but it might be informative to you just to see how the tool reprojects, resizes, rescales and clips all data layers to a common format. Clip data to Polygon Layer: This option is recommended for Land Facet analysis. This will clip the input layers so that only those regions that lay within the Wildland Blocks are exported to the output tables. By using this option, you ensure that the cluster analysis produces clusters that represent regions inside the Wildland Blocks rather than the entire study area. Output Tables: This tool will produce a separate table for each unique category in your initial categorical raster. Each table will be named “FuzzyData_ClassX”, where “X” is the numeric value of the category from the initial categorical raster. If a table already exists with that name in your specified folder, then this tool will automatically append a numeric value to make the name unique (i.e. “FuzzyData_ClassX_2”, “FuzzyData_ClassX_3”, etc.) The tool will open these tables in your map document so you can review them before analyzing them in your statistical software. Upon completion the tool will give you a report summarizing all the input parameters and showing where all the output tables were saved. Last modified 9-Jul-13 MANUAL: Land Facet Corridor Designer 36 Land Facet Clusters from R: This tool uses the parameter files produced by your statistical software to generate a set of land facets for a single landscape category (e.g., for the ridgetop topographic position, or a particular soil category). You will need to repeat this process for each landscape category. The final land facet classification for any particular point on the landscape will be based on the highest cluster membership value at that point, whether or not the combination of landscape variables makes the point an outlier (as determined by the R analysis), and whether the confusion index at that point is below a specified threshold. Points that are considered outliers and points that exceed the confusion index threshold will be assigned NoData values in the land facet raster. All other points will be assigned a land facet category according to the highest cluster membership value. Note: This tool requires 4 – 5 files from your statistical output. These files must be formatted correctly in order to be read by this tool. If you use the R tools supplied with this extension (see p. 87), then your data files should all be formatted correctly for this tool. Otherwise you will need to make sure the files are formatted correctly yourself. The required files are: 1. A file of the cluster centroids, as a comma-delimited text file (*.csv). The first row of this file should contain the variable names, and each row thereafter should contain the X- and Ycoordinates of the centroids. Note: These centroids are in graph space (or multivariate space) – not geographic space. They are also based on standardized variable data, not the original data. For example, a file containing 4 centroids derived from Elevation and Slope layers will look like the following: "elevation","slope" 1.64018638860946,1.04783261529517 0.539214631963649,-0.595812897281045 -0.884427408396287,-0.900497532396411 -0.302027659811837,0.85184747241411 2. A file of the standardization parameters (i.e. the mean and standard deviation of each variable) as a comma-delimited text file (*.csv). These values are in units of the original data, e.g., meters of elevation. This file will have exactly 3 rows. The first row should contain an empty text value, then the name of each variable. The second row should contain the word “mean”, then the mean for each variable. The third row should contain the word “sd”, and then the standard deviation for each variable. For example, a standardization parameters file for the same analysis illustrated in [1] above will look like the following: "","elevation","slope" "mean",1420.50778137251,16.564496811089 "sd",205.77177104164,8.38386627343209 3. A file of the bin widths used in the cluster analysis, as a comma-delimited text file (*.csv). As discussed in the section on R Functions for Defining Land Facets (p. 87), the data are binned to speed up the processing time. This file will have exactly 2 rows. The first row Last modified 9-Jul-13 MANUAL: Land Facet Corridor Designer 37 should contain the variable names, and the second row should contain the bin width of each variable. For example: "elevation","slope" 6.10668600994654,0.248883798708814 4. A file of the bin coordinates for all the non-outlier bins used in the cluster analysis, as a comma-delimited text file (*.csv). The R tools should have excluded a percentage of the most extreme bins as outliers. This file of bin coordinates contains all the bins that were not excluded. The tool will use this list of non-extreme bin coordinates, along with the bin widths, to determine which regions on your landscape should also be excluded as outliers. This file will typically have hundreds or thousands of bin centerpoint coordinates. The first row should include the variable names and all subsequent rows should include the centerpoint coordinates for each bin. For example: "elevation","slope" 1065.683075,2.546923765 1065.683075,3.044691363 1065.683075,3.54245896 ... ... ... ... ... ... ... ... ... 2103.819696,29.42637403 2103.819696,29.92414162 2152.673184,30.42190922 5. Optional: A file of the FCM Fuzziness parameter used in the analysis, as a standard ASCII text file (*.txt). This file should have only a single row with a single numeric value. The tool requires that you use the same fuzziness parameter here that you used in the FCM analysis, but you can either enter it manually or load the value from a file. A file indicating a fuzziness parameter of 1.5 will look like the following: 1.5 button to run the tool. You will need to step through 4 dialogs in order to specify all Click the the required analysis parameters. Last modified 9-Jul-13 MANUAL: Land Facet Corridor Designer 38 Step 1: Identify the same categorical raster used in the Export for R Analysis tool (p. 33). You will also need to identify specifically which landscape category you are creating land facets for. Recall that you need to repeat this process for each landscape category. Also specify where to save your new land facet raster and in what format. All land facets for this landscape category will be in this single raster. Optional - Save Table with Fuzzy Cluster Statistics: Optionally you can generate a table with all the data necessary to create the land facets yourself. This is not necessary but it is useful if you want to confirm the output or if you want to know more about the cluster properties of any of the pixels. This table will contain one row for each cell in this landscape category. The attribute fields will include X- and Y-coordinates, an ID value for the landscape category, values for all input variables, cluster membership values for all clusters, Cluster ID values for the clusters with 1st and 2nd highest strengths of membership, the confusion index value at this cell, and whether or not R classified the cell as an outlier. Last modified 9-Jul-13 MANUAL: Land Facet Corridor Designer 39 Step 2: Identify the *.CSV files containing the cluster centroids, standardization parameters, bin widths and bin locations. As you select each file, the tool will show you the information included in that file as well as the actual file text. Last modified 9-Jul-13 MANUAL: Land Facet Corridor Designer 40 Step 3: Identify the layers associated with the input variables. These input variable names are extracted from the files you selected in step [2] above. You may select either raster or polygon vector layers. Step 4: Enter the fuzziness parameter used in the original FCM analysis (you may also load this value from a file), and the confusion index threshold. Only raster cells with a confusion index below this threshold will be included in the Land Facet raster. Last modified 9-Jul-13 MANUAL: Land Facet Corridor Designer 41 Density Surface Tool: The land facet density surface reflects the proportion of a neighborhood that is composed of a particular land facet. If half the cells around a particular cell were composed of Land Facet X, then the density of Land Facet X at that point would be 0.5. The density values will range between 0 and 1. The density surface will be used in two procedures: 1. Areas of high density within Wildland Blocks will be selected as corridor termini (see p. 45), and 2. Density is one of the variables used to build the Mahalanobis Cost Surface (see p. 63) Click the button to run the tool. The “Select Categorical Raster” listbox will contain a list of all rasters that have attribute tables. Chose a raster, then select the appropriate raster attribute field, and finally select the category value you wish to analyze. As you select an attribute field, the category value list will regenerate itself with a list of all unique values in that attribute field. Choose the neighborhood radius you wish to use. This tool is written to use circular neighborhoods, and the radius units are in cells. The actual neighborhood will consist of all cells whose cell centers are ≤ the radius distance of the focal cell center. Note: Neighborhood analysis at the edges of the Last modified 9-Jul-13 MANUAL: Land Facet Corridor Designer 42 raster are automatically adjusted so that the neighborhood size only reflects the portion of the neighborhood inside the raster. In other words, the density of a cell at the edge or corner of the raster is only based on those neighborhood cells actually inside the raster. Optionally you may force the tool to set the density value to NoData if there are any NoData cells in the neighborhood. This option is not recommended for the Land Facet corridor functions because NoData cells have infinite resistance in the corridor function, essentially excluding them from corridor analysis. Furthermore, if your land facet type is sparsely distributed across the landscape or you use a large neighborhood, you could end up with a raster composed entirely of NoData cells. Last modified 9-Jul-13 MANUAL: Land Facet Corridor Designer 43 Shannon’s Index Tool: Shannon’s Index H is a measure of diversity and evenness that reflects both the number and the balance of unique values within an area (in this case, the area is a moving window). H values increase with both the number of classes observed and with how evenly distributed they are. There are alternative methods for calculating this index and this tool uses the following: S Shannon's Index H pi ln pi i 1 where: ni Proportion of observations in land facet i N ni number of observations in land facet i pi N Total number of observations S Number of land facets By this formula, Shannon’s Index values range from 0 to ln(S), where S = the number of unique categories (i.e. land facets) that occur in the landscape. Click the button to run the tool. You must select the raster you wish to analyze, the output format for your Shannon’s Index Surface, and the neighborhood radius size. This tool uses a circular neighborhood. If only NoData values are observed in the neighborhood, the tool will assign a Diversity value of 0. Otherwise NoData values will be ignored. NoData values will not be counted as an additional “NoData” class. Optionally you may force the tool to assign NoData values if any NoData values are found in the neighborhood. Click ‘OK’ and the tool will generate the Shannon’s Index raster and add it to your map document. Last modified 9-Jul-13 MANUAL: Land Facet Corridor Designer Last modified 9-Jul-13 44 MANUAL: Land Facet Corridor Designer 45 Identify Termini Polygons Tool: Corridor polygons do not run simply from the edge of one Wildland Block to the edge of the other Wildland Block, but instead run between land facet polygons within the Wildland Blocks. If there are no land facet polygons within the blocks, then there is little sense in creating a land facet corridor to connect them. This tool creates land facet termini polygons within the Wildland Blocks based on a raster surface (such as the Density surface [p. 33] or the Shannon’s Index surface [p. 43]). All regions with cell values greater than some specified value are considered eligible to become termini polygons. In practice, we recommend using X > 0 for Density surfaces, and H’ > Median(H’) for Diversity surfaces Not all regions that are eligible to become termini polygons are necessarily desirable as corridor termini. A very small island of a land facet within a Wildland Block may be too small to be a meaningful corridor terminus. Generally we want to connect the largest concentrations of land facet type within each Wildland Block, and therefore we only want to retain the larger termini polygons. This tool takes several steps to identify the appropriate termini polygons within each Wildland Block: 1. First it identifies all cells above the specified threshold within each Wildland Block (i.e. with a Density value above 0, or with a Diversity value above the median value). 2. It then aggregates those cells into disconnected polygons. Cells that touch along an edge or at a corner are considered part of the same polygon. 3. It then calculates the area of the largest polygon within each Wildland Block. 4. Analyzing each Wildland Block separately, it compares the area of each polygon in that Wildland Block with the area of the largest polygon in that block (from Step [3]), and retains only those polygons that are larger than some specified proportion value. For example, if the largest polygon in a Wildland Block was 100 hectares in size, and the user had specified a size threshold of 50%, then the tool would retain all polygons that were ≥ 50 hectares. These polygons are potential termini for the corridor. Click the button to run the tool. Last modified 9-Jul-13 MANUAL: Land Facet Corridor Designer 46 The Analysis Layer dropdown box lists all rasters in your active map. Select the raster you wish to analyze (typically a Density or Diversity raster). The Analysis Layer Threshold is the cut-off value. Only portions of the raster greater than this threshold value are converted to polygons. Typically we recommend using a threshold value of 0 for Land Facet Density rasters (so that all regions with any density > 0 are used), or a value the median H’ value for Diversity rasters (so that approximately the greatest 50% of diversity values are used). The Wildland Block Polygon Layer dropdown box lists possible Wildland Block polygon layers in your map. Note: Only polygon layers containing exactly two polygons are listed! If your Wildland Blocks are not available in this format, then the following standard ArcGIS tools may be helpful: 1. Append: If your Wildland Blocks are in separate feature classes, then this tool may be used to add features from one feature class to the other.. Location: ArcToolbox Data Management Tools General Append 2. Merge: If your Wildland Blocks are in separate feature classes, then this tool may be used to combine them into a new feature class. Location: ArcToolbox Data Management Tools General Merge 3. Dissolve: If your Wildland Blocks are composed of multiple discrete polygons, this tool will combine them into a single multi-part polygon object. Location: ArcToolbox Data Management Tools Generalization Dissolve 4. Multipart to Singlepart: If both of your Wildland Blocks are combined into a single multipart object, this tool will split them into separate objects. Location: ArcToolbox Data Management Tools Features Multipart to Singlepart Last modified 9-Jul-13 MANUAL: Land Facet Corridor Designer The Relative Size Threshold for Termini Polygons specifies how large a polygon must be, as a percent of the size of the largest polygon in the Wildland Block, to be considered a terminus. This value should be between 0 and 100%. Last modified 9-Jul-13 47 MANUAL: Land Facet Corridor Designer 48 Invert Raster Tool: This tool will numerically invert any raster (i.e. each new cell value = 1 x , where x is the original cell value), but it is specifically intended to invert the Shannon’s Index raster (see p. 43) in order to use it as a cost surface in Corridor Designer. This tool also lets you add a small constant to each raster value before inverting it, to prevent “division by zero” problems which will result in “NoData” values in your inverted raster. We strongly recommend using this option; we find that 0.1 is a good default value for the constant. Click the button to run this tool. Simply select the raster to invert, the output format, whether you wish to add a value to each cell, and finally the output filename. The tool will then invert the raster and add it to your map document. Last modified 9-Jul-13 MANUAL: Land Facet Corridor Designer 49 Topographic Position Index Tools Description Andrew Weiss presented an interesting and useful poster at the 2001 ESRI International User Conference describing the concept of Topographic Position Index (TPI) and how it could be calculated (Weiss 2001; see also Guisan et al. 1999 and Jones et al. 2000). Using this TPI at different scales, plus slope, users can classify the landscape into both topographic position (i.e. ridge top, valley bottom, mid-slope, etc.) and landform category (i.e. steep narrow canyons, gentle valleys, plains, open slopes, mesas, etc.). In designing corridors for land facets, we have simply used the Topographic Position Index to classify the landscape into three broad topographic positions (namely, ridges, canyon bottoms, and slopes), but we describe other options for users that may wish to use TPI in other ways. The algorithms are clever and fairly simple. The TPI is the basis of the classification system and is simply the difference between a cell elevation value and the average elevation of the neighborhood around that cell. Positive values mean the cell is higher than its surroundings while negative values mean it is lower. The degree to which it is higher or lower, plus the slope of the cell, can be used to classify the cell into slope position. If it is significantly higher than the surrounding neighborhood, then it is likely to be at or near the top of a hill or ridge. Significantly low values suggest the cell is at or near the bottom of a valley. TPI values near zero could mean either a flat area or a mid-slope area, so the cell slope can be used to distinguish the two. Last modified 9-Jul-13 MANUAL: Land Facet Corridor Designer 50 SCALES AND NEIGHBORHOODS: TPI is naturally scale-dependent. The same point at the crest of a mountain range might be considered a ridgetop to a highway construction crew or a flat plain to an insect living in the soil. The classifications produced by this tool depend entirely on the scale you use to analyze the landscape. For example, in the illustration below, TPI is calculated for the same point on the landscape using 3 different scales. In each case, the point is located on top of a small hill set inside a larger valley. In Case A, the scale is small enough that the point is at about the same elevation as the entire analysis region so the TPI value would be approximately 0. In Case B, the analysis region is big enough to encompass the entire small hill, and the point is consequently much higher than its neighbors and has a correspondingly high TPI value. In Case C, the neighborhood includes the hills on either side of the valley, and therefore the point is lower than its neighbors and has a negative TPI value. Users should consider what scale is most relevant for the phenomenon being analyzed. If you are interested in topographic habitat characteristics of large, wide-ranging animals, you would likely define your landscape classifications in terms of large, distinctive topographic features. Cougars, for example, may be influenced by a tall ridgeline on the horizon more than by minor ripples immediately surrounding them. Furthermore, a point on top of a small hill at the bottom of a canyon may be classified as a canyon bottom at one scale, or a hilltop at a different scale. Both are valid classifications; the user must decide what scale is reasonable for their analysis. Scale is determined by the neighborhood used in the analysis. The TPI values reflect the difference between the elevation in a particular cell and the average elevation of the cells around that cell. The Neighborhood defines what cells are considered to be “around” that cell. In the illustration below, TPI values were calculated using 2 different neighborhoods. The left example used a circular neighborhood with a 500m radius, meaning that the TPI value for each cell reflected the difference between the elevation of that cell and the average elevation of all cells within 500m of that cell. The example on the right used a circular neighborhood with a 2000m radius. Last modified 9-Jul-13 MANUAL: Land Facet Corridor Designer 51 These examples used circular neighborhoods, but other options are available. Weiss’ examples used annular (ring- or doughnut-shaped) neighborhoods where only cells within a specified distance range are considered. Some researchers use rectangular neighborhoods, although in most cases circular or annular neighborhoods are more reasonable. Wedge-shaped neighborhoods are useful for restricting your analysis to a particular direction. Weiss’ poster discusses some ideas for future research in which he plans to compare directional TPI values in order to distinguish saddles from flat areas, ridges from hilltops and valleys from local depressions, as well as identify the general aspect of landforms. CLASSIFYING BY TOPOGRAPHIC POSITION: TPI values can easily be classified into topographic position classes based on (a) how much a pixel’s elevation differs from the mean of its neighbors and (b) the steepness (slope angle) at each point. There are a couple of strategies you can take to do this. The easiest way is simply to set threshold values for the TPI grids themselves. TPI values above a certain threshold might be classified as ridgetops or hilltops, while TPI values below a threshold might be classified as valley bottoms or depressions. TPI values near 0 could be classified as flat plains (if the slope angle is near 0) or as mid-slope areas (if steeper than a specified threshold). Last modified 9-Jul-13 MANUAL: Land Facet Corridor Designer 52 Dickson and Beier (2006) used this method in a study of the influences of topography on cougar movement. A somewhat more sophisticated method, illustrated by Weiss in his poster, is to define threshold TPI values in terms of standard deviations from the elevation, which therefore take into account the variability of elevation values within that neighborhood. This means that grid cells with identical TPI value may be classified differently in different areas, depending on the variability in their respective neighborhoods. This method may or may not be useful in your analysis. You would use this method if you felt that cells with high neighborhood elevation variability should have to meet a higher TPI threshold in order to be classified into some category. As with TPI values in general, neighborhood size is also a critical component of the Slope Position classification process. Small neighborhoods capture small and local hills and valleys while large neighborhoods capture larger-scale features. Last modified 9-Jul-13 MANUAL: Land Facet Corridor Designer 53 TPI values near 0 mean only that the elevation is close to the mean elevation of the neighborhood cells, and this could happen if that cell is in a flat area or if it is on a slope. An easy way to distinguish between these 2 possibilities is to check the slope angle at that point. If the angle is near 0, then the point is probably on a flat area. A high slope angle means that the point is on a slope. In his poster, Weiss demonstrates one possible classification process using both TPI and slope to generate a 6- Last modified 9-Jul-13 MANUAL: Land Facet Corridor Designer 54 category Slope Position grid: TPI Types: This tool offers three variations of TPI. 1. TPI: This is the traditional definition of TPI, where each cell is defined as the difference between the elevation cell value and the average elevation of all cells in the neighborhood. TPI units are in elevation units, such that a TPI value of 10 would mean that this particular cell is 10 units (generally meters or feet) higher than the average elevation of the neighborhood. 2. Standardized Elevation: This is very similar to TPI, but taken one step farther. This takes the TPI (defined as [Elevation cell value – Neighborhood Average Elevation]), and divides it by the Neighborhood Standard Deviation. Units are in standard deviations, such that a Standardized Elevation value of 1 would mean that this particular cell is 1 standard deviation higher than the average elevation in the neighborhood. 3. Standardized TPI: This option takes the TPI values from option 1 above, and standardizes them by the mean and standard deviation of all TPI values in the raster. A value of 1 would Last modified 9-Jul-13 MANUAL: Land Facet Corridor Designer 55 imply that this cell is one standard deviation higher than the average TPI value of the entire TPI raster. Note: This option is probably less useful than Options 1 and 2 in most analyses, and we only offer it because users have requested it. This particular option can classify ridges as valleys and vice versa. In most types of analyses Options 1 and 2 will make far more sense. Neighborhood Types: When generating TPI or Slope Classification rasters, you will be asked to define your neighborhood. You can choose between a circle, annulus (doughnut-shape), rectangle or wedge. You can also enter your neighborhood parameters in units of either grid cells or map units (i.e. meters, feet, etc.). 1. Circle: A circular neighborhood defined by a radius length extending outward from the cell center. This neighborhood is composed of all grid cells whose cell centers lie within that distance of the focal cell center. 2. Annulus: An annular neighborhood looks like a ring or doughnut defined by an inner and outer radius length extending outward from the cell center. This neighborhood is composed of all cells whose cell centers lie within this ring. 3. Wedge: A wedge-shaped neighborhood looks like a slice of pie cut out of a circular neighborhood and is defined by a starting angle, and ending angle, and a radius. 4. Rectangle: A square or rectangular neighborhood defined by width and height, which will be centered around your focal cell center. Cells will be included in the neighborhood if the cell centers lie within this rectangle. Using the tools: Last modified 9-Jul-13 MANUAL: Land Facet Corridor Designer 56 CALCULATE A TPI RASTER: This tool simply converts an elevation (DEM) raster into a TPI raster. No further classification or categorization is done Click the button to run the tool. Simply select your analysis parameters and click ‘OK’. Please see the sections above on TPI types (p. 54) and Neighborhood types (p. 55) if you have any questions on these parameters. The output raster will be a continuous floating-point raster. Last modified 9-Jul-13 MANUAL: Land Facet Corridor Designer 57 CREATE A 3-CATEGORY TOPOGRAPHIC POSITION RASTER: This tool will create a 3-class Topographic Position raster based on TPI values. Click the to run the tool. We used this tool in all of our land facet analyses. Last modified 9-Jul-13 button MANUAL: Land Facet Corridor Designer 58 The three classes are named Canyons, Slopes and Ridges by default, but you can change the names by clicking the “Reset Class Names” button. In general, the classes are defined as follows: Canyons: TPI ≤ [A] Slopes: [A] < TPI ≤ [B] Ridges: TPI > [B] where [A] and [B] are threshold TPI values set by the user. The threshold units should be the same as the units of the TPI type. Please see the sections above on TPI types (p. 54) and Neighborhood types (p. 55) if you have any questions on these parameters. The output raster will be a 3-Category Integer raster with the class names in the attribute table. In our work designing land facet corridors, we experimented with various neighborhood sizes in three diverse landscapes. A radius of 5 cells produced land facets that made sense to end-users who were familiar with the landscapes we analyzed. We used “raw” (not standardized) TPI. We typically used 6 m and +6 m for A and B, respectively, but users should experiment with values that work in their landscapes. Last modified 9-Jul-13 MANUAL: Land Facet Corridor Designer CREATE A 4-CATEGORY TOPOGRAPHIC POSITION RASTER: This tool will create a 4-class Topographic Position raster based on combinations of TPI values and Slope Angle. Click the Last modified 9-Jul-13 button to run the tool. 59 MANUAL: Land Facet Corridor Designer 60 The four classes are named Canyons, Gentle Slopes, Steep Slopes and Ridges by default, but you can change the names by clicking the “Reset Class Names” button. In general, the classes are defined as follows: Canyons: Gentle Slopes: Steep Slopes: Ridges: TPI ≤ [A] [A] < TPI ≤ [B], Slope Angle < [S]° [A] < TPI ≤ [B], Slope Angle ≥ [S]° TPI > [B] where [A] and [B] are threshold TPI values and [S] is the threshold slope angle. TPI threshold units should be the same as the units of the TPI type, and Slope angle threshold units should be in Degrees. Please see the sections above on TPI types (p. 54) and Neighborhood types (p. 55) if you have any questions on these parameters. The output raster will be a 4-Category Integer raster with the class names in the attribute table. Last modified 9-Jul-13 MANUAL: Land Facet Corridor Designer CREATE A 6-CATEGORY TOPOGRAPHIC POSITION RASTER: This tool will create a 6-class Topographic Position raster based on TPI values and Slope Angle. Click the button to run the tool. Last modified 9-Jul-13 61 MANUAL: Land Facet Corridor Designer 62 The six classes are named Valleys, Lower Slopes, Gentle Slopes, Steep Slopes, Upper Slopes and Ridges by default, but you can change the names by clicking the “Reset Class Names” button. In general, the classes are defined as follows: Valleys: Lower Slopes: Gentle Slopes: Steep Slopes: Upper Slopes: Ridges: TPI ≤ [A] [A] < TPI ≤ [B] [B] < TPI ≤ [C], Slope Angle < [S]° [B] < TPI ≤ [C], Slope Angle ≥ [S]° [C] < TPI ≤ [D] TPI > [D] where [A], [B], [C] and [D] are threshold TPI values and [S] is the threshold slope angle. TPI threshold units should be the same as the units of the TPI type, and Slope Angle threshold should be in Degrees. Please see the sections above on TPI types (p. 54) and Neighborhood types (p. 55) if you have any questions on these parameters. The output raster will be a 6-Category Integer raster with the class names in the attribute table. Last modified 9-Jul-13 MANUAL: Land Facet Corridor Designer 63 Mahalanobis Distance Tools Discussion of Mahalanobis Distances: GENERAL CONCEPTS: Mahalanobis distances provide a powerful tool for describing how similar some set of conditions is to an “ideal” or “prototypical” set of conditions, and can be very useful for identifying which regions in a landscape are most similar to a prototype (in this case, a land facet). For example, in the field of wildlife biology we might define an “ideal” landscape as that which best fits the niche of some wildlife species. Through observation, we may find that a wildlife species typically occurs within a particular elevation range, on slopes of a particular steepness, and perhaps within a certain vegetation density. Using Mahalanobis distances, we can quantitatively describe the entire landscape in terms of how similar it is to the ideal elevation, slope and vegetation density of that animal. Moreover, Mahalanobis distances are based on both the mean and variance of the predictor variables, plus the covariance matrix of all the variables, and therefore take advantage of the variable covariance. The region of constant Mahalanobis distance around the mean forms an ellipse in 2D space (i.e. when only 2 variables are measured), or an ellipsoid or hyperellipsoid when more variables are used. Mahalanobis distances are calculated as: Last modified 9-Jul-13 MANUAL: Land Facet Corridor Designer 64 D 2 x m C1 x m T where: D 2 Mahalanobis distance x Vector of data m Vector of mean values of independent variables C1 Inverse Covariance matrix of independent variables T Indicates vector should be transposed For example, suppose we took a single observation from a bivariate population with Variable X and Variable Y, and that our two variables had the following characteristics: Variable X: mean = 500, SD = 79.32 Variable Y: mean = 500, SD = 79.25 Variance/Covariance Matrix X Y X 6291.55737 3754.32851 Y 3754.32851 6280.77066 If, in our single observation, X = 410 and Y = 400, we would calculate the Mahalanobis distance for that single value as: Given that Mahalanobis Distance D 2 x m C1 x m T 410 500 90 400 500 100 x m 1 6291.55737 3754.32851 0.00025 -0.00015 C = 3754.32851 6280.77066 -0.00015 0.00025 1 0.00025 -0.00015 90 Therefore D 2 90 100 -0.00015 0.00025 100 1.825 Therefore, our single observation would have a distance of 1.825 standardized units from the mean (mean is at X = 500, Y = 500). Last modified 9-Jul-13 MANUAL: Land Facet Corridor Designer 65 If we took many such observations, graphed them and colored them according to their Mahalanobis values, we can see the elliptical Mahalanobis regions come out. For example, the cloud of data points below are randomly generated from the bivariate population described above: If we calculate Mahalanobis distances for each of these points and shade them according to their distance value, we see clear elliptical patterns emerge: Last modified 9-Jul-13 MANUAL: Land Facet Corridor Designer We can also draw actual ellipses at regions of constant Mahalanobis values: Last modified 9-Jul-13 66 MANUAL: Land Facet Corridor Designer 67 One interesting feature to note from this figure is that a Mahalanobis distance of 1 unit corresponds to 1 standard deviation along both primary axes of variance. RE-SCALING MAHALANOBIS DISTANCES USING CHI-SQUARE P-VALUES: Mahalanobis distances are occasionally converted to Chi-square p-values for analysis (see Clark et al. 1993). When the predictor variables are normally distributed, the Mahalanobis distances do follow the 2 distribution with N - 1 degrees of freedom (where N = # of habitat variables; 2 in the example above). Although wildlife habitat variables often fail to meet the assumption of normality (Farber and Kadmon 2003), the conversion to Chi-square p-values is nonetheless a valid way to re-scale Mahalanobis distances to a 0-1 scale. Mahalanobis distances themselves have no upper limit, so this rescaling may be convenient for some analyses. In general, the p-value reflects the probability of seeing a Mahalanobis value as large or larger than the actual Mahalanobis value, assuming the vector of predictor values that produced that Mahalanobis Last modified 9-Jul-13 MANUAL: Land Facet Corridor Designer 68 value was sampled from a population with an ideal mean (i.e. equal to the vector of mean predictor variable values used to generate the Mahalanobis value). P-values close to 0 reflect high Mahalanobis distance values and are therefore very dissimilar to the ideal combination of predictor variables. Pvalues close to 1 reflect low Mahalanobis distances and are therefore very similar to the ideal combination of predictor variables. The closer the p-value is to 1, the more similar that combination of predictor values is to the ideal combination. Because P-values close to 0 correspond with high Mahalanobis values, while P-values close to 1 correspond with low Mahalanobis values, this transformation also inverts the order of values. High cell values in the P-value raster surface will correspond with low values in the Mahalanobis raster and vice versa. APPLICATIONS TO LANDSCAPE ANALYSIS: Suppose we have a grid of elevation values and a grid of slope values, and we are interested in identifying those regions on the landscape that have similar slopes and elevations to a mean slope and elevation characteristic of a land facet: : 1931 54 Covariance Matrix 54 87 Elevation = 2121 Vector of Mean Values Slope = 18 We can then enter the Elevation and Slope rasters directly into the Mahalanobis equation to produce a Mahalanobis raster: Given that D 2 x m C1 x m T [Elevation Raster] 2121.41667 [Slope Raster] 18.18997 x m 1 1931 54 0.00074 0.00046 C 1 = 54 87 0.00046 0.01173 [Elevation Raster] 2121.41667 0.00074 0.00046 [Elevation Raster] 2121.41667 Therefore D 2 [Slope Raster] 18.18997 0.00046 0.01173 [Slope Raster] 18.18997 T [Mahalanobis Distance Raster] Last modified 9-Jul-13 MANUAL: Land Facet Corridor Designer Last modified 9-Jul-13 69 MANUAL: Land Facet Corridor Designer 70 MEAN VECTOR AND COVARIANCE MATRIX TABLES: The Mahalanobis tools included with this extension require a vector of mean values and a matrix of variance/covariance values. The Mahalanobis Raster tool (p. 74) can calculate these means and covariances on-the-fly while it conducts the Mahalanobis analysis, or extract them from existing tables in your map document. The Mahalanobis Values at Sample Points tool (p. 78) requires that you use existing tables. If you use the Covariance tools provided with this extension (see Generating Statistical Matrices, p. 82), then the tables will be formatted correctly. However, if you have used another statistical software package to create these tables, then make sure the tables are formatted as follows: Formatting Rules for the Mean Vector Table: 1. Must have only a single attribute field, which contains the mean values for each variable. 2. This single field must be numeric. 1. There is no restriction on the name of this field. 3. If importing the table from a Comma-Delimited Text file (*.csv), then the field name should occupy the first row. 4. This tool will ignore any OID fields that may be in the table. If the table has an OID field in addition to the field of Mean values, then the tool will still recognize this table as a valid Mean Vector table. 5. The following text is an example of a valid Mean Vector table in Comma-Delimited Text format (*.csv). Means 1747.993290 25.533938 Formatting Rules for the Covariance Matrix Table: 2. Must have only numeric fields in the table. 3. The number of rows in the table must be exactly the same as the number of attribute fields. Each field represents one variable, as does each row. 4. There are no restrictions on the field names. 5. If importing the table from a Comma-Delimited Text file (*.csv), then the field names should occupy the first row. 6. This tool will ignore any OID fields that may be in the table. If the table has an OID field in addition to the Variable Covariance fields, then the tool will still recognize this table as a potential Covariance Matrix table. 7. The following text is an example of a valid Covariance Matrix table in Comma-Delimited Text format (*.csv). Elevation,Slope Last modified 9-Jul-13 MANUAL: Land Facet Corridor Designer 71 13341.396994,-41.471005 -41.471005,22.228850 Formatting Rules for Both Tables: 1. Both tables must have the same number of rows. If they do not, then they must not describe the same set of variables and the tool will not let you proceed to the next dialog. STATISTICAL MATRIX DEFINITIONS AND FORMULAE: n X i Mean: Variance/Covariance Matrix: i 1 n n (X Variance of variable X xx ; estimated by i 1 2 n 1 n Covariance between x and y xy ; estimated by (x i 1 X )2 i x )( y i y ) i n 1 Therefore, given p variables: 11 12 22 21 Covariance Matrix Cov ( X) p1 p 2 1p 2 p pp n ( xi 1 x1 ) 2 i 1 n 1 n ( xi 2 x 2 )( xi 1 x1 ) estimated by i 1 n 1 n ( xip x p )( xi 1 x1 ) i 1 n 1 n (x i 1 i1 n 1 n (x i 1 i2 n (x i 1 ip x2 )2 n 1 x p )( xi 2 x 2 ) n 1 x1 )( xip x p ) n 1 n ( xi 2 x 2 )( xip x p ) i 1 n 1 n 2 ( xip x p ) i 1 n 1 n x1 )( xi 2 x2 ) (x i 1 i1 Inverse Covariance Matrix: Matrix inversion is computationally complex, and the author refers interested readers to the Lower/Upper (LU) Decomposition method in chapter 2 of Press et al (2002). Pearson Correlation Matrix: Last modified 9-Jul-13 MANUAL: Land Facet Corridor Designer 11 12 22 21 Given a Covariance Matrix Cov ( X) p2 p1 11 11 11 21 the Pearson Correlation Matrix 11 22 p1 pp 11 72 1p 2 p pp 12 11 22 22 22 22 p2 22 pp 1p 11 pp 2p 22 pp pp pp pp Spearman Correlation Matrix: Computationally identical to the Pearson Correlation Matrix except that ranks are used in place of original values. For example, the list of values {12, 3, 56, 23, 1} would be replaced with {3, 2, 5, 4, 1}, and the replacement list would then be used to generate the correlation matrix. EXACT VALUES VS. INTERPOLATED VALUES: You have the option to use the exact cell value for each of your point locations, or interpolated values based on the 4 closest cells to that point. For interpolated values, ArcView uses a 2-step method whereby values are interpolated first vertically and then horizontally. For example, given 4 cells around a particular location: Lines are first generated between the cell centers of cells A and C, and between cells B and D, and values are interpolated along these lines at the Y-coordinate of the point location. Then a final value is interpolated along the X-axis between these two interpolated values. In this case, the interpolated value of the point is approximately 4.31, while the exact cell value of the point is 2.54. Last modified 9-Jul-13 MANUAL: Land Facet Corridor Designer 73 ADDITIONAL READING: The author recommends Clark et al. (1993), Knick & Dyer (1997), and Farber & Kadmon (2002) for a few good papers illustrating the use of Mahalanobis distances in ecological applications. For anyone interested in the details of matrix algebra and computational/statistical algorithms, the author recommends Conover (1980), Neter et al. (1990), Golub and Van Loan (1996), Draper and Smith (1998), Meyer (2000) and Press et al. (2002). Last modified 9-Jul-13 MANUAL: Land Facet Corridor Designer 74 Using the Tools: CREATE MAHALANOBIS RASTER SURFACE This is the primary tool used to generate the cost surface for the Land Facet corridors. Mahalanobis distances are calculated based on the means and covariances of a set of variables, and therefore you must either specify existing tables containing the mean vector and covariance matrix, or create them on-the-fly. This tool allows both options. If you calculate the data on the fly, you have the option to define your sample locations by either a point layer or a single category in a categorical raster. Note: If you are generating Land Facet corridors using the methods outlined in this document, and if you are using Land Facet Density as one of your input variables, do not calculate the mean vector and covariance matrix on-the-fly, but rather generate them using the Calculating Statistical Matrices tools included with this extension (see p. 82). Alternatively, if you have a large sample size (N > ~20,000 or so – and you often will), then it might be quicker to use the Export to R tool (p. 33) to create a table of values suitable for analysis in statistical software. In general, if you have < 20,000 observations, we recommend you use the Calculating Statistical Matrices tool included in this extension because it ensures that the matrices will be formatted correctly. If you have a larger sample, then we recommend you use your statistical software to calculate the data, and follow the examples on p. 70 to make sure the data are formatted correctly. Mahalanobis values typically reflect the multivariate similarity to the vector of ideal values, which are typically, but not always, the mean values. Although the mean elevation, slope angle, and insolation are meaningful descriptors of a land facet, the mean Land Facet Density does not represent the ideal. The ideal land facet density would be when the neighborhood was completely covered with this particular land facet (i.e. a land facet density = 1). Therefore, after you create the mean vector, you must change the ideal Land Facet Density value to “1” before running the Mahalanobis analysis. Important: If you select existing tables for your mean vector and covariance matrix, then you must make sure that the order of variables in the tables is the same as the order of variables you use to calculate your Mahalanobis surface. Please refer to the discussion of the Mean Vector and Covariance Matrix tables on p. 70 for a more detailed explanation of these tables. Click the button to run the tool. Last modified 9-Jul-13 MANUAL: Land Facet Corridor Designer 75 In the first dialog, select the source for your Mean Vector and Covariance Matrix. You may either generate them on-the-fly or extract them from existing tables. If you create them on-the-fly, you will have the option to save them as standalone tables by clicking the “Options to Save Additional Data” button. After you have specified the source for your mean vector and covariance matrix, click the “Next” button to move to the next dialog. Last modified 9-Jul-13 MANUAL: Land Facet Corridor Designer 76 Select the raster or polygon datasets to use in the analysis. These layers should correspond with the variables used to generate the mean vector and covariance matrix. In our analyses using land facets to design corridors, we used the density of the land facet, slope, elevation, and insolation as variables for land facets within the Canyon Bottom or Ridge topographic positions. We used these variables plus insolation for land facets within the Slopes topographic position (See the Overview for an explanation). Important: Be sure to sort these layers into the correct order! Click the "Variable Order" tab to see the order of variables listed in the specified Covariance Matrix (selected in the previous dialog). Last modified 9-Jul-13 MANUAL: Land Facet Corridor Designer 77 You may select both Raster and Polygon Vector datasets for your input variables. For raster datasets, you might have the option to use either the exact cell value at each point or an interpolated value from the four nearest points. This option is only available if you are generating your mean vector and covariance matrix on-the-fly from a set of sample points extracted from a point layer. Please see the discussion on Exact Values vs. Interpolated Points on p. 72 for more details on this concept. Note: If you are performing a Land Facet analysis using Density as one of your variables, then you are likely using existing mean and covariance data and therefore you will not see this option. Click ‘OK’ and the tool will produce the Mahalanobis Raster surface and add it to your map. Last modified 9-Jul-13 MANUAL: Land Facet Corridor Designer 78 CALCULATING MAHALANOBIS VALUES AT SAMPLE POINTS This tool will calculate Mahalanobis distance values at a set of points, based on an existing mean vector and covariance matrix. See Generating Statistical Matrices on p. 82 for a tool to calculating these data. Optionally the tool will add the Mahalanobis values to an existing field in the Point layer attribute table, to a new field added to the attribute table, or to a new table entirely. The mean vector and covariance matrix must be selected from tables currently available in your map document. Note: You must take care to ensure that the order of variables in the tables is the same as the order of variables you use to calculate your Mahalanobis surface. If the variable layers are not entered in the same order as they are exist in the mean vector and covariance matrix, then the Mahalanobis Distance values will be incorrect. Click the button to run the tool. In the first dialog, identify the point layer you wish to analyze. If any of your points are selected, then you have the option to analyze only those selected points. Next specify the correct mean vector and covariance matrix. These objects must be available as tables in your map document, and they must be formatted correctly in order to be recognized as potential Mean and Covariance tables. Please see the discussion of the Mean Vector and Covariance Matrix tables on p. 70 for explanations of these tables. Last modified 9-Jul-13 MANUAL: Land Facet Corridor Designer 79 After you have selected your sample point layer, mean vector table and covariance table, click the “Next” button to move to the next dialog. Select the raster or polygon datasets to extract the sample data from. These layers should correspond with the variables used to generate the mean vector and covariance matrix. Important: Be sure to sort these layers into the correct order! Click the "Variable Order" tab to see the order of variables listed in the specified Covariance Matrix (selected in the previous dialog). Last modified 9-Jul-13 MANUAL: Land Facet Corridor Designer 80 You may select both Raster and Polygon Vector datasets for your input variables. For raster datasets, you also have the option to use either the exact cell value at each point or an interpolated value from the four nearest points. Please see the discussion on Exact Values vs. Interpolated Points on p. 72 for more details on this concept. After you have selected your variable layers, click the “Next” button to move on to the last dialog. Last modified 9-Jul-13 MANUAL: Land Facet Corridor Designer 81 Use this dialog to specify where you want to save your Mahalanobis values. Optionally you may save them to a new table, to an existing numeric attribute field in your Point feature class, or to a new attribute field in your Point feature class. Last modified 9-Jul-13 MANUAL: Land Facet Corridor Designer 82 GENERATING STATISTICAL MATRICES: This function provides a quick way to generate tables containing the mean vector, covariance matrix, inverse covariance matrix, Pearson’s r correlation matrix, and Spearman’s rho rank correlation matrix from multiple raster and polygon datasets in your map. The mean vector and covariance matrix tables can be used with the Mahalanobis functions described elsewhere in this manual. Pearson’s r correlations measure how much one variable changes as a second variable changes, and in which direction. Values range between -1 and 1, with negative values implying a negative relationship (i.e. as one variable increases, the other decreases). Values close to 1 or -1 have high correlation while values close to 0 have low correlation. Spearman’s rho correlations are identical to Pearson’s r except that they are calculated from the relative rank of each value rather than the value itself (see Conover 1980:252). Spearman's rho correlations are generally considered more appropriate when the variables are not normally distributed or when the researcher wants to reduce the importance of outliers. Warning: This tool works well with relatively small datasets (N < 20,000 sample points or so). However, if you need to calculate statistical matrices for large regions which will require hundreds of thousands or millions of sample locations, then we recommend you use the Export to R tool (p. 33) to create a table of values suitable for analysis in statistical software, then use that statistical software to create the matrices. See p. 70 for a discussion of formatting tips to make sure the tool can read the matrices correctly. Click the button to start the process. First select the region containing the sample locations. If you select a point layer, then your statistical matrices will be generated from all your datasets that intersect those points. If you select a categorical raster, then your statistical matrices will be generated from all datasets that intersect the specific raster category you select. For example, if we wanted to generate statistical matrices for Land Facet 1, then we would fill out the dialog as follows: Last modified 9-Jul-13 MANUAL: Land Facet Corridor Designer 83 Next, choose the layers containing the variables you wish to analyze. If you select polygon layers, then you will also need to select the attribute field containing the variable data. Note: If you plan to use these statistical matrices in a Mahalanobis analysis, make sure to keep track of the order of the variables. The variables will need to be entered in the same order in the Mahalanobis dialogs. Last modified 9-Jul-13 MANUAL: Land Facet Corridor Designer Finally, choose which statistical matrices you wish to generate and where you want to save them. Last modified 9-Jul-13 84 MANUAL: Land Facet Corridor Designer 85 Upon completion, the tool will add these tables to your map document and open them. Note: If you plan to use these tables in the Mahalanobis analysis, and if you are using Land Facet Density as one of your variables, then you must change the “mean” density value to 1 before you run the analysis, so that the Mahalanobis Distance value will reflect the distance from “1” (i.e. the ideal density value) rather than the actual mean. Last modified 9-Jul-13 MANUAL: Land Facet Corridor Designer 86 CHI-SQUARE RASTER TRANSFORM: This tool will transform a raster of Chi-Square values (i.e. Mahalanobis distance values) to P-values based on the Chi-Square distribution with N - 1 degrees of freedom. If and only if the N input variables are normally distributed, then the Mahalanobis values will follow a Chi-Square distribution with N - 1 degrees of freedom. Farber and Kadmon (2003) warn that wildlife habitat variables often fail to meet the assumption of normality, so in this case the conversion to Chi-square p-values serves only to recode the Mahalanobis distances to a 0-1 scale. Mahalanobis distances themselves have no upper limit, so this rescaling may be convenient for some analyses. Please see the discussion on ChiSquare transformation on p. 67 for more details. Click the button to run the tool. Select the raster layer of Chi-Square values (i.e. the Mahalanobis raster) layer from the list , and enter the number of degrees of freedom to use in the Chi-Square transformation. The degrees of freedom should be equal to [Number of Variables - 1] used in the original Mahalanobis analysis. For example, if 6 rasters were used to create the Mahalanobis raster, then the Degrees of Freedom would be [6 - 1] = 5. Finally, specify the name of your new raster and where to save it. Last modified 9-Jul-13 MANUAL: Land Facet Corridor Designer 87 R Functions for Defining Land Facets This section documents the functions used to define land facets, or recurring polygons of relatively homogenous topography and soils. These functions are implemented in R, a widely-used computer language for data manipulation, calculation, and graphical display. It is an environment within which many classical and modern statistical techniques are implemented. R has a steeper learning curve than other statistical software packages because of its command-line interface; however, R offers nearly unlimited capabilities for data analysis. R is distributed for free from www.r-project.org, the R Project for Statistical Computing website. It is compatible with Windows, MacOS X, and Linux operating systems. There are two R functions used for identifying outliers in a data set, one function for classifying the data set into land facets, and a final function for exporting products of the classification in a format compatible with the “Land Facet Clusters from R” tool of the Land Facet CorridorDesigner extension to ArcGIS. The input data for these functions is generated by the “Export for R Analysis” tool of the same extension. Prior to describing the R functions for defining land facets, I briefly introduce those features of R statistical language essential for using these functions. An Introduction to R by Venables and Smith offers a more comprehensive introduction to the R language. It is free and available on the R website (under the Manuals section). An excellent (but not free) reference that covers data handling, graphics, mathematical functions, and a wide range of statistical techniques in R is The R Book by Michael Crawley. An R Primer After installation, R can be started like any other application, that is by double-clicking the “R” icon. This opens the R Console, the window through which the user communicates with R. The “>” symbol at the beginning of the input line in the R Console is the prompt from the application, after which an expression is entered for R to evaluate. If the expression is complete, R returns its product. If it is incomplete, the prompt changes to a “+” to indicate more input is required. Any text after a “#” is ignored by R, which is a simple way of embedding comments in lines of R code. USING R AS A CALCULATOR Arithmetic expressions can be typed directly into the R console. If the expression (in red) is complete, the line is evaluated and the result (in blue) is printed. The “[1]” at the beginning of the response is an index indicating that what follows is the first (and in this case only) element of a numeric vector. For example: 5-1 [1] 4 7*10/2 [1] 35 ASSIGNING VALUES TO OBJECTS R is an object-oriented language, which means that variables, data, functions, and results are stored in the form of objects. All currently-defined R objects are contained in the R workspace. Objects have a name and the user can act on them with operators (arithmetic, logical, etc.) and functions. Note that Last modified 9-Jul-13 MANUAL: Land Facet Corridor Designer R is case-sensitive. The assignment operator is the two-character sequence “<-“. Typing the name of the object will cause R to print out the contents of the object. The function ls lists the names of objects in the current workspace, whereas the rm function removes objects. For example: x <- 3 #assign the object x a value of 3 x [1] 3 y <- 5 x-y [1] -2 ls() #list all objects in the current workspace [1] "x" "y" rm(x) #remove the object x from the workspace ls() [1] "y" Multiple values can be assigned to a single object using the concatenate function, c. For example: y <- c(2, 5, 7) #assign the object y the values 2, 5, and 7 y [1] 2 5 7 To assign a sequence of integer values to an object, place a colon between the first and last numbers of the sequence, like this: y <- c(2:7) #assign the object y the integer values 2-7 y [1] 2 3 4 5 6 7 USING R FUNCTIONS The structure of a typical R statement is new.object <- function(arguments) where “function” is the name of a previously-defined (or built-in) function, “arguments” is a list of one or more arguments specific to that function, and “new.object” is the name of a new object Last modified 9-Jul-13 88 MANUAL: Land Facet Corridor Designer 89 containing the product(s) of the function. To illustrate, the following statement is used to read data in the format of a comma-separated value (csv) file into R: data <- read.csv(file="C:/land_facets/example_data.csv") The function is called read.csv and its file argument is the location and name of the csv file to be read into R. Notice that branches in the file directory containing example_data.csv are separated by forward slashes, not backslashes. After executing this line, the object data contains the information stored in the csv file. data is a dataframe, which is an object that has rows and columns. The rows contain values for different observations (i.e., raster cells) and the columns contain the values of different variables. The function head returns the first six lines of the object for inspection: head(data) elevation slope 1 1655.584 29.4104 2 2484.788 32.2004 3 2057.512 20.6244 4 2044.320 13.4432 5 1308.766 16.5707 6 1473.009 25.7639 This shows that data contains two variables, elevation and slope. The first column of numbers indexes the rows in data. To refer to a single variable within a dataframe, one would type dataframe$variable. For example, data$elevation pulls out the column of elevation values from the data dataframe. The number of rows in data is: nrow(data) [1] 100000 ISOLATING SUBSETS OF DATA IN A DATAFRAME: Subscripts are used to reference subsets of data in a dataframe. In R, subscripts appear in square brackets (i.e., [ ]). The rows of a dataframe are referenced by the first (left-hand) subscript and the columns by the second (right-hand) subscript. For example, data[2,1] [1] 2484.788 is the value in data at the intersection of row 2 and column 1. To select all entries in a row or column, leave the respective subscript blank. For example, data[2,] would return all values in the second row of data, and data[,2] would return all values in its second column. Logical subscripts can be use to isolate subsets of a dataframe that satisfy a specified condition. For example, data[data$elevation > 1000,] selects only those rows in data that have an elevation value greater than 1000. Other logical operators include <= for “less than or equal to” or == (that’s two equal signs back-to-back) for “equal to,” just to name a couple. Last modified 9-Jul-13 MANUAL: Land Facet Corridor Designer 90 INSTALLING AND LOADING R PACKAGES Many functions are built into the base R environment (i.e., functions that automatically come with R). Many more functions are supplied as add-on packages. To install an add-on package, use the install.packages command. For example, install.packages(pkgs=“ks”) installs the ks package for multivariate kernel density estimation. You will be asked to select the mirror (or repository) nearest you for fast downloading. Everything else is automatic. To use the package, the user first needs to load it into the workspace using the library function. For example, library(package=ks) loads the ks package into the workspace, allowing R to access the functions that it contains. Note that packages only need to be installed once, but they need to be loaded into the R workspace during each new R session. GETTING HELP IN R Help files for R functions can be accessed by typing a question mark followed by the function name. So, ?read.csv opens the R reference manual for the function read.csv. Help files contain a description of the function, information on its usage including the arguments it accepts, and the value(s) that it returns. SOME SUGGESTIONS Although commands can be typed directly into the R Console, it is often useful to use R’s built-in text editor (click on “New Script…” under the “File” menu). Not only can commands be typed and edited in the editor, but selected lines of code can be executed directly from the editor, too. Simply highlight the code of interest and press CTRL+R. “Scripts” (lines of commands) can also be saved, making it easy to document your work or re-run the commands at a later date. If you read from or write files to the same path frequently, it is sensible to set the working directory using the setwd function: setwd(dir="C:/land_facets/") Now, to read a csv file into R from the working directory, just type: data <- read.csv(file="example_data.csv") When you exit R, you are given the option of saving the workspace. If you do save it, the contents of the workspace will be restored when you open R again. To limit the clutter in your workspace, I recommend not saving on exit. Instead, use the “Save Workspace” option under the “File” menu to save the workspace for your current project under a name you specify; that named workspace can then be restored if necessary by using the “Load Workspace” option under the same menu. This lets you choose the amount of clutter – or useful information – in your workspace. Last modified 9-Jul-13 MANUAL: Land Facet Corridor Designer 91 Overview Of R Functions For Defining Land Facets The “Land Facet Clusters from R” tool provides four new R functions, namely: two functions to identify outliers in a data set (LF.kde and LF.outlier), one function to classify a data set into land facets (LF.cluster), and one function (LF.export) to export the products of the classification, which is necessary for compatibility with the “Land Facet Clusters from R” tool of the Land Facet CorridorDesigner extension to ArcGIS. Unlike built-in R functions or those in add-on packages, ?function.name will not access Help files for these four functions. Thus, documentation is provided below in a format similar to R reference manuals. Documentation for each function includes five sections. The “Description” and “Usage” subsections describe the function and illustrate its structure, respectively. The “Arguments” subsection lists and describes the arguments to each function, whereas “Details” provides information about the function. If the function automatically outputs information for compatibility with the Land Facet CorridorDesigner extension to ArcGIS, these files are described in the “Output” subsection. Finally, the “Values” subsection lists and describes the values returned by the function. The functions are presented in the order in which they are intended to be used. They depend on R packages ks, e1071, lattice, clusterSim, and nnclust. The last part of this Section, Workflow for Defining Land Facets, illustrates how these functions are implemented. Last modified 9-Jul-13 MANUAL: Land Facet Corridor Designer 92 KERNEL DENSITY ESTIMATION: FUNCTION LF.KDE Description Function LF.kde is the first step in identifying outliers, or cells with combinations of values for continuous variables that rarely occur in a data set. Outliers occupy the tails of the (multivariate) distribution generated from a kernel density estimation, a non-parametric procedure that estimates the probability density function of a random variable or group of variables. This function automatically plots the kernel density estimation, allowing the user to determine an appropriate density threshold (contour) beyond which cells are identified as outliers. An appropriate threshold separates regions in attribute space densely populated by cells from those more sparsely populated. You will use this threshold an argument in LF.outlier, the next function. Function LF.kde implements the Hpi.diag and kde functions of package ks for bandwidth selection and multivariate kernel density estimation, respectively. Because raster data sets are large, this function “bins” the data set (individual cells in the raster are grouped according their attribute values into bins of equal interval across the range of each variable). Kernel density estimation is performed on these bins, reducing computation time by several orders of magnitude. We experimented with different numbers of bins to develop the recommendations below; specifying more bins (larger grid size) greatly increases computation time without increasing your ability to identify outliers. LF.kde automatically outputs to the working directory information on the bins used for the kernel density estimation. Usage LF.kde(x, gridsize) Arguments x the matrix or dataframe containing topographic and/or soil data. Consists of one row per raster cell and one column per topographic or soil variable. gridsize The number of equal intervals into which the range of each variable will be split for the purpose of creating bins. Due to memory constraints, gridsize=151 is appropriate for 2-dimensional data; in this case kernel density estimation is performed on a 2-dimensional array of 1512 bins (22,801 bins). For 3-dimensional data, gridsize=91 is appropriate; in this case kernel density estimation is performed on a 3-dimensional array of 913 bins (753,571 bins). If you are using more than 3 continuous variables to define outliers (i.e., your multivariate space has more than 3 dimensions), you will require a smaller gridsize less than 91; we have not experimented with datasets of dimension > 3. Details LF.kde is functional for 1- to 6-dimensional data sets. Last modified 9-Jul-13 MANUAL: Land Facet Corridor Designer 93 This function automatically plots the objects in x and the density estimation. For 1-dimensional data sets, the plot shows the univariate density curve and a rug plot of objects in x. For 2-dimensional data sets, density contours are overlaid onto the bivariate plot of objects in x. The contours have an interval of 10% from 10% to 70%, and a 5% interval from 70% to 100%. The contour labeled “10” contains the 10% of objects occurring at highest density. For 3-dimensional data, this function plots the objects in x and the 3-dimensional density contours. For visual clarity, only the 25, 50, 75, 90, and 100% density contours are displayed, but you can use the plot and data to specify a density threshold other than one of these values. Output This function writes to the working directory bin_width.csv, a comma delimited file that contains the (multidimensional) half-width of bins used in the kernel density estimation. Value x dataframe containing topographic and/or soil data--same as input. width (multidimensional) half-width of bins used in the kernel density estimation. Same as values outputted in bin_width.csv. eval.points points at which the density estimate is evaluated. For each bin, this is the center point (not the centroid of observations falling in the bin). estimate kernel density estimate at eval.points. Kernel density estimates sum to one. H bandwidth matrix. This is a technical detail you can ignore. h scalar bandwidth (1-dimension only). names names of variables in x. w weights. This is another technical detail you can ignore. Last modified 9-Jul-13 MANUAL: Land Facet Corridor Designer 94 Identify Outliers: Function LF.outlier Description Function LF.outlier is the second step in identifying outliers. It first assigns individual cells the kernel density estimate of the bins into which they were grouped. Then, it identifies which cells occur beyond the user-specified density threshold defining outliers. This density threshold can be estimated from the plot generated by function LF.kde. Function LF.outlier also outputs to the working directory information about the location of bins containing non-outlier cells. Usage LF.outlier(x, threshold=90) Arguments x an object returned from function LF.kde. threshold threshold corresponding to the density contour (from contour plot of LF.kde) beyond which observations are identified as outliers. For example, a threshold of 90 identifies the 10% of cells beyond the 90% contour as outliers (i.e., the 10% of cells with the lowest kernel density estimates would be identified as outliers). Output This function outputs to the working directory grid.csv, a comma delimited file that contains the location of bins containing non-outlier cells. Value outlier a vector of length nrow(x) consisting of values 0 (indicates non-outlier) or 1 (indicates outlier). density a vector of length nrow(x) containing the interpolated kernel density for each object in x. Each raster cell is “interpolated” by assigning it the density of the bin in which it falls. Last modified 9-Jul-13 MANUAL: Land Facet Corridor Designer 95 Fuzzy c-means Cluster Analysis: Function LF.cluster Description Function LF.cluster is used to classify the non-outlier cells into land facets. This function implements the cmeans function of package e1071 to perform fuzzy c-means cluster analysis, an iterative procedure that assigns each raster cell to one of c clusters in a way that minimizes the c within-cluster variances. Each such assignment is called a “partition” of the cells. Because there may be more than one partition that minimizes within-cluster variances for a given value of c, you are encouraged to repeat the procedure 30 times (iterations take lots of computing time, and our experiments suggest that 30 iterations are sufficient to detect such cases). Function LF.cluster requires the user to specify the range of values of c to be evaluated, and the number of iterations for each value of c. The function automatically computes eight cluster validity indices used to determine the optimal number of clusters for the given data set. Once complete, this function generates two plots. The first is a plot of cluster centroids for each iteration of each c, which is useful for detecting cases in which more than one partition for a given c minimizes the within-cluster variance. The second plot graphs the validity indices for each iteration of each c, which is necessary for identifying k, the optimal number of clusters for the given data set. The Fukuyama-Sugeno and Average Within Cluster Distance indices are interpreted as a scree plot, where an “elbow” in the plot indicates the optimal number of clusters. The Xie-Beni, Xie-Beni*, and Davies-Bouldin indices are minimized for the optimal number of clusters, whereas the PBM, Calinski-Harabasz, and Fuzzy Silhouette indices are maximized. Usage LF.cluster(x, nclust=c(2:7), niter=30, psi=1.5, max=1000000) Arguments x the matrix or dataframe containing topographic and/or soil data, minus rows identified as outliers by function LF.outlier. Consists of one row per non-outlier raster cell and one column per topographic or soil variable. nclust range of values of c for which to perform the cluster analyses. niter number of iterations of the cluster analysis to perform for each value of c. psi a weighting parameter that determines the overlap between clusters. A crisp classification (i.e., no overlap between classes) corresponds to psi = 1; larger values of psi produce increasingly fuzzy classifications. Based on our limited experimentation, we recommend using the default value of 1.5; we welcome feedback from users who experiment with different values. max the maximum number of observations upon which to perform the cluster analysis. Last modified 9-Jul-13 MANUAL: Land Facet Corridor Designer 96 Provided to avoid memory limitations encountered on large data sets. Details Depending on the size of the data set, this function could take hours to complete. For example, testing nclust=c(2:7) and niter=30 on a data set containing 2 attributes and 256205 objects took 6 hours to complete on a Microsoft Windows XP platform with 3.0 GHz Intel Core 2 Duo processor. Computation time increases with the size of x (raster cells in your landscape, which you cannot control), the number of values of c to be evaluated (we never found an optimum at c > 5, so we recommend stopping at c = 7 unless your validity indices suggest that additional values should be tested), and number of iterations (we recommend stopping at 30). Value centroids location of cluster centroids for each iteration of each c. validity validity indices for each iteration of each c. Contents: c number of clusters z Iteration FS Fukuyama-Sugeno index AWCD Average Within Cluster Distance XB Xie-Beni index XB_star Xie-Beni* index DB Davies-Bouldin index PBM PBM index CH Calinski-Harabasz index FSil Fuzzy Silhouette index Last modified 9-Jul-13 MANUAL: Land Facet Corridor Designer 97 Exporting Information for Land Facet CorridorDesigner: Function LF.export Description Outputs to the working directory three comma delimited files necessary for compatibility with the Land Facet CorridorDesigner extension to ArcGIS: (1) cluster centroids for the optimal fuzzy-c partition, (2) mean and standard deviation of attributes (elevation and slope in the sample data set) across all non-outliers, regardless of cluster ; these are needed later to standardize your data, and (3) value for psi used in function LF.cluster. the mean and SD of elevation and. Usage LF.export(x, k, iter=1) Arguments x object returned from LF.cluster. k optimal number of clusters. iter iteration having optimal validity indices for k clusters. Necessary only for instances where multiple solutions minimize the within-cluster variances for k partitions. Output Outputs to the working directory: (1) centroids.csv, which contains the location of cluster centroids for the optimal fuzzy-c partition; (2) params.csv, which contains the mean and standard deviations of the attributes in the data set; and (3) psi.csv, which contains the value of psi used in function LF.cluster. Last modified 9-Jul-13 MANUAL: Land Facet Corridor Designer 98 Downloading The R Functions For Defining Land Facets Download and extract the files contained in LF_R_fxns.zip from http://www.corridordesign.org/. The Zip file contains three files: 1. LF_fxns.R – source code for the R functions for defining land facets 2. LF_code.R – sample code for using the R functions in LF_fxns.R 3. sample_data.csv – a sample data set Workflow For Defining Land Facets 1. Use the “Export for R Analysis” tool in the Land Facet Corridor extension to ArcGIS to export topographic and soil data from ArcGIS in a format compatible with R. 2. Open R. 3. Open the LF_code.R file by selecting “Open Script...” from the “File” menu and navigating to and selecting the LF_code.R file. This file contains all of the R code in the workflow below. Note that you will need to change the file directories in this code, unless your files are located in the directory C:/land_facets. 4. The R functions for defining land facets depend on R packages ks, e1071, lattice, clusterSim, and nnclust. Install these add-on packages: install.packages(“ks”) install.packages(“e1071”) install.packages(“lattice”) install.packages(“clusterSim”) install.packages(“nnclust”) 5. Load the R functions for defining land facets into the workspace using the source function: source(file=“C:/land_facets/LF_fxns.R”) The “file” argument to this function is the location of LF_fxns.R. Execution of this file also loads the add-on packages in Step 3 into the workspace. 6. Set the working directory: setwd(“c:/land_facets”) Note: the functions for defining land facets automatically write files to the working directory for compatibility with the Land Facet CorridorDesigner extension to ArcGIS. 7. Load the topographic and soils data from ArcGIS into R: data <- read.csv("c:/land_facets/example_data.csv") head(data) #inspect first six rows of data elevation slope 1 1655.584 29.4104 2 2484.788 32.2004 Last modified 9-Jul-13 MANUAL: Land Facet Corridor Designer 3 4 5 6 99 2057.512 20.6244 2044.320 13.4432 1308.766 16.5707 1473.009 25.7639 To read a dbf file into R, you will need to install and load the foreign package. The corresponding function is read.dbf. 8. To identify outliers, first use function LF.kde: kde <- LF.kde(x=data, gridsize=151) The resulting plot of the objects in data and the kernel density estimation should look like this: Examine this plot to determine an appropriate density threshold (contour) beyond which cells should be classified as outliers. An appropriate threshold separates regions in attribute space densely populated by cells from those more sparsely populated. Here, for example, the 90% contour appears to be appropriate. This threshold is provided as an argument to function LF.outlier in step 8. 9. Identify outliers using the density threshold from Step 7: out <- LF.outlier(x=kde, threshold=90) The object out contains a variable outlier (accessed by outlier$outlier) indicating which rows of data are outliers (1) and which are not (0). To keep things clean, let’s add this information to a column named outlier in the object data: data$outlier <- out$outlier head(data) Last modified 9-Jul-13 MANUAL: Land Facet Corridor Designer 1 2 3 4 5 6 100 elevation slope outlier 1655.584 29.4104 0 2484.788 32.2004 1 2057.512 20.6244 1 2044.320 13.4432 1 1308.766 16.5707 0 1473.009 25.7639 0 Next, tabulate the number of outliers in data: table(data$outlier) 0 1 89842 10158 That’s 10,158 outliers (10.2%) and 89,842 non-outliers. The proportion of outliers (10.2%) differed slightly from the 10% you specified because the most extreme 10% of the 22,801 bins contained a bit more than 10% of your 100,000 raster cells. 10. Classify the non-outlier cells into land facets using the function LF.cluster: clust <- LF.cluster(x=data[data$outlier==0,1:2], nclust=c(2:7), niter=2, psi=1.5, max=1000000) Note: the argument for niter used here is demonstration only. A larger number of iterations for each c (i.e., niter=30) is necessary to identify partitions with multiple optimal solutions. Once LF.cluster is finished iterating, it generates two plots. Save each of these plots by selecting “Save as” from the “File” menu in the plot window. The first plot is a graph of cluster centroids for each iteration of each c. Centroids in this plot are numbered according to their iteration. In the plot, a blue “1” lies underneath each red “2,” indicating that there was only one optimal partition for each value of c (although performing two iterations does not give much opportunity to identify multiple optimal solutions). Last modified 9-Jul-13 MANUAL: Land Facet Corridor Designer 101 The second plot is a graph of validity indices for each iteration of each c. Note that this plot will likely need to be resized to prevent panel text from getting cut-off. The top two indices are read like a scree plot, where an “elbow” in the plot indicates the optimal number of clusters. The middle three indices are minimized for the optimal partition, whereas the bottom three are maximized. This plot suggests that a four cluster solution is optimal. Last modified 9-Jul-13 MANUAL: Land Facet Corridor Designer 102 11. Export information about the cluster analysis: LF.export(x=clust, k=4) Here, the argument k specifies that a 4 cluster solution was optimal. Since only one optimal partition was found for 4 clusters, niter (the iteration with the optimal partition) does not need to be specified. If there were two or more optimal partitions at 4 clusters, you would select the partition with the highest value in the bottom row, the lowest value in the middle row, and the “best elbow” in the top row. 12. Use the “Land Facet Clusters from R” tool in the Land Facet CorridorDesigner extension to ArcGIS to import the results from these R functions into ArcGIS. These results are contained in: a) bin_width.csv: the (multidimensional) half-width of the bins used in the kernel b) c) d) e) density estimation grid.csv: the location of bins containing non-outlier cells centroids.csv: the location of cluster centroids for the optimal fuzzy-c partition params.csv: the mean and standard deviation of the attributes in the data set psi.csv: the value of psi used in the function LF.cluster Recall that all of these files were outputted to the working directory. Last modified 9-Jul-13 MANUAL: Land Facet Corridor Designer Last modified 9-Jul-13 103 MANUAL: Land Facet Corridor Designer 104 About the Land Facet Evaluation Tools and Manual The “About” dialog includes links to the Corridor Designer website, as well as email links to all the authors. The full manual (in PDF format) is available by clicking the “Open Manual” button. Documents Related to Land Facet Analysis The “Additional Docs” button on the “About” dialog above will open a list of documents that may be of interest. Simply select the documents you wish to open and click ‘OK’, and your computer will open them for you. Last modified 9-Jul-13 MANUAL: Land Facet Corridor Designer 105 Suggestions for Improvements? We want these tools to be as useful as possible to you and we definitely want to correct any bugs that you might find. Many of the tools currently available here came directly from user suggestions. If you have any ideas for new methods or metrics for creating and analyzing land facets, please let us know. If we have time, we will do our best to incorporate them into the toolset. Notice that on the “About Land Facet Corridor Analysis” dialog above, there is a “Suggestions” button. Just click that button to open up an email pre-addressed to Jeff Jenness. Last modified 9-Jul-13 MANUAL: Land Facet Corridor Designer 106 Updates March 31, 2010: Version 1.2.598 – Initial Release April 20, 2010 Version 1.2.797 Added a tool to identify Termini polygons Added documentation for all tools Fixed a number of bugs found in various tools April 27, 2010 Version 1.2.805 Primarily modifed manual to clarify and further explain several tools. Minor modifications to dialog control names. June 24, 2010 Version 1.2.808 Several minor code changes throughout extension. Added discussion of R tools to the manual. July 1, 2010 Version 1.2.809 Fixed a “Type Mismatch” error that occurred when you clicked the button for many of the raster tools. The error would only occur if you had a non-raster layer selected in your map when you clicked the tool. July 20, 2010 Version 1.2.813 Repaired a bug in the 3-class slope position tool in which it mislabeled “canyons” as “ridges” and vice versa. November 7, 2010 Version 1.2.815 Updated tools and installer to run in ArcGIS 10.0. November 16, 2010 Version 1.2.816 Wrote a workaround for an ArcGIS 10 bug in which the GX Dialog was unable to recognize a GRID filter, causing an “ActiveX component can’t create object” error message. This error would only appear in ArcGIS 10, and would always appear when the user clicked a button to specify a new location to save a raster. March 14, 2011 Version 1.2.831 Fixed bugs caused by raster data types that are not recognized by Visual Basic. Also fixed bugs which inadvertently changed the appearance of certain raster layers in the map document, and which prevented some tools from being run more than one time in a single ArcGIS session. Last modified 9-Jul-13 MANUAL: Land Facet Corridor Designer 107 Added additional ArcGIS 10 registration instructions to manual to handle Windows 7/Vista and Windows 32-bit/64-bit issues. April 28, 2011 Version 1.2.832 Modified the code to work around an “Automation Error” arising from a problem extracting the attribute table of categorical rasters. August 10, 2011 Version 1.2.837 Fixed an error that reported an “Invalid Property Value” at line 154 of the “Export to R” tool, caused when there was at least one raster in the map but no rasters with attribute tables. December 14, 2011 Version 1.2.837 Fixed a bug in the "Export to R" dialog in which it would occasionally crash with the error "Invalid procedure call or argument" at line 329. June 13, 2012 Version 1.2.848 Fixed a bug in the TPI tools in which it would not always save the raster correctly to the hard drive. June 16, 2013 Version 1.2.874 Wrote a work-around for an ArcGIS 10.x bug in which the “Land Facet Clusters from ‘R’” tool was unable to create a 16-bit integer grid, causing a crash that would typically say something like “Invalid procedure call or argument” at line 2540 of the “CalcLandFacetRaster” function. If you are running ArcGIS 9.x, then the tool works exactly the same as it did before. If you are running ArcGIS 10.x, then the tool creates a floating point raster of land facets, then exports it to an integer raster, then deletes the original floating point raster. Removed the options to create Land Facet Cluster rasters in any format other than GRIDs because the raster tables were causing problems in other formats. If necessary, you can easily export your Land Facet GRID to another format manually. July 9, 2013 Version 1.2.884 Wrote a work-around for an ArcGIS 10.x issue in which the TPI “Standard Elevation” option triggered an “Error in executing grid expression” error at line 2952 of TPI_Code.bas module. Wrote a work-around for an ArcGIS 10.x issue in which the “Identify Termini Polygon” function would trigger an error stating that “An unknown error has occurred in the geometry system” at line 618 of the “LandFacetFunctions.bas” module. Last modified 9-Jul-13 MANUAL: Land Facet Corridor Designer 108 Literature Cited Adriaensen, F, JP Chardon, G deBlust, E Swinnen, S Villalba, H Gulinck, and E Matthysen. 2003. The application of ‘least-cost’ modeling as a functional landscape model. Landscape and Urban Planning 64:233-247. Beier, P, D Majka, and WD Spencer. 2008. Forks in the road: choices in procedures for designing wildlife linkages. Conservation Biology 22:836-851. Beier, P., and B. Brost. 2010. Use of land facets to plan for climate change: conserving the arenas, not the actors. Conservation Biology. DOI: 10.1111/j.1523-1739.2009.01422.x Beier, P., DR Majka, and T. Bayless. 2007. Wildlife linkage designs for the state of Arizona. Reports to Arizona Game and Fish Department, Phoenix. available at www.corridordesign.org Bezdek, C. J. 1981. Pattern recognition with fuzzy objective function algorithms. Plenum Press, New York Brost, B. 2010. Use of land facets to design linkages for climate change. Thesis, School of Forestry, Northern Arizona University. Clark, Joseph D., Dunn, James E., and Smith, Kimberly G. 1993. A multivariate model of female black bear habitat use for a geographic information system. Journal of Wildlife Management. 57:519-526. Conover, W. J., 1980. Practical nonparametric statistics, 2nd Ed. John Wiley and Sons. 493 p. Cowling, R. M., R. L. Pressey, A. T. Lombard, P. G. Desmet, and A. G. Ellis. 1999. From representation to persistence: Requirements for a sustainable system of conservation areas in the species-rich Mediterranean-climate desert of southern Africa. Diversity and Distributions 5:5171. Cowling, R. M., R. L. Pressey, M. Rouget, and A. T. Lombard. 2003. A conservation plan for a global biodiversity hotspot---the Cape Floristic Region, South Africa. Biological Conservation 112:191-216. Dimitriadou, E., K. Hornik, F. Leisch, D. Meyer, and A. Weingessel. 2009. e1071: Misc Functions of the Department of Statistics (e1071), TU Wien. R package version 1.5-19. Dickson, B. and P. Beier. 2006. Quantifying the influence of topographic position on cougar (Puma concolor) movement In Southern California, USA. The Zoological Society of London. Journal of Zoology. doi: 10.1111/j.1469-7998.2006.00215.x Draper, Norman R. and Smith, Harry. 1998. Applied Regression Analysis, 3rd Ed. Wiley Series in Probability and Statistics. 706 p. Farber, Oren. and Kadmon, Ronen. 2002. Assessment of alternative approaches for bioclimatic modeling with special emphasis on the Mahalanobis distance. Ecological Modeling. Elsevier Science. 160:115-130. Golub, Gene H. and Van Loan, Charles F. 1996. Matrix computations, 3rd Ed. Johns Hopkins University Press. 694 p. Last modified 9-Jul-13 MANUAL: Land Facet Corridor Designer 109 Guisan, A., S. B. Weiss and A. D. Weiss. 1999. GLM versus CCA spatial modeling of plant species distribution. Kluwer Academic Publishers. Plant Ecology. 143:107-122. Franklin, J. 1995. Predictive vegetation mapping: Geographic modeling of biospatial patterns in relation to environmental gradients. Progress in Physical Geography 19:474–499. Hannah, L., G. F. Midgley, and D. Millar. 2002. Climate change-integrated conservation strategies. Global Ecology and Biogeography 11:485-495. Jenness Enterprises. 2006. Topographic position index. Version 1.3a. Available from: http://www.jennessent.com (accessed November 2009). Jones , K.B., D.T. Heggem, T.G. Wade, A.C. Neale, D.W. Ebert, M.S. Nash, M.H. Mehaffey, K.A. Hermann, A.R. Selle, S. Augustine, I.A. Goodman, J. Pedersen, D. Bolgrien, J.M. Viger, D. Chiang, C.J. Lin, Y. Zhong, J. Baker And R.D. Van Remortel. 2000. Assessing Landscape Conditions Relative to Water Resources in the Western United States: A Strategic Approach. Environmental Monitoring and Assessment 64: 227 – 245. Knick, Steven T. and Dyer, Deanna L. 1997. Distribution of black-tailed jackrabbit habitat determined by GIS in southwestern Idaho. Journal of Wildlife Management. 61:75-85. Lovejoy, TE, and L Hannah. 2005. Climate change and biodiversity. Yale Univ. Press. McCune, B., and J. B. Grace. 2002. Analysis of ecological communities. MjM Software Design, Gleneden Beach, Oregon. Meyer, Carl D. 2000. Matrix analysis and applied linear algebra. Society for Industrial and Applied Mathematics. Philadelphia. 718 p. Moore, I. D., R. B. Grayson, and A. R. Ladson. 1991. Digital terrain modeling: A review of hydrological, geomorphological, and biological applications. Hydrological Processes 5:3-30. Neter, John., Wasserman, William., and Kutner, Michael H. 1990. Applied Linear Statistical Models, 3rd Ed. 1181 p. Press, William H.; Teukolsky, Saul A.; Vetterling, William T., and Flannery, Brian P. 2002 Numerical recipes in C: the art of scientific computing. 2nd ed. Cambridge: Cambridge University Press; 994 pages. Phillips, S. J., P. Williams, G. Midgley, and A. Archer. 2008. Optimizing dispersal corridors for the Cape Proteaceae using network flow. Ecological Applications 18:1200-1211. Sanchez, P. A., et al. 2009. Digital soil map of the world. Science 325:680-681. Weiss, A. 2001. Topographic Position and Landforms Analysis. Poster presentation, ESRI User Conference, San Diego, CA. Available, by permission from the author, at http://www.jennessent.com/arcview/TPI_Weiss_poster.htm. Williams, P, L Hannah, S Andelman, G Midgley, M Araujo, G Hughes, L Manne, E MartinezMeyer, and R Pearson. 2005. Planning for climate change: identifying minimum-dispersal corridors for the cape Protaceae. Conservation Biology 19:1063-1074. Last modified 9-Jul-13 MANUAL: Land Facet Corridor Designer Last modified 9-Jul-13 110