1
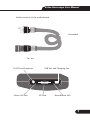
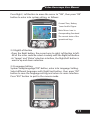
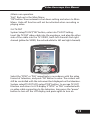
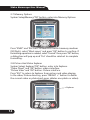
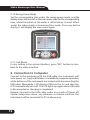
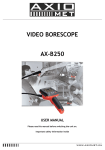
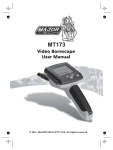
Video Borescope User Manual
Video Borescope User Manual
Contents
Page
1.Safety Tips............................................................................. 4
2.Function Description..............................................................4
3.Specification..........................................................................5
4.Name and Function................................................................6
5.Operation ..............................................................................9
6.Connection to Computer........................................................16
7.Charging................................................................................17
8.Reset function........................................................................17
9.Notices...................................................................................17
Video Borescope User Manual
1.Safety Tips
Before using the instrument, read all safety information and specification
of the video borescope carefully.
1-1.Application
•Detect the inside parts of machinery (such as cars, ships, aircraft,
heavy machineries) to check whether it is working normally.
•Apply the gooseneck with camera underwater to check the object in
the water (such as Drainage works).
•Applied in supervision cases (such as rearview mirror of the cars).
•Applied in wild adventure.
1-2.Maintenance and cleaning
•Repair or maintenance should be operated only by qualified
professionals.
•Please clean the camera after use, and no detergents should be
used in cleaning.
1-3.Safety Sybomls
•Satisfied with European CE safety standards.
2.Function Description
•On-site inspection of photos and videos
•Images rotation by pressing up and down buttons under video mode
•Images display with current time and date
•Single image or video deletion
•Image and video recording
•Display with time and date
•SD Card (32GB)
•Flash Card (8GB)
•Built-in 65M Flash Capacity
•TV-OUT
•Video Format (MP4,AVI,3GP,ASF)
•Image Photo Format (JPG,JPEG)
•Languages: English, French, German, Spanish, Turkish
•Support operation in dark environment (with four LED lights)
•USB charging(Li battery)
•USB2.0 connection to computer
4
Video Borescope User Manual
3.Specification
Display Sceen
Display Pixel
Photosensitive Devices
Sensor Pixel
Photo Resolution
Maximum Number of Frames (FPS)
Color Digit(bit)
Focusing Distance
Goosenneck Length
Camera Diameter
Video Format
Photo Format
Camera Video Format
Saved Image Format
SD Card
Flash Memory
Working Voltage
Video Working Current
Static Current
TV-OUT
Operating Temperature
Charging Temperature
Storage Temperature
Storage Humidity
Data Output
Power Supply
Size(L,W,H)
Accessories
3.2 inch TFT
240(RGB) *320
1/4 inch CMOS
640*480
640*480
30FPS/S
24
Fixed at 5-15cm
1m(2m/3m selectable)
17mm
MPEG4/3GP/AVI/ASF
JPEG
3GP
JPG(640*480)
MAX 32GB
MAX 8GB
Li battery 3.7V/2000mA
Approx.380mA
MAX 20UA
PAL/NTSC system
0~55°C
0~50°C
-20~60°C
15% to 85%RH
USB data cable and SD card
a 3.7V,2000mA/h battery(1860)
240mm*100mm*160mm
user manual, 3.7V lithium
battery, package box,
USB cable, DC5V charger,
video output cable, CD,
mirror & hoop etc.
5
Video Borescope User Manual
4.Name and Function
3.2inch TFT LCD
Backlight Increase Button
Backlight Decrease Button
UP Button
OK Button
ON/OFF Button
Down Button
Quit button
Hand Shank(with Li Battery)
6
Video Borescope User Manual
Socket connects to the motherboard
Gooseneck
Carema
TV-OUT and Earphone
Silicon Gel Jack
USB Port and Charging Port
SD Card
Reset Button Jack
7
Video Borescope User Manual
Photo Button
Video Button
REMOVE
Carema Socket
Motherboard Socket
8
Video Borescope User Manual
5.Operation
1.Operation Under Video Mode
1-1.Power ON/OFF
Hold the power button for three seconds to enter into camera
scanning mode, as follow:
LED Backlight Indicate
The Current Date And Time
Display The
Picture While Photo
Display The Current Memory
Hold on the power button for three seconds to colse the instrument.
1-2.Adjust The Brightness of CMOS
In the above camera scanning mode, adjust the LED light built in
the head of the gooseneck to realize the operation in different
circumstances. Increase the backlight level by each press on the
"BRIGHT +" button until brightest and backlight level displays on
the top left corner of the screen. Decrease the backlight level by each
press on the "BRIGHT-" button until turn-off. (10 stands for the
brightest, 0 for the most dark and the LED goes out when 0.)
1-3.Rotate Images
In camera mode, press up/down button to adjust the angle on the
screen to get a suitable image displayed. Image angle can be rotated
from 0° to 180° with up/down button, which will greatly facilitate
the detection.
9
Video Borescope User Manual
1-4.Image
In camera mode, each press of the "SNAP" button will save an image,
(Enter into "Date/Time" in the System setup/time menu, the current
time and date will display on the saved image. Enter into "Close Date
/Time" in the same menu, no current time and date will display on
the saved image.)
1-5.Video
Under video mode, hold the "RECORD" button for three seconds to
enter into the video mode with a video symbol displaying and
flickering on the top left side of the screen. Meanwhile, a dynamic
memory capacity will be displayed at the left bottom indicating the
current available memory capacity. When the capacity was used up,
a dialog box will appear to advice of insufficient memory capacity.
Preserve the current video file by pressing "RECORD" button. The video
can be played in "System setup\Explorer\video player" menu.
1-6.System Setup
Press "OK" button under camera mode to pop up a "MENU" dialog
box.
Select "Yes" with the left/right button, and then press "OK" button to
enter into Main Interface "System Setup".
2.System Set
2-1.Under the camera scanning mode, press "OK" button, and the
following dialog box pops up.
10
Video Borescope User Manual
Press Right / Left button to move the cursor to "YES", then press "OK"
button to enter into system setting, as follows:
Current Time, Battery
Power And Sd Figure
Main Menu Icon In
Corresponding Functional
The current state of the
operational keys
2-2.Right/Left button
•Press the Right button, the cursor turns to right; Left button to left.
All of the icons could be select circularly with the Right/Left button.
•In "Image" and "Video" selection interface, the Right/Left button is
used in up and down selection.
2-3.Language Setting
System Setup/Language/"OK" button, enter into Language Setting.
Select different languages with Right/Lest button, then press "OK"
button to save the language setting and return to main interface.
Press "ESC" button to quit to the camera mode.
11
Video Borescope User Manual
2-4.Time Setting
System Setup/Time/"OK" button, enter into Time Setting.
Move the cursor with Right/Left button to the functions you want
to set up, then press "SNAP" and "RECORD" to adjust the date and
time. Select "OFF" on "Time" interface to end up the Time and Date
display both on the "System Setup" interface and in the camera mode.
Press "OK" button to save the time setting and return to main interface
or press "ESC" to back up to camera mode.
2-5.Automatic Shut Down Setting.
System Setup/Auto Off/"OK" button, enter into Automatic Shut Down
Setting.
"Never": Turn off the auto-off function.
"3Min/15Min/60Min": The instrument will turn off upon 3min/15min
12
Video Borescope User Manual
/60min non-operation.
"Exit": Back up to the Main Menu
"OK" button: Save automatic shut down setting and return to Main
Menu. Auto-off function will not be activated when recording or
playing video.
2-6.TV-OUT
System Setup/TV-OUT/"OK" button, enter into TV-OUT Setting.
Insert the TV-OUT video cable into the earphone, and plug the other
side of the cable into the TV VIDEO, both left channel and right
channel (yellow for VIDEO, the red and white for left and right channels)
Select the "NTSC" or "PAL" respectively in accordance with the video
format of television, and press "OK" button to enter. The content will
still be controlled with the instrument but displayed on the television.
System setup\TV-OUT\LCD output\"OK" button, to escape TV-OUT
function and return to LCD display. If "NTSC" or "PAL" is selected with
no video cable connecting to the television, long press the "power"
button to turn off the LCD display and press again to turn on.
13
Video Borescope User Manual
2-7.Memory Options
System Setup/Memory/"OK" button, enter into Memory Options.
Press "SNAP" and "RECORD" to select the current memory medium
(SD/Flash), select "Work space" and press "OK" button to confirm. If
formatting operation is needed, select "Format" then press "OK" button,
a dialog box will pop up and "Yes" should be selected to complete
formatting.
2-8.Picture And Video Explorer
System Setup/ Explorer/"OK" button, enter into Explorer.
"Video Player" and "OK" button: videos interface.
"Picture View" and "OK" button: Picture interface.
Press "ESC" to return to Explorer from picture and video playing.
In the video/ Picture directory, press "BRIGHT +" button to delete
the current video or photo(each press deletes one photo or video).
Explorer
14
Video Borescope User Manual
Video Player
Picture View
2-9.Setting
System Setup/Set/"OK" button, enter Setting.
Press "SNAP" and "RECORD" button to increase or decrease the value
to adjust the effect of the camera. (The adjustment will produce a
slight effect and only can be identified in the camera mode. This
adjustment is not suggested for the instrument has been best
calibrated before delivery. Press "Default" to return to the best-calibrated
default value.)
15
Video Borescope User Manual
2-10.Saving Power Mode
Set the corresponding time under the saving power mode, and the
display screen will turn off as the main menu stays for the corresponding
time, while the system of the meter is still working. It won't effect
under the video mode or browsing files mode. Press any button
shortly, it will display the main menu again.
2-11. Exit Mode
In any setting in the system interface, press "ESC" button to turn
back to the video interface.
6. Connection to Computer
Connect to the computer with the USB cable, the instrument will
auto power on. Copy and Deletion is available by computer operation,
while buttons of the instrument are locked until disconnecting the
USB cable. Meanwhile, LCD displays USB icon for 2s and then the
LCD automatically turns off. The LCD lights up again when USB cable
is disconnected or charging is completed.
Remark: Connect to the USB cable under any mode of Power off,
System Setup main menu, any submenu or camera interface, the
instrument will be connected to PC in above way.
16
Video Borescope User Manual
7. Charging
•Connect to DC5V/1A charger, the instrument is auto-on and enters
into System Setup interface with a battery icon flickering on the
top right corner indicating battery charging. The icon will stop
flickering when charging is completed.
•All the buttons are locked and remain unavailable while battery
charging. Disconnecting the USB cable will release the buttons.
8. Reset function
If system halted unexpectedly, please press the RESET button on the
leftside of the instrument, thence, it will be reset. Instrument can be
operated normally after power on it again.
9. Notices
•The gooseneck should not be bend to a diameter less than 5 inch,
or it will be irreparable.
•Take out the battery when the instrument is not in use for a long
time to avoid corruption caused by the battery fluid leakage.
•Clean the camera before operation.
•Use 3.7V Li battery.
•To avoid electrical shock, the instrument and gooseneck should not
contact with high voltage objects during operation.
•To avoid instrument damaged and user injured, the gooseneck
cannot be inserted into the rotational gear wheel.
17
Video Borescope User Manual
Video Borescope User Manual