1
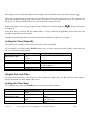
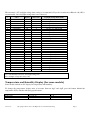
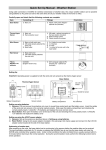
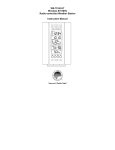
Torinnov 12103 Series
Radio-controlled (Atomic)
Mechanical Calendar Wall Clock
User Manual
Table of Contents
1 Introduction .................................................................................................................................... 2
2 Overview ........................................................................................................................................ 2
3 Important Notes and Warnings ........................................................................................................ 2
4 Installation ...................................................................................................................................... 3
5 Battery Installation and Initial Operation ......................................................................................... 3
6 Initial Set Up................................................................................................................................... 4
7 Radio Signal Search Mode .............................................................................................................. 5
8 Setting the Time Manually .............................................................................................................. 6
9 Display Date and Time .................................................................................................................... 6
10 Setting the Time Zone ................................................................................................................... 6
11 Temperature and Humidity Display (RC-12118) ............................................................................ 7
12 Specifications................................................................................................................................ 8
13 Troubleshooting Guide .................................................................................................................. 8
14 Liability Disclaimer ...................................................................................................................... 8
15 Warranty Information .................................................................................................................... 8
16 Disposal ........................................................................................................................................ 8
Version 1.0
©Copyright 2014, Torinnov. All Rights Reserved and Patents Pending.
Page 1
Introduction
Thank you for your purchase of the Torinnov Radio-controlled Mechanical Calendar wall clock. The following
user guide provides step by step instructions for operation and troubleshooting. To download the latest manual
and additional troubleshooting tips, please visit:
http://torinnov.com/rcwallclock
Overview
This product displays the time, month, date, the day of the week and/or temperature and/or humidity.
The radio-controlled clock (Atomic) updates time and date automatically using a radio receiver from the atomic
time transmitted from Fort Collins, CO, USA (WWVB).
This signal is shortwave, and travels thousands of miles by bouncing off of the ionosphere. The signal is best
received at night when there is no solar interference.
The radio controlled clock never requires setting, and automatically adjusts to daylight savings time (DST) and
the day of 28th~31st to 1st. This feature can be overridden for locations that do not observe DST (examples,
Arizona and Hawaii).
Features include:
• Noise free second hand (LCD display)
• Weekday, Day and Month hands
• LC-display for second
• Automatic daylight savings time update and leap year observation
• 28 time zones settings
• Low battery detection
• IR sensor to correct alignment of the clock hands
The reception attempt for the daily automatic synchronization with the radio time is performed several times a
night. Just one successful synchronization per night is sufficient to accurately set the clock to the second.
Important Notes and Warnings
When used in the directed manner, this unit has been designed and manufactured to ensure your personal safety.
Please read all safety and operating instructions carefully before use, and keep these instructions handy for
future reference. Take special note of all warnings listed in these instructions.
Before using this product, please read the following warning and cautions:
1. Read these instructions – All the safety and operating instructions should be read before the unit is
operated.
2. Keep these instructions – The safety and operating instructions should be kept for future reference.
3. Heed all warnings – All warnings on the device and in the operating instructions should be adhered to.
4. Follow all instructions – All operation and use instructions should be followed
5. Operate and store in a dry location. Do not operate outside.
6. The product must be protected against electromagnetic fields, static electrical fields, extreme
Version 1.0
©Copyright 2014, Torinnov. All Rights Reserved and Patents Pending.
Page 2
temperatures, direct sunlight and moisture. Only operate within specified temperature range.
7. Clean only with dry cloth – The device should be cleaned only as recommended by the manufacturer.
8. Do not use near any heat sources such as radiators, heat registers, stoves, or other device (including
amplifiers) that produce heat.
9. Refer all servicing to qualified service personnel. Servicing is required when the device has been
damaged in any way, such as liquid has been spilled or the device has been exposed to rain or moisture,
does not operate normally, or has been dropped.
10. This device shall not be exposed to dripping or splashing water and that no object filled with liquids
shall be placed on the device.
11. Do not attempt to dismantle, open or repair this product yourself. If a fault occurs, seek advice from the
authorized dealer or torinnov support only.
12. The product must not be exposed to substantial mechanical strain or strong vibrations.
13. Unauthorized conversion and/or modification of the device are inadmissible because of safety and
approval reasons (CE, UL and FCC). Any usage other than described in this manual is not permitted and
can damage the product and lead to associated risks such as short-circuit, fire, electric shock, etc.
14. Do not leave packaging materials unattended. It may become a dangerous plaything for children.
15. Handle the product with care. It can be damaged by dropping and vibration.
Installation
The clock includes a suspension eye for hanging on a wall.
To ensure proper radio reception, the clock should not be placed near electronic devices or on a metal wall
(metal blocks radio signals).
Battery Installation and Initial Operation
Open the battery compartment on the back of the housing and insert three AA fresh alkaline batteries, observing
the correct polarity. The correct polarity is indicated in the battery compartment.
After inserting the batteries and closing the battery compartment, the LCD starts flashing and you can set the
time zone (reference Section 0) and daylight savings time.
After 10 seconds, or subsequent to pressing the ZONE button on the back of the housing, the hands starts
running to 8:05, Sun, 31st, Dec (reference Section 6) then the RCC clock will attempt receive the WWVB
signal.
If the text on the LCD is invalid, press the RESET button on the back of the housing to resume normal
operation.
NOTE: Replace the batteries when the low battery warning symbol
appears on the LCD. The use of
rechargeable batteries is acceptable. However, the lower operating voltage and lower capacity will reduce the
operating time.
Version 1.0
©Copyright 2014, Torinnov. All Rights Reserved and Patents Pending.
Page 3
Initial Set Up
The LCD displays status icons, as shown in Figure 1.
Figure 1
The following table provides the sequence of events during initial set up. When initializing the clock operation,
move away from any electronic sources such as televisions, computers and other wireless devices. The sequence
may take several hours, based on the time of day (reception is better at night) and distance from the radio
controlled clock.
The IR sensor(s) on the clock face must not be exposed to direct sunlight during initial startup. Thus, perform
the start up in a shady location. If the RF sensor fails, the LCD will display “KE”.
Version 1.0
©Copyright 2014, Torinnov. All Rights Reserved and Patents Pending.
Page 4
Step
Insert Battery
Set Time Zone
Display
Description
ET (WWVB Eastern Time Zone for USA) flashes on LCD.
Press [–] to adjust down, [+] to adjust up (reference Table 4) on the back
of the housing.
Press ZONE button to confirm.
If no buttons are pressed for 10 seconds, the clock will proceed to the
initialization step.
Hour:minute Clock
hand initialization
HM (hour:minute) and the WAIT symbol ( ) flashes and the clock
hands move to the reception search position (08:05)).
Please wait…
Month clock
hand initialization
MO (month) and the WAIT symbol ( ) flashes and the clock hands
move to the reception search position (December), if this hand is
available with your clock.
Please wait…
Day clock hand
initialization
DA (day) and the WAIT symbol ( ) flashes and the clock hands move to
the reception search position (31st), if this hand is available with your
clock.
Please wait…
Day of week clock
hand initialization
WK (day of week) and the WAIT symbol ( ) flashes and the clock
hands move to the reception search position (Sunday), if this hand is
available with your clock.
Please wait…
Radio controlled
clock
synchronization
The radio controlled clock icon (
) will flash and seconds will be
displayed. Do not touch any buttons during synchronization.
Refer to Section 0 for more details on radio reception mode and issues
related to lack of reception and incorrect clock setting.
Table 1
Radio Signal Search Mode
To perform a manual search for the radio controlled clock signal, press and hold the + button for two seconds to
begin.
The radio controlled clock icon (
during synchronization.
Version 1.0
) will flash and seconds will be displayed. Do not touch any buttons
©Copyright 2014, Torinnov. All Rights Reserved and Patents Pending.
Page 5
If no signal is received after 10 minutes, the incomplete radio controlled clock icon will be displayed ( ).
There may be interference present from solar radiation, proximity to electronic devices, or the signal may be
blocked by aluminum siding, thick concrete walls, basements, or window treatments. Allow 24 to 48 hours for
the time to set. If the problem persists, move the clock near a window location.
If the correct time is received, the complete radio controlled icon will be displayed (
is displayed.
) and the correct time
If the hour hand is incorrect but the minute hand is correct, additional programming of the time zone and
daylight savings time may be required.
All other programming features are locked out until the 10 minute search mode is complete.
Setting the Time Manually
If reception is not available, the clock date and time can be set manually.
To set manually, press and hold the ZONE button for two seconds to begin and follow Table 2. Press and hold
the + or – buttons to change rapidly.
Command
Press and hold ZONE
button for 2 seconds
Press ZONE button
Press ZONE button
Press ZONE button
Mode
Enter manual time
mode
Set year
Set month
Set day
Set hour
Press ZONE button
Press ZONE button
Set minute
Exit manual time mode
Settings
Press [+] to increase, [-] to decrease.
Press [+] to increase, [-] to decrease.
Press [+] to increase, [-] to decrease.
Press [+] to increase, [-] to decrease (observing
the AM and PM icon)
Press [+] to increase, [-] to decrease.
Table 2
Display Date and Time
To view the date and time on the LCD, press the [+] button to display the year. Press the [+] button again to
display the month, day, hour, minute and second.
Setting the Time Zone
To set the time zone, press the ZONE button (do not hold) and follow Table 3.
Command
Press ZONE button
Press and hold ZONE
button for 2 seconds
Press ZONE button
Press ZONE button
Mode
Display current time zone
setting
Set time zone
Set daylight savings time
(DST)
Exist Set Time Zone mode
Settings
Press [+] to increase, [-] to decrease. Reference
Table 4.
Press [+] to change between AU (automatic), OF
(off) and ON (on).
Table 3
Version 1.0
©Copyright 2014, Torinnov. All Rights Reserved and Patents Pending.
Page 6
The automatic (AU) daylight savings time setting is recommended. If you live in Arizona or Hawaii, off (OF) is
recommended, since daylight savings time is not observed.
#
Cities
Display
Time Zone
Daylight Savings Time (DST)
1
2
3
4
5
6
7
8
9
10
11
12
13
14
15
16
17
18
19
20
21
22
23
24
25
26
27
28
Hawaii Time
Alaska Time
Vancouver
Pacific Time
Mountain Time
Central Time
Mexico
Eastern Time
Atlantic Time
Newfoundland
Rio de Janeiro
London
Frankfurt
Paris
Madrid
Rome
Zurich
Cairo
Baghdad
Moscow
India
Bangkok
Hong Kong
Beijing
Tokyo
Adelaide
Sydney
Auckland
HA
AL
VA
PT
MT
CT
MX
ET
AT
NF
RI
LO
FF
PA
MA
RO
ZU
CA
BA
MO
IN
BK
HK
BJ
TY
AD
SY
AK
-10
-9
-8
-8
-7
-6
-6
-5
-4
-3.5
-3
+0
+1
+1
+1
+1
+1
+2
+3
+4
+6.5
+7
+8
+8
+9
+9.5
+10
+12
OF (pre-set) and ON
AU (pre-set), OF and ON
AU (pre-set), OF and ON
AU (pre-set), OF and ON
AU (pre-set), OF and ON
AU (pre-set), OF and ON
AU (pre-set), OF and ON
AU (pre-set), OF and ON
AU (pre-set), OF and ON
OF (pre-set) and ON
OF (pre-set) and ON
AU
AU
AU
AU
AU
AU
AU
OF (pre-set) and ON
OF (pre-set) and ON
OF (pre-set) and ON
OF (pre-set) and ON
OF (pre-set) and ON
OF (pre-set) and ON
N/A
AU (pre-set), OF and ON
AU (pre-set), OF and ON
AU (pre-set), OF and ON
OF = daylight savings time always OFF (example, Arizona or Hawaii)
AU = automatically sets based on daylight savings time.
ON = daylight savings time always ON.
Table 4
Temperature and Humidity Display (For some models)
Some models include an LC-display for temperature and humidity.
To change the temperature display units of measure between degC and degF, press the button behind the
temperature LCD, with the following specifications:
Measurement
Temperature
Humidity
Version 1.0
Range
14 to 158 °F
20 to 95%
Accuracy
± 2 °F
±5%
©Copyright 2014, Torinnov. All Rights Reserved and Patents Pending.
Page 7
Specifications
Operating Voltage
Battery
Battery Life
Radio controlled time protocol
4.5 Vdc
3 x AA
About 2 years (high quality batteries)
WWVB (USA)
Troubleshooting Guide
If your question is not answered here, you can contact us as follows:
Email Support: [email protected]
Liability Disclaimer
Reading the “User manual” is highly recommended. The manufacturer and supplier cannot accept any
responsibility for any incorrect readings and any consequences that occur should an inaccurate reading take
place.
This product is not to be used for medical purposes or public information.
The specifications of this product may change without prior notice.
This product is not a toy. Keep out of the reach of children.
No part of this manual may be reproduced without written authorization of the manufacturer.
Torinnov, WILL NOT ASSUME LIABILITY FOR INCIDENTAL, CONSEQUENTIAL, PUNITIVE, OR
OTHER SIMILAR DAMAGES ASSOCIATED WITH THE OPERATION OR MALFUNCTION OF THIS
PRODUCT.
This product complies with the applicable national and USA and European regulations. All rights reserved and
patents pending.
Warranty Information
Torinnov provides a 1-year limited warranty on this product against manufacturing defects in materials and
workmanship.
This limited warranty begins on the original purchase date, and is valid only on products purchased and used in
the United States, only to the original purchaser of this product, and only from an authorized dealer. To receive
warranty service, the purchaser must contact the authorized dealer or [email protected] for troubleshooting
and service.
Disposal
Please help in the preservation of the environment and return used batteries to an authorized depot.
The electrical and electronic wastes contain hazardous substances. Disposal of electronic waste in wild country
and/or in unauthorized grounds strongly damages the environment.
Version 1.0
©Copyright 2014, Torinnov. All Rights Reserved and Patents Pending.
Page 8