1
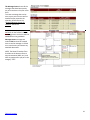
Technology Manual Last Revised: 9-27-2013 Table of Contents Need Help? ............................................................................................................................................................................. 3 Help Desk Technology Facilitators Technology Training ............................................................................................................................................................... 4 Tech Hours HRM Portal Atomic Learning Pay Forms Computer Logins..................................................................................................................................................................... 5 Generic Login Student Login Staff Login Phones .................................................................................................................................................................................... 6 SharePoint .............................................................................................................................................................................. 8 District Level Forms and Documents Building Level Forms and Documents My Site – accessing documents from outside district E-Mail .................................................................................................................................................................................... 10 Opening Outlook Composing an e-mail Opening an attachment Creating a distribution list Print Shop Orders .................................................................................................................................................................. 13 Copiers Scanning to PDF ....................................................................................................................................................... 17 For the Classroom: Attendance............................................................................................................................................................... 18 Secondary Grading (Skyward) .................................................................................................................................................... 19 (Skyward Family Access Viewing) Elementary Grading (Easy Grade Pro).......................................................................................................................................... 21 (Skyward) ................................................................................................................................................... 23 RAD (Data Warehouse) ........................................................................................................................................... 31 Classroom Webpages (SWIFT) ................................................................................................................................. 33 Software: Pearson SuccessMaker Adding Groups ............................................................................................................................................ 35 Adding Students .......................................................................................................................................... 35 Adding Courseware ..................................................................................................................................... 38 Editing Starting Level .................................................................................................................................. 38 View/Print/Save Reports ............................................................................................................................ 39 Whole Group Instruction ............................................................................................................................ 39 Individualized Instruction ........................................................................................................................... 43 Imagine Learning 1 Table of Contents Reading DIBELs Next................................................................................................................................................. 45 SRI ................................................................................................................................................................... Math IXL.................................................................................................................................................................... Pearson SuccessNet ........................................................................................................................................ Bridges to Algebra ........................................................................................................................................... Algebra 1 ......................................................................................................................................................... Catch Up Math ................................................................................................................................................ Streaming Media Discovery Streaming ....................................................................................................................................... Youtube ........................................................................................................................................................... TeacherTube ................................................................................................................................................... Office 2010 Customizing the ribbon ............................................................................................................................... 49 Screenshots ................................................................................................................................................. 49 Removing background from image............................................................................................................. 50 Smart Art (graphics/charts) ........................................................................................................................ 51 Save & Send ................................................................................................................................................ 52 Excel Spark Lines .................................................................................................................................................. 53 End of Year Reports………………………………………………………………………………………………………………………………………………….54 Laptop Initial Training PowerPoint 2 Table of Contents Need Help? For hardware problems, please contact the Help Desk ([email protected] or phone 4-4357). Examples of issues: Computer login No internet connection Computer won’t turn on Phone problems Computer is asking for updated software SharePoint login keeps popping up Install software Broken hardware For software support, please contact your Technology Facilitator (see the Instructional Technology website for phone listing). Examples of issues: Need help using a program (SRI, DIBELS, Outlook, Word, etc.) Need login information for a program or service (Atomic Learning, Classroom Website, SRI, DIBELs, etc.) Would like to integrate or develop a technology infused unit or lesson Schedule or request technology training Presentation station issues 3 Table of Contents Technology Training: Tech Hours: Certificated staff currently has 8 tech hours available each year for technology professional development. HRM Portal: Technology training is coordinated and offered through the Department of Instructional Technology throughout the year. District professional development classes are posted on the HRM portal. If you do not have an account, click on “Register” and fill in the appropriate information (you will need your employee ID # and e-mail address). Atomic Learning: In addition to district offered professional development, you are also invited to go to www.atomiclearning.com and participate in online technology professional development. This service is available to all RSD employees. Atomic learning has video tutorials for a plethora of computer programs. Simply choose the program and topic you want to learn about and watch the video! Make sure to keep track of the total amount of time you spend viewing tutorials and practicing the skills…that is the number of hours you submit on the tech hour form. For first time users: Login = full e-mail address ([email protected]) Password = (same as your computer login password) Forms: Certificated Tech Hour form - click here. Administrative Extra Hrs. form – click here. Classified Training form – click here. Check Tech Hours you have used and have left here. 4 Table of Contents Computer Logins K-3rd grade: (This is also referred to as the ELEM login or “generic” login. It has the highest level of internet filtering and restrictions) Login: elem Password: (contact your TIS) Student Logins: Login: the first 12 letters of their last name; excluding hyphens, apostrophes, and spaces period their first initial and then Internal ID# Sample: smith.j12345 Password: internal ID # / Password: renton + internal ID # (for secondary students) Staff Logins: Login: First name Period Last name Sample: john.smith Password: Call the help desk to have your password reset (4-4357) 5 Table of Contents Phone Setup VOIP Phones - Directory Feature (Finding a phone number in your building) 1) Press the softkey below the word “DIR” on the display 2) Use the dial keypad to put in the first letter of the first name. (ie: press 5 once for “J”, or twice for “K”, or three times for “L”, etc.) (you may have to go through Building names at this time to get to a specific individual in the KEC….this directory is for this building only also if a name is associated with both a “boss” and a phone keyset it will show up twice) 3) Scroll using the “NEXT” softkey 4) Then when you find the correct number press the “DIAL” softkey. To Change the ringer on the new VOIP phones: 1) 2) 3) 4) 5) 6) 7) 8) 9) 10) Press and hold the OK button Scroll down to “Userdef” Then pick “Ring Type” Then you have the option to do the ringer for either internal or external calls Choose one and press ok Push the “Edit” softkey Scroll to choose Press OK when you have made your choice Press ESC on the softkey until the volume choice appears Scroll to “volume” to hear your choice and then ESC to the idle display to complete Voicemail Retrieval – VOIP phones If the vm light indicator is flashing: 1) Press either the black MSG key or the softkey below the display that says MSG 2) When the attendant asks for your security code enter it and follow the normal vm instructions To access the vm system when there is no vm indicator flashing: 1) Press the top key of the 4 that are programmable on the main keyset ( or dial 4-2495) 2) When the vm system prompts you, enter your security code and proceed as usual (the system will prompt you step by step what to do) to access your messages. 3) ALWAYS REMEMBER…WHEN ASKED A “YES OR NO” QUESTION BY THE SYSTEM… Press ”1” FOR YES AND “2” FOR NO. To use the LOG feature: 1) 2) 3) 4) 5) Press the LOG softkey Choose OUT or IN Use the UP or DOWN key to scroll the calls It will show and in district name or a PRI trunk To find out the number…press NUM on the softkey 6 Table of Contents 6) You may then choose to dial the number or press the spkr button to return to the idle stat VOIP Phones: Voice Page (intercom over the phone speaker) - This feature is restricted to administration. Programming the buttons on the phone: 1) You can program the 4 buttons on the main keyset that have white display background and all but the bottom two buttons on the added TEM. (those say shift next to them…when you press the shift button it allows a 2nd number to be programmed on each button on the TEM. This would give you a total of 44 possible programmed numbers…most of you will never need to use the shift) 2) Use the same procedure that was used to program buttons on the old phones: a) Dial #139 b) Press the button to be programmed c) Put in the number you wish it to dial..including the 9 if it is an outside number d) Press the button to be programmed again e) Press the spkr button to set the programming 7 Table of Contents SharePoint District Level Forms and Documents: RSD uses SharePoint to store and organize district documents and forms. You can access SharePoint from outside the district by logging in. To log in, use your computer login and password with rsdnet\ before your first.last in the login: (rsdnet\first.last) Each building has their own area in SharePoint as well as each department in the district office. To access SharePoint: 1. Open the website: www.rentonschools.us/start 2. Click on “SharePoint” 3. For district level documents, click “RSD Documents” (this is where you will find most forms) Building Level Forms and Documents: 1. From SharePoint, click on “Schools” 2. Select your building from the list of sites 8 Table of Contents 3. Building documents will be in the menu on the left My Site: Your “My Site” is your own personal SharePoint space. In it you can: View e-mail, calendar, etc Directions for: e-mail calendar Store documents – Personal Documents This is where you can store documents if you want to be able to access them from outside the district. Share documents – Shared Documents area (you can restrict permissions for who can access specific documents) Keep a list of links you frequently use 9 Table of Contents E-Mail RSD uses Microsoft Outlook for e-mail and calendars. To access Outlook: 1. Click the icon for Outlook on your desktop 1. If the icon is not there, open the All Programs list and select “Microsoft Office” and select “Microsoft Outlook” Creating an e-mail: 1. Click on “New E-mail” 2. Click “To” 10 Table of Contents 3. Select the person you want to send the message to and click “To” (to select multiple people, repeat the process) 4. Select “Ok”, enter the subject of the message, and compose your e-mail 5. When you are ready, click “Send” to deliver the message Opening an Attachment: 1. Open the e-mail message 2. Double click on the attached file 3. If you want to save the document, you must click the “Save As” once it is opened. Creating a Contact Group (Distribution List): 1. Click on “Contacts” 11 Table of Contents 2. Select “New Contact Group” 3. Type the name that you want associated with the group 4. To add people, click “Add Members” and select “From Address Book” 5. Select the person you want to enter and click “Members” (repeat for additional people). When you are done adding people, click “ok” 12 Table of Contents Print Shop Orders: RSD Staff Printing an Order Electronically to the Print Shop 1. Open the document you would like to send to the Print Shop 2. Select File > Print from the menu 3. In the printer menu, choose the RSD print shop printer (Wait until a later screen to put in the number of copies you want. Just leave it as one here) 13 Table of Contents 4. The same document will be opened in a new window with three choices in the top left corner (This can be slow to load as it converts and uploads.) 5. Select “Accept” 6. You will then be directed to the login page of the Print Shop 7. Your username will already be filled in, but you may have to re-enter your password (the dots that are already there are a filler) This is the same user name and password you use on your computer. 8. The screen may now have a few buttons: Continue Shopping, Checkout Continue Shopping means: You want to add more documents to the same order. It will close the window and take you back to your regular computer screen. Checkout means You are ready to choose how many copies of each you want and other finishing options. 14 Table of Contents 9. Selecting Checkout takes you to your “Cart” screen Stapling and collate are under the BINDING tab. Hole punch is under the FOLD/PUNCH tab. Did you know you can also send in print orders from home? Go to http://printorders.rentonschools.us/ and download/install the RSD Print Shop printer on your home computer by clicking the link: Get the SurePDF Driver Please note there is no technical support for software on home computers. A. Enter the quantity you want printed B. Choose your Due Date (At least 3 business days from today). C. Click the approve box D. Select your account code from the drop down menu E. Click “Place Order” Account Codes The account code is for the Print Shop budget. If this job should be paid from another budget, please email [email protected] to have additional account codes added to your user profile. If there are no account codes available, please email [email protected] to have the account code added to your user profile. Please indicate your assigned building in the email. 10. Once you have placed you order, there will be a confirmation screen that lists the job and contact details. 11. Close the window…you are done! Some Additional Notes: A. If the order didn’t go through, the reason why will be at the top of the form, (usually in ORANGE letters). B. If you get the message that the Due Date is too soon, that means you’ll 15 Table of Contents need to choose a time farther out. You can check current turnaround time on the Print Shop website: http://www.rentonschools.us/Departments/Print_Shop 16 Table of Contents After swiping the ID card, press the “Services Home” button Choose the person from the list and press on their name Select “E-Mail” Select “Add (To:) Press the icon for “Address Book” Their name will now appear in the list on the right. Select “Close” Type the last name of who you want to send the scan to and press the “Search” button Press the start button to scan your document 17 Table of Contents For the Classroom Attendance: RSD uses Skyward for attendance. To access Skyward you will need to obtain a login and password from Student Services…phone 4-2333. 1. Open your internet browser 2. Go to the website www.rentonschools.us/start 3. Click the link for Skyward employee access 4. Log in to Skyward 5. From the “Educator Access” tab 6. Select “Post Daily Attendance” 7. Select “By Name” 8. Click the fields for present, absent, and tardy students 18 Table of Contents Secondary Grading Skyward: 1. From the “Home” screen in Skyward 2. Select “My Gradebook” 3. Select the course you want to enter grades for 4. Click on “Assignments” and then “Add Assignment” 5. Enter the assignment name, dates, and then select “Save and Back” 19 Table of Contents 6. Click on the asterisk for one of the students 7. Enter the student scores in the score column 20 Table of Contents Skyward Family Access Teacher Views When we turn on Family Access on December 1st, you will see under Family Access Display, 3 things you will be able to view from the same perspective as your students/parents: Gradebook Message Center Calendar You can find these options by selecting a specific student’s profile. Clicking on Gradebook gives you an instant Progress Report for all that student’s classes. The tabs at the top: Missing Assignments lists ALL missing assignments for EVERY class. Teacher’s Log will show anything you added to the log for that student (provided you checked the box(es) to make that log note visible (The log is located in the gradebook under Display Options ->Teacher’s Log) Comments are what teachers added during report card posting time. Detailed grade book for that class is found by clicking on the underlined GRADE for that class. 21 Table of Contents The Message Center shows all the messages that have been sent by any of his teachers to his/her entire class. To create a message that can be sent to your entire class as well as emailed and/or posted to the calendar, please refer to the “Skyward Message Center for Teachers” document. The Calendar displays all the DUE DATES for all the student’s classes. Red assignments are those coded as MISSING from the gradebook. Message Center messages are coded as MC and can be hovered over to see the message or clicked on to see the entry and access any attached documents. NOTE: The Show ST-Student Tests checkbox at the bottom refers to state assessments (MSP, etc..) and NOT any assignments you put in the category “Test”. 22 Table of Contents Elementary Grading Easy Grade Pro: 1. Click the Easy Grade Pro icon on your desktop 2. If it is not on your desktop, click “Start”, “All Programs”, then the Easy Grade Pro folder, and then “Easy Grade Pro” 3. Select “Create New Gradebook” 4. Choose a location to save and name your grade book (remember these!) 5. Select “Add Class” 23 Table of Contents 6. Type the name of the class (Subject), select the term, and then select “done” 7. The first time you choose the class you will be prompted to enter student names. On subsequent classes, you can copy the students from the first class you typed them in. 8. To add assignments, click “Add Assignment” 24 Table of Contents Elementary Skyward: Entering assignments (“Events”) 1. From the home screen on Skyward, select “My Gradebook” 2. Select the link “Standards Gradebook” 3. Your grade book displays each content area and standard. To expand or collapse each grade area, click the + or – below the subject column heading 25 Table of Contents 4. To add an assignment (“event”) select the “events” button and then choose “Add Event” 5. In the window that appears, select the subject, skill, dates, and other subject/skill areas that the assignment covers 26 Table of Contents 6. Select “Save and Back” to go back to your grade book and enter scores -orSelect “Save and Add Another” if you have more assignments (events) to put in 7. To enter scores for an assignment (event), click on the asterisk for one of the students 8. To see the available grade marks, and special codes, click the + next to each category 27 Table of Contents 9. The first column with asterisks is for the score. The second blank column is for special codes (such as MISS for missing). You can also check a box for “no count” or “missing” as well as entering comments for a student’s score *REMEMBER – select “Save” at the top of the screen! 10. Students who have received no score will have an asterisk, and students with a special code will show the code. Comments are marked by the red triangle in the corner of the assignment box 11. To edit the assignment, double click on the assignment heading 28 Table of Contents 12. On the right of the screen you will have options to edit, clone, or delete the assignment 13. If you would like to enter scores for multiple events at a time, select “Quick Scoring” 14. This will open a screen with asterisks in all areas and events. You can now enter scores in any cell 29 Table of Contents Grading for report cards: 1. From the grade book screen, click on a student’s name 2. The student report card will appear. Select the button to “Enter Scores for Skills” 3. The cells become active to enter scores. Once all scores have been entered, click on “Save” 30 Table of Contents 4. From the student report card screen, select the “Comments” tab 5. Select the “Edit Comments” button 6. Enter comments in the text field and select “Save” when you are done 7. You can also enter comments from the grade book screen by clicking on the “Comments” tab 8. Select the term for your comments 31 Table of Contents 9. Enter comments in the text bar, or click the “Expand Window” icon on the right of the bar 10. This is what the expanded window looks like. Select “ok” when you are done entering comments 32 Table of Contents 11. When you are done entering comments for all students, select “save” 33 Table of Contents RAD (Data Warehouse) In the 2010-2011 school year, RSD implemented the Renton Assessment Data Warehouse (RAD or “Data Warehouse”. It is a one stop location where staff can view student assessment information, attendance, grades, discipline information, and much more. It is a location that is centered on providing comprehensive information on each student, class, building, and the district as a whole. To access the Data Warehouse: 1. Open the internet and go to: www.rentonschools.us/start 2. Click on the link for “Data Warehouse” 3. Click the link for registered users 4. Enter your login and password 5. If you have forgotten your username, password, or would like training in navigating the RAD, contact your Technology Facilitator, Librarian, or Principal 34 Table of Contents SWIFT Classroom Webpages Each teacher has a classroom webpage that they can utilize as an additional means of communication. The webpages are built on the SWIFT platform and can be accessed from anywhere there is an internet connection both in and outside the district. To create or modify your webpage: 1. Open the internet and go to 2. Click the link for “SWIFT 2.0” www.rentonschools.us/start 3. If you don’t know your login information, contact your Technology Facilitator 4. Use the tabs at the top of the screen to navigate through and edit each webpage 5. For your changes on each page to stick, you have to click “save changes” at the bottom of the screen To access the SWIFT user manual, click here: SWIFT User Manual 35 Table of Contents Creating a Group from the Teacher Dashboard To create a group from the teacher dashboard: 1. Click Students at the top of the screen. 2. Click the Groups tab. 3. Select Actions to the right of the tabs. 4. Click Add. 5. In the ACTIONS menu, click Add new group. 6. Enter a unique name for the new group using up to 35 characters. 7. Click Save to finish creating the group. 8. Click Done to return to the Groups tab. Adding Students (not owned by you) to your Class How to add one student to your class: NOTE: You MUST add them to a group (Create group first if necessary) 1. On the teacher home page click the action icon in the search students box 2. This will bring up the Search All Students by Grade Box 3. Select the grade for the students you wish to add to your class. 4. This will bring up the students list of all the students in the system in that grade. 5. Select the action icon next to the student’s name that you wish to add to your class. 6. From the Actions Box select Add student to group. 7. From the Add Students to Box, select the group name and select Add. The student will be added to the group. 36 Table of Contents How to add multiple students to your class: 1. On the teacher home page click the action icon in the search students box 2. This will bring up the Search All Students by Grade Box 3. Select the grade for the students you wish to add to your class. 4. This will bring up the students list of all the students in the system in that grade. 5. Select the Action Button in the top menu bar to enter multi-edit mode. 6. This will allow you to select all students from the menu bar, or to click on multiple students from the student list. 7. Select Add from the multi-edit mode bar to bring up the Actions Box. 8. From the Actions box, select Add students to existing group 7. Select the group name and select Add. The student will be added to the group. 37 Table of Contents If this group to which you are adding the students has already received a group assignment, these new students will not automatically pick up the new assignement. The teacher must go back and give the assignement to the students. Assigning Courses to Your Students 1. 2. 3. 4. 5. Highlight “My Students” in the Students tab Choose “Courseware” on the top menu bar Select “School Course Repository” Click on the action gear for Math or Reading Select “One or more of my students” 6. Choose “your group name” and click “Assign” 38 Table of Contents Adjusting a Student’s Starting Level This allows you to have a student begin Initial Placement (IP) at a different level than their demographic grade. This is particularly useful for students identified as performing significantly below grade level. 1. 2. 3. 4. 5. Click on “Students” in the top menu bar Highlight the student name in the students list on left Choose “Performance” tab Click on the action gear for selected student Choose “Edit assignment settings” 39 Table of Contents 6. Click “On” to “Manually set course level” 7. Slide the “Course level” to desired starting point and click “Save” 40 Table of Contents View/Print/Save Success Maker Reports Using the Groups Tab: 1. Put a check mark in the box next to the group name 2. On the bottom-left of the screen, you will see: Cumulative Performance Report ▼ 3. Click on the triangle ▼ to see the reports selection 41 Table of Contents 4. Choose the report you wish to run 5. Click GO 6. Choose the Subject (math or reading) by clicking the ▼ 7. Click Go – at the bottom of the screen Using the Student Tab: 1. Put a check mark in the box next to the student(s) you wish to run a report on 2. At the bottom of the screen, you will see: Cumulative Performance Report ▼ 3. Click on the triangle ▼ to see the reports selection 4. Choose the report you wish to run 5. Click GO 42 Table of Contents 6. Choose the Subject (math or reading) by clicking the ▼ 7. Click GO – at the bottom of the screen Printing and Saving Reports: The top right corner of the report has three options: Save as PDF - Save at CVS - Print Report Descriptions Last Session Report The Last Session Report for both Math and Reading provides information about the last completed session for groups of students and for individual students in the group. The information includes performance as indicated by the number and percentage of attempted and correctly answered exercises. It also includes information about the date and duration of the student’s last session. Running the Last Session Report weekly is recommended but it can be run as often as necessary. Cumulative Performance Report The Cumulative Performance Report shows information about student performance and progress including students’ current course level and gain, usage time, raw exercise performance, and mastery performance. Running the Cumulative Performance Report weekly is recommended but it can be run as often as necessary. Student Performance Report The Student Performance Report provides detailed information about student performance and progress in a course. The report includes cumulative and recent performance information in both Math and Reading, Initial Placement performance information, and identifies specific areas of difficulty in a course. Running the Student Performance Report weekly is recommended but it can be run as often as necessary. Skills Performance Report The Skills Performance Details report can provide a list of all the proficiency scale ranges for a selected skill objective or only the skills for a selected proficiency scale range. For each skill, the report displays the name of the assessed skill and all students who have assessed that skill. The body of the report provides each student’s name, percent correct, and the number of attempts for that skill objective. Areas Of Difficulty Report The Areas of Difficulty Report lists the skills in Math and Reading courses with which the selected students are having difficulty. The report groups students by these skills to allow teachers to determine which students require assistance and/or intervention. The report is available for default and edit by settings courses only. It is not available for custom by concept and custom by standards courses. Running the Areas of Difficulty Report weekly is recommended but it can be run as often as necessary. 43 Table of Contents Using SuccessMaker for Whole Group Instruction Log into Successmaker 1. Click Courseware 2. Click Course – Reading or Math 3. Find the Original Reading or Math Course 4. In the body of your computer click Save As (on the far right side of the screen) 5. Click Customizing the Course by Concept You will need to choose a grade level. 1. Click the + sign next to the concept 2. Keep clicking the + sign until you see the Learning Object description 3. Click on the words that describe the skill 4. Look to the right side of the screen and you will see the LO 5. Click on View LO to see the actual skills presented to the students For Reading – Too View the Print Partner: 1. Click on Print Partner 2. Click on View Print Partners 44 Table of Contents Individualizing Instruction using Last Session Graph Click on the Current Average for the student. (The bar in color) You will get a graph of the student’s last session 45 Table of Contents Each vertical colored bar represents a Learning Objective (LO) that the student did while on SuccessMaker during his/her last session. Click on one of the bars. A blue box appears showing you the LO that the student worked on with the number of attempts and the number correct on those attempts. If you click on View LO, the actual LO will come up and you can work with the student one-on-one on the skill. You are not using a license. You are not putting any data in the students queue. 46 Table of Contents DIBELs Next Click the shortcut for DIBELs that is on your desktop. Log in to DIBELs Next using your mClass login and password (same from last year) Click the link for DIBELs Next Your class list is displayed…click on a student to begin testing Choose between Benchmark and Progress Monitoring Available assessments are marked by the hand icon 47 Table of Contents Click start to begin the assessment Use the mouse to mark responses during the assessment To exit an assessment in progress, click the up arrow and choose “exit and invalidate” To change the assessment period, click on the BOY tab at the top left corner of the window. Choose between BOY, MOY, and EOY assessments The corresponding assessments will now be available when you select the student To exit DIBELs, click on the mClass button on the top bar You can choose to go to the mClass website for reports, or log out For information on the changes within the assessments please visit : http://bitcast-a.v1.o1.sjc1.bitgravity.com/wgen/DIBELS_Next/Tutorial.swf 48 Table of Contents Office 2010 Customizing the ribbon: Select “File” and “Options” 1. Select “Customize Ribbon” from the menu 2. From the drop down menu, choose the category of commands you would like to choose from 3. Select the command you want to add 4. Select the tab you would like to add it to 5. OR – create a new tab of your own! 6. Highlight the tab name and click the up or down arrow to move it in the order 7. Select “OK” to save your changes Inserting Screenshots (Windows 7 – not Windows XP): 1. 2. 3. 4. Select the “Insert” tab Click on “Screenshot” Choose an active window OR – choose “Screen Clipping” to highlight a portion of a screen 49 Table of Contents Remove Background tool: Click on the picture you want to work on. (eight dots will appear around the perimeter of the picture) A new tab titled “Format” will appear and give you the tool “Remove Background” The picture background will turn pink. Make sure to adjust the frame so that your whole image is inside (note the turkey’s tail is not all in the frame) 50 Table of Contents If additional areas need to be kept or removed, select the appropriate button and click the areas on the picture. When you are done, select “Keep Changes”. Smart Art: 1. Select “Insert” 2. Click “Smart Art” 3. Choose the category 4. Select the graphic you want 5. Click “OK” 6. The graphic and a text entry window will appear. When you are done, click on an area of your document that is away from the graphic. 7. 8. 9. 10. Once your graphic is created, you can: Edit the sections Change the type of graphic Change the colors Alter the style of the graphic 51 Table of Contents To change the colors of your graphic: 1. Right click on the graphic and select “Format Shape” 2. Select the type of fill you want 3. Choose the color 4. Select “Close” Save and Send: 52 Table of Contents 1. 2. 3. 4. Select “File” “Save & Send” Choose “Send Using E-mail” Choose either “Send as Attachment” 5. OR “Send as PDF” EXCEL Spark Lines: 1. Select the cell you want the graph in 2. Click on the “Insert” tab 3. Choose the type of Sparkline you would like 4. Highlight the cells you want the Sparkline to represent 5. Verify that it includes all the cells you want 6. Click “OK” 53 Table of Contents To change the appearance of your Sparkline: 7. Click on “Sparkline Color” 8. Choose the color you want the line to be 9. Choose the weight *You will need to resize the cell the Sparkline is in so that it represents the data accurately. 54 Table of Contents END OF YEAR REPORTS These reports goes in students’ cumulative files: The district has links to all of the necessary websites on the www.rentonschools.us/start SRI results: 1. 2. 3. 4. 5. 6. Select Scholastic Achievement Manager (under Other Top Resources) Click on picture Login is firstnamelastname (no dot or space), password is newrsd403 Click on Reports In the dropdown menu, select student reports Select Student Progress Report. 7. Select Run Report 55 Table of Contents 8. Make sure to change the Time Period!! To do this, select time period, change the ‘from’ year in the calendar, select September 1, 2011, change the ‘to’ year and select June 21, 2012. 9. Click Run report 10.Click on Print Preview, Even though the report does not show, it will after you click run report. 11.Print Individual Student Performance Profile DIBEL/End of Year Progress Report : 1. Go to mClass Dibels- Data 2. Log in 3. Click Enter Dibels Next 56 Table of Contents 4. 5. 3. 4. Click on (blue) Summary at top of page Click on Printer Friendly Select “All Student Summaries” Print! Math Benchmark Assessments: 1. Go to Data Director 2. Login 3. Click on the little box in the top left, then choose students. 4. 5. 6. 7. Check your grade level Select Go Click on student’s name Print These reports goes home to parents: Individual Student Performance Profile (see directions above) DIBELS Parent Letter in MClass: 1. 2. 3. 4. Go to mclass Log in Click Enter Dibels Next Click on “Now What? Tools” – blue box at upper left hand corner. Select Home Connect from drop down menu. 57 Table of Contents 5. Select whether you want letters in English or Spanish for each child. (If printing all in English, simply choose “select all”) 6. Go to bottom of page and click Generate Letters 7. Once letters are ready, click on “open home connect letters” 8. When the letters appear – print away!!! 58 Table of Contents WHAT IS INCLUDED • • • • • • • • • Docking station AC Power Adapter Keyboard Mouse [Rechargeable, Wireless] Monitor Video Projector Out Lock Cable Extended Battery Case 59 Table of Contents SECURING LAPTOP Cable-lock Press and twist to secure Key cannot come out when in unlocked position Building Technology Assistants have master keys Cable secures to desk then docking station then laptop Remains secured to desk Press Play -> 60 Table of Contents 61 Table of Contents 62 Table of Contents 63 Table of Contents 64 Table of Contents 65 Table of Contents 66 Table of Contents 67 Table of Contents 68 Table of Contents 69 Table of Contents 70 Table of Contents 71 Table of Contents