1
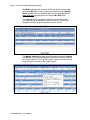
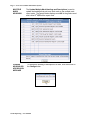
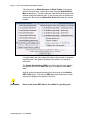
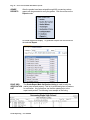
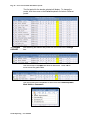
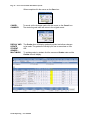
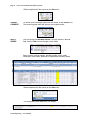
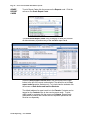
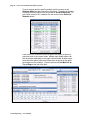
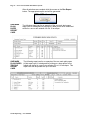
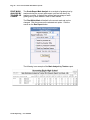
Aeries.net™ Student Information System
Grade Reporting – User Manual
May 2, 2010
The most important area in Grade Reporting is verifying that the
options are setup correctly prior to initializing the grade table. This area
can affect many aspects to the outcome of the grading process.
Verify all options are setup correctly in School Options. Verify the
Terms have been setup correctly for the current school year and the
Starting and Ending dates must be valid school days as reflected in
the School Calendar.
Selecting Multiple Marks under Grade Reporting will allow up to
twelve marks for each student for the grading period and can print out
report cards during the year with previous grades in each subject.
Selecting One Mark will ONLY allow one-mark for each grading
period.
Please be aware that Eagle Software’s objective is to provide their users with documented procedures, such
as the one that follows, in an attempt to expedite the steps necessary to accomplish certain tasks within
Aeries™. However, Eagle Software recognizes that each school and district using Aeries™ has established
their own unique guidelines and policies.
By using these procedures you assume full responsibility for the appropriate application, the results of their
use, any impact upon your database and conforming to all guidelines and policies that have been
established by your school or district.
Page 2 –Aeries.net™ Student Information System
One Mark indicates only one mark will be stored in the grade table,
utilizing the MK field, for the current grade reporting cycle. Multiple
Marks indicates that one grade will be stored in the grade table for
more than one reporting period, utilizing the M1–M12 fields.
The Courses setup must also be verified to ensure the correct
information prints on the Report Cards, such as, the Course Title,
Academic Courses for GPA calculation, include T/A etc.
The Master Schedule contains credit information utilized in Grading
and History. Verify that the Credit field contains the correct credit for
the course displayed. The Tag field can be utilized so that the course
displayed does not show on the Grade Reports.
Grade Reporting – User Manual
Page 3 –Aeries.net™ Student Information System
GRADE
REPORTING
The Grade Reporting navigation tree displays all forms and reports
used during the Grade Reporting period.
Due to the fact that Multiple Marks is mostly used in Secondary
schools, the following documentation mainly describes the Grade
Reporting for Multiple Marks. The form or report displayed can vary
depending on whether you selected single or multi marks on the
School Options form.
The Configurations node will display various options to allow you to
setup Grade Reporting.
Grade Reporting – User Manual
Page 4 –Aeries.net™ Student Information System
UPDATE
ADDRESS
OPTIONS
Update the address to be used on the return address, whether or not
a mailing permit will be printed or if an endorsement message will be
printed.
The following options are available:
Print Which Return Address – Select either the School or District
address to print on the Return Address and can select to print in
Uppercase.
Print Mailing Permit? - Select YES if a mailing permit will be printed
on the report cards. Enter the permit number, city, state and zip code.
Print PO Endorsement? - Select YES if an endorsement will be
printed on the report cards. Enter the endorsement message
selected.
Grade Reporting – User Manual
Page 5 –Aeries.net™ Student Information System
GRADE
REPORTING
OPTIONS
The Grade Reporting Options is used to select information to print
on report cards. This MUST be verified every grade-reporting period
prior to printing report cards. The options available display below
along with an example of data needed to generate report cards.
Title on Report
Cards
Describes the current grading period and prints on the report cards.
School
Message
A message to be printed on every report card.
Reporting
Period
Starting and ending dates for the grade-reporting period. The dates
are initially setup when Create New Grade Reporting Table is
generated and prints on the report cards.
Default
Citizenship
Mark
Print Credit
Earned?
A default citizenship mark, such as "S", will automatically be entered
for each grade record if the teacher does not enter a citizenship mark.
Print Absent?
Select YES for the number of absences to be printed.
Print Tardy
Select YES for the number of tardies to be printed.
Sort Report
Cards?
Select the order that the report cards will be sorted when printed. If
teacher is selected the option is available to print by name or number.
Print Zip Code
Extension
Select whether or not to print the zip code extension.
Print Which
GPA?
Select which GPA’s to be printed on the report cards.
Print
Cumulative
Class Rank
Select the cumulative class rank to be printed for each student.
Print GPA’s to
4 Decimals
Select the GPA to print 4 decimals instead of the default 2 decimals.
Select YES for the credits earned to be printed on the report cards.
Grade Reporting – User Manual
Page 6 –Aeries.net™ Student Information System
UPDATE
CODES ON
REPORT
CARDS
The Update Grade Reporting Codes and Descriptions displays the
codes and descriptions in the COD table used in Grade Reporting.
The left side of the form displays all Academic Mark codes. Note that
the plus or minus marks do not need to be defined. To the right of the
academic marks are Citizenship Marks and Work Habits. The
descriptions for these codes are used on most of the report cards for
printing the legends.
All Comment Codes used in grade reporting display on the right side
of the form. The comment code descriptions print on report cards if
selected. At the bottom of the form are Message Codes and
descriptions. They are used to print messages on student's report
cards.
Next to each list of codes displays a total indicating the total number
of each mark currently in the GRD table.
Grade Reporting – User Manual
Page 7 –Aeries.net™ Student Information System
ADD A CODE
To add a code and description click the mouse on the Add New
Record in the area selected.
Enter a code selected and press Tab. Type the code description.
When complete click the mouse on the Save icon.
CHANGE A
CODE
To change a code description, click the mouse on the Change icon.
Enter the new description and click the mouse on the Save icon.
The record will now be updated in the listing.
Grade Reporting – User Manual
Page 8 –Aeries.net™ Student Information System
DELETE A
CODE
To delete a code click the mouse on the Change icon. Click the
mouse on the Delete icon.
The following message will display to verify the delete. Click the
mouse on the OK button.
The record will no longer display in the listing.
Grade Reporting – User Manual
Page 9 –Aeries.net™ Student Information System
MULTIPLE
MARK
HEADINGS
CHANGE
HEADING OR
ADD SCHOOL
MESSAGE
The Update Multiple Mark Headings and Descriptions is used to
update the headings that print over each mark on the multiple mark
report cards. The sample below displays mark M1 in the grade record
and is titled 1st QTR on the report card.
To change the heading or description of a mark, click the mouse on
the Change button.
Grade Reporting – User Manual
Page 10 –Aeries.net™ Student Information System
Click the mouse on the radio button next to the Mark selected. Press
Tab. Change the Heading or Description. Add any school message
to print on the report card. Click the mouse on the Update button.
The record will now be updated in the listing.
Grade Reporting – User Manual
Page 11 –Aeries.net™ Student Information System
UPDATE
VALID MARKS
The Update Valid Marks is used to update or display all marks
considered valid. Every possible mark, including those with plus and
minus must be setup for grade reporting. For example, "A", "A-"
and "A+" must be defined.
A mark can also be selected to be included in the GPA computation. If
a student receives this mark the credit for the course is counted as
completed and/or attempted. Some schools give a higher weighted
GPA for honors courses. The point value is maintained in this table.
For example, more weight can be given to an “A+” than for an “A –“.
ADD A MARK
Click the mouse on the Add button..
Grade Reporting – User Manual
Page 12 –Aeries.net™ Student Information System
Enter the selected Mark and press Tab. Enter the point values for the
mark. On the left hand side of the form select whether this mark will
be counted in the GPA computation, count as attempted or count as
completed. Enter the Default Gradebook % Range. When complete
click the mouse on the Insert button. The Mark will display in the left
hand Marks column.
CHANGE A
MARK
From the Marks column, click the mouse on the mark to be changed.
Click the mouse on the Change button.
Make any necessary changes to the Mark displayed. When complete
click the mouse on the Update button.
Grade Reporting – User Manual
Page 13 –Aeries.net™ Student Information System
DELETE A
MARK
From the Marks column, click the mouse on the mark to be deleted.
Click the mouse on the Delete button.
The following message will display to verify the delete. Click the
mouse on the OK button and the Mark will no longer display in the
listing.
Grade Reporting – User Manual
Page 14 –Aeries.net™ Student Information System
CREATE OR
UPDATE
GRADE
REPORTING
TABLE –
MULTIPLE
MARKS
To create the Grade table, click the mouse on Initialize New Grade
Reporting Table node under Functions.
The following form will display. Select the Reporting Period in the
upper left corner.
The starting and ending dates will display for the term selected that
have been setup in School Options. To change these dates click the
mouse on the Starting and Ending Dates calendar and select new
dates. Click the mouse on the type of Scanner Forms to be used in
the upper right hand corner.
Grade Reporting – User Manual
Page 15 –Aeries.net™ Student Information System
Click the mouse on Show Absences or Show Tardies to have them
print on the report card. Select which mark from the Initialize Which
Mark dropdown list. This will update the mark field with the grade mark
entered during this reporting cycle. If you are only going to update one
section click the mouse on Update One Section and enter the section
number.
If multiple tracks are setup select the tracks to be included in the grade
reporting cycle. This area will be blank if the school is not setup as
multi-track.
The Update Grade History (GRH) is an option that will copy over the
last grade marks into the GRH table prior to creating the new GRD
table.
After all options have been selected click the mouse on the Initialize
GRD Table button. The date the GRD table was created for the mark
selected will display at the bottom of the form.
REMEMBER:
Never create a new GRD table in the middle of a grading cycle.
Grade Reporting – User Manual
Page 16 –Aeries.net™ Student Information System
GRADE
REPORTS
After the grades have been entered through ABI or scanning various
reports can be generated to verify the grades. Click the mouse on the
Reports node.
All Grade reports will display. To generate a report click the mouse on
the selected Report.
PRINT GRD
VERIFICATION
LIST
The Grade Report Mark Verification Listing is used to verify the
marks were entered properly. This list is printed and given to teachers
for verification. Any corrections can then be updated prior to the
report cards printed. The following is an example of the listing.
Grade Reporting – User Manual
Page 17 –Aeries.net™ Student Information System
PRINT
MISSING
MARK LIST
The Missing Mark Listing is used to locate missing grade marks for
students. This sheet is given to the teacher to alert them of missing
marks. This report can be generated in order by student or by the
teacher’s class, with all students in the same period. The following is
an example of the Missing Mark Listing by Teacher.
UPDATE
GRADES BY
TEACHER MULTI MARK
To update grades in order by teacher click the mouse on the Update
Grades by Teacher node. To select a specific teacher click the
mouse on the teacher.
Grade Reporting – User Manual
Page 18 –Aeries.net™ Student Information System
The first period for the teacher selected will display. To change the
period, click the mouse on the Period dropdown and select a different
period.
TO CHANGE
A GRADE
After selecting the teacher and period click the mouse on the Change
icon.
Click the mouse in the Mark and enter a valid mark. Press Tab to
move across the grade fields.
Click the mouse on the dropdown to select from the Citizenship Mark,
Work Habits or Comments.
Grade Reporting – User Manual
Page 19 –Aeries.net™ Student Information System
When complete click the mouse on the Save icon.
CANCEL
CHANGES
To cancel out the changes made click the mouse on the Cancel icon.
The student’s grade mark will return to the original record.
DISPLAY AND
UPDATE
STUDENT
GRADES MULTI MARK
The Grades form will display grades by student and allows changes
to be made. The grades are usually input from a scan sheet or from
ABI.
To update grades by student click the mouse on Grades node and the
Grades form will display.
Grade Reporting – User Manual
Page 20 –Aeries.net™ Student Information System
To select a specific student use the search engine to locate and
display the students grades.
CHANGE A
GRADE
After selecting the student click the mouse on the Change icon.
Click the mouse in the Mark and enter a valid mark. Press Tab to
move across the grade fields.
Click the mouse on the dropdown to select from the Citizenship Mark,
Work Habits or Comments.
Grade Reporting – User Manual
Page 21 –Aeries.net™ Student Information System
When complete click the mouse on the Save icon.
CANCEL
CHANGES
To cancel out the changes made click the mouse on the Cancel icon.
The student’s grade mark will return to the original record.
ADD A
GRADE
Click the mouse on Add New Record. Click the mouse in the Per
field. Use the Tab to move through out the fields.
Enter a period, course number, teacher number, mark, credit,
citizenship, work habits, absences or tardies and comment codes.
When complete click the mouse on the Save icon.
The new grade record added will now display.
Grade Reporting – User Manual
Page 22 –Aeries.net™ Student Information System
CANCEL
CHANGES
To cancel out the changes made click the mouse on the Cancel icon.
The student’s grade mark will return to the original record.
DELETE A
GRADE
To Delete a grade for the student displayed click the mouse on the
Change icon next to the grade to be deleted. Click the mouse on the
Delete icon.
A verification message will display. Click the mouse on the OK button
to delete the grade.
RECALCULATE
GPA, CLASS
RANK, SIZE
Any changes to Grades will affect the current GPA’s calculated and
must be re-computed.
After grades are updated, to recalculate the GPA, class rank and
size for the student displayed, click the mouse on the Recompute
button.
The calculations will be performed and the new calculations will now
display.
Grade Reporting – User Manual
Page 23 –Aeries.net™ Student Information System
FUNCTIONS
NODE
After all grades have been verified and updated prior to generating
report cards various calculations must be performed. The Update
Grade Reporting Absence Totals should be generated if attendance
is printed on the report cards.
UPDATE
ABSENCE
TOTALS
From the Functions node click the mouse on Update Grade
Reporting Absence Totals.
The following form will display. Click the mouse on the Update Grade
Reporting Absence Totals button.
The following message will display. Click the mouse on the OK button.
The following message will display while the absence totals are being
updated.
Grade Reporting – User Manual
Page 24 –Aeries.net™ Student Information System
RECOMPUTE
GRADE
REPORT
GPA AND
CLASS
RANKING
The Re-compute Grade Report GPA and Class Ranking will
recalculate all students’ GPA, class rank and size. This option must be
run prior to printing the Report Cards to ensure that all GPA’s are
correct when printed.
From the Functions node click the mouse on the Re-compute Grade
Report GPA and Class Ranking node.
The following selection box will display. Select the GPA to rank. This
will determine what the class rank is based on. The class rank can be
based on the Academic GPA or Total GPA. A message also displays to
indicate which mark will be used to calculate GPAs if multiple marks are
being stored. Click the mouse on the Recompute GPA and Class
Rank button.
The following message will display. Click the mouse on the OK button.
The calculation process will begin and the following message will
display.
Grade Reporting – User Manual
Page 25 –Aeries.net™ Student Information System
GRADE
REPORT
CARDS
To print Report Cards click the mouse on the Reports node. Click the
mouse on the Grade Report Cards.
The Print Grade Report Cards form will display to allow you to select
all data necessary to produce any of the available report cards.
Under the Select Report Card to Print, click the mouse on the radio
button to the left of the report card selected. The default is set to Print
report cards for active students only. To include inactive students click
the mouse on Both Active and Inactive Students.
The default address for report cards is to the Parents. Contacts can be
tagged on the Contacts form to also receive report cards. To print
report cards for contacts click the mouse on Contacts. Report cards
generated for parents and contacts are two separate operations and
must be run separately.
Grade Reporting – User Manual
Page 26 –Aeries.net™ Student Information System
To print a report card for specific students click the mouse on the
Students Name and the name will be hi-lighted. To display all students
including inactive students click the mouse on Show All Students. To
print report cards for ALL students click the mouse on the Select All
Students button.
If the school is a multi-track school an option will display to specify a
particular track to print report cards. Multiple mark grade reports can
also be printed depending on the report card selected. All letter report
cards have the option to print mail information at the top of the report
card instead of at the bottom. Click the mouse on Print Mail info At
Top of Page at the top of the form.
Grade Reporting – User Manual
Page 27 –Aeries.net™ Student Information System
After all selections are complete click the mouse on the Run Report
button. The appropriate report card will be generated.
ONE MARK
PLAIN
PAPER
REPORT
CARD
ONE MARK
PLAIN PAPER
TRI-FOLD
REPORT
CARD
The following report card is an example of the one mark plain paper
report card. It is designed for printing on a laser printer to be folded and
stuffed in a one or two window # 9 or # 10 envelope.
The following report card is an example of the one mark plain paper
tri-fold report card. It is designed for printing on a laser printer to be
folded and stuffed in a one or two window # 9 or # 10 envelope. This
report card can be printed with up to 9 marks.
Grade Reporting – User Manual
Page 28 –Aeries.net™ Student Information System
PRINT GRADE
REPORT
MARK LIST
The Grade Report Mark Listing displays all grade information printed
on the report cards. Select whether to View Only Populated
Marking Periods, to Show comment Descriptions Instead of Codes
and whether to Include Inactive Students. Click the mouse on the
Run Report button.
The following is an example of Mark Listing By Student with multiple
marks.
Grade Reporting – User Manual
Page 29 –Aeries.net™ Student Information System
PRINT HONOR
ROLL AND
CLASS RANK
LIST
The Honor Roll and Class Rank Listing is based on the Class
Rank from the latest grade reporting cycle. Prior to printing the
report the current grade point averages and class ranks must
be recomputed.
From the Reports node click the mouse on Grade Report Honor
Roll and the following selection box will display.
Click the mouse on the Select the Sort Report By dropdown and
select the order for the report to be generated. Click the mouse on
the Run Report button.
The following is an example of the Honor Roll and Class Rank
Listing report.
Grade Reporting – User Manual
Page 30 –Aeries.net™ Student Information System
PRINT MARK
ANALYSIS BY
TEACHER OR
COURSE
The Grade Report Mark Analysis is an analysis of grades given by
teachers during the current grade report cycle and can be run by
teacher or course. It displays the number and percentage of each
grade given by each teacher in each of their classes.
The Print Which Mark will default to the current mark and can be
changed. Click the mouse on the selected sort option. Click the
mouse on the Run Report button.
The following is an example of the Mark Analysis by Teacher report.
Grade Reporting – User Manual