1
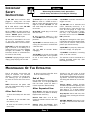
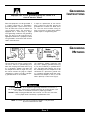
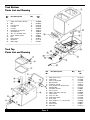
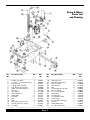
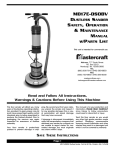
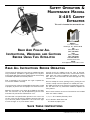
SAFETY OPERATION &
MAINTENANCE MANUAL
X-405 CARPET
EXTRACTOR
This unit is intended for commercial use.
READ AND FOLLOW ALL
INSTRUCTIONS, WARNINGS AND CAUTIONS
BEFORE USING THIS EXTRACTOR
Address:
777 South Street
Newburgh, NY 12550-0606
TEL:
(800) 835-7812
(845) 565-8850
FAX:
(800) 752-6883
(845) 565-9392
Internet Address
mastercraftusa.com
E-Mail:
[email protected]
READ ALL INSTRUCTIONS BEFORE OPERATING
This extractor will afford you many years of trouble-free operating satisfaction, provided it is given proper care. All parts
have passed rigid quality control standards prior to their being
assembled to produce the finished product.
Prior to packaging, this extractor was again inspected for
assurance of flawless assembly.
The manufacturer takes no responsibility for damages caused
to property or persons due to improper use of the extractor.
Operating instructions must always be available for the operator. This extractor may only be operated by persons who
have been fully trained and authorized to use it.
All information and specifications printed in this manual are
current at the time of printing. However, because of our policy of continual product improvement, we reserve the right
to make changes at any time without notice.
Carefully check the shipping carton for signs of damage.
Remove the machine from the carton, if the machine is damaged, notify the carrier immediately and request an inspection. Only a visual examination will reveal damage that may
have occurred.
Be sure to keep the carton, packing inserts, packing list and
carrier's receipt until the inspector has verified your claim.
Our liability ceases when the shipment is picked up by the carrier. We will furnish any information needed to expedite the
claim process.
Check carton contents to ensure all accessories are included
which are listed as follows:
1) 11/2 x 15 Ft Solution/Recovery Hose
2) 5 Ft Stainless Steel Wand and
12” Nozzle w/2 Spray Jets
SAVE THESE INSTRUCTIONS
PAGE 1
X-405 Manual Printed in USA 07/16/07
IMPORTANT
SAFETY
INSTRUCTIONS
1) DO NOT leave extractor when
plugged in. Unplug from the outlet
when not in use and before servicing.
2) To avoid electric shock, DO NOT
expose to rain. Store indoors.
3) This is NOT a toy. Close attention is
necessary when used around or near
children. DO NOT permit small children to crawl on damp carpet.
4) Use only as described in this manual. Use only manufacturer's recommended attachments and accessories.
5) DO NOT use with damaged cord or
plug. If extractor is not working as it
should, because it has been dropped,
damaged, left outdoors, or dropped
into water, contact an authorized service center or the factory.
6) DO NOT unplug by pulling on cord. To
unplug, grasp the plug, not the cord.
WARNING:
When using this extractor, basic precautions
should always be followed, including the following:
7) DO NOT pull or carry by the cord DO
NOT use cord as a handle or close a
door on cord or pull cord around sharp
edges or corners. DO NOT run unit
over cord. Keep cord away from heated surfaces.
8) DO NOT handle plug or extractor
with wet hands.
9) Store extractor indoors in a dry
area. DO NOT expose to freezing temperatures.
10) DO NOT use extractor for dry vacuuming. This extractor is not fitted with
a fine dust filter.
11) Turn OFF all controls before
unplugging.
12) DO NOT use to pick up flammable
or combustible liquids such as gasoline
or use in areas where they may be
present.
13) DO NOT use where anesthetics or
oxygen are used.
14) DO NOT use an extension cord
unless absolutely necessary. If an
extension cord is used, then wire size
must be #12 gauge or larger and
should not exceed 50 feet in length.
Use only a (3) conductor grounded
extension cord to ensure "GROUNDING" protection.
15) Replace damaged or worn parts
immediately with genuine original equipment parts to maintain safety and to
protect your limited warranty.
16) DO NOT run pump dry. When solution tank is empty, turn pump off.
17) DO NOT use outdoors, in standing
water, or on wet surfaces.
This extractor must be connected to a
properly grounded outlet only. (See
Grounding Instructions)
MAINTENANCE OF THE EXTRACTOR
Due to the design, construction and
quality of materials, this extractor
requires a minimum of maintenance.
The following tips are provided to
increase the service life of the extractor.
NOTE: Disconnect the power cord
from the outlet before doing any work
on the extractor.
After Each Use:
1. Drain the recovery tank after each
use.
4. Check and clean in-line filter located in the motor housing.
End of Day:
Pour 2 gallons of clean hot water in the
solution tank. Turn the pump ON and
flush the entire system for about a
minute to prevent alkaline build-up.
After Repeated Use:
Spray Nozzles: Remove and clean the
spray nozzles of any debris or build-up.
Replace when necessary.
2. Remove all soil and debris from
the recovery tank.
Solution Tank: After 4 to 6 uses,
inspect the solution tank for cracks and
abrasions.
3. Flush out the recovery tank with
clean water.
Solution Lines and Fittings: Flush
extractor at least once a month with a
PAGE 2
solution of one part water to three
parts white vinegar in order to neutralize the alkaline residue left by the cleaning solution. Lubricate all quick disconnect fitting with WD-40 or similar lubricant.
Vacuum Motor: Carbon brushes
should be replaced after operating 750
hours or when the carbon brushes are
worn down to 3/8 " in length. Replace
both carbon brushes at the same time.
Pump System: After 4 to 6 uses, flush
with clean water, including the all hoses
and wand.
CAUTION: DO NOT leave water in tank
over night or store extractor with water
in tanks.
GROUNDING
DANGER:
Improper use of the grounding plug can result in a
risk of electric shock.
Electrical equipment must be grounded. If
it should malfunction or breakdown,
grounding provides a path of least resistance for electrical current to reduce the
risk of electric shock. This extractor is
equipped with a cord having an equipment-grounding conductor and grounding
plug. The plug must be inserted into an
appropriate outlet that is properly installed
and grounded in accordance with all local
codes and ordinances.
INSTRUCTIONS
If repair or replacement of the cord or
plug is necessary, DO NOT connect the
grounded wire to either flat blade terminal. The wire with insulation having an
outer surface that is green with or without
yellow stripes is the grounding wire.
GROUNDING
METHODS
This extractor is for use on a nominal 120
volt circuit, and has a grounded plug that
looks like the plug illustrated-rated in (Fig
A). A temporary adaptor that looks like
the adaptor illustrated in (Fig B & C) may
be used to connect this plug to a 2-pole
receptacle as shown in (Fig B) if a properly grounded outlet is not available.
The temporary adaptor should be used
only until a properly grounded outlet (Fig
A) can be installed by a qualified electrician. The green color rigid ear, lug, or the
like, extending from the adaptor must be
connected to a permanent ground such
as a properly grounded outlet box cover.
Whenever the adaptor is used, it must be
held in place by a metal screw (Fig C).
WARNING:
Improper connection of the equipment-grounding conductor can result in a
risk of electric shock. Check with a qualified electrician or service person if you
are in doubt as to whether the outlet is properly grounded.
DO NOT modify the plug provided with the extractor. If it will not fit the outlet,
have a proper outlet installed by a qualified electrician.
NOTE: In Canada, the use of a temporary adaptor is not permitted
by the Canadian Electric Code.
PAGE 3
IMPORTANT
PROCEDURES
BEFORE
CLEANING
1) Remove furniture from the area. Large
pieces can be moved to opposite end of
the room from where you start cleaning.
2) Thoroughly vacuum carpet making sure
all dirt and loose debris is removed.
3) Before plugging power cord into
grounded outlet all switches must be in the
OFF position.
4) Add the cleaning chemicals and clean
water to the solution tank, following the
chemical manufactures directions.When
using a bucket to fill the tank always use a
clean bucket.
6] Connect the solution hose to the quick
disconnect coupling and insert vacuum
hose in to the plug-in sleeve. Push other
end of the vacuum hose onto wand and
connect other end of the solution hose to
quick disconnect on wand.
NOTE: Carpets that have been previously
shampooed may have a heavy build-up of
old shampoo residue which may cause
excessive foaming in recovery tank.
Monitor the recovery tank for foam
buildup. If this occurs add a defoamer
chemical to the recovery tank to protect
the vacuum motor form damage.
5) Monitor the foam level and add defoamer
to recovery side if necessary.
CHECK CARPET
BEFORE
CLEANING
In order to avoid damage to the carpet
during the cleaning operation check for the
following:
3) Carpet does not have a backing that is
sensitive to water (Jute or Jute Blends).
4) Test carpet to see if it is color-fast.
1) Carpet is secured with adhesive that is
water resistant.
2) Carpet is glued down completely, not
partially
CARE OF THE
EXTRACTOR
This extractor is designed to be safe when
used to perform cleaning functions as
specified. Should damage occur to electrical parts, the unit should NOT be used
until the damage is repaired by the manufacturer or authorized service center. This
will avoid further damage to the unit or
injury to the user.
These instructions are for your protections
and information PLEASE READ CAREFULLY! Failure to follow the precautions or
instructions could result injury or damage
to the user and/or extractor.
FREEZING
TEMPERATURE
PRE-CAUTIONS
If it becomes necessary to store or transport the unit where temperatures could
drop below 40° F, the pump, solution hose
and valve on the tools must be protected
from freezing with a solution of automotive
radiator antifreeze.
2) Vacuum excess mixture out of solution
tank into the recovery tank and dispose of
the anti-freeze mixture.
1) Mix 1/2 gallon of water and 1/2 gallon
of antifreeze and follow the priming
instructions in the Set-Up and Operation
Sections page 5.
PAGE 4
The antifreeze MUST be flushed out of the
pump and vacuum system thoroughly with
clean water before use, otherwise, the
carpet may be damaged. Dispose of
antifreeze properly.
3) To prevent damage, allow extractor to
reach room temperature before using.
Attach Cleaning Tool:
1) Connect vacuum hose to the vacuum
intake and the extraction wand.
2) Connect the solution hose to the unit
and the wand. Pull the sleeve on the coupler and insert the male quick disconnect
plug on the hose. The sleeve should
'CLICK' and retract back indicating a positive seal.
Filling Solution Tank:
1) Fill solution tank with hot tap water (not
to exceed 140° F).
It is recommended that you use a low
foaming chemical or a defoamer to eliminate foam build-up in the recovery tank and
damage to the vacuum motor. If moisture
does enter the vacuum motor it is necessary to use WD-40 on the motor.
SET-UP &
OPERATING
PROCEDURES
Electrical:
Plug extractor into a dedicated 120 volt,
15 AMP circuit. Never remove ground
prong from the plug.
If circuit breaker trips during operation:
A) Turn OFF the extractor.
B) Reset the breaker.
C) Plug electrical cord into a different
outlet and resume cleaning.
2) Pour cleaning solution in tank following
the directions on the bottle’s label for best
results.
1] Position extractor where you are going
to start cleaning.
2) Switch ON the vacuum
and pump green switches
located on the front of the
extractor.
To start cleaning:
7) Empty the dirty solution from the recovery tank into a bucket by pulling UP on the
drain valve handle. Make sure to close the
valve after draining the tank.
When job is completed:
6) Vacuum out the remaining cleaning
solution into the recovery tank.
3) Position the wand at a comfortable
position in front of you.
7) Empty the recovery tank and rinse out
dirt and debris from the tank.
4) Squeeze the carpet tool trigger while
slowly pulling it towards you. Apply a slight
downward pressure on the wand grip to
maximize extraction.
Heavily Soiled Carpet:
5) Hold nozzle steadily against the carpet,
spraying solution and recovering the dirty
solution immediately.
4] Before completing each path, shut OFF
the solution supply and vacuum up the last
of the solution sprayed on. This will also
reduce the drying time of the carpet.
Repeat the cleaning process a second
time, where possible in a crosswise direction. Allow the carpet to totally dry before
starting the second cleaning.
Confined Areas:
Use the upholstery tool to clean stairs,
upholstery, in corners, under obstacles
and edges, etc.
5] The next cleaning path should overlap
the previous on by 21/2 " to 31/2 ".
6] When the width of the spray pattern
starts getting smaller, the solution tanks
need to be refilled. Turn OFF vacuum and
pump switches.
PAGE 5
OPERATING
INSTRUCTIONS
Tank Bottom
Parts List and Drawing
___________________________________
Ref
No
Part Description
Qty
Part
No
___________________________________
1
2
3
4
5
6
7
8
9
10
11
12
13
Upper And Lower Housing
Bolt
Lock Washer
Lock Nut
Lanyard
Rivet Back Up Washer
Cord Retainer
25" 12 x 3 Yellow Cord
Green Rocker Switch
Nut
Switch Plate
Receptical
Body Hinge
1
2
6
6
1
8
1
1
2
4
1
2
1
440396
205532
210218
210153
209929
440515
445843
445606
445231
210625
444871
211176
440167
___________________________________
Tank Top
Parts List and Drawing
______________________________________
Ref
No
Part Description
Qty
Part
No
______________________________________
1
2
3
4
5
6
7
8
9
10
11
12
13
14
15
16
17
18
SS Bracket Screw
Lid Bracket
Clear Lid With Rod
Dome Gasket
Stationary Handle
Fresh Water Tank Screen Filter
SS Nylok Nut
SS Finder Washer
SS ¼" Screw
Upper And Lower Housing
Valve Gasket
Valve Jam Nut
Valve Down Spout
Drain Valve
Hose Adaptor 1½” x Barb x NPT
Inlet Elbow
Float Screen
Float Pipe
4
2
1
1
1
1
4
4
4
1
1
1
1
1
1
1
1
1
441279
441163
441066
441112
440310
443026
441007
440981
440671
440396
441031
441058
441023
441015
440558
440590
440647
441570
______________________________________
PAGE 6
Pump & Motor
Parts List
and Drawing
____________________________________
Ref
No
Part Description
Qty
Part
No
____________________________________
1
2
3
4
5
6
7
8
9
10
11
12
13
14
15
16
Pump-In-Line Hose
¼ x NPT x 3/8 Barb 90° Fitting
60 PSI Pump
2 Stage Vacuum Motor
Q.D. Spacer And Washer
Upper And Lower Housing
Lock Nut
Lock Washer
Wheel Nylok Nut
Wheel Bolt
8" Wheel
Axle
Bolt
Right Side Machine Latch
Female Q.D. Brass Fitting
4" Wheel
2
2
1
2
1
1
2
2
2
2
2
1
6
1
1
2
443212
443263
443271
442593
443859
440396
210145
210196
444863
444774
444057
205303
205524
440175
440604
445851
____________________________________
____________________________________
Ref
No
Part Description
Qty
Part
No
____________________________________
18
20
21
22
23
24
25
26
27
28
29
30
31
32
33
34
Left Side Latch
Rivet Back Up Washer
Exhaust Flange
Lock Washer
Bolt
Air Manifold Vacuum Duct
Vacuum Gasket
5" x ¼ Carriage Bolt
Flat Washer
¼ Keeps Nut
2" x 8" Motor Hose
2" SS Clamp
Exhaust Elbow (No Ring)
Jam Nut
Metal Elbow Fitting
2" x 18" Motor Hose
1
6
1
8
8
1
1
3
3
3
1
4
1
1
1
1
442224
440515
443565
210218
205532
442232
442631
442682
442712
442739
442003
442402
441694
441791
207934
442267
____________________________________
PAGE 7
TROUBLE
SHOOTING
GUIDE
CAUTION:
Before working on the extractor disconnect power cord.
PROBLEM: Extractor does not run, no power.
Possible Cause
Possible Solution
1) Fuse blown or circuit breaker tripped.
1) Replace fuse with same rating or reset
circuit breaker.
2) Replace switch or switches.
3) Trace and repair.
4) Replace motor.
5) Replace power cord or plug.
6) Check electrical system.
7) Replace rocker switch
2)
3)
4)
5)
6)
7)
Faulty ON/OFF switches.
Loose wiring.
Faulty motor.
Defective power cord or damaged plug.
No power to pump.
Defective switch.
PROBLEM: Loss of vacuum.
Possible Cause
1)
2)
3)
4)
5)
6)
7)
8)
Possible Solution
Drain valve open.
Leaking around recovery lid.
Holes in vacuum hose or loose cuffs.
Defective vacuum motor.
Wand head or vacuum hose clogged.
Water coming out of vacuum exhaust.
Recovery tank full.
Lint accumulation on vacuum filter screen.
1)
2)
3)
4)
5)
6)
7)
8)
Close drain valve.
Replace recovery lid gasket.
Replace hose or tighten cuffs.
Repair or replace vacuum motor.
Check and unclog
Use a low foaming detergent.
Drain dirty water out of recovery tank.
Clean filter screen. Replace if necessary.
PROBLEM: Streaking, uneven spray, or no spray from jets.
Possible Cause
1)
2)
3)
4)
Possible Solution
Spray jets clogged.
Worn spray jets.
Faulty pump.
Solution tank empty.
1)
2)
3)
4)
Unclog jets.
Replace spray jets.
Replace pump.
Flush out tank and refill.
PROBLEM: Pump not running properly
Possible Cause
Possible Solution
1) Pump is pulsating.
2) Loose or kinked hose.
1) Check for clogged jets and clean.
2) Check and replace hose if necessary.
WARNING
Service and repairs, should only be performed by an
authorized service center.
PAGE 8
X-405 Manual Printed in USA 07/16/07