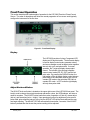
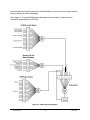
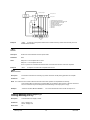
1
User’s Guide Precision Pulsed Current Source LDP-3830 ILX Lightwave · 31950 Frontage Road · Bozeman, MT, U.S.A. 59715 · U.S. & Canada: 1-800-459-9459 · International Inquiries: 406-556-2481 · Fax 406-586-9405 ilx.custhelp.com · www.newport.com/ilxlightwave 70045001 February 2014 Table of Contents Safety and Warranty Information............................................... v Safety Information and the Manual ........................................................ v General Safety Considerations .............................................................. v Safety Symbols .....................................................................................vi Safety Marking Symbols ....................................................................... vii Warranty ............................................................................................... vii Limitations .......................................................................................... vii Returning an Instrument ...................................................................... viii Claims for Shipping Damage ............................................................. viii Comments, Suggestions, and Problems ...............................................ix Chapter 1 : Introduction and Specifications .............................. 1 Safety Considerations ........................................................................... 1 Initial Inspection ................................................................................... 1 Product Overview .................................................................................. 2 Options and Accessories ....................................................................... 3 Specifications ........................................................................................ 4 Chapter 2 : Operations ............................................................. 5 Installation ............................................................................................. 5 Grounding Requirements .................................................................... 5 AC Line Power Requirements ............................................................. 5 Power up Sequence ............................................................................ 5 Firmware Upgradeability ...................................................................... 6 GPIB Communication .......................................................................... 6 USB Communication ........................................................................... 6 Tilt Foot Adjustment ............................................................................. 6 Rack Mounting ..................................................................................... 6 Laser Connections ............................................................................... 6 Current Monitor on the LPB-386 .......................................................... 7 Interlock Connections .......................................................................... 7 Connecting to the Laser ...................................................................... 7 February 2014 i LDP-3830 Front Panel Operation ........................................................................... 8 Display .................................................................................................8 Adjust Knob and Button .......................................................................8 Setup ....................................................................................................9 Pulse ....................................................................................................9 General Operating Procedures ............................................................ 11 Warm-Up and Environmental Considerations ....................................11 Pulse Mode Operation .......................................................................11 Pulse Current Limit ............................................................................12 Chapter 3 : Remote Operation ................................................13 Remote Operation ............................................................................... 13 Basic GPIB Concepts ........................................................................13 Data and Interface Messages ............................................................13 Talkers, Listeners, and Controllers ....................................................13 GPIB Cable Connections ...................................................................14 Reading the GPIB Address ................................................................14 Changing the GPIB Address ..............................................................14 Basic USB concepts ..........................................................................14 Changing Operation from Local to Remote........................................14 GPIB vs. USB Communication ..........................................................15 Syntax Summary ................................................................................15 Program Headers ...............................................................................15 488.2 Common Program Headers .....................................................15 Command Tree Structure .................................................................... 16 Header Tree Traversal .......................................................................16 Separators .........................................................................................17 Parameters ........................................................................................17 Coupled Commands ..........................................................................18 Status Reporting .................................................................................. 20 Status Byte .........................................................................................20 Event Registers ..................................................................................21 Standard Event Status Register .........................................................21 QUEStionable Status .........................................................................22 OPERation Status ..............................................................................22 Command Timing ................................................................................ 22 Sequential / Overlapped Commands .................................................22 Query Response Timing ....................................................................23 Chapter 4 : Command Reference ............................................25 Remote Command Reference Summary ............................................. 25 Command Reference .......................................................................... 27 February 2014 ii LDP-3830 Chapter 5 : Troubleshooting ................................................... 41 Troubleshooting Guide ........................................................................ 42 Error Messages ................................................................................... 44 Error Code Tables ............................................................................. 44 February 2014 iii LDP-3830 February 2014 iv LDP-3830 Safety and Warranty Information Details about cautionary symbols Safety markings used on the instrument Information about the warranty Customer service contact information Safety Information and the Manual Throughout this manual, you will see the words Caution and Warning indicating potentially dangerous or hazardous situations which, if not avoided, could result in death, serious or minor injury, or damage to the product. Specifically: Caution indicates a potentially hazardous situation which can result in minor or moderate injury or damage to the product or equipment. Warning indicates a potentially dangerous situation which can result in serious injury or death. Visible and/or invisible laser radiation. Avoid direct exposure to the beam. General Safety Considerations If any of the following conditions exist, or are even suspected, do not use the instrument until safe operation can be verified by trained service personnel: Visible damage Severe transport stress Prolonged storage under adverse conditions Failure to perform intended measurements or functions If necessary, return the instrument to ILX Lightwave, or authorized local ILX Lightwave distributor, for service or repair to ensure that safety features are maintained. All instruments returned to ILX Lightwave are required to have a Return Authorization Number assigned by an official representative of ILX Lightwave Corporation. See Returning an Instrument for more information. February 2014 v LDP-3830 Safety Symbols This section describes the safety symbols and classifications. Technical specifications including electrical ratings and weight are included within the manual. See the Table of Contents to locate the specifications and other product information. The following classifications are standard across all ILX Lightwave products: Indoor use only Ordinary Protection: This product is NOT protected against the harmful ingress of moisture. Class I Equipment (grounded type) Mains supply voltage fluctuations are not to exceed ±10% of the nominal supply voltage. Pollution Degree II Installation (overvoltage) Category II for transient overvoltages Maximum Relative Humidity: <80% RH, non-condensing Operating temperature range of 0 °C to 40 °C Storage and transportation temperature of –40 °C to 70 °C Maximum altitude: 3000 m (9843 ft.) This equipment is suitable for continuous operation. February 2014 vi LDP-3830 Safety Marking Symbols This section provides a description of the safety marking symbols that appear on the instrument. These symbols provide information about potentially dangerous situations which can result in death, injury, or damage to the instrument and other components. Caution, refer to manual Earth ground Terminal Alternating current Visible and/or invisible laser radiation Caution, risk of electric shock Protective Conductor Terminal Caution, hot surface Frame or chassis terminal On: in position of bistable push control. The slash (|) only denotes that mains are on Off: Out position of a bistable push control. The circle (O) only denotes that mains are off. Warranty ILX LIGHTWAVE CORPORATION warrants this instrument to be free from defects in material and workmanship for a period of one year from date of shipment. During the warranty period, ILX will repair or replace the unit, at our option, without charge. Limitations This warranty does not apply to fuses, lamps, defects caused by abuse, modifications, or to use of the product for which it was not intended. This warranty is in lieu of all other warranties, expressed or implied, including any implied warranty of merchantability or fitness for any particular purpose. ILX Lightwave Corporation shall not be liable for any incidental, special, or consequential damages. If a problem occurs, please contact ILX Lightwave Corporation with the instrument's serial number, and thoroughly describe the nature of the problem. February 2014 vii LDP-3830 Returning an Instrument If an instrument is to be shipped to ILX Lightwave for repair or service, be sure to: Obtain a Return Authorization number (RA) from ILX Customer Service. Attach a tag to the instrument identifying the owner and indicating the required service or repair. Include the instrument serial number from the rear panel of the instrument. Attach the anti-static protective caps that were shipped with the instrument and place the instrument in a protective anti-static bag. Place the instrument in the original packing container with at least 3 inches (7.5 cm) of compressible packaging material. Shipping damage is not covered by this warranty. Secure the packing box with fiber reinforced strapping tape or metal bands. Send the instrument, transportation pre-paid, to ILX Lightwave. Clearly write the return authorization number on the outside of the box and on the shipping paperwork. ILX Lightwave recommends you insure the shipment. If the original shipping container is not available, place your instrument in a container with at least 3 inches (7.5 cm) of compressible packaging material on all sides. Repairs are made and the instrument returned transportation pre-paid. Repairs are warranted for the remainder of the original warranty or for 90 days, whichever is greater. Claims for Shipping Damage When you receive the instrument, inspect it immediately for any damage or shortages on the packing list. If the instrument is damaged, file a claim with the carrier. The factory will supply you with a quotation for estimated costs of repair. You must negotiate and settle with the carrier for the amount of damage. February 2014 viii LDP-3830 Comments, Suggestions, and Problems To ensure that you get the most out of your ILX Lightwave product, we ask that you direct any product operation or service related questions or comments to ILX Lightwave Customer Support. You may contact us in whatever way is most convenient: Phone (800) 459-9459 or (406) 586-1244 Fax (406) 586-9405 On the web at: ilx.custhelp.com Or mail to: ILX Lightwave Corporation P. O. Box 6310 Bozeman, Montana, U.S.A 59771 www.ilxlightwave.com When you contact us, please have the following information: Model Number Serial Number End-user Name Company Phone Fax Description of what is connected to the ILX Lightwave instrument Description of the problem If ILX Lightwave determines that a return to the factory is necessary, you are issued a Return Authorization (RA) number. Please mark this number on the outside of the shipping box. You or your shipping service is responsible for any shipping damage when returning the instrument to ILX Lightwave; ILX recommends you insure the shipment. If the original shipping container is not available, place your instrument in a container with at least 3 inches (7.5 cm) of compressible packaging material on all sides. We look forward to serving you even better in the future! February 2014 ix LDP-3830 February 2014 x LDP-3830 Chapter 1 : Introduction and Specifications This chapter is an introduction to the LDP-3830 Precision Pulsed Current Source. Safety considerations and instructions Product overview and theory of operation Options and accessories Specifications Safety Considerations If any of the following symptoms exist, or are even suspected, remove the LDP-3830 from service. Do not use the LDP-3830 until trained service personnel can verify safe operation. Visible damage Severe transport stress Prolonged storage under adverse conditions Failure to perform intended measurements or functions If necessary, return the LDP-3830 to ILX Lightwave for service and repair to ensure that safety features are maintained. Initial Inspection When you receive your LDP-3830 Precision Pulsed Current Source verify that the following items were shipped with the instrument LDP-3830 Precision Pulsed Current Source LPB-386 LDP-3830 Pulse Board CC-385 Pulse Interconnect Cable LDP-3830 Manual Power Cord Shipping Kit Verify that the line voltage marked on the rear panel matches the line voltage intended to power the unit. February 2014 1 LDP-3830 Product Overview The LDP-3830 Precision Pulsed Current Source was designed for applications requiring fast, repeatable current pulses up to 5A with a compliance voltage of 20V. To provide the required pulse performance, an external pulse driver board, the LPB-386, is included in the initial system purchase. The LPB-386 is required to operate the LDP-3830. Pulse parameters such as pulse width, duty cycle, and frequency are programmable from the front panel or through the GPIB or USB interface. The current source can be operated in three modes, constant duty cycle, constant frequency and external trigger, which allows adjustment of the pulse width while maintaining the respective control mode. Laser diode protection features include programmable current limit, output shorting relay, AC line filters and double shielded transformers to help suppress AC line transients. Testing and characterization can be automated with the 3830 through the GPIB/IEEE-488.1 or USB 2.0 interface. For basic system integration without an automated program, a trigger in/out can be used to control pulses and initiate corresponding measurements. Pulsed current output up to 5A 20V compliance voltage Adjustable pulse width from 25 ns to 1 µs Adjustable duty cycle from 0.01% to 5.00% Pulse trigger in/out Current monitor connection Laser diode protection including current limits, transient protection, and shorting relay Safety interlocks (compatible with temperature controller over-temperature output) USB and GPIB computer interfaces Figure 1.1 – LDP-3830 Front Panel February 2014 2 LDP-3830 Figure 1.2 – LDP-3830 Rear Panel Options and Accessories Options and accessories available for the LDP-3830 Precision Pulsed Current Source include the following: Model / Part Number LPB-386 CC-385 CC-388 RM-144 RM-145 February 2014 Description LDP-3830 Pulse Board Pulse Interconnect Cable Current Monitor Cable Single Rack Mount Kit Dual Rack Mount Kit 3 LDP-3830 Specifications February 2014 4 LDP-3830 Chapter 2 : Operations This chapter is an overview of the operation of the LDP-3830 Precision Pulse Current Source. Installation Connecting to the instrument Introduction to the LDP-3830 front panel General operating procedures Installation Grounding Requirements The LDP-3830 Precision Pulse Current Source comes with a three conductor AC power cable. The power cable must be plugged into an approved three-contact electrical outlet or used with a threecontact to two-contact adaptor with the grounding wire connected to an electrical ground (safety ground). ILX Lightwave recommends connecting the instrument only to properly earth grounded receptacles. The power cord connector and power cable meet IEC safety standards. To avoid electrical shock hazard, connect the instrument to a properly earth grounded, three prong receptacle only. Failure to observe this precaution can result in severe personal injury or death. AC Line Power Requirements The LDP-3830 is factory configured for operation at nominal line voltages of 100-120 or 220-240 VAC. Make sure the voltage requirements that are printed on the back panel of the instrument matches the power-line voltage in your area. Contact ILX Lightwave Customer Service if you need to reconfigure the input voltage range. Power up Sequence With the LDP-3830 connected to an AC power source, pressing POWER ( power to the instrument and starts the following power-up sequence: ) supplies AC line All front panel indicators ON, all 7-segment displays indicate "8" All front panel indicators OFF Display shows serial number and firmware version of the LDP-3830 Display shows the model and serial number of the attached LPB-386 pulse board Each display lasts 2-3 seconds. February 2014 5 LDP-3830 During the front panel indicator test, the LDP-3830 performs a self-test to ensure that internal hardware and software are communicating. If the LDP-3830 cannot successfully complete the test, an error message is displayed. See Appendix A for a complete list of error messages. After the self test, LDP-3830 configuration is set to the same state as when power was last turned off. If you wish, you can use the recall function to quickly get to a different configuration. See Store and Recall for more information. Firmware Upgradeability The firmware on the LDP-3830 can be reinstalled or upgraded via USB 2.0 by visiting the ILX Lightwave website at www.newport.com/ilxlightwave. Follow the directions on the LDP-3830 product web page to complete the firmware upgrade. GPIB Communication The IEEE 488.1 GPIB interface connector is located on the rear panel, directly above the power input (See Figure 1.2 on page 3). The 24-pin connector is tapered to ensure proper orientation of the GPIB cable. Use fingers to tighten the two screws on the cable connector. A total of 15 devices can be connected together on the same GPIB interface bus. The cables have double-sided male/female connectors on each end so that several cables can be stacked. This allows more than one cable to be attached to any one device. However, the maximum length of the GPIB interface bus must not exceed 20 meters (65 feet), or 3 meters (10 feet) per device. USB Communication The USB connector is located on the back rear panel, next to the GPIB connector. This USB connector is the square "B"-style connector. A standard USB A/B cable is required to communicate with the instrument. This instrument uses the USB Test and Measurement class, and drivers are available from National Instruments and Agilent Technologies. As a convenience the National Instruments Visa Libraries can be installed from the accompanying CD. Please refer to Chapter 3 for more detailed instructions on operating the instrument through USB. Tilt Foot Adjustment The LDP-3830 has front legs that extend to make it easier to view the displays. To use them, rotate the legs downward until they snap into position. Rack Mounting The LDP-3830 conforms to international standards for a 2U height ½ width rack mounting. Available rack mount accessory kits contain detailed mounting instructions. Laser Connections The LPB-386 Laser Pulse Board must be connected to the LDP-3830 unit using the provided CC385 cable. To limit potential damage to the LPB-386 and the device under test, it is important to screw the connector into both the LDP-3830 and the attached LPB-386 LDP-3830 Pulse Board. February 2014 6 LDP-3830 Current Monitor on the LPB-386 Current Monitoring is provided via an SMB connector on the top of the LPB-386. Selection is configured by a switch providing positions for current monitor and off. With the switch in the off position the SMB connector is isolated from the laser. In the current monitoring position, earth grounding of the laser anode or cathode will result in inaccurate current measurements and possible laser damage. When using the current monitor, ensure the attached equipment is set to 50 ohm termination to achieve the rated accuracy of the LDP-3830. Interlock Connections Interlock 1 is intended for interfacing with a TTL control signal. Operation is normal in the low state, but the output will be disabled when in the high state. This is compatible with the Trigger Out connector on the LDT-5948 and LDT-5980 products. Additionally, the connector can also be used as a normally closed interlock. The interlock is pulled high using a weak internal pull-up resistor wherefore a short circuit will cause the output to be disabled. Interlock 2 provides a normally open interlock, it requires a short circuit between the two terminal blocks on the rear panel for proper operation. These terminal blocks are intended to be used with door or cover interlocks incorporating a normally open mechanical or reed relay. The LDP-3830 is shipped with a wire across this connector so the instrument will not need any additional configuration as received. Connecting to the Laser The laser may be soldered directly to the tabs on the output of the pulse board. Note the polarity on the cover of the LPB-386. The pads on both the top side and bottom side of the board are available to connect to support various device connections. See ILX Lightwave technical note “LDP-3830 Connecting Your Laser” for additional information on connecting to the LPB-386. February 2014 7 LDP-3830 Front Panel Operation This section describes the fundamentals of operation for the LDP-3830 Precision Pulsed Current Source. The order of descriptions will follow the normal progression of how a user would typically configure the instrument for the first time. Figure 2.1 - Front Panel Display Display The LDP-3830 consists of a large 7-segement LED display and 20 digit dot matrix. The dot matrix display is used to display control mode, parameter values and error messages as well as adjust pulse repetition interval, duty cycle, and pulse width. In normal operation, the 7-segment display shows output current. The left side of the dot matrix displays current control mode (PRI, DC, EXT) and the set point value. By pressing the DISPLAY button, the right portion of the dot matrix display cycles between pulse width or the calculated value for duty cycle in constant PRI mode or the calculated PRI value in constant DC mode. In EXT mode the right display will only show pulse width. Adjust Knob and Button The ADJUST knob and button is located on the upper right corner of the LDP-3830 front panel. The knob is used to change the set points and enter parameter values, the GPIB address, and store or recall bin numbers. The ADJUST button has three modes of operation: off (led off), coarse adjust (led on), and fine adjust (led on – bright). Upon pressing a function for adjustment (pulse current, pulse width, pulse repetition interval, duty cycle) the ADJUST LED will be illuminated and the user can begin adjusting. The ADJUST LED will automatically timeout after 3 seconds, if the ADJUST button is pressed after the timeout the previous setting can be adjusted. February 2014 8 LDP-3830 Setup The SETUP button box contains the SET button, PARAM button, RECALL button, and STORE button. Pressing the PARAM button cycles through each of the available parameters and displays them on the dot matrix screen. The parameter menu items are Current Limit, Trig In Delay, Trig out Delay, GPIB Address, and Brightness all of which are described below: Current Limit: Used to define the maximum pulsed laser current. If the limit is exceeded, the output will turn-off and an error message will be displayed. Trig In Delay: Adjusts the delay between the time when the LDP-3830 receives an external trigger signal and when the LDP-3830 initiates a corresponding output current pulse. Trig Out Delay: Adjusts the delay between the time when the LDP-3830 sends a TTL trigger signal out and when the LDP-3830 outputs a current pulse. GPIB Address: Sets the GPIB address from 1 to 30. Brightness: Sets the display brightness from 1 to 10. The items in the setup menu automatically time out after three seconds of no activity and the instrument will return to its default measurement display mode. To adjust a parameter value, first press the PARAM button until the appropriate parameter is shown and immediately press SET. The units will begin to flash on the display and the parameter can then be adjusted by the ADJUST knob. To set the value, press the SET button or leave the adjust knob untouched for three seconds. The STORE and RECALL parameter functions are used to store and retrieve instrument configurations. Non-volatile memory is used for saving the instrument parameters. When a store operation is performed, all of the instrument parameters currently in effect are stored to a "bin" number (1 - 10). When that "bin" number is recalled, the instrument configuration is recalled to the stored values. To enter the STORE/RECALL mode, press either the STORE or RECALL button which will display the current “bin” number in the bottom of the screen. The current “bin” number will be flashing and the ADJUST knob can be used to select a new “bin”. The “store” or “recall” operation is performed when the SET button is pressed. If the SET button isn’t pressed after three second the LDP-3830 will time out and the new “bin” number will not be stored or recalled. Pulse The PULSE section contains the PRI button, DC % button, EXT button, PULSE WIDTH button, CURRENT button, and ON button. Each button function is described below. To change between control modes (constant PRI, DC%, EXT) press the corresponding button twice. The output will automatically be disabled. DC%: When the DC% LED is illuminated, the instrument is operating in a constant duty cycle mode where the instrument maintains a constant duty cycle for a set pulse width. The pulse repetition interval will automatically be adjusted to create the desired duty cycle. In this mode, pressing the PRI button will display the calculated pulse repetition interval in the right portion of the DOT Matrix display. February 2014 9 LDP-3830 DC = (PW / PRI) * 100 where: DC is Duty Cycle in percent PW is Pulse Width in ns PRI is Pulse Repetition Interval in µs PRI: When the PRI LED is illuminated, the instrument is operating in a constant pulse repetition interval mode where the instrument maintains a constant PRI for a set pulse width. The duty cycle will automatically be adjusted to create the desired pulse repetition interval. In this mode, if the DC% button is pressed, the calculated duty cycle will be displayed in the right portion of the DOT Matrix display. EXT: When the EXT LED is illuminated, the instrument will operate in External Trigger mode. With an externally supplied trigger, only the pulse width may be adjusted. When the instrument is outputting a pulse the TRIG light on the display will be illuminated. The DC% / PRI display mode is disabled in EXT mode. Instead, the repetition interval is determined by the rate of the TTL signal at the TRIGGER IN connector. The LDP-3830 will limit the maximum duty cycle to 5% in order protect the LDP-3830. PULSE WIDTH: Pressing the PULSE WIDTH button allows the user to adjust the pulse width of the LDP-3830. The pulse width will be displayed in right portion of the DOT Matrix display. Note: Pulse wide adjustment may be limited by other settings and duty cycle requirements. CURRENT: Pressing the CURRENT button allows the user to adjust the current set point of the LDP-3830. ON: Enables or Disables the LDP-3830 current output after a two second delay. When turning on, the output LED will flash for two seconds before the output is enabled. During this period, pressing the ON button again will cancel the turn-on sequence. After the output is enabled, pressing the ON button will immediately turn off the output. February 2014 10 LDP-3830 General Operating Procedures The following sections present some operational guidelines as well as some common operating procedures. Remote operations are discussed in Chapter 4. Before turning on the output, be sure that the current limit is slightly greater than your laser’s maximum operating current. Also, adjust the output current set point to a safe and reasonable level. If this is the first time operating the LDP-3830 or a new laser is being used, ILX would recommend setting the current to zero and slowly ramping up to the desired set point. The connections to the laser must be secure to prevent an open circuit should they be jostled or bumped. If an open circuit occurs during laser operation then the OUTPUT will be turned off automatically. Experience indicates that if an open circuit occurs during laser operation (while the OUTPUT is ON), that the laser may be damaged by a momentary circuit break-and-remake before the final circuit break. Therefore, securing the cabling is very important. Warm-Up and Environmental Considerations Operate the LDP-3830 at an ambient temperature in the range of 10 to +40ºC. Storage temperatures should be in the range of -40 to +70ºC. Let the LDP-3830 warm up for at least 1 hour before use to achieve the rated accuracy. Pulse Mode Operation You can operate the LDP-3830 in several modes: constant duty cycle (DC%), constant pulse repetition interval (PRI) or external trigger (EXT). For pulse mode operation in any control mode, follow the steps below. Plug the LDP-3830 into an AC power source supplying the correct voltage for the instrument (refer to the back panel for the correct voltage ratings). Turn on the LDP-3830 by pressing the front panel POWER button. o The output stage will be off at power-up and the instrument will be configured to the state it was in when the power was last shut off. Configure the Current Limit under PARAM o Use the RECALL feature to recall a pre-configured setup and then recheck the configuration parameters. Connect the laser (or other device) to the instrument. Press the CURRENT button. Turn the ADJUST knob until the desired setpoint is displayed. Select the mode of operation by pressing PRI, DC% or EXT twice. For DC% or PRI modes, press the corresponding button and using the ADJUST knob to set it the respective value. Next, set the pulse width by pressing the PULSE WIDTH button. Then turn the ADJUST knob to set pulse width. Turn the output on by pressing the ON button. After a 2 second delay, the output-on sequence will start with a slow ramp during which the LDP-3830 will automatically drive the laser to the set point current. While the output is on, the laser drive current set point and limit may be changed. Also, the pulse width and/or duty cycle percentage may be adjusted. If the pulse width is changed, the duty cycle percentage range may be automatically limited, if required (due to the limitations of the resolution of the PW and PRI values). February 2014 11 LDP-3830 If the mode of operation (DC%, PRI, EXT) is changed, the OUTPUT will be automatically turned off. Pulse Current Limit The pulse current limit will have to be always set higher than your maximum setpoint. The combined accuracy of the setpoint and the current limit circuitry can cause a current limit even when the current limit is set 100mA above the current setpoint. Furthermore, in the case of an inductive load at short pulse widths, the LDP-3830 will compensate for low pulse amplitude at the rising edge, and cause the middle of the pulse to rise above the setpoint value in order to maintain the configured average pulse amplitude. February 2014 12 LDP-3830 Chapter 3 : Remote Operation This chapter is an overview of the remote operation of the LDP-3830 Precision Pulse Current Source. Remote Operation Command Tree Structure Status Reporting Command Timing Remote Operation Test and measurement equipment with remote operation capability will generally communicate through either GPIB or USB interfaces. GPIB (General Purpose Interface Bus) is the common name for IEEE Standard 488.1, an industry standard for interconnecting test instruments in a system. USB (Universal Serial Bus) is the most common serial communication protocol used by computers today. Everything that can be done from the front panel can also be done remotely, and in some cases, with more flexibility. For instance, in remote mode, there is access to functions and modes not available from the front panel, such as commands that will increment (CURRent UP) or decrement (CURRent DOWN) the current setpoint by a predefined step value. The following sections explain the fundamentals of operating the LDP-3830 Precision Pulse Current Source remotely through either the GPIB or USB interface. Basic GPIB Concepts The information in the Basic GPIB Concepts section is normally not necessary to successfully operate the LDP-3830 through its GPIB interface because the host computer’s GPIB controller usually handles the details; however, it is a useful perspective in understanding GPIB. Data and Interface Messages GPIB devices communicate with each other by sending data and interface messages. Data contains device-specific information such as programming instructions, measurement results, and instrument status. Each device has an address number, and ignores all data traffic not addressed to it. Depending on its content, data is often called a “device dependent message” or a “device dependent command”. Interface messages manage the bus, with functions such as initializing the bus and addressing or unaddressing devices. In addition, some individual bus lines are designated for this purpose. Talkers, Listeners, and Controllers Every GPIB system consists of one or more “talkers” and “listeners” and often at least one “controller”. Talkers supply data. Listeners accept data. A system can consist of simply a talker and listener, for example a meter connected to a datalogger or chart recorder. Controllers designate talkers and listeners. A controller is necessary when the active talkers or listeners must be changed. When the controller is a computer, it often also designates itself as a listener so it can collect data from designated talkers. September 2011 13 LDP-3830 If there is more than one controller, only one can be the Controller In Charge (CIC). Control can be passed from one computer to another. In a multiple controller system, there can be one “System Controller” capable of asserting control (becoming CIC). GPIB Cable Connections Standard GPIB connectors can be connected together (stacked) allowing the system to be configured linearly or in a star configuration. Figure 3.1 - GPIB Connections Reading the GPIB Address Before operating the LDP-3830 remotely, its GPIB address must be known. Simply press the PARAM button until the GPIB address is displayed in the dot matrix display. The factory default address is “1”. Changing the GPIB Address Every device on the GPIB bus must have a unique address. If it is necessary to change the address, press the PARAM button until the GPIB address is displayed. Then press the SET button and adjust the knob until the desired address value is shown. When the instrument times out then the new GPIB address is stored in nonvolatile memory. The allowable address range is 1 to 30. Basic USB concepts The LDP-3830 communicates with the computer using the USB Test and Measurement Class USB488 Subclass (USBTMC488). If you are using other test equipment, you may already have this on your computer as it is included with National Instruments and Agilent Technologies VISA libraries. The USBTMC488 passes messages based on the IEEE 488.1 and IEEE 488.2 standards. In most cases, code written for GPIB can be used over the USB interface by only changing the connection string. Changing Operation from Local to Remote Sending a command over the GPIB or USB bus automatically puts the instrument in remote mode. The remote indicator in the display identifies when the controller is in remote operation mode. When the instrument is in remote mode, all front panel controls are disabled except for the RECALL/LOCAL February 2014 14 LDP-3830 button. Pressing the RECALL/LOCAL button returns the instrument to Local control mode unless the Local Lockout mode has been activated by the host computer. Local Lockout disables all front panel controls, including the RECALL/LOCAL button, until this condition is changed by the host computer. When the instrument is placed in Local Lockout Mode by the host computer, the remote indicator will illuminate on the VFD display. GPIB vs. USB Communication The USB port follows the USB Test and Measurement Class, USB488 Subclass Specifications. Due to the physical hardware differences, broadcast and multicast messages along with SRQ interrupts are not available over the hardware. In these cases, the software controlling the instrument can replace these GPIB hardware commands with functionally equivalent alternatives. You can review the USB Test and Measurement Specification and the USB488 Subclass Specification from the www.usb.org website. Syntax Summary Each IEEE 488.1 Command/Query is composed of a program header and optional program data. Program Headers All program headers consist of one or more keywords, since they are based on a hierarchical structure, also known as a tree system. To obtain a particular command, the full path to that command must be specified. Square brackets ([ ]) are used to enclose a keyword that is optional when programming the command. The command will have the same effect whether included or not and is referred to as a default node. Letter case is used to differentiate between the accepted short form (the uppercase characters) and the long form (the whole keyword). All commands are case insensitive, but each keyword must be of the short or long form. A “?” character at the end of a program header indicates that it is a query. Table 3.1 – Acceptable and Not Acceptable Commands Acceptable Not Acceptable :SOURCE:CURRENT:level :SOURCE:LEVEL :CurrenT :CURREN 488.2 Common Program Headers IEEE 488.2 Common Commands and Queries are distinguished by the “*” which begins each mnemonic. All the IEEE 488.2 Common Commands and Queries supported by the LDP-3830 are listed below: February 2014 15 LDP-3830 Table 3.2 – 488.2 Common Commands Supported by LDP-3830 *CLS *ESE *ESE? *ESR? *IDN *OPC *OPC? *PSC *PSC? *RCL *RST *SAV *SRE *SRE? *STB? *TST? *WAI Command Tree Structure All device-dependent commands are structured in a tree format as shown in Figure 3.2. Each of the legal paths is shown, followed by its list of path options, followed by the commands themselves. It is recommended that the first-time user begin learning the commands by using the full path notation. Once familiar with the commands, command path shortcuts may be used. Each level of the tree is traversed by placing a colon (:) between each keyword. : (root node) OUTPut DISPlay [WINDow] [SOURce] [STATe][?]CURRent DELay[?] MEASure [PULse] STATus SYSTem [SCALar] OPERation QUESTionable PRESet PTYPe? TRIGger FORMat [:SOURce][?] :SREGister[?] ERRor [STATe][?] [LEVel][?] LIMit[?] STEP[?] CURRent? DELay[?] [EVEnt]? DCYCle[?] COND? [EVEnt]? [NEXT]? HOLD[?] ENABle[?] COND? PERiod[?] NTRansition[?] ENABle[?] WIDTh[?] NTRansition[?]PTRansition[?] PTRansition[?] Figure 3.2 – Command Tree Structure Header Tree Traversal Multiple Commands/Queries can be sent in a message. The first command is always referenced to the root node; however, subsequent commands are referenced to the same tree level as the previous command. Preceding a program header with a colon (:) returns the parser back to the root node. Insertion of a common command has no effect on the position of the parser within the tree. February 2014 16 LDP-3830 For example, the following commands behave as described: SOURCE:CURRENT:LEVEL 2.5;LIMIT 3 will set the current setpoint to 2.5A and the current limit to 3 amps. SOURCE:CURRENT:LEVEL 2.5;WIDTH 100e-9 will set the current to 2.5A and generate an error because WIDTH is not a node at the current parser level. SOURCE:CURRENT:LEVEL 2.5;:WIDTH 100e9 will set the current to 2.5A and the pulse width to 100 ns since the “:” returned the parser to the root node and SOURCE and PULSE are default nodes under the root node. CURRENT 2.5; LIMIT 3 will set the current to 2.5A since SOURCE and LEVEL are default nodes and then return an error since LIMIT is not on the root node. CURRENT 2.5;WIDTH 100e9 will set both the current and the pulse width since there are default nodes to each command from the root node. Separators Separators are required between the program header and program data, between individual program data elements and between each IEEE 488.1 Command/Query. White space is required between the program header and parameter data. “White space” is any number of ASCII-encoded bytes in the range of 00-09, 0B-20 (0-9, 11-32 decimal). This range includes the ASCII control characters and the space but excludes the newline. Table 3.3 – White Space Acceptable Not Acceptable CURRENT 3.0 CURRENT3.0 A comma (,) is required between multiple program data elements and white space may be included on either sided of the comma. It is ignored by the parser. A semicolon (;) separates one complete command from another. Again, white space may be included on either side of the semicolon to enhance readability. Parameters When a command requires a parameter, the parameter syntax is shown in the command following the program header. The LDP-3830 accepts both character program data, which is indicated by mixed case text after the program header, or numerical data, which is indicated by the name of the value enclosed in right and left carrots (<>). The vertical bar (|) can be read as “or” and separates alternative parameter options. Numbers are represented in ASCII format in binary, integer, floating point form, or in engineering/scientific notation. For example the number “twenty” may be represented by any of the following ASCII strings: February 2014 17 LDP-3830 Table 3.4 – Numeric Format Integer 20 +20 Floating Point 20.0 +20.0 Scientific Notation 2.0E+1 2.0e+1 +2.0E+1 +2.0e+1 Binary Format #H14 #O24 #B10100 #h14 #o24 #b10100 There are no default values for omitted parameters. If a command is expecting a parameter and nothing is entered, error “-109, Missing parameter”, is generated. Following are examples of invalid command strings that will produce errors: Table 3.5 – Invalid Syntax Command Strings COMMAND COMMENT OUTP:STATE *IDN? Missing colon; STATE? expected. OUTP ON *IDN Missing semicolon; INC command generates an error. OUTP:ON ? Space not allowed before question mark. WIDTH0.000001;WIDTH? Space missing between WIDTH command and the parameter value 0.000001. Numeric data is required with *PSC (1 = on, 0 = off), *RCL (0 – 10, see front panel RECALL function), *SAV (1 – 10, see front panel STORE function), and *ESE (0 – 255, see Figure 4.2 – GPIB connector diagram). Coupled Commands SOURce:PULse:WIDTh, SOURce:PULse:DCYCle, and SOURce:PULse:PERiod along with SOURce:CURRent:LEVel and SOURce:CURRent:LIMit are coupled commands. This means that setting one may have an effect on the other values. With coupled commands, care needs to be exercised when sending down commands. For instance if the instrument is currently set to a pulse width of 60ns and a period of 1.2us, if you sent the command “WIDTH 100e-9” followed by the command “PERIOD 5e-6”, the WIDTH command would result in a execution error. This is because setting a 100ns pulse width at a period of 1.2us would violate the 5% limit on duty cycle. The PERIOD command would execute, but then the settings would be pulse width of 60ns and period of 5us. If these commands were sent down in the opposite order, the settings would be as expected. The better alternative, is that you send down both commands in one message, “WIDTH 100e9;PERIOD 5e-6”. We have designed the parser to wait until we have gotten all of the coupled commands an then we parse them together. Sending them together will take the burden off of the programmer to determine the correct order to send down parameters. But keep in mind, that it doesn’t solve all of your problems. If “WIDTH 100e-9;PERIOD 5e-6;DCYCLE 1” was sent to the instrument, the instrument does not attempt to guess which two headers were the most important, February 2014 18 LDP-3830 and since all three of those values can’t be obtained together, an execution error will occur and the previous settings will remain unchanged. See Chapter 4 – Command Reference for descriptions of all commands, including common commands, supported by the LDP-3830. Figure 3.3 - Status Reporting Diagram February 2014 19 LDP-3830 Status Reporting The status reporting model diagramed in Figure 3.3 is used to summarize the condition of the instrument down to the IEEE 488.1 defined status byte. It also enables service requests. Status Byte The status byte is composed of a status byte register and a service request enable register. The status byte register contains the IEEE 488.1 STB and RQS/MSS messages. The bits in the status byte act as summary bits for the data structures residing behind them. In the case of the MAV, the status byte indicates that the output queue is not empty while the error queue indicates that there are unread errors. The service request enable register is a mask that enables Service Request Interrupt (SRQ) to the host controller when the corresponding bit in the status byte register is set. Bit 6 in the status byte register is unique in that it indicates that a service request is enabled and the corresponding bit 6 in the service request enable register is ignored. The status byte register can be read with either a serial poll over GPIB, READ_STATUS_BYTE request over USB, or the *STB? common query. Depending on which method is used, the status byte register response may change. If read by serial poll over GPIB, or READ_STATUS_BYTE over USB, the value of the status byte register is not altered; however, if the system had asserted a request for service, the register will be cleared without a corresponding change to the status byte. Bit 6 will report ‘0’ if the instrument is polled again before a new reason for service has occurred. Reading with the *STB? query will send the contents of the status byte register as a single element. The response will be identical to that of the serial poll or READ_STATUS_BYTE request except that bit 6 will report the inclusive or the bitwise combination, excluding bit 6, of the status byte register and the server request enable register. The *STB? common query does not directly alter the status byte, or the request for service message. Commands associated with the status byte are: *STB?, *CLS, *SRE, *SRE?, *PSC, *PSC?. These, as well as all valid queries, will set the MAV bit and all errors will set the error queue bit. February 2014 20 LDP-3830 Event Registers Event registers capture changes in conditions. Each event bit in an event register corresponds to a condition bit in the condition register or, if there is no condition register, to a specific condition in the instrument. The event will become true when the associated condition makes a defined transition. The bits in the event register “latch” once they are set meaning that they are not cleared until they are read by the application. The event register guarantees that the application cannot miss an event that occurs between the reading and clearing of an event register. Event registers also have a corresponding event enable register that determine which bits in the corresponding event register will cause a true summary message when set. Once set, the summary is passed down to the status register. Event registers cannot be directly written to and they are cleared when read or sent the *CLS common command. Figure 3.4 – Event Register Diagram When an event register also has a corresponding condition register, there is a Positive Transition Register (PTR) and Negative Transition Register (NTR) that active the corresponding bits in the event register. The PTR allows an event to be reported when the condition changes from false to true. The NTR allows an event to be reported when the condition changes from true to false. Setting both allows an event to be reported anytime the condition changes. Clearing both transition registers disables event reporting. *CLS will clear all event registers within the instrument. *PSC enables clearing of event registers at power on. Standard Event Status Register The standard event register is defined in the IEEE 488.1-1992 specification. It does not have a corresponding condition register. Bit 7 – Power On indicates that an off-to-on transition has occurred in the power supply. Bit 6 – User Request indicates that a front panel button press has requested local control. Bit 5 – Command Error indicates an error has been detected by the command parser. Bit 4 – Execution Error indicates a command was valid but could not be executed. Bit 3 – Device-specific Error indicates an error that occurs due to hardware limitations. Bit 2 – Query Error reports data in the output queue is not available or has been lost. Bit 1 – Unused and always reports 0. Bit 0 – Operation Complete is generated in response to the *OPC command. Commands that affect the standard event register are *OPC, *CLS, *ESR?, *ESE, *ESR?, *PSC and *PSC?. February 2014 21 LDP-3830 QUEStionable Status The QUEStionable status register contains bits which give an indication of the quality of various aspects of the signal. A bit set in the condition register indicates that the data currently being generated is of questionable quality due to a parameter associated with the bit. For instance, the current warning could mean that the current is changing and has not reached the setpoint or that a command was sent to the unit that was clipped to a value based on the limits of the instrument. The timing warning may indicate that the external trigger is faster than the 5% duty cycle limitation of the instrument and was therefore ignored. A pulse board error indicates that there is no pulse board or an unrecognized pulse board is attached to the instrument. Interlock 1 and 2 indicate that the unit is in interlock and will not operated. Commands associated with the QUEStionable status register: :STATus:QUEStionable:CONDition? – Queries the Condition Register :STATus:QUEStionable[:EVENt]? – Queries/Clears the Event Register :STATus:QUEStionable[:EVENt]:NTRansition[?] – Negative Transition Register :STATus:QUEStionable[:EVENt]:PTRansition[?] – Positive Transition Register :STATus:QUEStionable:ENABle[?] – Questionable Event Enable Register OPERation Status The OPERation status register contains conditions that are part of the instrument’s normal operation. Settling indicates that the setpoint has been changed and the instrument is adjusting to the new setpoint. Settling is also likely to result in a current or timing warning questionable status. Commands associated with the OPERation status register: :STATus:OPERation:CONDition? – Queries the Condition Register :STATus:OPERation[:EVENt]? – Queries/Clears the Event Register :STATus:OPERation[:EVENt]:NTRansition[?] – Negative Transition Register :STATus:OPERation[:EVENt]:PTRansition[?] – Positive Transition Register :STATus:OPERation:ENABle[?] – Questionable Event Enable Register Command Timing This section describes, for each device-dependent command, whether that command is performed in an overlapped or sequential manner. In other words, it states whether the next command may begin while the first is being executed or if it must wait until the first command is completed before its execution begins. Sequential / Overlapped Commands All device-dependent commands are executed in an overlapped manner, i.e. subsequent commands may begin before the current command has completed. Three common commands (*OPC, *WAI, *OPC?) are used to synchronize operation to the execution of overlapped commands. All overlapped commands are associated with a pending operation flag, which is set to true when the action is being performed. The flag is set to false when the operation is finished or aborted. When all operations are complete, the no operation pending flag will transition from false to true. If *OPC is sent down, the instrument will set the corresponding status bit when this transition occurs. Commands that change the status of the instrument are restored at power up and will not have their OPC flag set until all of the current writing to the non-volatile memory has been completed. February 2014 22 LDP-3830 Query Response Timing Query responses are evaluated at the time the query request is received and not at the time the response message is sent. In most cases, this does not create a problem since the time between parsing a query and sending its response is small. February 2014 23 LDP-3830 February 2014 24 LDP-3830 Chapter 4 : Command Reference This chapter is a guide to all of the device-dependent commands for the LDP-3830 Precision Pulse Current Source. This chapter is divided into two parts. Overview of the remote commands List of remote commands in alphabetical order Remote Command Reference Summary This section contains all of the commands for the LDP-3830 Precision Pulse Current Source, listed in alphabetical order. Table 4.1 contains a list and a description of each IEEE 488.1 common command. Table 4.2 contains the instrument specific commands. Unless otherwise noted, each of the instrument specific commands has a corresponding query without a parameter. See Figure 4.4 for the command path tree structure. Table 4.1 – Remote Command Summary of IEEE 488.1 Common Commands Command Syntax Function *CLS Resets the Standard Event Register, Status Byte and Error Queue to zero. *ESE <integer> Sets the Standard Event Status Enable Register. *ESE? Returns the value of the Standard Event Status Enable Register. *ESR? Returns the value of the Standard Event Status Register. *IDN? Returns the Device Identification string. *OPC Generates the Operation Complete message in the Standard Event Status Register. *OPC? Places an ASCII character 1 into the Output Queue. *PSC Used to avoid any undesirable service requests. *PSC? Queries the Power-On-Status-Clear Flag. *RCL <integer> Used to recall a stored setup configuration. *RST Forces a device reset. *SAV <integer> Saves the current setup configuration. *SRE <integer> Sets the Service Request Enable Register bits to allow generation of userselectable service requests. *SRE? Returns the current contents of the Service Request Enable Register. *STB? Returns the current contents of the Status Byte Register. *TST? Initiates an internal self-test and returns a response when complete. *WAI Prevents executing any further commands until the No-Operation-Pending flag is true. February 2014 25 LDP-3830 Table 4.2 – Instrument Specific Command Summary Reference List Name Function :DISPlay[:WINDow][:STATe] ON|OFF|1|0 Toggles the display on/off FORMat:SREGister ASCii|BINary|HEXadecimal|OCTal Response format for status subsystem data :MEASure[:SCALar]:CURRent? (Query Only) Measured/front panel pulse current :OUTPut[:STATe] Switches pulse outputs on or off :OUTPut:DELay <seconds> Trigger out delay [SOURce]:CURRent[:LEVel] <amps>|UP|DOWN Pulse current setpoint [SOURce]:CURRent:LIMit <amps> Pulse current limit [SOURce]:CURRent:STEP <amps> Pulse current step size [SOURce][:PULSe]:DCYCle <percent> Duty cycle [SOURce][:PULSe]:HOLD WIDTh|DCYLe Holds duty cycle or pulse width constant [SOURce][:PULSe]:PERiod <seconds> Pulse repetition period [SOURce][:PULSe]:WIDTh <seconds> Pulse width STATus:OPERation[:EVEnt]? (Query Only)Read the Operational Event Register STATus:OPERation:COND? (Query Only)Read the Operational Condition Register STATus:OPERation:ENABle <integer> Operational Event Enable Register STATus:OPERation:NTRansition <integer> Operational Status Negative Transition Event Enable Register STATus:OPERation:PTRansition <integer> Operational Status Positive Transition Event Enable Register STATus:QUESTionable[:EVEnt]? (Query Only)Read the Questionable Event Register STATus:QUESTionable:COND? (Query Only)Read the Questionable Condition Register STATus:QUESTionable:ENABle <integer> Questionable Event Enable Register STATus:QUESTionable:NTRansition <integer> Questionable Status Negative Transition Event Enable Register STATus:QUESTionable:PTRansition <integer> Operational Status Positive Transition Event Enable Register SYSTem:ERRor:[NEXT]? (Query Only)Returns first entry in error queue SYSTem:PRESet (No Query)Instrument reset SYSTem:PTYPe? (Query Only)Returns Pulse Board information TRIGger:SOURce IMMediate|EXTernal Sets the pulse repetition source. February 2014 26 LDP-3830 Command Reference The following pages contain a reference for both common and device-dependent commands of the LDP-3830 Precision Pulse Current Source. *CLS Clear Status Description Clears all status event registers and the error queue Notes Useful to clear registers before enabling service requests (SRQ) Example *CLS *ESE <integer> Standard Event Status Enable Description Sets the bits in the standard event status enable register. Parameters The value must be between 0 and 255. Notes The integer sent as a parameter is expressed in binary form when an event occurs in the standard event status register that matches the corresponding bit in the standard event status enable register, bit 5 will is enabled in the status byte register See *ESR? for a description of each bit in the status register along with a diagram of the reporting structure. Examples “*ESE 40” Sets the standard event status enable register to enable bit 5 of the status byte register if a 3 5 device-dependent error or a command error occurs (40 = 2 + 2 ) *ESE? Event Status Enable Query Description Determine the contents of the standard event status enable register Parameters None Notes The response is a value between 0 and 255, representing the bits of the standard event status enable register when expressed in base 2 binary format See *ESR? for a description of each bit in the status register along with a diagram of the reporting structure Examples “*ESE?” A response of 68 means the user request and query error bits have been enabled in the 2 6 standard event status enable register (68 = 2 + 2 ) *ESR? Standard Event Status Register Query Description Determine the contents of the standard event status register Parameters None September 2011 27 LDP-3830 Notes Reading this register clears the contents. The response is a value between 0 and 255, representing the bits of the standard event status register when expressed in base 2 binary format. The event bit is set when a specific event occurs: Bit 0 Operation Complete is set when all pending device operations have been finished after *OPC common command has been executed 1 Unused and always reports 0 2 Query Error means that data in the output has been lost or that none was available 3 Device-Specific Error is an error has occurred that is neither a command query or execution error 4 Execution Error means a parameter was evaluated to be outside the legal input range or capability 5 Command Error means a command could not be interpreted by the parser 6 Unused and always reports “” Bit 7 Power On indicates that an off-to-on transition has occurred in the power supply *CLS will clear this register Examples “*ESR?” A response of 32 means a command error has occurred *IDN? Instrument Identification Description Requests the instrument to identify itself Parameters None Notes Returns a string of instrument identification information. The string contains a comma separated list of manufacturer, model number, serial number, and firmware revision. Examples “*IDN?” Responds with “ ILX Lightwave,LDP-3830,38301111,1.0 -- 1.0” *OPC Operation Complete Description Sets the operation complete bit (bit 0) in the standard event status register when all pending overlapped commands have been completed Parameters None Notes This command does not hold off subsequent operations. You can determine when the overlapped commands have completed either by polling the standard event status register (*ESR?) or by setting up the status system such that a serve request is asserted when bit 0 is set in the standard event status register. Examples OUTPUT ON;*OPC February 2014 Will set bit 0 in the standard event status register when the output is on 28 LDP-3830 *OPC? Operation Complete Query Description Places an ASCII character 1 into the instrument’s output queue when all pending operations have been finished Parameters None Notes This command is a sequential command that holds off all subsequent commands until the “1” is returned. Make sure you have set the timeouts appropriately for using this command when you expect long delays. Examples *OPC? A response of “1” means that all overlapped commands are complete *PSC <number> Power-on Status Clear Description Sets automatic power-on clearing of the enable registers Parameters A number that rounds to the integer zero disables the power-on clearing of enable register while any other number enables the power-on clearing of enable registers. Notes Registers affected: Condition Status Enable Event Status Enable Operational Event Enable Service Request Enable Standard Event Status Enable Questionable Event Enable Factory default condition: Disabled In the disabled state, the values of the enable registers are saved through power OFF/ON. The power-on status clear flag (see *PSC?) is set to false, disallowing service request interrupts after power-on. In the enabled state, the enable registers are cleared during power-on. The power-on status clear flag (see *PSC?) is set to true, allowing service request interrupts after power-on. Examples *PSC 0 Disable automatic power-on clearing of the enable registers *PSC 1 Enable automatic power-on clearing of the enable registers *PSC? Power-on Status Clear Query Description Requests the status of the power-on status clear flag Parameters None Notes Response: 0 – The enable registers are saved through power off/on. 1 – The enable registers are cleared during power on. Registers affected: Condition Status Enable Event Status Enable Operational Event Enable Service Request Enable Standard Event Status Enable Questionable Event Enable See Chapter Four for more information on register structure Examples February 2014 *PSC? Requests state of power-on status clear flag 29 LDP-3830 *RCL <bin> Recall Description Recalls a stored setup configuration from memory Parameters A value from 0 – 10 Notes Bin 0 is the factory-set default configuration The *SAV function is used to save configurations for convenient recall The current setup is automatically stored and recalled at the next power-on Examples “*RCL 0” –response: instrument is reconfigured to factory-default settings *RST Reset Description Performs a device reset Parameters None Notes 1. 2. 3. Clears *OPC or *OPC? device requirements Stops operation of overlapped commands Sets all device specific function to a known state (*RST Value) The reset command does NOT affect the following: 1. Output Queue 2. Enable Registers 3. Event Registers 4. *PSC state 5. Memory contents associated with *SAV *SAV <bin> Save Description Saves the current instrument configuration to non-volatile memory Parameters A value from 1 – 10 Notes The *SAV operation saves the contents of everything affected by the *RST command. It is not necessary to save the current setup for next power-on. The current setup is automatically stored and recall at next power-on. Use *RCL <bin> to restore the saved configuration Examples “*SAV 3” The current instrument configuration is stored in memory bin 3 *SRE <integer> Service Request Enable Command Description Sets the service request enable register bits Parameters A value in the range of 0 to 255 February 2014 30 LDP-3830 Notes The integer sent as a parameter when expressed in binary format, each bit repress a bit in the service request enable register. A bit value of one indicates an enabled condition. A bit value of zero indicates a disabled condition. Bit 6 will be ignored. Setting the service request enable register allows the programmer to select which summary messages in the status byte register may cause service requests. Each bit in the service request enable register corresponds to a bit in the status byte register. A service request is generated when a bit in either the service request enable register or the status byte register transitions from zero to one and the corresponding bit in the other register is either set to one or transitions from zero to one at the same time. Chapter 3 has detailed information on status reporting. Status Byte Register RQS Service Request Generation 7 6 read by Serial Poll 5 4 3 2 1 0 MSS read by *STB? 7 – Operational Event Summary Bit 6 – Service Request/Master Status Summary Bit 5 – Standard Event Status Summary Bit 4 – Message Available Bit 3 – Conditional Event Summary Bit 2 – Error Queue Not Empty Bit 1 – Not Used 0 – Not Used Logical OR & & & & & & & 7 5 4 3 2 1 0 Service Request Enable Register *SRE <integer> *SRE? Examples “*SRE 16” Enables the service request enable register to generate a service request when a query generating message is available to read from the output queue. *SRE? Service Request Enable Query Description Returns the enabled bits in the service request enable register Parameters None Notes The response is a value between 0 and 255, representing the bits of the standard event status enable register when expressed in base 2 binary format Examples “*SRE?” A response of 16 signifies that the message available summary bit is enabled *STB? Status Byte Query Description Returns the value of the status byte register Parameters None Notes The response is the sum of the enabled bits and must be a value between 0 and 255 February 2014 31 LDP-3830 Status Byte Register RQS Service Request Generation 7 6 read by Serial Poll 5 4 3 2 1 0 MSS read by *STB? 7 – Operational Event Summary Bit 6 – Service Request/Master Status Summary Bit 5 – Standard Event Status Summary Bit 4 – Message Available Bit 3 – Conditional Event Summary Bit 2 – Error Queue Not Empty Bit 1 – Not Used 0 – Not Used Logical OR & & & & & & & 7 5 4 3 2 1 0 Service Request Enable Register *SRE <integer> *SRE? Examples “*STB?” A response of 200 specifies that the laser condition summary, master status summary and error available bits are enabled *TST? Self Test Description Performs an internal self-test and then reports results Parameters None Notes Response 0 = test completed with no errors Response 1 = test completed with errors This is a synchronous command and will block other commands from execution until it has completed Examples “*TST?” A response of 0 means test completed without errors *WAI Wait to Continue Description Prevents the instrument from executing any further commands until all pending operations are complete Parameters None Notes This command can be used to make the instrument wait until an operation is complete before continuing Care should be taken to set the time-out appropriately for use with the *WAI command. After this command is sent, the instrument may block subsequent commands waiting for the input queue to empty. Examples “:OUTPUT ON;*WAI;:MEAS:CURRENT?” The current measurement will occur after the output is on :DISPlay[:WINDow][:STATe] ON|OFF|1|0 :DISPlay[:WINDow][:STATe]? Description Controls whether the display is visible Parameters ON/1 – Display is on OFF/0 – Display is off Reset Value On February 2014 32 LDP-3830 Examples “DISP ON”: Turns on the VFD display “DISP:WINDOW:STATE?” A response of 0 means that the VFD display is turned off :FORMat:SREGister ASCii|BINary|HEXadecimal|OCTal :FORMat:SREGister? Description Sets the data type of the response to queries for status subsystem registers Parameters ASCii BINary HEXadecimal OCTal Notes All status, condition and event requests respond in the selected radix Reset Value ASCii Examples :FORMAT:SREG BIN;*STB? May respond with ‘#B11001 :FORMat:SREGister? A response of HEXIDECIMAL means status subsystem responses will be in hexadecimal encoding ASCII standard numeric format Encoded as numeric, base 2, preceded by ‘#B’ Encoded as numeric, base 16, preceded by ‘#H’ Encoded as numeric, base 8, preceded by ‘#Q’ :MEASure[:SCALar]:CURRent? Description Reports measured pulse current Responses Current in amps Notes Useful during a slow trigger to determine where in the ramp on the current is set Examples “MEAS:CURR?” A response of 1.00 means that the instrument is measuring 1 Amp of pulsed current :OUTPut[:STATe] ON|OFF|1|0 :OUTPut[:STATe]? Description Controls whether the output is enabled or not Parameters ON/1: Turns the output on OFF/0: Turns the output off Notes This is an overlapped command and has a two second delay on turn on. Turn off is immediate. The output on bit 8 in the operation status register can be used to determine the actual point that the output is turned on, or if it has automatically shut off due to an error condition. Additionally, *OPC? Or *WAI may be used to determine the time when the output reaches setpoint. Reset Value OFF Examples “OUTP?” A response of 0 means that the pulse output is off “OUTP ON” Enables pulse output :OUTPut:DELay <seconds> :OUTPut:DELay? Description Sets the delay between the output pulse and the trigger out Parameters None Notes The value must be between 0 and 655.35e-6. The resolution is 10ns and will be rounded to the nearest value. There will be no trigger out signal if the delay is longer than the period of the pulse signal. February 2014 33 LDP-3830 Reset Value 0 Examples “OUTP:DEL 0.00035858." Sets the trigger out delay to 358.58 microseconds “OUTPUT:DELAY?” A response of 4.704E-05 means that the trigger out delay output is 47.04 microseconds [SOURce]:CURRent[:LEVel] <amps>|UP|DOWN [SOURce]:CURRent[:LEVel]? Description Controls the pulse setpoint Parameters <amps> Sets the output in amps to a specific value UP/DOWN Increments or decrements the current setpoint by the value in :[SOURce]:CURRent:STEP Notes The range for this is 0 to 5 Amps, if you set a value higher than [SOURce]:CURRent:LIMit, the value will be clipped at the limit and a current warning questionable status will be set. Reset Value 0 Examples “CURR 4.5” Sets pulse output current setpoint to 4.5 A “CURR 0.2; CURR:STEP 0.1; CURR UP” Sets bias current to 200mA; sets bias current step to 100mA; increases bias current setpoint to 300mA “CURR:LEV?” A response of 0.21 means the output current setpoint is 210 mA [SOURce]:CURRent:LIMit <amps> [SOURce]:CURRent:LIMit? Description Controls the pulse current limit Parameters <amps> Specified hardware and set point current limit. Notes The current limit sets independent hardware monitoring of the current. Due to overshoot and accuracy limitations, this will usually need to be set higher than the current setpoint. Setting the limit to a value lower than the [SOURce]:CURRent[:LEVel] will result in the setpoint clipping at the value of the limit and the current warning questionable status will be set. Reset Value 5.50 Amps Examples “CURR:LIM 4.5” Sets pulse output current limit to 4.5 A CURR2:LIM?” A response of 0.35 means that the bias current limit is 350 mA [SOURce]:CURRent:STEP <amps> [SOURce]:CURRent:STEP? Description Controls the pulse current step size in amps Parameters <amps> The step size, ranging from 0.01 to 5.00 Notes Use [SOURce]:CURRent[:LEVel] UP|DOWN to step the current after setting the step amount Reset Value 0.01 A Examples “CURR2 0.2; CURR2:STEP 0.1; CURR2 UP” increases bias current setpoint to 300mA February 2014 Sets bias current to 200mA; sets bias current step to 100mA; 34 LDP-3830 [SOURce][:PULSe]:DCYCle <percent> [SOURce][:PULSe]:DCYCle? Description Controls the duty cycle in % of the pulses Parameters <percent> Notes The percent must be in the range of 0.01 to 5.00. This is a coupled command with [SOURce][:PULSe]:PERiod and [SOURce][:PULSe]:WIDTh. This command will not change the period, but will change the width to adjust to this setpoint. Changes that would cause the width to go out of the specified range will cause an execution error. The duty cycle percentage to be used for immediate trigger mode In some cases when the period and width specify a duty cycle less than 0.01% this will report 0 as its set point Reset Value PERiod = 500us, WIDTh = 500ns, DCYCle = 1% Examples “DCYC?” A response of 0.30 means that the duty cycle is 0.30% [SOURce][:PULSe]:DELay <seconds> [SOURce][:PULSe]:DELay? Description Controls the delay between the trigger in signal and the pulse output generated Parameters <seconds> Notes The value must be between 0 and 655.35e-6. The resolution is 10ns and will be rounded to the nearest value. Tthe input trigger delay If the [SOURce][:PULSe]:DELay is longer that the pulse period, there will be no output Reset Value 0 Examples “DEL 0.000535” Sets the trigger in delay to 535 microseconds [SOURce][:PULSe]:HOLD DCYCLE|WIDTH [SOURce][:PULSe]:HOLD? Description Controls whether the pulse duty cycle or width parameter is held constant while changing the period. Parameters Specifies which pulse parameter is held constant when the period changes Reset Value WIDTH Examples “HOLD DCYCLE” The duty cycle will remain unchanged when the period is changed [SOURce][:PULSe]:PERiod <seconds> [SOURce][:PULSe]:PERiod? Description Controls the pulse period in seconds Parameters <seconds> Notes The seconds must be in the range of 500e-9 to 1e-3. This is a coupled command with [SOURce][:PULSe]:DCYCle and [SOURce][:PULSe]:WIDTh. This command will change the parameter that is not defined in [SOURce][:PULSe]:HOLD in order to set the new period. Set points that cause the duty cycle or width to exceed their specified ranges will cause an execution error. February 2014 The pulse repetition period when in immediate trigger mode 35 LDP-3830 Reset Value 50 microseconds Examples "PERIOD 2E-6" Sets the pulse period to be 2 us "PER?" A responseof 0.0002 means that the period is 200 us [SOURce][:PULSe]:WIDTh <seconds> [SOURce][:PULSe]:WIDTh? Description Controls the pulse width Parameters <seconds> Reset Value The seconds must be in the range of 25e-9 to 1e-6. This is a coupled command with [SOURce][:PULSe]:DCYCle and [SOURce][:PULSe]:PERiod. This command will not change the period, but will change the duty cycle to adjust to this set point. Changes that would cause the duty cycle to go out of the specified range will cause an execution error. Reset Value 500e-9 Examples WIDTH 2E-7 Adjuss pulse width to 200 ns WIDTH?” A response of 3E-8 means that the pulse width is 30 ns The output current pulse width in seconds STATus:OPERation[:EVEnt]? Description Read the operational event register Notes This register requires that the associated PTR or NTR filters are set before the condition register bit can set the event register. The data in this register is latched until it is queried. Querying the register clears the data, ensuring that no events are missed between subsequent reads of the register. *CLS will also clear this register There are two operation events enabled in the LDP-3830: Bit 1 = Settling meaning that the current, pulse width or period is settling on the setpoint Bit 8 = Output On meaning that the output is currently on See Figure 3.2 for a description of the operational status registers Examples "STAT:OPER?" A response of 256 means that there has been an "Output On" event STATus:OPERation:COND? Description Read the operational status condition register. Notes This will report the current status of the two enabled operation condition bits: Bit 1 = Settling, the current, pulse width or period is settling on the setpoint. Bit 8 = Output On, the output is currently on. Use the STATus:OPERation:NTRansition and STATus:OPERation:PTRansition filters to enable the associated event register. Reset Value 0 Examples "STAT:OPER:COND?" --response 256, means that the output is currently on February 2014 36 LDP-3830 STATus:OPERation:ENABle <integer> STATus:OPERation:ENABle? Description Controls which OPERation events causes summary bit 7 of the status byte to be set Parameters Value between 0 and 32767, representing the bits of the operation event enable register when expressed in base 2 binary format Notes When a bit in this register is set, along with the corresponding bit in the operation event register, bit 7 will be set in the status byte. This register is cleared at power on when *PSC is set to 1. There are two bits used in the LDP-3830: Bit 1 = Settling can be used to determine when the current, pulse width or period is done settling event has occurred Bit 8 = Output On can be used to determine when the output on/off event has occurred Reset Value Not Affected by *RST Examples "STAT:OPER:ENAB 256" Enables the "Output On" events report to the status byte STATus:OPERation:NTRansition <integer> STATus:OPERation:NTRansition? Description Controls the operational status negative transition filter register Parameters Value between 0 and 32767, representing the bits of the operational status negative transition filter register when expressed in base 2 binary format Notes Causes the corresponding bit in the operational status event register to be set when the corresponding bit in the operation event condition register transitions from a '1' to a '0' There are two bits used in the LDP-3830: Bit 1 = Settling creates an event when the current, pulse width or period is done settling on the setpoint Bit 8 = Output On creates an event when the output shuts off Reset Value 0 Examples "STAT:OPER:NTR 256" Enables an event when the output shuts off STATus:OPERation:PTRansition <nrf value> STATus:OPERation:PTRansition? Description Controls the Operational Status Positive Transition Filter register Parameters Value between 0 and 32767, representing the bits of the Operational Status Positive Transition Filter register when expressed in base 2 binary format Notes Causes the corresponding bit in the operational status event register to be set when the corresponding bit in the operation event condition register transitions from a '0' to a '1' There are two bits used in the LDP-3830: Bit 1 = Settling creates an event when the current, pulse width or period is starts to settling on the setpoint Bit 8 = Output On creates an event when the output turns on Reset Value 32767 Examples "STAT:OPER:PTR 256" February 2014 Enables an event when the output turns on 37 LDP-3830 STATus:QUEStionable[:EVEnt]? Description Read the questionable event register Notes This register requires that the associated PTR or NTR filters are set before the condition register bit can set the event register. The data in this register is latched until it is queried. Querying the register clears the data, ensuring that no events are missed between subsequent reads of the register. *CLS will also clear this register There are eight questionable events enabled in the LDP-3830: Bit 0 = Voltage Warning Bit 1 = Current Warning Bit 2 = Timing Warning Bit 5 = Frequency Warning Bit 9 = Pulse Board Error Bit 10 = Interlock 1 Bit 11 = Interlock 2 Bit 14 = Command Warning See Figure 3.2 for a description of the questionable status registers Examples "STAT:QUES?" A response of 2048 means that there has been an Interlock 2 event STATus:QUEStionable:COND? Description Read the questionable status condition register Notes This will report the current status of the eight enabled questionable condition bits: Bit 0 = Voltage Warning means the compliance voltage of the device won’t allow the current to get to set point Bit 1 = Current Warning means the current is not at the set point due to device conditions Bit 2 = Timing Warning means the internal clock has not achieved phase lock Bit 5 = Frequency Warning means the internal clock has not achieved phase lock Bit 9 = Pulse Board Error means the pulse board is either removed from the instrument or is incompatible with the instrument Bit 10 = Interlock 1 means that Interlock 1 is closed or in the TTL low state Bit 11 = Interlock 2 means that Interlock 2 is open Bit 14 = Command Warning means that a current set point was sent, but was limited by the current limit or that the exact duty cycle sent down was not obtainable due to the period and width resolution. These are not fatal warnings that indicate that the state is probably expected but may deviate in some manner. Several of these conditions will cause the instrument to turn off therefore clearing the condition; this will cause an event if either transition filter is enabled. Some of these like the pulse board error and interlock conditions can be used to inform an operator if the system is ready to be run. Use the STATus:QUEStionable:NTRansition and STATus:QUEStionable:PTRansition filters to enable the associated event register Examples "STAT:QUES:COND?" A response of 2048 means that Interlock 2 is open STATus:QUEStionable:ENABle <integer> STATus:QUEStionable:ENABle? Description Controls which questionable events cause summary bit 3 of the status byte to be set Parameters Value between 0 and 32767, representing the bits of the questionable event enable register when expressed in base 2 binary format Notes When a bit in this register is set, along with the corresponding bit in the questionable event register, bit 3 will be set in the status byte. This register is cleared at power on when *PSC is set to 1. February 2014 38 LDP-3830 There are eight bits used in the LDP-3830: Bit 0 = Voltage Warning Bit 1 = Current Warning Bit 2 = Timing Warning Bit 5 = Frequency Warning Bit 9 = Pulse Board Error Bit 10 = Interlock 1 Bit 11 = Interlock 2 Bit 14 = Command Warning Reset Value Not Affected by *RST Examples "STAT:QUEST:ENAB 16384" Command Warning events report to the status byte STATus:QUEStionable:NTRansition <integer> STATus:QUEStionable:NTRansition? Description Controls the operational status negative transition filter register Parameters Value between 0 and 32767, representing the bits of the operational status negative transition filter register when expressed in base 2 binary format Notes Causes the corresponding bit in the operational status event register to be set when the corresponding bit in the operation event condition register transitions from a '1' to a '0' There are eight bits used in the LDP-3830: Bit 0 = Voltage Warning Bit 1 = Current Warning Bit 2 = Timing Warning Bit 5 = Frequency Warning Bit 9 = Pulse Board Error Bit 10 = Interlock 1 Bit 11 = Interlock 2 Bit 14 = Command Warning Reset Value 0 Examples "STAT:QUES:NTR 256" Enables an event when the output shuts off STATus:QUEStionable:PTRansition <nrf value> STATus:QUEStionable:PTRansition? Description Controls the operational status positive transition filter register Parameters Value between 0 and 32767, representing the bits of the operational status positive transition filter register when expressed in base 2 binary format Notes Causes the corresponding bit in the operational status event register to be set when the corresponding bit in the operation event condition register transitions from a '0' to a '1' There are eight bits used in the LDP-3830: Bit 0 = Voltage Warning Bit 1 = Current Warning, Bit 2 = Timing Warning Bit 5 = Frequency Warning Bit 9 = Pulse Board Error Bit 10 = Interlock 1 Bit 11 = Interlock 2 Bit 14 = Command Warning Reset Value 32767 Examples "STAT:QUES:PTR 256" February 2014 Enables an event when the output turns on 39 LDP-3830 SYSTem:ERRor[:NEXT]? Description Returns first error in the error queue. The errors are identified by a number and string descriptor separated by a comma. Refer to Chapter 4 for information regarding error handling and Chapter 6 for error code explanations. Parameters None Notes The response data will be the first error in the queue. Each time an error is read, it is removed from the queue. If the queue is first in, first out, if the queue overflows, the last error is replaced with error “-350, “Queue overflow”” If the error queue is empty, then ‘0, “No error”’ will be returned. *CLS shall clear the error queue Reset Value *RST does not affect the error queue. Examples “ERR?” A response of 0,"No error"\n means that no errors have been reported SYSTem:PRESet Description Performs a device reset and sets the OCIS and OQIS states Parameters None Notes Performs the same function as *RST SYSTem:PTYPe? Description Reads the pulse board ID string Parameters None Notes Querying the pulse board ID string when no pulse board is connected will generate error 531,"Pulse board not connected" Examples “SYST:PTYPE?” A response of "ILX Lightwave,LPB-386,3861001,0\n" means a LPB-386 Pulse board with serial number 3861001 is connected "SYSTEM:PTYPE?" A response of "ILX Lightwave,0,0,0\n" means that no pulse board is connected TRIGger:SOURce IMMediate|EXTernal TRIGger:SOURce? Description Configures the source for pulse generation Parameters IMMediate: Pulses are generated based on the timing signal coming from the period command EXTernal: A pulse is generated on the rising edge of the trigger in signal Notes [SOURce][:PULSe]:DELay sets the delay between the trigger in and the pulse output when using an external source. If the trigger input occurs that would cause the output to violate the maximum 5% duty cycle, that trigger edge will be ignored and a pulse will be generated on the next trigger edge that won’t violate the duty cycle specification. Reset Value IMMediate Examples “TRIG:SOUR external” Places the unit in external trigger operation “TRIG:SOUR?” A response of 0 means that the instrument is set to external trigger mode; a response of 1 means that the instrument is set to immediate trigger mode. February 2014 40 LDP-3830 Chapter 5 : Troubleshooting This chapter is to help you resolve problems quickly. If you need help, contact ILX Lightwave Customer Service. See page viii for contact information. ILX Lightwave Corporation provides in-house and on-site calibration services for ILX instruments. Most ILX instruments, including the LDP-3830 require yearly calibration to ensure performance to published specifications. ILX factory calibrations employ NIST traceable measurement instrumentation and our calibration engineers and technicians use automated test equipment to accurately and efficiently capture and record calibration data. An original certificate of calibration authenticity is provided with all instrument calibrations and a detailed report showing any pre-calibration out-of-tolerance conditions is available upon request. Calibration turn-times are normally five business days or less. On-site calibrations can be performed around your production schedule, night or day, seven days a week. Please contact ILX Customer Support (see Comments, Suggestions, and Problems on page viii for contact information) for additional calibration information. For further assistance with technical solutions and troubleshooting, visit the www.ilxlightwave.com Support page (www.ilxlightwave.com/support/index.html), and the Library page (www.ilxlightwave.com/library/index.html) for Application Notes and Technical Notes. February 2014 41 LDP-3830 Troubleshooting Guide This section lists some common problems and corrective actions. The corrective actions may not solve the problem; in which case, you should contact ILX Lightwave. For a comprehensive list of frequently asked questions, see the ILX Lightwave website or contact ILX Lightwave Customer Service (see Comments, Suggestions, and Problems on page viii for contact information). Symptom Corrective Action The instrument does not power up Check the power cord to make sure that it is properly connected and check the wall outlet by connecting to operational instrument. Check the rear panel marking to make sure that the unit is configured for the line voltage applied. Improper line voltage will cause the internal fuses to blow, and it will need to be returned to an ILX Lightwave service center for repair. Unit Reads: “Current Limit” Unit Reads: “Internal Communication Error” Unit Reads: “Cable Interlock” Output is not tracking the external trigger This is due to a current limit. See the end of chapter 2 for an explanation of the current limit. E-555 is the internal communication error indicating that the LDP-3830 platform is not functioning correctly. Often this may be corrected by cycling the power. If the problem persists, the instrument must be returned to ILX Lightwave for repair. Check to ensure the CC-385 cable is securely screwed to both the LDP-3830 and LDP-386. A loose CC-385 cable can cause permanent damage to either the LDP-386 or laser. The cable interlock is extremely sensitive in order to detect cable disconnects as soon as possible, therefore additional cable interlock errors can result from changing the monitor switch during operation, or electro-static discharge onto the cable or the LPB-386 pulse enclosure. To prevent potential damage to the laser ILX advises turning the output off prior to changing the monitor switch. Check the trigger in delay. If it is larger than period that you are sending pulses, then there will be no pulses on the output. Make sure that your trigger in is at the proper level. If the signal is too low, it may not detect the signal. Instrument is displaying multiple errors at once Check to make sure that you are not providing a trigger in signal that violates the 5% duty cycle. Triggers that occur within the 5% duty cycle window will be ignored. This usually is due to multiple faults detected at the same time such as Interlock 1 closed and Interlock 2 open at the same time. If there are multiple errors including “Internal February 2014 42 LDP-3830 Can’t adjust using the front panel Communication Error”, it often means that there was a brown out that caused the pulsing subsystem to reset, but didn’t shut down the instrument completely. Cycle the power to correct this issue. Due to command coupling, you may be violating the constraints of another parameter. For instance if you are in hold PRI mode, and the PRI is set to 500ns, and you try to adjust the pulse width, it will seem to be stuck at 25ns, because 25ns is the lower limit for pulse width and any higher pulse width would violate the 5% duty cycle limitation. Adjust the PRI to a higher value first than pulse width can be adjusted. If the unit has been remotely operated, the Recall/Local button in the lower left of setup section needs to be pressed in order to return the unit from remote operation and allow the front panel to work. Pulse Board Error The adjustment knob has a three second timeout of inactivity. If this period has elapsed the “Adjust” led will de-illuminate. To re-enable adjustment, either press the parameter button again or press the button under the “Adjust” led. This error is cause if a LPB-386 is not connected to the CC-385 cable or if there is a loose connection. Ensure the LPB-386 is connected and the CC-385 is firmly connected to the output connectors. If this problem persists please contact ILX Lightwave for further assistance. February 2014 43 LDP-3830 Error Messages Error messages may appear on the LDP-3830 display when error conditions occur in the instrument. In remote operation, use or SYST:ERR? to read the latest error. Error Code Tables The error codes are classified and placed in tables corresponding to their classification. The classifications are Command Errors, Execution Errors, Device Errors, Query Errors and Instrument Specific Errors. Table 5.1 - Command Errors Error Code Explanation -104 -108 -113 -115 -121 -123 -151 -160 -161 Data type error Parameter not allowed Undefined header Unexpected number of parameters Invalid character in number Exponent too large Invalid string data Block data error Invalid block data Table 5.2 - Execution Errors Error Code Explanation -220 -222 Parameter error Data out of range Table 5.3 - Device Errors Error Code Explanation -311 Memory error Table 5.4 - Query Errors Error Code Explanation -410 -420 Query interrupted Query unterminated Table 5.5 - Instrument Specific Errors Error Code Explanation 530 531 552 553 554 555 557 558 Pulse Board Error Pulse Board not connected Cable Interlock Pulse Current Limit Output over voltage Internal Comm. Error Interlock 1 Interlock 2 February 2014 44 LDP-3830