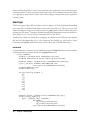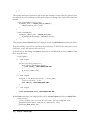
1
iPhone Game Development
Paul Zirkle and Joe Hogue
Beijing • Cambridge • Farnham • Köln • Sebastopol • Taipei • Tokyo
iPhone Game Development
by Paul Zirkle and Joe Hogue
Copyright © 2010 Paul Zirkle and Joe Hogue. All rights reserved.
Printed in the United States of America.
Published by O’Reilly Media, Inc., 1005 Gravenstein Highway North, Sebastopol, CA 95472.
O’Reilly books may be purchased for educational, business, or sales promotional use. Online editions
are also available for most titles (http://my.safaribooksonline.com). For more information, contact our
corporate/institutional sales department: 800-998-9938 or [email protected].
Editor: Andy Oram
Production Editor: Loranah Dimant
Copyeditor: Audrey Doyle
Proofreader: Loranah Dimant
Indexer: Lucie Haskins
Cover Designer: Karen Montgomery
Interior Designer: David Futato
Illustrator: Robert Romano
Printing History:
November 2009:
First Edition.
Nutshell Handbook, the Nutshell Handbook logo, and the O’Reilly logo are registered trademarks of
O’Reilly Media, Inc. iPhone Game Development, the image of a roadrunner, and related trade dress are
trademarks of O’Reilly Media, Inc.
Many of the designations used by manufacturers and sellers to distinguish their products are claimed as
trademarks. Where those designations appear in this book, and O’Reilly Media, Inc. was aware of a
trademark claim, the designations have been printed in caps or initial caps.
While every precaution has been taken in the preparation of this book, the publisher and authors assume
no responsibility for errors or omissions, or for damages resulting from the use of the information contained herein.
ISBN: 978-0-596-15985-6
[M]
1256658809
Table of Contents
Preface . . . . . . . . . . . . . . . . . . . . . . . . . . . . . . . . . . . . . . . . . . . . . . . . . . . . . . . . . . . . . . . . . . . . . vii
1. Introduction to the iPhone . . . . . . . . . . . . . . . . . . . . . . . . . . . . . . . . . . . . . . . . . . . . . . . 1
Apple Developer Account and Downloading the SDK
Application Bundles
Xcode and Interface Builder
Views and Controllers
Loading Devices
Certificates and Profiles
Xcode Configuration
Objective-C Primer
Classes
Instantiation
Messaging
Member Variables
Memory Management
Constructors and Destructors
Interface Builder Integration
Mixed C++ and Objective-C
Conclusion
1
2
4
13
22
22
24
25
27
31
31
32
33
33
34
34
34
2. Game Engine Anatomy . . . . . . . . . . . . . . . . . . . . . . . . . . . . . . . . . . . . . . . . . . . . . . . . . . 35
Application Framework
Main Loop
Game State Manager
State Machine
Graphics Engine
Texturing
Animation
Physics Engine
Audio Engine
35
36
37
38
41
41
46
51
56
iii
Player Input
Game Logic
Conclusion
58
61
68
3. The Framework . . . . . . . . . . . . . . . . . . . . . . . . . . . . . . . . . . . . . . . . . . . . . . . . . . . . . . . . 69
Game State Management
Implementation
Removing the Status Bar
The App Delegate
Frames per Second
Event Handling
The Resource Manager
Texture Format
Sound Format
Deploying Resources
Management
The Render Engine
GLESGameState
Textures
Font Textures
Example State
The Sound Engine
Example State
The Data Store
Storing Simple Data
Storing Complex Data
Example State
The Skeleton Application
Conclusion
70
71
73
73
75
76
78
78
78
79
79
80
81
82
83
85
87
88
89
89
90
90
93
95
4. 2D Game Engine . . . . . . . . . . . . . . . . . . . . . . . . . . . . . . . . . . . . . . . . . . . . . . . . . . . . . . . 97
Game Design
Feature List
User Input Scheme
Learning Curve
Tile Engine
Unique Tiles
Drawing Tiles
TileWorld Class
Animation
Animation and Sprite Classes
Physics
Entities
iv | Table of Contents
97
98
99
100
102
102
104
105
110
111
121
121
Entity-to-World
Special Tiles
Entity-to-Entity
Level 1 Implementation
gsEmuLevel
TileWorld
Main Character
Emu Chicks
Emu Mother
Game Logic
Sound
Level 2 Implementation
gsLionLevel
TileWorld
McGuffin
Main Character
Lion Entities
Game Logic
Sound
Level 3 Implementation
gsMazeLevel
TileWorld
Buttons
Doors
Cat and Mouse
User Input
Game Logic
Sounds
Level 4 Implementation
gsRiverLevel
TileWorld
Crocodiles
Logs
Tom
User Input
Game Logic
Sounds
Game State Serialization
Initialize Storage
End Game
Modify UI
Conclusion
122
126
126
127
127
128
128
131
137
139
140
141
141
142
143
143
144
151
152
152
153
154
155
156
157
157
158
164
164
165
165
167
168
169
171
172
175
175
175
176
179
180
Table of Contents | v
5. 3D Games . . . . . . . . . . . . . . . . . . . . . . . . . . . . . . . . . . . . . . . . . . . . . . . . . . . . . . . . . . . . 181
GLESGameState3D Class
POWERVR
Sprite3D
Accelerometer
3D Game Design
Graphics
Input
Camera
Logic
Implementation
Camera
Skybox
Input
Rings
Particle System
Logic
Best Times
End Game
Conclusion
182
184
185
186
187
187
189
190
190
190
192
194
196
204
209
217
219
222
224
6. Considerations for Game Design . . . . . . . . . . . . . . . . . . . . . . . . . . . . . . . . . . . . . . . . . 225
Resource Management
User Input Design
Networking
Third-Party Code
Libraries
Middleware
Open Source Games
App Store
Conclusion
225
226
227
227
227
228
228
229
230
Appendix: References . . . . . . . . . . . . . . . . . . . . . . . . . . . . . . . . . . . . . . . . . . . . . . . . . . . . . . . 231
Index . . . . . . . . . . . . . . . . . . . . . . . . . . . . . . . . . . . . . . . . . . . . . . . . . . . . . . . . . . . . . . . . . . . . . 233
vi | Table of Contents
Preface
If you’re reading this Preface, you might be trying to decide whether this book is right
for you. So, we’ll explain what we intend to cover and who we expect will get the most
out of reading the book. But we’ll start with why you should even listen to us.
The Authors
We’re two programmers who have been buddies in the Los Angeles area for a long time
and have been making mobile games since 2003. Between the two of us we have developed and ported close to a hundred titles for cell phones, including Ninja Gaiden,
Castlevania: Order of Shadows, Dance Dance Revolution: Mobius, and Contra 4, among
many, many others. Paul currently works for Konami, and occasionally gives lectures
about game programming at USC. Joe works at EA and recently published a game for
the iPhone. Paul wrote most of the theory, while Joe cooked up some great example
projects.
Our Goal
We expect there is—scratch that—we know there is a lot of interest in the iPhone as a
new game platform. The high-end hardware promises plenty of power and memory for
graphics and content, while the unique touch screen and gyroscope interface pose an
interesting challenge that encourages innovative game designs. Add to that the open
market of the iTunes App Store, which promises easy entry for independent developers
as well as accurate revenue tracking for serious publishers, and it’s no surprise that the
iPhone is making a huge splash in the mobile space.
Our goal was to write a book that can put iPhone game development in the reach of
any programmer out there, in a format that suits both beginning and advanced game
programmers.
This book is not a course on Objective-C, though it will contain a primer. This book
is not an exhaustive study of the iPhone SDK, as we will use only the functionality
needed to make our games. This book is not a five-year course on game programming
vii
technology. However, this book is the source for all you need to know not only to build
the example games we have provided but also to build your own.
By the end of the book, you will have learned all of the core concepts of creating a game
engine, and how to apply it to the iPhone. You will learn enough Objective-C to utilize
the iPhone SDK to make a 2D game. You will have been introduced to OpenGL ES on
the iPhone for making 3D games. And finally, you will be familiar with the certification
process so that making the last plunge into the App Store is much less scary.
Prerequisites
To get the most out of this book, you will need to have some programming knowledge.
The iPhone uses Objective-C, but most people are more familiar with C/C++ or Java,
so the Objective-C primer in Chapter 1 will help familiarize you with the basics.
You will also need a Mac. The iPhone Software Development Kit (SDK) is available
only for OS X, so a trip to the Apple store may be in your future if you are serious about
developing for the iPhone. Fortunately, the base model Mac Mini has plenty of power
to develop for the iPhone, and you can use your existing monitor and keyboard setup.
Meanwhile, once you have a Mac, the Xcode Integrated Development Environment
(IDE) is free. But we’re getting ahead of ourselves.
The third requirement is not 100% necessary, but strongly recommended: an iPhone
or iPod Touch. Although we use the term iPhone throughout the book, games made
for the iPhone will also work on iPod Touch. Some people will undoubtedly try to
create an iPhone game using only the iPhone Simulator. It may be possible to do this,
and even get it placed into the App Store, but we strongly recommend that you develop
and test on the device itself. After all, what good is a game you can’t play yourself?
Beyond those three requirements, everything else you need you can either download
or learn. We are working on useful classes and examples at https://sourceforge.net/
projects/iphonegamebook/, where you will also find the source code for all examples.
Audience
As we mentioned earlier, we expect you to have some basic programming knowledge.
That aside, all kinds of programmers are interested in the iPhone. Developers of all
levels are going to be reading up to try their skill.
You might not have any game programming experience and will need some basic theory
on game engines and user-interface design. Or perhaps you have plenty of experience
making video games on other platforms and just need to become familiar with the
iPhone SDK and build process, along with some touch-screen concepts. You may also
be interested in advanced topics, such as how to write portable code for cross-platform
games and what middleware solutions currently exist. Either way, this book has got
you covered.
viii | Preface
Organization of This Book
Chapter 1, Introduction to the iPhone, gets you set up to build interfaces and write code
in Objective-C, including logistics such as setting up a developer account with Apple.
Chapter 2, Game Engine Anatomy, introduces the elements of game logic and good
design that will let you write a maintainable and enjoyable game application.
Chapter 3, The Framework, shows the code that will wrap your particular game implementation as well as critical classes we wrote to supplement the features provided
by the Apple SDK.
Chapter 4, 2D Game Engine, creates a complete four-level game based on the framework in Chapter 3. We start with 2D because both the game tasks and the coding
complexity are much easier in 2D than in 3D. Basic movement, visual and audio effects,
movement through game levels, and other elements of game programming are covered.
Chapter 5, 3D Games, explains the more sophisticated tasks required to write a 3D
game. Although the chapter uses the OpenGL library, its goal is not to explain 3D basics
or OpenGL, but to give you the unique skills required to use them in game
programming.
Chapter 6, Considerations for Game Design, wraps up the book with some large-scale
considerations for advanced developers, and pointers to more resources, including
useful libraries and middleware.
Appendix, References, points to useful sources of information, libraries, and products.
Conventions Used in This Book
The following typographical conventions are used in this book:
Italic
Indicates new terms, URLs, filenames, and file extensions
Constant width
Indicates variables, method names, and other code elements, as well as the contents
of files
Constant width bold
Highlights new code in an example
Constant width italic
Shows text that should be replaced with user-supplied values
Preface | ix
This icon signifies a tip, suggestion, or general note.
This icon indicates a warning or caution.
Using Code Examples
This book is here to help you get your job done. In general, you may use the code in
this book in your programs and documentation. You do not need to contact us for
permission unless you’re reproducing a significant portion of the code. For example,
writing a program that uses several chunks of code from this book does not require
permission. Selling or distributing a CD-ROM of examples from O’Reilly books does
require permission. Answering a question by citing this book and quoting example
code does not require permission. Incorporating a significant amount of example code
from this book into your product’s documentation does require permission.
We appreciate, but do not require, attribution. An attribution usually includes the title,
author, publisher, and ISBN. For example: “iPhone Game Development by Paul Zirkle
and Joe Hogue. Copyright 2010 Paul Zirkle and Joe Hogue, 978-0-596-15985-6.”
If you feel your use of code examples falls outside fair use or the permission given here,
feel free to contact us at [email protected].
We’d Like to Hear from You
Every example in this book has been tested, but occasionally you may encounter problems. Mistakes and oversights can occur and we will gratefully receive details of any
that you find, as well as any suggestions you would like to make for future editions.
You can contact the authors and editors at:
O’Reilly Media, Inc.
1005 Gravenstein Highway North
Sebastopol, CA 95472
800-998-9938 (in the United States or Canada)
707-829-0515 (international or local)
707-829-0104 (fax)
We have a web page for this book, where we list errata, examples, and any additional
information. You can access this page at:
http://www.oreilly.com/catalog/9780596159856
x | Preface
To comment or ask technical questions about this book, send email to the following,
quoting the book’s ISBN number (9780596159856):
[email protected]
For more information about our books, conferences, Resource Centers, and the
O’Reilly Network, see our website at:
http://www.oreilly.com
Safari® Books Online
Safari Books Online is an on-demand digital library that lets you easily
search over 7,500 technology and creative reference books and videos to
find the answers you need quickly.
With a subscription, you can read any page and watch any video from our library online.
Read books on your cell phone and mobile devices. Access new titles before they are
available for print, and get exclusive access to manuscripts in development and post
feedback for the authors. Copy and paste code samples, organize your favorites, download chapters, bookmark key sections, create notes, print out pages, and benefit from
tons of other time-saving features.
O’Reilly Media has uploaded this book to the Safari Books Online service. To have full
digital access to this book and others on similar topics from O’Reilly and other publishers, sign up for free at http://my.safaribooksonline.com.
Acknowledgments
Thanks to Andy Oram, Marlowe Shaeffer, Isabel Kunkle, and the rest of the crew at
O’Reilly. Special thanks to Erin Reynolds, for game art. Thanks to Brad O’Hearne,
Jonathan Hohle, and Trina Gregory for technical reviews of this book. And thanks to
all of the readers who left comments on Rough Cuts.
Paul would also like to thank his family, Amanda Joy and William “Nizor” Eiten.
Preface | xi
CHAPTER 1
Introduction to the iPhone
The iPhone is one of the most distinctive game platforms currently available. The touch
screen, integration with iTunes, programming in Objective-C, low development cost,
and ease of publishing all make for a very strange but promising new development
opportunity. As the newest kid on the block, the iPhone instantly captured a noticeable
portion of the mobile phone market and inspired a wave of copycat devices by makers
such as Motorola, Samsung, and LG.
As a programmer, you might not be impressed with sales figures and market shares,
but you should be interested in the viability of the iPhone as a whole. If no one owns
an iPhone, no one will buy the games you make for it. The good news is that even in
the face of the 2009 economic downturn, iPhones continued to sell.
To get started with the iPhone, you’ll need to get a free Apple developer account. Next
you’ll download the iPhone SDK on your Mac, which also contains the Xcode IDE and
Interface Builder tool for laying out screens. (Apple doesn’t provide a toolkit for Windows or any other non-Mac platform.) And because the iPhone API requires you to
write in Objective-C, you will need to read a primer on the language if you do not
already understand it. This chapter takes you step by step through all of these tasks.
Apple Developer Account and Downloading the SDK
The first step in setting up your iPhone development environment is to register an Apple
developer account. Signing up for an account is free and gives you access to Apple’s
online documentation, tutorial videos, and the SDK download:
1. Go to http://developer.apple.com/iphone/.
2. Click the Register link, and then click Start Now. Choose the option to create a
new Apple ID, or to log in using an Apple ID from an iTunes or App Store account.
3. Once you have registered, you can log in to the iPhone Dev Center.
4. Apple may already have emailed you a link to download the free SDK, or you may
choose to download the SDK using the link from the website. Note that you should
1
not download Xcode separately because it is included within the SDK download
package (and the version of Xcode that comes with the SDK may be newer than
what is otherwise available).
5. Once downloaded, install the SDK, which will make Xcode and Interface Builder
accessible to you in the /Developer/Applications folder on your hard drive (you can
also activate Spotlight and search for Xcode and Interface Builder to launch either
application quickly).
The free developer account will allow you to build applications and run them in a
simulator on your Mac. However, to load your application onto a phone, you will also
need to sign up for the paid developer program. This requires a small annual fee, so
even if you are a private developer, it won’t hurt your wallet too much:
1. Go to http://developer.apple.com/iphone/program/apply.html.
2. You will have two options: Standard Program and Enterprise Program. If you are
writing games for the general public, you probably do not want the Enterprise
Program. If you read closely, you will notice the Enterprise Program is actually for
creating applications that only you and your company will use internally. If you
plan to create games that will be sold via the App Store, rest assured that the
Standard Program is the correct choice for you.
3. Select Enroll Now and log in if necessary.
4. You now have another choice: enroll as an individual or as a company. If you
choose Individual, you will not be able to add other programmers or quality assurance members to your account, which is necessary to distribute your application
to others during the development and testing process. However, if you select Company, you will be required to provide detailed information about your company.
5. Continue through the website, selecting the appropriate information, until you
arrive at a screen that says “Thank you for submitting your enrollment.” Now you
must wait for an email from Apple (which may take on the order of a month to
arrive).
Signing up for the paid developer program will also give you access to
beta releases of future versions of the iPhone OS and SDK, but only
during the times at which Apple chooses to make them available.
It is good to get your paid developer account enrollment going as soon as possible so
that it will be available when you actually need it.
Application Bundles
When you build an application using Xcode, the end result is called an application
bundle. In Mac OS X and the iPhone, an application bundle is a special type of directory
2 | Chapter 1: Introduction to the iPhone
that holds an executable file and the resources needed to run it. This includes an icon
to represent the application, files with special information about the application, and
any images or sounds the application uses.
In the Finder, an application bundle simply appears as its application
icon; right-click or Ctrl-click on it and select View Package Contents
from the menu to see what’s inside.
Although you can’t do this on the iPhone, you can find iPhone applications in the iPhone Simulator. If you have the iPhone SDK installed,
you can use Spotlight to search for the MobileSafari.app file. Show this
file in the Finder (don’t try to run it on your Mac), and view its package
contents (some of which appears in the following list).
A typical iPhone application bundle might have the following structure:
Executable
(Required.) This is the compiled code executable; it will typically have the same
name as your application. In MobileSafari.app, this is the file named MobileSafari.
Info.plist
(Required.) This is a collection of properties, in key-value pair form, that specifies
important information about your application. Notable properties listed here are
the display name of your application, the version number, and a unique ID number.
These files use a binary format that can’t be read in a text editor, but you can use
the Property List Editor located in /Developer/Applications/Utilities to view them.
icon.png
(Required.) This is a 57 × 57 pixel icon used to represent your application on the
iPhone’s home screen. Glossy button effects will be added on top of this image
automatically, so it should be flat-colored.
Various resources
(Optional.) All common resource files, such as images, sounds, and binary data,
used by your application will be placed in the same folder as the executable. The
only subfolders present in an iPhone application bundle are for localized resources.
Localization folders
(Optional.) If your application supports multiple languages, you may add subfolders to the bundle, which contain resources that cater to individual languages.
The folder names will have a language name or an ISO language abbreviation followed by “.lproj”; for example, English.lproj, French.lproj, German.lproj, and
uk.lproj would each contain resources specific to English, French, German, and
UK English languages, respectively.
Settings.bundle
(Optional.) You will create this file if you want your application to provide user
preference options in the Settings application that comes with the iPhone.
Apple Developer Account and Downloading the SDK | 3
Icon-Settings.png
(Optional.) If you added a Settings.bundle file, this image is used to represent the
application in the Settings application. The image should be 29 × 29 pixels. However, if you do not add this image, the Icon.png image will be scaled and used
automatically.
MainWindow.nib
(Optional.) Created by the Interface Builder application, MainWindow.nib contains code and resources necessary to draw your application as it starts up.
More .nib files can be loaded after this one, but it will always be the first in memory.
Default.png
(Optional.) This image is displayed as the application is loading the MainWindow.nib file. It should be full screen, which is 480 × 320 pixels on the iPhone.
If this image is close to what the user will see when the application is finished
loading, the load process will appear to take less time.
iTunesArtwork
(Optional.) If you are distributing the application outside the App Store, this artwork is used to display your application when loading onto a handset using iTunes.
More on this later.
As you will see in the next section, when you’re creating your application, Xcode and
Interface Builder will create most of these files for you.
Xcode and Interface Builder
If you are unfamiliar with Xcode, you may be reluctant to learn a new IDE at first.
However, the way iPhone development works, you pretty much have to. Fortunately,
once you get used to it, you’ll see that Xcode is pretty good at what it does. It has all
the features you would expect from an industry-standard IDE: it jumps to the line of
compile errors, auto-completes complicated API methods, and has integrated SDK
references.
And it gets better: Xcode supports on-device debugging, a full-featured iPhone Simulator, useful project wizards, refactoring tools, and even direct integration with Subversion revision control repositories.
An Xcode project contains all the code, resources, certificates, and configurations you
need to create an iPhone application. To get acquainted with the environment, open
your Xcode IDE and follow these steps to create a typical “Hello World” application:
1. Open Xcode.
2. Select File→New Project.
3. In the dialog that opens, select iPhone OS, then View-Based Application (see Figure 1-1), and click Choose.
4. Name the project “HelloWorld” and click Save.
4 | Chapter 1: Introduction to the iPhone
5. At this point, you can build and run (click the Build and Go icon in the toolbar).
The HelloWorld application shows only a blank gray screen when run in the Simulator, as shown in Figure 1-2.
Figure 1-1. Selecting View-Based Application
Not very interesting yet, is it? Before we go on to make this a proper “Hello World”
application, here is a quick rundown of the files that were generated when you created
the project:
HelloWorldAppDelegate.m, HelloWorldAppDelegate.h
The class held in these files can be considered the main code entry point of the
application. The app delegate controls the main window and main View Controller,
and is responsible for setting them up for display.
HelloWorldViewController.m, HelloWorldViewController.h
This class in these files holds the main view, and is responsible for showing the
horribly uninteresting gray screen. We will be editing it to say “Hello World” soon.
Apple Developer Account and Downloading the SDK | 5
Figure 1-2. Empty application in the Simulator
MainWindow.xib
This Interface Builder file results in a .nib file that is placed in your application
bundle when the project is compiled. When loaded, it creates the app delegate,
and loads the main window and View Controller.
HelloWorldViewController.xib
This file lays out the design for the HelloWorldViewController’s view.
NIB stands for NeXTSTEP Interface Builder, and XIB stands for Xcode
Interface Builder. NIB files are dense compiled binary files; XIB files are
human-readable XML files. As we mentioned earlier, Xcode compiles
XIB files into NIB files. The XIB format was created specifically to solve
issues with merging NIB files in projects under source control, since you
can diff XML files more easily than binary files.
Now we need to draw the “Hello World” text. We can go about this in several ways:
•
•
•
•
Add a Cocoa UILabel by writing code directly in HelloWorldViewController.m.
Add a Cocoa UILabel in Interface Builder to HelloWorldViewController.xib.
Define a subclass of UIView, and use a Quartz font rendering in drawRect.
Create a texture-mapped font in OpenGL ES to render with.
Let’s start with the first method: adding a UILabel by writing code in HelloWorldViewController.m. A stub method named viewDidLoad is already inside HelloWorldViewController.m, which is a good place to add our code. This method will be called
after .nib file loading is done, but before rendering begins:
6 | Chapter 1: Introduction to the iPhone
1. Replace the viewDidLoad function in HelloWorldViewController.m with the following (this function is commented out by default, so be sure to remove the /* that
precedes it and the */ that follows it):
- (void) viewDidLoad {
[super viewDidLoad];
//draw "Hello World" using Cocoa UIKit.
//grab the screen dimensions
int w = self.view.frame.size.width;
int h = self.view.frame.size.height;
}
//create a text label: the size 100,50 here is arbitrary
// but it must be large enough to fit the "Hello World" text.
UILabel* label = [[UILabel alloc] initWithFrame:CGRectMake(0, 0, 100, 50)];
//put the label at the center of the screen
label.center = CGPointMake(w/2, h/2);
//align the text to the center of the label (default is left)
label.textAlignment = UITextAlignmentCenter;
//don't draw the label's background (default is white)
label.backgroundColor = [UIColor clearColor];
label.text = @"Hello world!";
//add label to our view, so that it can be rendered
[self.view addSubview:label];
//since we alloc'd label in this method we need to release label here
[label release];
2. Build and run the project (if you haven’t quit the Simulator from its previous run,
you’ll be prompted to stop it). The app should now display your text (see Figure 1-3).
Figure 1-3. “Hello world!” text shown
Apple Developer Account and Downloading the SDK | 7
Now let’s go over the second method, adding a UILabel to HelloWorldViewController.xib using Interface Builder. You must undo your changes if you followed the preceding example:
1. Open the HelloWorldViewController.xib file in Interface Builder by double-clicking
it from the list of project files in Xcode.
2. Double-click the View object to begin editing it (Figure 1-4).
Figure 1-4. Double-clicking the View object to edit the file
3. Find the Label object in the Library panel (open the panel by selecting
Tools→Library Panel, if it is not already open). See Figure 1-5.
4. Drag the label into the View editing window, as shown in Figure 1-6.
5. Double-click the new label and edit the text to say “Hello World”. You can also
edit it from the Attributes Inspector (Tools→Attributes Inspector).
6. In the Label Size Inspector (Tools→Size Inspector), click both of the Placement
buttons to center the label horizontally and vertically, as shown in Figure 1-7.
7. Save the .xib file and return to Xcode. Building the application will update
the .nib file, which will cause the changes to appear when the application is run,
as shown in Figure 1-8.
8. When the .nib file is loaded, it creates and displays the UILabel. If our code needs
access to read or modify the created label, we can link it to an IBOutlet in our code.
In HelloWorldViewController.h, replace the stub definition of HelloWorldViewCon
troller with the following:
@interface HelloWorldViewController : UIViewController {
IBOutlet UILabel* myLabel;
}
8 | Chapter 1: Introduction to the iPhone
An IBOutlet is a code tag that enables Interface Builder to recognize possible handles in code that can be linked to.
Figure 1-5. Selecting Label from the Objects Library
9. To link the .nib’s label to the outlet, open HelloWorldViewController.xib in Interface Builder and open the Connections Inspector (Tools→Connections Inspector).
Then, click to select the label, drag the label’s New Referencing Outlet to the File’s
Owner object, release, and click on the “myLabel” text that shows up in the
Apple Developer Account and Downloading the SDK | 9
Figure 1-6. Adding a new label to the view
pop-up menu (see Figures 1-9 through 1-11). Because we set the Referencing Outlet, the two objects will be linked together when the .nib is loaded. Specifically,
when HelloWorldViewController.nib is loaded in the application, it will know to
set the variable myLabel to point at the UILabel we just linked to.
10. Save HelloWorldViewController.xib and quit Interface Builder.
Now our code has access to the label through myLabel. This linking process is used
frequently in Interface Builder to specify outlets, actions, delegates, and data sources.
Any interaction between visible elements of the interface and your code is made via
Interface Builder links.
10 | Chapter 1: Introduction to the iPhone
Figure 1-7. Modifying the Label object properties
Figure 1-8. “Hello World!” text with Label object
Apple Developer Account and Downloading the SDK | 11
Figure 1-9. The Label Connections window
Figure 1-10. Clicking and dragging from New Referencing Outlet to File’s Owner
12 | Chapter 1: Introduction to the iPhone
Figure 1-11. Selecting “myLabel” from the pop-up window
Views and Controllers
The UIView class represents a View object in the iPhone SDK. Views are visible rectangular portions of the screen that handle drawing and animation, event handling, and
subview management. If you look at the iPod application that comes with your iPhone,
you’ll see that the navigation bar at the top, the tab bar at the bottom, and the content
area in the middle are three separate views.
When creating a view-based application in the New Project Wizard, start with a single
View Controller and a single View. You may want more Views as your application
becomes more complex. For example, you may have one View for your game, another
for a Main menu, one for a Settings screen, and another for an online High Score screen.
If your Views share a lot of the same code, it makes sense to add those Views to the
same View Controller, along with the shared code. In the preceding example, we may
want to put the Main menu and the Settings in the same View Controller, but put the
main Game state and High Score screen each in their own View Controller. Nothing is
stopping us from putting them all in one View Controller, or using a different View
Controller for each one; it’s purely an organizational consideration.
Apple Developer Account and Downloading the SDK | 13
Adding a new View and View Controller to an existing window
Follow these steps to add a new View and View Controller to an existing window:
1. In Xcode, create a new class that extends UIViewController. We are calling ours
TestViewController.
2. Create a new XIB file by selecting File→New File and choosing View XIB from the
User Interfaces section, as shown in Figure 1-12.
Figure 1-12. Adding a new View XIB file
3. In Interface Builder, select the File’s Owner icon. In the Identity Inspector, set the
Class Identity to TestViewController. If the Identity Inspector window is not open,
you can access it from Tools→Identity Inspector. See Figure 1-13.
14 | Chapter 1: Introduction to the iPhone
Figure 1-13. Editing the class name
4. Set the View’s Referencing Outlet to the File’s Owner view, the same way we did
in the Hello World example earlier (Figure 1-14).
5. Add a TestViewController instance to your code and label it as an IBOutlet. We
are putting it in the app delegate class, TestAppDelegate. In TestAppDelegate.h, the
new code will look like this:
IBOutlet TestViewController* testViewController;
6. Edit your main window’s XIB file and add a ViewController object by dragging it
from the Library window into the MainWindow.xib window. You can
find the ViewController object in the Library under Library→Cocoa Touch
Plugin→Controllers, as shown in Figures 1-15 and 1-16.
Apple Developer Account and Downloading the SDK | 15
Figure 1-14. Linking to the File’s Owner object
7. Edit this object to change the name of the class and the NIB to load to “TestViewController”. Do this by selecting the ViewController object in the MainWindow.xib window and editing the class name in the Identity Inspector window.
Next, select the Attributes button in the same window to switch it from the Identity
Inspector to the Attributes Inspector. Finally, edit the NIB name in the Attributes
Inspector (Figures 1-17 and 1-18).
8. Link this object’s Referencing Outlet to the IBOutlet in TestAppDelegate that we
created earlier: testViewController. See Figure 1-19.
9. Use the following code to add the View object to the Window object before it can be
displayed:
[window addSubview:testViewController.view];
10. Once the View object has been added to the Window object, activate it by calling:
[window bringSubviewToFront: testViewController.view];
16 | Chapter 1: Introduction to the iPhone
Figure 1-15. Adding a View Controller from the Library
Apple Developer Account and Downloading the SDK | 17
Figure 1-16. Modifying the ViewController object
Note that only one View can be active at any time. Calling bringSubviewToFront will
remove the currently active View from the responder chain. It will not show up on the
foreground or receive input events until you call bringSubviewToFront on it again.
Adding a new View to an existing View Controller
Follow these steps to add a new View to an existing View Controller:
1. Open the View Controller’s .h file in Xcode and add an IBOutlet UIView pointer
for the new View. Ours is named secondView. The code will look like this:
IBOutlet UIView* secondView;
2. In Interface Builder, open the View Controller’s XIB file window and add a
UIView object from the Library. You can find UIView under Library→Cocoa Touch
Plugin→Windows, Views & Bars, as shown in Figure 1-20.
3. Set the UIView’s Referencing Outlet to the IBOutlet you created earlier, secondView.
4. For organizational purposes, you may wish to name the UIView object in the View
Controller’s XIB file window.
5. To switch to the new View, somewhere in the View Controller, call this:
self.view = secondView;
Since we are overwriting the View Controller’s view property here, we will want to make
sure we have another reference to the old View in case we want to switch back to it.
We typically put each UIView into its own IBOutlet, and additionally assign the initial
startup UIView into the view property. You can have more than one Reference Outlet
for any UIView, so the initial View will have outlets named initialView and view.
18 | Chapter 1: Introduction to the iPhone
Figure 1-17. Editing the class name
Apple Developer Account and Downloading the SDK | 19
Figure 1-18. Editing the NIB name
Figure 1-19. Linking to TestViewController
20 | Chapter 1: Introduction to the iPhone
Figure 1-20. Adding a View object from the Library
Apple Developer Account and Downloading the SDK | 21
Proxy objects
Objects inside the NIB have access to properties inside the File’s Owner class. To access
properties outside the NIB, you need to use Proxy objects. The Proxy has an associated
class name and proxy name, but it does not create an instance of the associated class.
You have to pass in a Proxy instance yourself when initializing the NIB file:
//Instead of auto-loading the view controller from the main window NIB,
// load it manually so that we can set up the proxy object.
viewController = [[HelloWorldViewController alloc] init];
//We want viewController to be able to access IBActions in
// HelloWorldViewController and in HelloWorldAppDelegate.
// The File's Owner will be the View Controller,
// and the Proxy named AppDelegate will be the app delegate [self].
NSDictionary*
proxies = [NSDictionary
dictionaryWithObject:self forKey:@"AppDelegate"];
//link proxy object name to app delegate instance
NSDictionary*
options = [NSDictionary
dictionaryWithObject:proxies
forKey:UINibProxiedObjectsKey];
//set up options with our proxy
[[NSBundle mainBundle] loadNibNamed:@"HelloWorldViewController"
owner:viewController options:options];
Loading Devices
Assuming you have finished the process of signing up for the paid developer program,
you are now authorized to load applications such as the “Hello World” example onto
an iPhone using Xcode. However, you have to jump through a couple more hoops
before you can do this.
Since the iPhone is a secured platform, a lot of bookkeeping is required before you can
execute your code on the device. You have to sign builds, Apple has to trust your
signature, and the device you are loading has to be provisioned for self-signed
applications.
You manage signatures, certificates, and provisioning profiles through the online
Program Portal on Apple’s website. Once you are a paid developer, you can find it at
http://developer.apple.com/iphone/manage/overview/index.action.
The portal has step-by-step guides for each section—generating Certificate Signing
Requests (CSRs), creating a distribution profile, adding a device ID, and so on. However, this can be a complex process, so we will go over the general concepts.
Certificates and Profiles
To publish your application to a phone or to the App Store, you need two signed
profiles. One is a developer profile, which you use while developing and testing your
app. The other is a distribution profile, which you use when sending your finished
22 | Chapter 1: Introduction to the iPhone
application off to the App Store to be published. In a corporate setting, the lead programmer might keep track of the developer profile, whereas the production manager
might keep track of the distribution profile.
To create these profiles, you need to generate a certificate that has a public and private
key. Apple has to sign the certificate for it to be valid, so first you must use Keychain
Access on your Mac to create what is called a Certificate Submission Request, which
gets sent to Apple’s developer program. When Apple has reviewed and approved your
request, you can download the certificate from the Apple Developer Portal website.
Once you have the signed certificate, you will need an Application Identifier (App ID),
a Unique Device Identifier (UDID), and the WWDR certificate.
App ID
The App ID is generated on the Developer Portal to be used in a profile and in your
application bundle. An App ID looks like this: com.YourGameCo.YourAwesomeGameName.
This is called reverse domain notation, and Java and C# programmers may be familiar
with it as the format that package names use in those languages.
If you will be making multiple applications, you can use a wildcard format so that the
same developer can use one App ID for multiple applications. A wildcard App ID looks
like this: com.YourGameCo.*.
When listed in the Developer Portal, the ID may have 10 alphanumeric characters
appended to the front. These are for Apple’s internal use and you can ignore them.
After creating an App ID on the Developer Portal, you must open the Info.plist file in
your application bundle and replace the default value of the bundle identifier key with
your App ID. If you used a wildcard when creating the App ID on the Portal, you should
also replace the asterisk (*) with the name of your game when updating the Info.plist file.
UDID
The UDID is a 40-character hex string that you can obtain from the iPhone device you
wish to load by attaching it to your Mac and running iTunes or the Xcode Organizer
window.
The UDID is used only for the developer profile and is not useful for the
distribution profile.
WWDR certificate
Apple’s World Wide Developer Relations (WWDR) certificate is available from
Apple at http://developer.apple.com/certificationauthority/AppleWWDRCA.cer. Download and install the certificate so that you can use it to certify builds. The WWDR
Loading Devices | 23
certificate links your development certificate to Apple, completing the trust chain for
your application.
Installing the profile
Once you have these three items, you can download a provisioning profile from the
Developer Portal. This file will have a .mobileprovision file extension. Once you download this file, double-click it to install the profile. It should load into Xcode’s Organizer
and show up there when you connect your iPhone to your computer. Make sure the
profile is listed in the device’s installed profiles.
Keep in mind that an application is limited to the devices listed in its developer profile.
Xcode Configuration
Once you have all the certificates, keys, and profiles installed, you are ready to set up
Xcode to compile an application that will run on your iPhone.
Set the code signing profile in Project→Edit Project Settings→Build→Code Signing Identity→Any iPhone OS Device. See Figure 1-21.
If your provisioning profile does not show up in the drop-down list, you are missing
some part of the certificate chain:
•
•
•
•
Private key
Signing certificate
WWDR certificate
Provisioning profile
Change the bundle identifier to match the App ID name in the provisioning profile.
Select the Build Clean menu option after any Info.plist changes; otherwise, the changes
will not be reflected in the build (see Figure 1-22).
Set Xcode to build for the device, as shown in Figure 1-23.
If everything goes smoothly, you should be able to build and run the application on the
device. Xcode will install your app on the device during the build process.
If something goes wrong, you won’t see any helpful error messages; you will see “ApplicationVerificationFailed,” which could mean anything went wrong. Here is a list of
some common issues that could be the source of an error:
The bundle identifier contains typos or whitespace
The bundle identifier must match the App ID. You must select Build→Clean after
modifying the bundle identifier.
Part of the certificate chain is missing
The WWDR certificate is easy to miss.
24 | Chapter 1: Introduction to the iPhone
Figure 1-21. Setting the code signing profile
Your certificate has expired
If everything has been working fine and you suddenly encounter a problem as you
get closer to your deadline, you may have an expired certificate.
Sometimes just rebooting the iPhone and reconnecting it will get things back on track.
Objective-C Primer
The iPhone API uses the Objective-C language. Objective-C is an application of principles from Smalltalk to the C language. The idea was to combine the power of the C
language, which is an industry standard, with the object-oriented programming
Objective-C Primer | 25
approach of the Smalltalk language. The result is a language that might be confusing
at first, but it makes sense once you understand a few concepts.
Figure 1-22. Editing the App ID in Info.plist
Figure 1-23. Setting the device as the build target
26 | Chapter 1: Introduction to the iPhone
The first thing to know is that Objective-C is a strict superset of C. Anything that you
can write in C you can compile using the Objective-C compiler. C-style structs, function
calls, memory allocation, and pointers are all available. However, in addition to all of
the normal C language syntax, Objective-C adds some of its own features as well, such
as thread synchronization, try-catch blocks, and garbage collection. The primary improvement provided (and the reason for the language) is an object-oriented structure.
Classes
Classes in Objective-C are conceptually very similar to Java and C++ classes. A class is
an object that contains data, called member variables, and functions, called methods.
Just like in Java and C++, classes are usually defined before they can be used (although
in Objective-C, they can also be created at runtime). You define a class using the
@interface keyword. Similar to C++, Objective-C classes should be defined in an .h
file, while their implementations should be separated into an .m file. Also as with
C++, you may use the @public or @private keyword to denote the level of syntax protection of the following lines. Objective-C is different from C++ or Java, however, in
that it defines its methods outside the curly braces of the class. The methods are associated to the previous class and terminated by an @end keyword.
The following code creates a class named Animal:
@interface Animal
{
// Member Variables go here
@private
int foo;
}
// class Methods go here, outside the braces
- (int) bar: (double) input1;
@end
Notice the interesting way methods are defined: they begin with a − for normal functions
(or a + for class methods, which we will discuss shortly), followed by the return type
of the function in parentheses and the name of the function. If the function has parameters, each is written with a parameter description followed by a colon, the parameter type in parentheses, and the parameter name (except for the first parameter, which
uses the function name instead of a parameter name).
Here is the same class in C++; note the semicolon required at the end:
class Animal
{
// Member Variables and Methods go here
private:
int foo;
public:
int bar( double input1 );
};
Objective-C Primer | 27
Once more for Java:
class Animal
{
// Member Variables and Methods go here
private int foo;
public int bar( double input1 ) {}
}
All three languages can use // for single-line comments.
And just as in Java and C++, classes can extend or inherit other classes. A common base
class that almost all Objective-C classes inherit from is NSObject, which we will explain
later. The syntax for inheritance is similar to C++, except that public and private
keywords are not used in front of the parent class:
@interface Animal : NSObject
{
}
//Objective-C inheritance
@end
class Animal : public NSObject
{
//C++ inheritance
};
class Animal extends NSObject
{
//Java inheritance
}
It is important to note that just like Java Objective-C cannot inherit from multiple
classes. Say you want to create a class Animal that inherits NSObject, but also inherits a
class GameEventListener, which allows it to respond to special events in your game. In
C++, you could define GameEventListener as an abstract base class and inherit from
both. However, in Java, you would have to define GameEventListener as an interface
class, and in Objective-C, you would define it as @protocol. A protocol in Objective-C
is similar to an abstract base class in C++, except that it must be absolutely virtual. It
cannot have any member variables or method implementations. Just like interfaces in
Java, a class in Objective-C may implement as many protocols as necessary.
Here is the implementation in C++:
class GameEventListener
{
// Member Variables, Methods and Virtual Methods go here
private:
bool active;
public:
bool isListening(); //returns true if active is true
virtual void handleEvent( int event ) = 0;
};
28 | Chapter 1: Introduction to the iPhone
class Animal : public NSObject, public GameEventListener
{
// Member Variables and Methods, and Override Methods go here
// any pure virtual functions from GameEventListener must be implemented
private:
int foo;
public:
int bar( double input1 );
void handleEvent( int event );
// isListening() already implemented, no need to override
};
Here is the same implementation in Java:
interface GameEventListener
{
// interfaces may not contain Member Variables
// Method definitions go here, they cannot be implemented yet
public bool isListening( );
public void handleEvent( int event );
}
class Animal extends NSObject implements GameEventListener
{
// Member Variables, Methods and Override Methods go here
private int foo;
private bool active; //must be defined here
}
public int bar( double input1 ) {}
public bool isListening( ) {}
public void handleEvent( int event ) {}
The Java interface class is called a protocol class in Objective-C, so we define it using
@protocol:
@protocol GameEventListener
// protocols may not contain Member Variables, no curly braces
// Method definitions go here, they cannot be implemented yet
- (BOOL) isListening;
- (void) handleEvent: (int) event;
@end
@interface Animal : NSObject <GameEventListener>
{
// Member Variables go here
@private
int foo;
BOOL active;
}
// Methods and Override Methods go here
- (int) bar: (double) input1;
Objective-C Primer | 29
- (BOOL) isListening;
- (void) handleEvent: (int) event;
@end
Programmers who are experienced in using template classes in C++ or
generics in Java may get confused here. Although the syntax for using
protocols in Objective-C looks like the syntax for templates in C++ and
generics in Java, it is not the same thing.
As we mentioned earlier, function implementations are separated into .m files. The
C++ implementation of the example would look like this:
bool GameEventListener::isListening()
{
return active;
}
void Animal::bar( double input1 )
{
//do something with input1
}
void Animal::handleEvent( int event )
{
//do something with event
}
And the Objective-C implementation would look like this:
@implementation Animal
@synthesize foo;
- (void) bar: (double) input1
{
//do something with input 1
}
- (BOOL) isListening
{
return self.active;
}
- (void) handleEvent: (int) event
{
//do something with event
}
@end
30 | Chapter 1: Introduction to the iPhone
Instantiation
Once you have defined a class, you will want to create an instance of it.
In both C++ and Java, the instance would look like this:
Animal* beaver = new Animal();
While Objective-C would use this:
Animal* beaver = [Animal alloc];
Messaging
The use of those brackets around the call to alloc is known as messaging, one of the
interesting features of Objective-C. It is basically the way you call functions on
Objective-C objects. Although the syntax may be new, the concept is the same as a
function call in C++ or Java. The preceding example calls the new function on the
Animal class, which will return a newly allocated instance of that class.
Predictably, you could now call functions on that object, like so:
BOOL listening = [beaver isListening];
In C++, the preceding code would look like this:
bool listening = beaver->isListening();
And in Java, it would look like this:
boolean listening = beaver.isListening();
Sending parameters is also possible. Parameters are separated by colons:
[beaver handleEvent: EVT_EXAMPLE ];
In C++, the preceding code would look like this:
beaver->handleEvent( EVT_EXAMPLE );
And again in Java:
beaver.handleEvent( EVT_EXAMPLE );
One of the additions of messaging is keywords. Each parameter after the first is preceded by a keyword. If the Animal class also had a function called findFood that expected
an amount of food to find and a flag to indicate only vegetables were allowed, you might
see this:
[beaver findFood: 50 vegetablesOnly: true];
The same function in C++ would look like this:
beaver->findFood(50, true);
Objective-C Primer | 31
Although this makes function calls use more room on the screen, it also attempts to
make reading them easier. You do not need to look up the function definition or rely
on an IDE’s code completion feature to understand the nature of the values passed in.
You can also nest messages by inserting another set of brackets where a parameter
would go. If the Animal class had a function BOOL -isVegetarian, you might see this:
[beaver findFood: 50 vegetablesOnly: [beaver isVegetarian]];
In C++, it would look like this:
beaver->findFood(50, beaver->isVegetarian());
The Objective-C equivalent to a const or factory method in C++ or Java
is to use + in front of the method name in the @interface section. This
allows you to call the function on the class itself without the need for
an instance of the class.
For example:
@interface Animal
+ (BOOL) canAnimalsTalk;
@end
can be called this way:
[Animal canAnimalsTalk];
These are called class methods in Objective-C, since they are called directly on the class itself instead of an instance of the class. Functions
declared this way cannot make use of the class’s member variables.
Member Variables
Objective-C provides a number of ways to access class member variables. The first way
uses messaging, where the name of the function is the same as the name of the member
variable being accessed. This is called an accessor function, and it would be similar to
writing get and set functions in C++ or Java. The functions are created automatically
when you use the @synthesize keyword in the @implementation section of the class and
@property when defining it in the .h file.
The usage syntax looks like this:
int example = [beaver foo]; //returns the value of int foo
[beaver setFoo:10]; //sets the value of int foo to 10
Notice that the name of the automatically generated setter method is set followed by
the variable’s name with the first character in uppercase. You can also use dot notation
for the same purpose, like so:
int example = beaver.foo; //returns the value of int foo
beaver.foo = 10; //sets the value of int foo to 10
32 | Chapter 1: Introduction to the iPhone
Just like the this keyword in C++ and Java, the self keyword is available
inside Objective-C class methods.
Memory Management
Since Objective-C is a superset of C, all of the rules regarding malloc and free still apply.
On the iPhone, there is no Garbage Collector that takes care of all objects for you, like
the one in Java does, so it is possible to have memory leaks if allocated memory is not
properly deallocated.
However, Objective-C does implement a reference counter inside the base class
NSObject. Therefore, any class that inherits from NSObject (and most will) has the same
reference counting functionality built-in. Specifically, the copy, new, retain, release,
autorelease, and alloc methods provided by NSObject are what get the job done.
Whenever an NSObject subclass instance is created using the alloc method or any
function with new or copy at the beginning of its name, it will be created with a reference
count of 1. You can use the retain function to increment the value by one, and the
release and autorelease functions to decrement the value by one. Once the reference
value has reached 0, the object will be removed from memory.
If you call retain on an object, you will leak memory if you do not also call release or
autorelease on that object because the reference count will never reach 0.
Constructors and Destructors
Like C++, Objective-C classes support the concept of constructor and destructor functions, but with some slight variation. When an object is allocated, the programmer
must call the initialization function manually. By default, initialization functions are
named init.
The following code is typical of Objective-C:
Animal* beaver = [[Animal alloc] init];
When an Objective-C class is destroyed from memory, its dealloc function will be
called, similar to a destructor. If you overload the dealloc function in your class, you
must also call the dealloc method of the superclass or it may leak memory:
-(void) dealloc {
//perform destructor code here
[super dealloc];
}
Objective-C Primer | 33
Interface Builder Integration
Because Objective-C and Interface Builder are used together for iPhone apps, two macros have been included to allow you to link Objective-C code to Interface Builder
views: IBOutlet and IBAction.
By putting IBOutlet in front of UI variables and IBAction in front of class methods, you
allow Interface Builder to know what variables and functions your code has made
available for its use:
@interface myWindow
{
IBOutlet UIImageView *backgroundImage;
IBOutlet UIWindow *window;
IBOutlet UISwitch*soundToggle;
}
- (IBAction) playgame;
- (IBAction) toggleSound:(id) sender;
- (IBAction) handleEvent:(id) sender forEvent:(UIEvent*) event;
@end
At compile time, IBAction is replaced with void, and IBOutlet is simply removed. They
are used only to determine which methods and variables show up in Interface Builder
and have no runtime effect.
Mixed C++ and Objective-C
Because Objective-C is a superset of the C language, you can write portions of your
code entirely in C. But the Objective-C compiler also allows you to use C++ in your
projects. It is possible to use C, C++, and Objective-C syntax in the same file. Files that
contain C++ implementations should use the extension .mm instead of .m.
Conclusion
This chapter provided you with a basic understanding of the Objective-C language and
the procedures necessary to write, compile, and run code on the iPhone. We encourage
you to read as many tutorials as necessary to round out your knowledge of the language
and API. Documents at http://developer.apple.com are particularly helpful, and access
is free with your Apple developer account.
However, games can be very complicated applications, and without an understanding
of the theory behind game programming, game development will be a very challenging
task. If you are new to game programming, reading the next chapter thoroughly before
attempting to create your game will benefit you greatly.
34 | Chapter 1: Introduction to the iPhone
CHAPTER 2
Game Engine Anatomy
To solve the large problem of how to create a game on the iPhone, we first need to solve
a series of smaller problems such as how to display graphics and play sounds. These
are problems associated with building parts of a game engine. And just like the human
body, each part of a game engine is different but vital. Thus begins our chapter on game
engine anatomy. We will discuss each major part of a game engine, including the application framework, state machine, graphics engine, physics engine, audio engine,
player input, and game logic.
Writing a serious game is a big task that involves a lot of code. It is important to design
that code in an organized fashion from the start, rather than adding bits and pieces over
time. When building a house, an architect creates blueprints for the whole house, which
the contractors then build. However, many programmers who are new to game programming build one part of the “house” from a tutorial, and add each “room” piece
by piece as they learn. It’s no surprise when the end result is bad.
Figure 2-1 shows the structure of a game engine that works well for most games. By
understanding all of the parts of a game engine and how they work together, we can
design the whole game at the start, and build our application the “Right Way.” In the
following sections, we’ll cover each part of Figure 2-1:
• Application framework
• Game state manager
• Graphics engine
Application Framework
The application framework consists of code necessary to get an application started,
including creating an instance of the application and initializing the rest of the subsystems. Our code first creates a Framework class when our application starts and, in turn,
will be in charge of creating and destroying the state machine, graphics engine, and
35
Figure 2-1. Functional structure of a game engine
audio engine. If our game is complex enough to require a physics engine, the framework
will manage that as well.
The framework should take care of the peculiarities of the platform we are working on,
including handling any system events (such as Shut Down or Sleep), and managing the
loading and unloading of resources so that the rest of the code can focus only on the
game.
Main Loop
The framework will provide the main loop that is the driving force behind any interactive program; on each iteration of the loop, the program will check for and handle
incoming events, run updates on the game logic, and draw to the screen as necessary
(see Figure 2-2).
Figure 2-2. Main loop sequence
Exactly how the main loop is implemented depends on the system you are using. For
a basic console application, it could be as simple as a while loop that calls each function:
36 | Chapter 2: Game Engine Anatomy
while( !finished ) {
handle_events();
update();
render();
sleep(20);
}
Notice the sleep function here. It puts the code to sleep for some small period each
loop so that it does not form a solid loop that would constantly suck up all of the time
on the CPU.
Some systems don’t want user code to write loops like that at all; instead, they use a
callback system that forces the programmer to release the CPU regularly. This way,
when the application starts, the programmer registers some functions to be called back
during each loop:
void main(void) {
OS_register_event_handler( myEventHandler );
OS_register_update_function( myUpdate );
OS_register_render_function( myRender );
}
Once the program starts, those functions are called periodically, as needed. The iPhone
is closest to this last example, which you will see in the next chapter and in the examples
provided with the iPhone SDK.
Legacy C and C++ Code
If you have a C/C++ code base you want to port to the iPhone, or want to keep the
option of reusable code from an iPhone application on other platforms such as Windows Mobile or Android, Objective-C presents a challenge to porting. The good news
is that you can write C++ code that runs directly on the iPhone. However, you will
have to write Objective-C to use certain portions of the iPhone SDK. The framework
is the perfect place to wrap those interfaces in C++ classes so that the rest of your code
can be written in pure C++.
If you or your company is dedicated to launching cross-platform titles, we strongly
suggest developing engines with similar features and interfaces on each of the platforms.
After you isolate your game-specific code this way, it is an easy task to copy code from
one project to another and make minor adjustments to get it up and running. With a
little care, this technique even works when switching between C++ and Java!
Game State Manager
A serious video game offers more than just a theater of action holding the game: it has
a Main menu that allows the player to set options and start a new game or continue a
previous one; a Credits screen that shows the names of all the hardworking people who
helped make the game; and if your game doesn’t come with a user manual, perhaps a
Help section that gives the player a clue about what he’s supposed to be doing.
Game State Manager | 37
Each of these is a game state and represents a separate part of the application code. For
instance, the functions and navigation invoked by a player in the Main menu are quite
different from those invoked by a player in the Credits screen, so the program logic is
a lot different, too. Specifically, in the Main menu, you will likely be drawing a title
image and some kind of menu, and listening for player input to select one of the menu
options. When you are in the Credits screen, you will be drawing the names of all the
people who worked on the game, while listening for player input that will cause your
current game state to change from the Credits screen back to the Main menu. And
finally, in the Game Play state, you will be rendering the actual game and listening for
the player’s input to interact with the game logic.
Each of these game states is responsible for handling player input, rendering to the
screen, and providing any application logic that is specific to that state. You might
recognize these tasks from our earlier discussion about the main loop, and that’s because they are exactly the same tasks. However, each state implements them in its own
way, which is why we have to keep them separate. You don’t want to have to search
through the Main menu code to make a change to the Game Play event handler.
State Machine
The Game State Manager is a state machine, which means it keeps track of the current
game state. When the application starts, the state machine creates the basic state information. It goes on to create information required by each state and to destroy temporary information when the application leaves a state.
A large number of different objects have state that is maintained by the state machine.
One obvious state is the screen the player is on (Main menu, Game Theater, etc.). But
if you have an enemy artificial intelligence (AI) agent on the screen that can be in a
“sleeping,” “attacking,” or “dead” state, a state machine can be used to keep track of
those states as well.
What is the right architecture for a Game State Manager? Let’s take a look at some state
machines and decide which design pattern best fits our needs.
There are many ways to implement a state machine, the most basic of which is a simple
switch statement:
class StateManager {
void main_loop() {
switch(myState) {
case STATE_01:
state01_handle_event();
state01_update();
state01_render;
break;
case STATE_02:
state02_handle_event();
state02_update();
state02_render;
38 | Chapter 2: Game Engine Anatomy
};
}
break;
case STATE_03:
state03_handle_event();
state03_update();
state03_render;
break;
}
All that is necessary to switch states is to change the value of the myState variable and
return to the start of the loop. However, as you can see, the more states we add, the
larger that code block gets. Furthermore, we typically have entire blocks of tasks we
need to perform predictably when entering or leaving a state: initialize state-specific
variables, load new resources (such as images), and deallocate resources used by the
previous state. In a simple switch statement, we’d have to add that block to each case
and make sure not to forget a step.
This is fine for simple tasks, but something as complex as our Game State Manager
needs a better solution. The next best way to implement a state machine is to use
function pointers:
class StateManager {
//the function pointer:
void (*m_stateHandleEventFPTR) (void);
void (*m_stateUpdateFPTR)(void);
void (*m_stateRenderFPTR)(void);
void main_loop() {
stateHandleEventFPTR();
m_stateUpdateFPTR();
m_stateRenderFPTR();
}
};
void change_state( void (*newHandleEventFPTR)(void),
void (*newUpdateFPTR)(void),
void (*newRenderFPTR)(void)
) {
m_stateHandleEventFPTR = newHandleEventFPTR;
m_stateUpdateFPTR = newUpdateFPTR;
m_stateRenderFPTR = newRenderFPTR
}
Now the main loop is very small and simple, even if we handle many game states. However, this solution still does not help us initialize and deallocate states. Because each
game state has not only code but also unique resources, it is appropriate to think of
game states as attributes of an object. So, next we will look at an object-oriented programming (OOP) approach.
Game State Manager | 39
We start by creating a class to represent our game states:
class GameState
{
GameState();
//constructor
virtual ~GameState();
//destructor
};
virtual void Handle_Event();
virtual void Update();
virtual void Render();
Next, we change our state manager to use that class:
class StateManager {
GameState* m_state;
void main_loop() {
m_state->Handle_Event();
m_state->Update();
m_state->Render();
}
};
void change_state( GameState* newState ) {
delete m_state;
m_state = newState;
}
Finally, we create a specific instance of our game state:
class State_MainMenu : public GameState
{
int m_currMenuOption;
State_MainMenu();
~State_MainMenu();
};
void Handle_Event();
void Update();
void Render();
When it is represented by a class, each game state can store its unique variables inside
that class. It can also allocate any resources it needs in its constructor and deallocate
them in its destructor.
Furthermore, this system keeps our code nicely organized because we have to put the
code for each state in separate files. If you are looking for the Main menu code, all you
have to do is open the State_MainMenu class and there it is. And the OOP solution makes
this code easy to reuse.
This seems to best fit our needs, so we will use the OOP solution for our Game State
Manager.
40 | Chapter 2: Game Engine Anatomy
The Next Level: Concurrent Access
Another, more complicated, approach to the Game State Manager would be a kernel
or scheduler. Very complex game engines, such as the ones found in current-generation
PC and console platforms, use these to organize multiple tasks that run simultaneously,
such as disk access, physics, and graphics routines.
Concurrent processes take advantage of the delays in completing tasks on each CPU,
so while one portion of the game is waiting on something such as hard drive access and
another part is waiting on the graphics card, you can still use the CPU to calculate
physics simulations. This idea is also well suited for hardware with multiple CPU cores.
However, concurrent access isn’t very useful for games on the iPhone. First of all, most
game designs are limited by the graphics and input provided by the platform, and
therefore they demand far fewer resources and calculations than console games. Furthermore, there is less to be gained from multithreaded processes on the iPhone because
filesystem access is much faster due to the hard drive being much smaller in capacity
and responding to only one application at a time.
But the iPhone is still a new platform, and developers have yet to tap into its capabilities
to the fullest. Just keep in mind that game code should solve the problem put forth by
game design. Don’t get carried away if it doesn’t help you implement the game.
Graphics Engine
The graphics engine is in charge of visual output. This includes drawing graphical user
interface (GUI) objects for the player to interact with, animating 2D sprites or 3D
models, and rendering backgrounds and special effects.
Although the techniques used to render 2D and 3D graphics may be different, they
evolve from the same set of graphics tasks. These include texturing and animation, in
increasing order of complexity.
Texturing
Texturing is central to the display of graphics. In 2D, a flat image is displayed pixel by
pixel to the screen, while in 3D, a collection of triangles (also called a mesh) undergoes
some mathematical magic to produce a flat image, which is then also displayed on the
screen. From there on, everything else gets more complicated.
Pixels, textures, and images
When drawing to the screen, the basic unit of measurement is a pixel. Each pixel can
be broken into Red, Green, and Blue color values, along with an Alpha value for transparency that we’ll discuss shortly.
Graphics Engine | 41
A texture is a collection of data about how to render a group of pixels. It contains color
data for each pixel to be drawn.
An image is a high-level concept and is not directly related to a particular set of pixels
or textures. When a human sees a group of pixels, her brain puts them together to form
an image; e.g., if the pixels are in the right order, she might see an image of a giraffe.
It is important to keep these concepts separate. A texture might contain pixels that
form the image of a giraffe. It might contain enough pixels to form multiple images of
a giraffe, or it may contain only some of the pixels required to render an image of a
giraffe. The texture itself is just a collection of pixels, and does not inherently understand that it contains an image.
Transparency
At any one time, your game will likely have several if not many objects rendering textures to the screen, and some of them will overlap one another. The question is, how
do you know which pixel of which object should be rendered?
If the texture on top (being drawn after the other texture) at each location is completely
opaque, its pixels will be displayed. However, for game objects, which have nonrectangular shapes and partially transparent objects, the result might be a combination of
the two textures.
The most commonly used form of blending in 2D graphics is full transparency. Let’s
say we want to draw an image of a koala (Figure 2-3) on top of a background of eucalyptus trees (Figure 2-4). The image of the koala is stored in a rectangular texture in
memory, but we don’t want to draw the whole rectangle; we want to draw only the
pixels of the texture that shows the koala. For each pixel in the texture, we need to
know whether the pixel should or should not be drawn.
Figure 2-3. Koala source texture
42 | Chapter 2: Game Engine Anatomy
Figure 2-4. Eucalyptus source texture
Some graphical systems accomplish this by adding a mask. Imagine that we have another texture in memory that is the same size as the koala texture; however, it contains
only black and white pixels. Each white pixel in this mask texture represents a pixel in
the original koala texture that should be drawn, and each black pixel represents a pixel
that should not be drawn. If we have this mask texture present when we are drawing
our koala to the screen, we can check the value of each pixel in the koala texture against
each pixel in the mask texture and draw only the appropriate pixels to the screen. If
each pixel allows a range of values instead of just a binary white/black value, it can
support partial transparency (see Figure 2-5).
However, this would require us to store and load two separate textures for each image.
Some texture formats incorporate transparency right into the texture by adding a
visibility value to the pixel in addition to the Red, Green, and Blue color values. This
is called the Alpha value.
Graphics Engine | 43
Figure 2-5. Koala mask texture
Texture blending
The memory devoted in textures to Alpha values is large enough for each pixel to have
a range. Typically, an Alpha value occupies a whole byte of a pixel, allowing a value
from 0 to 255. Interesting visual effects can be achieved by blending together the color
values of two pixels. This effect is usually used for partial transparency, such as objects
that are partially or fully see-through (see Figure 2-6).
Figure 2-6. Partially transparent green rectangle
We can use the Alpha value for each pixel to determine how it should be blended. If
the range of a pixel color value is 0–255, the range of the Alpha value would also be
0–255. Although 0 for a Red color value means that no red would be used when drawing
that pixel, a 0 for an Alpha value would mean the pixel would not be drawn at all.
Meanwhile, a value of 128 for Red would indicate that half of the maximum Red value
should be used when drawing the pixel, and a value of 128 for Alpha would indicate
that half of that pixel’s color value should be used when blending with another pixel.
It becomes very important to properly sort the drawing order of objects when blending
is used. Because each blended render operation can only blend the source with the
destination, items that are drawn first will not be blended with objects drawn after
44 | Chapter 2: Game Engine Anatomy
them. Although this is easy to manage in 2D graphics, it can become complicated very
quickly in 3D graphics.
To correctly sort meshes for texture blending in 3D graphics, you have
to sort objects before rendering them. The objects must be drawn in
order, starting with the object that is farthest from the camera and ending with the one that is closest to it.
Fortunately, the OpenGL ES implementation on the iPhone was specifically designed to handle this problem. This makes it much easier to
sort geometric objects and obtain the right composite texture.
Rotation
In 2D graphics, most textures are rendered directly to their destinations without rotation. This is because standard hardware does not have functionality for rotations, so
the rotations must be calculated in software, which is a slow process and often results
in a poor-quality image.
Commonly, game developers will avoid this by prerendering their objects at several
different rotations and simply drawing the image that corresponds to the correct
rotation.
In 3D graphics, rotation is calculated similarly to the way lighting is, as part of the
rendering process on the hardware.
If you are developing a 2D application that requires a large number of
objects to be rotated, you might consider using a 3D engine and merely
setting up an orthogonal camera so that the scene still looks 2D.
On the iPhone, this is not necessary. Quartz 2D, the 2D Graphics API
on the iPhone, has a nice rotational system already in place so that rotations are not expensive; you can continue developing your game in
pure 2D as planned.
Clipping
For reasons that we will explain in the next section, another important aspect of texturing is clipping. Although the examples we have used so far have been drawing entire
source textures onto destination textures, it often becomes important to draw only part
of the source to a limited section of the destination.
For instance, if your source contains multiple images in one texture file, cropping allows
you to render only the portions of each source texture that contains the image you wish
to draw.
Clipping also allows you to limit drawing access to a subsection of the destination
texture. This helps you render objects in 3D through texture mapping, which spreads
Graphics Engine | 45
a texture over a mesh of triangles that can be an arbitrary shape. For instance, a texture
could represent clothing or the pelt of an animal and could undulate in a supple 3D
fashion as the character underneath it moves. The texture in this case is usually called a
skin.
The first 3D games used 2D sprites mapped to very simple rectangle
meshes. These meshes were called billboards, and they always faced directly toward the camera when rendered. However, because their position and scale were based on 3D projection, they acted like 3D objects.
Billboards are still useful in today’s games, mostly in the form of particle
systems in which hundreds of small billboards are generated and move
together in a semirandom fashion. Because the geometry is so simple,
it is easy to render many of these objects at once.
Animation
By rendering a consecutive sequence of images, we can convince the player that he is
watching a moving object, even though all he’s doing is staring at the same pixels as
they rapidly change color. This is the concept of animation. Two-dimensional animation has remained pretty simple, whereas 3D animation is more sophisticated because
it usually involves more objects and more motion.
In addition to discussing animation techniques, this section also covers the main types
of optimizations that enable our graphics engine to efficiently and reliably perform
complex graphics tasks that would be impossible to do with a naive approach. Some
of the major optimization techniques include culling, texture sorting, smart texture file
usage, resource management, and level-of-detail rendering.
Two-dimensional animation: Sprites
In 2D graphics, if we wanted to render a horse in full gallop, we could do so by first
creating an image of the horse in each pose that we will be rendering to the screen. Each
image is called a frame, and when each frame is rendered one after the other, the horse
is animated (see Figure 2-7). This is quite similar to the way film creates the illusion of
animation, by presenting successive frames that differ just in the parts that are meant
to move.
To keep these frames together, they are put into the same texture, called a sprite. Using
the cropping method we described in the previous section, only the section containing
the current frame is rendered to the screen.
Depending on how fast you want the animation to play, and how many frames of the
animation are provided, you may render each frame multiple times before moving on
to the next one in the sequence. In fact, you can create many effects by controlling the
order and speed of the rendered frames.
46 | Chapter 2: Game Engine Anatomy
Figure 2-7. Stanford’s horse in motion
Three-dimensional animation: Models
Instead of maintaining a complete image to be rendered on each redraw, as in 2D
sprites, 3D animation actually calculates the effects of movement geometrically. As we
described earlier, all 3D objects comprise a group of one or more triangles, called a
mesh. There are several ways to animate a mesh, and the technology has evolved along
with game development and graphics hardware. The basic idea behind these techniques
is called keyframing.
Keyframes are slightly different from the frames we discussed for 2D animation. Twodimensional animation requires every single frame to be created by an artist and stored
in a texture. However, in 3D, if we store only the most distinctive frames (the keyframes), we can re-create the other frames mathematically.
The first games that used animated meshes actually stored multiple copies of the mesh,
each in a different keyframe position. For instance, if we were rendering the horse in
3D, there would be a separate mesh for each keyframe listed earlier in the sprite. At
time(1), the first frame would be drawn as is; at time(2), the second frame would be
drawn as is.
Between major keyframes, a technique called interpolation would be used. Since we
know that the first and second frames have the same number of triangles but with
slightly different positions, we can calculate a third “temporary” mesh that combines
the two based on the current animation time. So, at time(1.5), the temporary mesh
would look like it was exactly halfway between the first and second keyframe meshes.
And at time(1.8), it would almost completely resemble the second frame.
For obvious reasons, this is very inefficient. This is acceptable for meshes with a small
number of triangles and a small number of keyframes; however, modern graphics
Graphics Engine | 47
require high-resolution models with detailed animation. Fortunately, there is a better
way to store the keyframe data.
The technique is called skeletal animation, or bone rigging. If you consider the horse
example, you will note that most of the triangles move together in groups, such as the
head group, the tail group, and four separate leg groups. If you were to say that each
group had a “bone” associated with it, you could consider that together all of the bones
form a skeleton.
A skeleton is a group of bones that can be applied to a mesh. An animation is formed
when a series of skeletons in different positions is shown in succession. Each frame of
the animation uses the same mesh, but with the bones moved slightly from their previous position to indicate motion.
By storing the mesh in one position, but applying one of the keyframe skeletons to it,
we can create a temporary mesh to render to the screen. By interpolating between two
skeleton keyframes, we can create the same animation effect at a fraction of the cost.
Another advantage of bone rigging over storing a mesh for each keyframe is animation blending. Say we have one animation of our horse
trotting forward and a different animation of the horse standing still but
shaking his head and tail. If we combined the body and legs of the first
animation with the head and tail of the second animation, we would get
a horse trotting forward while shaking its head and tail; a complex animation built from two simple animations.
If we were to try to do this with the old technique of one mesh per
keyframe, we would have to interpolate between four separate meshes.
With bone rigging, we can blend the keyframes together at the bone
level very easily and then apply that skeleton to the mesh as usual.
Animation controllers
An animation controller object is useful to abstract the low-level tasks of choosing what
frame to render, how long to render it, and which new frame to substitute afterward.
It is the glue that bridges the game logic and the graphics engine wherever animation
is concerned.
At the top level, the game logic is worried only about setting an object to something
like the “Run” animation, and possibly what speed it should be running at in units per
second. The Controller object knows which sequence of frames corresponds to the
“Run” animation, and how fast they should be played, so the game logic doesn’t have
to know.
Particle systems
Another useful object, similar to the Controller, is the Particle System Manager. A
particle system is used when drawing special effects that have highly fragmented
48 | Chapter 2: Game Engine Anatomy
elements, such as fire, cloud particles, or sparkle trails. Although each object in the
particle system has very limited detail and animation, their combined motions can
produce very entertaining visual effects.
Culling
The best way to increase the number of times you can draw to the screen per second
is to reduce the amount of drawing done on each iteration. Your scene might contain
hundreds or even thousands of objects at the same time, but if you have to draw only
a few of them, you can still render the scene quickly.
Culling is the removal of unnecessary objects from the drawing path. You can perform
culling on many levels simultaneously. For instance, at a high level, you may consider
that a user in a room with a closed door cannot see any of the objects in the next room,
so you do not even have to try to draw any of those objects.
At a low level, 3D graphics engines will often try to remove portions of the meshes you
ask them to draw. Consider that at any given time approximately half of a mesh’s
geometry is the back side—facing way from the camera. The camera cannot see that
geometry, so it will be overdrawn by the front side of the mesh. Therefore, all triangles
that are facing away from the camera can safely be ignored when rendering each mesh;
this is called back-face culling.
Texture sorting
Each time an object is rendered to the screen, the graphics hardware has to load the
source texture into its local memory. This is part of what is called context switching.
If three images are going to be drawn to the screen and two of them share the same
source texture, there are two ways to handle the texture sorting: the efficient method
draws the two images that share the same texture in sequence and requires only one
context switch, whereas the inefficient method requires two context switches. You
don’t want the third image to be drawn in between the two that share a texture.
Sorting your rendering process by objects that share the same texture will reduce the
number of unnecessary context switches, resulting in faster rendering.
Texture files
Planning out your texture organization at the start will help you sort your textures in
an optimal manner. For instance, let’s say you are going to be drawing level geometry,
a player avatar, and several types of creatures throughout your game.
If the first two levels are grassy areas and the next is a desert, you might keep all of the
tree, grass, bush, rock, and flower images used to render the first two levels together,
and keep the sand images used by the third level in a separate texture. Similarly, you
will want to keep all of the images used to render the player avatar in one texture.
Graphics Engine | 49
If all of the creatures are used in all of the levels, it may be optimal to keep them all
together in one texture. However, if the first level has howler monkeys and flying
squirrels, but the second level has only wood rats and a Surinam toad, you may wish
to keep the first two animals together in one texture, and the second two together in a
separate texture.
Resource management
Most video games render only a small portion of their total graphical content at any
one time. It is very inefficient to have all of those textures loaded into memory at the
same time.
Fortunately, game design usually dictates which resources are visible at different segments of the game. By keeping necessary textures loaded while unloading unused textures, you can make the most efficient use of the limited amount of memory available.
Using the last example from the previous section, when the game engine loads the first
level, your resource management code would make sure the texture with the howler
monkeys and flying squirrels was loaded into memory. When progressing to the next
level, it would unload that texture because it is known to be unused for the second level.
Textures can also be managed dynamically. For instance, if you have
room for five textures in memory, and the current level is using only two
textures, while the next level is going to use only one, it is not necessary
to unload either of the first two. Furthermore, if the third level uses the
same textures as the first, it does not have to load any textures into
memory because its texture is already prepared. This system would remove unnecessary textures only when it ran out of room to allocate new
ones.
Level of detail
Another optimization technique, particular to 3D graphics, is level of detail. Consider
an object that is far away from the camera, such as on the horizon; because it is so far
away, it looks very small and most of the detail of the shape is lost. You could easily
draw the same object at that size with a much simpler mesh, or even a billboard.
Level of detail will do exactly that, by keeping simplified copies of objects in memory.
Your graphics engine can determine which copy to use based on the object’s distance
from the camera.
50 | Chapter 2: Game Engine Anatomy
Physics Engine
A physics engine is the part of a game engine that deals with distance, movement, and
other aspects of game physics. Not all game engines will require a physics engine;
however, all graphics-based games have physics code at some level.
Don’t believe us? Take tic-tac-toe, for example. A very simple game, yes; however, even
this game has physics. When the user selects a square in which to place a mark, we
have to check whether that square is available. If it is, we have to place the mark and
check whether the user has won the game. This is an example of the two most basic
tasks of the physics engine: detection and resolution.
Collision detection versus collision resolution
It is very important to keep these two aspects separate in your mind. In game code,
detection is independent of resolution. Not every object in your game will collide with
every other object in the same way (or at all). Furthermore, not every collision that has
been detected will be resolved in the same way.
For example, let’s propose a pretend game: the O’Reilly Wildlife Adventure. In this topdown adventure game, the player’s avatar has unwittingly found his way onto the
wrong side of the fence at the O’Reilly Wildlife Preserve and is now trying to avoid the
odd (and sometimes dangerous) animals while making his way to safety.
Several physical interactions can happen in this game:
1.
2.
3.
4.
Player-world collision
Animal-world collision
Player-animal collision
Player-goal collision
The first type, player-world collision, is very simple. We check the bounding area of
the player against the walls in our level. If the player is colliding with one of the walls,
we offset his avatar to a place where he and the wall will no longer collide.
The second interaction is slightly more complicated. We use the same collision detection method: check the bounding area of the animal against the walls in our level.
However, our resolution needs to be different because the animal is controlled by the
computer—not by a player. When we resolved case 1, we simply stopped the player
from moving into a wall. It was up to the player to realize he was hitting a wall and to
decide to change direction.
Graphics Engine | 51
If we were to do the same thing for case 2, the AI would not realize it was hitting walls
and would continue to walk blindly into them. Instead, we resolve the situation by first
moving the animal to an offset where it no longer collides with the walls, and then
notifying the AI that an animal has collided with a wall. This will allow the game logic
that controls that animal to cause it to change directions.
In case 3, we first detect the collision by checking the player’s bounding area against
the animal’s bounding area. Once we have determined they are colliding, a number of
different outcomes might occur. If the animal is a tarsier, it might run away. If the
animal is an asp or a lion, it might attack the player. A camel would probably ignore
the player. And if the animal is a grasshopper, it might get squished!
Finally, case 4 is a new situation. The goal is different from the world, player, and animal
scenarios, because it does not have a graphical representation. It is an invisible trigger
area that sends an event when the player steps into it. Fortunately, even though it
doesn’t have a graphical representation, it still has a physical representation. So again,
all we have to do is test the player’s bounding area against the goal’s bounding area. If
we determine that the player has triggered the goal, we notify the game logic, which
will then change to the “You Win!” game state.
Two-dimensional collision detection
Two-dimensional collision detection is a relatively simple process. Most of it can be
summed up in the following set of detection routines: rectangle-to-rectangle, point-inrectangle, circle-to-rectangle, point-in-circle, and circle-to-circle. (It might also be necessary to check line segments, but that can usually be avoided.)
Since these routines will be used many times per second, it is very important to make
them as efficient as possible. To do this, we will perform a series of cheap tests to prove
that two objects did not collide before determining that the objects did collide:
bool cd_rectangleToRectangle( Rect r1, Rect r2)
{
//can't be colliding because R1 is too far left of R2
if( r1.x + r1.width < r2.x ) return FALSE;
//can't be colliding because R1 is too far right of R2
if( r1.x > r2.x + r2.width ) return FALSE;
//can't be colliding because R1 is too far below R2
if( r1.y + r1.width < r2.y ) return FALSE;
//can't be colliding because R1 is too far above R2
if( r1.y < r2.y + r2.width ) return FALSE;
}
//if we get here, the two rects MUST be colliding
return TRUE;
Even though this will result in more code being run in the case that objects do collide,
most of the time objects are not in collision with each other; we optimize for the case
that happens most often (objects not in collision) because it’s much more efficient.
52 | Chapter 2: Game Engine Anatomy
High-Speed Collision Detection
Physics detection works best between two similarly sized objects moving at slow speeds.
High-velocity objects require special consideration. Consider a pinball game: a very
small ball moves at high speeds and bounces off many different objects. Because the
pinball is moving so fast, simply checking whether it collides with a bumper is not
enough (see Figure 2-8).
Figure 2-8. Pinball versus bumper
At time 1, the ball is to the left of the bumper, but by time 2, the ball has enough speed
to move clear through the bumper, and a circle-rectangle collision check would fail
because the ball and the bumper are not touching. Instead of checking collision between
the ball and the bumper, the collision detection code should check the path of the ball.
In this way, the pinball’s collision with the bumper will be properly detected no matter
how large its velocity (see Figure 2-9).
Figure 2-9. Multiple collisions in one step
Graphics Engine | 53
But we’re not done yet. If we performed only one check, the ball’s velocity could be so
large that even after bouncing off one bumper it still has enough speed to pierce another
bumper. To accurately simulate the pinball’s motion (and avoid having it shoot through
your bumpers), it is necessary to perform multiple collision detection steps on the pinball until its full velocity has been calculated for that entire game loop.
Before we continue, let’s focus for a moment on a very important concept: the graphical
representation of a game object is separate from its physical representation. Computers
can supply only a limited amount of calculating power per second, and it’s hard to
perform very detailed physical simulations in real time. Because of this, game physics
code has a long and proud tradition of being only as accurate as it needs to be to let the
game feel right to the player.
For example, in our proposed game, the player’s avatar is going to collide with a rhinoceros. (Obviously, the player was either not paying much attention, or he was busy
running away from an angry mama tiger.) The player, being a human, has many appendages animating forward and backward as he runs. The rhino, being a rhino, has a
similar number of appendages, as well as a decidedly unfriendly looking horn poking
out of its head.
Although the graphical representation of the player needs to show where the player’s
arms and legs are as he is animated running across the screen, do we really need to
know where they are in the physics representation? Do we really need to check the
avatar’s two arms and two legs, as well as a head and a torso for collision against the
rhino’s head, torso, four legs, and horn? (And don’t forget about that vicious tail!) Of
course not, since our game is top-down, a simple rectangle bounding the player versus
a simple rectangle bounding the rhino is all we need.
Three-dimensional collision detection
Collision detection in 3D can be a lot more difficult than in 2D. You must be familiar
with some 3D math, such as linear algebra. And if the math requirement weren’t
enough, 3D games tend to have much more detailed physical worlds. Fortunately, you
can still rely on approximation techniques to help reduce the number of calculations
you’ll while still being as accurate as necessary to make the game “feel” right to the
player.
As we discussed earlier, an object’s graphical representation is different from its physical representation. However, sometimes we want to make sure the difference is as small
as possible. Consider a first-person shooter game. When the player fires a bullet at
another player’s head, we want to know not only whether the bullet hit the player, but
also whether it scored a head shot. Obviously, a simple bounding box will not do. But
we can’t afford to check the bullet’s path against every triangle in every player’s avatar.
We use the same technique in 3D collision detection as we did in 2D collision detection:
perform a series of cheap failure tests before performing the more expensive and
54 | Chapter 2: Game Engine Anatomy
accurate test. For the bullet example, we would first test to see whether the bullet path
intersected each player’s bounding boxes. If it didn’t hit any of them, we exit our collision check. For the boxes it did hit, we determine which is closest to the projectile’s
starting point and then do a more detailed check against every triangle in that player’s
mesh. This is the physics version of the level-of-detail concept in graphics optimization.
If the check on the closest player failed, we would do the detailed test on the next player
whose bounding box was hit in the first check. In this way, we can efficiently and
accurately determine even a complex case in which a bullet flies between the legs of
one player to hit another player behind him.
Additional 3D Optimizations
Three-dimensional physics scenes tend to get very complicated very fast. Another
optimization that physics engines borrow from graphics code is culling. Although levelof-detail optimization can help speed up our collision detection tests for complex objects, our physics code will be faster if we have fewer objects to test in the first place.
By using detailed knowledge of the physical scene, culling reduces the total number of
objects we have to check.
The Binary Space Partition or BSP tree is one such method that is commonly used for
indoor scenes. By slicing the level into a binary tree of geometry nodes we can separate
large portions of the level that are not visible to each other. For example, let’s say we
have a building consisting of three rooms, where Room A opens into Rooms B and C,
but Rooms B and C do not open into each other (see Figure 2-10).
Figure 2-10. Room visibility
When a player fires a bullet from Room A, we may have to check geometry in Rooms
A, B, and C for collision. However, if the player fires from Room B, we know for certain
that we have to check geometry only in rooms A and B, saving us from having to check
any geometry in Room C.
Graphics Engine | 55
Collision resolution
Once a collision has been detected, it’s time to perform collision resolution. The first
thing to consider is what “low-level” or “high-level” actions must take place. Low-level
actions are those that the physics code can resolve, such as adjusting a player’s position
so that he is just above the ground instead of falling into it. High-level actions are signals
that get sent out to the game logic section of the game engine; these signals let the game
logic know things such as when an animal has run into a wall or whether a player has
reached the “goal” trigger area.
Some collision responses will require multiple high- and low-level responses at the same
time. For instance, when a pinball hits a bumper, it should bounce off the bumper
appropriately (low level) but also send a signal to the game logic that will animate the
bumper, produce a sound, and increase the user’s score (high level).
When testing the results of low-level collision resolution code, pay special attention to
detail. One of the most visceral elements of game “feel” is the physics code. Does the
avatar respond quickly to player input? Does the car in a racing game accurately model
a realistic suspension and transmission? Does the whole screen shake when someone
fires the “big gun”?
Ultimately, it is the designer’s job to declare when the game play feels right. But it is
the programmer’s job to make that happen. Don’t be afraid to write special cases to
get the right results.
For example, one common technique is to flag objects that are at rest. When an object
has made contact with geometry considered to be the “ground,” you can set a “grounded” flag on that object to “true.” When the grounded flag is true, the object is considered at rest and you do not need to apply gravity to the object or test its collision
with the world. This not only saves you from having to run collision detection on a
large number of stationary objects, but it also avoids the possible jittering of objects
that can happen in some physics simulations when objects bounce back and forth on
the ground.
Audio Engine
Audio is often a neglected dimension of game development, which is perplexing when
you consider that audio makes up one-third of the human senses used to play video
games. Using the right sounds at the right time can greatly increase the value of game
play with very little effort on the part of the programmer.
Basic audio features include loading and unloading a sound sample; playing sound;
and stopping, pausing, resuming, and looping. Typically, all sounds can play at the
same volume, but you may wish to allow users to change the master volume level for
all sounds to suit their preferences.
56 | Chapter 2: Game Engine Anatomy
Games that require 3D sound, also known as positional audio, can use
the iPhone’s OpenAL library.
Sound samples
Before you can play a sound, you need to load a sound sample from a file or a memory
buffer. The iPhone API supports AAC and MP3 formats for high-quality sounds, as
well as PCM and IMA4 for smaller samples and a number of other less common formats.
Playing sound
Once you’ve loaded a sound sample, your API provides functions to start and stop
playback of the sample. Most APIs also provide pause and resume functionality, and
some allow you to seek to a position in the sample. More advanced features are available, but typically these are all a game developer will need.
Sometimes you can load multiple sounds more efficiently by putting
them into one sound sample and seeking to the start of each sound that
needs to play. Although this reduces the overhead of loading several
samples, it allows you to play only one of these sounds at a time.
Multichannel sound
Because sound playback is hardware dependent, the number of sounds you can play
at one time is limited. Each sound playing at the same time is using one channel. On
the iPhone, all MP3 and AAC samples use the same hardware channel, and only one
is available; however, multiple channels are available for PCM and IMA4.
This means that at any one time only one MP3/AAC-formatted sample can be playing,
but multiple PCM/IMA4 samples can play simultaneously (and at the same time as an
MP3 or AAC).
Music versus SFX
Most sounds used in games fall into two categories: ambient sound (typically background music) and sound effects (SFX). Sometimes environmental or ambient sounds
are used instead of music, but they share the same characteristics.
Music typically involves one relatively long sample that may loop after playing, or it
may immediately proceed to another music sample. Typically, only one music sample
is playing at any given time, which makes the MP3/AAC format limitation a nonissue.
Sound effects are much shorter and may require many different types of samples
to be playing in an overlapping fashion. The PCM/IMA4 sample formats work well for
this purpose.
Graphics Engine | 57
Because a limited number of channels is available to PCM/IMA4, if your game can
result in many SFX samples trying to play at the same time, some of them may not play.
It might become important to assign priorities to SFX samples to ensure that certain
sounds play when audio channels are scarce.
For instance, let’s say the player’s avatar from our earlier example walks into a room
full of angry rhinos. Each rhino will play an “angry snort” sample, possibly followed
by a “charging” sample, and the player avatar will want to produce a “shrill cry” sample.
We should give the player’s avatar sound effects a higher priority than others so that
his shrill cry is not drowned out by the sound of charging rhinos.
Fortunately, the current iPhone supports at least 32 sample channels, so it is highly
unlikely that you will have to prioritize samples on that platform.
Output devices and interruptions
The iPhone supports internal speakers and headphones as output devices. It is recommended that the device use only one at a time. When the player inserts headphones
into her iPhone, the audio should switch over to the headphones automatically.
Because the iPhone is a mobile device, it is possible for the headphones to accidentally
fall off as the player is walking about. A good design choice is to pause the game when
headphones are removed to allow the user time to find the plug and reattach the headphones. Optionally, you may wish to stop sound during the pause state for this reason.
Most importantly, consider audio from the player’s perspective. Playing your game is
not the only reason players use their iPhone, so don’t let the game become annoying
by allowing it to take priority, or players will turn it off.
Player Input
The player input portion of the game engine is focused on receiving “low-level” events
from the operating system, and translating them into “high-level” events that the game
logic code can use. For PC games, the low-level events could be mouse and keyboard
input. For console games, they could be generated by the controller’s joysticks, triggers,
and buttons. In our case, the iPhone will handle touch and gyroscope events.
Touch events
Touch-screen interfaces require an approach to interface design that’s fundamentally
different from the approach found in most mobile, console, and PC platforms. For
starters, there tends to be much more latency between the moment the user touches
the screen and the moment your application receives an event (although the iPhone
does a good job of keeping that latency as short as possible). However, the real problem
is that whenever the user performs a touch, he is forced to cover part of the screen with
his finger, effectively reducing the visibility of the game.
58 | Chapter 2: Game Engine Anatomy
You can mitigate the problem by providing a graphical button for the user to click (thus
returning to the old button-click system, but at the cost of screen space) or by using
clever metaphors. For instance, if the player clicks a space in the game world, you could
have the player’s avatar walk in that direction, thereby reducing the need for continuous
player input by making the game smarter.
Although user interface design falls under the responsibility of the designer, it’s the
programmer’s job to let the designer know what the target platform can and can’t do.
The iPhone supports the following touch events:
•
•
•
•
Touch start
Touch moved
Touch end
Touch canceled
You may wonder what could trigger the “canceled” event. When some event suspends
your application between the “start” and “end” of a touch event, the program receives
the canceled event to let you know you won’t be receiving the rest of the events (such
as “touch end”).
To handle multiple touches, the UIEvent object sent to your application can contain a
list of multiple UITouch objects. If one finger is touching the screen, you will receive
only one UITouch object; if two fingers are touching the screen, you will receive two
UITouch objects, and so on. Furthermore, the iPhone keeps track of up to five simultaneous tap events (a TouchStart followed quickly by a TouchEnd) that are or have happened recently.
Unfortunately, using these events to determine when the player is trying to single-tap,
double-tap, or perform swipe or pinch motions can get complicated. It isn’t difficult to
do; it’s just not obvious at first. Take the following example:
Time 0:
TouchStart - numTaps(0) numTouches(1) Touches { (40,40) }
Time 100: TouchEnd
- numTaps (1) numTouches(1) Touches { (40,40) }
Handle single-tap..
So far, the user has touched the screen once, so your code might perform the action
that corresponds with a single tap. But wait!
Time 0:
TouchStart - numTaps(0) numTouches(1) Touches { (40,40) }
Time 100: TouchEnd
- numTaps (1) numTouches(1) Touches { (40,40) }
Handled single-tap.. INCORRECTLY
Time 200: TouchStart - numTaps (1) numTouches(1) Touches { (40,40) }
Time 300: TouchEnd
- numTaps (2) numTouches(1) Touches { (40,40) }
FAILED to handle double-tap
The player tapped the screen a second time. If your code had acted immediately on the
TouchEnd event, it would have incorrectly responded to a single tap instead of the double
tap the player was trying to perform.
Graphics Engine | 59
How can we handle these events correctly for both cases? The solution is to defer the
first TouchEnd event to a timed callback. When we receive the first TouchEnd, we set up
a callback. If we receive a second TouchEnd before the callback is called, we know the
player is double-tapping, and we can cancel the callback and act on the double tap. If
we do receive the callback, we know the player never tapped a second time and we
should handle a single tap.
Here are some examples showing those two cases:
Time 0:
TouchStart - numTaps(0) numTouches(1) Touches { (40,40) }
Time 100: TouchEnd
- numTaps (1) numTouches(1) Touches { (40,40) }
Initiate callback timer
Time 200: TouchStart - numTaps (1) numTouches(1) Touches { (40,40) }
Time 300: TouchEnd
- numTaps (2) numTouches(1) Touches { (40,40) }
Handle double-tap, cancel callback
This time, the player has double-tapped and the code handled it correctly:
Time 0:
TouchStart - numTaps(0) numTouches(1) Touches { (40,40) }
Time 100: TouchEnd
- numTaps (1) numTouches(1) Touches { (40,40) }
Initiate callback timer
Time 500: Callback recieved
Handle single-tap
And now, the player has single-tapped and the code handled it correctly as well.
Note that you do not have to jump through these hoops for interfaces that expect only
single taps.
Detecting actions such as swipes is even more involved, but a little bit more obvious.
The code has to store a start point and an end point for the touch, and then evaluate
whether the line the user made was up, down, left, or right, and whether she swiped
her finger fast enough.
Resolving into high-level events
Once you have determined the physical action the player is performing, your code must
convert that action into something the game logic component can use. Exactly how
you do that depends on the context of your game, but there are a few typical patterns:
• If the player is trying to control an avatar, there is usually a continual interaction
between the player and the game. It is often necessary to store a representation of
the current player input. For example, if the input device were a joystick, you might
keep track of its current position in the x- and y-axes and then modify the player
avatar’s momentum during the main loop. The level of interaction expected between the player and his avatar is usually so tightly coupled that the physical state
of the controller represents a high-level model of the state of the avatar: when the
joystick is held “forward,” the avatar is moving forward, and when the “jump”
button is pressed, the avatar is jumping.
60 | Chapter 2: Game Engine Anatomy
• If the player is interacting with the game world itself, a more indirect approach is
necessary. For example, if the player must touch an object in the game world, the
code would have to translate the player’s touch position from screen coordinates
to world coordinates to determine what the player actually touched. That might
be as simple as inverting the y-axis and subtracting a 2D camera offset, or as difficult
as performing a camera-ray collision detection within a 3D scene.
• Finally, the user might be trying to perform an action that indirectly affects game
play, such as pausing or interacting with the GUI. In this case, a simple message
or function can be triggered to notify the game logic of what to do.
Game Logic
Game logic is the part of the game engine that makes your game unique. The logic
keeps track of the player state, takes care of the AI agents, determines when goals are
met, and generally enforces all of the rules of the game. It will be different for each game
because essentially, it is the game. Given two similar games, the graphics engine and
physics engine might have slight discrepancies, but the game logic code will show the
most difference.
The game logic works closely with the physics engine, and in small games where there
is no separate physics engine code, it may be responsible for whatever physics the game
has. However, for games that do warrant a physics engine, it is important to keep the
two separate. The best way to do this is to have them communicate by having the
physics engine send the game logic “high-level” game events.
High-level events
As much as possible, the game logic code should be concerned with only these highlevel problems. It does not care when the player touched the screen, what order to draw
to the screen, or whether two rectangles are intersecting. It does care about when the
player wants to “move forward,” when new game objects should be created or removed,
and what to do when two objects are “hitting” each other.
To maintain this conceptual distance, the parts of code that deal with low-level concepts (such as player input and the physics engine) should create high-level messages
to send to the game logic code to be processed. This will not only help keep code
separate and modular, but it will also aid in debugging. By logging the high-level messages that are being passed around, you can determine whether the cause of a bug is
incorrect processing of the message (a problem in the game logic code) or a failure to
send the message at the right time (a problem with the “low-level” code).
A very basic technique for sending high-level messages is to write a string and send that.
For instance, let’s say the player has pressed the up arrow key and that it should move
his avatar forward:
Graphics Engine | 61
void onPlayerInput( Input inputEvt ) {
if(inputEvt.type == IE_KEY && inputEvt.value == KEY_UP ) {
g_myApp->sendGameLogicMessage( "player move forward" );
}
}
Although this is very easy to read as a programmer, it is not very efficient for the computer. It requires much more memory and processing than is necessary. Instead, we
should take a hint from the player input method itself; rather than using a string, it uses
an object with a “type” and a “value.” Because the number of possible events is structured and finite, we can use integers and enumerations to specify the event information
we want to send in our messages.
First, we have to set up an enumeration to specify exactly what those events could be:
enumeration eGameLogicMessage_Types {
GLMT_PLAYER_INPUT,
GLMT_PROJECTILE_WEAPON,
GLMT_GOAL_REACHED,
};
Next, we set up enumerations to specify values for the events:
enumeration eGameLogicMesage_Values {
GLMV_PLAYER_FORWARD,
GLMV_PLAYER_BACKWARD,
GLMV_PLAYER_LEFT,
GLMV_PLAYER_RIGHT,
};
GLMV_ROCKET_FIRED,
GLMV_ROCKET_HIT,
Now, we define an object to hold our message data:
struct sGameLogicMessage {
short type;
short value;
} Message;
And now, we can use an object to send our message from the previous example:
void onPlayerInput( Input inputEvt ) {
if(inputEvt.type == IE_KEY && inputEvt.value == KEY_UP ) {
Message msg;
msg.type = GLMT_PLAYER_INPUT;
msg.value = GLMV_PLAYER_FORWARD;
g_myApp->sendGameLogicMessage( msg );
}
}
This may seem like more work, but it runs much more efficiently. The first (bad) example uses 20 bytes to send the message (20 characters at one byte each; don’t forget
the null terminator). The second example uses only four bytes for the same message!
But more importantly, when the sendGameLogicMessage() function tries to handle the
62 | Chapter 2: Game Engine Anatomy
message, it has to go through only two switch statements to find the right response,
instead of having to parse the data from a string, which is very slow.
Artificial intelligence
Another of the game logic’s duties is to manage the AI agents. Two types of games
typically use an AI system: one matches a player against a computer opponent, whereas
the other models a system containing semiautonomous entities within the game world
itself. In both situations, AI agents receive input and provide output that controls the
actions of objects in the game world.
In the first type of game, the AI is called an expert system. It is expected to emulate the
actions of a human who understands the rules of the game and employ strategies of
various difficulties to challenge the player. The AI typically has inputs and outputs
similar to those of the player, to closely reproduce human behavior. Because humans
are much better at processing complex information than current real-time AI agents,
the input for an expert system sometimes provides more information than the player
receives to make the AI system seem more intelligent.
For instance, if it is a real-time strategy (RTS) game in which a “fog of war” is used to
limit the human player’s view, the AI opponent might be able to see all units everywhere. Although this can allow you to easily increase the ability for the AI to compete
against a more intelligent human, if the advantage becomes too large, it may seem like
the AI is cheating. Remember, the point of the game is to be fun for the players, not to
let your AI defeat them.
In the second type of game, there may be many AI agents, each individually much less
intelligent. In some cases, the agents will be directly opposing the player, whereas in
others, they might be neutral, and in yet others, you may have a combination of both.
Some agents may be entirely dumb, offering very specific, limited behavior that doesn’t
pay any attention to what’s happening in the game world. One example may be an
enemy that merely walks back and forth in one hallway. Others may be slightly dumb,
with only one input and one output, such as a door that allows the player to open and
close it. And yet others may be very complex, and even coordinate their behavior in
groups. Choosing appropriate inputs for AI agents will allow you to simulate “awareness” and increase their realism.
No matter how simple the AI agent is, a state machine will typically have to be
employed. For instance, the entirely dumb object in the first example would have to
keep track of which direction it was walking. The slightly dumb object would have to
keep track of whether it was open or closed. More complex objects could track
states between “neutral” and “aggressive” behaviors, such as patrolling, confronting,
and attacking.
Graphics Engine | 63
Path Finding
Depending on your game’s design, it may be important for your agents to decide where
to move and how to get there. When the domain they have to move across involves
obstacles, finding their way requires planning a route in advance instead of just moving
directly toward their goal. This is called path finding and can be very CPU-intensive. If
this is necessary for your game, consider precomputing common travel routes to include
with that level’s data for the AI logic to use.
Transparent suspend and resume
It is important to treat game play as a simulation within the main game state. Do not
confuse real-world time with game time. If the player decides to take a break, your game
should pause to allow him to do so. The game should then be able to resume smoothly,
as though nothing had happened. Because the iPhone is a mobile device, saving and
resuming state becomes even more important.
Only one application is allowed to run on the iPhone at a time, and users expect those
applications to load very quickly. At the same time, they expect to be able to resume
what they were doing after switching between applications. That means being able to
save the state of your game to the device, and later resume it as quickly as possible. For
a game, the task requires saving the current level and reloading it so that the player can
continue playing immediately upon restarting the application. You need to choose
which data to save and find a compact, consistent format in which to write it to disk;
this structured data saving is called serialization.
Depending on the type of game, this could be more difficult than it sounds. For a puzzle
type of game, you would only have to keep track of which level the player is on and
what the current state of the board looks like. However, for an action game, you might
have to store the position of every object in the level in addition to the state of the
player’s avatar. At a certain point, this becomes unmanageable, especially when it’s
expected to happen quickly. For situations such as this, you can take a number of steps
at the game design level to ensure success.
First, you should decide exactly what is necessary to save the state. The position of
every little flame in a fire particle system isn’t important, but the position of that particle
system in the larger game might be. The state of each enemy in the game might not be
important—if they can be spawned from the level data. Taking this idea further, the
exact position and state of the player’s avatar might not be necessary, if you can simply
start him at a “check point.”
64 | Chapter 2: Game Engine Anatomy
Serialization Options
There are many ways to serialize game data. You could create a format for storing the
position and states of entities and write the data to a file in that format. However, this
requires processing the data, creating and using a buffer as the game state is examined,
and then reading in that format and re-creating those objects later.
There is another viable solution that trades efficiency of file space usage for speed.
Rather than parsing the game objects and creating a specially formatted file, you can
“freeze” the actual structures in memory to a file. Then, upon resuming, you would
load that file directly back into memory and use those objects immediately as they are.
Of course, most cases are not quite as simple as this. For one, you have no control over
the memory address location of the data; therefore, any pointers to memory addresses
would be invalid. Furthermore, some resources (such as images and sounds) are managed by the OS and cannot be frozen.
Instead, a hybrid approach is useful. By keeping game logic objects segmented into
“freezable” and “unfreezable” data, you can partially freeze those objects. When resuming the application, load those parts directly back into memory and then re-create
the “unfreezable” portions.
For instance, the player avatar could store his position, hit points, and animation state
in a “freezable” object, but let the image used for the avatar’s sprite be destroyed. When
that object is loaded back into memory, the game logic re-creates the sprite image and
attaches the two together.
Frame-based versus time-based logic
Frame-based logic updates game objects based on changes to individual frames. Timebased logic, which is more complex but more closely associated to the actual state of
the game, updates game objects based on the time that has transpired.
Programmers who are new to game development often make the mistake of combining
frame- and time-based logic. The difference is subtle in definition, but it can cause very
noticeable bugs if not handled appropriately.
For example, let’s take the case of player movement. Novice programmers might write
something such as this:
void onPlayerInput( Input inputEvent ) {
if(inputEvt.type == IE_KEY && inputEvt.value == KEY_UP) {
//apply movement based on the user input
playerAvatar.y += movementSpeed;
}
}
Every time the player presses a key, the avatar moves forward a set amount. This is
frame-based logic because the change in movement can potentially happen with every
new frame. Actually, in the current example, it will happen once per input event, which
Graphics Engine | 65
might be more or less than an iteration of the main loop. The visual impact of the move
will be noticed only on the next iteration of the main loop, so any intermediate avatar
movements will be wasted calculations. Let’s make the following improvement:
void onPlayerInput( Input inputEvent ) {
if(inputEvt.type == IE_KEY && inputEvt.value == KEY_UP) {
//save the input state, but don't apply it
playerAvatar.joystick = KEY_UP;
}
if(inputEvt.type == IE_KEY_RELEASE) {
playerAvatar.joystick = 0;
}
}
void Update() {
//update the player avatar
if( playerAvatar.joystick == KEY_UP ) {
playerAvatar.y += movementSpeed;
}
}
Now we know that the movement speed will be applied exactly once per game loop
while the key is being held down. However, this is still frame-based logic.
The problem with frame-based logic is that frames do not always happen at the same
time interval. If, during a game loop, the rendering or game logic takes longer to complete than normal, it could push back the next loop. So, sometimes you will have 60
frames per second (fps), and other times, you might have only 30 fps. Because the
movement is being applied per frame, sometimes you will move only half as fast as
other times.
You can represent movement properly by using time-based logic instead. By keeping
track of the time since the last update frame, you can apply a portion of the movement
speed. In this way, you can specify a movement speed based on units per second, and
no matter what the current frame rate is, the avatar’s movement will always be the same:
void Update( long currTime ) {
long updateDT = currTime - lastUpdateTime;
//update the player avatar
if( playerAvatar.joystick == KEY_UP ) {
//since currTime is in milliseconds, we have to divide by 1000
// to get the correct speed in seconds.
playerAvatar.y += (movementSpeed * updateDT)/1000;
}
}
lastUpdateTime = currTime;
In this example, the same amount of movement speed would be applied whether we
had 2 fps or 60 fps. Time-based logic takes a little extra code to set up, but it allows
you to be accurate regardless of temporary lag.
66 | Chapter 2: Game Engine Anatomy
It is certainly possible to develop a game using frame-based logic. The important thing
is to avoid mixing the two. For instance, if your graphics code uses time-based logic to
animate the player avatar’s sprite moving forward, but the game logic code uses
frame-based logic to move the avatar forward in the game world, the walking animation
is not going to sync up with the distance the player has traveled.
For some applications, time-based logic is a requirement. Networked multiplayer
games, for instance, require synchronization between two clients. So, it’s absolutely
necessary to use time-based logic to ensure that both clients render the same movement
rate for all objects. Developers working on 3D games will notice that most physics APIs
also use time-based logic for their simulations.
If you can get away with frame-based logic, do so. But thinking in terms of time-based
logic will help you in the long run.
Game logic organization
The core function of game logic code is to manage the rules and progress of the Game
Play state. Depending on your game design, this can mean just about anything. However, there are a few typical patterns based on the type of game you are making.
Game logic typically is not associated with a particular class. Instead, it starts by being
manifested in the Game State object. When the main game state is initialized, it will
load and initialize the resources necessary for the current level, such as a list of hints
and words to find in a crossword puzzle, graphics data for player avatars, and physics
data for the area the player is currently in. During a game loop, the game logic will
receive user input, run the physics simulation, and handle any resulting collision resolution messages, simulate AI action, and enforce game rules. Finally, when the application needs to end the main game state, it will release any game-specific resources and
possibly save the state to the hard drive.
Depending on the complexity of your game, you may find it convenient to split up the
game logic further. For instance, if you are developing an adventure game, you most
likely have a world with environment data (ground, buildings, rivers, trees, etc.), entities that can move or interact (player avatars, enemies, nonplayer characters, switches,
obstacles, etc.), and perhaps some kind of user interface for performing special actions
and displaying vital information. Each feature entails a large amount of code, and although they work together to make the game what it is, you can separate them to keep
the workload modular.
You might create a class called Level Manager to handle the world environment, including loading and unloading the physics and graphics data necessary to display the
world, as well as calling the physics engine to test collisions between entities and the
world. You could create another class, or series of classes, to handle the entities that
exist in the world. Each class signals the loading and unloading of the physics and
graphics necessary to render those objects, and contains the AI to control them.
Graphics Engine | 67
And finally, you would likely create another separate class to handle the in-game user
interface, allowing you to keep the code for all three concepts separate.
This architecture works with any type of game, adventure or not. First, evaluate the
major features of your design and then group the features in a way that keeps similar
functionality and data together.
Conclusion
You should now have a basic understanding of some of the tasks that must be completed when making a game engine, which will help in the next chapter as we describe
the creation of these elements in preparation for our game.
68 | Chapter 2: Game Engine Anatomy
CHAPTER 3
The Framework
In this chapter, we’ll start creating a game application by building up the application
framework. This will contain code necessary to get your application started, by initializing subsystems and starting the main loop. It will also form a layer between the
iPhone OS and your game, providing resource management and abstracting complicated APIs such as graphics and sound. In essence, the framework should take care of
as many common tasks as possible, so developers on new projects can immediately
begin to implement game-specific code with as little work as necessary.
For our example game, the framework will consist of the following components:
The GameState and GameStateManager classes
These are the base classes from which each major application state will inherit.
The AppDelegate class
This is where the application begins and ends.
Event handling
This will be handled separately by each game state class.
The Resource Manager
We will create a singleton to provide resource loading and management, as well as
functionality including textures, sounds, and user data.
The render engine
This uses OpenGL ES to render textures in 2D format. Later we can expand on
this to allow 3D graphics as well.
The sound engine
This uses OpenAL and Audio Queue to play music and sound effects.
The data store
This uses NSUserDefaults to store and load user preferences and game progression
data in persistent memory.
Finally, in this chapter, we will create a skeleton project to show off the framework
features. After preparing all of the framework components, we will have produced a
reusable code base that will facilitate the creation of all kinds of exciting iPhone games.
69
Before you begin, please download the Chapter 3 examples at https://sourceforge.net/
projects/iphonegamebook/files/.
Game State Management
Unfortunately for us, the iPhone is not centered on games. Instead, its focus is on utility
and productivity applications such as web browsers, email clients, and music players.
This is evident in the iPhone SDK, where its core APIs are mainly focused on GUI
interaction and expect an event-callback scenario for processing data. This is not to say
that games on the iPhone are at all inferior: it just takes a few extra steps to get what
we want from the SDK.
First, let’s look at the UIView and UIViewController classes from the iPhone SDK.
At first glance, they seem similar to our GameState and GameStateManager classes.
The UIViewController is responsible for managing one or more UIViews, just as the
GameStateManager handles multiple GameStates. The UIView is responsible for rendering
graphics in drawRect and handling input events from the touch screen in touchesEn
ded, roles similar to the GameState class’s Render and Handle_Event functions we discussed in the preceding chapter.
However, one small difference creates an important mismatch between UIView and
GameState: UIView lacks an Update function. This serves to highlight an important difference in the purpose of the two classes: UIView is not meant to represent separate
application states.
So, how should we coordinate the use of GameState and UIView? There are a number of
configurations we could try:
• One UIViewController and one UIView for the entire application
• One UIViewController for all GameStateManagers and one UIView for each GameState
• One UIViewController for each GameStateManager and one UIView for each
GameState
All of these configurations will work, so it doesn’t matter which one you choose. We
chose to go with the second configuration, for the following reasons.
To begin, there is no need for multiple UIViewControllers because for our purposes,
they do not do much. The real design decision comes down to whether to have one
UIView for each GameState or one for the entire application.
Because each UIView contains its own event handling function, you can easily keep the
event handling code for each GameState separate under the second configuration. Also,
because each UIView has its own set of drawing coordinates, if multiple GameStates are
drawn to different portions of the screen at the same time (such as a “game play” state
overlaid by a “pause menu” state), the render code for each state does not have to worry
about the screen offset of the origin in the state’s window. And finally, because OpenGL
70 | Chapter 3: The Framework
ES code does not play nicely with Cocoa and Quartz rendering code, it is advantageous
to have a separate UIView for the different types of rendering we will be doing (more on
this later).
Implementation
Now we are going to begin the framework. We will start by creating a new project and
adding classes to represent our GameState and GameStateManager:
1. Open Xcode and select File→New Project→View-Based Application.
2. Add two new classes named GameState and GameStateManager.
3. In GameStateManager.h, add the following function to GameStateManager:
- (void) doStateChange: (Class) state;
This will allow you to change game states simply by passing the Class type of the
state you want the GameStateManager to create.
4. In GameState.h, change the GameState class to inherit from UIView instead of
NSObject. Also add the member variable GameStateManager* m_pManager; and the
following functions:
-(id) initWithFrame:(CGRect)frame andManager:(GameStateManager*)pManager;
-(void) Render;
-(void) Update;
5. Open ExampleViewController.m and uncomment the loadView function there, but
leave it empty.
The first thing we did was to create a new view-based application. This automatically
creates a few classes for us, including a single UIViewController and an AppDelegate.
The GameStateManager class is very basic; it is supposed to be a base class and provides
just the doStateChange function, which will be inherited and overridden.
The GameState class is slightly more interesting; it is also a base class, but since we chose
to have a single UIView for each of our GameStates, we will actually inherit UIView in our
GameState class! This means that every GameState object is a UIView. Because our class
is a UIView, we need to be sure to call initWithFrame on the superclass, but we also want
to receive a pointer to our GameStateManager, so we need to create a new constructor
that will initWithFrame: andManager.
We also have the Render and Update functions we discussed in Chapter 2. You will
notice we do not have a Handle_Event function; this is because the UIView comes with
a function that does this already, named touchesEnded: withEvent.
The implementation of the new GameState class functions looks like this:
//GameState.m
-(id) initWithFrame:(CGRect)frame andManager:(GameStateManager*)pManager;
{
Game State Management | 71
}
if (self = [super initWithFrame:frame]) {
// Initialization code
m_pManager = pManager;
self.userInteractionEnabled = true;
}
return self;
-(void) Update
{
}
-(void) Render
{
}
-(void) drawRect:(CGRect)rect
{
}
The Update and Render functions are empty because they will be overloaded. The init
WithFrame function will also be overloaded, but we want to make sure to set up the
UIView and set our GameStateManager pointer so that classes that inherit GameState don’t
have to. The drawRect function is inherited from UIView and gets called to render new
graphics when the View gets invalidated; here we rerouted it to our own Render
function.
Finally, notice that we did not declare or implement the touchesEnded function. That
is because it is already taken care of inside the UIView class, and any of our classes that
inherit from GameState will also inherit the UIView class as well.
Now that we have created the base class, we should start our first real GameState. We
will call it gsMain, defined in the gsMain.m and gsMain.h files in the Classes subdirectory
of the application, and for now all the class will do is display some text. Although we
define touchesEnded and a few related variables, we have no code yet for handling
touches:
//gsMain.h
@interface gsTest : GameState {
//no new member declarations necessary
}
@end
//gsMain.m
@implementation gsMain
-(gsMain*) initWithFrame:(CGRect)frame andManager:(GameStateManager*)pManager
{
if (self = [super initWithFrame:frame andManager:pManager]) {
NSLog(@"gsTest init");
72 | Chapter 3: The Framework
}
}
return self;
-(void) Render
{
CGContextRef g = UIGraphicsGetCurrentContext();
//fill background with gray
CGContextSetFillColorWithColor(g, [UIColor greyColor].CGColor);
CGContextFillRect(g, CGRectMake(0, 0, self.frame.size.width,
self.frame.size.height));
//draw text in black
CGContextSetFillColorWithColor(g, [UIColor blackColor].CGColor);
}
[@"O'Reilly Rules!" drawAtPoint:CGPointMake(10.0,20.0)
withFont:[UIFont systemFontOfSize:[UIFont systemFontSize]]];
-(void)touchesEnded:(NSSet*)touches withEvent:(UIEvent*)event
{
UITouch* touch = [touches anyObject];
NSUInteger numTaps = [touch tapCount];
//todo: implement touch event code here
}
@end
The gsMain class inherits from GameState (which inherits from UIView). In the constructor, we make sure to call the GameState constructor (which calls the UIView constructor).
Removing the Status Bar
Because this game will want to take up as much of the screen as possible, we need to
hide the status bar from view. This will also hide the green “touch to return to call” bar
that shows up when running an application during an active phone call (which is nice
because we don’t have to worry about resizing our game due to the change in visible
screen space):
1. In Xcode, double-click the Info.plist file in the left window.
2. Add a key named UIStatusBarHidden to Info.plist.
3. Right-click the value field and set the type to Boolean, and then check True.
The App Delegate
One of the classes Xcode created for us was AppDelegate. This is the first piece of code
that gets loaded when our program is run, and the last to unload. We are going to
modify this class to inherit from GameStateManager because it is going to manage all of
the important GameStates in our game. Like the other classes, GameStateManager.m
The App Delegate | 73
and GameStateManager.h are located in the Classes subdirectory. Begin by modifying
the Test_FrameworkAppDelegate class:
//Test_FrameworkAppDelegate.h
#include "GameStateManager.h"
@interface Test_FrameworkAppDelegate : GameStateManager <UIApplicationDelegate>
When our application starts up, the applicationDidFinishLaunching function is called
on our AppDelegate to let us start initializing our game. We need to do two things here:
start our main loop code and create an instance of our first GameState.
Add the following code to your AppDelegate class (don’t forget to add the appropriate
header functions):
//Test_FrameworkAppDelegate.m
#include "Test_FrameworkAppDelegate.h"
- (void) applicationDidFinishLaunching:(UIApplication *)application
{
//set up main loop
[NSTimer scheduledTimerWithTimeInterval:0.033
target:self
selector:@selector(gameLoop:)
userInfo:nil
repeats:NO];
}
//create instance of the first GameState
[self doStateChange:[gsMain class]];
- (void) gameLoop: (id) sender
{
[((GameState*)viewController.view) Update];
[((GameState*)viewController.view) Render];
}
[NSTimer scheduledTimerWithTimeInterval:0.033
target:self
selector:@selector(gameLoop:)
userInfo:nil
repeats:NO];
- (void) doStateChange: (Class) state
{
if( viewController.view != nil ) {
//remove view from window's subviews.
[viewController.view removeFromSuperview];
[viewController.view release]; //release gamestate
}
viewController.view = [[state alloc]
initWithFrame:CGRectMake(0, 0, IPHONE_WIDTH, IPHONE_HEIGHT)
andManager:self];
74 | Chapter 3: The Framework
}
//now set our view as visible
[window addSubview:viewController.view];
[window makeKeyAndVisible];
First, the applicationDidFinishLaunching function starts a callback to our gameLoop
function. Next, it changes to our first GameState, which will be gsMain.
Our gameLoop function is the main loop of our application. First it calls the Update
function on the current GameState class and redraws the screen with the Render function.
It finishes by setting up a new callback to continue the next cycle of the main loop.
The doStateChange function is inherited from our GameStateManager class. It accepts a
class as a parameter; this should be a class that inherits from GameState because it will
be instantiated and set as the current view. It begins by checking to see whether a
previous state exists; if so, the state is removed from the window and released to avoid
leaking any memory. Then it creates a new instance of the class that was passed in,
being sure to send a pointer to our AppDelegate class in the addManager parameter.
Finally, it sets the new GameState as our viewController’s current UIView object and sets
it as the window’s active view.
Remember when we implemented ExampleViewController’s loadView function but left
it empty? That was so that when our application starts, it does not set up a UIView of
its own from the .nib file.
Frames per Second
As an added exercise to make sure we understand the way the main loop works, we
will add code to display the current frames per second (fps) in our gsMain class.
First, we will calculate the fps in our AppDelegate class so that we can provide the
information to any of our GameStates that wants to know. Add the following variables
to your @interface definition in AppDelegate.h:
CFTimeInterval m_FPS_lastSecondStart;
int m_FPS_framesThisSecond;
int m_FPS;
Now open AppDelegate.m and add the following code to the start of the gameLoop
function:
double currTime = [[NSDate date] timeIntervalSince1970];
m_FPS_framesThisSecond++;
float timeThisSecond = currTime - m_FPS_lastSecondStart;
if( timeThisSecond > 1.0f ) {
m_FPS = m_FPS_framesThisSecond;
m_FPS_framesThisSecond = 0;
m_FPS_lastSecondStart = currTime;
}
What is going on here? To start, we have a counter named m_FPS_framesThisSecond that
will start at 0 every second and increment each time the game loop is run. Once we
The App Delegate | 75
have passed one second, as determined by m_FPS_lastSecondStart, we store the value
in m_FPS for use by our GameState, and reset the counter and start time.
The iPhone SDK treats time differently from most APIs. Unless you are an OS X developer, you may be used to getting the time in milliseconds as an unsigned 32-bit
integer. However, OS X and the iPhone refer to time as a 64-bit double, and a value of
1.0 means one second; milliseconds are found behind the decimal place.
It takes a second (pun intended) to get used to, but once you understand the difference
it’s quite easy to work with. For instance, why did we use 0.033 as our sleep timer? One
second divided by 30 frames = 1.0 / 30.0 = 0.033 seconds per frame. So, to have 30 fps,
the standard refresh rate to produce smooth effects to the human eye, we need our
game loop to run once every 0.033 seconds.
Now that we know our fps, we need to display it. There are plenty of ways we could
pass the data from the GameStateHandler to the GameState; we will use a straightforward
method and add a function to the AppDelegate with the signature - (int) getFrames
PerSecond. The function just returns the value of m_FPS.
In our gsMain state, edit the Update function to add the following code:
int FPS = [((Test_FrameworkAppDelegate*)m_pManager) getFramesPerSecond];
NSString* strFPS = [NSString stringWithFormat:@"%d", FPS];
[strFPS drawAtPoint:CGPointMake(10.0,60.0) withFont:[UIFont
systemFontOfSize:[UIFont systemFontSize]]];
First, we retrieve the value of m_FPS from our GameStateHandler, which we know to be
the AppDelegate class. Next, we format a string from the integer value, and then draw
that string to the screen with a default system font.
Event Handling
Because our GameState class inherits from UIView, we can override its event handling
functions for our purposes. To show this behavior, we will add to our example by
creating a second GameState named gsTest. We will modify gsMain to change to the new
state when the user double-taps the screen, and switch back again when she doubletaps from gsTest:
//gsTest.h
@interface gsTest : GameState {
//no members necessary
}
@end
//gsTest.m
@class gsMain //forward declaration
@implementation gsTest
-(gsTest*) initWithFrame:(CGRect)frame andManager:(GameStateManager*)pManager
{
76 | Chapter 3: The Framework
}
if (self = [super initWithFrame:frame andManager:pManager]) {
NSLog(@"gsTest init");
}
return self;
-(void) Render
{
CGContextRef g = UIGraphicsGetCurrentContext();
//fill background with blue
CGContextSetFillColorWithColor(g, [UIColor blueColor].CGColor);
CGContextFillRect(g,
CGRectMake(0, 0, self.frame.size.width, self.frame.size.height));
//draw text in black
CGContextSetFillColorWithColor(g, [UIColor blackColor].CGColor);
}
[@"it works!" drawAtPoint:CGPointMake(10.0,20.0)
withFont:[UIFont systemFontOfSize:[UIFont systemFontSize]]];
-(void)touchesEnded:(NSSet*)touches withEvent:(UIEvent*)event
{
UITouch* touch = [touches anyObject];
NSUInteger numTaps = [touch tapCount];
if( numTaps > 1 ) {
[m_pManager doStateChange:[gsMain class]];
}
}
@end
For the return to gsTest, we need to add the same touchesEnded function to our
gsMain class, but making doStateChange call [gsTest class]. When compiled and run,
the application should now respond to a double tap by switching to the gsTest state,
and back to the gsMain state with another double tap.
What is going on here? To start, we take a UITouch object from the set of touches that
gets passed into our touchesEnded function. Keep in mind that the user can be touching
the screen with multiple fingers at the same time. To keep track of that, the iPhone
keeps an array of UITouch objects, one for each finger, and sends that to each touch
event handling function.
At this point, we don’t really care how many fingers were used or which UITouch object
we respond to, so we grab anyObject from the set. Next, we find out the number of taps
this UITouch object has performed so far, and if that number is greater than one, we
perform our desired action: a state change.
Handling touch events can get much more complicated, but this is all we need to get
started.
Event Handling | 77
The Resource Manager
To begin drawing images, playing music, and saving user preferences, we first need to
be able to load textures and sound samples, and to read and write binary files. That is
the first responsibility of the Resource Manager. The second responsibility is to unload
resources when they are no longer needed, to make room for others.
First we must decide what formats to use for our textures and sound samples, and how
we will distribute them with our application. Next, we will have to write code to load
those resources when needed, and unload them when they are not being used.
Texture Format
For the texture format, the iPhone prefers PNG files. The PNG file format provides
compressed textures with decent quality as well as the option of alpha blending for
transparent pixels.
As we will discuss in the next chapter, we will be using OpenGL ES as our graphics
API. To use a texture with OpenGL, we first have to load the texture file, uncompress
it into a buffer, and use that buffer to generate a GL_TEXTURE_2D texture. To keep all of
this simple so that we can stay focused on game programming, we are going to need a
class to represent OpenGL textures, which we will name GLTexture.
A number of example applications distributed by Apple during the iPhone SDK Beta
are no longer available, and one of them provided a class that acted as a simple 2D
texture interface for OpenGL ES. We have tracked the class down and modified it for
use in our framework.
In addition to providing GLTextures, we will also provide GLFonts to draw text using
OpenGL. We will go into more detail about this in the section “The Render Engine” on page 80.
Sound Format
The native sound format for the iPhone is CAF, which stands for Core Audio Format.
To get the best performance, all sound effects used should be .caf files. Meanwhile,
music files tend to be much too large and should be stored using the compressed .mp3 format instead.
We will need to use both OpenAL and Audio Queue APIs to handle these two formats.
Fortunately, another piece of code is available from Apple that we have managed to
incorporate into our framework to make handling sounds much easier.
78 | Chapter 3: The Framework
The tool to convert a sound file to CAF format is called afconvert and
is available on OS X from the command line, like so:
/usr/bin/afconvert -f caff -d LEI16 mySound.wav
mySound.caf
Deploying Resources
For your program to access these sound and image files, the files need to be a part of
your application bundle. Adding resources to your application bundle is very easy.
Simply drag the files you wish to include from the filesystem into the Resources folder
in your Xcode project window. They will automatically be included in the bundle the
next time you build your application.
Management
Now that we know what formats we are supporting, and some classes that make loading
and using those formats simple, we want a class that will give us easy access to all of
the resources in our bundle. We also want it to keep track of the ones we have already
loaded into memory, as well as unload those resources when they are no longer in use.
We will begin by creating a class called ResourceManager that will keep track of
our resources. It will have a single instance that is globally accessible so that it is easy
to access all of our game code. All we need to do to add a texture to a class is call
getTexture on the instance of our ResourceManager like so:
GLTexture* myTexture = [g_ResManager getTexture:@"myTexture.png"];
If the myTexture.png file is already loaded into memory, the ResourceManager class will
simply hand it to us. If not, it will automatically load the image and then hand it over.
Loading and playing sounds is just as easy:
[g_ResManager playSound:@"mySound.caf"];
This will automatically load the sound if it isn’t already in memory, and then play it.
Now comes the question of when to unload resources. Optimally, only resources currently in use would be in memory at any one time so that we would not end up with
memory allocated for a resource that is not in use. However, loading resources can be
slow, so having to unload and reload a resource between each use can also be inefficient.
More resources in memory means less CPU time wasted reloading them, but our memory is limited.
Fortunately, although games tend to use a large amount of resources, they also have
an easy way to predict which groups of resources will be necessary during certain application states. Specifically, most game designs split game play among many distinct
levels. As the game programmer, you know ahead of time which resources may be
The Resource Manager | 79
needed for each level and which are not. You can simply purge resources when leaving
one level and load only the resources necessary for the next level.
To do this, we provide purge functions for each resource:
[g_ResManager purgeTextures];
[g_ResManager purgeSounds];
Simply call the purge functions to release resources when you know you don’t need
them, such as when you are changing GameStates.
Resource management can be very complex. Consider a system that
automatically releases old resources that have not been used recently to
make room for new ones. This system would be beneficial in reducing
the amount of redundant loading and unloading between state changes,
as long as there was enough memory to go around.
In fact, this idea is very close to garbage collection, of which there are
many types of implementations. However, it can be very hard to do well,
and since it is unnecessary in our case, we will avoid the complexity in
our framework.
The Render Engine
There are several APIs for drawing in the iPhone SDK, each useful for different purposes. Cocoa uses Objective-C and focuses on manipulating high-level GUI objects such
as UIImage, UIColor, and UIFont. Quartz Core Graphics uses C and is great for drawing
vector graphics such as lines, gradients, and shading, and for rendering PDF content.
However, most games require a high-performance rendering API, which is why
OpenGL ES is available.
OpenGL ES is a very low-level API focused on 3D rendering, so we are going to have
to build up some code to bridge the gap between what we want to do—draw 2D animated sprites—and what OpenGL ES can do: render textures onto 3D geometry.
2D Graphics with a 3D API
At this point, you might be asking yourself: “How are we going to use OpenGL to draw
2D sprites? I thought OpenGL was for 3D!”
Without getting into the math, 2D is a subset of 3D. That means anything you can do
in 2D you can also do in 3D. Specifically, imagine a table with a piece of paper on it.
The table and the paper are 3D. However, if you point a camera straight down at the
paper, the camera sees what looks like a 2D scene. That is essentially what you will be
doing with your 2D game. Meanwhile, when you get to the 3D example, you can use
the full power of OpenGL ES with very little additional work, since it’s already set up.
80 | Chapter 3: The Framework
Three-dimensional rendering concepts and code can become complicated and confusing very quickly, and this is not a book about OpenGL ES. For this chapter and the
next, we will try to use as little OpenGL ES code as necessary, and this code will be
available to you at http://iphonegamebook.sourceforge.net/ so that we can focus on
what is being done, rather than how it is being done.
Three things are required to perform basic rendering with OpenGL ES on the iPhone:
a GLContext object, an OpenGL layer for that context to draw to, and the ability to load
an image into memory and bind it for use as a GL_TEXTURE_2D texture.
We need only one GLContext for the life of our application, and it needs to be accessible
by all game states that wish to render using OpenGL ES. Meanwhile, we will want a
separate OpenGL layer for each game state that renders using OpenGL. Because, as we
discussed earlier, our GameState class inherits from UIView, each GameState instance can
use the layer provided by its UIView. By overriding the UIView function named layer
Class, we can specify a custom type of layer for that View and create an OpenGL layer
instead. And once we have set up the GLContext and OpenGL layer, we will be able to
get textures from our ResourceManager.
GLESGameState
To encapsulate these ideas, we will create a new type of GameState class called
GLESGameState. It will contain all of the code necessary to instantiate the GLContext
instance and prepare OpenGL for rendering, as well as inherit from GameState and
override the layerClass function.
The code we’ll be writing is available in the example files as GLESGameState.m. If you
are familiar with OpenGL, you will recognize much of this code; if not, don’t worry
about it. You don’t need to know what you’re doing with OpenGL in this section; you
just need to know enough to plug the code into your application. We’ll describe what
we’re doing and how to incorporate the code into an application in this section.
To begin, notice the global gles_context variable at the top, of type CAEAGLContext. This
will be our GLContext, and we made it global so that any of our GLESGameState classes
will be able to use it easily.
Next, take a look at the initialize function. In Objective-C, every class can have a
function of this name, and it gets called exactly once (not once for each instance), before
that class receives any other messages. This is perfect for initializing singleton class
instances that don’t depend on other resources. Our initialize function calls
setup2D, which will prepare our OpenGL context to draw in a 2D fashion.
Now take a look at the layerClass method. The UIView class calls this method for each
instance when it’s created, to create its UILayer. Our GLESGameState class overrides the
layerClass method of UIView to return a CAEAGLLayer class instead of a CALayer class so
that our layer object will be the right type for OpenGL ES to draw to.
The Render Engine | 81
Finally, in our initWithFrame function, notice the call to bindLayer. This needs to happen every time we create a new GLESGameState so that we tell GLContext that a new
OpenGL layer is available and that we should be rendering to it now. The heart of the
function is the call to the EAGLContext function, setCurrentContext, which loads this
instance’s context into the global variable we defined for the current context,
gles_context.
Once a GLESGameState is created, we are prepared to use OpenGL API calls to render
to an OpenGL layer. All you need to do is create some GLTextures and draw with them
in the Render function of your GLESGameState.
Textures
Now that we have a GLContext and an OpenGL layer, all we need to render an image
to the screen is a GL_TEXTURE_2D texture. Unfortunately, OpenGL does not provide any
code to open image files and load them into memory, a task that is filesystem dependent.
Instead, we must rely on Quartz2D to load an image format into a buffer in memory,
after which we can use OpenGL to create a GL_TEXTURE_2D texture from that buffer.
We have assembled this functionality in the GLTexture class, which is based on some
examples provided by Apple. You do not need to be able to follow every line of the
code; you only need to plug it into your application.
As you may recall, the ResourceManager class will load an image file and create a
GLTexture object when we call the getTexture function. That function simply creates
a UIImage into which to load the image file, which is then sent to the initWithImage
function of GLTexture.
Once a GLTexture has been created, you can use it to draw to the screen in your
Render function by calling any of its draw functions. The simplest method is to specify
a point on the screen where the entire image will be drawn, like so:
GLTexture* myTexture = [g_ResManager getTexture:@"myTexture.png"];
[myTexture drawAtPoint:CGPointMake(150, 150)];
This will draw the center of your image 150 pixels from the left and 150 pixels from
the bottom of the screen.
The coordinate system for OpenGL starts with the origin (0,0) at the
bottom left by default, where the Y value increases as you move up the
screen. This is different from the way Quartz draws, with the origin at
the top left and the Y value increasing as you move down the screen.
Of course, it may be necessary to draw textures in more complicated ways, such as with
rotations, or to draw only a portion of your texture, which is why additional draw
functions are also available.
82 | Chapter 3: The Framework
Furthermore, it may be helpful to know more information about our textures, such as
the height and width of the original image file. For instance, let’s say we wanted to draw
the previous example from the top left of the image instead of from the center. Given
the original height and width, we could do this as follows:
GLTexture* myTexture = [g_ResManager getTexture:@"myTexture.png"];
[myTexture drawAtPoint:
CGPointMake(150 - [myTexture contentSize].width/2,
150 - [myTexture contentSize].height/2)];
Armed with these basic tools, we can proceed to more complex rendering tasks, such
as fonts.
Tricks for Drawing Textures with OpenGL
Note the following tricks when drawing textures with OpenGL:
• All GL_TEXTURE_2D textures should be sized in powers of 2, which means that even
if your image is 250 × 31, when you create the texture on hardware to store it you
will be making a 256 × 32 pixel texture buffer. Your GLTexture class will round up
the buffer size transparently, so you may not even realize it, but keep in mind that,
for example, a 257 × 33 pixel image will actually end up occupying the space of a
512 × 64 image in memory.
• Transparent edges can “bleed” color when blended. Pay careful attention to the
cropped image in the example state at the end of this section. You may see a tinge
of red around the green pixels that should have been cropped. Make sure to edit
the transparency of the pixels in source images correctly to avoid this.
Each time you change the texture you are drawing with, OpenGL has
to switch contexts. This causes a minor performance hit that you can
avoid through a combination of two techniques. First, when creating
your textures, try to put all of the images that might be drawn at the
same time into the same texture. Second, try to draw objects that use
the same image at the same time. For instance, place all tiles for a single
level in the same texture file and draw the entire level together before
drawing the rest of the scene.
Font Textures
Because OpenGL does not play nicely with the other graphical APIs on the iPhone, we
cannot use the same code to draw text in our GLESGameStates as we did in our gsMain
and gsTest classes. Instead, we are going to have to draw our text using GLTextures.
There are two ways to accomplish this task. One is to create a texture and draw our
letters into it to create the word we want. Although this is great for static words that
don’t change, our game is likely to have many different words or strings with numbers
that change frequently.
The Render Engine | 83
Consider the frames-per-second example from earlier; if we were to create a new texture
for every frame rate number, we would quickly run out of memory. Instead, we could
create a larger texture containing the digits 0 through 9. When we need to draw our
frames-per-second number, we choose a subsection of the texture and draw only the
portion we need for each digit. This is an application of the optimization we described
earlier: combining many images into one texture. This is a much more efficient way to
draw text in OpenGL, and the one we will use.
Specifically, we will create a large dictionary texture that contains all of the letters,
numbers, and symbols we need, as well as the code to draw the appropriate sections
of the texture to the screen when we want to render a string.
We have done this for you in the GLFont class. You do not need to understand what is
going on in every line, but we will offer an overview.
Because GLFont will ultimately contain a GL_TEXTURE_2D texture and the code to draw
it, we start by inheriting from the GLTexture class. Next, we add a custom initialization
function named initWithString.
In the initWithString function, the GLFont class uses the Quartz2D API to create an
image buffer in memory and render all of the letters to it. It has parameters that allow
you to specify a font name and size, as well as a second function with extended parameters to specify color and stroke.
While we are rendering each letter into the image buffer, we will store the exact size
and position of each character for use later when we want to draw strings to the screen.
The data associated with each character is called a glyph, and we store our glyphs in an
array called fontdata.
Once the image buffer is filled in using Quartz2D, we call the GLTexture initialization
function to convert it for use with OpenGL, remembering to release the now unnecessary Quartz2D image buffer.
Finally comes the drawString function, which accepts the string to draw and a
CGPoint to indicate where to draw to the screen, starting at the bottom left of the string.
For each character in the input string, the function looks up the appropriate glyph in
the fontdata array and draws a subsection of our GLTexture to the screen, remembering
to add an x offset after each character is drawn.
It is very easy to use this class:
//Initialize the font for use in a constructor
GLFont* tex = [GLFont alloc];
[tex initWithString:@"
abcdefghijklmnopqrstuvwxyzABCDEFGHIJKLMNOPQRSTUVWXYZ1234567890.!?, "
fontName:@"Helvetica" fontSize:15.0f];
//Draw a string to the screen in a Render function
[tex drawString:@"I love monkeys!" atPoint:CGPointMake(20, 300)];
84 | Chapter 3: The Framework
Keep in mind that, just like GLTexture, you must use GLFont in conjunction with a valid
GLESGameState.
As a convenience function, we have added a defaultFont function to our Resource
Manager to create and return a GLFont with default parameters. You can customize the
string to contain whatever characters you need in your displays.
Example State
To show off all of the work we have done, let’s create an example state that shows the
use of the GLESGameState, GLTexture, and GLFont classes:
1. Before we can use any OpenGL ES code, we need to add the OpenGLES.framework and QuartzCore.framework files to our project. A .framework file is similar
to a .lib file in Windows programs, or an .so file in Linux. Right-click the frameworks folder in the project browser on the left of your Xcode window, select
Add→Existing Framework, and find OpenGLES.Framework. If you cannot find it,
you are in the wrong folder, so start in /Developer/Platforms/ and search
for the latest iPhone SDK folder followed by /System/Library/Frameworks/OpenGLES.framework.
2. Select Xcode file→New File→Cocoa Touch Classes→NSObject subclass, and name
the new class gsTextureTest.
3. Add #include "GameState.h" to the top of gsTextureTest.h.
4. Modify gsTextureTest.h so that the gsTextureTest class inherits from
GLESGameState instead of NSObject.
5. The default constructor from GSLESGameState will do all the necessary setup automatically, so all we need is a Render function that will handle the drawing code.
Technically, you could put all of this in the Update function, but it’s a good practice
to keep your rendering code separate from your update logic. To begin, Render will
have the basic code needed to clear the background and commit our graphics to
the screen:
-(void) Render {
//clear anything left over from the last frame, and set background color.
glClearColor(0xff/256.0f, 0x66/256.0f, 0x00/256.0f, 1.0f);
glClear(GL_COLOR_BUFFER_BIT);
//Render textures here
};
//you get a nice boring white screen if you forget to swap buffers.
[self swapBuffers];
Notice the glClearColor and glClear function calls. Both of these are OpenGL
functions. You can use OpenGL directly in your code; however, you won’t need
to do this often.
The Render Engine | 85
6. Now we are going to add some spice to our Render function. We want to draw
some text and images using defaultFont and the scissors.png and drawregion.png
files in Chapter3Framework.zip. To make things interesting, we will move the scissors texture left and right, and draw only a portion of the drawregion texture:
//some rendering offsets
int yspacing = −24, line = 0, yoff = 360;
int leftcolumn = 10;
//test our GLFont
[[g_ResManager defaultFont] drawString:@"Font ok."
atPoint:CGPointMake(leftcolumn, yoff+yspacing*line++)];
//draw the scissors image with a label
[[g_ResManager defaultFont] drawString:@"GLTexture test:"
atPoint:CGPointMake(leftcolumn, yoff+yspacing*line++)];
//make the image waggle back and forth.
float x = (1+sin([[NSDate date] timeIntervalSince1970]))
* self.frame.size.width / 2;
[[g_ResManager getTexture:@"scissors.png"]
drawAtPoint:CGPointMake(x, yoff+yspacing*line)];
yoff -= [[g_ResManager getTexture:@"scissors.png"] contentSize].height;
//draw the clipped drawregion image with a label
[[g_ResManager defaultFont] drawString:@"Clipped image test:"
atPoint:CGPointMake(leftcolumn, yoff+yspacing*line++)];
[[g_ResManager getTexture:@"drawregion.png"]
drawInRect:CGRectMake(leftcolumn, yoff+yspacing*line, 20, 20)
withClip:CGRectMake(15, 30, 20, 20) withRotation:0];
As you can see, we are using the defaultFont provided by the Resource Manager,
and can easily draw “Font ok.” text to the screen.
Next, we draw another string to label our second test. Our starting point is the line
following the previous string, because we increment our line variable each time
we use it to calculate a location. We compute an x position offset from the center
of the screen as a sine wave of the current time (don’t worry too much about the
math behind this). We grab our scissors.png texture from the Resource Manager
and call drawAtPoint using that offset. For convenience, we also modify our yoff
variable to move down a number of pixels equal to the height of the image. (If we
replaced scissors.png with a different image here, this assignment statement would
automatically resize the y offset of the next drawing test.)
Finally, we draw a third string to label the last test. We grab drawregion.png from
our Resource Manager and draw it with the drawInRect: withClip function. Notice
that we leave the rotation at zero; you could easily modify this to add rotation based
on time (as we did with the x position of our scissors.png image). Everything is
working so far, so let’s move on to the next feature.
7. Add a touchesEnded function to allow this state to change to a Main menu state we
will create later on:
86 | Chapter 3: The Framework
-(void)touchesEnded:(NSSet*)touches withEvent:(UIEvent*)event
{
UITouch* touch = [touches anyObject];
NSUInteger numTaps = [touch tapCount];
if( numTaps > 1 ) {
[m_pManager doStateChange:[gsMainMenu class]];
//we will create gsMainMenu at the end of this chapter
}
}
The Sound Engine
There are typically two purposes for playing a sound in a game application: background
music and sound effects. Both end up at the same place, the speakers (or headphones),
but due to their different requirements, they need two different routes to get there.
Sound effect files tend to be very short, most of them between one and 10 seconds long,
and they don’t take up much memory, partly because their sound quality can be lower
than that of music. For our application, we require that they play as soon as we request
them to play with little to no latency (so that they are relevant to what is happening on
the screen), and we may need to play many of them at once.
However, music files tend to be longer (on the order of one or more minutes) and much
larger. So large, in fact, that they need to be compressed to reduce their size, thus the
popularity of the .mp3 file format. Unfortunately, that also means they need to be
uncompressed when we want to play the file, which requires additional CPU usage.
Since we don’t need to play more than one music file at the same time, this is acceptable.
Just as with graphics, the iPhone provides multiple APIs for sound playback. Your
decision of which to use will depend on the problem you are trying to solve. For example, OpenAL is good at playing short sound effect files with as little latency as possible, while Audio Queue can be used for playing music from compressed file formats.
A lot of code goes into setting all this up, but Apple has provided some example code
in the form of SoundEngine.h and SoundEngine.cpp, which we have incorporated into
our framework. Although the body of work is C++ code, Xcode can compile ObjectiveC, standard C, and C++ in the same project. Note, however, that the C++ code is
entirely contained in the .cpp file and that all of the .h interfaces are standard C functions
so that the C++ code can be easily used within Objective-C code.
As we mentioned earlier, we have written ResourceProvider functions that act as an
interface to this code to make it even simpler to use, by handling the loading and unloading of sound resources automatically.
The Sound Engine | 87
Example State
Just as with the example state for rendering, we want to create an example state to show
our new sound functionality. This state will be a little different from the last one:
because we do not need to use any OpenGL rendering, we will create a normal
GameState and use Interface Builder to add severalUIButtons to it.
Specifically, we will create a button that plays a sound effect file, tap.caf; another button
that plays a looped music file, social.mp3; a button that stops the music file; and a
button that switches state to the Main menu state:
1. Add the OpenAL.framework and AudioToolbox.frameworks files in the same manner as you added the OpenGLES.framework file earlier.
2. Select Xcode file→New File→User Interfaces→View XIB and name the file
soundtest.xib.
3. Select Xcode file→New File→Cocoa Touch Classes→NSObject subclass and name
the new class gsSoundTest.
4. Add #include "GameState.h" to the top of gsSoundTest.h.
5. Modify gsSoundTest.h to have the gsSoundTest class inherit from GameState instead
of NSObject.
6. Add an IBOutlet to gsSoundTest.h to represent the UIView:
IBOutlet UIView* subview;
7. Add four IBActions to gsSoundTest.h to represent the actions that will take place
when each button is pressed:
-(IBAction)
-(IBAction)
-(IBAction)
-(IBAction)
playCafSfx;
playMp3;
stopMusic;
back;
8. Modify the initWithFrame function in gsSoundTest.m to load the soundtest.nib file:
-(SoundTest*) initWithFrame:(CGRect)frame
andManager:(GameStateManager*)pManager
{
if (self = [super initWithFrame:frame andManager:pManager]) {
NSLog(@"SoundTest init");
//load the soundtest.xib file here.
//this will instantiate the 'subview' uiview.
[[NSBundle mainBundle] loadNibNamed:@"soundtest"
owner:self options:nil];
//add subview as... a subview.
//This will let everything from the nib file show up on screen.
[self addSubview:subview];
}
}
return self;
88 | Chapter 3: The Framework
9. Implement the IBAction functions we defined to play the sound effect file, play the
music file, stop the music, and return to the Main menu state:
-(IBAction) playCafSfx
{
[g_ResManager playSound:@"tap.caf"];
}
-(IBAction) playMp3
{
[g_ResManager playMusic:@"social.mp3"];
}
-(IBAction) stopMusic
{
[g_ResManager stopMusic];
}
-(IBAction) back {
[m_pManager doStateChange:[gsMainMenu class]];
}
Have you noticed that the sound interface we created is function-based
instead of object-oriented? The Resource Manager will give us a
GLTexture object or GLFont object, but why is there no SoundObject?
Although it makes sense to treat textures like objects (to manipulate
properties such as height and width, and choose which way to draw
them), sound playback is much simpler. Typically, you want a sound
to play in a fire-and-forget manner. You don’t need to know how long
it is or the present position of a sample that is currently playing. All you
want it to do is play or stop sounds and let the sound engine do the rest.
The Data Store
The final feature we must add to our framework is the ability to store and load data,
such as the player’s sound preferences and game progression.
On some platforms, we would be required to create a binary file format to store our
data manually using filesystem I/O; however, the iPhone provides the NSUserDe
faults API, which allows us to store key-value pairs (similar to the Registry in Windows) of the following types: NSData, NSString, NSNumber, NSArray, and NSDictionary.
We have added an interface to perform these tasks easily in ResourceManager.
Storing Simple Data
The simplest data we will want to store is a Boolean variable to indicate whether the
user wants game sounds to be on or off. We can store it as an NSNumber in the following
manner:
The Data Store | 89
[g_ResManager storeUserData:[NSNumber numberWithBool:TRUE]
toFile:@"soundPrefs"];
This will save the NSNumber value of TRUE with a key name of "soundPrefs". Then we can
exit the application knowing that value has been saved to disk. To retrieve it the next
time we start up, we’ll use the following code:
BOOL mySoundPref = [[g_ResManager getUserData:@"soundPrefs"] boolValue];
This will load the NSNumber value associated with the key "soundPrefs" and convert it
to a BOOL, which will have a value of TRUE because we stored it on our previous application run.
You can use this method for any of the data types, leading to more interesting combinations. For instance, to store a list of high scores, you could create an NSDictionary
whose NSString keys represent names and whose NSNumber values represent the scores.
You could then store that NSDictionary and retrieve it again later on.
Storing Complex Data
As the player progresses through a game, he may unlock new levels, gain new weapons
and equipment, or achieve new high scores. He may even wish to save his exact position
and all other game entities in the middle of game play if a phone call interrupts him.
Having to translate all of this data from objects in memory to NSNumber or NSDiction
ary types would be inefficient. However, the NSData type allows us to store a buffer with
arbitrary memory content using the storeUserData function.
After serializing the data you wish to save into a buffer in memory, use the following
code to store dataSize bytes of data into NSUserDefaults:
int dataSize;
void* progressionData = myGameSaveFunction(&dataSize);
[g_ResManager storeUserData:
[NSData dataWithBytes:progressionData length:dataSize]
toFile:@"gameSave1"];
And to retrieve the buffer from memory, issue the following:
const void* savedData = [[g_ResManager getUserData:@"gameSave1"] bytes];
Example State
Now we will create the third example state. Similar to the sound example, we do not
need to use OpenGL to render any elements, so we will inherit from the regular
GameState class and use Interface Builder to add UI elements.
Specifically, we want to show that we can store a preference to persistent memory and
recall that value the next time our application runs. So, we will add a UISwitch to represent the preference, as well as a UIButton to allow the user to return to the Main menu:
90 | Chapter 3: The Framework
1. Select Xcode file→New File→User Interfaces→View XIB and name the file
storagetest.xib.
2. Select Xcode file→New File→Cocoa Touch Classes→NSObject subclass and name
the new class gsStorageTest.
3. Modify gsStorageTest.h so that the class inherits from GameState instead of
NSObject.
4. Add #include "GameState.h" to the top of gsStorageTest.h.
5. Add two IBOutlets in gsStorageTest.h, one for the view you will load from
storagetest.xib and one for the UISwitch inside that view:
IBOutlet UIView* subview;
IBOutlet UISwitch* toggle;
6. Add two IBActions in gsStorageTest.h to represent the actions that take place when
the UISwitch and UIButton are pressed, as well as a function to run some additional
unit tests:
- (void) runTests;
- (IBAction) toggled;
- (IBAction) back;
7. Modify the initWithFrame function in gsStorageTest.m to load the storagetest.nib
file, initialize the state of your UISwitch with getUserData, and call the runTests
function:
-(gsStorageTest*) initWithFrame:(CGRect)frame
andManager:(GameStateManager*)pManager
{
if (self = [super initWithFrame:frame andManager:pManager]) {
NSLog(@"storagetest init");
//load the storagetest.xib file here.
//this will instantiate the 'subview' uiview.
[[NSBundle mainBundle] loadNibNamed:@"storagetest"
owner:self
options:nil];
//add subview as... a subview.
//This will let everything from the nib file show up on screen.
[self addSubview:subview];
}
//load the last saved state of the toggle switch.
toggle.on = [[g_ResManager getUserData:@"toggle.on"] boolValue];
[self runTests];
}
return self;
8. Implement the IBAction functions to switch to the Main menu state, and update
the state of the UISwitch with storeUserData:
-(IBAction) back {
[m_pManager doStateChange:[gsMainMenu class]];
}
The Data Store | 91
-(IBAction) toggled {
//we can't directly store a bool, but we can store a nsnumber with a bool.
[g_ResManager storeUserData:
[NSNumber numberWithBool:toggle.on]
toFile:@"toggle.on"];
}
9. Implement the runTests function to unit-test more complex aspects of data storage:
-(void) log:(NSString*)str {
//just dump to console.
NSLog(str);
}
-(NSString*)passfail:(BOOL)pass{
return pass?@"(pass)":@"(fail)";
}
//unit tests for data storage.
//Anything that comes out as (fail) is problematic.
-(void) runTests {
{
NSData* nonexistantfile = [g_ResManager getUserData:@"notfound"];
[self log:[NSString stringWithFormat:@"%@ load non existant file: %@",
[self passfail:nonexistantfile==nil],
nonexistantfile]];
}
{
BOOL fileexists = [g_ResManager userDataExists:@"notfound"];
[self log:[NSString stringWithFormat:@"%@ non existant file test: %d",
[self passfail:!fileexists],
fileexists]];
NSString* savedString = @"some saved text.";
BOOL saveok = [g_ResManager storeUserData:
[savedString dataUsingEncoding:NSUnicodeStringEncoding]
toFile:@"savetest"];
[self log:[NSString stringWithFormat:@"%@ save result: %d",
[self passfail:saveok], saveok]];
BOOL fileexists = [g_ResManager userDataExists:@"savetest"];
[self log:[NSString stringWithFormat:@"%@ existant file test: %d",
[self passfail:fileexists], fileexists]];
NSString* loadedString = [[NSString alloc] initWithData:
[g_ResManager getUserData:@"savetest"]
encoding:NSUnicodeStringEncoding];
[self log:[NSString stringWithFormat:@"%@ load result: %@",
[self passfail:
[loadedString isEqualToString:savedString]], loadedString]];
}
[loadedString release];
92 | Chapter 3: The Framework
{
NSString* savedString = @"another saved text.";
NSString* loadedString = [g_ResManager getUserData:@"savetest2"];
if(loadedString == nil){
[self log:@"Restart app to test loading from persistent storage.
If you already have, then something might have failed."];
} else {
[self log:
[NSString stringWithFormat:@"%@ second save test loaded as %@",
[self passfail:
[loadedString isEqualToString:savedString]], loadedString]];
}
[g_ResManager storeUserData:savedString toFile:@"savetest2"];
}
}
That last step was fairly complicated, so let’s walk through it.
The first two functions are simply for utility; log merely sends a string to NSLog() that
can be viewed from the debug output window (you can access the debugger console
with the hotkey Shift-Apple-Y), and passfail converts a BOOL value into the text
"(pass)" if its value is TRUE or "(fail)" if its value is FALSE.
The runTests function consists of three separate code blocks. The first one focuses on
testing the existence of a nonexistent userData file named notfound. The first time your
application runs, there will be no stored user data. It is necessary to check for the
existence of the data first so that you can store a default value if your application is
being run for the first time.
The second code block stores an NSString to a user data store named savetest. After
storing the data, the code calls userDataExists to prove that the data now exists inside
persistent memory. Finally, the code reloads the string from memory and tests that the
loaded string is exactly the same as the original string.
The third code block shows what happens when you try to load a string that does not
exist the first time the application is run, but will exist afterward.
The Skeleton Application
By now, we should have a well-rounded framework with all of the basic functionality
to begin creating our game. In addition, we have a number of example states showing
how to use each feature available. Before we move on to the next chapter, we should
create a skeleton application that ties all of the states together to show off our work.
Since we already have the framework and example states, all we need to do is create a
Main menu state that will allow us to navigate to each example. The fastest way to do
this is with Interface Builder:
1. Select Xcode file→New File→User Interfaces→View XIB and name the file
gsmainmenu.xib.
The Skeleton Application | 93
2. Select Xcode file→New File→Cocoa Touch Classes→NSObject subclass and name
the new class gsMainMenu.
3. Modify gsMainMenu.h so that the class inherits from GameState instead of
NSObject.
4. Add #include "GameState.h" to the top of gsMainMenu.h.
5. Add an IBOutlet to gsMainMenu.h for the view that you will load from
gsmainmenu.xib:
IBOutlet UIView* subview;
6. In gsMainMenu.m, override initWithFrame: andManager: to manually load gsmainmenu.xib and set up the subview:
-(gsMainMenu*) initWithFrame:(CGRect)frame
andManager:(GameStateManager*)pManager
{
if (self = [super initWithFrame:frame andManager:pManager]) {
//load the gsmainmenu.xib file here. this will
//instantiate the 'subview' uiview.
[[NSBundle mainBundle] loadNibNamed:@"gsmainmenu"
owner:self options:nil];
//add subview as... a subview. This will let everything
//from the nib file show up on screen.
[self addSubview:subview];
}
return self;
}
7. Open gsmainmenu.xib in Interface Builder.
8. In the Identity Inspector for File’s Owner, set Class to gsMainMenu.
9. Right-clicking on File’s Owner should now show subview available as an outlet.
Drag a link from subview to the View object.
10. Double-click the View object to begin editing it.
11. Drag and drop three Round Rect Buttons from the Library to the middle of the
View.
12. Label them “Graphics”, “Sound”, and “Data Store” (you do not need an exit button
because the iPhone’s Home button is assumed to perform that functionality).
13. Add IBActions for each button to gsMainMenu.h:
- (IBAction) doGraphicsTest;
- (IBAction) doSoundTest;
- (IBAction) doStorageTest;
14. Link each button to its action in Interface Builder.
15. In gsMainMenu.m, make each action call doStateChange:
- (IBAction) doGraphicsTest {
[m_pManager doStateChange:[TextureTest class]];
}
94 | Chapter 3: The Framework
16. Change the example states to return to gsMainMenu when double-tapped.
Now build the skeleton application and marvel at all that you have accomplished.
Nothing is holding you back from writing your first game on the iPhone.
Conclusion
We have now completed the foundation for making a great iPhone game. This framework can be used for any kind of game engine, be it 2D or 3D, first-person or top-down,
casual or hardcore. Now let’s put it to work!
Conclusion | 95
CHAPTER 4
2D Game Engine
Finally, the good stuff! The first three chapters of this book introduced the basics involved in programming for the iPhone and the concepts behind a game engine. We
even laid out a nice framework to get us started. All that’s left is to make our game…
but wait, aren’t we forgetting something? What kind of game are we going to make?
Before we start coding away, we need to have a plan. We need a game design.
Game Design
The first step in coming up with a good game design is brainstorming. What will the
game look like, and how will it feel to play the game? What are the goals, and how will
you keep players entertained? Remember that as much fun as it is to make a game, the
end result needs to be something that’s fun to play.
To begin, we’ll need to keep in mind the special considerations of the iPhone:
• Touch-screen input
• Limited resolution and memory
• Play sessions that are short and can be interrupted at any time by a phone call
This means we need to come up with a design that incorporates:
• A simplistic input scheme
• Efficient use of memory for graphics and sound
• Game play that is broken into short segments that can easily be stopped and
resumed
To fulfill all of these requirements, we will create a 2D tile-based engine. Tile-based
means the level background will be composed of a limited number of square tiles that
are repeated and put together to form the level (this allows us to create a large level that
uses only a small amount of texture memory). Most 2D games are static (the screen
does not scroll at all—think puzzle games), side-scrolling (think Super Mario Bros.), or
top-down (like Zelda). A puzzle game is going to be too limiting in terms of AI logic,
97
and most side-scrolling games are too demanding in terms of user input, so top-down
best fits our needs. And since this is an O’Reilly book, we’ll borrow from the theme of
O’Reilly animals.
With these parameters in mind, let’s create O’Reilly’s Wildlife Adventure. As the name
suggests, this will be an adventure game involving wild animals. Players will need to
help our main character, Tom O’Reilly, as he tends to the animals of a wild animal
park. Each “level” will represent a different animal pen, which will nicely segment game
play and allow us to challenge players in unique ways with each type of animal they
encounter. Tom will handle various special objects as he deals with each animal.
This game design probably won’t win any major awards, but it will definitely cover all
of the major facets of game development for the iPhone.
Feature List
Now that we have finished brainstorming, it’s time to nail down exactly what we need
to bring this design into reality.
Graphical layout
To render the game, we will need to draw:
• The level background
• The main character
• Several different types of animals
• Any random objects that may appear in a level
If the levels are larger than the screen, we will need to be able to scroll our view
into the world to keep the player centered on the screen.
Input
We will need to interpret user input to:
• Control the main character
• Create an AI engine to control the animal behaviors
• Code up some physics to handle the movement and interaction of those entities
with each other and the level
We will also need game logic to determine when goals have been met and store the
player’s progress.
Display
Apart from drawing the world, we may need to overlay additional information in
a heads-up display (HUD) for things such as:
• The player’s condition
• Notification of any special items that have been picked up
• Possibly a button to open a pause menu
98 | Chapter 4: 2D Game Engine
Furthermore, we will probably need to display some text for dialogs if our main
character has anything interesting to say.
Game progress
So far, we’ve discussed only what goes on during game play. We will also need to
add:
• Code to link the levels together and show game progression
• Something like a map that lets players choose what level to play next and unlocks
new areas as they complete old ones
Putting it all together, we have the following technical feature list:
•
•
•
•
•
A 2D tile-based render engine with scrolling capability
Animated sprite entities for the main character, animals, and possibly level entities
Functions to handle user input to control the main character
Animal entity logic for several types of animals (such as lions, crocodiles, and emus)
Physics to allow entities to move where they should, and not where they shouldn’t
(such as into other entities)
• Level logic to determine when goals have been met and to store the player’s progress through the game
• A HUD for important information, including character dialogs
• A menu that allows players to select what level to play and displays their progression through the game
User Input Scheme
As we mentioned earlier, the touch-screen feature of the iPhone means user input has
to be a major focus of game design. Specifically, there are three problems that our game
design should try to avoid.
The first problem to avoid is requiring accurate touches. When a player touches the
screen, she is actually touching many pixels at once; the iPhone will estimate the center
pixel among those pixels and events will correspond to just that one pixel. It is important to make touchable interfaces (such as buttons) or in-game objects large enough
that an inaccurate touch event will still find its mark if the player touched close enough.
Therefore, we should use a rule of thumb (pun intended) that touchable objects should
be at least 44 × 44 pixels.
The second problem to avoid is causing the player to cover the screen with her hand
while trying to use the screen for input. This is one of the major downsides to a touchscreen interface; because both input and output happen on the same surface, they end
up fighting each other for space. One way to solve this is to require as little input from
the user as possible. Another is to take user input only in nonessential parts of the
Game Design | 99
screen, or nonessential application states—states where fast response to game actions
is not required.
The third problem to avoid is requiring many different types of touches. The iPhone
can record not only single and double taps but also finger dragging. With a little work,
it is even possible to detect when the player forms symbols (such as a circle or square)
with her finger. However, it is important to keep in mind that game play can get frantic,
and complex input schemes will frustrate players if they cannot quickly and easily
communicate their intended actions to the game.
We chose a top-down design to help reduce the amount of user input activity needed
to play the game. Specifically, with a top-down view, we can keep the camera zoomed
out far enough that the player can tap an area of the level she wants to move to, and
the game will plot out a path and move the character for her. In this way, one simple
input (tapping a part of the level) is translated into a series of more complex movements
(move forward, turn right, move forward, turn left, move forward), saving the player
from a lot of busy work.
However, movement is not the only type of input that will be required during game
play. We may also need to handle special actions such as jumping, picking up items,
and anything else the game requires. We can handle these in a similar fashion to movement: by translating a simple command into an intelligent behavior. Specifically, we
know that if the player touches an area of the level the character is not standing in, we
should move the character to that point. However, if she taps the square the character
is already standing in, we can treat it as a special command.
But how do we know what that special command is? By determining the context in
which the command is used. If the character is standing on the edge of a gap when the
player taps, we could consider this as a command to jump across the gap. If instead the
character is standing next to a door, we could consider this as a command to open the
door. Based on the proximity of the character to a special feature of the level, tapping
the character will cause the character to interact with that feature. Such actions are
considered context-sensitive.
This allows us to have a system that can produce a lot of complex behavior, but the
input system remains absolutely simple. In fact, the player needs to know only two
motions: tap the area you want the character to move to, or tap the character itself to
perform a context-sensitive action.
Learning Curve
By now, we have a basic understanding of the structure of the game world (top-down,
tile-based, with entities moving about) and how the user will interact with it (by tapping
the level or the character). It is time to come up with some level concepts. However,
an important part of level design is to consider the game’s learning curve.
100 | Chapter 4: 2D Game Engine
When a player first picks up your game, she will not be an expert at it. In fact, learning
how to play your game will be part of the fun for her. But if the first levels she encounters
are too challenging, she will become frustrated easily and stop playing. On the other
hand, if she masters your game in the first five minutes, she will get bored and put it
down.
Therefore, it is important to design the levels in such a fashion that the player is neither
bored nor overwhelmed. Typically, you should try to introduce one new concept (or a
combination of two previously introduced concepts) per level to ensure that players
stay awake.
Level 1
Our first level will involve merely walking about, with no context-sensitive actions or
fear of death. However, if the player only had to walk from one side of the level to the
other without a challenge, she would get bored. So, we will give her something to chase
to motivate her to keep playing.
A mother emu’s chicks have wandered from the nest and our character will have to
chase them in the right direction. This will also give us a chance to work on some
flocking AI.
Level 2
Our second level will continue with the movement-only-centered activity, but will increase the intensity of the game.
Specifically, we will ask the player to walk across a habitat filled with sleeping lions to
the back of the cave to grab a McGuffin. A McGuffin is a nonsense term that means
“something that moves the plot.”* Basically, we need a reason to send our main character to the back of a lion’s cave. It doesn’t have to be a good reason, just a reason.
That’s what the McGuffin is for. If the player avoids the lions, the level will be easy. If
she gets too close, the lions will wake up and swipe at her. This will allow us to work
on some multistate AI (sleeping and chasing).
Level 3
The third level will dial back the intensity, but it will introduce a new concept. Here,
we’ll teach the player how to use the context-sensitive actions by providing her with
button objects she can interact with to change the level.
We will set up the level as a puzzle: a grid of cells (3 × 3) will contain a cat and a mouse,
as well as cheese below a control room that contains three buttons and the main character. Between each cell is a door that can only be opened by pressing the corresponding
button from the control room.
* Film director Alfred Hitchcock was famous for using the term.
Game Design | 101
The goal is to open the doors in such a way that the mouse reaches the cheese without
meeting the cat. This will show the flexibility of our game engine, being able to create
a casual puzzle type of game play experience.
Level 4
The fourth level will focus on using the context-sensitive action method of input in a
time-sensitive setting. We will place a McGuffin at the top end of the level past several
streams of water that must be crossed.
To do this, we will place logs in the streams that the player can jump on, using the
context-sensitive action. The player will have to move quickly, however, as the logs
will slowly sink and disappear into the water, requiring a series of decisive jumps.
And if that weren’t enough, we will also have crocodiles patrolling the waters, jumping
and snapping at the player if she gets too close.
At this point, we are ready to start implementing. Please download the Chapter 4 example code from https://sourceforge.net/projects/iphonegamebook/files/.
Tile Engine
The first step in constructing our game will be to focus on the foundation of the game
world: the tile engine. The tile engine is responsible for loading the tiles that represent
the level and drawing them to the screen. If the level is larger than the viewable area of
the screen, we will keep track of a “camera offset” that will be used to draw the portion
of the level we are interested in, as well as to draw the rest of the objects on top of the
level with the same offset.
Unique Tiles
To begin, we will start with an image that represents our level (see Figure 4-1). This
image was constructed out of tiles that are 32 × 32 pixels wide and high. The level is 15
tiles wide by 25 tiles high, or 375 tiles total. However, because it was created from a
small set of tiles, we need to load only the unique tiles into memory; we need only 32
tiles (see Figure 4-2).
That’s more than 90% less memory! However, we’re also going to need to store some
data that tells us which unique tile image to use when rendering the level. So, in addition
to the unique tile image, we will also need an index array, such as:
1,0,0,0,0,0,0,0,0,0,0,0,0,0,2
1,0,0,0,0,11,12,13,14,15,0,0,0,0,2
1,0,10,0,0,16,17,18,19,20,0,0,0,0,2
1,0,0,0,0,21,22,23,24,25,0,0,4,0,2
1,0,0,0,0,0,0,0,0,0,0,0,0,0,2
1,0,0,0,0,0,0,0,0,0,0,0,0,0,2
1,0,0,0,0,0,0,0,0,0,0,0,0,0,2
102 | Chapter 4: 2D Game Engine
1,0,0,0,0,10,0,0,0,4,0,0,0,0,2
1,0,4,5,0,0,0,0,0,0,0,0,0,0,2
1,0,0,10,0,0,0,0,0,0,0,0,7,0,2
1,0,0,0,0,0,0,0,0,0,0,0,0,0,2
1,0,0,0,0,0,0,0,0,0,0,0,0,0,2
1,0,0,0,0,0,0,0,0,0,0,0,0,0,2
1,0,0,0,0,5,6,0,0,0,0,0,0,0,2
1,3,4,0,0,10,0,0,0,0,0,0,0,0,2
1,0,0,0,0,0,0,0,0,0,8,9,0,0,2
1,0,0,0,0,0,0,0,0,0,10,0,0,0,2
1,0,0,0,0,0,0,0,0,0,0,0,0,0,2
1,0,0,0,0,0,0,0,0,0,0,0,10,8,2
1,0,0,0,0,0,0,0,0,0,0,0,0,0,2
1,0,0,0,0,0,0,0,4,0,0,0,0,0,2
1,0,0,0,3,4,0,0,0,0,0,9,0,0,2
1,0,0,0,0,0,0,0,0,0,5,6,0,0,2
1,0,0,0,0,0,0,0,0,0,0,0,0,0,2
1,0,0,0,0,0,0,0,0,0,0,0,0,0,2
The preceding code describes the tile indexes of a 15 × 25-tile map. The top-left tile
uses the second frame (index “1” because indexes start at “0”). The next frame uses
frame index “0,” and so on.
Figure 4-1. Level 1 in its entirety
Figure 4-2. Unique tile strip for Level 1
Tile Engine | 103
Drawing Tiles
As we discussed in “Animation” on page 46, sprites are textures that contain multiple
images that should be drawn in succession to represent an animation. Each image in
the sprite texture is called a frame. However, the class we presented in Chapter 3 for
rendering textures, GLTexture, is not suitable for drawing frames.
Specifically, we want to consider the unique tile strip (Figure 4-2) to be like a film strip.
Each frame is exactly the same width, so finding the location of a single frame in the
texture is as easy as x = frame*frameWidth; where frameWidth is the same as the tile size.
The iPhone also limits us to a maximum of 1,024 for both the width and the height of
the texture. That means that if our unique tiles are 32 × 32 and we have more than 32
tiles in either direction (because 32 * 32 = 1,024), we have to wrap them to keep our
image width or height from exceeding 1,024.
The OpenGL ES implementation on the iPhone will try to automatically
scale down any texture larger than 1,024 in height or width. This could
cause unintended side effects for any images that are too large; if you
are noticing problems with your textures, make sure they aren’t too big.
That means the calculation for the frame offset becomes:
int x = (frame * tileSize) % 1024;
int row = (( frame * tileSize ) - x) / 1024;
int y = row * tileSize;
Because of the number of mathematical operations involved in calculating this position,
it is more efficient to store the results after the first calculation and reuse them, rather
than recalculating the frame for each tile in every loop. Therefore, we will create a
Tile class that can store the offset into a GLTexture, like so:
//Tile.h
typedef enum {
UNWALKABLE = 1,
WATER = 2,
EMUTEARS = 4,
} PhysicsFlags;
@interface Tile : NSObject {
NSString* textureName;
CGRect frame;
PhysicsFlags flags;
}
@property (nonatomic, copy) NSString* textureName;
@property (nonatomic) CGRect frame;
- (void) drawInRect:(CGRect)rect;
- (Tile*) initWithTexture:(NSString*)texture withFrame:(CGRect) _frame;
@end
104 | Chapter 4: 2D Game Engine
//Tile.m
@implementation Tile
@synthesize textureName;
@synthesize frame;
- (Tile*) init {
[super init];
flags = 0;
return self;
}
- (Tile*) initWithTexture:(NSString*)texture withFrame:(CGRect) _frame
{
[self init];
self.textureName = texture;
self.frame = _frame;
return self;
}
- (void) drawInRect:(CGRect)rect {
[[g_ResManager getTexture:textureName]
drawInRect:rect
withClip:frame
withRotation:0];
}
- (void) dealloc {
[super dealloc];
}
@end
Notice the PhysicsFlags enumeration. We will use this later for entity-to-world collision detection.
TileWorld Class
With the unique tile index array data, we can now write a class that will render the level
to the screen using the Tile class. To do this, we will create a new class named Tile
World that a GLESGameState can use. When the GameState is initialized, it will create the
TileWorld and load the level data; when the GameState is rendering, it will tell the
TileWorld to draw itself before anything else.
This class needs to keep a list of tiles, along with a rectangle that describes what portion
of the screen to render those tiles to. In addition, our levels may be larger than the
viewable area, so we will need to keep a “camera” offset to pan our rendering to display
the portion of the level we want to see:
//TileWorld.h
//global tile size.
#define TILE_SIZE 32
Tile Engine | 105
@class Tile;
@class Entity;
@interface TileWorld : NSObject {
Tile*** tiles;
CGRect view; //typically will be the same rect as the screen. in pixels.
considered to be in opengl coordinates (0, 0 in bottom left)
int world_width, world_height; //in tiles.
int camera_x, camera_y; //in pixels, relative to world origin (0, 0).
// view will be centered on this point.
}
NSMutableArray* entities;
- (TileWorld*) initWithFrame:(CGRect) frame;
- (void) loadLevel:(NSString*) levelFilename
withTiles:(NSString*)imageFilename;
- (void) draw;
- (void) setCamera:(CGPoint)position;
//utility function
- (CGPoint) worldPosition:(CGPoint)screenPosition;
- (void) addEntity:(Entity*) entity;
- (Tile*) tileAt:(CGPoint)worldPosition;
- (BOOL) walkable:(CGPoint) point;
There are a number of things to note here before we move on to the implementation.
First, what is that TILE_SIZE definition? We stated earlier that we would be using 32 ×
32 pixel tiles. This definition helps us avoid magic numbers.
A magic number is a certain numeric value that is used over and over again in code,
and it is bad because you cannot tell when, for example, a value of 32 is used to represent
a tile size or some other concept. It’s also bad because if you wanted to change the tile
size to some other value, such as 16, you’d have to do a search and replace, being careful
to replace only the instances of 32 that represent tile size. You should always use a
define for values instead of magic numbers, to make your intended use clear.
The next important piece of code is the Tile*** tiles; line. This represents a dynamically allocated 2D array of Tile pointers. Because the tile engine could be used to
represent a level of any width or height, we must allocate the tiles dynamically.
Finally, you will notice the NSMutableArray* entities; definition. This array will keep
a list of objects we wish to draw in every frame. Because objects in front should be
drawn on top of objects behind them, we need to sort those objects and draw them in
order (from back to front). We also need to offset the rendering position of those objects
by the same camera offset the level tiles are being drawn with.
You can view the implementation of the TileWorld class in the TileWorld.mm file.
106 | Chapter 4: 2D Game Engine
Loading
Let’s hone in on the loadLevel: function, which accepts a text file in the following
format:
[height]x[width]
[comma separated tile texture indexes]
[comma separated tile physics flags]
First, it loads the file contents into an NSString. Next, it parses out the width and height
values from the first line by separating them using the componentsSeparatedByString:
function of NSString to grab the characters to the left and right of the x character. Then
it calls the intValue function to parse the string into an integer value for each.
Once we have the width and height of the level in tiles, we know how many Tile object
pointers must be allocated. This is done in the allocateWidth: height: function.
Next, we parse through the file and create a new Tile object for each tile in the level,
initializing it with a CGRect representing the frame position of the unique tile index
found in the .txt file, as we discussed in “Drawing Tiles” on page 104.
Once all of the tiles have been created, we skip past the second blank line and start
parsing the physics flags. For each tile, we read in the value and initialize the flags
property of the corresponding Tile object.
Finally, we can release the original file data. Remember, since we have allocated the
Tiles array and objects, we will need to deallocate them when we unload the level.
Rendering
Now that we have the Tiles initialized, we can render the level. Keep in mind that the
TileWorld instance will be a member of a GLESGameState class, which will be calling the
draw: function:
-(void) draw
{
CGFloat xoff = -camera_x + view.origin.x + view.size.width/2;
CGFloat yoff = -camera_y + view.origin.y + view.size.height/2;
CGRect rect = CGRectMake(0, 0, TILE_SIZE, TILE_SIZE);
for(int x=0;x<world_width;x++){
rect.origin.x = x*TILE_SIZE + xoff;
//optimization: don't draw offscreen tiles.
// Useful only when world is much larger than screen,
// which our emu level happens to be.
if(rect.origin.x + rect.size.width < view.origin.x ||
rect.origin.x > view.origin.x + view.size.width) {
continue;
}
Tile Engine | 107
for(int y=0;y<world_height;y++){
rect.origin.y = y*TILE_SIZE + yoff;
if(rect.origin.y + rect.size.height < view.origin.y ||
rect.origin.y > view.origin.y + view.size.height) {
continue;
}
[tiles[x][y] drawInRect:rect];
}
}
}
if(entities){
[entities sortUsingSelector:@selector(depthSort:)];
for(Entity* entity in entities){
[entity drawAtPoint:CGPointMake(xoff, yoff)];
}
}
First we calculate the offset between the world and the viewable area of the screen. We
are basically transforming between world coordinates and screen coordinates.
As an optimization, we also initialize a rectangle the size of a tile for use in the Tile
object’s drawInRect: function. Rather than creating the rectangle for each tile, we can
set it up outside the for loop and have to change only the x and y positions, saving us
some processing power.
You may recall from Chapter 2 that another form of graphics optimization is culling.
Inside the for loop, we begin by culling any columns of Tiles that wouldn’t show up
in the viewable area. Then we start the inner for loop to draw the actual Tiles, first
being sure to cull any individual tiles in that row that are outside the viewable area.
Now we get back to the entities array. We will discuss the Entity class in more detail
later, but recall that entities need to be sorted and drawn in order from back to front
so that they overlap each other correctly. Because the entities variable here is an
NSMutableArray we can use the sortUsingSelector method which allows us to apply a
comparison function we’ve written for this purpose.
The comparison function is expected to be called as a message on one object, with a
single parameter being an object of the same type that should be compared. The return
value must be NSOrderedAscending, NSOrderedSame, or NSOrderedDescending based on
the result of the comparison.
A default comparison function is available for use with simple types such as NSString
and NSNumber. However, because we are comparing entities, we must write a custom
comparison.
Our custom function is named depthSort: and is located in the Entity.m file:
- (NSComparisonResult) depthSort:(Entity*) other {
if (self->worldPos.y > other->worldPos.y) return NSOrderedAscending;
if (self->worldPos.y < other->worldPos.y) return NSOrderedDescending;
//the logical thing to do at this point is return NSOrderedSame, but that
//causes flickering when two items are overlapping at the same y. Instead,
108 | Chapter 4: 2D Game Engine
}
//one must be drawn over the other deterministically... we use the memory
//addresses of the entities for a tie-breaker.
if (self < other) return NSOrderedDescending;
return NSOrderedAscending;
The function compares the y values of the objects, returning NSOrderedAscending if the
“other” Entity has a smaller y value. Recall that y = 0 at the top of the screen, so the
smaller the y value, the farther “up” on the screen the object will be drawn. We want
things closer to the bottom of the screen to be considered “close” and things at the top
to be considered “far,” so returning the objects in ascending order by y coordinate will
make sure that entities that are higher on the screen (farther away) will be drawn first,
and entities lower on the screen (closer) will be drawn last (thereby showing on top of
the others).
Camera
We mentioned that the tiles are able to be offset so that the viewable area shows the
part of the level we are interested in. We call it the camera offset because it’s like a
camera panning around inside the level area. In particular, we want to be able to set
the camera offset to follow our main character as he walks around the level.
By calling setCamera: on our TileWorld with a target position (in world coordinates),
we can calculate the offset necessary to draw the tiles so that they will be visible within
the screen coordinates. If we offset a point within the tile rectangle by the negated value
of that point, it will show up at the top left of the viewable area.
However, we want the main character to show up in the center of the screen, not the
top left. Furthermore, if the character walks close to the left side of the world, rather
than staying in the middle of the screen (thereby causing the viewable area to extend
beyond the level and show empty space), we want to force the camera to stay within
the bounds of the level and instead cause the character to leave the center of the screen
and get close to the edge. The same condition applies for the top, bottom, and right
sides of the screen. Therefore, when the intended camera position is sent to
setCamera:, we do a bounds check on each side of the viewable area to make sure the
camera stays put, like so:
-(void) setCamera:(CGPoint)position {
camera_x = position.x;
camera_y = position.y;
if (camera_x < 0 + view.size.width/2) {
camera_x = view.size.width/2;
}
if (camera_x > TILE_SIZE*world_width - view.size.width/2) {
camera_x = TILE_SIZE*world_width - view.size.width/2;
}
if (camera_y < 0 + view.size.height/2) {
camera_y = view.size.height/2;
}
Tile Engine | 109
}
if (camera_y > TILE_SIZE*world_height - view.size.height/2) {
camera_y = TILE_SIZE*world_height - view.size.height/2;
}
Physics
Apart from drawing the tiles and entities at their appropriate offsets, the last feature of
the TileEngine is physics. Remember that each Tile in the tiles array has a physics
flag that was initialized when we loaded the level file.
During the GameState update function, we will be checking entity-to-world collision by
asking the TileWorld for each entity if it is colliding with any tiles that have special
physics flags.
To this end, we provide the tileAt: function, which will return the Tile object located
at a particular point (in world coordinates). Furthermore, as a convenience, we will
also provide the walkable: function to determine whether the Tile has any special
physical properties we should worry about.
Animation
Our game will contain a main character and several animated animals. Each of these
entities will require one or more animations for each of their behaviors and each of the
directions they could be facing during those behaviors. For instance, the main character
could have “idle,” “walking,” and “jumping” animations in the “north,” “south,”
“east,” and “west” directions.
Once our artist has rendered each of these, we can assemble them together into a sprite
texture similar to the unique tile strip texture we will use for the tile engine map. However, these animations are much more complex than the unique tile strip. See Figure 4-3, for instance, for the images we need to represent a walking emu chick.
Figure 4-3. Emu chick walking animation
As you can see, the emu chick sprite texture has three animations: walking west, walking north, and walking south (we omitted walking east because it can be created by
flipping the walking west animation horizontally, which saves precious texture
memory).
To make things more complicated, the animations are set up in such a way that some
frames should be used multiple times in a single animation sequence. Specifically, the
walking west animation should be displayed in the frame sequence 0, 1, 2, 3, 4.
110 | Chapter 4: 2D Game Engine
If we had a more complex animation, this format would support something similar to
0, 1, 0, 2, 0, 3…, where the frame indexes are not sequential.
Additionally, we could want some frames to take longer than others, so we should
specify how long (in milliseconds) each frame should take: 200, 300, 200, 100, 200,
100, 100, 200. This adds up to an animation sequence that takes 1,400 ms (or 1.4 s) to
complete.
To complicate things further, some animations should be looped until we change to a
different animation, whereas other animations should play only once and stop. In addition, some animations should specify another animation to switch to as soon as they
have completed.
Animation and Sprite Classes
However, our game logic should not have to deal with all of the intricacies of animation
programming. We need to encapsulate the animation logic inside an Animation class.
To begin, we need a way to specify the animation sequences that an Animation object
will represent. We could hardcode all of the animation logic, but that would be a lot
of work with all of the animals and such, and we would have to throw it away the next
time we wrote a game. We could also create a proprietary file format, but then we’d
need to write a tool that could take in all of the animation sequences and write them
to the file, which is beyond the scope of this book.
Instead, we will use something familiar to Mac developers: the .plist file. You already
used a .plist file to set up certain parameters for your Xcode project. Here we will use
a .plist file to contain all of our animation sequence data, and we will write an initialization function in our Animation class that will read in that data.
Property list
We can use Xcode to create a .plist file for animation purposes. We will use the
emuchick.png file as our texture. Our goal is to describe the “walking left,” “walking
up,” “walking down,” and “walking right” animations:
1.
2.
3.
4.
From within Xcode, select File→New File to open the New File dialog.
From the left column select Other and in the right window select Property List.
Type Animations.plist for the name and click the Finish button.
Select the Animations.plist file within Xcode. The .plist editor view will appear.
All items in a property list are added to the root dictionary item, in key-value pairs. You
can structure your data by nesting dictionaries or arrays. We are going to structure our
animation data by using a dictionary for each sprite texture.
We will begin by adding a dictionary named emuchick.png:
1. Right-click the Root row and select Add Row.
Animation | 111
2. Replace the “New Item” text with “emuchick.png” in the Key column.
3. Change the Row type to Dictionary by clicking the Type column (it is set to String
by default) and selecting Dictionary.
Now we can start adding rows to the emuchick.png dictionary to describe the animations
found in this sprite texture:
4. Add a row to the emuchick.png dictionary by right-clicking and selecting Add Row.
Make sure you added the row to our dictionary, not the root: the new row should
be indented farther to the right than the emuchick.png row is in the Key column.
5. Name the new row “frameCount” and set its type to Number.
6. Set the value for frameCount to 15, since there are 15 frames in the emuchick.png
texture.
Next, we want to store information about all of the different animations that can be
found in this sprite. For each separate animation, we will create a new dictionary below
the emuchick.png dictionary:
7. Add another row to the emuchick.png dictionary by right-clicking and selecting Add
Row again.
8. Name this one “walkLeft” and set its type to Dictionary. It will represent an animation of the emu chick walking to the left.
Each animation will need to specify a sequence of frames and the animation period for
each of those frames. For “walkLeft”, we want to use a frame sequence of 0,1,2,3,4
with 100 ms for each frame:
9. Add two rows to the walkLeft dictionary and name them “anim” and “time”. Leave
their types as String.
10. In “anim”, set the value to “0,1,2,3,4”, with no spaces.
11. In “time”, set the value to “100,100,100,100,100”, also with no spaces.
Great; now we have the first sequence done. For the next two, we can actually copy
and paste the walkLeft dictionary and rename it to save us some time:
12. Right-click on “walkLeft” and select Copy.
13. Left-click on “emuchick.png”, then right-click and select Paste (it is important to
have it highlighted by left-clicking before pasting, or your new copy will end up in
the wrong place). Double-check that the new copy is a child of emuchick.png; it
should be at the same indentation as the original walkLeft dictionary.
14. Rename the first new copy to “walkup” and change the “anim” value to “5,6,7,8,9”.
15. Rename the second copy to “walkdown” and change its “anim” value to
“10,11,12,13,14”.
112 | Chapter 4: 2D Game Engine
Now we need a walking right animation. But the sprite has no frames of the emu chick
walking to the right. Instead, following our plan when we asked the artist to draw the
images, we’ll flip the left-facing frames for use in the walking right animation:
16. Copy and paste the walkLeft dictionary onto emuchick.png once more.
17. This time, add a row to walkRight, named “flipHorizontal”.
18. Set its type to Boolean and toggle the checkbox that shows up in the Value column.
It should be marked with a check, which means the value is set to true.
The last piece of data we need to store about the emuchick.png animations is an offset
value for all of the frames. When we want to draw the emu chick, we don’t want to
have to figure out how big the frame is and draw from the upper-left corner; instead,
we set that value here so that we can automatically offset the graphics. In this case, we
want the origin to be at 16,6 within the frame:
19. Add one more row to the emuchick.png dictionary.
20. Name this one “anchor” and keep its type as String.
21. Set its value to “16,6”.
Now we have a .plist file that contains all of the data to represent a series of animations
used by an entity. Next, we will create an Animation class that will allow us to use this
data in our game.
Consider, however, that we do not want to allocate a new Animation object for each of
our entities. For instance, let’s say we have three siren salamanders walking around in
our level. Just as they are all using the same GLTexture for their image data, they should
also use the same Animation object for their animation data. You should consider an
Animation object as a resource such as a texture.
However, certain aspects of the animation should belong to each Salamander entity:
specifically, the current animation sequence being rendered, and the time since the start
of the animation.
To facilitate this, we will also create a Sprite class. This class will keep track of the
animation data, as well as the exact frame and start time of the animation being
rendered.
Animation class
Although the Animation class will represent the animation used by an object in our
game, it’s possible that a single object could have multiple behaviors. In the preceding
example, the emu chick had only a walking animation, but it could also have had an
idle animation or a sleeping animation.
We call each of these behaviors an animation sequence, and our Animation class will
keep track of multiple AnimationSequence objects.
Animation | 113
In the preceding example, the Animation object used by the emu chick would have only
one AnimationSequence.
We will start by defining the AnimationSequence class, followed by the Animation class:
//Animation.h
@interface AnimationSequence : NSObject
{
@public
int frameCount;
float* timeout;
CGRect* frames;
bool flipped;
NSString* next;
}
- (AnimationSequence*) initWithFrames:(NSDictionary*) animData
width:(float) width
height:(float) height;
@end
@interface Animation : NSObject {
NSString* image;
NSMutableDictionary* sequences;
CGPoint anchor;
}
- (Animation*) initWithAnim:(NSString*) img;
- (void) drawAtPoint:(CGPoint) point
withSequence:(NSString*) sequence
withFrame:(int) frame;
-(int) getFrameCount:(NSString*) sequence;
-(NSString*) firstSequence;
-(AnimationSequence*) get:(NSString*) sequence;
@end
The AnimationSequence class keeps track of the number of frames, the time that each
frame should be displayed, and (similar to the Tile class) a CGRect to represent the
subsection of the GLTexture that represents each frame. It also keeps a Boolean to determine whether the frame should be drawn flipped on the horizontal axis.
The Animation class keeps a string that represents the name of the GLTexture for use
with our ResourceManager’s getTexture: function, as well as an NSMutableDictionary to
keep track of our AnimationSequences. To make things easy, we will use a string as the
key value. When we want to access the walking animation sequence, all we have to do
is call [sequences valueForKey:"walking"]. Finally, we keep an anchor point that allows
us to draw the animation at an offset.
The AnimationSequence class we defined had only one function, an initialization
method, which will parse the animation sequence data from a .plist file:
114 | Chapter 4: 2D Game Engine
//Animation.mm
@implementation AnimationSequence
- (AnimationSequence*) initWithFrames:(NSDictionary*) animData
width:(float) width
height:(float) height
{
[super init];
NSArray* framesData = [[animData valueForKey:@"anim"]
componentsSeparatedByString:@","];
NSArray* timeoutData = [[animData valueForKey:@"time"]
componentsSeparatedByString:@","];
//will be nil if "time" is not present.
bool flip = [[animData valueForKey:@"flipHorizontal"] boolValue];
self->next = [[animData valueForKey:@"next"] retain];
frameCount = [framesData count];
frames = new CGRect[frameCount];
flipped = flip;
for(int i=0;i<frameCount;i++){
int frame = [[framesData objectAtIndex:i] intValue];
int x = (frame * (int)width) % 1024;
int row = (( frame * width ) - x) / 1024;
int y = row * height;
frames[i] = CGRectMake(x, y, width, height);
}
timeout = NULL;
if(timeoutData){
timeout = new float[frameCount];
for(int i=0;i<frameCount;i++){
timeout[i] = [[timeoutData objectAtIndex:i] floatValue] / 1000.0f;
if(i > 0) timeout[i] += timeout[i-1];
}
}
return self;
}
- (void) dealloc {
delete frames;
if(timeout) delete timeout;
[self->next release];
[super dealloc];
}
@end
We begin by grabbing the array of animation frames labeled “anim” from inside the
animData dictionary. We do this by passing @"anim" as the key into the valueForKey:
function of NSDictionary, which returns a string value. In the same line, we split that
string into substrings by separating each section marked by a comma using the
componentsSeparatedByString: method of NSString. We do the same thing on the next
line, only we grab the “time” entry instead.
We also grab the “flipHorizontal” entry and convert it to a bool value from which we
directly initialize our flipped member variable. After that, we get the “next” entry to
Animation | 115
determine what the next animation sequence should be: if the value is nil, we will
simply stop animating; otherwise, we will continue into the next animation sequence
automatically.
Next, we want to create a CGRect that represents the section of the GLTexture each frame
represents. We know the width and height of the CGRect because they were passed into
our function and each frame is the same size. All we need to do is calculate the x and
y offsets based on the frame number of each animation.
We index the framesData array using the objectAtIndex: function and convert each
element to an integer to get the frame index. Next, we calculate the x and y offsets based
on the frame height and width. Remember, we need to wrap the frames if the width or
height is larger than 1,024.
After we are done creating the frame rectangles, we initialize our timeout array. After
indexing the timeoutData array and converting each element into an int (the same as
we did earlier), we divide the result by 1,000. We mentioned earlier that the iPhone
counts time by seconds, although it allows fractional values. Because the time periods
in our .plist are in milliseconds, dividing by 1000.0f converts from integer milliseconds
to floating-point seconds, which is what we want.
Now we can implement the Animation class. Recall that the Animation class is a resource
that multiple Sprite classes will use; it should not store any data used to render a
particular instance of an animation, only the list of AnimationSequences. The drawing
function should have parameters that specify exactly which frame of which Animation
Sequence is currently being requested so that multiple Sprites can render the same
animation at different locations of the screen and of the animation.
Let’s start by looking at the initialization function:
//Animation.mm
- (Animation*) initWithAnim:(NSString*) img {
NSData* pData;
pData = [NSData dataWithContentsOfFile:[[NSBundle mainBundle]
pathForResource:@"Animations" ofType:@"plist"]];
NSString *error;
NSDictionary* animData;
NSPropertyListFormat format;
animData = [NSPropertyListSerialization propertyListFromData:pData
mutabilityOption:NSPropertyListImmutable
format:&format
errorDescription:&error];
animData = [animData objectForKey:img];
GLTexture *tex = [g_ResManager getTexture:img];
image = img;
float frameWidth, frameHeight;
if([animData objectForKey:@"frameCount"]){
int frameCount = [[animData objectForKey:@"frameCount"] intValue];
116 | Chapter 4: 2D Game Engine
}
frameWidth = [tex width] / (float)frameCount;
frameHeight = [tex height];
if([animData objectForKey:@"frameSize"]){
NSArray* wh = [[animData objectForKey:@"frameSize"]
componentsSeparatedByString:@"x"];
frameWidth = [[wh objectAtIndex:0] intValue];
frameHeight = [[wh objectAtIndex:1] intValue];
}
//anchor is the position in the image that is considered the center. In
//pixels. Relative to the bottom left corner. Will typically be positive.
//all frames in all sequences share the same anchor.
NSString* anchorData = [animData valueForKey:@"anchor"];
if(anchorData){
NSArray* tmp = [anchorData componentsSeparatedByString:@","];
anchor.x = [[tmp objectAtIndex:0] floatValue];
anchor.y = [[tmp objectAtIndex:1] floatValue];
}
NSEnumerator *enumerator = [animData keyEnumerator];
NSString* key;
sequences = [NSMutableDictionary dictionaryWithCapacity:1];
while ((key = [enumerator nextObject])) {
NSDictionary* sequencedata = [animData objectForKey:key];
if (![sequencedata isKindOfClass:[NSDictionary class]]) continue;
AnimationSequence* tmp = [[AnimationSequence alloc]
initWithFrames:sequencedata
width:frameWidth
height:frameHeight];
}
[sequences setValue:tmp forKey:key];
[tmp release];
[sequences retain];
}
return self;
The initWithAnim: function accepts the name of an image as its only parameter. This
will be used to grab the associated animation from within the Animations.plist file, as
well as the GLTexture by the same name.
We start by using an NSData pointer to grab the contents of the Animations.plist file.
Next, we convert it into an NSDictionary for easy access of the data inside using the
propertyListFromData: method of the NSPropertyListSerialization utility class.
However, the NSDictionary we just got contains all of the animations in the .plist file,
and we want only the animation that corresponds to the image name passed into our
Animation | 117
initialization function. We grab the subsection with [animData objectForKey:img], reassigning it to our NSDictionary pointer. We don’t need to worry about a memory leak
while doing this because the original NSDictionary returned by propertyListFrom
Data: is put into an auto-release pool before it’s handed to us.
Now that we have only the data that pertains to this animation, we will extract the
Animation and AnimationSequence information from it. For the Animation class, we need
the data that applies to all of the AnimationSequences, including the frame height and
width and the anchor offset.
The rest of the entries into the dictionary comprise AnimationSequence data. However,
we don’t know what their names are or how many there will be, so we need to use an
NSEnumerator to iterate across all of the entries. We do this by calling keyEnumerator:
on the animData dictionary.
We also need a place to store the AnimationSequences we create, so we initialize our
sequences variable as an empty NSMutableDictionary. Since we are calling alloc on
sequences here, we need to remember to release it in the dealloc function, as well as
all of the entries inside it.
Next, we start the while loop to iterate through all of the keys in our animData dictionary.
The entries are not in a particular order, so we need to be sure to skip any entries that
we have already read (and therefore are not AnimationSequence dictionaries). We know
that any entry that is an NSDictionary will represent an AnimationSequence, so we check
the type of entry using isKindOfClass:. If the entry is not an NSDictionary, we skip it.
Finally, we know we have an AnimationSequence dictionary. We grab it from animData
using objectForKey: and then send it into a newly allocated AnimationSequence object.
Once the AnimationSequence is initialized, we can store it into our sequences dictionary.
Since we called alloc on the AnimationSequence when we were creating it, we need to
call release. Rest assured, however, that it was retained by NSDictionary when we
inserted it into sequences.
And now the rendering function:
//Animation.mm
- (void) drawAtPoint:(CGPoint) point
withSequence:(NSString*) sequence
withFrame:(int) frame
{
AnimationSequence* seq = [sequences valueForKey:sequence];
CGRect currframe = seq->frames[frame];
[[g_ResManager getTexture:image]
drawInRect:CGRectMake(
point.x+(seq->flipped?currframe.size.width:0)-anchor.x,
point.y-anchor.y,
seq->flipped?-currframe.size.width:currframe.size.width,
currframe.size.height)
withClip:currframe
withRotation:0];
}
118 | Chapter 4: 2D Game Engine
Compared to the initialization function, rendering is fairly simple. We first grab the
AnimationSequence as detailed by the sequence parameter. We then extract the CGRect
that represents the portion of a GLTexture that contains the frame we want from the
AnimationSequence and store it as currFrame.
Next, we grab the GLTexture from the ResourceManager and call drawInRect:, creating
the destination rectangle using the utility function CGRectMake and using currFrame as
our source rectangle. Creating the destination rectangle is a little tricky because we have
to consider whether the animation is flipped and whether there is an anchor offset.
Fortunately, the math is simple, as you can see.
Sprite class
Now that we have an Animation, we can create a Sprite class that will allow us to use
it. The Sprite class needs to keep track of what animation it is associated with, which
AnimationSequence is currently being drawn, when that sequence started, and what the
current frame is.
Because the Sprite class will be used directly in our game code, we are going to make
an autorelease constructor instead of the typical init function. We will also need a
rendering function that accepts a position to draw the sprite, an update function that
will calculate when the current frame needs to change based on the timeout values from
the current AnimationSequence, and finally, a way to set which sequence we want to
display:
//Sprite.h
@interface Sprite : NSObject {
Animation* anim;
NSString* sequence;
float sequence_time;
int currentFrame;
}
@property (nonatomic, retain) Animation* anim;
@property (nonatomic, retain) NSString* sequence;
+ (Sprite*) spriteWithAnimation:(Animation*) anim;
- (void) drawAtPoint:(CGPoint) point;
- (void) update:(float) time;
@end
Notice the @property tag we are using for anim and sequence variables. It will cause a
special setter function to be called whenever we assign anything to anim or to
sequence. Since retain is one of the keywords, it will automatically be retained when
we set these.
Although the default setter is acceptable for anim, we want to specify our own setter
function for sequence because whenever the sequence changes we need to reset the
Animation | 119
sequence_time and currentFrame back to zero. We do this by overloading the setter
function named setSequence in the following code.
The implementation of Sprite follows:
//Sprite.m
+ (Sprite*) spriteWithAnimation:(Animation*) anim {
Sprite* retval = [[Sprite alloc] init];
retval.anim = anim;
retval.sequence = [anim firstSequence];
}
[retval autorelease];
return retval;
- (void) drawAtPoint:(CGPoint) point {
[anim drawAtPoint:point withSequence:sequence withFrame:currentFrame];
}
- (void) update:(float) time{
AnimationSequence* seq = [anim get:sequence];
}
if(seq->timeout == NULL){
currentFrame++;
if(currentFrame >= [anim getFrameCount:sequence]) currentFrame = 0;
} else {
sequence_time += time;
if(sequence_time > seq->timeout[seq->frameCount-1]){
sequence_time -= seq->timeout[seq->frameCount-1];
}
for(int i=0;i<seq->frameCount;i++){
if(sequence_time < seq->timeout[i]) {
currentFrame = i;
break;
}
}
}
- (void) setSequence:(NSString*) seq {
[seq retain];
[self->sequence release];
self->sequence = seq;
currentFrame = 0;
sequence_time = 0;
}
The constructor function needs to be statically accessible (you call it before an object
exists, not on an object), so we use + instead of − in the definition. It starts by allocating
and initializing a Sprite object.
We then set the animation to the anim variable sent in the parameter. Remember that
we declared this as a retain parameter, so it will automatically be retained when we
set this, meaning we need to release it in our dealloc function.
120 | Chapter 4: 2D Game Engine
We start the first AnimationSequence by using a utility function to ask the Animation
which we should use first and then setting it to sequence. This is also a property, but it
will be calling our custom setter, the setSequence: function.
Finally, we add the new Sprite to an autorelease pool and return it.
The rendering function is very simple: just pass the point to draw at, the current sequence, and the current frame into the Animation drawAtPoint: function we discussed
earlier.
The update function needs to start by grabbing a pointer to the AnimationSequence we
are currently running. Next, we need to check that it has a list of frame times; if it does
not, we simply increment the frame every update loop. If we reach the end of the
AnimationSequence, we start over from the first Animation.
If there is frame time information, we need to know whether the current frame should
be incremented. The time parameter of the update function represents the amount of
time that has elapsed since the last call to update, so we can simply add this to the
sequence_time variable and check whether it is larger than the timeout value of the
current frame. We calculate the current frame based on the total sequence_time elapsed.
The setSequence: function is our overloaded setter function, as we already mentioned.
A normal setter function has two jobs: retain the new object being assigned to, and
release the old one. Our custom setter will also initialize the currentFrame and
sequence_time to zero so that the new sequence starts at the beginning.
Physics
In our game, physics will be a simple matter of entity-to-world and entity-to-entity
collision in two dimensions. In Level 4, we have water tiles, but that will be a special
case of entity-to-world.
Entities
What are “entities”? As we mentioned in “Physics Engine” on page 51, the game world
consists of the “level,” the “player,” and the “animals.” To simplify things, we will say
the game world consists of the “level” and “entities.” An entity is anything that exists
in the game world within a particular level.
The player is an entity because she is in the world but can move around independently.
The animals are also entities that can move around on their own. There can also be
stationary entities, such as a button. Because a button has an animation and logic behind it (pressed and unpressed), it cannot be fully represented as merely a part of the
tile-engine portion of the level; it must be an entity.
All entities need to have a position, a way to render themselves, and an update function
that gets called every frame to allow their internal logic to progress.
Physics | 121
We will begin by creating a class named Entity (which you already saw referenced in
TileWorld):
//Entity.h
@interface Entity : NSObject {
CGPoint worldPos;
CGPoint velocity;
Sprite* sprite;
TileWorld* world;
}
@property (nonatomic, retain) Sprite* sprite;
@property (nonatomic) CGPoint position;
-
(id) initWithPos:(CGPoint) pos sprite:(Sprite*)sprite;
(void) drawAtPoint:(CGPoint) offset;
(void) update:(CGFloat) time;
(void) setWorld:(TileWorld*) newWorld;
@end
Notice the pointer to TileWorld. This allows the entity to check for entity-to-world
collisions on its own.
The implementation of the Entity class is very simple, with the exception of the render
function, which adds its position to a camera offset before calling drawAtPoint: on its
Sprite:
//Entity.m
- (void) drawAtPoint:(CGPoint) offset {
offset.x += worldPos.x;
offset.y += worldPos.y;
[sprite drawAtPoint:offset];
}
The rest of the functions are simple or empty because Entity is a base class. We will
create other classes that inherit from Entity and implement more interesting
functionality.
Entity-to-World
Entities that can move but are limited by the physical properties of the level must detect
entity-to-world collisions. But first we must have a way to know what physical property
each level tile has.
We do this in a way similar to the unique tile indexes of the tile graphics. Just as we
had a file with texture indexes for each tile, we can have a file with physics flags for
each tile. Our game design incorporates the following physics properties for tiles: normal, impassable, and water. Normal is applied to tiles that can be walked upon, impassable is used for walls and tiles that are otherwise inaccessible to entities, and water
is for special tiles that represent water.
122 | Chapter 4: 2D Game Engine
Giving values (0 = normal, 1 = impassable, 2 = water), we could represent the first level
with the following data:
1,
1,
1,
1,
1,
1,
1,
1,
1,
1,
1,
1,
1,
1,
1,
1,
1,
1,
1,
1,
1,
1,
1,
1,
1,
0,
0,
0,
0,
0,
0,
0,
0,
0,
0,
0,
0,
0,
0,
0,
0,
0,
0,
0,
0,
0,
0,
0,
0,
0,
0,
0,
0,
0,
0,
0,
0,
0,
0,
0,
0,
0,
0,
0,
0,
0,
0,
0,
0,
0,
0,
0,
0,
0,
0,
0,
0,
0,
0,
0,
0,
0,
0,
0,
0,
0,
0,
0,
0,
0,
0,
0,
0,
0,
0,
0,
0,
0,
0,
0,
0,
0,
0,
0,
0,
0,
0,
0,
0,
0,
0,
0,
0,
0,
0,
0,
0,
0,
0,
0,
0,
0,
0,
0,
0,
0,
0,
0,
0,
0,
0,
0,
0,
0,
0,
0,
0,
0,
0,
0,
0,
0,
0,
0,
0,
0,
0,
0,
0,
0,
0,
0,
0,
0,
0,
0,
0,
0,
0,
0,
0,
0,
0,
0,
0,
0,
0,
0,
0,
0,
0,
0,
0,
0,
0,
0,
0,
0,
0,
0,
0,
0,
0,
0,
0,
0,
0,
0,
0,
0,
0,
0,
0,
0,
0,
0,
0,
0,
0,
0,
0,
0,
0,
0,
0,
0,
0,
0,
0,
0,
0,
0,
0,
0,
0,
0,
0,
0,
0,
0,
0,
0,
0,
0,
0,
0,
0,
0,
0,
0,
0,
0,
0,
0,
0,
0,
0,
0,
0,
0,
0,
0,
0,
0,
0,
0,
0,
0,
0,
0,
0,
0,
0,
0,
0,
0,
0,
0,
0,
0,
0,
0,
0,
0,
0,
0,
0,
0,
0,
0,
0,
0,
0,
0,
0,
0,
0,
0,
0,
0,
0,
0,
0,
0,
0,
0,
0,
0,
0,
0,
0,
0,
0,
0,
0,
0,
0,
0,
0,
0,
0,
0,
0,
0,
0,
0,
0,
0,
0,
0,
0,
0,
0,
0,
0,
0,
0,
0,
0,
0,
0,
0,
0,
0,
0,
0,
0,
0,
0,
0,
0,
0,
0,
0,
0,
0,
0,
0,
0,
0,
0,
0,
0,
0,
0,
0,
0,
0,
0,
0,
1
1
1
1
1
1
1
1
1
1
1
1
1
1
1
1
1
1
1
1
1
1
1
1
1
Not very exciting, but you get the point. Entities cannot enter any of the tiles with a
“1,” but they can walk freely in any tile with a “0.”
Now that we know what each tile is supposed to represent physically, we can perform
entity-to-world collision detection (remember the separation between collision “detection” and collision “resolution”).
The most naive approach is to do a rectangle-to-rectangle collision between the entity
and each level tile. However, this quickly becomes inefficient as you have to perform
levelWidth*levelHeight checks for all entities at every frame. Fortunately, we can make
a number of optimizations.
Since this check will be performed every update loop, we can assume that our entity is
in a stable state at the start of our check (because any collisions would have been resolved during the last frame). Therefore, if the entity is not moving (its velocity is zero),
we can skip the process altogether (for the current loop).
Meanwhile, if the entity is moving, we only need to check for collisions along its intended path. Even better, if we know that our entities aren’t moving faster than one tile
length per frame, we only need to check the end of the path on each frame (because it
will give the same result as the middle of the path if we’re not passing through more
than one tile).
Physics | 123
Vector Math Primer
Vector math is important for games in both 2D and 3D. If you aren’t familiar with
vectors, you may need to read up on them. There are several important aspects you
should be aware of:
• Vector addition and subtraction
Vectors can be added or subtracted from other vectors. The result represents what
happens when the forces represented by both vectors have an impact:
V1 = 25, 15
V2 = 5, 15
V1 + V2 = 25+5, 15+15 = 30, 30
V2 − V1 = 5-25, 15-15 = −20,0
• Vector to scalar multiplication
A vector cannot be multiplied by another vector, but it can be multiplied by a single
number (also called a scalar). This represents the intensification of a vector (e.g.,
multiplying by 2 to move twice as fast in the same direction):
V1 = 20, 10
V1 * 3.0 = 60, 30
V1 * 0.5 = 10, 5
• Vector magnitude
A vector can be thought of as a direction and a magnitude (or length):
V1 = 30, 20
V1.magnitude = sqrt( x^2 + y^2 ) = sqrt(30*30 + 20*20) = 36.05
• Vector normalization
Normalization will take any vector and return a new vector that has the same
direction, but a length of exactly “1” unit. This is also called a unit vector:
V1 = 1,1
V1.magnitude = sqrt( 1*1 + 1*1 ) = 1.414
V1.normal = 1/V1.magnitude, 1/V1.magnitude = 0.707, 0.707
V1.normal.magnitude = sqrt( 0.707*0.707 + 0.707*0.707 ) = 1
Unfortunately for us, the iPhone SDK does not come with a helpful 2D vector
class. Therefore, we have to provide our own functions for vector math located in
PointMath.h:
124 | Chapter 4: 2D Game Engine
add
Performs vector addition on two CGPoint vectors
sub
Performs vector subtraction on two CGPoint vectors
scale
Performs scalar multiplication between a CGPoint and a scalar float
distsquared
Returns the squared magnitude of a CGPoint vector
unit
Returns a unit vector based on a CGPoint vector
towards
A utility function that gets the vector between two CGPoints and derives its unit
vector
The following is an example of how we will check for collisions in our entity code using
our functions for vector math (remember that the time parameter of our update function
represents time passed since the last update):
CGPoint distThisFrame = scale(velocity, time);
CGPoint projection = add( worldPos, distThisFrame );
Tile* newTile = [world tileAt:projection];
if( overtile == nil || (overtile->flags & UNWALKABLE) != 0 ) {
//tile is out of bounds or impassable
projection = worldPos; //don't move
}
worldPos = projection;
First we calculate the amount of space that will be moved during this frame. Note that
we scale our velocity by the time passed during the last frame, instead of merely using
the entire velocity. This is because our speed is in units per second, but our update
function is not called once per second (hopefully it’s being called 33 times per second).
If we used the full velocity, the entities would be moving far too quickly, and more
importantly, they would speed up or slow down if our game loop was faster or slower.
Next, we use vector math to add the distThisFrame to our current worldPos to get the
projected position at the end of the current loop. Now we need to check to see whether
that projected point is going to be in a safe tile or if it is impassable.
We use the tileAt: function of TileWorld to grab the tile that is underneath that point.
If the point is out of the bounds of the level, it will return nil.
We check to see whether the result is nil or whether it has an UNWALKABLE physics flag.
If either of these cases is true, we should not let the entity walk onto the tile, so we set
the projection to our current position.
Finally, we accept the projection vector as our new current position.
Physics | 125
Special Tiles
Although impassable tile collisions can simply be resolved as soon as they are detected,
other special types of tiles need extra game logic. To handle these situations, we can
send the entity a message when it collides with a certain type of tile. This allows us to
write code to allow entities to handle special tiles in their own way.
If a hippopotamus is walking on land and collides with a water tile, it can move to a
swimming state and keep going. In contrast, a cougar might decide it doesn’t want to
get wet and the AI can use the message to turn the cougar around and find another path.
Entity-to-Entity
Entity-to-world collision is fairly straightforward. Your only goal is to keep entities from
entering impassable tiles, and notifying them when they’re on special tiles such as water.
Entity-to-entity collision, however, is more complex.
With entity-to-entity collision, there are many results from different types of collisions.
If an animal touches another animal, we could simply choose not to let the animals
pass through each other, or we could ignore the situation if we want to allow animals
to walk over each other. Or if they are two different types of animals, they might attack
each other.
When collision resolution takes many different forms due to game design, the line
between physics code and game logic code gets blurred. Similar to special tiles, we can
handle this through special messages alerting entities of events so that the entities
themselves can handle the resolution logic.
However, we might also want to resolve these collisions strictly at the GameState level.
A single entity knows only as much about the world as we give it access to. However,
the GameState envelops the entire world, including all of the entities, the level, and all
of the game logic code.
To clarify, consider the following example. For the first level, we want to determine
when one of the emu chicks has walked onto the nest at the top of the level. To represent
the nest, we will have a special kind of entity called a trigger area. A trigger area has a
bounding box for determining physical collisions just like a regular entity, but it doesn’t
necessarily have a graphical representation. Because the nest is already represented in
the tiles of the level background, we don’t need to draw anything for this trigger area.
Instead, we merely perform entity-to-entity collision between emu chicks and the nest
trigger area.
However, when we detect this collision, we want to remove the emu entity from the
level. Simply sending a message to the entity won’t allow it to remove itself. We need
the resolution to happen at the GameState level.
In addition, not all entities require collision detection against each other. Using the
previous example, although an emu chick should be tested for collision against the nest
126 | Chapter 4: 2D Game Engine
trigger area, the main character should not be. Because of the wide variety of expected
results from entity-to-entity collision, it should be handled on a case-by-case basis.
In the next section, we will examine the implementation of these cases.
Level 1 Implementation
As we stated before, the goal for Level 1 is for the player to control the main character
in a way that will herd a flock of emu chicks into their mother’s nest.
This will require the following resources:
• A tile level with a clear depiction of a nest and a wide space for the chicks to run
around in
• A main character sprite with idle and walking animations
• An emu chick sprite with idle and running animations
• A mother emu sprite that will pace back and forth on the nest
The game logic will include detecting when an emu chick has walked onto the nest and
removing it from the world when it does, a nest trigger area for determining when emu
chicks have reached the nest, and a level complete state transition when all emu chicks
have reached the goal.
AI logic will consist of:
• A very basic emu mother entity that walks back and forth on the nest
• An emu chick entity that will flock together with other emu chick entities and try
to run away from the main character
User input will include detecting a single touch on the screen from the player, translating that into world coordinates to detect the target square, and setting the main
character’s velocity to move toward that square.
gsEmuLevel
To hold our tile engine, entities, and game logic for the first level, let’s create a class
named gsEmuLevel that inherits from the GLESGameState class.
gsEmuLevel will need to keep track of the TileWorld, the main character entity, the emu
flock entities, and the emu mother entity, as well as the level’s complete state:
@interface gsEmuLevel : GLESGameState {
TileWorld* tileWorld;
Tom* m_tom;
EmuMother* mama;
Emu** flock;
int flock_len;
BOOL win;
Level 1 Implementation | 127
}
@end
TileWorld
In the constructor, we initialize the TileWorld object with the level data:
- (id) initWithFrame:(CGRect)frame andManager:(GameStateManager*)pManager;
{
if (self = [super initWithFrame:frame andManager:pManager]) {
[self setupWorld];
}
return self;
}
- (void) setupWorld {
tileWorld = [[TileWorld alloc] initWithFrame:self.frame];
[tileWorld loadLevel:@"lvl1_idx.txt" withTiles:@"lvl1_tiles.png"];
}
In the render function of our game state, we tell the TileWorld to draw itself:
- (void) Render {
//clear anything left over from the last frame, and set background color.
glClearColor(0xff/256.0f, 0x66/256.0f, 0x00/256.0f, 1.0f);
glClear(GL_COLOR_BUFFER_BIT);
[tileWorld draw];
}
[self swapBuffers];
Now that we have a level to walk around in, we need something to walk around in it.
Main Character
To start, we need the main character sprite. We want the main character to walk around
or stand still, so we need walking and idle frames for all facings. Again we will use the
draw flipped technique for the right-facing frames so that we need only up, down, and
left frames on the texture. Figure 4-4 shows the sprite representing Tom O’Reilly.
Figure 4-4. Tom O’Reilly sprite
Once we have the sprite, we can create an Entity class to wrap around it. Then we can
put this Entity object into gsEmuLevel where we will initialize it and hook it into the
128 | Chapter 4: 2D Game Engine
render and update loops. And since Tom is going to be controlled by the player directly,
we can hook it up to the user input code as well.
Entity
The Entity class that represents Tom will be named, well, Tom. It is actually quite a
simple class, as most of the rendering code will already have been handled by the
Entity class it inherits from, and the entity logic will simply be to move toward a square
designated by the player:
@interface Tom : Entity {
CGPoint destPos;
}
- (id) initWithPos:(CGPoint) pos sprite:(Sprite*)spr ;
- (void) moveToPosition:(CGPoint) point;
@end
The initWithPos function simply calls the Entity initWithPos function and initializes
the destPos to be equal to the current worldPos (otherwise, it would be moving when
the game loop starts).
The moveToPosition function will be called by the user input code of gsEmuLevel and
will simply set the destination position to the given point in world coordinates.
Tom also overrides the update: function inherited from Entity, like this:
//Tom.m
- (void) update:(CGFloat) time {
float xspeed = 200*time, yspeed=200*time; //pixels per second.
What is that 200 value? Uh-oh, that’s a magic number! We should replace that with a
define such as PLAYER_SPEED. Notice how we multiply it by time (like the distThis
Frame example earlier) to get the scaled speed per frame. Next, we save the current
worldPos in case our attempt at moving fails (because of a wall or the edge of the level):
CGPoint revertPos = worldPos;
And now we project the entity toward the destination position, first on the x-axis followed by the y-axis. If our speed causes us to go past the square (fabs(dx) < xspeed),
we snap the distance traveled to end exactly at the destination position. Otherwise, we
multiply the speed by positive or negative 1 depending on whether we’re moving “right”
or “left.”
float dx = worldPos.x - destPos.x;
if(dx != 0){
if(fabs(dx) < xspeed){
worldPos.x = destPos.x;
} else {
worldPos.x += -sign(dx)*xspeed;
}
}
Level 1 Implementation | 129
float dy = worldPos.y - destPos.y;
if(dy != 0){
if(fabs(dy) < yspeed){
worldPos.y = destPos.y;
} else {
worldPos.y += -sign(dy)*yspeed;
}
}
Now we check to see whether we have moved to an acceptable tile. If not, we don’t
want to simply stand still; it would be better to try to slide along the edge of whatever
obstacle we have reached. First, we project ourselves using only the new x value, keeping
our old y value as though we had no intention of moving in any direction but horizontal;
if that projection works, we accept it and move on. If not, we try to project our position
only in the y direction; again, if that works, we accept it and move on. Finally, if neither
attempt works, we accept our failure and revert to the old position:
if(![world walkable:worldPos]){
if([world walkable:CGPointMake(worldPos.x, revertPos.y)]){
worldPos = CGPointMake(worldPos.x, revertPos.y);
}
else if([world walkable:CGPointMake(revertPos.x, worldPos.y)]){
worldPos = CGPointMake(revertPos.x, worldPos.y);
}
else {
worldPos = revertPos;
}
}
Now that we know what the new position will be, we should recalculate the way our
sprite is facing and update the animation sequence:
//calculate current direction
NSString* facing = nil;
if(dx != 0 || dy != 0){
if(fabs(dx) > fabs(dy)){
if(dx < 0) {
facing = @"walkright";
} else {
facing = @"walkleft";
}
} else {
if(dy < 0){
facing = @"walkup";
} else {
facing = @"walkdown";
}
}
} else {
facing = @"idle";
}
//if the direction has changed, we also change our animation
if(![sprite.sequence isEqualToString:facing])
130 | Chapter 4: 2D Game Engine
{
}
sprite.sequence = facing;
Finally, we tell our sprite to update:
}
[sprite update:time];
gsEmuLevel
Now that we have filled out our entity, we can plug it into our level. We already have
the m_tom variable defined in the header; all we need to do is use it.
First, we initialize it inside the setupWorld: function by loading the animation, initializing an instance of Tom, and assigning it to our m_tom variable. Then we add m_tom to
tileWorld’s list of entities to render and we set the camera to point at m_tom’s worldPos:
//gsEmuLevel.m
Animation* tomanim = [[Animation alloc] initWithAnim:@"tom_walk.png"];
m_tom = [[Tom alloc] initWithPos:CGPointMake(100, 100)
sprite:[Sprite spriteWithAnimation:tomanim]];
[tileWorld addEntity:m_tom];
[tileWorld setCamera:m_tom->worldPos];
Next, inside Update:, we call m_tom’s update: function.
We don’t need to add m_tom to the Render: function because TileWorld will have already
taken care of it because we added him to the list of entities to render.
Finally, we need to be sure to call release on m_tom in the destructor.
User input
The user input code is very simple. We will receive a call to touchesEnded: when the
player taps the screen.
We can get the position (in screen coordinates) of the tap by calling [self touchPosi
tion:touch]. We then convert that position from screen coordinates to world coordinates using the worldPosition: helper function we wrote in the TileWorld class.
Finally, we set the new destination (in world coordinates):
[m_tom moveToPosition:[tileWorld worldPosition:[self touchPosition:touch]]];
Emu Chicks
Now we’ll let loose the sprite for emu chicks that we introduced in “Animation.” We
attach that to a new class called Emu which will also inherit from the base Entity class.
This will allow us to write the AI code that controls the emus inside the Emu entity.
We want our emu chicks to flock together. There are many ways to implement a flocking algorithm, but they should all exhibit some common behavior:
Level 1 Implementation | 131
• Don’t stay too close to neighbors at short range.
• Calculate a velocity based on the average velocity of neighbors.
From here, based on the type of flocking behavior you wish to exhibit, you can add
more rules. For example, if you wish to keep a tight cloud-shaped grouping, you may
add:
• Try to move toward the center of mass of the flock.
In addition to the flocking behavior, we also want to assert two more rules:
• If the main character is nearby, run away from him.
• If the emu mother is nearby, run toward her.
When we write this code in the Emu entity and create multiple instances, we should see
emergent behavior from the entities in the form of a flock of emus that will run away
from the main character, and run toward their mother if they are in close proximity.
These rules may seem to be in conflict with each other, and in some cases they are; but
resolving that conflict is actually rather easy. Since each rule dictates a velocity, we can
consider them to all be impulses being added to the emu entity’s current velocity. When
we calculate all of them and add them together, we get a single velocity that represents
the direction in which the emu entity should move.
Entity
The Emu entity class will need a velocity vector to represent its speed and direction.
When we calculate our flocking, however, we want to count only the current velocity
before applying any new velocities based on the result of the flocking algorithm; therefore, we need to keep a temporary velocity used for flocking calculation, which we name
nextVel.
Finally, we also want to add a velocity to individual emus to keep them away from the
other emus. That is what collision_tweak is for:
@interface Emu : Entity {
CGPoint velocity;
CGPoint nextVel;
CGPoint collision_tweak;
}
-
(id) initWithPos:(CGPoint) pos sprite:(Sprite*)spr;
(void) flockAgainst:(Emu**) others count:(int)count;
(void) avoidPlayer:(Entity*) mainChar;
(void) runToGoal:(Entity*) emuMother;
(void) update:(CGFloat) time;
@end
Notice that we have three separate AI functions here, in addition to the update function.
The first one, flockAgainst, definitely needs to be separate from update: because it
132 | Chapter 4: 2D Game Engine
needs to be called on each entity separately before the individual entity behavior should
take place.
The next two, avoidPlayer: and runToGoal:, could technically be wrapped into
update: if we needed them to be. However, they can each act individually, and therefore
make a cleaner design as separate functions; if we were to simply omit a call to one of
them, you would still see all of the other set of behaviors you expected to see.
The implementation of flockAgainst: is a bit complicated. To start, we will utilize 95%
of our current velocity in our next velocity. This represents the fact that things such as
changes in flock movement do not happen immediately, but gradually over time.
Otherwise, you might see a flock of birds moving together in the sky immediately freeze,
then drop to the ground and land:
//Emu.m
- (void) flockAgainst:(Emu**) others count:(int)count {
nextVel = scale(velocity, 0.95f); //carry inertia
int neighbor_count=0, vel_count = 0;
CGPoint avg_pos = CGPointMake(0,0), avg_vel=CGPointMake(0,0);
collision_tweak = CGPointMake(0,0);
Next, we will perform calculation of short-range repulsion of neighbors. Rather than
repulsing against all emus, we find the nearest and move away from only that one.
For each emu in the flock (not counting ourselves), we first grab the distance between
the current emu and the one being flocked against. We keep track of which emu in the
flock is closest to this emu, and we also count the average velocity of all flock members
that are within two tiles of the current emu. In addition, we count the average position
of all flock members within four tiles of the current emu.
By considering only average velocity and positions of emus within a certain radius, we
can separate our emus into smaller groups that still flock independently of each other.
If those two subflocks were to get close to each other, they would merge into one giant
flock again:
float nearest_dist=0.0f;
Emu* nearest_emu;
float velCutoff = 2*TILE_SIZE;
float posCutoff = 4*TILE_SIZE;
for(int i=0;i<count;i++){
if(self == others[i]) continue;
float distSQ = distsquared(worldPos, others[i]->worldPos);
if(distSQ < nearest_distSQ || nearest_dist == 0)
{
nearest_distSQ = distSQ;
nearest_emu = others[i];
}
if(distSQ < velCutoff*velCutoff)
{
vel_count++;
avg_vel = add(avg_vel, others[i]->velocity);
Level 1 Implementation | 133
}
}
if(distSQ < posCutoff*posCutoff)
{
neighbor_count++;
avg_pos = add(avg_pos, others[i]->worldPos);
}
The preceding code updates our knowledge of the flock as seen from the point of view
of the current entity:
• We know which chick is closest, storing it from the others array into next_emu.
• We know the number of velocities to count from other chicks (storing it in
vel_count) and the average velocity of all the nearby chicks (in avg_vel).
• We know the number of chicks in the range we need to consider (storing it in
neighbor_count for positions and vel_count for velocities) and the average of all
their positions and velocities (in avg_pos and avg_vel).
Next, we calculate a velocity that will push us away from the nearest emu so that we
maintain a comfortable distance:
float emuradius = TILE_SIZE/2;
if(nearest_dist < emuradius*emuradius) {
CGPoint away = toward(nearest_emu->worldPos, worldPos);
float overlap = emuradius - sqrt(nearest_dist);
collision_tweak = scale(away, overlap*0.25f);
}
Then we try to move toward the average flock position. Technically, we were calculating only the total position and velocity earlier. We still need to divide it by the number
of neighbors to get the average. Once we know where the average position is, we look
at our distance from that point and ignore it if we’re too close or too far from the flock
center. Otherwise, we add a velocity toward the flock center, but we scale it based on
how far away it is so that if the emu is close it only waddles, but if the emu is far away
it hurries to catch up:
//make the sum into an actual average.
avg_pos = scale(avg_pos, 1.0f/neighbor_count);
CGPoint to = toward(worldPos, avg_pos);
float distToFlock = sqrt(distsquared(worldPos, avg_pos));
if(distToFlock > 34 && distToFlock < 128){
CGPoint accel = scale(to, sqrt(distToFlock −32));
//using a sqrt(distance) relationship here...
// (distance) was a bit too exaggerated.
nextVel = add(nextVel, accel);
}
Finally, we want our velocity to emulate the overall flock velocity. However, we want
it to represent only a portion of our calculated velocity, so we apply it as a ratio with
one part average velocity and 10 parts currently calculated velocity (the repulsion and
attraction values we put into nextVel, respectively):
134 | Chapter 4: 2D Game Engine
//attract to neighbors' velocity
if(vel_count > 0) {
avg_vel = scale(avg_vel, 1.0f/vel_count); //average velocity.
//take weighted average between avg_vel and nextVel.
CGPoint sum = add(scale(avg_vel, 1.0f), scale(nextVel, 10.0f));
nextVel = scale( sum, 1.0f/11.0f );
}
}
Note that this is all stored in nextVel—we don’t actually apply it to our real velocity
yet because this function is about to be called on the rest of the emus in the level and
we want them to perform their calculations based on our current velocity, not the new
one we just calculated for ourselves.
Next, we look at the logic used to run away from the main character. After the previous
function, this should seem familiar:
- (void) avoidPlayer:(Entity*) mainChar {
CGPoint away = toward(mainChar->worldPos, worldPos);
float dist = sqrt(distsquared(mainChar->worldPos, worldPos));
if(dist < 64){ //vision radius?
CGPoint accel = scale(away, 300.0f/dist);
nextVel = add(nextVel, accel);
}
}
The function to attract the emu toward the emu mother should also be easy to understand now. There is, however, a slight twist: if we are within 30 units of the goal, we
also add a repulsive velocity. This makes the emus stand near the emu mother, but not
directly on top of her:
- (void) runToGoal:(Entity*) emuMother {
CGPoint away = toward(emuMother->worldPos, worldPos);
float dist = sqrt(distsquared(emuMother->worldPos, worldPos));
if(dist < 30){ //vision radius
CGPoint accel = scale(away, 300.0f/dist);
nextVel = add(nextVel, accel);
}
if(dist > 34 && dist < 128){
CGPoint accel = scale(away, −0.5f*(dist-32));
nextVel = add(nextVel, accel);
}
}
Finally, we get to the update: function. This generally looks a lot like Tom’s update:
function, except that when the emu encounters an UNWALKABLE tile, it chooses a random
direction in which to wander off. We also speed up or slow down the walk animation
based on the magnitude of the velocity:
- (void) update:(CGFloat) time{
CGPoint revertPos = worldPos;
velocity = nextVel;
worldPos = add(worldPos, scale(velocity, time));
worldPos = add(worldPos, collision_tweak);
float dx = -velocity.x, dy = -velocity.y;
Level 1 Implementation | 135
Tile* overtile = [world tileAt:worldPos];
if(overtile == nil || (overtile->flags & UNWALKABLE) != 0){
//can't move here.
worldPos = revertPos;
float dir = (random() % 360) / 180.0f * PI;
float mag = TILE_SIZE*2;
velocity = PointFromPolarCoord(PolarCoordMake(dir, mag));
}
}
if(dx != 0 || dy != 0){
NSString* facing = nil;
if(fabs(dx) > fabs(dy)){
if(dx < 0) {
facing = @"walkright";
} else {
facing = @"walkleft";
}
} else {
if(dy < 0){
facing = @"walkup";
} else {
facing = @"walkdown";
}
}
if(![sprite.sequence isEqualToString:facing])
{
//NSLog(@"facing %@", facing);
sprite.sequence = facing;
}
}
float pixelsmoved = sqrt(dx*dx+dy*dy);
//using distance-based animation for emus instead of time-based
[sprite update:pixelsmoved/1000.0f];
gsEmuLevel
We already defined a list of Emu entities named flock. We can now insert the emus into
the level. We begin implementing the flock by initializing this array in setupWorld::
//gsEmuLevel.m
flock_len = 10;
Emu** emus;
flock = malloc(flock_len *sizeof(Emu*));
for(int i=0;i< flock_len;i++) {
emus[i] = [[Emu alloc]
initWithPos:CGPointMake(200, 15*TILE_SIZE)
sprite:[Sprite spriteWithAnimation:emuanim]];
[tileWorld addEntity: emus[i]];
}
In the preceding code, we decided to use 10 emus to represent the flock, so we allocate
10 Emu pointers—but notice that we used malloc(). That is a C function, not an
Objective-C function. What gives?
136 | Chapter 4: 2D Game Engine
As we mentioned before, you can mix C, C++, and Objective-C if you know what
you’re doing. In this case, we will need to remember to use free() to release this array
of pointers when gsEmuLevel is deallocated. However, we used alloc for the Emu objects,
so first we will iterate through that list and call release on each one.
Next, we iterate through the list and initialize 10 new Emu objects, remembering to add
them to TileWorld to be rendered. In Update:, we first call flockAgainst: on each flock
member. Once we complete that, we can call avoid:, goal:, and update: to finalize their
AI calculations and update their position and sprites:
for(int i=0;i<flock_len;i++){
[flock[i] flockAgainst:flock count:flock_len];
}
bool winning = true;
for(int i=0;i<flock_len;i++){
[flock[i] avoid:m_tom];
[flock[i] goal:mama];
[flock[i] update:time];
}
Again, we do not need to add anything to Render: because TileWorld will already render
all of the emus for us.
Emu Mother
The goal of the level is to lead the emu chicks to the nest where their mother is waiting
for them. We will represent the mother as an entity and limit her movements to the
area of the nest; therefore, we will not need an additional entity to represent the nest.
Simply colliding with the mother will mean the emu chick is over the nest.
All we need spritewise is for the emu mother to walk to the left and right and occasionally perform an idle animation such as looking about (see Figure 4-5).
Figure 4-5. Emu mother sprite
The entity AI will be just as simple as that:
typedef enum EmuMotherState {
EM_WALKING = 0,
EM_IDLING,
} EmuMotherState;
//EmuMother is a subclass of Emu, because we want
// to reuse Emu's update method.
@interface EmuMother : Emu{
EmuMotherState state;
Level 1 Implementation | 137
}
float state_timeout;
CGRect bounds; //where we will wander around.
@end
We define an enumeration to represent the two possible states the emu mother can be
in: walking and idling. We also inherit from Emu rather than Entity because we want
to reuse the Emu’s update function.
We will use the state_timeout variable to determine when to switch between walking
and idling.
The bounds CGRect will represent an area the emu mother can walk in (notice that this
is being used for AI and not for physics detection).
We initialize the emu mother with a hardcoded bounds area:
- (id) initWithPos:(CGPoint) pos sprite:(Sprite*)spr {
[super initWithPos:pos sprite:spr];
bounds = CGRectMake(144,687, 192, 64);
return self;
}
Next, we need an update: function that can move the emu mother between idle and
walking states, and keep her within the bounds rectangle if she is walking.
Because we inherit from Emu we can use all of the same variables for AI, including
velocity and nextVel. We begin by setting nextVel to our current velocity and calling
the Emu class update: function. This will move our entity forward, stopping if it hits any
UNWALKABLE tiles (such as the fences on the left and right sides of the level), and set our
walking animation sequence with the appropriate facing. Then we make sure we didn’t
walk out of bounds, and snap our position back if we did.
Next, we check to see whether time has expired on our current AI state; if so, we toggle
to the next one. If we were previously idling, we choose a random direction and start
walking. If we were walking, we start idling:
- (void) update:(CGFloat) time {
nextVel = velocity;
CGPoint revertPos = worldPos;
[super update:time];
state_timeout -= time;
if(worldPos.x < bounds.origin.x ||
worldPos.x > bounds.origin.x+bounds.size.width ||
worldPos.y < bounds.origin.y ||
worldPos.y > bounds.origin.y + bounds.size.height
){
//wandered too far.
worldPos = revertPos;
state_timeout = 0.0f;
}
if(state_timeout <= 0.0f){
switch (state) {
138 | Chapter 4: 2D Game Engine
}
}
}
case EM_IDLING:
{
//pick a random direction for wandering.
float dir = (random() % 360) / 180.0f * PI;
float mag = TILE_SIZE*4;
velocity = PointFromPolarCoord(PolarCoordMake(dir,
if(fabs(velocity.x) < fabs(velocity.y)){
//make primary movement horizontal, because we
//have up/down walk cycles for the emu mother.
float tmp = velocity.x;
velocity.x = velocity.y;
velocity.y = tmp;
}
state = EM_WALKING;
state_timeout = (random() % 1000) / 1000.0f * 1.5f
}
break;
case EM_WALKING:
//idle a while.
velocity = CGPointMake(0,0);
state = EM_IDLING;
state_timeout = (random() % 1000) / 1000.0f * 1.5f
break;
mag));
don't
+ 0.5f;
+ 0.5f;
This behavior looks pretty convincing when we run it.
Game Logic
Now that we have all of the elements necessary, we can write game logic to figure out
when the player reaches the win state. In the case of gsEmuLevel, the win state is achieved
when all of the Emu entities are near the EmuMother.
We can implement this check in the Update: function of gsEmuLevel by hijacking the
Emu update loop and checking the distance from mama for each emu:
bool winning = true;
for(int i=0;i<flock_len;i++){
[flock[i] update: timeElapsed];
if( distsquared(mama.position, flock[i].position) >
EMU_WIN_DISTANCE*EMU_WIN_DISTANCE)
{
winning = false;
}
}
We begin by assuming the win state is true and proceed by determining whether any
of the 10 Emu entities are not close enough to the EmuMother. We do this by checking to
see whether the distance between the mama and the current emu is larger than some
number EMU_WIN_DISTANCE.
Level 1 Implementation | 139
Notice we are doing something strange, though; we’re actually checking whether the
distance squared is greater than EMU_WIN_DISTANCE squared. This is a common speed
optimization that becomes apparent when you look at the math involved in calculating
distance.
The formula for the distance C between points A and B is:
(A.x − B.x)^2 + (A.y − B.y)^2 = C^2
Because we are trying to get C, the code would look like this:
int resultC = sqrt( (A.x - B.x)* (A.x - B.x) + (A.y - B.y)* (A.y - B.y) );
That formula requires four subtractions, two multiplications, one addition, and a call
to the sqrt() function. Without getting into CPU architecture, addition and subtraction
operations are very fast and a multiplication operation takes only slightly longer, but
sqrt() is very slow in comparison.
Fortunately, with a little math magic, we can get rid of the call to sqrt(). The trick is
that we don’t care about the actual value of the distance; we care only about
whether it is greater than some comparison value. If we simply remove the call to
sqrt(), we get C squared, which is fine for our purposes if the value we compare it to
is also squared! Therefore, simply comparing distSquared(...) > EMU_WIN_DISTANCE *
EMU_WIN_DISTANCE will provide the same results in half the time.
If any of the Emu objects are too far away, our checkWinState will get set to false and
when we get out of the loop, we’ll know not to set the win condition to true:
if(winning && ! win) {
win = true;
m_tom.celebrating = true;
}
If we have found a winning state and we haven’t already declared ourselves the winner,
we set win to true and tell Tom to start celebrating.
Sound
The main sound effect we want for this level is to hear the emu chicks peeping as they
search for their mother. Unfortunately, we don’t have an emu farm nearby, so we’re
going to have to use a chicken sound instead.
Fortunately, our players aren’t likely to be able to tell the difference. We don’t need an
accurate sound; we just need one that makes the player feel like she is chasing a flock
of avian babies.
We have added a sound called trimsqueak.mp3 to our project and we will play it looped
in the background music for this level. In gsEmuLevel.m, add the following lines of code
to the bottom of setupWorld:
[g_ResManager stopMusic];
[g_ResManager playMusic:@"trimsqueak.mp3"];
140 | Chapter 4: 2D Game Engine
The first line will stop whatever music may have been playing before (from the Main
menu), and the second plays the sound we want for this level.
Level 2 Implementation
The goal for Level 2 is for the player to navigate to the back of a cave of sleeping lions,
pick up the McGuffin, and return alive.
This will require the following resources:
• A tile level showing the inside of a cave.
• The same main character sprite from before, with added death animations.
• A lion sprite, including sleeping, napping, waking, and attacking animations. We
will include both lion and lioness for visual variety, but they will behave the same.
• A McGuffin object, such as a coin or a star.
The game logic will include determining when the player has reached the McGuffin
(“level complete”) or has been eaten by a hungry lion (“level failed”).
AI logic will consist of a lion entity. The lions will be strewn across the cave floor while
sleeping, forcing the player to weave between them to get to her goal. Occasionally,
they may wake up and look around. If they spot the main character, they will swipe at
him; and if he gets hit, the player loses.
User input will be the same as Level 1, with no changes.
gsLionLevel
If our levels were basically the same as far as game logic and user input, with only the
tile level and entities changing, we would reuse the same GLESGameState class for each
level.
But because each of our levels will exhibit strongly different game logic, and in some
cases user input, the best way to represent them is by separating each into its own class.
Therefore, we will create a new class named gsLionLevel that inherits from
GLESGameState. We can copy and paste the TileWorld and user input code from gsEmu
Level. When initializing the Tom entity, we can use the same code, just modifying the
start position to the bottom of our level:
@interface LionLevel : GLESGameState {
TileWorld* tileWorld;
Tom* m_tom;
Lion** m_lions;
int lions_length;
Entity* m_mcGuffin;
}
Level 2 Implementation | 141
The Tom class here is exactly the same as the last level. Lion is a new entity class we’ll
create to represent the lions in the level. And the rest of this code should be easily
recognizable by now, so we’ll move on.
TileWorld
The level we create for our TileWorld class should represent a cave full of lions with a
space in the back for the McGuffin to lie, something similar to Figure 4-6.
Figure 4-6. Lion level
Again you can see the unique tile strip that will be loaded (see Figure 4-7).
Figure 4-7. Lion level unique tiles
Here are the contents of the lvl2_idx.txt file which includes the tile indexes and physics
flags:
12x20
10,11,9,10,8,9,8,11,10,11,8,10
10,8,9,8,10,11,9,10,8,9,11,8
11,9,11,8,1,1,0,1,10,10,9,8
11,8,8,14,0,0,0,1,15,11,11,10
142 | Chapter 4: 2D Game Engine
10,14,1,1,0,1,0,0,1,1,15,9
8,1,1,0,0,0,1,0,0,1,1,8
9,1,1,2,1,2,2,1,0,1,1,11
11,1,1,2,1,1,2,1,0,1,1,8
11,1,1,1,2,1,1,1,0,1,1,10
8,1,2,1,1,2,1,1,2,1,1,8
11,1,2,1,1,1,2,2,1,1,1,11
10,12,2,2,1,1,1,1,1,1,13,10
10,8,12,2,2,1,1,2,1,13,11,9
11,9,8,12,2,2,2,1,13,10,9,11
9,11,10,10,1,2,2,1,9,11,10,8
11,8,7,6,7,6,7,6,7,6,10,8
8,10,4,3,3,4,3,3,3,3,8,11
10,4,5,3,3,3,3,3,3,3,3,8
5,3,3,3,5,3,3,3,3,3,5,3
3,3,4,3,3,3,3,3,5,3,3,3
1,1,1,1,1,1,1,1,1,1,1,1
1,1,1,1,1,1,1,1,1,1,1,1
1,1,1,1,0,0,0,0,1,1,1,1
1,1,1,1,0,0,0,0,1,1,1,1
1,1,0,0,0,0,0,0,0,0,1,1
1,0,0,0,0,0,0,0,0,0,0,1
1,0,0,0,0,0,0,0,0,0,0,1
1,0,0,0,0,0,0,0,0,0,0,1
1,0,0,0,0,0,0,0,0,0,0,1
1,0,0,0,0,0,0,0,0,0,0,1
1,0,0,0,0,0,0,0,0,0,0,1
1,1,0,0,0,0,0,0,0,0,1,1
1,1,1,0,0,0,0,0,0,1,1,1
1,1,1,1,0,0,0,0,1,1,1,1
1,1,1,1,0,0,0,0,1,1,1,1
1,1,0,0,0,0,0,0,0,0,1,1
1,1,0,0,0,0,0,0,0,0,1,1
1,0,0,0,0,0,0,0,0,0,0,1
0,0,0,0,0,0,0,0,0,0,0,0
0,0,0,0,0,0,0,0,0,0,0,0
McGuffin
As we described earlier, the McGuffin is a very simple object. It merely sits in place
until the player comes along to pick it up. To that end, we can simply use the Entity
class initialized with the McGuffin sprite.
Since there is no AI to deal with, just game logic for detecting player-to-McGuffin
collision, we’ll move on.
Main Character
Tom will move and act the same as in the first level, but he’ll need additional code to
handle being attacked by lions. We add the ability to play back a dying animation
sequence, and some flags to disable moving around while the character is dead.
Level 2 Implementation | 143
The dying flag is simply a Boolean, added to Tom.h:
bool dying; //flag for when death animations are playing.
// set in dieWithAnimation, used in update to modify movement
// and facing code. Does not reset.
We then need a method to start the dying process:
//used on player death.
// Caller can pass in special death animations per situation,
// such as drowning or mauling.
- (void) dieWithAnimation:(NSString*) deathanim {
if(!dying){ //You only die once.
dying = true;
sprite.sequence = deathanim;
}
}
Next, we need to modify Tom’s update method. We need to make sure the character
doesn’t move around while dying, and the easiest way to do that is to just reset speed
to 0 while in the dying state:
- (void) update:(CGFloat) time {
float xspeed = 200*time, yspeed=200*time; //pixels per second.
if(dying){
//you're not a zombie, hold still.
xspeed = yspeed = 0;
}
We also need to make sure the dying animation isn’t clobbered by other character
animations. We do this near the end of the update method:
if(dying){
//let the dying animation proceed as specified in the animation.plist.
} else {
if(![sprite.sequence isEqualToString:facing])
{
sprite.sequence = facing;
}
}
}
[sprite update:time];
Lion Entities
The challenge of sneaking around the sleeping lions is the whole point of this level. To
make this fun, we need to ensure that the player will have to go near the lions, while
also making sure to give the player plenty of visual feedback about the current state of
each lion.
Specifically, we will give the lions the following AI states:
144 | Chapter 4: 2D Game Engine
Sleeping
While sleeping, the lions will not be awakened no matter how close the main character gets to them. After a random period of time, the lions will move to the Napping state.
Napping
If the player gets close to a napping lion, the lion will move to the Alert state. If the
lion is not alerted after a period of time, it will return to the Sleeping state.
Alert
The lion is still lying down, but it has both eyes open and its head up, looking
around for the main character. If he is in the lion’s cone of vision, the lion will move
to the Attacking state.
Attacking
The lion has spotted the character and is swiping at him. If the lion is near the
character, the character will become incapacitated and the player will fail the level.
We will arrange the lions on the level so that there is only a little space between them
for the player to creep through. The player will have to wait and watch for the right
time to move, being careful not to walk onto any of the lions, or get too close to a
napping lion, or be within the field of vision of an alert lion.
The lions do not move, and although they are several tiles wide, they will be facing only
left or right (so we do not need “up” and “down” facing frames, and we can mirror the
frames, so we really need only one set of “left” facing animations). Notice again that
the sprite is wrapped at 1,024 pixels (see Figure 4-8).
Figure 4-8. A ferocious lion
Entity
The Lion class will inherit from Entity. We will define an enumeration that specifies
all of the different AI states the lion can be in. We will also use a float to count the
amount of time the lion has been in a state (so that we can decide when to switch from
sleeping to napping, etc.) and an integer to keep track of how much the player has
disturbed the lion’s sleep by being too close. Finally, the lions can be facing left or right,
which we will keep track of with the flip bool (if flip is true, they are facing to the
right):
typedef enum LionState {
ASLEEP = 0,
WAKING,
ALERT,
ATTACKING
} LionState;
Level 2 Implementation | 145
@interface Lion : Entity {
LionState state;
float state_time;
int m_rage;
bool flip;
}
- (id) initWithPos:(CGPoint) pos sprite:(Sprite*)spr;
- (void) wakeAgainst:(Entity*) other;
- (void) obstruct:(TileWorld*)world;
@end
Notice the wakeAgainst: and obstruct functions. In each frame, we will check the distance between the player and the lion to see whether it should wake up, invoking the
wakeAgainst: function if it should.
In addition, we want to make sure the player does not walk through the lions. If these
were entities that could move about, that would require entity-to-entity collision detection between the player and all of the lions. However, since the lions are stationary,
we can cheat: each time a lion is created, it will access the TileWorld to get the two tiles
it is on top of, and set their physics flags to UNWALKABLE. That is what the obstruct
function will do.
Let’s look at the implementation of this class. First, we have a utility function that gives
us the AnimationSequence names that should be used for each state the lion can be in.
If the lion is flipped we need to call the corresponding -flip sequences:
- (NSString*) animForState:(LionState) s {
NSString* states[] = {
@"asleep",
@"waking",
@"alert",
@"attacking",
};
NSString* states_flip[] = {
@"asleep-flip",
@"waking-flip",
@"alert-flip",
@"attacking-flip",
};
return (flip?states_flip:states)[s];
}
Next, we have a useful function for switching states. Because we want to make sure to
change not only the state variable but also the sprite animation, and additionally reset
the state_time and rage counter whenever we change state, we tuck all of those operations into one tidy function:
- (void) setState:(LionState) s {
state = s;
sprite.sequence = [self animForState:s];
state_time = 0;
146 | Chapter 4: 2D Game Engine
}
m_rage = 0;
The initialization function is short and sweet. We accept a new position, sprite, and
facing, and set our initial AI state to ASLEEP. Remember that the setState: function sets
our sprite sequence, state_time, and rage counters for us so that we don’t need to worry
about initializing them:
- (id) initWithPos:(CGPoint) pos sprite:(Sprite*)spr facingLeft:(bool)faceleft
{
[super initWithPos:pos sprite:spr];
flip = !faceleft;
[self setState:ASLEEP];
return self;
}
The update function is the heart of our lion AI code. It begins by counting up the elapsed
state_time. We then branch through a switch statement based on our current state. If
we are asleep, we will periodically and randomly check to see whether we should wake
up or keep sleeping. If we are waking, we will periodically and randomly decide to
switch to the ALERT state, back to the ASLEEP state, or neither. If we are alert but our
rage counter is empty, we will fall back to the WAKING state after two seconds have
elapsed. And finally, if we are attacking but our rage counter is empty, we will return
to the ALERT state after two seconds:
- (void) update:(CGFloat) time {
state_time += time;
switch (state) {
case ASLEEP:
//5 times a second, take a 2% chance to wake up.
if(state_time > 0.2f){
if(random() % 1000 < 20){
[self setState:WAKING];
} else {
state_time = 0;
}
}
break;
case WAKING:
if(state_time > 0.2f){
if(random() % 1000 < 20){
[self setState:ALERT];
} else if(random() % 1000 < 20){
//narcoleptic lions.
[self setState:ASLEEP];
} else {
state_time = 0;
}
}
break;
case ALERT:
if(state_time > 2.0f && m_rage == 0){
[self setState:WAKING];
Level 2 Implementation | 147
}
break;
case ATTACKING:
if(state_time > 2.0f && m_rage == 0){
[self setState:ALERT];
}
break;
default:
break;
}
}
[sprite update:time];
But none of this code has anything to do with the player’s proximity to the lion yet. To
check the proximity between the lion and the player, we need a pointer to the player.
Therefore, we have another function that will be called on each loop (in addition to the
update function) to perform that duty:
- (bool) wakeAgainst:(Entity*) other {
//each state has a different triggering radius...
// you can get closer to sleeping lions,
// and should stay further from alert lions.
float vision[] = {
TILE_SIZE, TILE_SIZE*2, TILE_SIZE*3, TILE_SIZE*3,
};
float distSQ = distsquared(self.position, other.position);
if(dist < vision[state]*vision[state]){
m_rage++;
} else {
m_rage--;
if(m_rage < 0) m_rage = 0;
}
//how much rage is needed to advance to the next rage state
int ragemax[] = {
1, 20, 20, 20,
};
if(m_rage > ragemax[state]){
if(state == ATTACKING){
m_rage = ragemax[state];
//can't rage more.
} else {
[self setState:state+1];
}
}
//attack hit detection against the player.
if(state == ATTACKING){
CGPoint attackoffset = CGPointMake(-TILE_SIZE, 0);
if(flip){
attackoffset.x = - attackoffset.x;
148 | Chapter 4: 2D Game Engine
}
attackoffset = add(worldPos, attackoffset);
float dist = distsquared(attackoffset, other.position);
if(dist < 64*64){
//kill player.
return true;
}
}
}
return false;
First, we have an array called vision with values that represent the distance at which
the lion can sense the character’s presence, corresponding to which state the lion is in.
When sleeping, he will be disturbed only by the character standing right next to him,
but when he is alert, he will see the character from three squares away.
Next, we calculate the distance (squared) from the character and compare it to the
appropriate vision level (again squared). If the character is in range, the rage counter
increases; otherwise, it decreases. We need to be sure to cap it at 0 on the low end, but
we don’t have to cap the high end here.
When the rage counter increases past a certain point, we will change states. That point
is based on our current state, so just like vision, we will use another array of values to
represent this. When the lion is ASLEEP, the player needs to be within range for only
one update loop before the lion switches to WAKING. If the lion is WAKING, it will wait for
the rage counter to reach 20 before switching to ALERT, and the same from ALERT to
ATTACKING. If the lion is already ATTACKING, it has no greater recourse, so we will cap the
rage counter.
If the lion is attacking, we need to check whether the player is within attack range. We
check the player’s position against the front of the lion. We have to take the flip variable
into account here, and modify the check position if the lion is flipped. When the player
is within attack range, we simply return true from wakeAgainst; it will be up to the caller
to actually kill the player.
The values in vision and ragemax directly affect game play. If we were
to increase the vision range of the lion or decrease the rage limits between states, we would make the game much harder for the player.
Conversely, changing these values in the opposite direction would make
it easier. These are the kinds of values game designers want to be able
to play with to “tweak the game”; tuning them to get the feel just right.
In fact, if we wanted to add a “difficulty level” feature to allow the player
to choose between playing the game in “easy mode” or “hard mode,”
we could tweak these values one way or the other based on the difficulty
the player selected.
Level 2 Implementation | 149
And lastly, the obstruct: function simply grabs the two tiles the lion is hovering over
and sets their flags to UNWALKABLE, like so:
- (void) obstruct:(TileWorld*) world {
Tile* t = [world tileAt:worldPos]; //right square
t->flags |= UNWALKABLE;
//left square, so offset x by -TILE_SIZE
t = [world tileAt:CGPointMake(worldPos.x-TILE_SIZE, worldPos.y)];
t->flags |= UNWALKABLE;
}
gsLionLevel
Integrating the Lion class into our gsLionLevel requires that we modify the setup
World: and update: functions.
In setupWorld:, we begin by hardcoding the position and direction of our lions. If we
were reusing this state for multiple levels, it would be worth it to load these values from
a resource file instead of hardcoding them. But we’re not, so we don’t.
Next, we allocate the Animation and an array of lion pointers. We then iterate that array
and create and initialize each Lion entity similar to the way we did the Emu entities from
the previous level, but with a twist. We are using the hardcoded positions and facings
and are randomly selecting between the male and female lion textures when we initialize
our Sprite for each lion.
Wrapping up, we add each Lion entity to the TileWorld for rendering purposes and
then call the obstruct: function from before to make sure the player can’t walk over
them:
int lion_positions[] = {
2,11,
4,13,
4,14,
5,11,
5,9,
6,12,
8,14,
8,8,
9,13,
9,9,
10,12,
};
bool lion_faceleft[] = {
false,
true,
true,
false,
true,
false,
true,
true,
false,
150 | Chapter 4: 2D Game Engine
true,
true,
};
int lioncount = 11;
Animation* lionanim = [[Animation alloc] initWithAnim:@"lion.png"];
Lion** lions;
lions = malloc(lioncount*sizeof(Lion*));
for(int i=0;i<lioncount;i++) {
Lion* otherlion = [[Lion alloc]
initWithPos:
CGPointMake((left+lion_positions[i*2+0])*TILE_SIZE,
(bottom+lion_positions[i*2+1])*TILE_SIZE)
sprite:[Sprite spriteWithAnimation:random()%100<25?lionanim:lioness]
facingLeft:lion_faceleft[i]];
[tileWorld addEntity:otherlion];
[otherlion obstruct:tileWorld];
lions[i] = otherlion;
}
[lionanim autorelease];
m_lions = lions;
lions_length = lioncount;
The change to the update function is very simple; just call the wakeAgainst: and
update: functions and we’re finished plugging in the lions:
for(int i=0;i<lions_length;i++){
if([m_lions[i] wakeAgainst:m_tom]){
[self onFail];
[m_tom dieWithAnimation:@"dying"];
}
[m_lions[i] update:time];
}
Game Logic
Unlike the previous level, we have two end states in Level 2. If a lion swipes the main
character, we will go to the level failed state. However, if the main character reaches
the McGuffin and returns to the bottom of the level, we will advance to the level completed state.
First, we must determine when the player touches the McGuffin and remove it from
the TileWorld render list to represent that the player has “picked it up.” Next, we determine when the player is back at the cave mouth and start celebrating.
You can find this code in the Update: function of the gsLionLevel class:
if(m_goal && distsquared(m_tom.position, m_goal.position) < 32*32){
//grab the macguffin and rush for the door.
[tileWorld removeEntity:m_goal];
[m_goal release];
m_goal = nil;
}
Level 2 Implementation | 151
if(m_goal == nil && m_tom.position.y < 8*TILE_SIZE){
//clear to the door, so win.
m_tom.celebrating = true;
}
Sound
When the lion takes a swipe at the player, we want to play a sound effect. We will inject
this code directly into the setState: function of the Lion class:
- (void) setState:(LionState) s {
state = s;
sprite.sequence = [self animForState:s];
state_time = 0;
m_rage = 0;
if(state == ATTACKING){
[g_ResManager playSound:@"tap.caf"];
}
}
Level 3 Implementation
The third level is a puzzle. The main character is located in a room at the top of the
level that contains three buttons. He will accomplish his goal or fail while staying in
that room. The rest of the level consists of nine cells connected with gates that are
controlled by the buttons in the upper room. Inside the cells are a mouse, a cat, and
cheese. The cat is located in the upper-left cell, the mouse in the upper right, and the
cheese in the bottom left.
The player must move the main character to press the buttons in a way that will open
gates for the mouse, allowing it to reach the cheese while avoiding the cat. Each time
the player opens a gate next to the cell occupied by the mouse, the mouse will move
into the open cell. Afterward, the cat will move into a random cell as well. If the cat
and mouse end up in the same cell, the cat will eat the mouse and the player will lose.
If the mouse ends up in the cell with the cheese, the player will win.
This will require the following resources:
• A tile level showing the upper room and the nine cells, divided by walls. The walls
between each cell should include an open space because the gates will be entities
that are drawn on top of the walls, not a part of the tile level.
• The Tom sprite we used before.
• The button entities, with unpressed and pressed frames. There will be three buttons, each a different color.
• The gates (one vertically and one horizontally aligned), open and closed, with colored lights to indicate which buttons they will work with.
152 | Chapter 4: 2D Game Engine
• The mouse sprite.
• The cat sprite.
• The cheese sprite.
Since this level is a puzzle, the game logic here will be more complex than previous
levels. There is still only one way to enter the win state (when the mouse reaches the
cheese) and only one way to enter the lose state (when the cat captures the mouse), but
we must also control the buttons and gates from the GameState level.
The AI logic will consist of the cat and the mouse. The mouse is simple: when a door
opens, the mouse will move to the next cell. The cat will decide a random cell to move
to and will open its own gate.
User input will be similar to Level 2, but now we will add a context-sensitive action.
When the user touches the screen above the player’s avatar, we will check to see whether
the touch is near a button; that context determines whether we react. Specifically, if
the avatar is near a button, the resulting game change will be activated.
gsMazeLevel
Again, we will create a new GLESGameState class to represent our level:
#define buttons_length 3
@interface MazeLevel : GLESGameState {
TileWorld* tileWorld;
Tom* m_tom;
Tom *cat, *mouse;
Entity* cheese;
MazeDoor* door[2][2][3];
MazeButton* buttons[buttons_length];
MazeState state;
//todo; mcGuffin* cheese;
}
@end
As you can see, there are many types of entities in this level. As usual, we have Tom acting
as the player’s avatar. We also have our trusty TileWorld behind the scene and the
McGuffin entity (in this case, named cheese). Our new actors will be the CAT and
MOUSE along with the MazeDoor and MazeButton.
There will be one CAT and one MOUSE. They will each start in different corners of the
“maze” portion of the level, and they will be controlled directly by the game logic.
There will be three MazeButtons, all accessible to the player at the top of the level in the
“control room” area. When the player performs a context-sensitive action, it will trigger
game logic that sets off one of the buttons and the corresponding MazeDoor.
There are nine cells, and there is a MazeDoor between each cell.
Level 3 Implementation | 153
TileWorld
Figure 4-9 shows the TileWorld for Level 3.
Figure 4-9. Level 3 mockup
The level map doesn’t have any simple duplicated tiles, so it gets sliced up into the tile
strip in Figure 4-10.
Figure 4-10. Level 3 tiles
Here is the lvl3_idx.txt tile index and physics information (“1” represents impassable
and “0” represents normal tiles):
10x15
0,1,2,3,4,5,6,7,8,9
10,11,12,13,14,15,16,17,18,19
20,21,22,23,24,25,26,27,28,29
30,31,32,33,34,35,36,37,38,39
154 | Chapter 4: 2D Game Engine
40,41,42,43,44,45,46,47,48,49
50,51,52,53,54,55,56,57,58,59
60,61,62,63,64,65,66,67,68,69
70,71,72,73,74,75,76,77,78,79
80,81,82,83,84,85,86,87,88,89
90,91,92,93,94,95,96,97,98,99
100,101,102,103,104,105,106,107,108,109
110,111,112,113,114,115,116,117,118,119
120,121,122,123,124,125,126,127,128,129
130,131,132,133,134,135,136,137,138,139
140,141,142,143,144,145,146,147,148,149
1,0,0,0,0,0,0,0,0,1
1,0,0,0,0,0,0,0,0,1
1,0,0,0,0,0,0,0,0,1
1,0,0,0,0,0,0,0,0,1
1,0,0,0,0,0,0,0,0,1
1,1,1,1,1,1,1,1,1,1
0,0,0,0,0,0,0,0,0,0
0,0,0,0,0,0,0,0,0,0
0,0,0,0,0,0,0,0,0,0
0,0,0,0,0,0,0,0,0,0
0,0,0,0,0,0,0,0,0,0
0,0,0,0,0,0,0,0,0,0
0,0,0,0,0,0,0,0,0,0
0,0,0,0,0,0,0,0,0,0
0,0,0,0,0,0,0,0,0,0
Notice that the physics flags define only the control room area the player will be bounded by. There is nothing to represent the cell walls that the cat and mouse must stay
in. This is because their positions will be entirely defined by game logic; we will not
need entity-to-world collision detection for them.
Buttons
The MazeButton entity itself is very simple. It merely shows an on or off state. It will
render the states using the appropriate color for each button, which are all placed in
one sprite for the usual efficiency in image loading. Because the buttons will be the
target of a context-sensitive action, we will also need a way to determine whether each
button is eligible for an action based on its proximity to the player’s avatar:
//MazeButton.h
@interface MazeButton : Entity {
int color;
}
- (id) initWithPos:(CGPoint) pos sprite:(Sprite*)spr color:(int)col;
//used to trigger the pressed animation.
- (void) press;
//used to determine if this button is under the specified entity
- (bool) under:(Entity*)other;
@end
Level 3 Implementation | 155
The integer will store which color the button represents; this will be useful both for
displaying the appropriate sprite and for letting the game logic know which button was
pressed during a context-sensitive action:
MazeButton.m
@implementation MazeButton
- (id) initWithPos:(CGPoint) pos sprite:(Sprite*)spr color:(int)col {
[super initWithPos:pos sprite:spr];
color = col;
[self press]; //probably should start with up image. using down for now...
return self;
}
static const NSString* down[] = {
@"down",
@"down-green",
@"down-red",
};
- (void) press {
sprite.sequence = down[color];
}
- (bool) under:(Entity*)other {
return distsquared(worldPos, other.position) < TILE_SIZE*TILE_SIZE;
}
@end
Initialization consists of storing the color and calling the press function.
The press function sets the sprite to render the appropriate color animation. Based on
the sprite data in the .plist for buttons.png, the “down” animation will automatically
reset to the “up” animation once it is complete.
Finally, the under: function will return true if the player is within one tile of the button
when the function is called.
Doors
Similar to the MazeButton class, MazeDoors will also be very simple:
@interface MazeDoor : Entity {
}
- (id) initWithPos:(CGPoint) pos sprite:(Sprite*)spr ;
@end
This entity holds the sprite that represents the door at various states of being opened,
closed, opening, closing, and closed with a colored light. However, since the door entity
156 | Chapter 4: 2D Game Engine
itself does not control these states (rather, the game logic will), we do not need special
code in this class beyond initialization:
- (id) initWithPos:(CGPoint) pos sprite:(Sprite*)spr
{
[super initWithPos:pos sprite:spr];
sprite.sequence = @"closed";
return self;
}
The initialization function simply sets the first animation of the door as closed and
leaves the rest to our game logic.
Cat and Mouse
The cat and mouse entities reuse the Tom class because the animation sequences are the
same. Meanwhile, they have no direct AI. The AI is located in the game logic and merely
commands the entities in the same way as user input commands Tom.
We could have named the Tom class the “externally controlled avatar” to make it more
general. But that just sounds silly.
User Input
This level’s context-sensitive action will take place inside the touchesEnded: function.
This time, instead of immediately calling moveToPosition on Tom when we receive a
single tap, we will check the distance between the tap and each button. If it is within a
certain distance, we will interpret the input as a command to activate the action associated with the button. Therefore, we search on the three buttons and perform the
appropriate game logic if we find one near enough to the touch:
- (void) touchesEnded:(NSSet*)touches withEvent:(UIEvent*)event
{
UITouch* touch = [touches anyObject];
CGPoint touchpos = [tileWorld worldPosition:[self touchPosition:touch]];
float dist = distsquared(touchpos, m_tom.position);
if(dist < 30*30){
if(state != WAITING_FOR_PLAYER) return;
//figure out if the player has stomped a button.
int buttonpressed = −1;
for(int i=0;i<buttons_length;i++){
if([buttons[i] under:m_tom]){
[buttons[i] press];
buttonpressed = i;
break;
}
}
if(buttonpressed == −1) return;
/// code snipped - performing game logic
}
Level 3 Implementation | 157
}
} else {
[m_tom moveToPosition:touchpos];
}
Game Logic
Most of the code in this level is going to be about game logic. In fact, apart from the
random relocation of the cat entity, there is no AI. The game proceeds purely on user
input and the rules of the maze game.
To begin, we’ll explicitly list all of the states the maze game can be in:
typedef enum MazeState {
MOVING_MOUSE=0,
MOVING_CAT,
WAITING_FOR_PLAYER,
GOT_CHEESE, //winning state
MOUSE_KILLED, //losing state
} MazeState;
We start in the WAITING_FOR_PLAYER state as we are waiting for the player to walk over
to a button and activate it. Once the player has made her selection, we will enter the
MOVING_MOUSE state as we open the corresponding door and move the mouse into the
next cell.
When that is complete, we must determine whether the mouse has reached the cheese,
in which case, we can move to the GOT_CHEESE state.
Otherwise, the game will automatically advance to the MOVING_CAT state, where we will
randomly open a door and move the cat into a new cell.
Lastly, we determine whether the cat has entered the same cell as the mouse, and if so,
we enter the MOUSE_KILLED state; otherwise, we return to the WAITING_FOR_PLAYER state
and the cycle begins anew.
Initialization
Armed with this simple state machine, we can initialize our game. As usual, we place
our initialization code into the setupWorld: function.
We begin by allocating the TileWorld. Because this level was designed to fit the screen
exactly, without the need to scroll, we can set the camera to (0, 0) and not have to
update it again.
Next, we allocate the main character as usual, placing him in the top control room area:
- (void) setupWorld {
tileWorld = [[TileWorld alloc] initWithFrame:self.frame];
[tileWorld loadLevel:@"lvl3_idx.txt" withTiles:@"lvl3_tiles.png"];
[tileWorld setCamera:CGPointMake(0, 0)];
158 | Chapter 4: 2D Game Engine
Animation* tomanim = [[Animation alloc] initWithAnim:@"tom_walk.png"];
m_tom = [[Tom alloc] initWithPos:CGPointMake(5.0f*TILE_SIZE, 12*TILE_SIZE)
sprite:[Sprite spriteWithAnimation:tomanim]];
[tileWorld addEntity:m_tom];
[tomanim autorelease];
The main character is followed by the cat, mouse, and McGuffin entities:
Animation* catanim = [[Animation alloc] initWithAnim:@"cat.png"];
cat = [[Tom alloc] initWithPos:CGPointMake(2*TILE_SIZE, 8*TILE_SIZE)
sprite:[Sprite spriteWithAnimation:catanim]];
[tileWorld addEntity:cat];
[catanim release];
Animation* mouseanim = [[Animation alloc] initWithAnim:@"mouse.png"];
mouse = [[Tom alloc] initWithPos:CGPointMake(8*TILE_SIZE, 8*TILE_SIZE)
sprite:[Sprite spriteWithAnimation:mouseanim]];
[tileWorld addEntity:mouse];
[mouseanim autorelease];
Animation* goalanim = [[Animation alloc] initWithAnim:@"mcguffin.png"];
cheese = [[Entity alloc]
initWithPos:CGPointMake(2*TILE_SIZE, 2*TILE_SIZE+0.1f)
sprite:[Sprite spriteWithAnimation:goalanim]];
[tileWorld addEntity:cheese];
[goalanim autorelease];
Now we begin adding the cell doors. As you may notice from the level mockup, the
cells are all drawn without doors. This lets us overlay the door sprites onto the scene,
allowing them to show the unobstructed passages underneath when they are opened.
There are nine cells, with a door between every two adjacent cells. That means two
rows of three vertically aligned doors, and two columns of three horizontally aligned
doors.
The central square has one door that doesn’t open. We’ve made this compromise in
the design so that we need only three buttons; it’s not worth adding a fourth button
just so that one cell can have a fourth door:
Animation* vertdoor = [[Animation alloc] initWithAnim:@"mazedoor.png"];
for(int x=0;x<2;x++){
for(int y=0;y<3;y++) {
door[0][x][y] =
[[MazeDoor alloc] initWithPos:
CGPointMake((3*x+3.5f)*TILE_SIZE, (3*y+1.0f)*TILE_SIZE)
sprite:[Sprite spriteWithAnimation:vertdoor]];
[tileWorld addEntity:door[0][x][y]];
}
}
[vertdoor autorelease];
Animation* horizdoor = [[Animation alloc] initWithAnim:
@"mazedoor-horizontal.png"];
Level 3 Implementation | 159
for(int x=0;x<3;x++){
for(int y=0;y<2;y++) {
door[1][y][x] =
[[MazeDoor alloc] initWithPos:
CGPointMake((3*x+2.0f)*TILE_SIZE, (3*y+3.5f)*TILE_SIZE)
sprite:[Sprite spriteWithAnimation:horizdoor]];
[tileWorld addEntity:door[1][y][x]];
}
}
[horizdoor autorelease];
Three buttons are located within the control room area. They need to be spaced out
enough so that only one button is ever eligible for a context-sensitive action at any given
time:
Animation* buttonanim = [[Animation alloc] initWithAnim:@"buttons.png"];
for(int i=0;i<buttons_length;i++){
buttons[i] =
[[MazeButton alloc] initWithPos:
CGPointMake((2.5f+2.5f*i)*TILE_SIZE,12*TILE_SIZE)
sprite:[Sprite spriteWithAnimation:buttonanim] color:i];
[tileWorld addEntity:buttons[i]];
}
[buttonanim release];
Finally, because we are starting in the WAITING_FOR_PLAYER state, we need to show colored lights above the doors leading out of the mouse’s current cell. We are going to
have to perform this action a lot, so let’s create a function named decorateDoors to
handle this feature:
}
state = WAITING_FOR_PLAYER;
[self decorateDoors];
Context action
We already showed the code in touchesEnded that detects when players have performed
a context-sensitive action; now we will examine the game logic that gets triggered when
they do:
if(state != WAITING_FOR_PLAYER) return;
//figure out if the player has stomped a button.
int buttonpressed = −1;
for(int i=0;i<buttons_length;i++){
if([buttons[i] under:m_tom]){
[buttons[i] press];
buttonpressed = i;
break;
}
}
if(buttonpressed == −1) return;
//perform action.
NSArray* moves;
int angle;
160 | Chapter 4: 2D Game Engine
moves = [self possibleMoves:mouse];
if(buttonpressed < [moves count]){
angle = [[moves objectAtIndex:buttonpressed] intValue];
//open the chosen door
[self doorFrom:mouse.position inDirection:angle].sprite.sequence = @"opening";
//un-decorate the other possible doors.
for(NSNumber* n in moves){
int i = [n intValue];
if (i==angle) continue;
[self doorFrom:mouse.position inDirection:i].sprite.sequence = @"closed";
}
}
//move the char through the open door.
CGPoint mousepos = mouse.position;
//int angle = random() % 4;
mousepos.y += TILE_SIZE*3*cheapsin[angle];
mousepos.x += TILE_SIZE*3*cheapcos[angle];
[mouse moveToPosition:mousepos];
//wait for the mouse to stop moving.
state = MOVING_MOUSE;
After determining which button the player pressed, we call the press function on that
button to show graphically that the button has been pressed.
Remember, each cell has either two or three doors. (One wall in the central cell has a
door that doesn’t open, as we explained earlier.) That means corner cells, which have
only two adjacent cells, will have only two possible moves, whereas the side and center
cells will have three.
After retrieving the list of possible moves the player could have made, we check to see
whether the button that was pressed corresponds to one of those moves. If the mouse
is in a corner cell and the third button is pressed, it would fail this test and we would
not open any doors. If you look ahead, you will see that the state is set to
MOVING_MOUSE only if this test passed. That means the player can press the wrong button
and see it depressed, but no door will open and she will still be able to choose a different
button.
Next, we retrieve the direction of the door from the moves array and use it to open the
corresponding door. Retrieving the right door is slightly complicated, so we place it
inside a subfunction that can return a door based on a cell and a direction from that cell:
- (MazeDoor*) doorFrom:(CGPoint) pos inDirection:(int) angle {
int x = gamepos(pos.x);
int y = gamepos(pos.y);
if(angle == 1 || angle == 3){
//moving left/right will find horizontal column doors only
if(angle == 1) x--;
return door[0][x][y]; //3 columns of 2 rows
} else {
//moving up/down will find verticle row doors only
Level 3 Implementation | 161
}
}
if(angle == 2) y--;
return door[1][y][x];
//x and y are reversed for horizontal doors,
//so that we can squeeze 2x3 of them in.
Once we have a door opening, we should remove the colored lights from the other
possible doors by setting their animations to “closed”.
Finally, we determine the new mouse position and send it to the mouse actor, similar
to the way we send the main character to a position when the player taps the screen.
Update
In the Update: function, we use a switch statement based on our current MazeState to
perform the appropriate logic:
//clockwise from straight up, in opengl coords.
int cheapsin[] = { 1, 0, −1, 0 };
int cheapcos[] = { 0, −1, 0, 1 };
- (void) Update {
float time = 0.033f;
//move mouse, wait to stop.
//move cat, wait to stop.
//decorate doors, wait for button push.
switch (state) {
case MOVING_MOUSE:
In the MOVING_MOUSE state, we will be waiting for the mouse to finish moving (it was
already told to begin moving at the start of the state when the player pressed one of the
buttons). Once the mouse has reached its destination cell, we will check to see whether
it found the cheese and move to the GOT_CHEESE state if it has.
Otherwise, we need to start moving the cat. We list the possible directions in which
the cat can move and randomly select one. We then open the corresponding door and
walk through it, just like we told the mouse to do in the touchesEnded: function:
if([mouse doneMoving]){
if (distsquared(mouse.position, cheese.position) < 16) {
//todo: win.
state = GOT_CHEESE;
NSLog(@"win condition triggered.");
} else {
//time to move the cat.
NSArray* moves = [self possibleMoves:cat];
int angle = [[moves
objectAtIndex:random()%[moves count]] intValue];
MazeDoor* door_tmp = [self doorFrom:cat.position
inDirection:angle];
162 | Chapter 4: 2D Game Engine
door_tmp.sprite.sequence = @"opening";
//move the char through the open door.
CGPoint catpos = cat.position;
//int angle = random() % 4;
catpos.y += TILE_SIZE*3*cheapsin[angle];
catpos.x += TILE_SIZE*3*cheapcos[angle];
[cat moveToPosition:catpos];
state = MOVING_CAT;
}
}
break;
case MOVING_CAT:
In the MOVING_CAT state, we are waiting for the cat to finish walking to its new cell. Once
it has, we should determine whether the cat caught the mouse, in which case, we move
to the MOUSE_KILLED state; otherwise, we return to WAITING_FOR_PLAYER:
if([cat doneMoving]){
if(distsquared(mouse.position, cat.position) < 16){
//todo: lose.
state = MOUSE_KILLED;
NSLog(@"lose condition triggered.");
} else {
[self decorateDoors];
state = WAITING_FOR_PLAYER;
}
}
break;
default:
The rest of the states do not require special processing in the update function.
WAITING_FOR_PLAYER is just waiting for the player to activate a button, and the
GOT_CHEESE and MOUSE_KILLED states are our win and lose states:
}
}
//nothing interesting here...
break;
[m_tom update:time];
[cat update:time];
[mouse update:time];
for(int i=0;i<2;i++){
for(int x=0;x<2;x++){
for(int y=0;y<3;y++){
[door[i][x][y] update:time];
}
}
}
for(int i=0;i<buttons_length;i++){
[buttons[i] update:time];
}
//[tileWorld setCamera:[m_tom position]]; //unnecessary for this level
Level 3 Implementation | 163
Finally, we make sure to update all of our entities so that they can animate their sprites.
Sounds
When the player presses a button, we want to play a click sound effect. We will add
the code into the press: function of the MazeButton class:
static const NSString* down[] = {
@"down",
@"down-green",
@"down-red",
};
- (void) press {
}
sprite.sequence = down[color];
[g_ResManager playSound:@"tap.caf"];
Level 4 Implementation
Level 4 features the timing of jumps across log platforms while avoiding crocodile enemies. Like before, we will be focusing on context-sensitive actions (the jump action
will require the same user input as pressing buttons did in the previous level), but this
time we use it to cross special water tiles.
This level will require the following sprites:
•
•
•
•
•
A tile level consisting of a series of solid ground patches separated by water tiles
The same Tom sprite as before, adding the “jump” animation
A log sprite with “floating” and “sinking” animations
A crocodile sprite with “swimming” and “attacking” animations
A plant sprite to make the level look like an overgrown swamp
The game logic will include detecting loss and win states. The two ways to lose in this
level are to fall into water or to get eaten by a crocodile. The way to win is to reach the
end of the level and grab the McGuffin.
The AI will consist of logs that sink when the character lands on them and crocodiles
that jump out of the water and snap at the character if the character jumps over them.
We will need to update the Tom class to support the new jump behavior. He is allowed
to jump upward (in the positive direction on the y-axis) as long as either solid ground
or a log is within three tiles in that direction.
User input will be the same as in the preceding level, except that instead of searching
for buttons, we will search for the edge of a platform or a log to jump to.
164 | Chapter 4: 2D Game Engine
gsRiverLevel
As in the previous levels, we will create a new class that inherits from GLESGameState:
@interface RiverLevel : GLESGameState {
TileWorld* tileWorld;
Tom* m_tom;
Rideable* log[log_length];
Croc *croc[croc_length];
Entity* m_goal;
int state;
}
This level reuses the TileWorld, Tom, and Entity classes from earlier. We also introduce
the Rideable class for floating log platforms and Croc to represent the crocodiles.
TileWorld
The tile world should look like Figure 4-11.
Figure 4-11. Level 4 mockup
Level 4 Implementation | 165
Figure 4-12 shows the unique tiles.
Figure 4-12. Level 4 tiles
And here is the lvl4_idx.txt file:
12x30
11,11,11,11,11,11,11,11,11,11,11,11
16,17,5,6,6,6,6,6,6,7,11,11
11,11,3,3,3,3,3,3,3,3,11,12
11,11,9,9,9,9,9,9,9,9,16,11
11,11,11,11,11,11,11,11,11,11,11,11
6,6,6,6,6,7,11,11,11,11,11,11
3,3,3,3,3,3,11,5,6,6,6,6
9,9,9,9,9,9,11,3,3,3,3,3
11,11,11,11,11,11,11,9,9,9,9,9
11,12,11,11,11,11,11,11,11,11,11,11
11,13,5,6,6,6,6,6,7,15,11,11
11,2,1,1,1,1,1,1,1,4,11,17
11,8,3,3,3,3,3,3,3,10,11,11
11,11,9,9,9,9,9,9,9,11,16,17
11,11,11,11,11,11,11,11,11,11,17,11
16,11,11,11,11,11,11,11,11,11,11,11
11,11,11,11,11,12,11,11,11,11,11,11
11,11,11,12,11,11,11,11,11,12,11,11
11,11,11,11,11,11,11,11,11,12,11,11
6,6,6,6,6,6,6,6,6,6,6,6
1,1,1,1,1,1,1,1,1,1,1,1
3,3,3,3,3,3,3,3,3,3,3,3
9,9,9,9,9,9,9,9,9,9,9,9
11,11,11,11,11,11,11,11,11,11,11,11
17,11,12,11,11,11,11,11,11,11,16,17
11,16,12,11,11,11,11,11,11,12,11,11
6,6,6,6,6,6,6,6,6,6,6,6
1,1,1,1,1,1,1,1,1,1,1,1
1,1,1,1,1,1,1,1,1,1,1,1
1,1,1,1,1,1,1,1,1,1,1,1
3,3,3,3,3,3,3,3,3,3,3,3
3,3,0,0,0,0,0,0,0,0,3,3
3,3,0,0,0,0,0,0,0,0,3,3
3,3,3,3,3,3,3,3,3,3,3,3
3,3,3,3,3,3,3,3,3,3,3,3
0,0,0,0,0,0,3,3,3,3,3,3
3,3,3,3,3,3,3,0,0,0,0,0
3,3,3,3,3,3,3,3,3,3,3,3
3,3,3,3,3,3,3,3,3,3,3,3
3,3,3,3,3,3,3,3,3,3,3,3
3,3,0,0,0,0,0,0,0,3,3,3
3,0,0,0,0,0,0,0,0,0,3,3
3,3,0,0,0,0,0,0,0,3,3,3
166 | Chapter 4: 2D Game Engine
3,3,3,3,3,3,3,3,3,3,3,3
3,3,3,3,3,3,3,3,3,3,3,3
3,3,3,3,3,3,3,3,3,3,3,3
3,3,3,3,3,3,3,3,3,3,3,3
3,3,3,3,3,3,3,3,3,3,3,3
3,3,3,3,3,3,3,3,3,3,3,3
0,0,0,0,0,0,0,0,0,0,0,0
0,0,0,0,0,0,0,0,0,0,0,0
0,0,0,0,0,0,0,0,0,0,0,0
3,3,3,3,3,3,3,3,3,3,3,3
3,3,3,3,3,3,3,3,3,3,3,3
3,3,3,3,3,3,3,3,3,3,3,3
3,3,3,3,3,3,3,3,3,3,3,3
0,0,0,0,0,0,0,0,0,0,0,0
0,0,0,0,0,0,0,0,0,0,0,0
0,0,0,0,0,0,0,0,0,0,0,0
0,0,0,0,0,0,0,0,0,0,0,0
In this level, we use the physics flag 3 to represent water tiles.
Crocodiles
The crocodile includes three frames of swimming, three frames of beginning the attack,
and six frames of jumping out of the water to snap at the player’s character. This is
unrealistic behavior for a crocodile, but at the risk of misrepresenting nature, it gives
the player an exciting explanation for why she just lost.
The definition of the Croc class includes an integer that tracks the direction of the
crocodile (it flips between 1 and –1 as the crocodile turns around at the edge of the
level) and a CGRect representing the bounds of the croc that the player must avoid:
@interface Croc : Entity {
int direction; //-1 or 1, for pacing back and forth across the level.
CGRect bounds; //used for hit detection on jumping player.
}
- (bool) under:(CGPoint)point;
- (void) attack:(Entity*) other;
@end
The interesting functions in the Croc class include under:, attack:, and update:. The
under: function will return true if the given point collides with the crocodile’s bounds
(offset by its current position):
- (bool) under:(CGPoint)point {
if(
point.x > self.position.x
point.x < self.position.x
point.y > self.position.y
point.y < self.position.y
) return true;
return false;
}
+
+
+
+
bounds.origin.x
bounds.origin.x
bounds.origin.y
bounds.origin.y
&&
+ bounds.size.width &&
&&
+ bounds.size.height
Level 4 Implementation | 167
The attack: function is used when the crocodile is found underneath the player’s character. We are using the current sprite to represent the AI state of the Croc. Only if it is
in the “idle” or “idle-flip” animation is the crocodile ready to attack. If it is, we snap
its position to be directly underneath the player’s character and then start the attacking
animation:
- (void) attack:(Entity*) other {
if([sprite.sequence isEqualToString:@"idle"] ||
[sprite.sequence isEqualToString:@"idle-flip"])
{
worldPos.x = other.position.x;
sprite.sequence = direction==1?@"attack-flip":@"attack";
}
}
The update: function simply moves the crocodile to the left or right, depending on its
direction, being sure to flip around if it reaches either side of the world:
- (void) update:(CGFloat) time {
[super update:time];
if([sprite.sequence isEqualToString:@"idle"] ||
[sprite.sequence isEqualToString:@"idle-flip"])
{
//pace back and forth.
float speed = time*200; //in pixels per second.
float nextx = speed*direction + worldPos.x;
if(nextx < 0 || nextx > world.world_width*TILE_SIZE){
direction = -direction;
//-1 is @"idle", 1 is @"idle-flip"
sprite.sequence = direction==1?@"idle-flip":@"idle";
} else {
worldPos.x = nextx;
}
}
}
Logs
The Rideable class is like the Croc class, but it is even simpler as it doesn’t move about:
@interface Rideable : Entity {
CGRect bounds;
}
- (bool) under:(CGPoint) point;
- (void) markRidden:(Entity*) rider;
@end
Just like the Croc class, the Rideable class keeps track of a physics boundary. The
under: function here is the same as Croc’s.
The markRidden: function will cause the log to start sinking if a pointer to an entity is
passed or to begin rising if the entity is null:
168 | Chapter 4: 2D Game Engine
- (void) markRidden:(Entity*) rider {
if(rider){
sprite.sequence = @"sinking";
} else {
sprite.sequence = @"rising";
}
}
Tom
For this level, we will add new functionality to the Tom class—two new member variables
and two functions to the header file:
//Tom.h
@interface Tom : Entity {
CGPoint destPos; //tom-specific
bool dying;
}
bool inJump;
Rideable* riding;
//... code snipped
- (void) jump;
@property (nonatomic, readonly) bool inJump;
The inJump bool will be true when we are currently jumping, false otherwise. The game
logic can use this during the physics simulation to know whether we should check for
collision with water.
The new Rideable pointer will be empty most of the time, but when the player is on a
log, it will point to that entity. This will allow us to walk to the left or right while on a
Rideable platform.
First, we modify the walkable: function to consider whether we are jumping, walking,
or riding:
- (bool) walkable:(CGPoint) point {
if(inJump) return true;
if(riding == nil) return [world walkable:point];
else return [riding under:point];
}
We also modify the moveToPosition: function to prevent new destinations from being
input while in the middle of a jump action:
- (void) moveToPosition:(CGPoint) point {
if(inJump) return; //freeze input while already jumping.
destPos = point;
}
Next, we add a check in our update: function just above NSString* facing = nil; to
handle the transition from jumping to landing on a platform:
Level 4 Implementation | 169
if(inJump){
if([self doneMoving]){
[riding markRidden:self];
inJump = false;
}
}
And finally, we implement the jump function itself:
- (void) jump {
if(inJump) return; //freeze input while already jumping.
if(![world walkable:worldPos]){
//search for a walkable tile in the +y direction to jump to.
//
take the first within 2 tiles.
for(int i=1;i<=2;i++){
if([world walkable:CGPointMake(worldPos.x, worldPos.y+i*TILE_SIZE)])
{
inJump = true;
destPos = CGPointMake(worldPos.x, worldPos.y+i*TILE_SIZE);
if(riding){
[riding markRidden:nil];
riding = nil;
}
return;
}
}
}
NSArray* nearby = [world entitiesNear:worldPos withRadius:4*TILE_SIZE];
for(Rideable* e in nearby){
if(e == riding) continue; //ignore the log we are already on.
//ignore things we can't ride on.
if(![e isKindOfClass:[Rideable class]]) continue;
CGPoint pos = CGPointMake(worldPos.x, e.position.y-1);
if(![e under:pos]) {
//NSLog(@"not lined up to make jump.");
continue;
}
float dy = e.position.y - worldPos.y;
if(
dy > TILE_SIZE*3 //too far to jump
||
dy < 0 //ignore logs behind us, only jump forward.
){
//NSLog(@"too far to jump");
continue;
}
inJump = true;
if(riding){
[riding markRidden:nil];
riding = nil;
}
riding = e;
destPos = pos;
return;
170 | Chapter 4: 2D Game Engine
}
}
NSLog(@"jump failed to initiate");
First, we make sure the jump function reacts only if we are not already jumping. Next,
we search for a jump position. The current implementation of jump allows movement
only in the up direction, so we only need to search upward (otherwise, we would search
based on the direction we are currently facing).
First, we search upward for a passable tile to land on. If we find one, we set it as our
destination position, turn on our inJump flag, and if we are currently attached to a
Rideable platform, we detach it and return from our function.
If we didn’t find solid ground to land on, we begin searching for Rideable entities. From
within the jump function, we don’t have access to RiverLevel’s Log array, but we do
have a pointer to the TileWorld with which we can call entitiesNear: to retrieve a list
of entities within a given radius of the player.
To weed out the entities that are not eligible platforms, we use the isKindOfClass function on each entity to determine whether they are instances of Rideable.
If they are Rideable, we project a vertical line to determine whether jumping straight
up would land on the log. If not, we continue our search. Otherwise, we tune our search
further and determine whether the object is within jumping distance (three tiles).
If the object is too far, we continue our search. If it’s within range, we mark our avatar
as jumping, set our new destination, detach from the previous platform (if any), and
attach to the new platform.
User Input
For this level, we want the context-sensitive action to call the new jump function on
Tom:
-(void)touchesEnded:(NSSet*)touches withEvent:(UIEvent*)event
{
UITouch* touch = [touches anyObject];
CGPoint touchpos = [tileWorld worldPosition:[self touchPosition:touch]];
float dist = distsquared(touchpos, m_tom.position);
if(dist < 30*30){
[m_tom jump];
}
if(![m_tom inJump])
{
[m_tom moveToPosition:[tileWorld worldPosition:
[self touchPosition:touch]]];
}
}
Notice that rather than simply using an if-else pair here, we check to see whether Tom
is inJump after telling him to jump. This is because calling jump does not always result
in a jump. If Tom is not in a place where he can jump, he won’t. In those cases, we still
Level 4 Implementation | 171
want to allow the player to move even small amounts (otherwise, we could wind up in
a situation where Tom is two pixels away from a place he can jump from, but the player
can’t get him to move there because the code is trying to interpret the move request as
a jump action).
Game Logic
This level’s game logic will be heavily focused on physics. If Tom finds himself standing
on a water tile, he will fall and drown; the player loses the level. This can occur only
when standing on a log for too long because our jump function doesn’t allow the player
to jump into the water. Tom faces another hazard while jumping across water, however:
if he jumps over a croc, he will get chomped and lose the level.
Furthermore, while the character is jumping, we should avoid collision tests against
the level for the water flag. Also, if the character has landed, we still need to check
collisions for Rideable platforms before we decide he has collided with water.
Initialization
Our initialization continues as usual with the setup of TileWorld and our various entities
(with hardcoded positions) inside the setupWorld function:
- (void) setupWorld {
tileWorld = [[TileWorld alloc] initWithFrame:self.frame];
[tileWorld loadLevel:@"lvl4_idx.txt" withTiles:@"lvl4_tiles.png"];
Animation* tomanim = [[Animation alloc] initWithAnim:@"tom_walk.png"];
m_tom = [[Tom alloc] initWithPos:CGPointMake(100, 100)
sprite:[Sprite spriteWithAnimation:tomanim]];
[tileWorld addEntity:m_tom];
[tomanim autorelease];
int log_position[log_length*2] = {
4,5,
3,7,
5,13,
2,15,
8,15,
7,16,
4,21,
9,22,
2,23,
7,26,
};
Animation* loganim = [[Animation alloc] initWithAnim:@"log.png"];
for(int i=0;i<log_length;i++){
log[i] = [[Rideable alloc] initWithPos:
CGPointMake(
log_position[i*2+0]*TILE_SIZE,
log_position[i*2+1]*TILE_SIZE )
sprite:[Sprite spriteWithAnimation:loganim]];
172 | Chapter 4: 2D Game Engine
[tileWorld addEntity:log[i]];
log[i].sprite.sequence = @"idle";
}
[loganim autorelease];
int croc_position[croc_length*2] = {
8,5,
5,13,
9,16,
4,21,
10,26,
};
Animation* crocanim = [[Animation alloc] initWithAnim:@"croc.png"];
for(int i=0;i<croc_length;i++){
croc[i] = [[Croc alloc] initWithPos:
CGPointMake(
croc_position[i*2+0]*TILE_SIZE,
croc_position[i*2+1]*TILE_SIZE+11)
sprite:[Sprite spriteWithAnimation:crocanim]];
[tileWorld addEntity:croc[i]];
}
[crocanim autorelease];
int bush_position[] = {
16,16,
16,112,
16,272,
16,304,
16,336,
16,784,
48,592,
304,592,
304,912,
320,752,
368,48,
368,272,
368,304,
368,336,
};
int bush_count=14;
Animation* bushanim = [[Animation alloc] initWithAnim:@"plant.png"];
for(int i=0;i<bush_count;i++){
Entity* bush = [[Entity alloc] initWithPos:
CGPointMake(
bush_position[i*2+0],
bush_position[i*2+1])
sprite:[Sprite spriteWithAnimation:bushanim]];
[tileWorld addEntity:[bush autorelease]];
}
[bushanim release];
Animation* goalanim = [[Animation alloc] initWithAnim:@"mcguffin.png"];
Level 4 Implementation | 173
m_goal = [[Entity alloc] initWithPos:CGPointMake(192,896)
sprite:[Sprite spriteWithAnimation:goalanim]];
[tileWorld addEntity:m_goal];
[goalanim autorelease];
[tileWorld setCamera:m_tom.position];
}
If you’ve studied the previous three levels, this code should be familiar.
Update
Now we need to update the player and the logs to determine whether the player’s
character has fallen in the water. We also need to check the crocodiles to determine
whether the character has been attacked and the McGuffin to determine whether the
player has completed the level successfully:
- (void) Update {
float time = 0.033f;
if(endgame_state != LOSING)
[m_tom update:time];
for(int i=0;i<log_length;i++){
[log[i] update:time];
}
for(int i=0;i<croc_length;i++){
[croc[i] update:time];
if(m_tom.inJump && [croc[i] under:m_tom.position]){
[croc[i] attack:m_tom];
//NSLog(@"lose, crikey!");
[m_tom dieWithAnimation:@"dying"];
[super onFail];
}
}
if(m_tom.riding && [m_tom.riding.sprite.sequence isEqualToString:@"sunk"])
{
[m_tom dieWithAnimation:@"dying"];
[super onFail];
//NSLog(@"lose");
}
if(m_goal && distsquared(m_tom.position, m_goal.position) < 32*32){
[super onWin];
//NSLog(@"win");
}
[m_goal update:time];
}
[tileWorld setCamera:[m_tom position]];
This code ends by updating the camera.
174 | Chapter 4: 2D Game Engine
Sounds
When the player jumps, we want to play a “boing” sound effect. We add the code into
the jump function of the Tom class:
- (void) jump {
if(inJump) return; //freeze input while already jumping.
if(![world walkable:worldPos]){
for(int i=1;i<=2;i++){
if([world walkable:CGPointMake(worldPos.x, worldPos.y+i*TILE_SIZE)])
{
inJump = true;
[g_ResManager playSound:@"tap.caf"];
destPos = CGPointMake(worldPos.x, worldPos.y+i*TILE_SIZE);
//worldPos = desPos;
if(riding){
[riding markRidden:nil];
riding = nil;
}
return;
}
}
}
}
//... code snipped
Game State Serialization
Now that we have implemented our levels, we need a way to show the progression
between them and a way to jump between levels and the menu. This presents us with
three tasks:
• We need to store an integer value that represents how many levels have been
unlocked.
• When the player completes a level for the first time, we need to increment that value.
• From our Main menu, we list all of the playable levels; we want to gray out the
links to levels that are currently locked.
Initialize Storage
We begin by adding the integer to our persistent storage in the Game2DAppDelegate class.
Therefore, we will add the following to our applicationDidFinishLaunching: function:
//Game2DAppDelegate.m
//setup default save data.
if([g_ResManager getUserData:ProgressionSavefile] == nil){
//progression will store the unlocked level count, from 0..3.
[g_ResManager storeUserData:[NSNumber numberWithInt:0]
toFile:ProgressionSaveFile];
}
Game State Serialization | 175
where ProgressionSaveFile is defined as:
#define ProgressionSaveFile @"progression"
End Game
Within our GLESGameStates, we have already written code to determine win and loss
states. Now we will write some functions that all of our levels can use to handle user
input and rendering for the end states (win or lose) and increment the progression
integer.
We modify the GLESGameState class:
@interface GLESGameState : GameState {
int endgame_state;
@private
float endgame_complete_time;
}
//... code snipped
#define
#define
#define
#define
-
(void)
(void)
(void)
(void)
(void)
ENDGAME_GAME_IN_PROGRESS 0
ENDGAME_WINNING 1
ENDGAME_LOSING 2
ENDGAME_HOLD_TIME 2.0f
onWin:(int)level;
onFail;
renderEndgame;
updateEndgame:(float)time;
touchEndgame;
@end
We want to keep track of whether the GameState is still in progress, or has completed
with a win or loss condition. We will also keep a time counter so that we can automatically return to the Main menu after displaying the win or loss result for a number
of seconds as defined by ENDGAME_HOLD_TIME.
First, we must initialize our new variables:
-(id) initWithFrame:(CGRect)frame andManager:(GameStateManager*)pManager;
{
if (self = [super initWithFrame:frame andManager:pManager]) {
// Initialization code
[self bindLayer];
endgame_state = ENDGAME_GAME_IN_PROGRESS;
endgame_complete_time = 0;
}
return self;
}
Next, we implement the onWin function, where we actually try to increment the progression variable (making sure to do so only if the level has not yet been completed):
176 | Chapter 4: 2D Game Engine
- (void) onWin:(int)level{
if(endgame_state == ENDGAME_GAME_IN_PROGRESS){
int unlocked = [[g_ResManager
getUserData:ProgressionSavefile] intValue];
if(level >= unlocked){
//when we beat a level, unlock the next level.
unlocked = level+1;
//note: we could do something special on unlocked==4
[g_ResManager storeUserData:[NSNumber numberWithInt:unlocked]
toFile:ProgressionSavefile];
}
endgame_state = ENDGAME_WINNING;
[g_ResManager stopMusic];
[g_ResManager playMusic:@"march.mp3"];
}
}
We grab the value from our ResourceManager with getUserData: and convert it to an
integer. Then we determine whether the current level has not yet been passed; if so, we
increment the value and save it back into persistent storage. Regardless, we set our
endgame_state to ENDGAME_WINNING and play a triumphant winning march.
If the level completes with a fail, we simply set the endgame_state to ENDGAME_LOSING:
- (void) onFail{
if(endgame_state == ENDGAME_GAME_IN_PROGRESS){
endgame_state = ENDGAME_LOSING;
}
}
In our render function, we perform a spiffy zoom and rotation effect on either the “level
complete” or “level failed” image. Once a time period has passed, we also display a
“tap to continue” message to cue the player that tapping the screen will now return her
to the Main menu. We expect the various GameStates to call this function on their own,
at the end of their own render functions, for this to be overlaid in front of their contents:
- (void) renderEndgame{
if(endgame_state == WINNING) {
[[g_ResManager getTexture:@"levelcomplete.png"]
drawAtPoint:
CGPointMake(self.frame.size.width/2, self.frame.size.height/2 - 64)
withRotation:min(endgame_complete_time, 0.25f)*4*2*180
withScale:min(endgame_complete_time, 0.25f)*4];
} else if (endgame_state == LOSING) {
[[g_ResManager getTexture:@"levelfailed.png"]
drawAtPoint:
CGPointMake(self.frame.size.width/2, self.frame.size.height/2 - 64)
withRotation:min(endgame_complete_time, 0.25f)*4*2*180
withScale:min(endgame_complete_time, 0.25f)*4];
}
if(endgame_complete_time > 2.0f){
[[g_ResManager getTexture:@"taptocontinue.png"]
drawAtPoint:
CGPointMake(self.frame.size.width/2, self.frame.size.height/2 - 128)
];
Game State Serialization | 177
}
}
The update and touch functions will count the amount of time that has passed since
we entered an end condition and allow the player to change state only if that time has
passed:
- (void) updateEndgame:(float) time{
if(endgame_state != ENDGAME_GAME_IN_PROGRESS){
endgame_complete_time += time;
}
}
- (void) touchEndgame{
if(endgame_complete_time > ENDGAME_HOLD_TIME){
[m_pManager doStateChange:[gsMainMenu class]];
}
}
This assumes that all GameState levels want to return to gsMainMenu when they are done.
Now we modify our levels to use these new functions. It will be the same process for
each level, so we will review only one level.
In LionLevel.m, we change the Update: function to call onFail if we lost or onWin: if we
have won the level:
- (void) Update {
//... code snipped
for(int i=0;i<lions_length;i++){
if([m_lions[i] wakeAgainst:m_tom]){
[self onFail]; //NEW PROGRESSION CODE
}
[m_lions[i] update:time];
}
//... code snipped
if(m_goal == nil && m_tom.position.y < 8*TILE_SIZE){
//clear to the door, so win.
[self onWin:1]; //NEW PROGRESSION CODE
}
//... code snipped
}
[super updateEndgame:time]; //NEW PROGRESSION CODE
In the Render function, we simply add a call to renderEndgame just above swapBuffers:
- (void) Render {
//clear anything left over from the last frame, and set background color.
glClearColor(0xff/256.0f, 0x66/256.0f, 0x00/256.0f, 1.0f);
glClear(GL_COLOR_BUFFER_BIT);
178 | Chapter 4: 2D Game Engine
[tileWorld draw];
[super renderEndgame]; //NEW PROGRESSION CODE
}
//you get a nice boring white screen if you forget to swap buffers.
self swapBuffers];
And finally, in touchesEnded:, we call touchEndgame at the bottom of the function:
-(void)touchesEnded:(NSSet*)touches withEvent:(UIEvent*)event
{
UITouch* touch = [touches anyObject];
[m_tom moveToPosition:
[tileWorld worldPosition:[self touchPosition:touch]]];
[super touchEndgame];
}
Modify UI
Now that we have a variable to represent progression, we need to enforce it. We already
have an Interface Builder-based GameState with buttons that link to each level. All we
need to do is check which ones should be locked and disable them in the initialization
of that state.
Inside gsMainMenu.m initWithFrame:, we add the following:
-(gsMainMenu*) initWithFrame:(CGRect)frame
andManager:(GameStateManager*)pManager
{
if (self = [super initWithFrame:frame andManager:pManager]) {
[[NSBundle mainBundle] loadNibNamed:@"MainMenu"
owner:self
options:nil];
[self addSubview:subview];
}
//NEW PROGRESSION CODE
UIButton* lvls[] = {
lvl1, lvl2, lvl3, lvl4
};
}
}
int unlocked = [[g_ResManager getUserData:ProgressionSavefile] intValue];
for(int i=0;i<4;i++){
lvls[i].enabled = i <= unlocked;
return self;
It’s as simple as that!
Game State Serialization | 179
Conclusion
Congratulations, you have created your first iPhone game! You could make many improvements to this game, including adding new levels and modifying the game play of
the current levels. But don’t get too distracted because next up is a 3D game!
180 | Chapter 4: 2D Game Engine
CHAPTER 5
3D Games
The topic of 3D game programming, including graphics, animation, and physics, is
worth years of college courses. A single chapter cannot hope to span the breadth of it.
What we can achieve, however, is a simple game that covers the basics of dealing with
3D on the iPhone, and we’ll build the steppingstones of more complex work.
We won’t offer advice on general 3D programming that you’ll probably use in your
game, specifically, lighting, triangle-mesh collision detection, skeletal animation, and
shaders. Instead, we will focus on topics with special significance for game developers:
•
•
•
•
•
Loading multiple 3D meshes for rendering
Creating a particle system for special effects
Using basic 3D math for physics detection
Using the iPhone’s accelerometer as input
Keeping track of player times
Again, we have provided example source code for the chapter that you should download at https://sourceforge.net/projects/iphonegamebook/files/.
Naturally, in this chapter, we will be writing a lot of 3D code. Unfortunately, a primer
on 3D graphics is beyond the scope of this book. If you are familiar with OpenGL or
Direct3D, you will already have a handle on much of it; if you are not, you may want
to look up a primer or continue to read here while paying attention to the more general
game-specific issues—particularly, how to use the code we have provided.
To get the most from this chapter, you should have an understanding of the following:
The difference between the Projection matrix and the Model View matrix
The Projection matrix is used to specify how the 3D scene is rendered to the screen,
and the Model View matrix is used to position objects within the scene.
Switching the Projection matrix between orthogonal and perspective projection
We used orthogonal projection for our 2D game because it renders everything in
parallel to the camera; but we will be using perspective projection for our 3D scene
181
because it will give us a sense of depth by rendering close objects larger than objects
that are farther away.
Using glPushMatrix, glPopMatrix, glTranslate, glRotate, glScale, and glMultMatrix to
manipulate the Model View matrix
glPushMatrix and glPopMatrix allow us to “save” and later “restore” the state of
the Model View matrix. This lets us use glTranslate, glRotate, and glScale and
set up the Model View matrix to render a specific object the way we want it, then
return to the previous matrix to process other objects. This procedure is conceptually like moving into the local coordinates of the object we want to render, and
then returning to world coordinates. And we’ll use glMultMatrix to perform the
same task as glTranslate, glRotate, and glScale, all in one operation.
Basic 3D vector math, such as vector addition, multiplication, dot product, and cross
product
This is just like 2D vectors, but with the extra z dimension thrown in. Now circles
are spheres, squares are boxes, and lines are planes, but don’t let that intimidate
you; we’re still taking things one challenge at a time.
The use of quaternions for rotation
Quaternions represent rotations and can be transformed into a rotation matrix or
angle-axis rotation pair. You don’t need to know how quaternions work; you just
need to know how to use them.
If you understand these concepts, you will be able to figure out the rest as we go.
GLESGameState3D Class
In the preceding chapter, we used OpenGL ES to draw a 2D game. Specifically, we set
up the Projection matrix in orthogonal projection mode. However, we need to use
perspective projection to draw a realistic 3D environment. There are some other settings we want to change as well; so, rather than reuse the GLESGameState class, we will
create a new GLESGameState3D class to handle our 3D game states:
//GLESGameState3D.h
@interface GLESGameState3D : GameState {
int endgame_state;
float endgame_complete_time;
}
+
(void)
(void)
(BOOL)
(void)
startDraw;
swapBuffers;
bindLayer;
setup;
-(id) initWithFrame:(CGRect)frame andManager:(GameStateManager*)pManager;
- (CGPoint) touchPosition:(UITouch*)touch;
@end
182 | Chapter 5: 3D Games
If you compare this class to GLESGameState, you’ll find them almost identical. That’s
because they provide the same services—what’s changed is how the class provides
them.
Specifically, we will need to modify the setup: function to configure the Projection
matrix to use a perspective projection instead of an orthogonal one. Instead of calling
glOrthof() to set up orthogonal projection, we will call glFrustrumf() to set up perspective projection:
//Set the OpenGL projection matrix
glMatrixMode(GL_PROJECTION);
const GLfloat
zNear = 0.1;
const GLfloat
zFar = 3000.0;
const GLfloat
fieldOfView = 60.0;
GLfloat size = zNear * tanf(DEGREES_TO_RADIANS(fieldOfView) / 2.0);
CGRect rect = CGRectMake(0, 0, 320, 480);
glFrustumf(-size, size, -size / (rect.size.width / rect.size.height),
size / (rect.size.width / rect.size.height),
zNear, zFar);
glViewport(0, 0, rect.size.width, rect.size.height);
Next, we will modify the bindLayer: function to add a depth buffer. A depth buffer is
used to keep track of which triangles being rendered are in front of or behind others.
We didn’t need a depth buffer for our last game because we were rendering everything
flat to the screen and we assumed whatever was rendered last would be drawn on top
of the other images. But unless you want to sort all of the triangles in all of the models
that are being drawn to the screen yourself (which would be unnecessary and slow!),
you need a depth buffer for your 3D scene.
We start by adding a global GLuint to hold the depth buffer ID next to the
global GLuints we are using for the frame and render buffers at the top of the file
GLESGameState3D.m, like so:
//primary context for all opengl calls.
EAGLContext* gles_context;
GLuint
GLuint
GLuint
gles_framebuffer;
gles_renderbuffer;
gles_depthRenderbuffer; //new in Chapter 5
Now we can generate a depth buffer in our bindLayer: function, just after we create
our render buffer:
// first, figure out the height and width of the render buffer
GLint backingWidth, backingHeight;
glGetRenderbufferParameterivOES(GL_RENDERBUFFER_OES,
GL_RENDERBUFFER_WIDTH_OES, &backingWidth);
glGetRenderbufferParameterivOES(GL_RENDERBUFFER_OES,
GL_RENDERBUFFER_HEIGHT_OES, &backingHeight);
// now generate a depth buffer
glGenRenderbuffersOES(1, &gles_depthRenderbuffer);
glBindRenderbufferOES(GL_RENDERBUFFER_OES, gles_depthRenderbuffer);
// and set up some configuration using the width and height values
GLESGameState3D Class | 183
glRenderbufferStorageOES(GL_RENDERBUFFER_OES, GL_DEPTH_COMPONENT16_OES,
backingWidth, backingHeight);
glFramebufferRenderbufferOES(GL_FRAMEBUFFER_OES, GL_DEPTH_ATTACHMENT_OES,
GL_RENDERBUFFER_OES, gles_depthRenderbuffer);
if(glCheckFramebufferStatusOES(GL_FRAMEBUFFER_OES) !=
GL_FRAMEBUFFER_COMPLETE_OES)
{
DebugLog(@"failed to make complete framebuffer object %x",
glCheckFramebufferStatusOES(GL_FRAMEBUFFER_OES));
return NO;
}
You don’t have to understand all of the OpenGL functions being used here; it’s enough
that you know we are adding a depth buffer. If you were to try to render a 3D scene in
a GLESGameState instead of a GLESGameState3D, it would probably look pretty weird (assuming it didn’t crash)!
POWERVR
As you know, we are using OpenGL ES as our 3D graphics library. On the iPhone, the
specific hardware solution that OpenGL ES runs on top of is called POWERVR. The
company that makes this chip (Imagination Technologies, or ImgTec for short) has
released a supplemental API that you can use to get the most out of its hardware. This
API is free to use and available for download from http://www.imgtec.com/powervr/
insider/powervr-sdk.asp. You can find additional utilities for handling POWERVR at
http://www.imgtec.com/powervr/insider/powervr-utilities.asp.
For ease of use, we have included the PVRT SDK with our Chapter5Example.zip file.
We will use PVRT to represent our 3D vectors and matrixes, to load and draw our 3D
models, and to perform quaternion rotations (more on quaternions later).
Vectors and matrixes
Conceptually, there is no real difference between using the PVRTVec3 and PVRTMat4
structures versus the simple float[3] and float[16] arrays OpenGL uses. In fact,
wherever a float[3] is expected, we can use a PVRTVec3, and wherever a float[16] is
expected, a PVRTMat4.
However, the PVRT structs also have overloaded operators, so we can do something
such as this:
PVRTVec3 vecB = vecA * matrixA; //vector-matrix multiplication
//or this
PVRTVec3 vecC = vecA.cross(vecB); //cross-product
We will use the PVRT structs for convenience.
184 | Chapter 5: 3D Games
Model format
To take advantage of the POWERVR hardware, ImgTec has created the POD model
format. It is a lightweight format that simply aligns the vertex, index, and texture data
in the configuration expected by the iPhone’s OpenGL ES API.
Source code to use the format is available as part of the PVRT SDK. The class is named
CPVRTModelPOD and it supports skeletal animation. To make using the class easier, we
have created a Model class to wrap the PowerVR class. You can view the code in
Model.h and Model.mm from the Chapter5Example.zip download.
You may notice that we use .mm files whenever we create classes that use the PVRT
code. The .mm format tells Xcode to compile code with support for C++ syntax, which
is required for PVRT.
3ds Max plug-in
To make the POD format easy to use, ImgTec has provided plug-ins for Maya and 3ds
Max (two of the major modeling programs). Simply load a model in one of the editors
and use the PVRGeoPOD plug-in to export the file as a .pod file.
If the original model was associated with a texture file, the .pod file will retain the same
association.
Texture format
In addition to the POD model format, ImgTec has also created the PVR texture format.
You can use the PVRTexTool utility to save textures as any format the POWERVR
hardware supports.
The POWERVR hardware extends OpenGL to support decompression of the PVR
format on the GPU hardware, making it a very efficient texture solution. For our game,
we are using PVRTC4bb (PVRT compressed 4 bits per pixel).
Of course, if you are saving a model texture as a .pvr file, you will have to modify
the .pod file to point to the new texture. You can use the PVRShaman utility for that.
Sprite3D
In the 2D game, our GLTexture is a resource, and we use a Sprite class to represent a
unique instance of that texture on the screen.
In our 3D game, we have a similar analogy. The Model class is our resource. Therefore,
we will create a Sprite3D class to represent unique instances of the model on the screen.
For example, consider a simple 3D game where the player flies through a series of hoops.
In this case, we have one hoop model that we want to display multiple times. Rather
than loading it into memory multiple times (one instance of Model for each hoop in the
GLESGameState3D Class | 185
level), we will load it only once and have multiple instances of Sprite3D that all share
a pointer to that mesh.
The Sprite3D class will contain a Model pointer, as well as scale, position, and orientation data in the form of a float, a PVRTVec3, and a PVRTQUATERNION, respectively.
As with the Model class, you can view the Sprite3D code in the Sprite3D.h and
Sprite3D.mm files from the Chapter5Example.zip download.
Accelerometer
The iPhone provides us with an accelerometer to sense when the player is tilting the
phone. To gain access to the output of the accelerometer, we need to conform to the
UIAccelerometerDelegate protocol like so:
@interface TestState : GLESGameState3D <UIAccelerometerDelegate> {
}
@end
Declaring that the TestState class conforms to the UIAccelerometerDelegate protocol
means it is expected to handle the - (void)accelerometer:(UIAccelerometer *)accel
erometer didAccelerate:(UIAcceleration *)acceleration function.
However, just because we say our class can receive these messages does not mean the
messages will automatically be directed to it. We must also set the class as the destination for accelerometer input when we create an instance of it.
We do this by grabbing the global pointer to the UIAccelerometer object and calling the
setDelegate: function on it:
-(id) initWithFrame:(CGRect)frame andManager:(GameStateManager*)pManager;
{
[super initWithFrame:frame andManager:pManager];
[[UIAccelerometer sharedAccelerometer] setUpdateInterval:(1.0 / 100.0)];
[[UIAccelerometer sharedAccelerometer] setDelegate:self];
return self;
}
While setting a class as the target delegate for accelerometer events, we also set the
frequency at which we wish to receive those events using the setUpdateInterval:
function.
When we do receive a message in our accelerometer:didAccelerate: function, we will
have access to it in the form of a UIAcceleration pointer, which has x, y, and z parameters representing acceleration in each axis direction.
However, we don’t want to use this data immediately. The values we get from the
accelerometer can be a bit noisy; we need a way to ignore unwanted values.
We will use something called a low-pass filter, the idea being that we allow the normal
“low-frequency” values to pass through the filter, while getting rid of the random
186 | Chapter 5: 3D Games
“high-frequency” values. Note that frequency here refers to wave frequency and doesn’t
really mean how often they show up.
It sounds complicated, but in practice it’s very simple. Instead of accepting the new
acceleration “signal” entirely every frame, we combine a portion of the new signal with
a corresponding portion of the old signal. This means that over time any large spikes
will get weighted out and the signal will remain steady.
To implement the filter, we choose a value k between 0.0 and 1.0 to represent how
much of the new signal we want to keep. We then multiply the new signal by k and
add it to 1 – k times the old value. If we store the x, y, and z accelerometer values in an
array of floats named accel, the code looks like this:
#define kFilteringFactor
0.1
- (void)accelerometer:(UIAccelerometer*)accelerometer
didAccelerate:(UIAcceleration*)acceleration
{
// accel represents the 'old' signal
// and acceleration is the 'new' signal
accel[0] = acceleration.x * kFilteringFactor
+ accel[0] * (1.0 - kFilteringFactor);
accel[1] = acceleration.y * kFilteringFactor
+ accel[1] * (1.0 - kFilteringFactor);
accel[2] = acceleration.z * kFilteringFactor
+ accel[2] * (1.0 - kFilteringFactor);
}
Now we can use the accel array in our game logic and we won’t have to worry about
strange spikes in our input values.
3D Game Design
As we did in the preceding chapter, we will want to specify a game design before we
implement our game.
Let’s create a flight simulation game where the goal is for the player to race through a
course of hoops as fast as he can. We will use the iPhone’s accelerometer (or “tilt sensor”
if you prefer) to control the flight since that will translate well to the feeling of flying.
We will also provide a slider bar on the touch screen to provide control over the ship’s
thrust velocity. Figure 5-1 shows the game concept.
Graphics
We need a 3D model for our ship, and the rings we’ll fly through. We will need a skybox
to represent the environment we are flying in. And just to enhance visual realism, we
will develop a particle system to show the vapor trail as our ship is flying about.
3D Game Design | 187
Figure 5-1. Game concept
In addition to the 3D scene, we will also want some 2D elements to represent our headsup display (HUD). We want to display a clock showing how much time the player is
taking, and we will need to show the thruster control in 2D as well.
Ship
We need a 3D model for our ship. Fortunately, plenty of places on the Web provide
free models for things such as this. We found a model at http://www.3Dxtras.com.
It’s not the right format, but we can use the PVRT plug-in for 3ds Max to export the
model as a .pod file. In addition to saving the shape of the model, the .pod file will also
store the texture data.
When drawing the ship, we’ll position the camera a short distance behind and above it.
Hoops
Similarly, we will need a model for the 3D hoops, but all we need is a simple torus
(doughnut) shape. We can easily create the shape and store it to POD format using 3ds
Max.
To distinguish which hoops have already been passed through, we will shrink hoops
as the ship collides with their center.
Skybox
To give a sense of motion, we must create the game so that the player notices a difference
in position between two frames of movement. When the ship is facing the rings, their
188 | Chapter 5: 3D Games
changes in size and shape will show the player’s movement through the level, but if the
ship turns away from the rings, the player will be without a point of reference.
Therefore, we need a background with a distinguishable pattern so that even when
there are no other objects to use as a point of reference, the player can detect the ship’s
motion as the background shifts around the camera.
A typical solution is to use a skybox. To understand the concept of a skybox, imagine
you are inside a large cube. Now imagine the interior walls of the cube are painted with
scenery. Looking up you see sky, looking down you see ground, and looking around
you see the horizon.
The skybox is a good solution for most situations where a 3D scene represents “outdoors” and the sky should be seen.
Particle system
Even with hoops and a skybox, the game world we are creating is still sparse. To add
some more visual stimulation, we will show a trail of engine vapors coming from the
ship, as well as a kind of explosion when the ship passes through a hoop.
A particle system is something that keeps track of a large number of simple objects.
When moving together, these simple objects (or “particles”) can represent complex
systems, such as fire or smoke. Particle systems are easy to make and look really cool.
For instance, when we use such a system to project a series of particles from the engine
of the ship, the player will see them as a stream of exhaust from the ship’s engines. By
increasing the number of particles generated in relation to the thrust, we can show the
engines working harder to give a realistic feel to the game. Like real smoke, our particles
will have a beginning and an end; each particle will last a fixed amount of time.
2D elements
Apart from the 3D elements of the game world, we also want to render some 2D HUD
elements on top of the screen: one to display the time taken in the current race and
another to display a sliding bar that represents the ship’s thruster controls.
Input
The controls for our ship are fairly simple. We need to be able to pitch (tilt up and
down) and yaw (turn left and right).
Along these lines, another method of controlling a ship is to roll it (spin it about its
forward axis), but that won’t be necessary for this game.
We will also provide a sliding bar to control the amount of forward velocity.
3D Game Design | 189
Accelerometer
The iPhone accelerometer gives us feedback when the phone is tilted or shifted in any
direction. When the player tilts the phone to the left or right, the ship will yaw. When
the player tilts the phone forward or back, the ship will pitch.
Another motion that elicits accelerometer action is to jerk the iPhone straight up or
down. We could have mapped that to the ship’s thrust control (speed); however, there
are a couple of problems with this.
First, jerking the phone makes it hard to read the screen and is hard to control delicately.
Second, unlike tilting, jerking the phone around doesn’t give a point of reference to the
current state of the control. So instead, we’ll provide a separate control.
Thruster
The player can control the ship’s speed through a slider bar that we’ll draw to the screen.
Whenever the player touches the bar, we will adjust the control to that position and
adjust the ship’s velocity as well.
The thruster will be placed to the side so that it can be controlled by the player’s thumb.
Camera
To give the player the best view of the game world, we will render the scene in landscape
orientation. As we described earlier, we will put the camera in third-person position,
slightly behind and above the ship, to give a clear view of it as it navigates through the
level.
By increasing or decreasing the distance of the camera from the ship in relation to the
change in the thrust control, we can give another feeling of acceleration in the ship.
Coupled with the particle system and the feel of titling and rotating the phone, these
subtle designs add up to a convincing game play feel.
Logic
For this game, we need to keep track of the time the course started as well as the list of
rings and how many of them have been passed through.
We can also save the player’s time to a list of high scores that can be accessed from the
Main menu, increasing the replay value of the game by giving the user a goal to achieve
the best score possible.
Implementation
We’ll begin by creating a class named RingsState that inherits from GLESGameState3D.
Since we plan to receive accelerometer input, we will also conform to the
190 | Chapter 5: 3D Games
UIAccelerometerDelegate protocol and add an array to store the input. We can start
rendering by using a Sprite3D to represent our space ship:
//RingsState.h
@interface RingsState : GLESGameState3D <UIAccelerometerDelegate> {
UIAccelerationValue
accel[3];
Sprite3D *ship;
}
Remember that we’ll be using PVRT code, which requires C++ compatibility, so our
implementation file will have to be in .mm format.
First, we need to hook into the UIAccelerometer in our initWithFrame: function:
//RingsState.mm
-(id) initWithFrame:(CGRect)frame andManager:(GameStateManager*)pManager;
{
[super initWithFrame:frame andManager:pManager];
[self setupWorld];
[[UIAccelerometer sharedAccelerometer] setUpdateInterval:(1.0 / 100.0)];
[[UIAccelerometer sharedAccelerometer] setDelegate:self];
return self;
}
Next, we initialize the ship in the setupWorld: function. If you are using the example
code, the ship.pod and littlespaceship02DiffuseMap.pvr files should already have been
added to the project in the same manner we added textures in the preceding chapter:
- (void) setupWorld {
ship = [[Sprite3D spriteWithModel:
[Model modelFromFile:@"ship.pod"]] retain];
[ship setScale:4.0f];
}
Because we called retain on the ship, we will need to let go of it in our dealloc function:
-(void) dealloc {
[ship release];
[super dealloc];
}
Now we can modify our render function to draw the ship:
- (void) Render {
//clear anything left over from the last frame, and set background color.
glClearColor(0xff/256.0f, 0xcc/256.0f, 0x99/256.0f, 1.0f);
//important to clear the depth buffer as well as color buffer.
glClear(GL_COLOR_BUFFER_BIT | GL_DEPTH_BUFFER_BIT);
glLoadIdentity();
[ship draw];
}
//you get a nice boring white screen if you forget to swap buffers.
[self swapBuffers];
Implementation | 191
So far so good, except…if we ran this code now, we might not see the ship at all. That’s
because we haven’t set up the camera yet. By default, the camera is sitting at the origin
(0,0,0) and so is the ship, so technically the ship is inside the camera. And because
back-face culling is on by default, it won’t render the inside of the ship.
We need to set up a camera!
Camera
Because we want to have a third-person camera, we will create a class specifically for
keeping track of where the camera should be in relation to the player’s ship.
Like the Sprite3D class we already have, the Camera class will need to keep track of
position and rotation. Rather than duplicating that code, we will make Camera inherit
from Sprite3D and simply leave it invisible instead of attaching a Model to it.
The Camera class will keep track of its offset away from its target (the ship) and provide
functionality to apply the camera to the scene:
//Camera.h
@interface Camera : Sprite3D {
PVRTVec3 boom;
//the follow distance from our view target. used for
// rotating about the target while keeping it in view
}
//function to create a camera and set it to autorelease
+ (Camera*) camera;
//applies the camera's position and rotation to the modelview matrix
- (void) apply;
//set the boom vector
- (void) offsetLook:(float)look up:(float)up right:(float)right;
@end
The implementation of the class is simple, but it is best understood when seen in
practice:
//Camera.mm
@implementation Camera
-(void) dealloc {
[super dealloc];
}
+ (Camera*) camera {
Camera* retval = [[Camera alloc] init];
retval->rotate.w = 1;
return [retval autorelease];
}
192 | Chapter 5: 3D Games
- (void) apply {
PVRTMat4 view;
PVRTMatrixRotationQuaternion(view, rotate);
PVRTMatrixInverse(view, view);
}
glTranslatef(-boom.x, -boom.y, -boom.z);
glMultMatrixf((float*)&view);
glTranslatef(-translate.x, -translate.y, -translate.z);
- (void) offsetLook:(float)look up:(float)up right:(float)right {
boom.z = look;
boom.y = up;
boom.x = right;
}
@end
We can now add a Camera pointer to our RingsState class:
//RingsState.h
@interface RingsState : GLESGameState3D <UIAccelerometerDelegate> {
UIAccelerationValue
accel[3];
Sprite3D *ship;
Camera *camera;
}
which we will initialize in the setupWorld: function after our ship initialization:
//RingsState.mm
- (void) setupWorld {
ship = [[Sprite3D spriteWithModel:
[Model modelFromFile:@"ship.pod"]] retain];
[ship setScale:4.0f];
}
camera = [[Camera camera] retain];
camera.position = ship.position;
camera.rotation = ship.rotation;
[camera offsetLook:100.0f up:30.0f right:0.0f];
And don’t forget to deallocate it!
-(void) dealloc {
[ship release];
[camera release];
[super dealloc];
}
Notice that we set the camera position and rotation to the same as that of the ship.
Won’t this end up drawing exactly the same as before? Don’t worry, the apply function
will apply the boom vector to the position of the camera when we are setting up the
world rotation and translation, which we will do at the beginning of the Render function:
- (void) Render {
//clear anything left over from the last frame, and set background color.
Implementation | 193
glClearColor(0xff/256.0f, 0xcc/256.0f, 0x99/256.0f, 1.0f);
//important to clear the depth buffer as well as color buffer.
glClear(GL_COLOR_BUFFER_BIT | GL_DEPTH_BUFFER_BIT);
glLoadIdentity();
[camera apply];
[ship draw];
}
//you get a nice boring white screen if you forget to swap buffers.
[self swapBuffers];
Now we can actually see the ship, as shown in Figure 5-2!
Figure 5-2. Ship model
Note what happens if you change the parameters of the offsetLook: function in
setupWorld.
Skybox
Next, we might want to implement the accelerometer input code, but then we wouldn’t
be able to tell whether it was working because there is nothing else in the scene to
compare movement to; so, we will implement the skybox first.
The skybox itself is simply a textured cube model exported to POD format, which we
will load with Sprite3D. However, because it is intended to be viewed from the inside,
we need to turn off face culling or we won’t be able to see the skybox (the same way
we couldn’t see the ship when the camera was inside it).
194 | Chapter 5: 3D Games
Also, unlike other models, we want the skybox to always be behind everything in the
scene. So, when we render it, we will need to turn off depth testing as well. This means
we will have to draw the skybox before anything else in the scene, even before applying
the camera.
With these warnings in mind, we start by adding a Sprite3D to the RingsState class that
will represent our skybox:
//RingsState.h
@interface RingsState : GLESGameState3D <UIAccelerometerDelegate> {
UIAccelerationValue
accel[3];
Sprite3D *ship;
Camera *camera;
Sprite3D *skybox;
}
Next, we initialize it in the setupWorld: function:
//RingsState.mm
- (void) setupWorld {
ship = [[Sprite3D spriteWithModel:
[Model modelFromFile:@"ship.pod"]] retain];
[ship setScale:4.0f];
camera = [[Camera camera] retain];
camera.position = ship.position;
camera.rotation = ship.rotation;
[camera offsetLook:100.0f up:30.0f right:0.0f];
}
skybox = [[Sprite3D spriteWithModel:
[Model modelFromFile:@"skybox.pod"]] retain];
For use with the example code, the files skybox.pod and skybox_texture.pvr have already been added to the project.
Let’s remember to deallocate the skybox:
-(void) dealloc {
[ship release];
[camera release];
[skybox release];
[super dealloc];
}
Finally, we apply the skybox to the world in the Render function immediately after we
reset the Model View matrix:
- (void) Render {
//clear anything left over from the last frame, and set background color.
glClearColor(0xff/256.0f, 0xcc/256.0f, 0x99/256.0f, 1.0f);
//important to clear the depth buffer as well as color buffer.
glClear(GL_COLOR_BUFFER_BIT | GL_DEPTH_BUFFER_BIT);
glLoadIdentity();
Implementation | 195
//grab the camera's matrix for orienting the skybox
PVRTMat4 view;
PVRTMatrixRotationQuaternion(view, camera.rotation);
PVRTMatrixInverse(view, view);
glPushMatrix();
glMultMatrixf((float*)&view);
glDisable(GL_CULL_FACE);
glDepthMask(GL_FALSE);
[skybox draw];
glDepthMask(GL_TRUE);
glEnable(GL_CULL_FACE);
glPopMatrix();
[camera apply];
[ship draw];
}
//you get a nice boring white screen if you forget to swap buffers.
[self swapBuffers];
So, what exactly is going on with this new code? As we mentioned before, we are turning
off culling and depth testing to draw the skybox. Since we are doing this before we
apply the camera to the world, we will need to manually apply the camera rotation to
the skybox or it will seem like the world never rotates (or that it is always the same
rotation as our camera, depending on your perspective).
First, we extract a rotation matrix from the quaternion that represents the camera’s
rotation and invert it. Next, we save the state of the Model View matrix before applying
the rotation matrix to it and disabling culling and depth writing.
Now the scene is ready for our skybox, so we render it and then immediately reenable
depth writing and culling and restore the Model View matrix to its original state.
We should now have a working skybox (see Figure 5-3). Enjoy the view!
Input
Now we may begin using our accelerometer data. This whole time it has been quietly
waiting for us in the accel[3] array we set up inside our RingsState class. To use it, we
will modify our Update function to apply rotation to our ship based on the accel values:
//RingsState.mm
- (void) Update {
PVRTVec3 accel_vec(accel[0], accel[1], accel[2]);
//yaw
float yaw = accel_vec.x;
//pitch
float pitch = accel_vec.y;
196 | Chapter 5: 3D Games
Figure 5-3. Ship with skybox
First, we wrap the accelerometer data inside a 3D vector to conceptualize the values
more easily. As we discussed earlier, when the player tilts the iPhone to the left or right,
it will excite the x-axis of the accelerometer, which we will use to yaw the ship. Similarly,
when the player tilts the iPhone forward or backward, it will excite the y-axis of the
accelerometer, which we will use to pitch the ship.
Next, we will filter the yaw and pitch values and apply them to the ship. It’s the filtering
of these values—just how sensitive the ship is and how tightly it turns—that gives us
the game play feel we’re after.
Also note that when we apply the pitch and yaw values to our ship, we aren’t simply
rotating the ship around the world’s x- and y-axes, rather we are rotating it around its
own local x- and y-axes:
if(fabs(yaw) > 0.15f) //ignore small values
{
//filter the yaw value and apply it
yaw = (yaw-sign(yaw)*0.15f)*0.25f
[ship applyYaw:yaw];
}
if(fabs(pitch) > 0.15f) //ignore small values
{
//filter the pitch value and apply it
pitch = (pitch-sign(pitch)*0.15f)*0.25f
[ship applyPitch:];
}
Now that we have rotated the ship appropriately, we are going to set up some code for
the next part of our input: the thruster control. When implemented, it will give us a
Implementation | 197
speed value that we can apply to the forward direction of our ship. For now, we will
just assume our speed is zero and leave a TODO comment:
//get the forward direction of the ship
PVRTVec3 movement_axis(0, 0, −1);
movement_axis = [ship getAxis:movement_axis];
//apply speed and direction to get velocity
float speed = 0.0f; //TODO: get speed from thruster input
PVRTVec3 velocity = speed*movement_axis;
//apply velocity to ship
PVRTVec3 shipPos = ship.position;
ship.position = shipPos + velocity;
Finally, we update the camera to follow our ship’s position and rotation:
//update the camera position and rotation
camera.position = ship.position;
camera.rotation = ship.rotation;
}
As an exercise for the reader, we leave the question: what happens when you don’t
update the camera’s position and/or rotation here?
Building now should show the ship rotating (pitching and yawing) as the player tilts
the phone.
Calibration
Notice that you may need to keep the phone flat (parallel to the ground) to keep from
rotating; this is because we are fighting with gravity. Holding the phone still but at a
tilt will give us constant accelerometer input as gravity pulls on the lower side of the
phone differently than the upper side.
But holding the phone flat isn’t a comfortable way to play the game. If only we knew
at what angle the player wanted to hold the phone, we could figure out the offset and
subtract it from the accelerometer input.
Fortunately, we can. We will add an Options screen to the Main menu where the
player can calibrate the game. This screen will show a Calibrate button. When the
player is holding the phone at a comfortable position and presses the button, we will
call storeUserData on our ResourceManager to save the state of the accelerometer input
to the device.
We will also add two toggle buttons to allow the user to invert the x- and y-axes; some
people might feel that tilting the phone up should point the ship’s nose upward, while
others may feel that it should rotate the world upward (thereby rotating the ship down).
We will give them the ability to play the game either way.
198 | Chapter 5: 3D Games
When we initialize our game state, we will load the calibration data and use it in our
Update function to normalize the accelerometer input.
You can see the Options screen (see Figure 5-4) in the Options.xib, Options.h, and
Options.m files in the Chapter5Examples.zip. For now, we will focus on how to use the
data in our game.
Figure 5-4. Options screen
First, we will add two PVRTVec3s to our RingsState class to represent the calibrated axis:
one for the “up” vector and one for the “right” vector. You may ask why we need to
worry about the “right” vector since gravity should apply only to the “up” vector of the
phone. This is true, but by also calibrating the “right” vector we allow the player to
prefer to hold the phone at a tilted horizontal angle (e.g., if the player wanted to play
the game while lying down on his side or to avoid the sun’s glare).
We also add two bools to represent the x- and y-axes’ invert preferences:
//RingsState.h
@interface RingsState : GLESGameState3D <UIAccelerometerDelegate> {
UIAccelerationValue
accel[3];
Sprite3D *ship;
Camera *camera;
}
bool invertX, invertY;
PVRTVec3 calibrate_axis_right; //right
PVRTVec3 calibrate_axis_up;
Next, we have to load the calibration data in the setupWorld: function of the
RingsState class:
Implementation | 199
//RingsState.mm
-(void) setupWorld {
//code snipped
invertY = [[g_ResManager getUserData:@"invertY.on"] boolValue];
invertX = [[g_ResManager getUserData:@"invertX.on"] boolValue];
Then, we extract the inverted axis preferences:
//load accelerometer calibration.
NSString *calibratedata = [g_ResManager getUserData:@"calibrate"];
NSArray *tmp = [calibratedata componentsSeparatedByString:@","];
//considered straight forward
PVRTVec3 calibrate_axis([[tmp objectAtIndex:0] floatValue],
[[tmp objectAtIndex:1] floatValue],
[[tmp objectAtIndex:2] floatValue]);
calibrate_axis.normalize();
The axis data is stored in comma-separated format, so after retrieving it using getUser
Data: from our ResourceProvider, we separate the values with the componentsSepara
tedByString: function of NSString. Next, we put the separate components back together inside a PVRTVec3 that represents the “forward” vector of the phone. From this,
we want to extract the “up” and “right” vectors.
Given two vectors, we can use the cross product to find a third vector perpendicular to
the first two. That means we could determine the “right” vector if we had the “forward”
and “up” vectors, or determine the “up” vector if we had the “forward” and “right”
vectors. But we have only the “forward” vector right now, so we need to get creative.
By assuming the “right” vector is parallel to the ground (0,1,0), we can use it to calculate
the “up” vector. And once we have the “forward” and “up” vectors, we can go back
and calculate the correct “right” vector:
calibrate_axis_right = PVRTVec3(0, 1, 0); //right
calibrate_axis_up = calibrate_axis_right.cross(calibrate_axis);
calibrate_axis_right = calibrate_axis.cross(calibrate_axis_up);
}
Finally, we have what we want, and we can use the calibration axes in the Update:
function:
- (void) Update {
PVRTVec3 accel_vec(accel[0], accel[1], accel[2]);
//yaw
float yaw = accel_vec.dot(calibrate_axis_right);
if(invertX) yaw = -yaw;
//pitch
float pitch = accel_vec.dot(calibrate_axis_up);
if(invertY) pitch = -pitch;
200 | Chapter 5: 3D Games
//code snipped
}
By applying the dot product of the calibration axes against the accelerometer vector,
we reduce the velocity applied by gravity to zero when holding the phone at the calibrated angle.
Thrusters
Right now our ship can rotate, but it won’t move anywhere because the speed is stuck
at zero. We need to add a graphical slider bar interface that accepts touch input to
adjust the ship’s speed from 0% to 100%.
First, we will add a float that represents the current value of the slider bar in
RingsState.h:
//RingsState.h
@interface RingsState : GLESGameState3D <UIAccelerometerDelegate> {
UIAccelerationValue
accel[3];
Sprite3D *ship;
Camera *camera;
float speed_knob;
// code snipped
@end
Next, we initialize the value to zero in the setupWorld function:
//RingsState.mm
- (void) setupWorld {
speed_knob = 0.0f;
// code snipped
}
Now we want to draw the slider bar interface. Because this is a 2D interface, we will
need to change our Projection matrix to orthogonal projection mode and turn off depth
testing.
Since we want the slider drawn on top, we should do it after we draw our 3D scene
elements (at the bottom of the Render function). This would also be a good place to
draw any other 2D HUD graphics, so we will come back to this code later when we
want to render the timer:
- (void) Render {
// code snipped
//Set up OpenGL projection matrix for 2d hud rendering.
Implementation | 201
//switch to the projection matrix so we can set up Orthogonal mode
glMatrixMode(GL_PROJECTION);
glPushMatrix(); //save the state of the normal projection matrix
glLoadIdentity(); //clear out the current projection matrix
//set projection mode to Orthogonal
glOrthof(0, self.frame.size.width, 0, self.frame.size.height, −1, 1);
//now switch back to the modelview matrix
glMatrixMode(GL_MODELVIEW);
glLoadIdentity(); //clear the current modelview matrix
glEnableClientState(GL_TEXTURE_COORD_ARRAY); //set up for 2D textures
glEnable(GL_BLEND); //enable transparent blending
glBlendFunc(GL_ONE, GL_ONE_MINUS_SRC_ALPHA);
//disable the depth test so last drawn shows on top
glDisable(GL_DEPTH_TEST);
glcolorf(1.0f,1.0f,1.0f,1.0f); //set default color to opaque white
Now that we have configured OpenGL to draw 2D graphics, we can begin displaying
our slider. Keep in mind that the player will be holding the phone sideways to view the
game in landscape mode, which means our 2D coordinate origin is at the bottom left
instead of the top left of the screen. The x-axis is now “up” and the y-axis is now “right.”
We need to draw the slider background first so that the slider knob will be displayed
on top. Next, we draw the knob, remembering to set the x position based on the value
of the speed_knob variable we defined previously:
//define some hardcoded values for slider bar position
int ycenter = 40;
int xcenter = self.frame.size.width/2;
int slide_groove = 246; //size of the area the slider knob can appear in.
int xmin = xcenter - slide_groove/2;
//draw the slider background image
[[g_ResManager getTexture:@"slider.png"]
drawAtPoint:CGPointMake(xcenter, ycenter) withRotation:-90 withScale:1];
//draw the slider knob at the proper position
[[g_ResManager getTexture:@"knob.png"]
drawAtPoint:CGPointMake(xmin+speed_knob*slide_groove, ycenter)
withRotation:90 withScale:1];
When we are finished rendering our 2D graphics, we must reconfigure OpenGL for 3D
so that the next frame will render properly:
//end drawing 2d stuff
glEnable(GL_DEPTH_TEST);
glDisable(GL_BLEND);
//switch to the projection matrix and
// restore the Perspective projection mode
glMatrixMode(GL_PROJECTION);
glPopMatrix();
//and switch back to the modelview matrix
202 | Chapter 5: 3D Games
glMatrixMode(GL_MODELVIEW);
}
//you get a nice boring white screen if you forget to swap buffers.
[self swapBuffers];
Remember, we always want to be left in Model View matrix mode whenever we are
rendering.
Figure 5-5 shows the result; the thruster bar is drawn on top of the scene in 2D.
Figure 5-5. Thruster bar
Finally, we need to handle touch input by responding to touchesBegan:, touches
Moved:, and touchesEnded:. We really care only about the position of the touch event
on the screen, so we will write one function to handle all three events.
Remember the coordinate origin is in the bottom-left corner with the x-axis:
- (void) touchSpeedKnob:(UITouch*) touch {
CGPoint pos = [self touchPosition:touch];
int xcenter = self.frame.size.width/2;
int slide_groove = 246; //size of the area the slider knob can appear in.
int xmax = xcenter + slide_groove/2;
int xmin = xcenter - slide_groove/2;
if(pos.x > xmax) pos.x = xmax;
if(pos.x < xmin) pos.x = xmin;
speed_knob = (pos.x - xmin) / slide_groove;
}
Implementation | 203
-(void)touchesEnded:(NSSet*)touches withEvent:(UIEvent*)event
{
[self touchSpeedKnob:[touches anyObject]];
}
-(void)touchesBegan:(NSSet*)touches withEvent:(UIEvent*)event
{
[self touchSpeedKnob:[touches anyObject]];
[self touchEndgame];
}
-(void)touchesMoved:(NSSet*)touches withEvent:(UIEvent*)event
{
[self touchSpeedKnob:[touches anyObject]];
}
Now the player can slide the knob by touching the screen and the ship reacts by increasing and decreasing velocity.
It bears consideration that some people are left-handed and would benefit from having
the slider bar on the left side of the screen. It shouldn’t be hard to add another toggle
to the Options screen and rearrange the position of the slider bar if you are so inclined.
Rings
By now, we have a 3D scene containing a skybox and a ship. The ship can yaw and
pitch and move about the scene. All we need now are the rings that the player will fly
through to complete the course.
Each ring will be represented by a Sprite3D. However, in addition to the basic position
and orientation of the ring, we also want to add functionality for detecting when the
ship has passed through a ring and keep track of the state of the ring as the ship passes
through it, making it inactive. Therefore, we create a new Ring class that inherits from
Sprite3D:
//Ring.h
@interface Ring : Sprite3D {
int lastDistance;
PVRTVec3 normal;
bool active;
}
+ (id) ringWithModel:(Model*)model;
− (bool) update:(float)time collideWith:(Sprite3D*) ship;
@property (nonatomic, readonly) PVRTVec3 normal;
@property (nonatomic, readonly) bool active;
@end
204 | Chapter 5: 3D Games
The lastDistance and normal variables are used for collision detection, and active is
true when the player still needs to pass through the ring. We will call the update:
function on all the active rings each frame to see whether the ship has passed through
them:
//Ring.mm
@implementation Ring
@synthesize normal, active;
- (void) forwardX:(float)x Y:(float)y Z:(float)z {
PVRTVec3 forward(x, y, z);
forward.normalize();
normal = forward;
[super forwardX:x Y:y Z:z];
}
First, we override the forwardX:Y:Z: function of Sprite3D because we want to store the
normal. Since the ring model we are using was created in 3ds Max in an orientation
such that its radius is on the x-y plane, its normal will be on the local z-axis or “forward”
vector.
However, we still want to allow the original functionality for this method, so once we
have the normal, we pass a call down to Sprite3D:
+ (id) ringWithModel:(Model*)model {
Ring *retval = [[Ring alloc] init];
retval.model = model;
return [retval autorelease];
}
− (id) init {
[super init];
active = true;
lastDistance = 1;
return self;
}
The update: function will try to detect collision with the Sprite3D we pass into the
function. Consider that a “ring” is a 2D concept created by mapping a sphere to a 2D
plane. Therefore, we will test collision by first checking whether the ship has recently
crossed the plane the ring inhabits, followed by detecting whether the ship is currently
in the sphere with a radius equal to the ring’s and centered at the ring’s position.
The detection takes place in two phases: point-plane detection, followed by
point-sphere. Point-plane detection is performed by applying the dot product of the
normal against the distance vector between the plane and the ship. If the result is positive, we consider the point to be “in front of” the plane, whereas if the distance is
negative, the point is “behind” the plane. The result is checked against a stored result
from the previous frame: if the value suddenly changes from negative to positive or
positive to negative, we know it has passed from one side of the plane to the other.
Implementation | 205
This is similar to back-face culling: for each triangle, the GPU can test
whether the camera is in front of or behind the triangle by taking the
dot product of the camera position against the triangle’s normal vector.
If the camera is behind the triangle, it is discarded from the render
pipeline.
Point-sphere detection is merely the 3D version of point-circle detection: get the distance
of the point from the center of the circle and test that against the circle’s radius. The
only difference is that the distance formula in 3D adds the z-axis: d2 = x2 + y2 + z2.
Again, we make sure to avoid using the slow sqrt() function by testing the distance
squared against the radius squared.
We could have tested either method first, as both require approximately the same
amount of calculation to complete: the dot product used in point-plane is three multiplications and two additions and so is the distance formula in point-sphere. However,
since we need to keep track of which side of the ring’s plane the player is on, we check
the point/plane collision first:
- (bool) update:(float)time collideWith:(Sprite3D*) ship {
bool retval = false;
float dist = (translate-ship.position).dot(normal);
int newdist = dist > 0.0f? 1 : −1;
if(newdist != lastDistance){
//ship crossed our plane; see if it was within the ring when it did so.
lastDistance = newdist;
PVRTVec3 toward = translate-ship.position;
float distsquared = toward.x*toward.x
+toward.y*toward.y
+toward.z*toward.z;
//the torus major radius is 60, minor radius is 10.
if(distsquared < 50*50)
{
//detected a proper fly-through.
active = false;
retval = true;
NSLog(@"detected fly through.");
}
}
Once we know the ship has collided with the ring, we set the ring’s active flag to
false. To distinguish between active and inactive rings, we want the inactive ones to
shrink. The ring.pod file we will be using is actually an animated model that starts with
a large torus and ends with a smaller one, so when the ring becomes inactive, we begin
the animation by incrementing the frame until it reaches the maximum number of
frames we define for rings. The default Sprite3D render function will take care to apply
the frame to the model when drawing, properly animating the ring:
if(!active){
if(frame < model.numFrames-1)
frame += 30*time;
206 | Chapter 5: 3D Games
}
if(frame > model.numFrames-1)
frame = model.numFrames-1;
return retval;
}
@end
Finally, we return true or false depending on whether a collision took place; this lets
the game logic take further action when a ring is passed through.
Layout
Exactly how the rings are placed and oriented will define the course: if they are very
close together with tight turns, it will be a very difficult course. If they are spread out
and arranged in almost a straight line, the course will be very easy.
We have defined a set of positions and orientations by drawing out the course on a
whiteboard, as shown in Figure 5-6 (notice the top and side views are necessary to show
all three dimensions).
Figure 5-6. Plotted ring positions
We then plotted out and hardcoded these values in the setupWorld: function. If we
planned to support multiple levels, we would place the information in a file and load
that file in setupWorld: instead.
Implementation
First, we add an array to the RingsState class to hold our rings. Since we know exactly
how many rings we will be creating, we can use an array of that size, but if we were
loading the data from a file, we would have to allocate a dynamically sized array:
Implementation | 207
//RingsState.h
#define RING_COUNT 11
@interface RingsState : GLESGameState3D <UIAccelerometerDelegate> {
UIAccelerationValue
accel[3];
Sprite3D *ship;
Ring *rings[RING_COUNT];
Camera *camera;
// code snipped
}
Next, we initialize the rings in setupWorld: using the hardcoded data we talked about:
RingsState.mm
- (void) setupWorld {
//these are the hardcoded positions of the rings in the level.
int positions[] = { //x,y,z
0, 0, 0,
154, 100, 132,
366, 174, 340,
370, 166, 552,
152, 114, 674,
196, −46, 922,
430, −120, 1116,
466, 96, 1490,
200, 168, 1702,
152, 90, 2008,
270, −24, 2292,
};
Notice that the increasing z values mean the course moves forward linearly across the zaxis. Since the camera is actually facing the negative z-axis to begin with, we invert the
z values when assigning them:
//these are the orientations of the rings in the level.
int normals[] = { //x,y,z
64, 51, 64,
64, 38, 64,
44, 0, 64,
−64, −25, 46,
−60, −35, 64,
64, −37, 52,
44, 0, 64,
−64, 34, 55,
−49, −19, 64,
31, −27, 64,
22, −26, 64,
};
Model *ringmodel = [Model modelFromFile:@"ring.pod"];
If you are using the example code, the ring.pod and ring.pvr files have already been
added to the project:
208 | Chapter 5: 3D Games
for(int i=0;i<RING_COUNT;i++){
rings[i] = [[Ring ringWithModel:ringmodel] retain];
//flipping z here, because our camera currently faces toward -z.
[rings[i] setTranslateX:positions[i*3+0]
Y:positions[i*3+1]
Z:-positions[i*3+2]];
//apply ring orientations, also with flipped z
[rings[i] forwardX:normals[i*3+0]
Y:normals[i*3+1]
Z:-normals[i*3+2]];
}
Once we have created and initialized all of the rings, we want to position the ship in
front of the first one:
ship = [[Sprite3D spriteWithModel:
[Model modelFromFile:@"ship.pod"]] retain];
[ship setScale:4.0f];
PVRTVec3 tmppos = rings[0].position;
tmppos += −100*rings[0].normal;
ship.position = tmppos;
// code snipped
}
We do not need to retain the model explicitly here because the rings will hold on to it
themselves. However, we will have to release the rings (see Figure 5-7):
-(void) dealloc {
[ship release];
[camera release];
for(int i=0;i<RING_COUNT;i++)
[rings[i] release];
[skybox release];
[super dealloc];
}
Particle System
The last graphical element to put in place is the particle system. At its heart, the particle
system is just a group of Sprite3Ds flying about in the world. However, for each particle,
we need to keep track of not only the model, position, and orientation (all provided by
Sprite3D), but also the velocity, life span, and animation speed. Therefore, we will
create a new Particle class that inherits from Sprite3D:
//Particle.h
@interface Particle : Sprite3D{
PVRTVec3 _vel;
float _life; //time, in seconds, that this particle will be around for.
float _framespeed;
}
Implementation | 209
+ (id) particleWithModel:(Model*)model;
- (void) resetLife:(float)life
velocitiy:(PVRTVec3)vel
framespeed:(float)framespeed;
- (void) update:(float)time;
- (bool) alive;
@end
Figure 5-7. Rings, of course
When a particle is made active, we set its _life variable to a positive number of seconds.
As we call update on the particle, the life gets ticked away until it reaches zero, at which
time, it is considered inactive. The update: function also adds the velocity to the position to move the particle along its path:
//Particle.mm
@implementation Particle
+ (id) particleWithModel:(Model*)model {
Particle *retval = [[Particle alloc] init];
retval.model = model;
return [retval autorelease];
}
- (id) init {
[super init];
[self resetLife:0.0f velocitiy:PVRTVec3(0, 0, 0) framespeed:0];
self.scale = 0.025f;
return self;
}
210 | Chapter 5: 3D Games
- (void) resetLife:(float)life
velocitiy:(PVRTVec3)vel
framespeed:(float)framespeed
{
frame = 0;
_life = life;
_vel = vel;
_framespeed = framespeed;
}
- (void) update:(float)time {
if(!_life) return;
_life -= time;
if(_life <= 0.0f){
_life = 0.0f;
return;
}
frame += _framespeed*time;
if(frame > model.numFrames){
frame -= model.numFrames;
}
translate += _vel * time;
}
- (bool) alive {
return _life != 0.0f;
}
- (void) draw {
if ([self alive])
[super draw];
}
@end
Only active particles will be rendered and updated.
Now we need to keep track of the particles in the RingsState class. We could keep a
dynamically sized list of particles, adding and removing them as they are needed. In
practice, however, many particles come into use very rapidly and just as quickly go
away; it would be inefficient to allocate and deallocate each particle over and over.
Fortunately, the concept of a memory pool is well suited to situations such as this. By
preallocating a sufficient number of particles and reusing inactive ones, we can make
it so that particles can go in and out of use without thrashing our heap memory. The
downside to this is that we will have a maximum number of particles that can be used
at any one time.
But because the particle system is used merely for graphical effect, our game will not
be adversely affected if we fail to add a particle to the screen. Meanwhile, all we have
Implementation | 211
to do is to wait and one of the previous particles will finish its life span, making room
for a new particle in the memory pool.
We implement the memory pool by adding an array of particles to the RingsState class.
We will also need to keep track of the models used by our particles; we want one model
for the engine exhaust particles and one for the ring explosion particles:
//RingsState.h
#define RING_COUNT 11
#define MAX_PARTICLES 100
@interface RingsState : GLESGameState3D <UIAccelerometerDelegate> {
UIAccelerationValue
accel[3];
Sprite3D *ship;
Ring *rings[RING_COUNT];
Particle *particle[MAX_PARTICLES];
Model *engine_particle, *ring_particle;
Camera *camera;
Sprite3D *skybox;
// code snipped
}
We want to preallocate all of the particles in the setupWorld: function. If you are using
the example code, star.pod and flare.pod have already been added to the project. These
models don’t have any textures on them and will be rendered as semitransparent and
double-sided:
//RingsState.mm
- (void) setupWorld {
//code snipped
}
ring_particle = [[Model modelFromFile:@"star.pod"] retain];
engine_particle = [[Model modelFromFile:@"flare.pod"] retain];
for(int i=0;i<MAX_PARTICLES;i++){
particle[i] = [[Particle particleWithModel:ring_particle] retain];
[particle[i] resetLife:0 velocitiy:PVRTVec3(0, 0, 0) framespeed:0];
}
Don’t forget to release the particles and models:
-(void) dealloc {
[ship release];
[camera release];
for(int i=0;i<RING_COUNT;i++)
[rings[i] release];
for(int i=0;i<MAX_PARTICLES;i++)
[particle[i] release];
[engine_particle release];
[ring_particle release];
[skybox release];
212 | Chapter 5: 3D Games
}
[super dealloc];
In the Update: function, we will add code to iterate the memory pool and update active
particles:
- (void) Update {
float time = 0.033f;
for(int i=0;i<MAX_PARTICLES;i++){
[particle[i] update:time];
}
// code snipped
}
Note that we are assuming a frame rate of 30 fps (or 0.033 seconds per frame).
We will also need to render the particles:
- (void) Render {
// code snipped
[ship draw];
//draw our particles as semitransparent orange.
glColor4f(1.0f, 0.6f, 0.0f, 0.5f);
//the particles have simple geometry, and are made
//to see both sides of polygons, so disable culling
glDisable(GL_CULL_FACE);
glBlendFunc(GL_SRC_ALPHA, GL_ONE); //shiny blend
glEnable(GL_BLEND);
for(int i=0;i<MAX_PARTICLES;i++){
[particle[i] draw];
}
glDisable(GL_BLEND);
glEnable(GL_CULL_FACE);
//reset global color
glColor4f(1.0f, 1.0f, 1.0f, 1.0f);
// code snipped
Before rendering, the first thing we need to do is set the color to a semitransparent
orange, since the particles do not have any texture applied to them. Next, we disable
face culling so that we can see both sides of the particles. We also set up the blending
mode to enable transparency, and we choose a blend function that will give the particle
a saturated look. After rendering the particles, we reset the blending, culling, and color
to their previous values.
Now we can start adding engine exhaust particles. We want the particles to be created
randomly behind each engine and move directly away from the path of the ship at the
time they are created. To help us calculate this, we will create a function that generates
engine particles:
Implementation | 213
- (void) engineParticleAt:(PVRTVec3) position
inDirection:(PVRTVec3) axis
withSpeed:(float) speed
{
for(int i=0;i<MAX_PARTICLES;i++){ //search the memory pool
if(![particle[i] alive]){
//find an inactive particle to reuse
float life = 0.25f;
[particle[i] resetLife:life
velocitiy:axis*(-speed)
framespeed:100.0f/life];
The first thing our function does is search the memory pool for an inactive particle. If
all of the particles in the memory pool are active, we simply fail to create a particle and
move on as though nothing happened.
Assuming an inactive particle was found, we reinitialize the particle, giving it life once
more. We calculate the velocity to be the forward axis of the engine multiplied by the
inverse speed (because we want the particle to go in the opposite direction of the engine). Note that for this to work properly the axis vector needs to be normalized before
it gets sent into this function. Otherwise, the particle’s speed may be greater than or
less than the speed parameter here:
particle[i].position = position+axis*5;
[particle[i] forwardX:axis.x Y:axis.y Z:axis.z];
particle[i].model = engine_particle;
particle[i].scale = 1.0f;
break;
}
}
}
We also initialize the position to the location of the engine plus five units in the ship’s
direction. This is so that the particle “comes into existence” inside the ship and can be
seen emerging from the engine. If we simply used the position given to us, the particles
would be created outside the ship and the player would notice them “popping” into
the world.
Next, we set the orientation of the particle; technically, this does not need to be done
for particles that are symmetric. Since we are sharing a memory pool of particles for
both engine exhaust and ring explosion particles, we must be sure to reinitialize the
model and scale of the particle.
Now, all we need to do is call this method from the Update: function:
- (void) Update {
float time = 0.033f;
for(int i=0;i<MAX_PARTICLES;i++){
[particle[i] update:time];
}
// code snipped
214 | Chapter 5: 3D Games
//generate engine particles
if(speed > 0.0f ) {
PVRTVec3 engine;
if((random() % 100) / 100.0f < speed_knob){
//figure out where the right engine is.
engine = [ship getAxis:PVRTVec3(5.0f, 0.2f, 3.0f)];
engine = engine*ship.scale;
[self engineParticleAt:engine+ship.position
inDirection:-movement_axis
withSpeed:speed];
}
}
if((random() % 100) / 100.0f < speed_knob){
//figure out where the left engine is.
engine = [ship getAxis:PVRTVec3(-5.0f, 0.2f, 3.0f)];
engine = engine*ship.scale;
[self engineParticleAt:engine+ship.position
inDirection:-movement_axis
withSpeed:speed];
}
// code snipped
}
We want the particles generated to be slightly randomized, and we want more particles
to be generated when the thrust is set higher. Therefore, we generate a random percent
value and create a new particle only if that value is greater than the current thrust value.
If the engine thrust is set to full, the engine has a 100% chance of creating a particle.
Next, we figure out where the ship’s engine is located in world coordinates by taking
the local offset of the engine from the ship’s origin, multiplying it by the ship’s current
orientation, and adding the ship’s position. We also multiply this by the ship’s scale (if
we scale the ship up or down, we want to be sure the particles will still be drawn at the
appropriate location on a bigger or smaller ship).
Finally, we call the engineParticleAt: function to generate the particles. We perform
these steps for both engines and voilà—engine exhaust à la mode (see Figure 5-8).
The other use for our particle system is to generate explosion particles when the ship
passes through a ring. As with the engine particles, we will create a function specifically
for generating ring explosion particles:
- (void) ringParticleAt:(PVRTVec3) position inDirection:(PVRTVec3)axis {
for(int i=0;i<MAX_PARTICLES;i++){
if(![particle[i] alive]){
[particle[i] resetLife:1+(random() % 100)/100.0f
velocitiy:axis*(200+(random() % 100)-50)
framespeed:100+(random()%60)-30];
particle[i].position = position;
Implementation | 215
}
}
}
particle[i].model = ring_particle;
[particle[i] setScale:(random() % 100) / 100.0f * 0.25f];
break;
Figure 5-8. Engine particles
As we did with the engineParticleAt: function, we start by searching the memory pool
for an inactive particle to reuse. Unlike the engine particles, we want ring explosion
particles to have random life, velocity, animation, and scale values.
We will call this function when the ship passes through a ring; to detect this, we
need to call the update: function we created before in our Ring class. This is done in
RingsState’s Update: function:
- (void) Update {
// code snipped
for(int i=0;i<RING_COUNT;i++){
if ( rings[i].active && [rings[i] update:time collideWith:ship]){
//player passed through an active ring
// so generate explosion particles
for(int j=0;j<20;j++){
PVRTVec3 randvec((random()%100)/99.0f-0.5f,
(random()%100)/99.0f-0.5f,
(random()%100)/99.0f-0.5f);
216 | Chapter 5: 3D Games
//beware of divide by zero
if(randVec.x == randVec.y == randVec.z == 0.0f )
randVec.x = 1.0f;
randVec.normalize();
randVec = randVec.cross(rings[i].normal);
}
[self ringParticleAt:rings[i].position
inDirection: randVec + movement_axis];
//TODO: if this was the last ring, perform game logic
}
}
}
Each game loop, we will check all of the active rings for collision with the ship. If a
collision is detected, we’ll generate 20 explosion particles.
For each particle, we generate a random direction vector; we want to normalize the
vector, but it is possible that a vector of zero length was created, which could cause a
divide by zero (a crash!) if we tried to normalize() it. Therefore, we’ll check for the
special case and handle it by setting an arbitrary axis (in this case, x) to a nonzero value.
Next, we take the cross product of the random vector and the ring normal; as you know,
the cross product generates a vector that is perpendicular to the two input vectors. Since
one of the vectors is the ring’s normal vector, we know the result will be perpendicular
to the ring’s normal: it will be somewhere on the ring’s local x-y plane at a distance of
one unit from the center.
Finally, we initialize the particle at the ring’s center position, with a direction pointing
away from the center of the ring. Because the ship is passing through the ring and the
camera is attached to the ship, the particles generated will quickly fall behind the camera
and we won’t see most of the debris. Therefore, we also add the forward movement
vector of the ship to the particles’ direction to keep them in the visible camera area for
a little while longer.
Figure 5-9 shows the particles exploding from a ring that was just passed. The ring is
not visible (because it is behind the camera) but the particles are.
Logic
By now, we have a fairly intricate game world. The player can fly around and through
the course of rings we have set up. All that’s left is to keep track of the time it takes to
pierce all of the hoops, and switch to an end game state when the player has done so.
We will also record a list of best times. If the player’s new time is faster than one of the
best times, we insert it into the list, which will be available from the Main menu.
Implementation | 217
First, we will add floats to keep track of the start and total course times and an integer
to indicate how highly ranked the new best time is to the RingsState class:
//RingsState.h
@interface RingsState : GLESGameState3D <UIAccelerometerDelegate> {
// code snipped
}
double startTime, courseTime;
int newbest;
Figure 5-9. Ring particles
As usual, the next step is always to initialize the variables in the setupWorld: function:
//RingsState.mm
- (void) setupWorld {
// code snipped
}
startTime = [[NSDate date] timeIntervalSince1970];
courseTime = 0.0f;
newbest = −1;
As you can see, we have already started the timer. Now we must be vigilant and wait
for the player to complete the course. We left a TODO comment in the Update: function
when we implemented the ring explosion particles—we will fill this in now:
- (void) Update {
// code snipped
218 | Chapter 5: 3D Games
for(int i=0;i<RING_COUNT;i++){
if ( rings[i].active && [rings[i] update:time collideWith:ship]){
//player passed through an active ring
// so generate explosion particles
for(int j=0;j<20;j++){
// code snipped
}
//if this was the last ring, perform game logic
bool finished = true;
for(int k=0;k<RING_COUNT;k++){
if(rings[k].active){
finished = false;
break;
}
}
if(finished){
[self onWin];
}
}
}
}
We check all of the rings to see whether any of them are active; if there is even one
active ring, we are not yet finished. If the test was passed, we call onWin to handle
calculating the course time and to check it against the best times list.
Note that onWin is just like the function we set up in the preceding chapter. We will be
implementing the accompanying renderEndGame:, updateEndGame:, and touchEndgame
functions as well. But first, the onWin function:
- (void) onWin{
if(endgame_state == 0){
courseTime = [[NSDate date] timeIntervalSince1970]-startTime;
newbest = [RingsState insertBestTime:endTime];
endgame_state = WINNING;
}
}
The course time is calculated by subtracting the current time from the start. We then
attempt to determine whether this is a new record with insertBestTime: (which we
have not yet implemented); regardless of whether the time is a new best, we enter the
WINNING end game state because the level was completed.
Best Times
Our best times will be stored using the ResourceManager storeData: function, just like
the accelerometer calibration data. We want to be able to read the list of times in the
HighScores state; we also need to be able to compare new values against the list, and
Implementation | 219
possibly insert them, in RingsState. Finally, we also want to be able to reset the list to
default values to provide a reset option in the HighScores (technically we should have
named this BestTimes) state.
To provide functionality to both classes, we will write these as publicly accessible class
methods in the RingsState class:
//RingsState.h
// code snipped
//maximum number of time entries we want to save
#define MAX_TIMES 10
// code snipped
@interface RingsState : GLESGameState3D <UIAccelerometerDelegate> {
// code snipped
}
+ (NSArray*) bestTimes;
+ (int) insertBestTime:(double) time;
+ (void) defaultBestTimes;
@end
First, some default best times, for the player to try to beat:
//RingsState.mm
//setup some default best times.
+ (void) defaultBestTimes {
NSArray *times = [NSArray arrayWithObjects:
[NSNumber numberWithDouble:40.0],
[NSNumber numberWithDouble:50.0],
[NSNumber numberWithDouble:60.0],
[NSNumber numberWithDouble:70.0],
nil];
[g_ResManager storeUserData:times toFile:@"bestTimes"];
}
The defaultBestTimes method demonstrates how our saved data will be formatted: we
are saving a sorted array of NSNumbers, each with a double value, to the file bestTimes.
The best times will be at the front of the array.
The times were chosen from trial and error by playing the game itself: 70 seconds should
be rather easy to beat, possibly the first time someone picks up the game. The 40-second
time should be achievable after the player gets more comfortable with the controls and
layout of the level.
Next, we need to load the best times:
//grab the stored best times, and initialize to defaults if needed
//returns an NSArray of NSNumber doubles with sorted best times.
+ (NSArray*) bestTimes {
220 | Chapter 5: 3D Games
}
id retval = [g_ResManager getUserData:@"bestTimes"];
if(retval == nil){
//no data stored, so setup defaults and try again.
[RingsState defaultBestTimes];
return [RingsState bestTimes];
}
return retval;
Loading is pretty straightforward: we simply grab the stored array. If the load fails, such
as when the game is first started and no best times exist, we simply call defaultBest
Times to set up the data and try loading again.
Now, we can update the best times when the player finishes the level:
//returns the slot where time has been inserted into the best times list,
//or −1 if the time didn't make it onto the list.
+ (int) insertBestTime:(double) time {
NSMutableArray* times = [NSMutableArray
arrayWithArray: [RingsState bestTimes]];
NSNumber* timeNumber = [NSNumber numberWithDouble:time];
//drop the time into the list, and then sort it
[times addObject:timeNumber];
[times sortUsingSelector: @selector(compare:)];
//if we now have too many items in the list, we need to bump off the
//times from the bottom
if([times count] > MAX_TIMES){
NSRange range = NSMakeRange(MAX_TIMES, [times count] - MAX_TIMES);
[times removeObjectsInRange: range];
}
//find out where we inserted the number.
NSUInteger index = [times indexOfObject: timeNumber];
//if the number isn't in there, it must not have been good
//enough, so return −1
int retval = (NSNotFound == index) ? −1 : index;
}
//dump the table back to persistent storage
[g_ResManager storeUserData:times toFile:@"bestTimes"];
return retval;
The first thing we do here is make a mutable copy of the best times array so that we
can add or remove times from it. We then add the new time to the end of the list, and
re-sort it. After adding the time, we need to make sure we’re not trying to save too many
best times, so we trim the end of the list to get under the MAX_TIMES limit. Next, we find
out where we inserted the time, so we can return it and eventually display it to the user.
Finally, we save the times back to persistent storage, and return the spot, if any, at
which the new time was inserted.
Implementation | 221
End Game
Now that we can determine when the player finishes a level, the time he took during
the level, and how that time fits in against existing best times, we can make a nice
display when the level is finished. We want to display a “level complete” message like
we did in the 2D game, and additionally display the player’s Best Time rank. The end
game methods will look a lot like they did in the 2D game:
//RingsState.h
@interface RingsState : GLESGameState3D <UIAccelerometerDelegate> {
// code snipped
}
- (void) renderEndgame;
- (void) updateEndgame:(float)time;
- (void) touchEndgame;
@end
Since the end game graphics are in 2D, we want to call renderEndgame near our other
2D code used for the throttle graphics:
//RingsState.mm
- (void) Render {
// code snipped
//draw the slider knob at the proper position
[[g_ResManager getTexture:@"knob.png"]
drawAtPoint:CGPointMake(xmin+speed_knob*slide_groove, ycenter)
withRotation:90 withScale:1];
[self renderEndgame];
//end drawing 2d stuff
We need to link in touches, so the player can continue back to the Main menu:
-(void)touchesBegan:(NSSet*)touches withEvent:(UIEvent*)event
{
[self touchSpeedKnob:[touches anyObject]];
[self touchEndgame];
}
And also update, for animation:
- (void) Update {
// code snipped
[self updateEndgame:time];
}
The renderEndgame function has a bit more complexity than the one used in the 2D
example. In addition to the Level Complete and Tap to Continue messages, we want
to display the player’s rank in the Best Times screen. We also have to rotate the messages
so that they display in landscape mode:
222 | Chapter 5: 3D Games
- (void) renderEndgame{
if(endgame_state != 0){
//xoff is used to lay items out in a vertical flow, from top of screen:
int xoff = self.frame.size.width-32;
//center items in middle of screen:
int yoff = self.frame.size.height/2;
if(endgame_state == WINNING) {
[[g_ResManager getTexture:@"levelcomplete.png"]
drawAtPoint:CGPointMake(xoff, yoff)
withRotation:min(endgame_complete_time, 0.25f)*4*2*180 −90
withScale:min(endgame_complete_time, 0.25f)*4];
}
if(newbest != −1){
//special message for when player gets a new best time
xoff -= 64;
if(endgame_complete_time > 1.0f){
//draw "new best time" prompt
[[g_ResManager getTexture:@"newbest.png"]
drawAtPoint:CGPointMake(xoff, yoff)
withRotation:-90 //landscape mode
withScale:1
];
xoff -= 64;
//draw which rank they got
glPushMatrix();
//font class can't rotate by itself, unfortunately
glRotatef(90, 0, 0, −1);
[[g_ResManager defaultFont]
drawString:[NSString
stringWithFormat:@"Rank %d", newbest+1]
atPoint:CGPointMake(-yoff, xoff)
withAnchor:GRAPHICS_HCENTER | GRAPHICS_VCENTER];
glPopMatrix();
}
}
xoff -= 64;
//draw tap to continue prompt after 2 seconds
if(endgame_complete_time > 2.0f){
[[g_ResManager getTexture:@"taptocontinue.png"]
drawAtPoint:CGPointMake(xoff, yoff)
withRotation:-90
withScale:1
];
}
}
}
The updateEndgame function is the same as in the 2D version; we just need to update
the time to make animation sequences work:
- (void) updateEndgame:(float) time{
if(endgame_state != 0){
endgame_complete_time += time;
}
}
Implementation | 223
The touchEndgame function is mostly the same, except that we need to release the accelerometer before switching back to the Main menu:
- (void) touchEndgame{
if(endgame_complete_time > 2.0f){
//will crash if you don't reset the accelerometer delegate before
//freeing this game state.
[[UIAccelerometer sharedAccelerometer] setDelegate:nil];
[m_pManager doStateChange:[gsMainMenu class]];
}
}
Conclusion
We have only scratched the surface of 3D game programming, but you now know more
than enough to begin your own project. Modify the current engine to add lighting,
meshes with bone animation, or fire projectiles, or create a new engine.
As long as you keep in mind the special considerations of the iPhone input, there is a
lot of room to do things that have never been done on a mobile platform. Now is the
time to show the world what you can do.
224 | Chapter 5: 3D Games
CHAPTER 6
Considerations for Game Design
In the preceding five chapters, we covered the basics of 2D and 3D game programming
for the iPhone. But we have only scratched the surface and you’ve nearly reached the
end of the book. You may be asking yourself, “What is the next step?”
Depending on your interests, there are many possibilities. You could modify the current
engine to fit your own needs, or you could create a new one. Every game design poses
a unique problem; your game code is the solution. Different types of game engines
represent different methods of solving those problems.
A first-person shooter (FPS) type game requires 3D graphics that respond quickly to
user input along with accurate rendering and physics detection. A real-time strategy
(RTS) game, however, focuses more on being able to render many entities with lower
detail, and it requires a user interface that can organize and manage many actions at
once.
It follows, then, that a game engine created to handle FPS games is not well suited to
RTS games. Learning how to solve the unique problems of your game design with
efficient trade-offs is what game programming is all about.
Resource Management
Our example games were very simple in their use of resources. However, more complicated games will have more art and sound assets that can be loaded into the device’s
memory at one time.
A good resource manager will always be able to find space in memory for the required
resources by unloading resources that are less important. But knowing what is and isn’t
important can be hard to determine from the engine’s perspective, since the value of
resources in memory changes when the game states change. When you’re in the Main
menu screen, you want the menu images and a background sound; but when you’re
playing the game, none of those has value…unless you’re about to switch back out to
the menu again!
225
We can give the resource manager a hint about what resources will be used in each
state by listing the required resources, preloading them at each state transition, and
unloading any resources that aren’t needed. However, this becomes tedious (especially
during development when assets are constantly being added or removed). Furthermore,
this also causes us to unload and reload assets when switching back and forth between
two states with different resource needs.
A smarter resource manager will cache resources, unloading assets only when there
isn’t enough memory. By keeping a timestamp on each resource in memory, the resource manager can search through its list and unload the Least Recently Used (LRU)
resource.
Statistically, this will ensure that resources that are frequently called on will stay in
memory even across state changes, instead of wasting time loading and unloading them
repeatedly.
User Input Design
The biggest challenge to creating compelling iPhone games is implementing a good
user input design.
As we discussed before, the conflict between using the screen as input versus output is
the driving problem, but you also have to deal with the inaccuracy of touch input and
the conflict between a comfortable holding angle and using the accelerometer for input.
A good game design will consider these factors when deciding exactly what the goal of
game play is and how the user must interact with the device to accomplish that goal.
For instance, although an FPS game on the PC may use the pinpoint accuracy of the
mouse and keyboard to its advantage, porting to the iPhone would require a change in
design. Rather than expecting accurate aiming from the player, it should focus more
on rewarding the player for being in the right place at the right time—perhaps by automatically correcting the player’s aim within the current view angle.
EA’s SimCity for the iPhone is an excellent example of adapting a complicated user
input design to the iPhone. The original game requires a keyboard and mouse, expecting pinpoint selection of squares on a grid, as well as click-dragging for multiple
selections. There is also a heads-up display (HUD) with a slew of buttons for various
macro-management features.
In the SimCity port to the iPhone, the designers increased the size of all HUD elements
so they are touchable. They simplified submenus and split them into multiple pages to
account for the new larger buttons. With the understanding that the player’s interaction
with the touch screen can sometimes be inaccurate, they split click and drag operations
into multiple steps with confirmation screens to make sure the player intended the exact
input that was given.
226 | Chapter 6: Considerations for Game Design
Due to the specific challenges of input on the iPhone, games should try to simplify the
interaction with the player and limit the penalty for erroneous input.
Networking
One of the most exciting aspects of the iPhone as a mobile platform is the ability to
network from anywhere. Most people think of networked games as real-time multiplayer, but they can also take the form of a turn-based multiplayer, interactive community (think leader boards and achievements), or downloadable content.
Those familiar with network programming will be interested to know that both
UDP/IP and TCP/IP are available. In addition, the 3.0 SDK, which Apple released in
June 2009, now has the ability to use Bluetooth to automatically discover and network
with other iPhone users in the area. See the Game Kit Programming Guide on the Apple
developer website for more information.
Apple has also added an API to allow publishers to use the App Store to charge players
for downloadable content natively within the game, thereby increasing the life span of
your game and the value you can provide to customers.
Third-Party Code
By now, it should be painfully apparent how much hard work and expertise go into
making even small games. It’s almost overwhelming, but fear not! You don’t have to
reinvent the wheel; no matter what type of game you are creating, reusable bodies of
code are available that can supplement many parts of your game engine. They come in
the form of libraries, middleware, and even fully fledged open source games.
Libraries
The iPhone SDK makes available many low-level Apple APIs (such as Core Graphics
and Core Audio) and mid-level APIs (such as NSUserDefaults, NSImage, NSSound, and
NSNetService). But you are not limited to these alone; many other libraries are available,
and some even come with the SDK (such as OpenGL and OpenAL).
Libraries exist to help you with sound, networking, and many other tasks that you
might find too low level.
Perhaps you want to store and organize large amounts of data; SQLite provides database functionality on the iPhone. Most likely you don’t want to write volumes of linear
algebra code for your 3D physics; that’s OK—Newton, Open Dynamics Engine, and
Bullet have beat you to the punch. For a really cool 2D rigid body physics library, you
should check out Box2D.
Third-Party Code | 227
The iPhone is a relatively new platform and new libraries are still being made available.
Fortunately, the iPhone shares a lot of code with the OS X platform, so many libraries
that work for the Mac can be used for the iPhone with a little tweaking.
Middleware
If your goal is simply to make a game in the easiest way possible, gluing together a game
engine of your own from scratch (even with the help of libraries) might not be the right
choice for you. Fortunately, a number of middleware solutions are available for the
iPhone.
Think of middleware as a game engine (with all of the graphics, audio, and input components you would expect), but without a game sitting on top of it. All you have to do
is write your game logic and add the art resources: middleware gives you a huge jumpstart toward a finalized game.
Packages vary in quality and price, from hobbyist and research projects to open source
projects such as cocos2D and the Oolong Game Engine (which are both freely available)
to proven cross-platform commercial products such as Torque 3D and the Unity
engine.
Our favorite open source middleware project, IrrLicht, has been ported by the community, can boast of several successfully published iPhone apps, and will soon have a
fully supported release.
Open Source Games
Another direction to consider is to modify an existing game. Just as there are open
source libraries and middleware, there are open source games.
Some of the games built off the open source middleware engines listed earlier are also
open source. In addition, others have also released their game code to the public.
Tris is a Tetris clone that was originally released on the App Store, but was later removed
by request of The Tetris Company.
id Software (maker of Doom, Quake, and many other FPS games) has a policy of releasing its code under the GNU Public License (GPL) once some time has passed and
a game has become unprofitable.
For example, a fan of the game Quake3 ported its open source PC project to the
iPhone. Because the source is GPL’d, the results also must be under the GPL and are
therefore freely available to the public.
In fact, John Carmack (the head graphics programming guru of id Software) is involved
in iPhone development. The company recently released Wolfenstein 3D, and Carmack
ported an open source project named Wolf3D Redux on SourceForge, itself based on
228 | Chapter 6: Considerations for Game Design
the open source version of Wolfenstein 3D originally released by id Software. Naturally,
Wolfenstein 3D for the iPhone was also released to the public.
Even if you don’t intend to modify and rerelease an open source game, simply browsing
through the source can provide unique insight into the ways others have solved the
problems of game development.
App Store
Once you have completed your game, you will want to make it available on the App
Store for others to play. The web interface Apple has set up for this (http://itunesconnect
.apple.com) is very easy to use, but you will have to prepare a few things first.
You will be creating either a Paid Application Contract or a Free Application Contract
with Apple (depending on whether you are charging for your app or releasing it for
free). If your app is not free, you will need to provide Apple with financial information
such as a bank account number and tax ID (such as an Employee Identification Number
for a company or a Social Security number for an individual), as well as fill out all
contact information fields on the form.
Regardless of whether you plan to charge for your application, you need to provide:
• One or more screenshots of your game.
• An application description that will show up on the App Store page for your game.
• A product web page containing your screenshot(s), your application description,
an icon, and a link to the game in the App Store when it has been made available.
• A support web page and email address. The support web page may be a forum or
a contact form.
• A 512 × 512 version of the application icon, which should match the app icon’s
appearance. It will be shown in the App Store page for your game.
Once you have submitted your game for approval, it might not pass on the first try. For
instance, if your game connects to the Internet but does not handle a loss of service, it
will be rejected. At that point, you may create a new build of your application that fixes
this problem, and resubmit it.
Once your game has been approved, it will be available on the App Store! However,
this initially covers only the U.S. market. To support markets worldwide, you will need
to create additional application contracts as necessary. For instance, the Japanese market entails a large amount of additional tax requirements and information, and it may
take a larger portion of your earnings compared to most countries.
As time marches on, you may wish to update your application with new features or
bug fixes (some applications broke when the iPhone SDK 3.0 was released and it was
forced to release updated builds to work again). You can do this easily on the same
Apple website you used to submit the application.
App Store | 229
Conclusion
We hope that this book has given you the desire, knowledge, and inspiration to begin
creating your first iPhone game.
The iPhone represents a world of opportunity for creativity and innovation. Now that
world is open to you: go for it!
230 | Chapter 6: Considerations for Game Design
APPENDIX
References
Throughout this book, we mentioned useful documentation, libraries, and software
products that you might want to check out during your game development work—this
appendix lists those resources.
Code Reference
Game Kit Programming Guide: http://developer.apple.com/iphone/library/documenta
tion/NetworkingInternet/Conceptual/GameKit_Guide/Introduction/Introduction.html
Physics Libraries
SQLite (SQL database): http://www.sqlite.org/
Bullet (3D physics): http://www.bulletphysics.com/
Open Dynamics Engine (3D physics): http://www.ode.org/
Newton (3D physics): http://newtondynamics.com/
Box2D (2D physics): http://www.box2d.org/
Middleware
Cocos2D: http://code.google.com/p/cocos2d-iphone/
Oolong: http://oolongengine.com/
Torque 3D: http://www.garagegames.com/products/torque-3D
Unity: http://unity3d.com/
IrrLicht Engine: http://irrlicht.sourceforge.net
231
Open Source Games
Tris (Tetris clone): http://code.google.com/p/tris/
Wolfenstein 3D (by John Carmack)—ftp://ftp.idsoftware.com/idstuff/wolf3d/wolf3d
_iphone_v1.0_src.zip
iPhone Quake 3 Arena (port of the PC original): http://code.google.com/p/quake3
-iphone/
232 | Appendix: References
Index
Symbols
: (colon), 31
; (semicolon), 27
A
AAC format, 57
accelerometer
player input and, 190, 197
3D game design, 186
accessor functions, 32
afconvert tool, 78
AI (artificial intelligence) agents, 38, 63
Alpha value (pixels)
defined, 43
texture blending, 44
ambient sound, 57
animation
animation controllers, 48
culling, 49
level-of-detail technique, 50
particle systems, 48
resource management, 50
skeletal, 48
texture files, 49
texture sorting, 49
3D games, 46, 47
2D games, 46, 110–121
Animation class
animation sequences, 113–119
drawAtPoint function, 121
functionality, 111
Level 2 implementation, 150
property list, 111–113
animation controllers, 48
animation sequences, 113–119, 157
AnimationSequence class
functionality, 113–119, 121
Level 2 implementation, 146
App ID (Application Identifier), 23
App Store, 227, 229
AppDelegate class
calculating fps, 75
creating, 71
inheritance, 73
overview, 73–76
Apple developer accounts
paid version, 2
Program Portal, 22
registering, 1
Apple Program Portal, 22
application bundles
defined, 2
typical iPhone structure, 3
application framework (game engines)
AppDelegate class, 73–76
data store, 89–93
event handling, 76
game state management, 70–73
implementing, 71–73
main loop, 36
overview, 35
removing status bar, 73
render engine, 80–86
Resource Manager, 78
skeleton application, 93
sound engine, 87–89
Application Identifier (App ID), 23
artificial intelligence (AI) agents, 38, 63
audio engine
We’d like to hear your suggestions for improving our indexes. Send email to [email protected].
233
features supported, 56
multichannel sound, 57
output devices and interruptions, 58
playing sound, 57
sound categories, 57
sound samples, 57
Audio Queue API, 78
B
back-face culling, 49
best times, 218, 219–221
billboards, defined, 46
Binary Space Partition (BSP) tree, 55
blending, texture, 44
bounds checking, 109
BSP (Binary Space Partition) tree, 55
C
C language, 37
C# language, 23
C++ language
class support, 27, 28
factory methods, 32
function calls, 31
Objective-C support, 34
porting legacy code, 37
this keyword, 32
CAF format, 78
calibration, 198–201
Camera class, 192–194
camera offset, 109, 190, 192–194
Carmack, John, 228
Certificate Signing Requests (CSRs), 23
certificates
downloading, 23
generating, 23
managing, 22
WWDR, 23
class methods, 32
classes
constructor/destructor functions, 33
creating, 27
dealloc method, 33
defined, 27
defining, 27
extending, 28
inheriting, 28, 33
init method, 33
234 | Index
instantiating, 31
overview, 27–30
protocol, 29
representing game states, 40
template, 30
clipping (texturing aspect), 45
cocos2D project, 228
collision detection
collision resolution comparison, 51
entity-to-entity collisions, 126
entity-to-world collisions, 122–125
high-speed, 53
3D games, 54
2D games, 52–54
collision resolution
collision detection comparison, 51
overview, 56
colon (:), 31
constructors, 33
context action, 160–162, 164
context switching, 49
CPVRTModelPOD class, 185
Credits screen (game state), 37
Croc class, 167
CSRs (Certificate Signing Requests), 23
culling (animation), 49
D
data store
example state, 90–93
storing complex data, 90
storing simple data, 89
Default.png file, 4
destructors, 33
developer profiles
defined, 22
UDID support, 23
devices
loading, 22–25
sound considerations, 58
distribution profiles, 22
dot notation, 32
E
Emu class, 131–137
end game, 176–179, 222–224
@end keyword, 27
entities
defined, 121
entity-to-entity collisions, 126
entity-to-world collisions, 122–125
Level 1 implementation, 129–131, 132–
135
Level 2 implementation, 144–151
Entity class
creating, 122
initWithPos function, 129
Level 1 implementation, 129–131
entity-to-entity collisions, 126
entity-to-world collisions, 122–125
enumerations, setting up, 62
event handling, 76
executable programs in application bundles, 3
expert systems, 63
extending classes, 28
F
factory method, 32
filters, low-pass, 186
first-person shooter (FPS) type game, 225
folders
localization, 3
resource files, 3
font textures, 83
FPS (first-person shooter) type game, 225
fps (frames per second), 75
frames
calculating offset, 104
defined, 46
game logic based on, 65–67
keyframing, 47
skybox, 188
frames per second (fps), 75
Framework class, 35
function calls, 31
function pointers, 39
G
game design
App Store and, 227, 229
brainstorming, 97
camera position, 190
game logic, 190
graphics, 187–189
learning curve, 100–102
level considerations, 101–102
networking and, 227
player input, 189, 226
resource management, 225
technical feature list, 98
third-party code, 227–229
3D models, 187–190
user input scheme, 99–100
game engines, 97
(see also 2D games; 3D games)
application framework, 35–37
audio engine, 56–61
game logic, 61–68
game state manager, 37–40
graphics engine, 41–68
physics engine, 51–56
player input, 58–61
resource management, 50
tile engine, 102–110
game logic
context action, 160–162
core function, 67
defined, 61
frame-based, 65–67
high-level events, 61
initializing games, 158–160, 172–174
Level 1 implementation, 127, 135, 139
Level 2 implementation, 151
Level 3 implementation, 158–164
Level 4 implementation, 172–174
managing AI agents, 63
path finding, 64
physics engine and, 61
resolving player input, 60
serializing game data, 64, 65
serializing game states, 175–179
3D game example, 190, 217–219
time-based, 65–67
2D game example, 98
updates, 162–164, 174
Game Play state, 38, 67
game state manager (game engines)
concurrent processes, 41
overview, 37
state machines, 38–40
game states
best times, 219
changing, 39, 71
classes representing, 40
creating instances, 40
Index | 235
defined, 38
end game, 176–179
game play as simulations, 64
Level 1 implementation, 127
Level 2 implementation, 144
Level 3 implementation, 162
Level 4 implementation, 164
managing, 70–73
serializing game data, 64, 65, 175–179
3D models, 182
transparent suspend/resume, 64
game time, 64, 65–67
GameState class
creating, 40
end game, 177
GLESGameState and, 81
Handle_Event function, 70
implementing functions, 71
Render function, 70, 71
resolving collisions, 126
TileWorld class and, 105
UIView comparison, 70
Update function, 71
GameStateManager class
AppDelegate class and, 73
UIViewController class and, 70
GLContext class, 81
GLESGameState class
creating, 81
end game, 176
example state, 85
TileWorld class, 105, 107
GLESGameState3D class
accelerometer, 186
functionality, 182–187
POWERVR support, 184
Sprite3D class, 185
GLFont class, 84, 85
GLTexture class
example state, 85
font textures, 83
functionality, 82
Tile class and, 104
graphics engine
animation, 46–50
audio engine, 56–58
context switching, 49
functionality, 41
game logic, 61–68
236 | Index
physics engine, 51–56
player input, 58–61
texturing, 41–46
3D game design, 187–189
gsEmuLevel class
functionality, 127, 131, 136
Update function, 139
gsLionLevel class, 141, 150
gsMain class
calculating fps, 75
creating, 72
inheritance, 73
Update function, 76
gsMainMenu class, 94, 178
gsMazeLevel class, 153
gsRiverLevel class, 165
gsSoundTest class, 88
gsTest class, 76
H
heads-up display (HUD), 98, 188
HelloWorldAppDelegate.h file, 5
HelloWorldAppDelegate.m file, 5
HelloWorldViewController.h file, 5
HelloWorldViewController.m file, 5
HelloWorldViewController.xib file, 6
Help section (game state), 37
HUD (heads-up display), 98, 188
I
IBAction macro, 34, 89, 91
IBOutlet macro, 8, 34, 94
Icon-Settings.png file, 4
icon.png file, 3
id Software, 228
IMA4 format, 57
images
animating, 46
defined, 42
frames, 46
Info.plist files, 3, 24
inheriting classes, 28, 33
initializing games, 158–160, 172–174
initializing storage, 175
instantiating classes, 31, 40
Interface Builder
creating applications, 8–10
Objective-C support, 34
views and view controllers, 14
@interface keyword, 27
interpolation technique, 47
iPhone API
Objective-C support, 25–34
playing sound, 57
sound formats supported, 57
iPhone SDK
application bundles, 2–4
downloading, 1
Interface Builder, 8–10
libraries, 227
loading devices, 22–25
views and controllers, 13–22
Xcode IDE, 4–7
iPhone Simulator, 4
IrrLicht, 228
iTunesArtwork, 4
J
Java language
class support, 27, 28
function calls, 31
reverse domain notation, 23
this keyword, 32
K
kernel, concurrent processes and, 41
keyframing, 47
L
latency, touch events, 58
learning curves, 100–102
Least Recently Used (LRU) resource, 226
legacy code, porting, 37
Level 1 (2D game)
emu chicks, 131–137
Emu class, 131–137
emu mother, 137–139
functionality, 101, 127
game logic, 139
gsEmuLevel class, 127
main character sprites, 128–131
player input, 131
sound effects, 140
TileWorld class, 128
Level 2 (2D game)
functionality, 101, 141
game logic, 151
gsLionLevel class, 141
Lion class, 145–150
lion entities, 144–151
main characters, 143
McGuffin, 143
player input, 141
sound effects, 152
TileWorld class, 142
Level 3 (2D game)
cat and mouse, 157
functionality, 101, 152
game logic, 158–164
gsMazeLevel class, 153
gsRiverLevel class, 165
MazeButton class, 153, 155
MazeDoor class, 153, 156
player input, 157
sound effects, 164
TileWorld class, 154, 158
Level 4 (2D game)
Croc class, 167
functionality, 102, 164
game logic, 172–174
player input, 171
Rideable class, 165, 168
sound effects, 175
TileWorld class, 165
Tom class, 169–171
level-of-detail technique, 50
libraries, 227
Lion class, 145–150
loading devices
certificates and profiles, 22–24
considerations, 22
Xcode configuration, 24–25
localization folders, 3
low-pass filters, 186
LRU (Least Recently Used) resource, 226
M
magic numbers, 106
main characters
Level 1 implementation, 128–131
Level 2 implementation, 143
Level 3 implementation, 152
Main menu (game state), 37
MainWindow.nib file, 4
MainWindow.xib file, 6
Index | 237
masks, defined, 43
Maya modeling program, 185
MazeButton class, 153, 155, 164
MazeDoor class, 153, 156
McGuffin
defined, 143
Level 2 implementation, 151
Level 3 implementation, 153
Level 4 implementation, 164
member variables
defined, 27
overview, 32
memory management
game design and, 225
overview, 33
tile engine, 102
meshes
defined, 41, 47
skeletal animation, 48
texture blending, 45
texture mapping, 46
messaging
functionality, 31
member variables, 32
methods
class, 32
defined, 27
defining, 27
factory, 32
middleware, 228
Model class, 185
Model View matrix
defined, 181
manipulating, 182
restoring state, 196
MP3 format, 57
multichannel sound, 57
N
networking, game design and, 227
New Project Wizard, 13
NSArray type, 89
NSData type, 89, 90
NSDictionary type, 89, 90, 117
NSEnumerator type, 118
NSMutableArray type, 108
NSMutableDictionary type, 118
NSNumber type, 89, 108
NSObject class
238 | Index
alloc method, 33
autorelease method, 33
copy method, 33
inheritance support, 28, 33
new method, 33
reference counters, 33
release method, 33
retain method, 33
NSPropertyListSerialization class, 117
NSString type, 89, 93, 107
NSUserDefaults API, 89, 90
O
object-oriented programming (OOP), 39
Objective-C
C++ support, 34
class instantiation, 31
class methods, 32
classes, 27–30
constructor/destructor functions, 33
functionality, 25
Interface Builder support, 34
member variables, 32
memory management, 33
messaging, 31
rendering considerations, 80
Oolong Game Engine, 228
OOP (object-oriented programming), 39
open source games, 228
OpenAL library, 56
OpenGL ES
coordinate system, 82
drawing textures, 83
POWERVR support, 184
rendering support, 80, 81
scaling down textures, 104
sound formats and, 78
texture formats and, 78, 82
P
Particle class, 209
Particle System Manager, 48
particle systems
functionality, 48
implementing, 209–217
3D game design, 187, 189
path finding, 64
PCM format, 57
physics engine
collision detection, 51, 54
collision resolution, 51, 56
defined, 51
game logic and, 61
level-of-detail technique and, 55
TileEngine class, 110
2D games, 121–127
PhysicsFlags enumeration, 105
pixels
Alpha value, 43, 44
defined, 41
transparency considerations, 42
player best times, 218, 219–221
player input
accelerometer, 190
calibrating, 198–201
game design and, 226
Level 1 implementation, 131
Level 2 implementation, 141
Level 3 implementation, 157
Level 4 implementation, 171
resolving into events, 60
3D games, 189, 196–204
thrusters, 190, 201–204
touch events, 58–60
2D game example, 98, 99–100
PLIST files
animation sequence data, 111
Info.plist, 3, 24
property lists, 111–113
PNG format, 78
PointMath.h file, 124
porting legacy code, 37
positional audio, 56
POWERVR (OpenGL ES)
functionality, 184
model format, 185
PVR texture format, 185
3ds Max plug-in, 185
vectors and matrixes, 184
PowerVR class, 185
@private keyword, 27
profiles
developer, 22, 23
distribution, 22
installing, 24
provisioning, 22, 24
Projection matrix
configuring, 183
defined, 181
projects, creating, 71
@property keyword, 119
property lists, 111–113
protocol classes, 29
@protocol keyword, 29
protocols, defined, 28
provisioning profiles
downloading, 24
managing, 22
proxy objects, 22
@public keyword, 27
puzzle games, 64, 97
PVR texture format, 185
PVRShaman utility, 185
PVRT SDK, 184, 185
PVRTexTool utility, 185
Q
Quake3-iPhone, 228
Quartz 2D API, 45
Quartz Core Graphics, 80, 82
quaternions, defined, 182
R
real-time strategy (RTS) game, 63, 225
reference counters, 33
render engine
example state, 85
font textures, 83
GLESGameState class, 81
overview, 80
textures and, 82
resource management
game design and, 225
Resource Manager, 78
textures, 50
Resource Manager
deploying resources, 79
management considerations, 79
overview, 78
sound format, 78
texture format, 78
ResourceManager class
end game, 177
getTexture function, 114
ResourceProvider class, 87, 200
Index | 239
resuming game play, 64
reverse domain notation, 23
Rideable class, 165, 168
Ring class, 204–209
RingsState class
adding arrays, 207
adding pointer, 193
best times, 218, 220
calibrating axis, 199
creating, 190
particle system, 211
skybox, 195
rotation (texturing aspect), 45
RTS (real-time strategy) game, 63, 225
S
schedulers, game engines, 41
self keyword, 32
semicolon (;), 27
serializing game data
defined, 64
options available, 65
serializing game states
end game, 176–179
initializing storage, 175
modifying UI, 179
Settings.bundle file, 3
SFX (sound effects)
Level 1 implementation, 140
Level 2 implementation, 152
Level 3 implementation, 164
Level 4 implementation, 175
music versus, 57
signatures, managing, 22
SimCity, 226
skeletal animation, 48
skin, defined, 46
skybox, 188, 194–196
sleep function, 37
sound
ambient, 57
loading samples, 57
multichannel, 57
playing, 57
positional audio, 56
typical categories, 57
sound effects (see SFX)
sound engine, 87–89
Sprite class
240 | Index
creating, 119–121
functionality, 113
Sprite3D class
creating, 185
particle system, 209
representing rings, 204
representing space ship, 191
skybox, 195
sprites (animation)
defined, 46
Level 1 implementation, 128–131
Level 2 implementation, 141
Level 3 implementation, 152
Level 4 implementation, 164
SQLite, 227
state machines
AI agents and, 63
changing states, 39
function pointers, 39
implementing, 38
overview, 38
states (see game states)
status bar, removing, 73
storing
complex data, 90
initializing storage, 175
simple data, 89
Subversion version control, 4
suspending game play, 64
switch statement, 38, 162–164
@synthesize keyword, 32
T
template classes, 30
Tetris Company, 228
texture blending (texturing aspect), 44
texture mapping, 45
texture sorting (animation), 49
textures
animation considerations, 49
defined, 42
drawing tiles, 104
drawing with OpenGL, 83
font, 83
managing dynamically, 50
PNG format and, 78
PVRTexTool utility, 185
render engine and, 82
resource management, 50
scaling down, 104
texturing
clipping aspect, 45
overview, 41
rotation aspect, 45
texture blending aspect, 44
transparency aspect, 42
third-party code, 227–229
this keyword, 32
3D games
animation support, 46, 47
calculating rotation, 45
camera position, 192–194
collision detection, 54
end game, 222–224
game design, 187–190
game logic, 217–219
GLESGameState3D class, 182–187
implementing, 190–224
level-of-detail technique, 50
optimizations, 55
particle system, 209–217
player best times, 219–221
player input, 189, 196–204
positional audio, 56
rendering considerations, 80
rings, 204–209
skybox, 194–196
texture blending, 45
texture mapping, 45
texturing process, 41
3D models, 188
vector math, 124
3ds Max modeling program, 185
thrusters, 190, 201–204
Tile class
creating, 104
drawInRect function, 108
tile engine
defined, 97, 102
drawing tiles, 104
special tiles, 126
Tile class, 104
TileWorld class, 105–110
unique tiles, 102
TileEngine class, 110
TileWorld class
camera offset, 109
creating, 105
Level 1 implementation, 128
Level 2 implementation, 142
Level 3 implementation, 154, 158
Level 4 implementation, 165
loading steps, 107
physics flags, 110
rendering steps, 107–109
setCamera function, 109
tileAt function, 125
worldPosition function, 131
timestamps, 226
Tom class
Level 1 implementation, 129
Level 2 implementation, 142
Level 3 implementation, 157
Level 4 implementation, 164, 169–171
Torque 3D middleware, 228
touch events, 58–60, 99
TouchEnd event, 59
TouchStart event, 59
transparency (texturing aspect), 42
2D games
animation support, 46, 110–121
calculating rotations, 45
collision detection, 52–54
full transparency, 42
game design, 97–102
game state serialization, 175–179
game structure, 97
Level 1 implementation, 101, 127–141
Level 2 implementation, 101, 141–152
Level 3 implementation, 101, 152–164
Level 4 implementation, 102, 164–175
physics engine, 121–127
rendering considerations, 80
texture blending, 45
texturing process, 41
tile engine, 97, 102–110
vector math, 124
U
UDID (Unique Device Identifier), 23
UIAccelerometer class, 186, 191
UIAccelerometerDelegate protocol, 186, 191
UIButton class, 88, 90
UIEvent class, 59
UIImage class, 82
UILabel class, 6–10
UISwitch class, 90
Index | 241
UITouch class, 59, 77
UIView class
game state management, 70
GameState comparison, 70
views and controllers, 13–22
UIViewController class
creating, 71
extending, 14
game state management, 70
Unique Device Identifier (UDID), 23
Unity engine, 228
updates, game logic, 162–164, 174
user input (see player input)
V
variables
game state, 40
member, 27, 32
vector math, 124, 182
velocity calculations, 134
View Controller
adding new View, 18
adding to existing window, 14–18
Views
adding to existing window, 14–18
adding to View Controller, 18
defined, 13
W
Window class, 16
Wolfenstein 3D, 228
WWDR certificates, 23
X
Xcode IDE
creating applications, 4–7
loading devices, 24–25
views and view controllers, 14
Z
z dimension, 182
242 | Index
About the Authors
Paul Zirkle has five years of mobile game programming experience and is currently a
lead mobile programmer at Konami Digital Entertainment. He has worked on the
porting, rewriting, and full development of more than 40 titles. Occasionally, Paul is
called upon to give lectures on game development at the University of Southern California.
Joe Hogue has five years of mobile game programming experience. He worked with
Paul at Konami and currently works for Electronic Arts as a mobile programmer. Joe
has also worked on the porting, rewriting, and full development of over 40 titles. Joe
has written an iPhone game that is currently available on the iTunes AppStore.
Colophon
The animal on the cover of iPhone Game Development is a greater roadrunner
(Geococcyx californianus), a long-legged bird belonging to the cuckoo family. It is the
largest North American cuckoo at approximately 22 inches long, and it weighs about
10 ounces. It has a dark head and back, an oversized beak, a long tail, a pale belly, and
four toes on each foot.
It is found in the Mojave, Sonoran, and Chihuahuan deserts as well as in other parts
of the southwestern U.S. It is well adapted to desert life for a number of reasons, including the fact that it reabsorbs water from its feces before excretion; it is quiet during
midday, which is the hottest time in the desert; and it is very fast and can catch prey
while it is in mid-air. Although it can fly, it would rather sprint and can run as fast as
20 miles per hour.
The roadrunner’s diet primarily consists of insects, small reptiles, rodents, small birds,
fruit, and seeds. Its incredible speed enables it to also prey on rattlesnakes. It grabs a
coiled rattlesnake by the tail and slams the snake’s head against the ground until it dies.
The roadrunner then consumes the snake whole, but oftentimes can’t eat it all in one
sitting, so the bird will go about its day with the remaining snake hanging out of its
mouth until what it has previously eaten has digested and it is ready to consume more.
The cover image is by Lorrie LeJeune. The cover font is Adobe ITC Garamond. The
text font is Linotype Birka; the heading font is Adobe Myriad Condensed; and the code
font is LucasFont’s TheSansMonoCondensed.