1
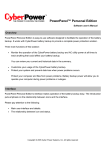
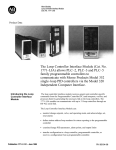
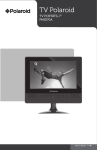
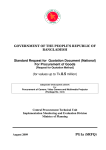
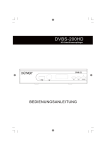
Digital High Defintion 230/12V Satellite
Receiver
User Manual
Important Safety Instructions
1.
Read these instructions
2.
Keep these instructions.
3.
Heed all warnings.
4.
Follow all instructions.
5.
Do not use this apparatus near water.
6.
Clean only with dry cloth.
7.
Do not install near any heat sources such as radiators, heat registers, stoves, or other apparatus (including amplifiers) that produce heat.
8.
Operate this product only from the type of power source indicated on the label. If you are not sure of the type of power connected to your home, consult your local power company. Disconnect the unit from the mains before any maintenance or installation procedure.
9.
Protect the mains cord from damage and stress.
10.
Only use attachments /accessories specified by the manufacturer.
11.
Unplug this apparatus during lightning storms or when unused for long periods of time.
12.
Refer all servicing to qualified service personnel. Servicing is required when the apparatus has been damaged in any way, in
cluding damage to the mains cord or plug, if the unit has been ex
posed to liquid or moisture, has been dropped or is not operating correctly.
13.
Do not impede the air flow into the unit by blocking the ventilation slots.
14.
Attention should be drawn to the environmental aspects of battery disposal.
15.
Use the apparatus in moderate climate.
WARNING: To reduce the risk of fire or electric shock, do not expose this apparatus to rain or moisture
WARNING: The batteries shall not be exposed to excessive heat such as directsun light, fire, etc.
Warning:
• The apparatus shall not be exposed to dripping or splashing and that no objects filled with liquids, such as vases, shall be placed on the apparatus.
• The MAINS plug or an appliance coupler is used as the disconnect device, the dis
connect device shall remain readily operable
• The batteries shall not be exposed to excessive heat such as sunshine, fire or the like.
This symbol indicates that dangerous voltages constituting a risk of electric
shock are present within this unit.
This Symbol indicates that there are important operating and maintenance instructions in the literature accompanying this unit.
This Symbol indicates that this product incorporates double insulation between
hazardous mains voltage and user accessible parts.
When servicing use only identical replacement parts.
Package Contents
Before installation, please check the contents of the package.
The package should contain the following items:
1) DVB-S2 Receiver
x1 pcs
2) Remote Control
x1 pcs
3) AAA Battery for the Remote Control
x1 pair
4) User Manual x1 pcs
5) 12/230V Power Adapter x1 pcs
6) 12V mobile Adapter
x1 pcs
7) external Infrarot Sensor
x1 pcs
8) CVBS Adapterx1 pcs
Table of Contents
Front and Rear Panel
Remote Control
System Connection
Satellite Setting
Channel Scan
Basic Operation
Program Setting
Picture Setting
Channel Search
Time Setting
Option
System Setting
USB
Time shift and Recording
Timer
EasyFind
Troubleshooing
Technical Specifications
Notice About Recycling
Declaration of Conformity
1
2
4
5
7
8
8
9
10
11
11
11
13
14
15
15
23
24
25
25
Front and Rear Panel
1. Front panel
2.Rear panel
1
1.
2.
3.
4.
5.
6.
7.
2
3 4
5
6
7
LNB IN: This socket connects to your satellite antenna.
LNB OUT:
USB: For Software upgrade and media playback
IR Sensor: Used to Receive the signal from Remote Control.
HDMI: High definition audio and video output used to connect to a HDMI device.
CVBS/L/R: Connector for the analog output with the delivered chinch cable.
12V: Power Connector
1
Remote Control
POWER: Switch the receiver in and out of Standbymode.
0-9: Numeric keys.
CH-/CH+: Program changing keys.
MENU: Display main menu on TV screen, and
press again to disappear menu.
OK: To confirm current setting, or display channel
list in no-menu mode.
VOL-/VOL+: To increase / decrease volume.
EPG: Shows the Electronic Program Guide
FAV: Displays your favorite channel list.
Press FAV again to access to the other favorite lists.
V-FORMAT: Switch the HDMI resolutions.
RECALL: Go back to the previous viewed channel.
RED/GREEN/YELLOW/BLUE: Used to navigate between pages in teletext mode
and special functions in Menu or EPG.
TTX: Switch in Teletext, if current channel has this option,
and use EXIT key to quit Teletext
SUB-T: Display subtitle options (availability depends on
the channel).
LANG: Change the Audio Language and Left/Right
channel (availability depends on the channel).
EXIT: Use this key to quit current menu.
INFO: Displays information about the current channel.
TV/RADIO: Switch between Digital Radio and Digital TV
mode.
MUTE: To switch audio output on/off.
PAGE+/PAGE-: To navigate inside the menus.
ASPECT: Switches Aspect Ration such as 4:3 / 16:9.
TIMESHIFT: Use to start Time shift function.
TIMER: Use to access ON/OFF Timer directly.
PVR: Use to access recorded content in USB drive.
GOTO: Go to desired time in multimedia file.
2
REPEAT: Repeat play multimedia file.
Installing the Batteries
Remove the battery cover from the rear of the Remote Control and place
2xAAA size batteries inside the compartment.
Please make sure the battery polarities match the polarity markings inside
The compartment.
Using the Remote Control
To use the Remote Control, point it towards the external IR Sensor of the Digital Set
Top Box.
The Remote Control has a range of up to 6 metres from the Set Top Box at an
Angle of up to 60 degrees.
The Remote Control will not operate if its path is blocked.
Sunlight or very bright light will decrease the sensitivity of the
Remote Control.
3
System connection
For a basic connection from your Set Top Box to your television set, you can
use the CVBS Adapter. For a higher quality connection use a direct HDMI connection.
Connect an audio amplifier you have to use also the CVBS Adapter for L/R Audio.
Satellite Setting
(1) Preparation:
You will have to know the following parameter to make a successful channel
Scanning.
The satellite orientation.
If you have more than one antenna or one antenna with more than one LNB,
You will have to know which type of switch (Toneburst od DISEqC) is employs
And to which port each Antenna LNB is connected.
For a Unicable/SCR EN50494, you will have to know which IF-Channel is
Available and its corresponding frequency.
Please ask the installer if any of the parameter is not known.
4
Example:
A satellite antenna orients satellite ASTRAS 19.2° and has a “universal” or
“Digital” LNB. We recommend the pre-programmes list in this case.
If you would not like to use the pre-programmed list, the common setup for
ASTRA 19.2° is as followed:
Satellite:
LNB Type:
LNB Voltage:
22KHz:
Toneburst:
DiSEqC 1.0:
DiSEqC 2.0:
Motor:
019.2E Astra 1H.
09750 / 10600
13/18V
AUTO
None
None
None
None
(2) Process:
On the left side of the screen there is a list of satellites which is preProgrammed. Settings of the chosen satellite is displayed on the right side.
Process:
Select the first satellite to be set up with UP/DOWN.
Press the OK button. The chosen satellite is marked with a hook, confirming
this satellite will be considered in the coming channel scan
Press the button RIGHT to access to the right side.
Select the option with UP/DOWN and change the parameter with
LEFT/RIGHT.
Press Menu after defining all parameters for this satellite to get back to the
Left side.
If your satellite system can receiver signals from a number of satellites,
Select a further satellite with UP/DOWN. Press OK and define the parameter
On the right side.
Repeat this procedure for all satellites available for your receiver.
Notes:
After a correct setting, an approximate value of the signal quality will be
Shown on the lower part of the menu.
If a satellite is missing on the list, press the Red button. A dialogue window
will appear, input the value for longitude, east/west and frequency and
choose “Blind Scan” in the coming channel san. If you add a satellite to the
list, there will be no display of the signal quality for this satellite, in spite of
correct setting. Signal quality can only be displayed for satellites saved
under the transponder list.
Press GOTO to display the transponder of the chosen satellite. Add new
Transponder with the RED button and mark the transponder for channel scan
With OK.
5
(3) Explanation of the parameters
LNB Type: define the oscillator frequency for your LNB. Please take the
Correct value from the manual of your LNB (standard: 09750/10600)
If you have a Unicable/SCR EN50494, select LNb type Unicable (A or B, A is
generally the correct choice by a Unicable system for satellite reception).
Choose a free channel (IF channel) and the corresponding frequency. Please
refer to the manual of your Unicable system.
LNB voltage: This parameter defines the storm voltage of the antenna and
the signal from the horizontal or vertical polarized transponder will be received. The
setting will only have to be changed in very rare cases. A false setting will
result in missing program or no signal reception at all (standard: 13/18V).
22KHz: The receiver can switch the LNB with 22KHz signals for the reception
of another frequency band. The setting will only have to be changed in very
rare cases. A false setting will result in missing program or no signal reception
at all (standard: Auto).
Toneburst: Toneburst switcher has two input ports. It enables the connection
of 2 antennas or LNB to the receiver. If you have a Tone burst switcher, you
will have to select one of the both connections (A or B) for the satellite chosen
on the left side.
DiSEqC: DiSEqC switcher has up to 16 input ports. It enables the connection of
multiple antennas or LNB to the receiver. If you have a DiSEqC switcher, you
will have to select one of the connections of the satellite chosen on the left side.
Please check which version (1.0, 1.1) can be supported in the manual of
your switcher.
Motor: Rotatable antennas require extended configurations. We recommend
Professional installation from a technician. Please set up according to your
Antenna. You can open further set up windows with the RED and the GREEN
Button
After the set up has been done for all reachable satellites, please press the
BLUE button to open the menu for channel scan.
6
Channel Scan
There appears a window showing “channel search” upon pressing the BLUE
Button on the menu of the satellite setting. In this window you can make
Three entries to affect the can result.
Scan mode:
Default: The receiver scans channels according to a pre-programmed list.
This search process goes fast without being able to find programs on new
Transponders
Blind search: The receiver scans every possible frequency. It takes a little
bit more time than the default scan. However, it is possible to find programs from
unknown transponders.
Network: The receiver scans channels according to a pre-programmed list.
The frequency of a new transponder could be found out through analysis of
the known transponders. The scan process is shorter than the “blind scan” but
There might be possible missing programs.
Please select “blind scan”. It takes a little bit longer but will result in a
Complete program list. If you can have added a new satellite on the menu of
Satellite setting, please select “blind scan”, for there is no transponder list
available for the newly added satellite. There is no “blind scan” option in case
of an Unicable system.
Press the OK button to start the channel scan.
After the channel scan is completed, a live picture of the first found channel will
be shown on the screen.
7
Basic Operation
(1). Program Manage settings
To access the menu press the MENU button
and select [program]. Using the LEFT/RIGHT
keys to navigate through the menu. The menu
provides options to adjust the Program
Manage Settings. Select an option and press
Ok or RIGHT to adjust that setting. Press the
EXIT button to exit the menu.
(a) Program Edit
To edit your program preferences (lock, skip, favorite, move or delete), you
will need to enter the Program Edit Menu. This
menu requires a password to access. Enter
the default password `000000´. The master
unlock password is `888888´.
(b) EPG (electronic Program Guide)
The EPG is an on-screen TV guide that shows scheduled programs seven
days in advance for every tuned channel. Press the EPG button on the remote
control to access the guide.
You can use the UP/DOWN key to select the
preferred program. If there is more than one
page information use the BLUE button for
page up and the YELLOW button for page
down.
You can select another channels´s EPG by
LEFT/RIGHT buttons, view details of each
EPG event by INFO button or schedule a
recording by OK button. (Please see page 16
of this manual for details in recording option)
8
(c) Sort
Sort your channels from the following options:
-Default
-Encrypt
-Freq
-Service name
(2). Picture Setting
To access the menu press MENU then select [Picture] using the RIGHT/LEFT
key. The menu provides options to adjust the video settings. Press UP/DOWN
to select an option and press RIGHT/LEFT to adjust the setting. Press EXIT to
exit the menu.
(a) Aspect Ratio
This setting defines the picture format of your TV and how the content with
Different Aspect Ratio can be adapted for your TV.
(b) Resolution
You can change the setting if the picture resolution doe not appear to be
Correct. This setting is to match the most common setting for HDMI.
[480i/480p]: for NTSC TV system.
[576i/576p]: for PAL TV system
[720p/1080i/1080p]: for NTSC or PAL TV system.
(c) TV Format
If the picture does not appear to be correct you an change this setting. This
should match the most common setting for TVs in your country.
[NTSC]: for NTSC system TV.
[PAL]: for PAL system TV.
9
(3). Channel Search
To access the menu press MENU and select channel search using the
LEFT/RIGHT keys.
(a) Dish Setup
After setup satellite dish, you can search the DTV channels. Select Dish
Setup and press OK to start the Dish Setup Menu.
Scan a Satellite
1. Select the desired satellite in the satellite list and press the BLUE key to start a
Channel Search Menu. You can also add a new satellite by pressing the RED key.
2. Select Scan Mode in Channel Search Menu.
3. Press the OK key to start the channel search.
Scan a Transponder
You can also scan a desired transponder. Select the satellite first and then press the
GOTO key to show the transponder list, select the desired transponder and press the
BLUE key to start the transponder scan.
Please see page 5-8 of this manual for more details.
(b) DB Management
With this option you can save the channel list on a USB (export) or load the
Channel list from the USB storage (import).
10
(4). Time Setting
(a) Time Offset
Select auto or manual for GMT offset adjustments.
(b) Time Zone
Select the Time Zone offset when Time Offset is set to manual.
(c) Date
Set current date when Time Offset is set to manual.
(d) Time
Set current time when Time Offset is set to manual.
(e) Auto Standby
Set auto Standby time. The unit will enter standby mode after the selected time
without user interaction. (such as press remote control).
(5). Option
To access the menu press MENU and select [optional] using the RIGHT/LEFT
Keys. The menu provides options to adjust the OSD Language,
Subtitle Language and Audio Language.
Select an option and press RIGHT/LEFT to adjust the setting.
Press EXIT to exit the menu.
(a) OSD (On Screen Display) Language
Select an OSD Language.
(b) Subtitle Language
Select the preferred subtitle language
11
(c) Audio Language
Select the preferred audio language for watching TV channels.
If the language is not available the default program language will be used.
(d) Digital Audio
If no sound is coming from the audio amplifier which is connected to the coaxial cable
You can change this setting.
(6). System Setting
(a) Parental Guidance
Set the age for the parental control.
(b) Set Password
Set or change the password for locked programs. Enter your old password or
the default password `000000´. You will then be asked to enter your new
password. Press the Ok button to confirm your new password.
Once it is confirmed press EXIT to exit the menu. The master unlock
password is`888888´.
(c) Restore Factory Default
You can cancel all settings and restore the factory default setting.
Note: All settings will be deleted. You will have to search the channel list once more.
(d) Information
Display information of model, SW and HM version.
(e) Recall list
You can change the function of the Recall button. If it is set “off” the
Receiver displays the last program upon pressing the Recall button. If it is
Set “on”, a list of programs seen at last will be displayed upon pressing
Recall.
(f) Software Update)
Used for software update.
12
(7.) USB
To access the menu press the MENU button and select [USB] using the
RIGHT/LEFT keys. The menu provides options to playback Music, Photo and
Multimedia files. It can support AVI, MP3, WMA, JPEG and BMP formats.
(a) Multimedia:
When a USB device is attached you can select from the Music,
Photo, Movie or PVR options in this menu using the RIGHT/LEFT keys and OK to
Select. If a USB device is not connected, the warning message “No USB device
Is Found” will appear.
(b) Photo configuration:
-Slide Time: adjust slide show interval to 1~8 seconds.
-Slide mode: adjust slide show effect as mode 0~59 or random.
-Aspect Ratio:
[Keep]: Play picture in its original aspect.
[Discard]: Play picture in full screen mode.
(c) Movie Configuration:
-Subtitle Specific:
Select the subtitle size. Available settings are Small, Normal and Big..
-Subtitle BG:
Select the subtitle background colour. Available settings are transparent, gray,
yellow, green and white.
- Subtitle Font Color:
Select the subtitle font color. Available settings are white, black, red, blue
and green.
(d) USB PVR Configuration:
-Recording Device:
Displays information of the connected USB storage device.
-Format:
Formats of the connected USB device. (ATTENTION: IT WILL DELETE ALL FILES!)
13
Time shift and Recording
Time shift
Press [Time shift/Pause] key first then at any time you can press the [Play] key
and the unit will start playing recorded programs from the start.
Press [GOTO] to select the playing time. The Play time cannot exceed the current time.
Press [Fast forward]/ [Fast back] to move through the current recording.
Note: Time shifting is only available when USB HDD is connected to the system
and read/write speed is high enough to support that.
Press [Stop] key the first time to end the playing mode. The unit will keep
recording but will return to current time. If you press [Pause] the playback will
start again from the beginning of the recording. Press [Stop] key again to stop
the recording.
Recording
Press [REC] key. The current program can then be recorded to the USB disc. Press
[REC]
repeatedly to choose the recording time. Press [INFO] key to see the recording
information during the recording as below:
14
Timer
The most unique feature of the STB is its ability to record live TV. There are two ways
You can do this. The first is to simply connect a USB storage device to your STB
And press the record button on the remote. The other way is to schedule a program to
record using the blue button or from within the EPG menu.
To schedule a recording follow the following steps:
Press the blue button on the remote.
Press the red button to add a schedule.
Adjust the settings according to the schedule of
the event. (Start-End time, record/view, etc)
Press OK button
Press EXIT button.
You will be able to select from the following two options:
Mode: View or Record
If at anytime you wish to delete a scheduled event you can press the blue button
to view the list of scheduled events. Use the arrow keys on the remote to highlight the
Event you wish to delete then press the blue button to delete it.
The recording files can be deleted on this unit. You can go to the PVR and press the
yellow
button to delete it. The TV program is recorded to file at.mts format which can be
played back on this unit and PC using a suitable player, but cannot be played back
on DVD or PDVD.
For recording high definition TV programs, the version (and speed) of the USB device
should
Be 2.0 or above, otherwise the unit may not record the HD programs correctly.
When recording to a USB stick or external Harddisc on this model, you have to wait a
few
seconds before pushing rec. after inserting the media. Otherwise the unit can freeze in
the signal. If that happens, then please take off the power and connect again to fix this.
Note:
We cannot guarantee compatibility (operation and/or bus power) with all
USB mass storage devices and assume no responsibility for any loss of
data that may occur when connected to this unit.
With large amounts of data, it may take longer for the system to read the
contents of a USB device.
Some USB devices may not be properly recognised.
Even when they are in supported format, some files may not play or
Display depending on the content.
Please use external AC-DC power adapter if the current consumption of the
USB device
is larger than 500mA.
15
Easy Find LNB in connection
For the first time, the Easy Find LNB enables the orientation of a satellite antenna without the help of a second person or direct view on the TV set. Also, this LNB replaces
orientation aids such as Sat-Finder or other expensive measuring instruments.
The Easy Find LNB is not included in the scope of supply of the digital satellite receiver.
16
Connection and rough direction of the antenna
You must connect the antenna cable to the LNB before directing the antenna.
Please follow also the instructions in the operating manual of
your satellite antenna.
Caution!
The receiver should only be connected to the power supply after you
have connected the antenna cable to the receiver.
If you have not mounted and directed your satellite system yet, you must first find a
suitable location for mounting the antenna. Please make sure that the antenna is directed correctly (to the south). Further information on the exact position of your specific
satellite can be found on www.dishpointer.com.
This means, you must have a free view in southern direction when you stand behind
the antenna. Keep in mind that the antenna must never be mounted behind a balustrade, a handrail or other obstacles (such as trees).
Please make sure to mount the LNB correctly. The following drawing will help you:
of the sun
When searching the southern direction, the position
might help you. During summer time, the sun is exactly in southern
position at 12 am noon and during winter at 1 pm.
17
South
East
You must have this view when standing behind the antenna.
In this angle of 90° nearly all common satellite positions, such as ASTRA1 19.2° E,
Eutelsat Hotbird 13° E, and Türksat 42° E, can be found.
Depending on which satellite you wish to receive, there must be free sight without
any obstacles in this angle. This must especially be ensured with an installation on a
wall. Make sure that you can turn your antenna completely without having contact with
the wall of your house before installing a corresponding wall bracket (not necessarily
included in the scope of supply). Please note also that the antenna should be mounted
in an angle of 90° to the wall.
After having made all relevant connections you can now start with the setup of the antenna. Please check again that the receiver is connected with the Easy Find LNB at the
antenna and the receiver with your TV set. As soon as these cable connections have
been made correctly, you can switch on the devices.
First step
Switch on your TV set. Please make sure that your TV set has been adjusted to the
receiver. In case of a Scart connection, the TV set must be set to the correct AV channel. In case of HDMI connections, the TV set must be switched over to HDMI.
Second step
Switch on the receiver. As the antenna has not been directed yet, the Receiver will
show no Signal Message.
18
Third step
Now, you can begin to make the correct settings for your receiver so that then you will
be able to direct the antenna with the Easy Find LNB. Please proceed as follows: Press
the OK key of the remote control of your receiver. Now you should see the following
image on your TV screen.
Fourth step
Press the GoTo key of the remote control of your receiver once. Now, the Easy Find
LNB list appears:
From this menu, select the satellite you wish to find with the CH▲ or CH▼ keys. The
corresponding satellite must be marked grey. If this is the case, press the „OK“ key to
confirm your selection.
19
Fifth step
Now you see the following image on your TV screen:
Now, press the INFO key of the remote control of your receiver twice. The following will
be displayed:
Press the red function key to enable the Easy Find function.
Now, you can go to your antenna to direct it. You will note that the LED on your Easy
Find LNB has begun to flash. This means, it is active. Now, the antenna can be
directed to the selected satellite.
Sixth step
Now, begin with the direction of your antenna. Please proceed as follows: Stand behind
the antenna and move the antenna completely into vertical position (see picture B).
Make sure that the receiving component of the antenna (Easy Find LNB) is directed
towards the south (see picture A).
a) Now, turn your antenna slowly to the East (left) or to the West (right) while observing
the still flashing LED diode of your Easy Find LNB, depending on where your selected
satellite is located.
20
b) If you are approaching a satellite, the LED diode begins to flash faster with red light.
With increasing signal strength, the colour changes to orange and the LED diode does
not flash anymore.
Please note that your antenna is also able to receive other satellites. Also with other
satellites it is possible that the LED diode changes to orange, with or without flashing.
If you have found the correct satellite - the one you have selected - it must be possible to direct the antenna in such a way that the LED diode changes to green without
flashing. This can only be the case with the satellite you have selected from the menu
of the receiver.
Should it be impossible, move your antenna in such a way that it is 1° flatter. For this
purpose, pull at the top of the antenna towards your position. A scale of vertical elevation angles can help you in this process:
Now, return the antenna slowly to its initial position towards the south. Then, adjust
the antenna once again so that it is 1° flatter (pull it towards your position) and move
it again to the left in eastern direction. Repeat these steps until the vertical elevation
angle crosses the horizontal azimuth angle, e.g. for ASTRA1 at 19.2° East, and the
LED diode on your Easy Find LNB shows a green light without flashing.
In case of digital satellite reception, the receiver receives the transmission signal
with a time lag. Therefore, turn the antenna very slowly and step by step.
21
Seventh step
As soon as you have found the selected satellite, you will see the programme list of the
set satellite on the screen, and also the sound will be transmitted.
The installation via the Easy Find LNB is done now. The current channel will be displayed.
The Easy Find function is deselected by pressing the red function key. Signal strength
and quality are displayed again.
Now, optimise the antenna direction until you have reached the maximum value on the
signal-quality bar. The value may vary according to the situation, weather and signal
strength. However, you should reach a minimum of 60%. Exit the menu now by pressing the “EXIT“ key of your remote control.
Eighth step
Please check once again if you are receiving the programme selected on the receiver.
Press the OK key of the remote control and then the 1 key. You will see the general
channel list „All satellites“. Now, check also if you can receive further channels of the
set satellite. The installation process is complete.
22
Troubleshooting
Problem
No power
Potential Reasons
What to do
Power isn´t connected
Connect the power
The power switch is not onSwitch on the power
Dish direction not correct. Realign the dish.
Please use a bigger
No DTV signal
Signal is too weak.
dish.
Retry scan DTV
No search program.
program.
no sound from
no or incorrect connection Connect the audio cable
the speakers
with audio cable.
correctly.
Turn off the mute
Sound on mute.
function.
Resoulution not supported Press V-FORMAT button
by TV set.
to change resolution.
Only sound,
No or incorrect connection Make sure cables are
no image on the with AV cable.
connected correctly.
Press <TV/RADIO> key
screen
The program is a radio
to
program.
shift into TV mode.
The battery is exhausted. Change battery.
Remote Control Remote Control is not
Adjust the position of the
Remote Control and
is not responding facing or close enough
move
to the Set Top Box.
closer to the unit.
Picture is breaking the signal is too weak.
check aerial cable and
up
connectins.
23
Technical Specifications
Item
Sub Item
Parameter
Input Frequency
950 - 2150MHz
Tuner
Impedance
75 Ohm
Symbol rate
2 - 45Mbps
Modulation
QPSK 8PSK
Decoder Format
MPEG4AVC/H.264 HP@L4
Video
Output Format
[email protected]
480i/480p/576i/576p/720p/1080i
/1080p
Output Port
Audio
Decoder Format
HDMI, SCART
MPEG-1 (layer1&2&3), WMA,
AC3
Audio Output
Coaxial, L/R (SCART)
USB 2.0 Supported Capacity
Supported Media
Supply Voltage
~100-240V 50/60Hz
Maximum Power Consumption
<25W
Standby Power Consumption
<1W
Weight
05.kg
Size
168 x 95 x 38 mm
Power
24
500 GB
MP3, WMA, JPEG, BMP, AVI,
MKV
Notice about recycling
Your product is designed and manufactured with high quality materials and
components which can be
Recycled and reused.
This symbol means that electrical equipment, at heir end-of-life, should be
disposed of
separately from your household waste.
Please dispose of this equipment at your local community waste collection/
recycling centre. In the
European Union there are separate collection systems for used electrical and
electronic products.
Please help us to conserve the environment we live in!
Declaration of Conformity
This product complies with the requirements of the following directives:
Electromagnetic Compatibility (EMC) Directive: 2007/108/EC
Low Voltage Directive (LVD): 2006/96/EC
CE Marking Directive: 93/68/EEC
Energy Using Products Directive: 2005/32/EC
The above Directives declare that the DVB-T Set Top Box B1602 is in
Compliance with following standards:
EN55013:2001+A1:2003+A2:2006
EN61000-3-2:2006
EN61000-3-3:1995+A1:2001+A2:2005
EN55020:2007
EN60065:2002+A1:2006
ISO/IEC 17025
COMMISSION REGULATION (EC) No 107/2009
25