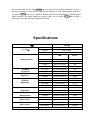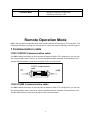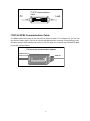
1
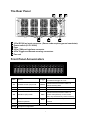
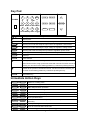
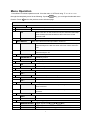
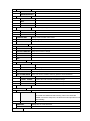
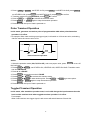
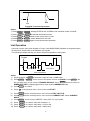
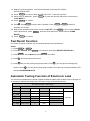
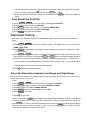
USER’S GUIDE
Programmable DC Electronic Load
Models IT8516S
© Copyright 2004
All Rights Reserved
Ver1.1/APR, 2006/ IT8500-401
1
QUICK REFERENCE ......................................................................................................................... 6
THE FRONT PANEL............................................................................................................................ 6
THE REAR PANEL.............................................................................................................................. 7
FRONT PANEL ANNUNCIATORS .......................................................................................................... 7
KEY PAD........................................................................................................................................... 8
IMMEDIATE ACTION KEYS .................................................................................................................. 8
MENU OPERATION ............................................................................................................................ 9
GENERAL INFORMATION............................................................................................................... 11
DOCUMENT ORIENTATION ............................................................................................................... 11
GETTING STARTED MAP .................................................................................................................. 11
OPTIONS AND ACCESSORIES ........................................................................................................... 11
Options...................................................................................................................................... 11
Accessories............................................................................................................................... 12
DESCRIPTION .................................................................................................................................. 12
FEATURES AND CAPABILITIES .......................................................................................................... 12
FRONT PANEL CONTROLS ............................................................................................................... 12
REMOTE PROGRAMMING ................................................................................................................. 12
OPERATING MODES ........................................................................................................................ 12
Constant Current(CC)Mode ................................................................................................. 13
Constant Resistance (CR) Mode .............................................................................................. 13
Constant Voltage (CV) Mode.................................................................................................... 13
Constant Power (CW) Mode..................................................................................................... 14
TRANSIENT OPERATION .................................................................................................................. 14
Continuous ................................................................................................................................ 14
Pulse ......................................................................................................................................... 14
Trigger Mode............................................................................................................................. 15
LIST OPERATION ............................................................................................................................. 15
TRIGGERED OPERATION .................................................................................................................. 16
INPUT CONTROL.............................................................................................................................. 16
Short On/Off .............................................................................................................................. 16
Input On/Off .............................................................................................................................. 16
Operation Range ...................................................................................................................... 17
PROTECTION FEATURES.................................................................................................................. 17
REMOTE SENSE FUNCTION ............................................................................................................. 18
SAVING AND RECALLING SETTINGS.................................................................................................. 19
BATTERY TESTING .......................................................................................................................... 19
VON/VOFF OPERATION ................................................................................................................... 21
INSTALLATION................................................................................................................................. 21
INSPECTION .................................................................................................................................... 21
Damage .................................................................................................................................... 21
Items Supplied .......................................................................................................................... 21
Cleaning .................................................................................................................................... 22
LOCATION ....................................................................................................................................... 22
Installation ................................................................................................................................. 22
2
BENCH OPERATION ......................................................................................................................... 23
INPUT CONNECTIONS ...................................................................................................................... 23
Power Cord ............................................................................................................................... 23
TURN-ON CHECKOUT .................................................................................................................... 24
INTRODUCTION................................................................................................................................ 24
CHECKOUT PROCEDURE ................................................................................................................. 24
In Case of Trouble .................................................................................................................... 24
FRONT PANEL OPERATION........................................................................................................... 25
EXAMPLE ........................................................................................................................................ 25
I-set (set up a constant current from 0 to Max current ) ........................................................... 25
P-set (set up a constant power from 0 to Max power) ............................................................. 26
R-set (set up a constant resistance from 0.1Ω to 4000Ω)........................................................ 26
V-set (set up a constant voltage from 0.1V to Max voltage) .................................................... 26
Shift + Store .............................................................................................................................. 26
Shift + Recall............................................................................................................................. 27
In On/Off input setting ............................................................................................................... 27
Transition Parameter Setting .................................................................................................... 27
Continuous Transient Operation............................................................................................... 27
Pulse Transient Operation ........................................................................................................ 28
Toggled Transient Operation .................................................................................................... 28
List Operation ........................................................................................................................... 29
FAST RECALL FUNCTION ................................................................................................................. 30
AUTOMATIC TESTING FUNCTION OF ELECTRONIC LOAD.................................................................... 30
Edit the Testing File .................................................................................................................. 31
Fast Recall the Test File ........................................................................................................... 32
Automatic Testing ..................................................................................................................... 32
Select the Resolution between Low Range and High Range .................................................. 32
SPECIFICATIONS ............................................................................................................................ 33
REMOTE OPERATION MODE ........................................................................................................ 34
1 COMMUNICATION CABLE ............................................................................................................... 34
2 COMMUNICATION BETWEEN ELECTRONIC LOAD AND PC ................................................................ 35
3
Warranty Information
Certification
We certify that this product met its published specifications at time of shipment from the factory.
Warranty
This hardware product is warranted against defects in material and workmanship for a period of
ONE year from date of delivery. IT8500 series electronic load for use with a hardware product and
when properly installed on that hardware product, are warranted not to fail to execute their
programming instructions due to defects in material and workmanship for a period of 90 days from
date of delivery. During the warranty period our company will either repair or replace products which
prove to be defective. Our company does not warranty that the operation for the software firmware
or hardware shall be uninterrupted or error free.
For warranty service, with the exception of warranty options, this product must be returned to a
service facility designated by our company. Customer shall prepay shipping charges by (and shall
pay all duty and taxes) for products returned to our place for warranty service. Our company shall
pay for return of products to Customer.
Limitation of Warranty
The foregoing warranty shall not apply to defects resulting from improper or inadequate
maintenance by the Customer, Customer-supplied software or interfacing, unauthorized
modification or misuse, operation outside of the environmental specifications for the product, or
improper site preparation and maintenance.
Assistance
The above statements apply only to the standard product warranty. Warranty options product
maintenance agreements and customer assistance agreements are also available.
Safety Summary
The following general safety precautions must be observed during all phases of operation of this
instrument. Failure to comply with these precautions or with specific warnings elsewhere in this
manual violates safety standards of design, manufacture, and intended use of the instrument .We
assumes no liability for the customer’s failure to comply with these requirements.
Environmental Conditions
This instrument is intended for indoor use. Pollution degree 2 environments. It is designed to
operate at a maximum relative humidity of 95% and at altitudes of up to 2000 meters. Refer to the
specifications tables for the ac mains voltage requirements and ambient operating temperature
range.
Before Applying Power
Verify that all safety precautions are taken. Note the instrument's external markings described under
"Safety Symbols".
4
Ground the Instrument
This product is a Safety Class 1 instrument (provided with a protective earth terminal). To minimize
shock hazard, the instrument chassis and cover must be connected to an electrical ground. The
instrument must be connected to the ac power mains through a grounded power cable, with the
ground wire firmly connected to an electrical ground (safety ground) at the power outlet. Note: Any
interruption of the protective (grounding) conductor or disconnection of the protective earth terminal
will cause a potential shock hazard that could result in personal injury.
DO NOT OPERATE IN AN EXPLOSIVE ATMOSPHERE
Do not operate the instrument in the presence of fumes or flammable gases.
KEEP AWAY FROM LIVE CIRCUITS
Operating personnel must not remove instrument covers except as instructed in this Guide for
installing or removing electronic load modules. Component replacement and internal adjustments
must be made only by qualified service personnel. Do not replace components with power cable
connected. Under certain conditions dangerous voltages may exist even with the power cable
removed. To avoid injuries always disconnect power, discharge circuits, and remove external
voltage sources before touching components.
DO NOT SERVICE OR ADJUST ALONE
Do not try to do some internal service or adjustment unless another person capable of rendering
first aid resuscitation is present.
Safety Symbols
Direct current
Alternating current
Both direct and alternating current
Protective earth (ground) terminal
Caution (refer to accompanying documents)
WARNING
The WARNING sign denotes a hazard. It calls attention to a procedure, practice, or the like, which, if
not correctly performed or adhered to, could result in personal injury. Do not proceed beyond a
WARNING sign until the indicated conditions are fully understood and met.
CAUTION
The CAUTION sign denotes a hazard. It calls attention to an operating procedure, or the like, which,
if not correctly performed or adhered to, could result in damage to or destruction of part or all of the
5
product. Do not proceed beyond a CAUTION sign until the indicated conditions are fully understood
and met.
Quick Reference
The Front Panel
1
3
1
2
3
4
5
6
7
4
2
5
6
7
16-character display shows voltage and current measurements.
Rotary knob
Power switch ON/OFF Input terminals
Entry keys:(numeric keys)
Enter values.
Increasing or decreasing the setup values.
Menu commands.
Keypad:
Enable/disable input.
Setup the current, resistance and voltage modes.
Set and reset protection functions.
Scroll through front panel.
ON/OFF Input terminals
6
The Rear Panel
1
5
6
1
2
3
4
5
6
2
3
4
3 Pin IEC320 ac input connector. (Power code requires ground conductor).
Power switch (110V / 220V)
Fuse
9-Pin COM port interface connector
4 Pin Trigger and Remote sensing connectors
Fan cool
Front Panel Annunciators
Indicates that the electronic load is waiting
OFF
input off
Trigger
CC
Constant current (CC) mode.
Sense
CV
Constant voltage (CV) mode.
Error
A errors have occurred
CW
Constant power (CW) mode.
Link
In the communication state
an initiate and trigger to occur.
Indicates that the electronic load is in
Remote sensing state
Indicates that the electronic load is in
CR
Resistance (CR) mode.
remote state (RS-232). In the remote
Rmt
state, only the active key is the Local key.
Tran
List
The input channel is enabled for
transient operation.
List mode is initiated or running.
Indicates that the shift key has been
Shift
pressed.
keyboard is locked by password
Lock
Unreg The input is unregulated.
7
Key Pad
POWER
1
2
A
B
4
5
3
ESC
I-set
V-set
0
P-set
R-set
Shift
Input on/off
Tran
6
ENTER
Store Recall S-Tran Menu
7
8
9
Local Battery Short Trigger
~ 9
0
0 through 9 are used for entering numeric values.
Decimal point.
ESC
The escape key. It may used to exit any working state.
I-set
Choosing CC mode and setup the input current of regulation current mode.
V-set
Choosing CV mode and setup the input voltage of regulation voltage mode.
P-set
Choosing CW mode and setup the input watt of regulation power mode.
R-set
Choosing CR mode and setup the input resistor of regulation resistance mode.
Shift
Shift keys.
On/Off
Power ON/OFF
△
Scrolling keys let you move through the commands in the presently
Select function menu, bring up the next command in the list. Function menus are
circular; you can return to the starting position by continuous pressing the key.
▽
Go back to the previous command in the list .Function menus are circular; you
can return to the starting position by continuous pressing the key.
Enter
Confirmation key.
Immediate Action Keys
Shift
+
A
Switch to A setting value
+
Shift +
B
Switch to B setting value
Tran
Start /Stop transition operation
Shift
Store
Press to store an existing electronic load state in non-volatile Memory.
+ Recall
Shift + S-Tran
Shift + Menu
Press to recall an existing electronic load state in non-volatile Memory.
Shift
+
Shift
Shift
Shift
+ Local
+ Battery
Shift + Short
Shift + Trigger
Set the transition operation parameter
Enter operation Menu.
When the load is controlled by PC, press these keys to enable the front
panel key
Battery discharge electronic operation
Turn on or turn off short circuit Test.
Causes a trigger to occur. Change the trigger source is IMMIDIATE
8
Menu Operation
Press Menu to indicate operation mode .View the menu in VFD and using ▽ and △ to scroll
through the completely menu list as following. If press Enter key, you could get the selected menu
function. Press
ESC
back to the previous menu selection page.
MENU
CONFIG
INITIAL CONFIG
Return to the factory default setup value.
POWER-ON RECALL Setting Power-on state of Load.
When users turn on the electronic load; the electronic load setup
ON
value will keep the state of last time when users turn off the
electronic load.
OFF<DEFAULT>
INPUT RECALL
Disable this function.
Setup of the electronic load input state in Power on.
When users turn on the electronic load; the electronic load input
ON
state will keep as the last time when users turn off the electronic
load.
OFF<DEFAULT>
When users turn on the electronic load, the electronic load input
state will keep the off.
KEY SOUND SET
Keypad sound setting.
ON<DEFAULT>
Enable key sound.
OFF
Disable key sound.
KNOB LOCK SET
Setup rotary knob lock state.
ON
Lock Rotary knob.
OFF<DEFAULT>
Unlock Rotary knob.
SHORT CUT RECALL Quickly recall the data stored before
ON
OFF>
RANG SELECT
Change the measure precision of voltage and current
ON
OFF>
REMOTE SENSE
Setup voltage measurement Mode.
ON
The electronic load will measure input voltage from the remote
sense connector.
OFF<DEFAULT>
The electronic load will measure input voltage from the front panel
connector.
ADC UPDATE RATE
HIGH
LOW<DEFAULT>
Choosing the trigger signals source.
IMMEDIATE<DEF> Trigger signals from Shift + Trigger key
Trigger signals from the TRIG connector in the rear panel.
EXTERNAL
TRIGGER SOURCE
BUS
Communication command trigger mode.
9
CONNECT MODE
MAXTIDLEXING
SEPARATE<DEF>
BAUDRATE SET
Setting baud rate.
9600<DEFAULT>
9600
19200
38400
COMM. PARITY SET Command parity setting.
NONE<DEFAULT>
EVEN
ODD
ADDRESS SET
Setting communication Flow mode
KEY LOCK SET
Setting keypad password.
EXIT
SYSTTEM SET
MAX CURRENT SET Setup the maximum current.
MAX POWER SET
Setup the maximum power.
MAX VOLTAGE SET Setup the maximum voltage.
VOLTAGE ONSET
VOLTAGE OFFSET
EXIT
LIST SET
Setting operation mode.
MODE SET
FIXED MODE
Fixed mode.
LIST MODE
Choosing List mode.
CALL LIST FILE
Recall list operation file.
EDIT LIST FILE
Edit list operation file.
LIST STORE MODE Users can choose 4 kind of memory space to save the list file.
8 X 120
STEPS
Total 8 files and each file have120 list steps.
4 X 250
STEPS
Total 4 files and each file have250 list steps.
2 X 500
STEPS
Total 2 files and each file have500 list steps.
1 X 1000 STEPS
Total 1 file and each file have1000 list steps.
EXIT
LOAD ON TIMER
TIMER STATE
Setting LOAD ON timer state
When users choose ON, and then turn on the electronic load input,
ON
the LOAD ON TIMER will start working. When the LOAD ON
TIMER is reach the setup time, the electronic load input will turn off
automatically.
OFF<DEFAULT>
TIMER SET
Setting time of LOAD ON timer.
EXIT
EXIT
10
General Information
Document Orientation
This manual describes the operation of the IT Model 8500 electronic loads. Unless otherwise noted,
all units will be referred to by the description "electronic load" throughout this User's manual. The
following documents and software are shipped with your electronic load. This User's Guide (this
document), contains installation, checkout, front panel information and detailed programming
information.
The Getting Started Map will help you find the information you need to complete the specific task
that you want to accomplish. Refer to the table of contents or index of each guide for a complete list
of the information contained within.
Getting Started Map
Task
Where to find information
Checking out the unit
User’s Guide
Verifying proper operation
Using the front panel
Calibrating the unit
User’s Guide
Using the front panel
Front panel keys
Front panel examples
User’s Guide
Using the programming interface
RS-232 interface
User’s Guide
Remote operation mode
Protocol information
Controller Program and Software driver:
CD-ROM
Power View PV8500 software
(If you’ve purchased the communication
Calibration PC8500 software
cable, you will get it for free)
Active driver PD8500 OCX software
Options and Accessories
Options
IT-E151 Rack mounts kit: for install one or two IT8500 series load on the 19 inch rack.
IT-E131 isolated communication cable: This cable converts the electronic load’s serial port (TTL
5V level) to PC RS232 interface.
IT-E132 isolated communication cable: This cable converts the electronic load’s serial port (TTL
5V level) to PC USB interface.
IT-E134 isolated communication cable: This cable converts the electronic load’s serial port (TTL
5V level) to PC GPIB interface.
11
Accessories
Power cord
User’s manual
Software CD-Rom (if you buy the communication cable, you’ll get it for free)
Calibration testing report
Description
The IT8500 series electronic load is used for design, manufacturing, and evaluation of DC power supplies,
batteries, and power components and so on. The electronic load contains a processor, serial port
connector, front-panel keypad and VFD, and other circuits common to the other entire load module.
IT8500 series electronic load could work in constant current (CC) mode, constant voltage (CV) mode, or
constant resistance (CR) mode and constant power (CW) mode.
Features and Capabilities
• High accuracy and high resolution
• Capable to work with constant current (CC), constant voltage (CV), constant resistance (CR) mode and
constant power (CW) operation.
• Serial port interface-DB9-RS232 port.
• Triggered input and measurement functions.
• Within the controlled keypad in the front panel
• Built-in pulse generator for continuous, pulsed, and toggled transient mode operation.
• Over voltage, over current, overpower, and over temperature protection.
• Electronic load calibrate by Software.
• Fan speed control by temperature.
• VFD display
• Short circuit test
• Battery testing function.
Front Panel Controls
The front panel has keyboard controls for setting the input voltage, current and resistance. The panel
display provides digital readouts of a number of functions including the inputs. Annunciators display the
operating status of the electronic load.
Remote Programming
The electronic load may be remotely programmed from the computer via the IT-E131 isolated
communication cable.
Operating Modes
The four modes of operation are:
1: Constant current (CC).
2: Constant voltage (CV).
3: Constant resistance (CR).
4: Constant power (CW)
12
Constant Current(CC)Mode
In this mode, the electronic load will sink a current in accordance with the programmed value regardless
of the input voltage. CC mode can be set with front panel keys. The CC mode parameters are
discussed in the following paragraphs.
I
CURRENT
SETTING
LOAD
CURRENT
LOAD INPUT
VOLTAGE
V
CONSTANTCURRENT MODE
Constant Resistance (CR) Mode
In this mode, the module will sink a current linearly proportional to the input voltage in accordance with
the programmed resistance. The CR mode can be set at the front panel. The CR mode parameters are
described in the following paragraph.
I
SLOPE
RESISTANCE
SETTING
LOAD
CURRENT
LOAD INPUT
VOLTAGE
V
CONSTANT RESISTANCE MODE
Constant Voltage (CV) Mode
In this mode, the electronic load will attempt to sink enough current to control the source voltage to the
programmed value. The module acts as a shunt voltage regulator when operating in the CV mode. The
CV mode can be set at the front panel. The CV mode parameters are described in the following
paragraphs.
V
VOLT
SETTING
LOAD INPUT
VOLTAGE
LOAD CURRENT
I
CONSTANT VOLTAGE MODE
13
Constant Power (CW) Mode
In this mode, the electronic loads will consumption power accordance with the programmed value
regardless of the input voltage. The CW mode can be set with front panel keys. The CW mode
parameters are discussed in the following paragraphs.
V
POWER
SETTING
LOAD INPUT V2
VOLTAGE
V3
I
I2 I3
LOAD
CURRENT
CONSTANT POWER MODE
Transient Operation
Transient operation enables the electronic load to periodically switch between two load levels, as might
be required for testing power supplies. A power supply's regulation and transient characteristics can be
evaluated by monitoring the supply's output voltage under varying combinations of load levels, frequency,
and duty cycle.
Transient operation can be turned on and off at the front panel or PC via the IT-E131 isolated
communication cable. Before you turn on transient operation, you should set the desired mode of
operation as well as all of the parameters associated with transient operation. Transient operation may be
used in the CC, CR, or CV or CW modes and can be setup in continuous, pulsed, or toggled operation
mode.
Continuous
Generates a repetitive pulse stream the toggles between two load levels and change the state
between value A and value B.
10A
5A
2.0ms
3.0ms
Continuous Transient Operation
Pulse
Switch to value B as receiving one trigger signal , taking the pulse time(TWD) of value B , Load will
return to Value A .
14
10A
5A
TWD
10ms
TWD
10ms
TRIG
TRIG
Pulsed Transient Operation
Trigger Mode
Switching the state between value A and value B once receiving a triggering signal
10A
5A
TRG
TRG
Toggled Transient Operation
List Operation
List mode lets you generate complex sequences of input changes with rapid, precise timing, which may
be synchronized with internal or external signals. List operation can be changed by edit every step value
and time in list operation. The parameter of list operation include the group file name, input step setting
(the max steps is 1000 steps),time of one step(1mS~1h)and setting value of one step. In CC mode, dwell
time range is 1mS to 6S, which also have an associated value. Note that lists data can only be saved in
total 1000 steps memory of 4 situations.
GROUP
Total = 1000 steps
1
1000 steps
2
500 steps
4
8
250 steps
120 steps
500 steps
250 steps
250 steps
120 steps 120 steps 120 steps 120 steps
250 steps
120steps 120 steps
120 steps
When receiving one trigger signal, it will start the list operation until receiving another trigger signal
or finish the List operation.
Trigger
0
1
2
3 4
5
List count=1
List count=2
List sequence
15
Triggered Operation
The electronic load has various triggering modes to allow synchronization with other test equipment or
events. Such as:
Keypad triggering mode: Press Shift + Trigger to trigger the electronic load.
TTL triggering mode: Send a high pulse with a constant time more than 5m Sec to the trigger
terminals in rear panel to trigger the electronic load.
Command triggering mode: Send triggering command to the electronic load via the serial port.
Input Control
Short On/Off
Load can simulate a short circuit at its input by turning the load on with full-scale current. The short
circuit can be toggled on/off at the front panel using the Shift + Short .Short operation is not
influence the operation setting current value , When short operation is on OFF state , Load back to
the original setting state.
The actual value of the electronic short is dependent on the mode and current range that are
active when the short is turned on.
In CC, CW and CR mode, the max short-circuit current value is 1.2 times of the current range. In CV
mode, short-circuit operation is same as the operation of setting CV to 0V.
NOTE
Turning the Short Test on in CV mode may cause the load to draw so much current that the
software current limit operates, which may turn the input off. Turning the short circuit on does not
affect the programmed settings, and the load input will return to the previously programmed values
when the short is turned off.
Input On/Off
Electronic load's input can be toggled on/off at the front panel. Turning the input off (zero current)
does not affect the programmed settings. The input will return to the previously programmed values
when the input is turned on again.
NOTE
The Input On/Off command supersedes the mode commands and Short Test
On/Off command.
16
Operation Range
Work in the range of Rated Current, Rated voltage and Rated Power, The figure is as following:
Rated voltage
INPUT VOLTAGE V
Rated power
Input current I Rated current
Operation mode change state
Rated voltage
INPUT VOLTAGE V
C
Software Power Limit
Software Current Limit
A
Input current I Rated current
Protection Features
Electronic load includes the following protection features:
Over Voltage
If input voltage exceeds the voltage limit set by the user, the DC load will turn the input OFF and the
buzzer will turn on. The display will show OVER VOLTAGE as following. The maximum voltage limit
value is equal to 100%+5% of the maximum rated voltage for each model.
OVER VOLTAGE
Over Current
When operating in CR, CC or CP mode, the load current will be limited by a current limit value set by the
user. The maximum current limit value is equal to the maximum rated current for each model. Once the
maximum current limit is reached, the DC Load will enter the over current protection state. If the DC
load previously operated CR or CP mode, the DC load will automatically revert to CC mode and the VFD
display will indicate CC.
When the DC load operates in a combined CV / transition mode or CV / List
mode, the buzzer will sound if the input current exceeds the current limit and the display will show a
flashing current value.
Over Power
If the input power exceeds the power limit in the normal operation mode, Load will work in the over
power protection state. VFD displays the information as CW.
17
When work in transition mode and list mode, if the input power exceeds the power limit. Buzzer is
mooing, VFD display the flashing current value and voltage value.
Reverse Voltage
This feature protects the load module in case the input DC voltage lines are connected with wrong
polarity, if a reverse voltage condition is detected, Buzzer is mooing. VFD display as following:
REVERSE VOLTAGE
Over Temperature
If internal power components ‘s temperature exceeds safe limits (80℃), Over temperature
protection is on work . Load will turn off the input and Buzzer is mooing, VFD display as following:
OVER HEAT
Remote Sense Function
When work in CC, CV, CR and CP mode, if load consumes biggish current, it will cause one
depressed voltage in the connection line between tested machine and terminals of Load. In order to
assure testing precision, Load provides one remote testing terminals in the rear panel, Users could
test the output terminals voltage of tested machine through it. Users should set the Load in
REMOTE mode before using the function.
4 Pin trigger and remote sensing connectors:
+ _
Sense
.
A
IN
Trigger
B
Remote Sensing: SENSE (+) and SENSE (–) are the remote sensing inputs. By eliminating the
effect of the inevitable voltage drop in the load leads, remote sensing provides greater accuracy by
allowing the load to regulate directly at the source's output terminals.
TRIG: A TTL-compatible input that responds to external edge trigger signal. A trigger applied to
this input can be used to change settings (voltage, current, resistance, etc.), toggle between
settings in transient-toggle mode, or generate a pulse in transient-pulse mode.
You must set the remote sense mode in the menu before using the remote sense function.
Action:
(1) Press Shift + Menu key into the menu
(2) VFD displays >CONFIG, press Enter key to confirm
(3) Press
key to choose>REMOTE SENSE, press Enter key to confirm
18
(4) Press
/
to choose>ON, press Enter key to confirm. And the remote sense function
has been set.
Wiring diagram for remote sense
Input port in front panel
+ -
+ UUT
Sense port in rear panel
+ -
Saving and Recalling Settings
The electronic load has internal registers in which settings (mode, current, voltage, resistance,
transient level, etc.).Users could use Shift + Store and Shift + Recall to save and
recall the relative data as following:
CC value /CW value /CR value /CV value
Transition current A value /Transition current B value /Transition voltage A value /Transition voltage
B value / Transition power A value /Transition power B value /Transition Resistance A value
/Transition Resistance B value
Current A pulse width time/ Current B pulse width time/Voltage A pulse width time/ Voltage B pulse
width time /Power A pulse width time/Power B pulse width time /Resistance A pulse width time
/Resistance B width time
Transition current testing mode/Transition voltage testing mode/Transition power testing mode
/Transition resistance testing mode
Max current value / Max voltage value / Max power value
Action
1) Press I-set
, set a value of current or voltage, press Enter
2) Press Shift
+ Store
3) Press Shift
+ Recall , set the store code that you set before, press Enter to confirm, then
to confirm.
set a store code at random, press Enter
to confirm.
you can get the number stored.
Battery Testing
Experiment proves the test with load is the best method to ensure the battery whether work well or
not. Only with the correct load testing, the battery can be confirmed if it was being the expectant life
curve location. The electronic loads can be used to test any type of the battery nowadays.
As the accumulator is used by any sheltered equipment or the uninterrupted service system, it is
19
necessary to use the load testing. Because the battery nearly is the lowest reliability component, so
it must use the load testing periodic ensure the security of the battery.
Capability test
Electronic load uses CC mode to do the capability test. Make a program to set the voltage in off state.
The accumulator have too low voltage, electronic load intermits test if system checks the accumulator
which is near to one rating or in insecurity state. In testing procedure, you could see the accumulator
voltage, discharge current, electronic load power and spare capability of accumulator. If connecting
with PC software, discharge curve could be displayed in window. This test can reflect the reliability
and using time of accumulator. So, it’s necessary to do the test before you change another new
accumulator.
Operation:
1. Turn off the load, connect with the tested battery.
2. Press I-set
Enter to confirm.
then press
3. Press
, VFD display CURRENT= *****A. Setting the discharge current of the battery,
Shift
Battery , VFD display MIN VOLT= ****V, Setting the voltage when turned off,
+
Press Enter to start the capacity testing. When the battery voltage is same as the voltage
without power, the load turns off.
During the testing , use ▼and ▲ to change the voltage , actual discharge current ,the electronic
load power and the released discharge capacity of the battery .
4. Then press
V
Shift
+
Battery , exit the battery capacity testing mode.
Battery Voltage
Min voltage
t
I
Load Sink Current
t
20
Von/Voff Operation
You can set voltage value Von/Voff to control the input state on/off for electronic load. When the
input voltage reaches the Von value, the load’s input state is on. When the input voltage reaches the
Voff value, the load’s input state is off.
Action for set Von/Voff value:
(1)Press Shift
+ Menu
into menu
(2)VFD displays >CONFIG, press
key to choose >SYSTEM SET, press Enter
(3)VFD displays >MAX CURRENT SET, press
to confirm
key to choose>VOLTAGE ON SET,
press Enter key to confirm
(4)VFD displays >VOLT.ON=0.00V, press numeric keys to set Von value (0.1V to max
voltage value), press Enter to confirm
(5)Press
key to choose >VOLTAGE OFF SET, press Enter to confirm
(6)VFD displays >VOLT.OFF=0.00V, press numeric keys to set Voff value (0V to max
voltage value), press Enter to confirm
Installation
Inspection
Damage
When you receive your electronic load, inspect it for any obvious damage that may have
occurred during shipment. If there is damage, notify the shipping carrier and nearest Agent
office and Support Office immediately.
Items Supplied
The following user replaceable items are included with your electronic load.
Item
Part Number
Description
Power Cord
IT-E171
Users will get one of the power
IT-E172
cords appropriate for your location.
IT-E173
21
IT-E174
User's Guide
Contains installation, checkout, and
front panel information and
Software CD-Rom
Programming information
Calibration Report
The Instrument calibration report.
Cleaning
Use a dry cloth or one slightly dampened with water to clean the external case parts. Do not attempt
to clean internally.
WARNING
To prevent electric shock, unplug unit before cleaning.
Location
The outline diagram in following figure gives the dimensions of your electronic load. The electronic
load must be installed in a location that allows sufficient space at the sides and back of the unit for
adequate air circulation.
Installation
Dimension :448mmW×185mmH×539mmD
22
Outline Diagram
Unit (mm)
Bench Operation
A fan cools the electronic load by drawing air through the button and sides and exhausting it out the
back.
Minimum clearances for bench operation are 25 mm along the sides.
CAUTION
Do not block the fan exhaust at the rear of the Load.
Input Connections
Power Cord
Connect the power cord to the IEC 320 connector on the rear of the unit. If the wrong power cord was
shipped with your unit, contact your nearest Agent to obtain the correct cord. See following figure for
the part number and ordering options.
WARNING
SHOCK HAZARD: the power cord provides a chassis ground through a third conductor. Be
certain that your power outlet is of the three-conductor type with the correct pin connected to earth
ground.
NOTE
The detachable power cord may be used as an emergency disconnecting device. Removing the
power cord from the ac input connector will disconnect ac input power to the unit.
E
E
E
N
L
L
E
N
N
L
L
China
IT-E171
United States, Canada
IT-E172
Europe
IT-E173
23
N
United Kingdom
IT-E174
Turn-On Checkout
Introduction
Successful tests in this chapter provide a high degree of confidence that the electronic load is
operating properly.
Checkout Procedure
The test in this section checks for proper operation of the electronic load. If you have not already
done so, connect the power cord to the unit and plug it in.
Procedure
Display
1. Turn the unit on.
The electronic Load
undergoes a self-test
when you First turn it on.
Explanation
During self test, all segments are
briefly lit
2. Wait for 1s after turn on
EPROM ERROR
electronic load.
EEPROM damage or Lost data of
last power off
Run well if no such display,
system will go to the step 3
directly.
3. Wait for another 2S.
ERROR CAL.DATA
EEPROM Lost calibration data
Run well if no such display,
system will go to the step 4
directly.
4. Press Shift button and
△▽keys .
LOAD MODEL:IT85XX
SN:XXX-XXX-XXX
VER x.xx
Display the information of the
product Type, series number
version of software.
0.000V
0.000A
Display the actual input voltage
and current value.
0.000W
I: 0.000A
Display the actual power value
and setting value.
5. Press
ESC
6.Press △▽
button
In Case of Trouble
Electronic load failure to run during power-on operation. The test of following in this section help you
to solve the possible problem when you turn on the power of electronic load.
1) Make sure if you have connected the power cord to the unit and plug it in. Power switch have
been pressed.
2) Check the power voltage setting.
Work voltage of load have two type 110V or 220V , Please make sure it is right voltage
accordance to the voltage in your area. You could change the voltage setting through dial the
switch in the rear panel.
3) Check the fuse of load.
If fuse is blowout, please change it as following specification.
24
Model
Fuse specification
(110VAC)
Fuse specification
(220VAC)
IT8516S
T2.5A 250V
T1.25A 250V
Front Panel Operation
Example
I-set (set up a constant current from 0 to Max current )
Set up a constant DC current input is the first main function of programmable DC electronic load,
IT8500 series electronic load provides two methods to set up the constant DC current input by using
the number keyboard and the rotary button. Please see the following operation procedure.
Procedure
Step1
Operation details
VFD display
Press I-set
CURRENT=0.000A
Enter the password or jump the step 4
Step 2
if your password for reentering
PASSWORD:
Enter the original value which
displayed in the LCD or enter a new
Step 3
value by using number keys or Rotary
knob to adjust the voltage value
Press Enter to confirm
Step 4
CURRENT=*.***A
0.00V
0.000A
Setup the input current at 4.33A.
Method 1: To set up by using number keyboard
Step1. Press
I-set
button.
Step2. Press numeric button to enter the current value 4.33.
Step3. Press
Enter
button to confirm the current value.
Method 2: To set up I-set
by using Rotary SW
If the key board is unlocked by password, directly adjust the Rotary SW button, and voltage will be
continually changed from the previews value according the rotation. At the beginning, the cursor will
be shown on the last number of the value which is indicated on the VFD, you can move the cursor to
the first number, second number etc by using number buttons, and then adjust the Rotary SW to
change each number, and let it stay at *.** A. Please see the following description. Then press I-set
to confirm the value.
0.00A 0.00V
0.0W 4.33A
Procedure:
25
Step1. Press I-set
button,
Step2. Adjust the Rotary knob to change the value, the operation is as the same as item (1)
Step5. Press Enter button to confirm the current value.
P-set (set up a constant power from 0 to Max power)
IT8500 series electronic load can be set up for a constant power.
Constant power setup procedure is as following:
Procedure
Step 1
Step 2
Step 3
Operation details
VFD display
Press P-set
Enter a new value by using numeric keys or
Rotary knob to adjust the voltage value
POWER =0.0W
Press Enter
POWER=*.***W
0.000W P:*.000W
to confirm.
R-set (set up a constant resistance from 0.1Ω to 4000Ω)
IT8500 series electronic load can be setup for a constant resistance.
Constant resistance setup procedure is as following:
Procedure
Operation details
VFD display
Step 1
Press R-set
RESISTANCE =0.0R
Step 2
enter a new value by using numeric keys or
Rotary knob to adjust the resistance value
RESISTANCE=*****R
Step 3
Press Enter
0.000W
to confirm.
R:0000R
V-set (set up a constant voltage from 0.1V to Max voltage)
IT8500 series electronic load can be setup for a constant voltage.
Constant voltage setup procedure is as following:
Procedure
Operation details
Step 1
Step 2
Press
VFD display
V-set
VOLTAGE=1.500V
enter a new value by using numeric keys or
Rotary knob to adjust the resistance value
Step 3
Press Enter
to confirm.
VOLTAGE=*.***V
0.000W
V:3.000V
Shift + Store
Procedure
Operation details
Step 1
Press Shift
Step 2
Press Enter
VFD display
and Store
to confirm.
26
STORE 1
Store the relative data
Shift + Recall
Procedure
Operation details
and Recall
Press Shift
Step 1
Press Enter
Step 2
VFD display
RECALL 1
Recall the saving data
to confirm
In On/Off input setting
Use On/Off to change the state of electronic load. Switch on to off state by press On/Off .
On/Off .
Transition Parameter Setting
Users could press Shift
Shift
+ S-Tran
Enter
Enter
Enter
Enter
+ S-Tran to set the transition parameter.
Setup value A
Setup time width of value A
Setup value B
Setup time width of value B
Choose one of the three
transition modes
LEVEL A =0.000A
WIDTH A = 0.5MS
LEVEL B=0.000A
WIDTH B= 0.5MS
>CONTINUOUS
>PULSE
>TOGGLED
Enter
Finish transition setting
Continuous Transient Operation
In this mode, electronic load will generates a repetitive pulse stream that toggles between
two load levels. ; Load could switch the state between two setting value (value A and value
B).
In this following example, assume that the CC mode is active; the applicable transient operation
parameters have been set as follows.
For example:
Continuous mode, current level A =5A, width = 2mS. Current level B =10A, width = 3ms. Testing
machine input voltage is 12V.
10A
5A
2.0ms
3.0ms
Continuous Transient Operation
Action
1. Select the operation mode (CC,CV,CR or CP), and set a proper value, press
the load input.
27
On/Off
to turn off
2. Press
Shift
+ S-Tran , set LEVEL A=5A, press Enter , set WIDTH A=3mS, press Enter ,
set LEVER B=10A, press Enter , set WIDTH B=2mS, press Enter to confirm.
3. Transition mode now is CONTINOUS, press Enter to confirm.
+ Tran to activate the transient mode.
4. Press Shift
5. Press Shift
+ Tran again to stop the transient operation.
6. Press On/Off , the input of load is powered on.
Pulse Transient Operation
In this mode, generates a transient pulse of programmable width when pulsed transient
operation is in effect.
For example: When load receiving one trigger signal, it will switch to 10A current value, and taking
10mS to return the current value of 5A.
10A
5A
TWD
10ms
TWD
10ms
TRIG
TRIG
Pulsed Transient Operation
Action
1. Select the operation mode (CC,CV,CR or CP), and set a proper value, press
the load input.
On/Off
to turn off
2. Press Shift + S-Tran , set LEVER A=5A, LEVER B=10A, WIDTH B=10mS. Transition mode
now is CONTINOUS.
3. Press ▼ till >PULSE.
4. Press
5. Press
6. Press
7. Press
8. Press
.
Enter , set transient mode is PULSE.
Shift +
Tran to activate the transient mode.
+ Trigger to start another pulse. Press Shift + Trigger , get more pulse.
Shift +
Tran again to stop the transient operation.
Shift
On/Off , the input of load is powered on.
Toggled Transient Operation
In this mode, after transition operation start, Load could change the input between the main
level and the transient level when toggled transient operation is in effect.
For example:
When Load receives one trigger signal, Load current will switch between 5A and 10A.
28
10A
5A
TRG
TRG
Toggled Transient Operation
Action
1. Press
2. Press
3. Press
4. Press
5. Press
Shift
+ S-Tran
+ Tran
Shift + Trigger
Shift + Trigger
Shift + Tran
Shift
, Setting LEVER A=5A, LEVER B=10A, transition mode is PULSE.
to activate the transient mode.
switch to the current value of 10A.
, switch between 5A and 10A.
again to stop the transient operation.
List Operation
Users can use the front panel keypad or Power View 8500(PV8500) software to programming the
list sequence. Please refer to the software user’s guide.
The following example will help you how to do the list operation in front panel.
Trigger
0
1
2
3 4
5
List count=1
List count=2
List sequence
Action
1)
2)
Press the button of On/Off , execute the input of Load I in OFF state.
Press Shift
+ Menu , move cursor to the option of menu of CONFIG, Press Enter into
the next step menu, move cursor to TRIGGER SOURCE. Press Enter and move cursor to
IMMEDIATE <DEF>, setting trigger source mode is panel IMMEDIATE mode.
3)
Press Enter
4)
Press
5)
6)
Press Enter into the next step menu .move cursor to EDIT LIST FILE.
Press Enter into the next step menu, move cursor to CURRENT LIST, select CURRENT
MODE.
7)
8)
9)
10)
Press Enter , move cursor to REPEAT. Setup LIST is in cycle mode.
Press Enter to confirm, setup the list steps = 5.
Press Enter to confirm, setup step 1 current =3A.
Press Enter to confirm, setup step 1 width=6mS.
Esc
to confirm.
to the previous menu, move cursor to LIST SET.
29
11) Repeat 7) and 8) operation , set current and width of one step 0A, 5mS;2A,
4mS;6A,2mS;0A,5mS.
12) Press Enter to confirm, Menu STORE LIST FILE 1, save file in group1.
13) Move cursor to Mode Set , press Enter to enter into the next step menu to set mode is
<LIST MODE >
Enter
14) Press
to confirm
15) Press Esc , Press On/Off , make Load in ON state. Press
Shift
+ Trigger , make list
operation run or stop.
16) Stop the list operation mode. Move cursor to LIST SET, press Enter , move cursor to Mode
Set in option menu, press Enter , enter into next step menu. Select mode is <FIXED
MODE>.
Enter
17) Press
to confirm.
Fast Recall Function
You recall 10 groups numbers very conveniently which were stored before.
Action
+ Menu
1) Press Shift
2) Press▼to CONFIG, press Enter
into submenu, press▼ to SHORTCURT RECALL
3) Press Enter , select >ON and press Enter
4) Press
5) Press
Esc
1
to confirm.
two times and quit the menu.
and you can get the first group number. Press
number. Press
2
, you can get the second group
0 , you can get the tenth group number. And if there is not stored number, VFD
will show NO EEPROM DATA.
Automatic Testing Function of Electronic Load
You test various parameters of power supplies at different loads. Now we take a kind of charger as
an example to explain the usage of the automatic testing of the electronic load.
The test proceeding of R35 charger
process
1st step
2nd step
3rd step
4th step
5th step
6th step
Test Method
Mode
Voltage(V)
Current(mA)
Power(W)
CC
5.8~6.15
210
≤4(input175VAC)
None
5.9~6.4
0
≤1.2(input175VAC)
CC
5
205~245
CV
3
205~245
CV
2
205~245
Short circuit
0
≤245
30
Ripple counter
≤50mVpp
Edit the Testing File
1)
2)
3)
4)
Press Shift
+ Menu into menu, VFD displays >CONFIG
Press▼ to >LIST SET.
Press Enter into submenu, press▼ to>EDIT LIST FILE.
Press Enter and begin to edit the automatic testing file, VFD shows MAX CURR=
20.000A, which means setting the maximum of voltage. The maximum is bigger than 3A,
3
which means CC mode is in high range, here, the maximum is 3A. Press
and
Enter
to confirm.
press
5) VFD displays MAX VOLT=120.00V, which means setting the maximum of voltage, the
maximum is bigger than 18V, which means CV is in high range, here ,the maximum is
1
8
+
to set MAX VOLT=18V, press Enter to confirm.
18V. Press
6) VFD displays MAX POWER=200.00W, which means setting the maximum of power, here,
+
+ 0 to set MAX POWER=150W, press Enter to confirm.
it is150W, Press
7) VFD displays TEST COUNT=2, which means setting steps of testing, 20 steps are
1
5
6
to set TEST COUNT=6, press
permitted at most, here, they are 6 steps. Press
Enter
to confirm.
8) Setting the mode of current procedure, press ▲、▼to choose one mode in CONST
CURRENT、CONST VOLTAGE、CONST POWER、CONST RESIS. Here, the first step
is CC mode, press ▲、▼to >CONST CURRENT, press Enter to confirm.
9) VFD shows SET 1=20.000A, which means setting the current procedure. Here, the first
+
+
, then press Enter to confirm.
sis 0.21A, press 0 +
10) Setting whether the current procedure is short circuit or not, press ▲、▼to choose one in
SHORT ON or SHORT OFF. Here the first step is SHORT OFF. Press SHORT OFF,
press Enter to confirm.
11) Select the test number of this step, press▲、▼ to choose >READBACK V,
PRESS Enter to confirm.
12) VFD displays MIN 1=120.00V, which means setting the lower limit. Here, the first step is
2
●
5
1
8
●
+
+
, press Enter to confirm.
5.8V. Press
13) VFD displays MAX 1=120.00V, which requests setting the upper limit. Here, the first step
6
●
1
5
+
+
+
,then press Enter to confirm.
is 6.15V, press
14) VFD shows DELAY 1= 1.0〈S〉, which means setting the prolong time, that is how long we
can read the testing value after inputting the value we settled. To wait for testing after the
input stable, the range of prolong time is 0~25.5 seconds, when the setting is 25.5
seconds, automatic testing will be pause, only the user press Shift
1
+ Trigger ,the
and then press Enter to
testing will continue. Here, the first step is 1 second, press
confirm.
15) Repeat 9)~14), and set the other process step by step as follows:
A. CONST CURRENT,0A,SHORT OFF, READ BACK V, 5.9V, 6.4V,1S
B. CONST VOLTAGE, 5V, SHORT OFF,READ BACK A, 0.205A, 0.245A,1S
C. CONST VOLTAGE, 3V, SHORT OFF, READ BACK A, 0.205A,0.245A,1S
D. CONST VOLTAGE, 2V,SHORT OFF, READ BACK A, 0.205A,0.245A, 1S
E. CONST CURRENT, 0A, SHORT ON, READ BACK A,0A,0.245A, 1S
16) VFD displays SHORT TEST FILE*, which requests saving the files edited to EEPROM,
automatically testing files and LIST files use a common memory area, and the area can
31
contain 8 groups of automatic testing files for next usage. Here, the testing file could be
1
and press Enter to confirm.
saved in the first group, press
17) When the edition of automatic testing file is finished, press Enter
menu.
two times to back the
Fast Recall the Test File
1) Press Shift + Menu to enter into menu, VFD displays>CONFIG
2) Press▼ and move the menu to>LIST SET
3) Press Enter to enter into submenu, VFD displays>MODE SET
4) Press▼ and move the menu to>CALL TEST FILE
5) Press Enter and recall the file edited
Automatic Testing
After editing the automatic testing file, the automatic testing could be carried out by the below
steps.
1) Press Shift
+ I-set
to enter into automatic testing, VFD displays the name of current file:
NAME: TEST FILE1
2) Press Enter to observe the voltage and current we inputted, and also can observe the step
number of testing.
3) Press Shift + Trigger and begin to operate, when the automatic testing is pause (the current
prolong time of one step is 25.5S), press Shift + Trigger also can make the testing continue.
4) When the automatic testing is finished, the buzzer will hint by tweet (buzzer), VFD reads the
result of testing. If the testing passed, VFD reads PASS, or reads FAULT. Press ▲、▼ also to
observe the numerical value and result of every step.
5) Press
ESC
to back the automatic testing.
Select the Resolution between Low Range and High Range
You can adjust the resolution by selecting the low and high range. The first step you should do is to
enable this function in the menu.
Action
1) Press Shift + Menu to enter into menu, VFD displays>CONFIG
2) Press Enter into the submenu, VFD displays>INITIAL CONFIG
3) Press▼to make VFD display RANGE SELECT
4) Press Enter to confirm, and press▼to choose ON
5) Press Enter to confirm
6) Press Esc to exit menu
Then you can press Shift +▲ to change the voltage range (maximum voltage). If the former
maximum voltage value is 120V and the resoulution is 10mV, it will become 18V when you
press Shift +▲ , and you will get 3 decimal points (xx.xxx) compared to 2 decimal points before.
Wheras if the former maximum voltage is 18V, you can press Shift +▼ to make it become
120V, also the resolution will become as 10mV.
32
On the other hand, you can press Shift +▼ to change the currnet range (maximum current). If
the former maximum current value is 12A and the resolution is 1mA, it will become 120A when
you press Shift +▼, and you will get 2 decimal points (xx.xx) compared to 3 decimal points
before. wheras if the fromer maximum current is 120A, you can press Shift +▼ to make it
become 12A, and the resolution will become as 1mA.
Specifications
参数
Output Rating
( 0 ~ 40 ℃)
Load Regulation
CV Mode
Regulation
CC Mode
Regulation
CR Mode
Regulation
CW Mode
Regulation
Current
Measurement
Voltage
Measurement
Power
Measurement
Battery
IT8516S
Voltage
0 ~ 120V
Current
1mA ~ 300A
Power
3000W
Range
精度
解析度
0~18V
±(0.05%+0.02%FS)
1mV
0~120V
±(0.05%+0.025%FS)
10mV
0~30A
±(0.1%+0.1%FS)
1mA
0~300A
±(0.2%+0.15%FS)
10mA
0.1~18V
±(0.05%+0.02%FS)
1mV
0.1~120V
±(0.05%+0.025%FS)
10mV
0~30A
±(0.1%+0.1%FS)
1mA
0~300A
±(0.2%+0.15%FS)
10mA
0.1~10Ω
±(1%+0.3%FS)
0.001Ω
10~99Ω
±(1%+0.3%FS)
0.01Ω
100~999Ω
±(1%+0.3%FS)
0. 1Ω
1K~4KΩ
±(1%+0.8%FS)
1Ω
0~100W
±(1%+0.1%FS)
1mW
100~3000W
±(1%+0.1%FS)
100mW
0~30A
±(0.1% + 0.1%FS)
1mA
0~300A
±(0.2%+0.15%FS)
10mA
0~18V
±(0.02% + 0.02%FS)
1mV
0~120V
±(0.02% + 0.025%FS)
10mV
0~100W
±(1%+0.1%FS)
1mW
100~3000W
±(1%+0.1%FS)
100mW
Input=0.1~120V
33
Max measurement capacity= 999AH
Resolution =10mA
Testing function
Timer range=1~60000sec
Range of Frequency 0.1Hz~1kHz
Frequency error rate<0.5%
Transition Mode
.
Remote Operation Mode
DB9 in the rear panel of electronic load could connect with RS-232 through on TTL connector. The
following information may help you to know how to control the output of electronic load through PC.
1 Communication cable
IT-E131 RS232 Communication cable
The DB9 interface connector on the rear panel of electronic load is TTL voltage level; you can use
the communication cable (IT-E131) to connect the DB9 interface connector of the electronic load
and the RS-232 interface connector of computer for the communication.
COMPUTER
IT
RS232
IT-E131 ISOLATED
COMMUNICATION CABLE
ISOLATION
RX
TTL(5V)
TX
859666668889942311
Load
INSTRUMENT
PC
IT-E131 communication
cable
IT-E132 USB Communication cable
The DB9 interface connector on the rear panel of electronic load is TTL voltage level; you can use
the communication cable (IT-E132) to connect the DB9 interface connector of the electronic load
and the USB interface connector of computer for the communication.
34
PC
COMPUTER
IT
RS232
IT-E131 ISOLATED
COMMUNICATION CABLE
ISOLATION
RX
TTL(5V)
TX
859666668889942311
Load
INSTRUMENT
IT-E131 communication
cable
IT-E134 GPIB Communication Cable
The DB9 interface connector on the rear panel of electronic load is TTL voltage level; you can use
the communication cable (IT-E134) to connect the DB9 interface connector of the electronic load,
and then connect GPIB interface connector of IT-E134 cable and computer with GPIB/IEEE 4888
line for the communication.
IT-E134 outer communication adapter
COM interface of
GPIB line
Electronic load
IT-E134 ISOLATED
Serial /IEEE 488 Controller
35
DB9 Interface Details
DB9 in the rear panel of electronic load is TTL level signal .it can be connecting with standard PC
interface through the IT-E131 isolated communication cable.
36