1
Automatic
Motor Testing
Software
MM-TTest 3.1
MT
MT--Test 3.1
MS
MS--Test 3.1
MTS
MTS--Test 3.1
User ’s Manual
MAGTROL, INC.
Sales and TTechnical
echnical Assistance
70 Gardenville Parkway
Buffalo, New York 14224 USA
Tel: (716) 668-5555 or 1-800-828-7844
Fax: (716) 668-8705
ww w.
magtr
ol.c
om
w.m
agtro
l.co
Manufacturers of:
Motor Test Equipment
!
Hysteresis Brakes and Clutches
While every precaution has been exercised
in the compilation of this document,
Magtrol, Inc., assumes no responsibility
for errors or omissions. Additionally, no
liability is assumed for any damages that
may result from the use of the information
contained within this publication.
IBM® is a registered trademark of
International Business Machines
Corporation.
LabVIEW® is a registered trademark of
National Instruments Corporation.
Windows® is a registered trademark of
Microsoft Corporation.
74M121 01/00
Table of Contents
SALES AND TECHNICAL ASSISTANCE .............................................................................................. 2
1 - ABOUT M-TEST ................................................................................................................................. 5
1.1 NEW FEATURES OF M-TEST 3.1 ....................................................................................................................... 5
2 - INSTALLATION.................................................................................................................................. 6
2.1
2.2
2.3
2.3
2.4
INSTALLATION SUMMARY .............................................................................................................................. 6
INSTALLING M-TEST PRODUCT SOFTWARE ................................................................................................ 6
INSTALLING THE GPIB CARD .......................................................................................................................... 6
CHECKING COMMUNICATIONS ...................................................................................................................... 7
INSTALLING TEMPERATURE MONITORING BOARD ................................................................................. 7
2.4.1 Thermocouple Connections .......................................................................................................................... 7
2.5 INSTALLING ADDITIONAL SENSOR BOARD ................................................................................................ 7
2.5.1 Additional Sensor Connections .................................................................................................................... 8
2.6 REQUIREMENTS FOR USING SERIAL COMMUNICATION ......................................................................... 8
3 - RUNNING M-TEST ............................................................................................................................. 9
4 - TEST SETUP .................................................................................................................................... 10
4.1 OPERATING PARAMETERS ............................................................................................................................. 10
4.1.1 Power Analyzer Selection ........................................................................................................................... 10
4.1.2 Dyno Torque Units ..................................................................................................................................... 10
4.1.3 Convert Toque Units ................................................................................................................................... 11
4.1.4 Encoder ....................................................................................................................................................... 11
4.1.5 Ramp Rate ................................................................................................................................................... 11
4.1.6 Dyno Controller .......................................................................................................................................... 11
4.1.7 Loading ....................................................................................................................................................... 11
4.1.8 Inertia Cancellation ..................................................................................................................................... 11
4.1.9 Minimum Speed .......................................................................................................................................... 11
4.1.10 Maximum Torque ..................................................................................................................................... 11
4.1.11 P,I,D Values .............................................................................................................................................. 11
4.1.12 Amps Value .............................................................................................................................................. 11
4.1.13 Repeat Cycle ............................................................................................................................................. 12
4.1.14 Number of Cycles ..................................................................................................................................... 12
4.1.15 Torque Table ............................................................................................................................................. 12
4.1.16 Speed Table .............................................................................................................................................. 12
4.1.17 Watts Value ............................................................................................................................................... 12
4.1.18 Length (Min.) ............................................................................................................................................ 12
4.1.19 Interval (Sec.) ........................................................................................................................................... 12
4.1.20 Watts Out Limit ........................................................................................................................................ 12
4.1.21 Communications Protocol ........................................................................................................................ 12
4.1.22 Data Logging ............................................................................................................................................ 12
4.1.23 Generate Report ........................................................................................................................................ 13
4.1.24 External Sensor ......................................................................................................................................... 13
4.1.25 Require Login ........................................................................................................................................... 13
4.1.26 Power Units ............................................................................................................................................... 13
4.1.27 Record Temperature ................................................................................................................................. 13
4.1.28 Additional Sensors .................................................................................................................................... 13
4.1.29 Gearbox Ratio-Speed ................................................................................................................................ 13
4.1.30 Gearbox Ratio-Torque .............................................................................................................................. 13
4.1.31 Number of Torque Steps ........................................................................................................................... 13
4.1.32 Step Duration (Sec.) .................................................................................................................................. 13
4.1.33 Torque Step Value .................................................................................................................................... 13
4.1.34 Number of Speed Steps ............................................................................................................................ 13
4.1.35 Step Duration (Sec.) .................................................................................................................................. 13
4.1.36 Start Speed (RPM) .................................................................................................................................... 14
4.1.37 Finish Speed (RPM) .................................................................................................................................. 14
4.2 M-TEST 3.1 CONFIGURATION PARAMETERS ............................................................................................. 14
4.2.1 Add New Test to Menu ............................................................................................................................... 14
4.2.2 Delete Test From Menu .............................................................................................................................. 14
4.2.3 Save Configuration ..................................................................................................................................... 14
4.2.4 Adjusting Controls for Dynamometer Controller ....................................................................................... 15
4.2.5 Configure Report ........................................................................................................................................ 15
4.2.6 Select Data Directory .................................................................................................................................. 16
4.2.7 Setup Complete ........................................................................................................................................... 16
4.2.8 Display Setup .............................................................................................................................................. 16
4.2.9 Screen Colors .............................................................................................................................................. 17
4.2.10 Setting Up Thermocouples ....................................................................................................................... 17
4.2.11 Setting Up Additional Sensors .................................................................................................................. 18
5 - TESTS ............................................................................................................................................. 19
5.1 STANDARD BUTTONS ...................................................................................................................................... 19
5.1.1 Store (F2) .................................................................................................................................................... 19
5.1.2 Output ......................................................................................................................................................... 19
5.1.3 Quit (F12) ................................................................................................................................................... 19
5.2 RAMP TEST ......................................................................................................................................................... 19
5.3 SPEED CURVE .................................................................................................................................................... 19
5.4 TORQUE CURVE ................................................................................................................................................ 20
5.5 SPEED STABILIZED .......................................................................................................................................... 20
5.5.1 Speed ........................................................................................................................................................... 20
5.6 TORQUE STABILIZED ...................................................................................................................................... 21
5.6.2 Torque ......................................................................................................................................................... 21
5.7 AMPS STABILIZED ............................................................................................................................................ 21
5.8 WATTS STABILIZED ......................................................................................................................................... 22
5.9 MANUAL ............................................................................................................................................................. 22
5.9.1 Hold ............................................................................................................................................................ 22
5.10 OPENING SAVED TESTS ................................................................................................................................ 22
6 - DATA OUTPUT OPTIONS ............................................................................................................... 23
6.1 DISPLAY .............................................................................................................................................................. 23
6.2 SCREEN PLOT .................................................................................................................................................... 23
6.2.1 Plot Setup .................................................................................................................................................... 23
6.2.2 One Plot ...................................................................................................................................................... 23
6.2.3 Multiple Plot ............................................................................................................................................... 24
6.2.4 Six Graph .................................................................................................................................................... 24
6.3 PRINT ................................................................................................................................................................... 24
6.4 FILE SAVE ........................................................................................................................................................... 25
6.5 RETURN ............................................................................................................................................................... 25
7 - CUSTOMIZING ................................................................................................................................. 26
MAGTROL LIMITED WARRANTY ....................................................................................................... 27
1 - About MTest
M-T
M-TEST is a LabVIEW® 5.0 based, automatic motor
testing program for Windows 95, using an IBM PC or
compatible, VGA color monitor, Magtrol load cell
Dynamometer, DSP6000/5240/4629B Controller, 6550/
5100/5300/4612B/4614B Power Analyzer and parallel
port laser printer. Interfacing between computer and
peripherals is accomplished with a required National
Instruments AT-GPIB/TNT (PnP) instrumentation
interface, or with the DSP6000 the serial interface may
be used. M-TEST was not designed to be an allencompassing motor testing program, but it provides
enough flexibility to test a majority of motor types in a
variety of ways. Because of LabVIEW's flexibility,
obtaining data from other sources such as
thermocouples, flow sensors, pressure sensors etc., and
controlling motor power, audio and visual indicators is
relatively easy. These additional inputs will usually
require the addition of a National Instruments data
acquisition board to your computer. If you have a
specialized test that you wish to perform, contact
Magtrol Technical Assistance.
1.1 NEW FEATURES OF M-TEST 3.1
Version 3.1 greatly expands the capabilities of M-TEST
by allowing the following:
1. Data correction for gearbox dynamometers and
gearbox motors
2. Easier user defined test saving
3. User selectable installation directory
4. Option of 7 (SCB-68) or 31 (AMUX-64T)
thermocouples
5. Data export to Excel spreadsheet
5
2 - Installation
2.1 INSTALLATION SUMMARY
The general installation order is as follows. You will
need to follow the specific installation instructions for
each component of the system.
1. Install M-Test product software
2. Install the GPIB driver software
3. Install GPIB board into computer, restart computer
and allow Windows 95 to recognize the board.
4. Install the NI-DAQ driver software included with
the data acquisition boards.
5. Install the data acquisition boards
2.2 INSTALLING M-TEST PRODUCT
SOFTWARE
Select Start>Settings>Control Panel. Double click
on the Add/Remove Programs icon. Click the
Install... button. Insert the M-TEST for Windows CDRom (or disk 1 if you are installing from diskette), and
click the Next button to proceed. The setup wizard
guides you through the necessary steps to install the
software.
When completed, the Magtrol folder should contain the
following files:
M-Test 3.1.EXE
SERPDRV
DAQDRV
In addition, a folder named MConfig will be created
that contains test configuration information.
NOTE:
If you want to preserve previous
versions of your M-Test software,
please rename the file C:\Magtrol\MTest.exe before installing the new
version.
2.3 INSTALLING THE GPIB CARD
Refer to the National Instruments' manual, Getting
Started with Your Plug and Play GPIB Hardware and
6
Software for Windows 95, for a detailed explanation of
the installation procedure.
1. Install the GPIB Software for Windows 95 by using
the Add/Remove New Programs found in the
control panel. Walk through the setup program and
when given the option of what programs to install,
choose NI-488.2M Software for Windows 95.
Then, choose to install driver files and applications
by choosing their respective boxes. Complete the
installation by following the finish and OK
commands of the setup program. After successfully
installing the software, follow the instructions for
installing the GPIB hardware carefully.
2. The NI-488.2M software must now be configured
to properly communicate with the Magtrol
instruments. Refer to the section, Configure the
NI-488.2M Software, in the Installation and
Configuration chapter. Double click the System
icon under Start>Settings>Control Panel. In the
System Properties dialog box, select the Device
Manager tab. Select the National Instruments
GPIB Interfaces icon and click the Properties
button. Select the Device Templates tab. Scroll
down to Device Name DEV9. Check Terminate
Read on EOS from the Termination Methods box.
Change the EOS Byte to 10. Select 3sec for I/O
from the Timeouts box. Check the Readdress box.
3. Scroll down to Device Name DEV12. Check
Terminate Read on EOS from the Termination
Methods box. Change the EOS Byte to 10. Select
1sec for I/O from the Timeouts box. Check the
Readdress box.
4. Scroll down to Device Name DEV14. Check
Terminate Read on EOS from the Termination
Methods box. Change the EOS Byte to 10. Select
1sec for I/O from the Timeouts box. Check the
Readdress box. Press the OK button when
finished.
5. Check for proper hardware and software installation
by
selecting
Diagnostic
under
Start>Programs>NI-488.2M Software for
Windows 95. Press the Test All button and wait
until the status is shown for GPIB0. If passed, press
the Exit button.
Magtrol Automatic Motor Testing Software
Installation
2.3 CHECKING COMMUNICATIONS
The GPIB address codes for the Magtrol devices should
be set as follows:
DSP6000/5240/4629B
9
5100/4612B
12
5300/4614B
14
6550
1
You may now check for proper communications by
selecting Win32 Interactive Control under
Start>Programs>NI-488.2M Software for Windows
95. At the : prompt enter IBFIND DEV9. You should
now have a DEV9: prompt. Enter IBWRT "M0\r\n".
The DSP6000 status line should indicate "REMOTE";
the 5240 CTLS ACTIVE LED should turn off. To exit
Win32 Interactive Control, enter a Q at the DEV9:
prompt. If no errors were reported and you are
convinced that everything is working properly, you can
begin running the M-Test program.
2.4 INSTALLING TEMPERATURE
MONITORING BOARD
If you have ordered MT-Test you will need to install
the included Data Acquisition Board. Follow the
National Instruments documentation for Installation of
the appropriate data acquisition board and NI-DAQ
driver software. Install the driver software by inserting
the NI-DAQ CD into your computer. Usually this CD
will invoke the auto-run feature and bring up the
installing menu. Choose install. If your system did not
invoke the auto-run feature, use the Control Panel to
invoke the Add/Remove Programs routine to install the
driver. When the "Select Components" window
appears, select only the "Driver Files". Once installation
is complete, restart your computer.
After Windows 95 is loaded once again, shut down your
computer and install the data acquisition card into an
empty slot on your computer. Re-boot your computer
and when Windows 95 is loaded, start the NI-DAQ
Configuration Utility found in the NI-DAQ for
Windows programs area. (Start>Programs>NIDAQ
for Windows>NI-DAQ Configuration Utility)
The Configuration Utility will then search your
computer and find the newly installed board. If you
have the standard MT-Test this board will be AT-MIO16E-10. The Configuration Utility will then prompt
you to specify which device this board will be. Choose
DEVICE 1. Now a window will appear that displays
the installed. Double click on Device 1 and then click
the AI tab. Verify that the polarity is set to -10V to
+10V and that the differential is selected as the mode.
Exit this window and then exit the configuration utility.
When the option appears, choose to save this
configuration.
2.4.1 THERMOCOUPLE CONNECTIONS
1. Open the SCB-68 Connector Box or AMUX-64T
to expose the terminal blocks.
2. The pair of terminals associated with Channel 0 are
being used by the cold junction compensation
sensor. Install your thermocouples beginning at
Channel 1.
3. (SCB-68) When all are attached, route the wires
out through the opening in the front panel and secure
them with the hold down bar.
4. (SCB-68) Close the cover.
5. Connect the 68-pin shielded cable assembly
between the connector box and the data acquisition
board.
2.5 INSTALLING ADDITIONAL SENSOR
BOARD
If you have ordered MS-Test you will need to install
the included Data Acquisition Board. Follow the
National Instruments documentation for Installation of
the appropriate data acquisition board and NI-DAQ
driver software. Install the driver software by inserting
the NI-DAQ CD into your computer. Usually this CD
will invoke the auto-run feature and bring up the
installing menu. Choose install. If your system did not
invoke the auto-run feature, use the Control Panel to
invoke the Add/Remove Programs routine to install the
driver. When the "Select Components" window
appears, select only the "Driver Files". Once installation
is complete, restart your computer.
After Windows 95 is loaded once again, shut down your
computer and install the data acquisition card into an
empty slot on your computer. After re-booting your
7
Installation
computer and when Windows 95 is loaded, start the
NI-DAQ Configuration Utility found in the NI-DAQ
for
Windows
programs
area.
(Start>Programs>NIDAQ for Windows>NI-DAQ
Configuration Utility)
The Configuration Utility will then search your
computer and find the newly installed board. If you
have the standard MS-Test this board will be AT-MIO16E-10. The Configuration Utility will then prompt
you to specify which device this board will be. Choose
DEVICE 2. Now a window will appear that displays
the installed. Double click on Device 1 and then click
the AI tab. Verify that the polarity is set to -10V to
+10V and that the differential is selected as the mode.
Exit this window and then exit the configuration utility.
When the option appears, choose to save this
configuration.
2.5.1 ADDITIONAL SENSOR CONNECTIONS
1. Open the SCB-68 Connector Box to expose the
terminal blocks.
2.
Install your sensor wires beginning at Channel 1.
3. When all are attached, route the wires out through
the opening in the front panel and secure them with
the hold down bar.
4.
Close the cover.
5. Connect the 68-pin shielded cable assembly
between the connector box and the data acquisition
board.
2.6 REQUIREMENTS FOR USING SERIAL
COMMUNICATION
When using the serial communication features of MTest, you must identify and purchase a serial cable to
connect between the DSP-6000 and your host computer.
This serial cable can be 9 pin or 25 pin and is a standard
connection cable.
8
Magtrol Automatic Motor Testing Software
3 - Running MTest
M-T
Run M-TEST by selecting M-TEST under
Start>Programs>M-Test. This screen will appear,
containing the program name and revision number,
along with the User Defined Tests menu. By selecting
the User Defined Test and the test type, you have loaded
a saved configuration into M-TEST. Try selecting
different test types to observe how each test loads a
different configuration into memory. The biggest
difference will be that a different color profile has been
saved for each of the test types. As you select the
different types, observe how the most recent selection
is moved to the top and that as the configuration is
loaded, the screen colors change.
There are other possible selections in the Main Screen
but these will be discussed later.
Magtrol has already set up a default test suite which
contains four of the available test types, but it is unlikely
that these default tests will satisfy all of your system's
testing requirements. To set up your own User defined
test or modify the existing default test, select TEST
SETUP.
9
4 - TTest
est Setup
mouse cursor within the table, press the right mouse
button, and drag the cursor to Clear Table. Release the
button when finished.
After a value has been changed, you will notice that the
test type and Save Configuration button begin to blink
red. This is an indication that the current configuration
has been changed and not yet saved. Keep this
indication in mind as you work with M-Test.
The following pages describe each of the parameters
and buttons found in the Test Setup.
4.1 OPERATING PARAMETERS
After selecting TEST SETUP from the Main Program,
the Test Setup screen appears. As in the previous screen,
you can select different test types from the Test Type
menu. You will notice that for each different test type,
a new setup of configurable parameters is loaded and a
different set of parameters is visible. The appropriate
controls for that test type will be visible, while the
unused controls are removed.
The Test Setup screen is loosely divided into two areas.
The upper section (surrounded by a framed box) are
the parameters that directly control the operation of tests,
and range from hardware configuration parameters to
motor deceleration rates. The lower half controls the
configuration of the M-Test display and the file saving
structure.
To change a parameter, click your mouse on the menu
button, drag the cursor to the desired item, then release
the button when finished. To change a digital control
value, click your mouse on the up/down arrows. The
rate of change may be increased by holding down the
keyboard <Shift> key while clicking the arrow. You
may also change the value by double clicking the mouse
with the cursor located in the display window and
entering a numerical value. Press the keypad <Enter>
key to complete the change. To enter values in the
tables, click the mouse in the first cell. Enter a numeric
value followed by the keyboard <Tab> key. The cursor
will move to the next cell. Make the next entry, followed
by <Tab>. On your last entry, terminate by pressing
the keypad <Enter> key. To clear the table, move the
10
4.1.1 POWER ANALYZER SELECTION
This menu is for selecting the type of Magtrol Power
Analyzer being used in the test. The available selections
are 5100, 5300 - 1 ph., 5300 - 3 ph., the 6550 options or
None. If '5100' is selected, the 5100 is programmed to
read Amps, Volts and Watts, while clearing the Hold,
Averaging and Power Factor functions. If '5300 - 1
ph.' is selected, the 5300 is programmed to read the
single phase Amps, Volts, and Watts from Phase 1
connections, while clearing the Hold, Averaging and
Power Factor functions. If '5300 - 3 ph.' is selected, the
5300 is programmed to read the three phase sum of
Amps, the three phase average of Line Volts, and the
three phase sum of Kilowatts, while clearing the Hold,
Averaging and Power Factor functions. Select 'None'
if you do not have any Power Analyzer connected.
NOTE:
It is very important that the amps
scale is not set for auto-ranging
during the Ramp Test, as this may
cause data errors over the GPIB bus
when there is a range change. Please
set the power analyzer amps range
manually to the highest current that
you expect to draw during the test.
4.1.2 DYNO TORQUE UNITS
This menu is for selecting the torque units of the
dynamometer in use. The parameter is found on the
tag on the front panel of the dynamometer. This must
Magtrol Automatic Motor Testing Software
be set correctly in order for Horsepower, Watts Output,
and Efficiency calculations to be accurate.
4.1.3 CONVERT TOQUE UNITS
This menu is for converting the dynamometer torque
units to another unit (English, Metric or SI).
4.1.4 ENCODER
This menu is for selecting the type of speed encoder
supplied with the dynamometer in use. The standard
encoder is 60-bit (or 60 pulses per revolution of the
dynamometer shaft). This will give speed resolution
of 1 RPM. Other encoders are available (600-bit/.1
RPM and 6000-bit/.01 RPM) to permit speed controlled
operation at very low motor speeds.
4.1.5 RAMP RATE
This digital control is for setting the rate at which the
motor decelerates during the Ramp Test. For the
DSP6000, this number directly relates to the change in
RPM per second, with 1 being the lowest and 10,000
being the highest. These values will differ for the 5240.
The 5240 rate relates indirectly to RPM/sec., and its
range is 1 to 99. As a rule of thumb, a value of 20 is
typically good for the 5240 and something on the order
of 1/10th free-run speed works well for the DSP6000.
4.1.6 DYNO CONTROLLER
This menu is for selecting the type of dynamometer
controller being used in the system. M-Test 3.1 will
operate both the DSP6000 and older generation 5240/
4629B style controllers. When using the older models,
some program selections will not be available and the
controls will be grayed out to indicate this.
4.1.7 LOADING
Manual or automatic table entry is available in M-Test
3.1. When 'Automatic' is selected, the appropriate
controls will be enabled to select the parameters. Once
created, the tables are saved in the configuration file
and there is no need to re-enter table values.
4.1.8 INERTIA CANCELLATION
This menu is for enabling or disabling inertial error
compensation. Whenever there is a changing speed,
such as the motor decelerating during the Ramp Test,
the stored energy in the rotating mass (dynamometer
rotor, coupling, armature, etc.) will produce torque
Test Setup
greater than what the motor is actually delivering. This
may cause substantial errors in the torque, horsepower,
watts output and efficiency readings. The error is
exaggerated when the ramp rate is increased and the
change in speed per unit time is greater. Selecting YES
for Inertia Cancellation will allow the program to run a
short routine to determine the correction factor, which
will then be applied to the data obtained during the Ramp
Test. After running one test with Inertia Cancellation,
you may run the setup again and select PREVIOUS
VALUE. This will apply the correction factor from the
last test to the current test without re-running the inertia
routine. The previous value is saved in the configuration
file of the test.
4.1.9 MINIMUM SPEED
This digital control is for setting the minimum speed
limit for the Ramp Test. The motor will decelerate from
free run to this speed (or maximum torque, whichever
is reached first) and then return to free run again.
4.1.10 MAXIMUM TORQUE
This digital control is for setting the maximum torque
limit during the Ramp Test and the Torque Curve Test.
When using the Ramp Test, the motor will decelerate
from free run to this torque (or minimum speed,
whichever is reached first) and then return to free run
again. When using the Torque Curve Test, the motor
will load to the data points selected or until the torque
exceeds this setting. Once reached, the motor will return
to free run and the test will terminate
4.1.11 P,I,D VALUES
When using the DSP6000, the P,I and D values are
available for programming to the DSP6000. These
values correspond to the proportional, integral, and
differential components used in the DSP6000 to control
the dynamometer. There is a provision in the Test Setup
to assist in setting these parameters.
4.1.12 AMPS VALUE
This digital control is for setting the amps level for the
Amps Stabilized Test. The controller will load the motor
to the selected amps level and maintain that level for
the specified period of time.
11
Test Setup
Magtrol Automatic Motor Testing Software
4.1.13 REPEAT CYCLE
4.1.17 WATTS VALUE
Checking this control box will cause either the speed
table to torque table to be repeated. The number of
cycles to be completed is controlled by the Number of
Cycle numeric that appears once this box is selected.
4.1.14 NUMBER OF CYCLES
This digital control is for setting the input watts level
for the Watts Stabilized Test. The controller will load
the motor to the selected input wattage level and
maintain that level for the specified period of time. The
Watts value may be changed during the Watts Stabilized
Test.
Controls the number of cycles the torque or speed curve
will run through.
4.1.18 LENGTH (MIN.)
4.1.15 TORQUE TABLE
This table is for entering the torque values and dwell
times to be used in the Torque Curve test. Any number
of values may be used, in any sequence, to simulate a
load or to check motor performance at several specific
loads. To enter data, click the mouse pointer in the first
cell. A cursor should appear in that cell. Type in the
value of torque and then hit the <Tab> key to enter the
dwell time. Press the <Tab> key again to move to the
next torque entry and continue this process until all of
the desired values have been entered.. Upon the last
entry, terminate the value either by pressing the keypad
<ENTER> key. To clear all values from the table, place
the mouse cursor within the table and click the right
mouse button. Drag the cursor to 'Empty Table' and
release. A '0' (zero) in the table will store the free run
data. Entering '9999' will load the motor to locked rotor
and store the data.
4.1.16 SPEED TABLE
This table is for entering the speed and dwell values to
be used in the Speed Curve test. Any number of values
may be used, in any sequence, to simulate a load or to
check motor performance at several specific speeds. To
enter data, click the mouse pointer in the first cell. A
cursor should appear in that cell. Type in the value of
speed. Hit the <Tab> key to move the cursor to the
dwell time. Use the <Tab> key again to move to the
next speed and continue this process until all desired
values are entered. Upon the last entry, terminate the
value either by pressing the keypad <ENTER>. To clear
all values from the table, place the mouse cursor within
the table and click the right mouse button. Drag the
cursor to 'Empty Table' and release. A '0' (zero) in the
table will load the motor to locked rotor and store the
data. Entering '99999' will store the free run data.
12
This digital control is for setting the length of test, in
minutes, during the Amps and Watts Stabilized Tests.
The controller will load the motor to the selected amps
or watts level and maintain that level for the duration
of the test. After completing the test, the controller
will unload the motor.
4.1.19 INTERVAL (SEC.)
This digital control is for setting the interval, in seconds,
at which data is stored during the Amps and Watts
Stabilized Tests.
4.1.20 WATTS OUT LIMIT
This digital control sets the maximum allowable load
on the motor. When the motor output power equals or
exceeds this value, the test terminates. This is a safety
feature to prevent excessive motor heating. The control
is active in all modes except Manual.
4.1.21 COMMUNICATIONS PROTOCOL
The Communications Protocol section refers to the type
of communication link between the computer and the
DSP6000. M-TEST 3.1 supports either GPIB or serial
communication. Click on the protocol section and drag
the mouse to specify which communication to use. If
serial is chosen, the com port and baud rate must be
specified. To determine the com port refer to your
computer manual and the baud rate setting must
correspond to the baud rate setting on the DSP6000.
4.1.22 DATA LOGGING
Selecting the Data Logging feature will cause the test
data to be automatically saved to file after the
completion of a test. Once selected, a data logging
directory descriptor appears above "Data Logging".
Following the "Select Data Directory" description found
on page 16 to select the storage location. The data is
stored to a filename created from many pieces of
Magtrol Automatic Motor Testing Software
information from the test including test time, test day,
serial #, user I.D. and so on. To view the exact file
construction, look at the directory after a file has been
saved.
Test Setup
will be selectable and the user can configure the sensor
parameters via this control. See section 4.2.11 Setting
Up Additional Sensors.
4.1.29 GEARBOX RATIO-SPEED
4.1.23 GENERATE REPORT
Enabling "Generate Report" will have a report generated
and sent to the printer at the end of each test. M-Test
3.1 uses the default printer specified in your Windows
95 Control Panel. The report is configured using the
"Configure Report" option described on page 15.
This control is used to set the speed correction for
dynamometers equipped with a gear box. Setting this
control correctly is essential for the program to function
properly and to get meaningful data. If you are using a
non-gear box dyno, this control must be set to 1.000.
4.1.30 GEARBOX RATIO-TORQUE
4.1.24 EXTERNAL SENSOR
Selecting this box enables the external input on the
DSP6000. Once selected, a units label will appear and
the operator can label the units that are coming in. This
label is then immediately available for graphing on the
test graph or for data recording.
This control is used to set the torque correction for
dynamometers equipped with a gear box. Setting this
control correctly is essential for the program to function
properly and to get meaningful data. If you are using a
non-gear box dyno, this control must be set to 1.000.
4.1.31 NUMBER OF TORQUE STEPS
4.1.25 REQUIRE LOGIN
If Require Login is selected, then at the beginning of
every test a dialog box will appear that queries the
operator to enter a user name and a serial # for the unit.
This data is then logged and is stored in the data filename
and available for display in the report
4.1.26 POWER UNITS
This allows the user to select whether the watts data
coming back from the power analyzer is in Watts or
kilowatts. This only comes into play when using an
external shunt with the 5100. Simply observe the 5100
display to determine if the units are Watts or Kilowatts.
The selector is grayed out when not applicable.
This control is activated when using the automatic table
entry option. Set a value based upon the number of
actual load points you wish to test the motor at.
4.1.32 STEP DURATION (SEC.)
This control is activated when using the automatic table
entry option. It is used to set the dwell time at each of
the torque steps. The value is in seconds.
4.1.33 TORQUE STEP VALUE
This control is activated when using the automatic table
entry option. It is used to set the value of torque to be
applied at each step. Each consecutive step will increase
the previous load by this value.
4.1.27 RECORD TEMPERATURE
4.1.34 NUMBER OF SPEED STEPS
This control will activate the temperature logging if the
temperature logging module has been purchased as part
of the software.
A button labeled "Setup
Thermocouples" will appear and allow the user to
configure the thermocouples. Please refer to section
4.2.10 Setting up Thermocouples.
This control is activated when using the automatic table
entry option. Set a number based upon the number of
actual speed points you wish to test the motor at. The
speed increments will be the (Start Speed - Finish Speed)
/ Number of Steps.
4.1.28 ADDITIONAL SENSORS
This control will activate the additional sensor
monitoring feature and begin taking data from the data
acquisition board. This is only available if the sensor
module of the software has been purchased. Once
selected, a button labeled "Setup Additional Sensors"
4.1.35 STEP DURATION (SEC.)
This control is activated when using the automatic table
entry option. It is used to set the dwell time at each of
the speed steps. The value is in seconds.
13
Test Setup
4.1.36 START SPEED (RPM)
This control is activated when using the automatic table
entry option. It is used to set the first speed at which
loading occurs.
4.1.37 FINISH SPEED (RPM)
Magtrol Automatic Motor Testing Software
press "Add New Test Type". The new test type is
immediately created and the configuration that is current
loaded will be saved to that test.
4.2.2 DELETE TEST FROM MENU
This control is activated when using the automatic table
entry option. It is used to set the last speed at which
loading occurs.
4.2 M-TEST 3.1 CONFIGURATION
PARAMETERS
4.2.1 ADD NEW TEST TO MENU
Once the "Delete Test From Menu" button is pushed, a
screen appears that allows the user to delete specific
test types or to delete user defined tests. To delete a
test type, select the user defined test and the test type
and then select "Delete Test Type". Select "Delete"
when the prompt appears and the test is immediately
deleted. You must be sure that you want to delete the
test type because they are not recoverable once deleted.
The "Add New Test To Menu" button brings a screen
that allows the user to create a new User Defined Test
or to add a new test type to an existing user defined
test.
To create a new User Defined Test select the "Create
New User Test" from the User Defined Test menu. A
new window will immediately appear. In the text space,
type the name for the new user defined test and select
"continue". The new user test is immediately created
and available in the User Defined window. A new test
type is also automatically created for this new User
Defined Test.
Since only one of each test type is allowed to be assigned
to each User Defined Test, only the test types that do
not exist for a specific user test are available in the Test
type window. To create a new test type, select the User
Defined Test and the new test type desired and then
14
To delete an entire User defined test press the "Delete
User Defined Test" and then delete at the prompt. This
will delete all of the test types associated with the User
defined Test as well as the User defined test. Again,
please be sure that you want to delete the entire User
Defined Test before deleting because once deleted, it is
not recoverable.
4.2.3 SAVE CONFIGURATION
To save a configuration that you have changed, press
the "Save Configuration" button. When starting, the
user defined test and test type that you had selected in
the Test Setup will be automatically defaulted to the
configuration to be saved. If you wish to save the current
configuration to a different location, simply select the
user defined test and test type to which you want to
save the configuration.
Magtrol Automatic Motor Testing Software
NOTE:
Test Setup
Once you save a user defined test,
the red blinking test type will turn
off.
4.2.4 ADJUSTING CONTROLS
CONTROLLER
FOR
DYNAMOMETER
After attaining a correct setting, press the "Adjust Curve
Fit" button to assign a curve fit value to the displayed
curve. A value of five (5) works well as a general rule
of thumb. This adjustment must be made in order for
the correction routine to operate effectively.
4.2.5 CONFIGURE REPORT
The "Adjust Dyno Controller" is a tool provided to assist
in adjusting the PID or gain, error and stability controls.
When selected, a window appears that plots the
performance of the ramp down versus an ideal constant
deceleration curve. The dyno controls should be
adjusted until the actual performance line is as close as
possible to the ideal line. Adjust the control parameters,
either by entering different PID values for the DSP6000,
or by adjusting the gain, error, and stability knobs on
the 5240. Then press the "Start" button and the
controller will run through a ramp down and display
the system performance. The system must yield almost
constant deceleration so that the inertia correction
routine may be applied. If the system does not exhibit
constant deceleration, the inertia compensation routine's
accuracy will be compromised. If additional assistance
is needed, refer to the Help section in "Adjust Dyno
Controller" or refer to the user manual that was provided
with your dynamometer controller.
If the "Generate Report" Option is selected then the user
may configure a report to be output to the printer. Once
pressed, a screen will appear that is a miniature model
of what the output report looks like. By clicking in the
available fields, and typing in the text areas, the user
can define the look of the report and select which
parameters are to be displayed This report configuration
is saved with the User Defined Test and will also be
generated at the end of a test if the "Generate Report"
option is selected.
15
Magtrol Automatic Motor Testing Software
Test Setup
4.2.6 SELECT DATA DIRECTORY
If the "Data Logging" parameter is selected, this button
allows the user to direct where the data should be saved.
A Windows 95 file select interface appears and the user
can navigate to the directory where the data should be
stored. Once the directory is selected, the user should
choose "Select Cur Dir." and this directory will appear
in the Test Setup above the "Data Logging" option.
NOTE:
the real-time graph. This should be sufficient for most
initial tests.
For clarity, it may be beneficial to
save the data to a directory that has
the same name as the User Defined
Test. This will create a very clear
and understandable database for test
data.
4.2.7 SETUP COMPLETE
Once finished setting up the test, press "Setup Complete"
and the program will return to the main screen. If the
current configuration is unsaved, the operator will be
prompted and reminded that the current configuration
is unsaved and will be lost if remained unsaved.
4.2.8 DISPLAY SETUP
The real-time graph is displayed during the test and plots
parameters that are specified in the "Plot Parameters"
windows. Pressing "Plot Parameters" brings up a
window that allows the user to define what parameters
should be plotted during the test. One X parameter can
be chosen and several of the Y parameters may be
chosen. Simply click on the desired values. For multiple
Y values, hold down the <Shift> key and select the Y
values in succession. Once the parameters have been
chosen, select "Finished" to return to the Display Setup.
4.2.8.1 Display Setup Advanced Topics
The following modifications can be made in the Display
Setup
•
•
•
•
•
Pressing the "Display Setup" button calls a screen that
shows what the display looks like during a test run. Also,
at the top of the screen is a series of controls that allows
the user to custom configure the display to fit the specific
application. This may be intimidating at first, but the
novice user can initially select "Restore default positions
& sizes". This button will return the display to a generic
configuration that displays all of the original M-Test
values, as well as a few additional analog displays and
16
Move display object
Resize display objects
Hide/revealed display object
Rescale display object
Auto X or Y graph axis
1. Display objects can be moved by selecting the
corresponding object in the Parameters selection
pull down. Once the correct object is selection, its
position can be altered by moving the respecting X
and Y axis in the Display location selection of the
Display Setup.
2. The Display objects size can be altered by choosing
the object from the Parameters selection and then
pushing the +/- button in the size window. Only
the graph and analog displays can be resized. The
digital displays cannot be resized.
Magtrol Automatic Motor Testing Software
3. The display objects can be hidden and revealed
using the Visibility section in the upper left corner
of the display setup. The Visibility section is
divided into Analog and Digital display sections
and toggling between the two sections can be done
by pushing the visibility button. An X next to the
display object indicates that it is visible. Pressing
the X box will turn the display on/off, making the
change visible immediately. The graph visibility
is controlled by the graph box and is available in
both digital and analog display mode.
4. Re-scaling the display object can be done two ways.
First, you can select the display from the Parameter
selection. Then near the "Set Range" button, type
in the maximum value that the system expects to
see during the test. Press the "Set Range" button.
This immediately sets the indicators maximum
value to the value specified and the minimum to
zero. The alternative is to double click the values
on the display and enter the desired values. In the
case of the graph, the operator must de-select auto
scaling for the desired axis before setting the values.
5. The graph has the capability of auto-scaling itself.
To disable this feature, simply click on the X box
located near auto scale X and auto scale Y.
NOTE:
The number and size of the display
objects may affect acquisition
performance. If the system is unable
to read the maximum or desired
number of parameters from the
power analyzers and dynamometer
controllers, try removing some of the
display objects. In the Ramp test, a
high speed mode is available by
turning off display elements. The test
screen will indicate when the system
is operating in this mode.
Test Setup
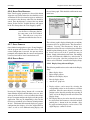
4.2.9 SCREEN COLORS
M-TEST 3.1 allows each User Defined Test and test
type to have a unique color scheme. Once pressed, a
screen will appear containing the 4 changeable colors
of M-Test. To change the color of the 3 displayed
elements, click on the box and then drag the cursor over
the desired color. As the cursor is moved, the color
will update in the box immediately. To change the
background color, click on the background and drag
the cursor to the desired color. At any time, pressing
the "Revert" Button will reset the colors to the original
values. Once satisfied with the colors, pressing
"Accept" returns the program to the Test Setup and
immediately implements the new colors.
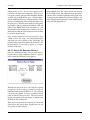
4.2.10 SETTING UP THERMOCOUPLES
Once the "Record Thermocouples" box has been
checked, a button labeled "Setup Thermocouples"
appears. Once pushed, the following screen appears.
17
Test Setup
Through this screen, the user can specify many
parameters of temperature monitoring. First, the user
can specify quantity and type of thermocouples. Options
available are the SCB-68 for up to 7 thermocouples,
and the AMUX-64T for up to 31 thermocouples. Then,
the user can individually name each thermocouple using
the string array. The first sensor in the list corresponds
to Channel 1 (pins 33 and 66 in the SCB-68, CH1 and
CH33 in the AMUX-64T) on the breakout box. The
first channel in the breakout box is Channel 0 and it is
dedicated to reading the cold junction sensor and cannot
be used for thermocouples.
Once all the parameters have been specified, select
"finish" to leave the setup. All of the thermocouples
and names are now available via the "Plot Setup" for
plotting on the graph and recording the data to file. The
thermocouples are not able to appear as a digital
indicator at this time.
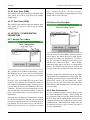
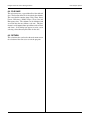
4.2.11 SETTING UP ADDITIONAL SENSORS
Once the "Additional Sensors" box has been check, a
button labeled "Setup Additional Sensors" appears.
Once pushed, the following screen appears.
Through this panel the user can setup the required
parameters for measuring parameters using the
additional sensor feature of MS-Test 3.1. First, the user
can specify the quantity of sensors to monitor and the
name or units that the sensor uses. The first sensor in
the list corresponds to Channel 0 (pins 34 and 68 in the
SCB-68) on the breakout box.
There are also two parameters to specify the conversion
from volts to the sensor's units, and then the user can
also specify an offset voltage.
18
Magtrol Automatic Motor Testing Software
Once complete, press the "finish" button and return to
the Test Setup screen. The additional sensor parameters
will now all be available for plotting on the graph or for
viewing using the additional sensor matrix display. All
of the configured sensor parameter values will be logged
to the data file during the test.
5 - TTests
ests
5.1 STANDARD BUTTONS
These buttons are used for several different types of
test:
5.1.1 STORE (F2)
Clicking this button or the keyboard F2 key will store
the data into memory. Every time the button is clicked,
the Index display will increment, thus keeping track of
the number of data points stored.
5.1.2 OUTPUT
If you have stored one or more data points, clicking
this button will show the Data Output menu. Click on
the menu button and drag the cursor to the appropriate
selection. The available selections are described in
Chapter 6-Data Ouput Options. Click the OK button
when finished.
5.1.3 QUIT (F12)
Clicking this button or the keyboard F12 key will return
you to the main menu for selecting the next test or
exiting the program.
controller first checks for dynamometer shaft rotation,
and prompts the user to start the motor if no rotation is
detected. It then waits until the motor has accelerated
to the point that two consecutive speed readings are
within 10 RPM of each other (1 RPM for 600-bit
encoders, .1 RPM for 6000-bit encoders). Loading then
begins until the ramp limit has been reached. The
controller then allows the motor to return to free run. If
Inertia Cancellation was selected, the controller now
loads the motor down to a speed stabilized point of
approximately 85% of free run. From these two
procedures, the inertial error correction factor is
determined and applied to the test data taken during the
motor test. The result is data that are free from the
effects of inertia, similar to taking hundreds of individual
speed stabilized data points, in a fraction of the time.
Clicking the QUIT button or the keyboard F12 key will
halt the test. When the test is completed, the Data Output
menu pops up to allow the selection of various ways of
handling the data, as described in Chapter 6-Data Ouput
Options.
5.3 SPEED CURVE
5.2 RAMP TEST
This is the main part of the M-TEST for Windows
program, allowing you to run a motor performance curve
from free run to minimum speed, maximum torque or
locked rotor. After making the appropriate selections
in the Test Setup screen, the motor test begins. The
This selection allows you to run a programmed series
of speed stabilized points, which is often used when
only a few specific speeds are of interest. The motor
will be loaded to each consecutive speed point and will
dwell the specified amount of time before taking data
and proceeding to the next point. The Index display
will keep track of the number of points that have
19
Magtrol Automatic Motor Testing Software
Tests
executed so far. If you wish to interrupt the test, click
the QUIT button. A dialog box will appear to query
whether you really want to quit the test. Click either
YES or NO. When the test is completed, the Data
Output menu will appear on the screen. Click on the
menu button and drag the cursor to your selection. The
available selections are described in Chapter 6-Data
Ouput Options. Click the OK button to execute your
choice.
5.5 SPEED STABILIZED
5.4 TORQUE CURVE
This selection allows you to load a motor to a specific
speed, regardless of heating effects, line voltage
variations, etc. This type of test may be of interest if
doing a burn in test on a motor while observing
temperature rise at various points around the motor. The
Index display keeps track of the number of data points
that have been stored.
5.5.1 SPEED
This selection allows you to run a programmed series
of torque stabilized points, which is often used when
only a few specific loads are of interest. The motor
will be loaded to each consecutive torque point and will
dwell the specified amount of time before taking data
and proceeding to the next point. The Index display
will keep track of the number of points executed so far.
If you wish to interrupt the test, click the QUIT button.
A dialog box will appear to query whether you really
want to quit the test. Click either YES or NO. When
the test is completed, the Data Output menu will appear
on the screen. Click on the menu button and drag the
cursor to your selection. The available selections are
described in Chapter 6-Data Ouput Options. Click the
OK button to execute your choice.
20
Clicking this button will make the RPM digital control
appear. Enter a value by using the up/down arrows or
entering a value directly. Entering a '0' (zero) will load
the motor to locked rotor. The default value is 32000.
When you have entered a value, click the SPEED button
to the off position. The controller will now load the
motor to that point.
Magtrol Automatic Motor Testing Software
Tests
5.6 TORQUE STABILIZED
5.7 AMPS STABILIZED
This selection allows you to load a motor to a specific
torque, regardless of heating effects, line voltage
variations, etc. This type of test may be of interest if
doing a burn in test on a motor while observing
temperature rise at various points around the motor. The
Index display keeps track of the number of data points
that have been stored.
This selection allows you to load a motor to a specific
current level, regardless of heating effects, line voltage
variations, etc. The program will record the parameters
at the specified interval for the specified length of time.
When the test period is completed, the controller will
unload the motor. This type of test may be of interest if
doing a burn in test on a motor while observing
temperature rise at various points around the motor. The
Index display keeps track of the number of data points
that have been stored. If you wish to interrupt the test,
click the QUIT button. A dialog box will appear to
query whether you really want to quit the test. Click
either YES or NO. When the test is completed, the
Data Output menu will appear on the screen. Click on
the menu button and drag the cursor to your selection.
The available selections are described in Chapter 6-Data
Ouput Options. Click the OK button to execute your
choice.
5.6.2 TORQUE
Clicking this button will make the Torque digital control
appear. Enter a value by using the up/down arrows or
entering a value directly. The default value is 0.0. A '0'
(zero) will remove loading from the motor. Entering
'9999' will load the motor to locked rotor. When you
have entered a value, click the TORQUE button to the
off position. The controller will now load the motor to
that point.
21
Magtrol Automatic Motor Testing Software
Tests
5.8 WATTS STABILIZED
5.9 MANUAL
This selection allows you to load a motor to a specific
input wattage level, regardless of heating effects, line
voltage variations, etc. The program will record the
parameters at the specified interval for the specified
length of time. When the test period is completed, the
controller will unload the motor. This type of test may
be of interest if doing a burn in test on a motor while
observing temperature rise at various points around the
motor. The Index display keeps track of the number of
data points that have been stored. If you wish to interrupt
the test, click the QUIT button. A dialog box will appear
to query whether you really want to quit the test. Click
either YES or NO. When the test is completed, the
Data Output menu will appear on the . Click on the
menu button and drag the cursor to your selection. The
available selections are described in Chapter 6-Data
Ouput Options. Click the OK button to execute your
choice.
This selection allows you to use the controller manually,
via front panel controls, while using the computer to
display and store the data as needed. The manual Torque
and Speed controls can be enabled for quickly loading
a motor to determine maximum torque produced,
maximum current drawn, etc.
22
5.9.1 HOLD
Clicking this button will cause the data acquisition to
halt, and the last readings will be held on the display.
5.10 OPENING SAVED TESTS
Making this selection will allow you to recall data that
was saved from a previous motor test. For the data to
import, the Magtrol format must be rigidly followed.
The first line of the file is a header for the columns.
The rest of the file contains Amps, Volts, Watts, Power
Factor, Efficiency, RPM, Torque, Watts Out and
Horsepower data. The columns use tab delimiters, and
an end-of-line character follows each row. A file dialog
box will appear that will assist you in selecting a drive/
directory/file name to import. After successfully
importing a file, the Data Output menu appears. The
available choices are described in Chapter 6-Data Ouput
Options. Click the OK button when finished.
6 - Data Output Options
6.1 DISPLAY
This screen is for selecting the style of graph and the
parameters to plot. The available graph styles are: One
Plot, Multiple Plot, and Six Graph. The unusable axis
menus for each selection will be disabled and grayed
out. The X and Y1 axes have the following choices
available: Speed, Torque, Watts Out, Horsepower,
Efficiency, Amps, Volts, Watts In and Power Factor.
For the remaining Y axes, you may select any of the
previous parameters or None, which would skip that
graph. The X axis parameter is common to all graphs.
After selecting the appropriate parameters, click the OK
button.
6.2.2 ONE PLOT
This selection displays the stored data in tabular format
on the computer CRT. As the number of data points
increases, a scroll bar will appear on the right side of
the display. Clicking on the arrows or clicking and
sliding the scroll button will allow you to review all of
the data. To obtain a hard copy of the data, press the
"Print Data" button and a print will be created on your
system printer. Pressing the "To Excel" button will send
the data to, and automatically open, an Excel
spreadsheet. Press "OK" to return to the previous screen.
6.2 SCREEN PLOT
6.2.1 PLOT SETUP
This menu selection plots a single motor performance
curve on the computer CRT. The X and Y axes are
automatically scaled in order to make best use of the
available plotting area. You may wish to change the
scaling, or zoom in on a portion of the curve. To do so,
click the right mouse button while the pointer is
somewhere within the graphing area. Drag to Autoscale
Y or Autoscale X to disable autoscaling. Then, double
click the mouse with the pointer on the upper limit of
the scale. Type in the new scale value and press
<Enter>. The lower limit may also be changed in the
same manner. Near the lower right portion of the screen
you will find a cursor control and readout. The left
most readout is the current X value. The right readout
is the current Y value. The next box is for turning the
cursor control On or Off. To its right is a box that allows
you to modify the cursor attributes. Click in the box
and drag to the appropriate selection. The last box is
23
Magtrol Automatic Motor Testing Software
Data Output Options
for locking the cursor onto the actual points taken during
the test. If you wish to unlock the cursor, click on the
lock symbol and drag the mouse to the Locked selection.
The keypad on the far right is for controlling the location
of the cursor. Click the button on the right to move
down the curve; click the button on the left to move up
the curve. There is also a text box available near the
bottom of the screen for entering header information.
Click the mouse inside the box, type the header
information, and press the keypad <Enter> key when
finished. Curve fitting is available during this graphing
selection. To enable fitting, click the cursor inside the
"Show Fit Data" box. The actual data may be removed
by clicking the "Show Actual Data" box. The fit
polynomial order may be changed by incrementing or
decrementing the "Curve Fit Adjustment" control. At
the lower right of the screen are two buttons, PRINT
and OK. If you wish to make a hard copy of the screen
plots, click the PRINT button. The contents of the screen
will be sent to your system printer.
6.2.3 MULTIPLE PLOT
This menu selection plots up to five motor performance
curves on a single graph on the computer CRT. The X
and Y axes are automatically scaled in order to make
best use of the available plotting area. There is no
provision under this selection for manually scaling the
axes. A text box is available at the bottom of the screen
for entering header information. Click the mouse inside
the box, type the header information, and press the
keypad <Enter> key when finished. At the lower right
of the screen are two buttons, PRINT and OK. If you
wish to make a hard copy of the screen plots, click the
PRINT button. The contents of the screen will be sent
to your printer. The curves are differentiated by color
24
coding, therefore it is advisable that a color printer be
used for hardcopy.
6.2.4 SIX GRAPH
This menu selection plots six individual motor
performance curves on the computer CRT. The X and
Y axes are automatically scaled in order to make best
use of the available plotting area. You may wish to
change the scaling or zoom in on a portion of the curve.
To do so, click the right mouse button while the pointer
is somewhere within the graphing area. Drag to
Autoscale Y or Autoscale X to disable autoscaling.
Then, double click the mouse with the pointer on the
upper limit of the scale. Type in the new scale value
and press <Enter>. The lower limit may also be changed
in the same manner. There is also a text box available
at the bottom of the screen for entering header
information. Click the mouse inside the box, type the
header information, and press the keypad <Enter> key
when finished. At the lower right of the screen are two
buttons, PRINT and OK. If you wish to make a hard
copy of the screen plots, click the PRINT button. The
contents of the screen will be sent to your laser printer.
6.3 PRINT
This selection takes all of the data collected and sends
it to the parallel port printer. The data is in tabular
format, similar to the Display function, with the first
data point at the top of the page and the last data point
at the bottom.
Magtrol Automatic Motor Testing Software
Data Output Options
6.4 FILE SAVE
This selection creates a spreadsheet file of the collected
data. The first line of the file is a header for the columns.
The rest of the file contains Amps, Volts, Watts, Power
Factor, Efficiency, RPM, Torque, Watts Out and
Horsepower data. The columns are tab delimited and
an end-of-line character follows each row. This data
format is easily imported into spreadsheets such as Excel
and Lotus. A file dialog box appears to assist you in
selecting a drive/directory/file name for the data.
6.5 RETURN
This selection takes you back to the main menu screen
for selection of the next test or to exit the program.
25
7 - Customizing
If you have purchased the M-TEST Source Code, you
may wish to modify the M-TEST program to enhance
it for your requirements. The complete program consists
of a number of VI's, or virtual instruments. They work
together, like subroutines, to make the finished program.
To edit the program you will need to have a copy of
National Instruments' LabVIEW for Windows 95 Full
Development System and Application Builder. This
should not be attempted by anyone but an experienced
LabVIEW programmer. Launch LabVIEW as you
normally would. Load the VI that you wish to modify
and make your changes. When you have completed
your modifications, you must re-compile the program.
From the File menu, select Save with Options. From
the menu bar select To VI Library for Application.
This saves the program without associated diagrams,
thus reducing the overall size of the program.
NOTE:
You must save to a different
directory than where your source
program is located! Failing to do so
will overwrite the source program
and you will not be able to do any
future editing.
Name a temporary directory to save the files to. From
the File menu select Open M-TEST.LLB then
About.vi. From the File menu, select Save A Copy
As... and select the temporary directory and library
name. Close About.vi. From the File menu, select
Build Application. Choose M-TEST.LLB from your
temporary directory. A message will appear stating that
at least one vi must be marked as auto-load. Select the
M-TEST vi for this. Select M-TEST.EXE for the
program name. LabVIEW should now finish the job
and provide you with a new M-TEST.EXE file that
you can insert into the working directory, normally
"C:\MAGTROL".
26
Magtrol Limited W
arranty
Warranty
Magtrol, Inc. warrants its products to be free from defects in material and workmanship under normal use and
service for a period of one (1) year from the date of shipment. Software is warranted to operate in accordance with
its programmed instructions on appropriate Magtrol instruments. This warranty extends only to the original purchaser
and shall not apply to fuses, computer media, or any other product which, in Magtrol’s sole opinion, has been
subject to misuse, alteration, abuse or abnormal conditions of operation or shipping.
Magtrol’s obligation under this warranty is limited to repair or replacement of a product which is returned to the
factory within the warranty period and is determined, upon examination by Magtrol, to be defective. If Magtrol
determines that the defect or malfunction has been caused by misuse, alteration, abuse or abnormal conditions of
operation or shipping, Magtrol will repair the product and bill the purchaser for the reasonable cost of repair. If the
product is not covered by this warranty, Magtrol will, if requested by purchaser, submit an estimate of the repair
costs before work is started.
To obtain repair service under this warranty, purchaser must forward the product (transportation prepaid) and a
description of the malfunction to the factory. The instrument shall be repaired at the factory and returned to purchaser,
transportation prepaid. MAGTROL ASSUMES NO RISK FOR IN-TRANSIT DAMAGE.
THE FOREGOING WARRANTY IS PURCHASER’S SOLE AND EXCLUSIVE REMEDY AND IS IN LIEU OF
ALL OTHER WARRANTIES, EXPRESSED OR IMPLIED, INCLUDING BUT NOT LIMITED TO ANY IMPLIED
WARRANTY OF MERCHANTABILITY, OR FITNESS FOR ANY PARTICULAR PURPOSE OR USE.
MAGTROL SHALL NOT BE LIABLE FOR ANY SPECIAL, INDIRECT, INCIDENTAL, OR CONSEQUENTIAL
DAMAGES OR LOSS WHETHER IN CONTRACT, TORT, OR OTHERWISE.
CLAIMS
Immediately upon arrival, purchaser shall check the packing container against the enclosed packing list and shall,
within thirty (30) days of arrival, give Magtrol notice of shortages or any nonconformity with the terms of the order.
If purchaser fails to give notice, the delivery shall be deemed to conform with the terms of the order.
The purchaser assumes all risk of loss or damage to products upon delivery by Magtrol to the carrier. If a product is
damaged in transit, PURCHASER MUST FILE ALL CLAIMS FOR DAMAGE WITH THE CARRIER to obtain
compensation. Upon request by purchaser, Magtrol will submit an estimate of the cost to repair shipment damage.