1
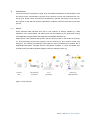
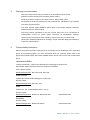
USER MANUAL
LCD Array Kit
Milk ID 2.0
Customized LCD-Array Kit
Code: A-850-12
Manual : Milk ID 2.0 Vers 1.0-2013
1)
Introduction:
This array has been developed for rapid, easy and reliable identification of animal DNA in milk
and milk products. Animal DNA of species most commonly used in milk production like cow,
sheep, goat, buffalo, horse and camel will be detected in parallel. The assay is well suited for
the analysis of milk and milk product preparations containing milk from more than one animal
species.
1.1)
Method:
Using extracted DNA extracted from milk or milk products as starting material (1), small
fragments of the mitochondrial 16S rRNA genes will be amplified by the initial PCR. During
this amplification the generated PCR fragments are labelled with Biotin (2).
PCR amplicons are hybridised with species specific capture probes on the surface of the array
(3). Non-specifically bound PCR amplicons will be removed by short washes under high
stringency. The remaining specifically bound amplicons can be visualized by incubation with a
Streptavidin-Peroxidase conjugate and the subsequent formation of a dark precipitate after
incubation with peroxidase substrate (TMB) provided as staining solution (4).
extracted
PCR with biotin
Array
Detection by
DNA
incorporation
hybridisation
TMB precipitation
Figure 1: Test principle
Manual : Milk ID 2.0 Vers 1.0-2013
1.2)
Assay Performance:
The amplicons generated by the provided primer mix originate in the 16S rRNA region of the
mitochondrial genomes (mt-DNA). Due to the high copy number of the mt-DNA in most
tissues and the short amplicon length (~125 bp) the assay has to be considered as very
sensitive. Under standard conditions (e.g. 35 PCR cycles for PCR amplification) as little as 1
% additions of one milk type into another can be detected (e.g. 1% cow milk in 99% goat milk).
Since this assay has been developed for the analysis of fresh milk and products thereof,
increasing the PCR cycler number might become necessary if analysis of highly processed
milk products is envisaged. The targets amplified by the supplied PCR primer mixes are highly
conserved sequences and the probes spotted on the array have been thoroughly evaluated for
their species specificity ( for details on capture probe specificities refer to Figure 2) . The probe
design is based on available data base entries and sequence analysis of reference material at
Chipron GmbH. Due to the complexity of modern races and breeds it can not be excluded,
that rare genotypes escape from the analysis.
1.3)
Array Pattern:
Each LCD-Chip contains eight identical arrays in rectangular reaction chambers which can be
addressed individually. All species-specific capture probes are positioned as vertical
duplicates. The positive detection of each species is indicated by two circular hybridization
signals. Functional controls to monitor hybridisation, secondary labeling and staining are
located in three corners. The arrays of the Milk ID 2.0 kit are 7 x 7 patterns with average spot
diameters of 350 μm.
* =
** =
Capture probe detects both species of the Genus Camelus ( C. bactrianus & C. dromedarius).
Cross reactivity of the capture probe for Donkey with 100% Horse may occur
Figure2: Array Pattern and probe specificities
Manual : Milk ID 2.0 Vers 1.0-2013
2
Storage conditions & kit content
When stored at the indicated temperature and not handled otherwise as specifically described,
all components are stable until their expiry date. Expire dates are printed on the components
label or the labels of the accompanying packages. More than 6 freezing and thawing cycles
should be avoided for components which require frozen storage. Prepare aliquots if
necessary.
Component
A-850-04 (32 tests)
A-850-12 (96 tests)
Storage
LCD-Arrays
1 box, 04 chips
3 boxes, 12 chips
+4°C to +28°
1 bottle
2 bottles
+4°C to +28°
Wash Powder
Primer Mix
MEAT
1 x 75 µl
2 x 75 µl
-10°C to –
25°C
Detection Kit I
Modulator
1 x 300 µl
2 x 300 µl
+4°C to +28°
Dilution Buffer
1 x 2000 µl
2 x 2000 µl
+4°C to +28°
Stain
1 x 2000 µl
2 x 2000 µl
1 x 1750 µl
2 x 1750 µl
(*)
+4°C to +28°
Detection Kit II
Hybridisation Buffer B
-10°C to –
25°C
Label
1 x 25 µl
2 x 25 µl
-10°C to –
25°C
Additional supplies
Manual, Pattern File, MSDS
Chip-Box Connectors
(*) =
1 CD
1 CD
---
2 connectors
6 connectors
---
Keep the ‚Stain’ solution always dark, protected from direct Light.
Manual : Milk ID 2.0 Vers 1.0-2013
3
Equipment and reagents - not supplied with the kit
Instrumentation
-
Thermal cycler
-
Water bath
(adjustable to 35°C)
-
Centrifuge for LCD-Arrays
(cat. no HS-500-01, Chipron GmbH)
-
Micro pipettes
(range from 2 µl to 1000 µl)
optional:
-
SlideScanner PF3650u
(cat. no HS-300-01, Chipron GmbH)
-
SlideReader Analysis Software
(cat. no HS-200-01, Chipron GmbH)
Reagents&Materials
4
-
Reagents for DNA extraction
-
PCR chemicals
-
PCR grade water
-
Deionised water
-
Disposable gloves
-
Sterile filter tips
-
PCR reaction vessels
-
3 wash containers
-
1l-bottles
( Taq Polymerase, Buffer, dNTPs)
( 150 to 400 ml each)
Preparation of reagents
WashBuffer
To prepare the 20 x wash buffer concentrate dissolve the content of one wash powder bottle in
1liter of deionised water. To prepare the 1 x wash buffer add 50 ml of 20 x wash buffer
concentrate to 950 ml of deionised water. Prepare the 1 x wash buffer always fresh.
Stability of Wash-Buffer solutions:
20 x Concentrate
2 month at room temperature, 12 month at +4°C
If formation of precipitate occurs, warm the solution to 42°C and let
equilibrate to room temperature prior to use
1 x Working solution
min. 10 days at room temperature
Manual : Milk ID 2.0 Vers 1.0-2013
5
Warnings and precautions
-
All protocol steps should only be carried out by well trained lab personnel.
-
Read the manual carefully and completely before starting.
-
Avoid any exposure to light of the ‘Stain’ solution. Always keep it dark.
-
All reagents in the kit are optimised for this particular test. Substitution of kit reagents
may effect the performance.
-
The same general safety guidelines which apply to the sample material should be
followed during the whole protocol.
-
The PCR products generated in the first protocol step have to be considered as
contamination sources for further PCRs. Therefore, all hybridisation, washing,
staining, drying and analysis steps should be carried out in the ‘post-PCR’ area.
-
Observe the standard guidelines for working in a PCR molecular diagnostic laboratory
to prevent contaminations.
6
General safety information
When working with chemicals, make sure that you always wear a suitable lab coat, disposable
gloves and protective goggles. For more information about our products, please refer to the
appropriate material safety data sheets (MSDS) which can be found on the CD provided with
the kit.
Hybridisation Buffer
contains formamide ( >50%) and N-Dodecanoyl-N-methylglycin-Sodium salt.
Hybridisation buffer should therefore be handled as formamide.
Toxic, harmful, irritant
Riskandsafetyphrases: R61, R36, R38, S24, S26
Wash Powder
contains N-Dodecanoyl-N-methylglycin-Sodium salt.
Harmful, irritant
Riskandsafetyphrases: R36, S24, S26
Stain
contains 3,3´,5,5´-Tetramethylbenzidin (> 0.5 %).
Harmful, irritant
Riskandsafetyphrases: R20/21/22, R36/37/38, R40
(Self Assessment)
Modulator
Harmful, irritant
Riskandsafetyphrases: R36/37/38 S26/36
(Self Assessment)
Manual : Milk ID 2.0 Vers 1.0-2013
7
Protocol
7.1
PCR amplification
7.1.1
PCR set-up
Using a 2 x PCR Master Mix (incl. Taq-Polymerase, dNTPs, Buffer and MgCl2)
Number of reactions (25 μl each)
1
4 (set up 5)
8 (set up 9)
12.5 μl
62.5 μl
112.5 μl
Primer Mix Meat
1.5 μl
7.5 μl
13.5 μl
PCR grade water
6.0 μl
30.0 μl
54.0 μl
20.0 μl
100.0 μl
180.0 μl
4 x 20.0 μl
8 x 20.0 μl
2x Master Mix ( incl. MgCl2 final 1.5-2.5 mM )
Total volume
Aliqout into
7.1.2
Template
Add 5.0 μl of extracted DNA as template to each reaction tube.
Note:
If larger or smaller volumes of template need to be added, reduce the amount of
added water accordingly
Manual : Milk ID 2.0 Vers 1.0-2013
7.1.3
Cycler settings
The cycle regime given below has been optimised for the use of
-
HotStar Taq Plus Master Mix
Qiagen GmbH
-
TProfessional Standard Cycler, Analytik Jena AG
[Code 203645]
[Code 070-951]
When other combinations of PCR cycler and enzyme will be used, slight modifications of the
given protocol could become necessary. Please contact your local distributor or the Chipron
support team if you wish assistance for any kind of assay optimization.
Step
Duration
Temperature
1)
5:00 min
95°C
Initial Denaturation
Ramp
Note
longer with some
“Hot-Start” enzymes
2)
3)
35* repetitions of:
Denaturation
0:30 min
94°C
3°C / sec
Annealing
0:45 min
57°C
3°C / sec
Elongation
0:45 min
72°C
2:00 min
72°C
Strand completion
3°C / sec
* increase number of PCR cycles for higher sensitivity
7.1.4
Agarose gel examination
When the arrays are used for the first time or optimisation becomes necessary, it is
recommended to analyse the PCR amplification by agarose gel electrophoreses ( 2.0 %
agarose gel ). Expected fragment size: 115-128 bp (species dependent).
7.2
LCD Array hybridisation and detection
Detailed protocol for first time user – advanced users refer to short protocol (chapter 7.3.)
General Remarks
Since the working principle of LCD-Arrays is DNA/DNA hybridisation, the specificity and
sensitivity of the assays are mainly controlled by the hybridisation stringency during the 30
minute hybridisation step. Apart from the concentration of the interacting molecules, the two
factors with the biggest influence on hybridisation stringency are temperature and buffer
composition (e.g. concentration of salts, formamide, urea etc.). It is crucial that the
temperature during hybridisation and the pipetting volumes are precisely controlled. The use
of calibrated thermometers and micro pipettes is strongly recommended.
Deviations of more than 1 °C or 1 µl can have severe effects.
Manual : Milk ID 2.0 Vers 1.0-2013
7.2.1
Hybridisation
1)
Set water bath temperature to 35 °C and add one droplet of water to each corner of
the humidity chamber. Do NOT preheat the LCD-Chip. The chip should be equilibrated
to room temperature.
2)
Prepare the Hybridisation Mix.
Make sure that all components are equilibrated to room temperature.
Number of reactions
Hybridisation buffer B
Modulator
Aliquot per*
1
4 (set up 5)
8 (set up 9)
22 µl
110 µl
198 µl
2 µl
10 µl
18 µl
-
24 µl
24 µl
* 0.2 ml reaction vials or 8-well PCR strips are well suited for setting up the reactions
3)
Combine the PCR product with the Hybridisation Mix.
Add 10 µl of the PCR product to the respective aliquot of Hybridisation Mix. Mix well
by pipetting up and down for several times – do not vortex!
4)
Initiate the hybridisation.
Place the slide in the humidity chamber and pipette 28 μl of the PCR-Hybridisation
mixes to the respective fields. Make sure that the PCR-Hybridisation mixes come into
contact with the entire reaction zone of the respective array field – avoid any contact of
the pipetting tip with the chip surface. Transfer the closed humidity chamber as quickly
as possible to the preset water bath (the chamber will float on the surface).
5)
Incubate the slide at 35°C for 30 minutes
6)
Prepare three wash containers with 1 x wash buffer (~ 150 ml each).
Prepare the 1 x wash buffer from the 20 x wash buffer concentrate, by adding 50 ml of
concentrate to 950 ml of deionized water. Mix thoroughly.
7)
Submerge the slide completely in the first container with the wash buffer and move it 3
times slowly backward and forward. Submerge the slide quickly, to avoid field to field
cross talk. Repeat the procedure in wash container 2. Subsequently, transfer the slide
to container 3 and incubate for 1 minute
8)
Dry the slide by spinning for 15 seconds in the CHIP Spin FVL2400N
(Cat.No. HS-500-01).
Manual : Milk ID 2.0 Vers 1.0-2013
7.2.2
Labelling
9)
Prepare the labelling mix
Number of reactions
4 (setup 5)
8 (setup 10)
27.0 µl
135 µl
270 µl
Modulator
3.0 µl
15 µl
30 µl
Label
0.2 µl
1 µl
2 µl
Total
30.2 µl
151 µl
302 µl
Dilution Buffer
1
Mix well by vortex or intensive pipetting
10)
Apply 28 μl of the label mix to each field of the slide.
Make sure that the label mix has contact with the entire reaction zone of the
respective array field – avoid any contact of the pipette tip with the chip surface.
11)
Incubate the slide at room temperature for 5 min
12)
Replace the wash buffer in all three containers and repeat the wash procedure from
step 7).
13)
7.2.3
Dry the slide as in step 8).
Staining
14)
Apply 28 μl of ‘Stain’ solution to each field and incubate for
5 minutes at room
temperature. Make sure that the fields do not contain any traces of washing solution –
wait until fields are completely dry.
Avoid any contamination of the ‘Stain’ stock solution! Prepare aliquots if necessary.
15)
Stop the staining process by rinsing the slide in the last wash container from step 12)
for 15 seconds.
16)
Dry the slide as in step 8).
The slides are now ready for read out and can be kept in the dark for several years
without a significant loss of signal intensity.
Manual : Milk ID 2.0 Vers 1.0-2013
7.3
Short protocol
1)
Set water bath temperature to 35°C
2)
For each reaction mix 22 μl Hybridisation buffer B, 2 μl of Modulator and 10 μl of PCR
product. Apply 28 µl of this solution to the respective array field.
3)
Incubate the slide at 35°C for 30 minutes (in humidity chamber)
4)
Prepare 3 wash containers with ~ 150 ml each of 1x wash solution.
(1 x wash buffer freshly prepared from 20x concentrate)
5)
Rinse slide in wash container 1 and 2 for 10 seconds each and incubate in wash
container 3 for 1 minute.
6)
Dry the slide by spinning it for 15 seconds in the CHIP-Spin Centrifuge
7)
Prepare the labelling mix by combining 27 μl of Dilution buffer, 3 μl of Modulator and
0.2 μl of Label per array field.
8)
Apply 28 μl of label mix to each field of the slide and incubate for 5 minutes at room
temperature.
9)
Replace the wash solution in all containers and repeat the wash procedure from 5).
10)
Dry the slide as in step 6).
11)
Apply 28 μl of Stain solution to each field of the slide and incubate for 5 minutes at
room temperature.
Avoid contamination of the STAIN solution with residues of Label solution
12)
Stop the staining after 5 minutes by rinsing the slide in the last wash container from
step 9) for 10 seconds.
13)
Dry the slide as in step 6) – the slide is now ready for analysis.
Manual : Milk ID 2.0 Vers 1.0-2013
8
Order information
Product:
Quantity
Order No.
Milk ID 2.0
32 Tests / 04 Chips
A-850-04
Milk ID 2.0
96 Tests / 12 Chips
A-850-12
Product
Description
Order No.
Slide Reader Software
1 License
HS-200-01
Scanner PF 7250u
Slide Scanner w. 10µm resolution
HS-300-01
CHIP Spin FVL 2400N
Mini-Centrifuge for LCD-Arrays
HS-500-01
Related Products:
9
10
Contact manufacturer
Chipron GmbH
Tel.:
+ 49 (0) 30 787994 70
Eresburgstrasse 22-23
Fax:
+ 49 (0) 30 787994 99
D-12103 Berlin
Email:
Germany
Support:
[email protected]
[email protected]
Symbol key
The following symbols are used on labels of the kit box and components therein
Manufacturer
Number of tests
Lot number
Date of expiry [ month – year ]
Order number
Storage temperature [ range °C ]
Manual : Milk ID 2.0 Vers 1.0-2013