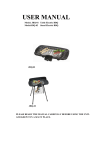
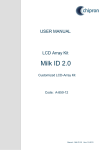
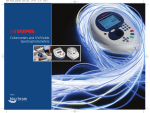
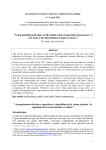
1
Detection of SNPs Using Molecular Biology Techniques By W. Alghazzawi Copyright © Biochemistry & ComputerScience Table of Contents Introduction………….....................................................................................3 Sterilization………….....................................................................................4 Serum, plasma, or whole blood collection...................................................6 Genomic DNA extraction from whole blood................................................8 Captured photos for genomic DNA extraction from whole blood...............10 Determination of DNA concentration .........................................................21 Captured Photos for determination of DNA concentration.........................22 Amplification of DNA fragments by polymerase chain reaction….............26 Captured Photos for amplification of DNA fragments by polymerase chain eaRction …………........................................................................................36 Cutting DNA fragments using restriction enzyme....................................48 Captured Photos for cutting DNA fragments using restriction enzyme…....49 Running samples using agarose gel electrophoresis…...............................56 Captured Photos for running samples using agarose gel electrophoresis.....57 Interpretation of data using statistical analysis..............................................70 Useful links for statistical analysis.............................................................72 Tables............................................................................................................74 References.....................................................................................................76 ii Copyright © Biochemistry & ComputerScience Introduction This research focuses on the different techniques are used in the molecular biochemistry to detect Single Nucleotide Polymorphisms of human DNA. These techniques organize sequential and include a collection of Blood plasma, serum, and whole blood, DNA extraction from whole blood, calculation of DNA concentration, amplification of DNA fragments by polymerase chain reaction, cutting DNA fragments using restriction enzymes, running samples using agarose gel electrophoresis, and interpretation of data using statistical analysis. This research is also supported by captured photos to help academicians and students understanding these techniques. 3 Copyright © Biochemistry & ComputerScience Sterilization Cover each container tightly with aluminum foil, and then sterilize glassware using autoclave machine before start your experiment. . A B 4 Copyright © Biochemistry & ComputerScience C D Pour distilled water into the reservoir through opening on top of the autoclave until it reaches the bottom of the base of the safety valves. The water reaches to border E F Turn On Set the time to 15 min min G H 5 Copyright © Biochemistry & ComputerScience Serum, plasma, or whole blood collection Serum preparation 1. Use red top tube that it does not contain anti-coagulant. 2. Whole blood is directly drawn into a blood tube. 3. Let blood clot at room temperature for at least 30 minutes. 4. Immediately centrifuge the clotted blood at 2,000 to 3,000 rpm for 15 minutes. It is better to repeat the centrifugation for 3 times. 5. Transfer and store serum samples into microcentrifuge tubes 6. Label the tube carefully and write clearly number of sample, name of patient, and date). 7. Keep the serum samples for within two weeks in < -20 ˚C. Keep at -70˚C for longer storage. 6 Copyright © Biochemistry & ComputerScience Plasma preparation 1. Use violet top tube or green top tube (it contains anti-coagulant). 2. Mix the blood with the anticoagulant immediately after drawing each sample. 3. Slowly invert the blood tube eight times. 4. Leave the tube at least for 30 minutes to 1 hour at the room temperature until the RBCs are precipitated into the bottom of the tube, and then the plasma (yellow fluid) is collected from the top of the tube into microcentrifuge tubes. 5. Label the tube carefully and write clearly number of sample, name of patient, and date. 6. Keep the serum samples for within two weeks in < -20 ˚C. Keep at -70˚C for longer storage. 7 Copyright © Biochemistry & ComputerScience Genomic DNA extraction from whole blood QIAamp DNA Blood Mini Kits (Catalog numbers: 51104 and 51106) are used for DNA extraction from the different sources. In this research, it will focus on the genomic DNA extraction from whole blood. Equipment: 1. Microcentrifuge tubes (1.5 ml) 2. Micropipettes (20-200 μl and 200-1000 μl) 3. Sterile tips (0-200 μl and 50-1000 μl) 4. Vortex 5. Water bath Reagents: 1. QIAamp DNA Blood Mini Kit 2. Ethanol (96–100%) 8 Copyright © Biochemistry & ComputerScience Protocol using QIAamp DNA Blood Mini Kit: 1. QIAGEN Protease stock solution (store at 2–8°C or –20°C). 2. When using the QIAamp DNA Blood Mini Kit (50), pipet 1.2 ml protease solvent into the vial containing lyophilized QIAGEN Protease, as indicated on the label. When using the QIAamp DNA Blood Mini Kit (250), pipet 5.5 ml protease solvent into the vial containing lyophilized QIAGEN Protease, as indicated on the label. 3. Dissolved QIAGEN Protease is stable for up to 2 months when stored at 2–8°C. Storage at –20°C is recommended to prolong the life of QIAGEN Protease, but repeated freezing and thawing should be avoided. For this reason, storage of aliquots of QIAGEN Protease is recommended. 4. Buffer AL† (store at room temperature, 15–25°C) Mix Buffer AL thoroughly by shaking before use. Buffer AL is stable for 1 year when stored at room temperature. Hint: Do not add QIAGEN Protease or proteinase K directly to Buffer AL. 5. Buffer AW1† (store at room temperature, 15–25°C) Buffer AW1 is supplied as a concentrate. Before using for the first time, add the appropriate amount of ethanol (96–100%) as indicated on the bottle. Buffer AW1 is stable for 1 year when stored closed at room temperature. 6. Buffer AW2* (store at room temperature, 15–25°C) Buffer AW2 is supplied as a concentrate. Before using for the first time, add the appropriate amount of ethanol (96–100%) to Buffer AW2 concentrate as indicated on the bottle. Buffer AW2 is stable for 1 year when stored closed at room temperature. Source: QIAamp® DNA Mini and Blood Mini Handbook. 9 Copyright © Biochemistry & ComputerScience Captured photos for Genomic DNA extraction from whole blood 1. Number microcentrifuge tubes according to your samples. A B 10 Copyright © Biochemistry & ComputerScience 2. Pipet 20 μl QIAGEN Protease (or Proteinase K) into the bottom of a 1.5 ml microcentrifuge tube. B A 3. Transfer 200 μl blood samples to microcentrifuge tubes. A B C D 11 Copyright © Biochemistry & ComputerScience F E 4. Add 200 μl Buffer AL to the sample. Mix by pulse-vortexing for 15 s (Immediately), then spin. Hint: in order to ensure efficient lysis, it is essential that the sample and Buffer AL are mixed thoroughly to yield a homogeneous solution. A B C D 12 Copyright © Biochemistry & ComputerScience E F 5. Incubate at 56°C for 10 min. Hint: DNA yield reaches a maximum after lysis for 10 min at 56°C. Longer incubation times have no effect on yield or quality of the purified DNA. A B C 13 Copyright © Biochemistry & ComputerScience 6. Briefly centrifuge 1.5 ml microcentrifuge tube to remove drops from the inside of the lid. A B 7. Add 200 μl of ethanol (96–100%) to the sample, and mix again by pulsevortexing for 15 s. A B C 14 Copyright © Biochemistry & ComputerScience 8. Briefly centrifuge 1.5 ml microcentrifuge tube to remove drops from the inside of the lid. 9. Carefully apply the mixture from step 6 to the QIAamp Spin Column (in a 2 ml collection tube) without wetting the rim, close the cap. B A C 15 Copyright © Biochemistry & ComputerScience 10. Centrifuge at 8000 rpm for 1 min. B A 11. Place the QIAamp Spin Column in a clean 2 ml collection tube (provided), and discard the tube containing the filtrate. A B C D 16 Copyright © Biochemistry & ComputerScience 12. Carefully open the QIAamp Spin Column and add 500 μl Buffer AW1 without wetting the rim. A B 13. Close the cap and centrifuge at 8000 rpm for 1 min. 14. Place the QIAamp Spin Column in a clean 2 ml collection tube (provided), and discard the collection tube containing the filtrate. A B 17 Copyright © Biochemistry & ComputerScience 15. Carefully open the QIAamp Spin Column and add 500 μl Buffer AW2 without wetting the rim. A B 16. Close the cap and centrifuge at full speed for 3 min. 17. Place the QIAamp Spin Column in a clean 1.5 ml microcentrifuge tube (not provided). Discard the collection tube containing the filtrate. A B 18 Copyright © Biochemistry & ComputerScience 18. Carefully open the QIAamp Spin Column and add 200 μl Buffer AE or distilled. 19. Incubate at room temperature (15–25°C) for 1 min. (incubating the QIAamp Spin Column loaded with Buffer AE or water for 5 min at room temperature before centrifugation generally increases DNA yield). A second elution step with a further 200 μl Buffer AE will increase yields by up to 15%. 19 Copyright © Biochemistry & ComputerScience 20. Centrifuge at 8000 rpm for 1 min. A B 21. For long-term storage of DNA, eluting in Buffer AE and storing at –20°C is Recommended, since DNA stored in water is subject to acid hydrolysis. Yield (µg) Sample Amount Elution 1 Elution 2 Elution 3 Total Whole blood 200 µl 3-8 1-2 0-2 4-12 DNA concentration Elution volume Yield Yield 200 6.80 100 34.0 150 6.51 95 43.4 100 6.25 92 62.5 50 5.84 86 116.8 (ng/µl) 20 Copyright © Biochemistry & ComputerScience Determination of DNA concentration GeneQuant instrument is used to calculate the DNA concentration and its purity. Equipment and Reagents: 1. Distill water 2. DNA sample 3. Pathlength cell Procedure: 1. For preparation of sample, add 20 µL of DNA sample and complete with 1980 of D.W. in a pathlength cell. 2. For preparation of blank, add only 2000 µl of D.W. in a new pathlength cell. 3. Read the blank and then measure the sample. Source: GeneQuant RNA/DNA Calculator User Manual. 21 Copyright © Biochemistry & ComputerScience Captured photos for calculation DNA concentration using GeneQuant instrument 22 Copyright © Biochemistry & ComputerScience Reference measurement A B C D Press on set ref F E 23 Copyright © Biochemistry & ComputerScience G H I 24 Copyright © Biochemistry & ComputerScience Sample measurement A B 1. Please Wait 2. Press on sample D C E F 25 Copyright © Biochemistry & ComputerScience Amplification of DNA fragments by polymerase chain reaction What is PCR? Polymerase Chain Reaction (PCR) means producing a large number of copies of a specific DNA sequence using a minimum amount of information about that sequence. It is a technique widely used in the molecular biology [1]. Component of the PCR reaction mixture: Template DNA, Heat stable or thermostable (Taq polymerase) Deoxynucleotide triphosphate (dNTPs) building blocks of DNA (A,C,G,T) Cofactor MgCl2 Buffer solution dH2O Two primers that flank both sides of the DNA to be amplified 26 Copyright © Biochemistry & ComputerScience Genomic DNA: It is purified DNA from specific source which contains the region of the DNA fragment to be amplified Taq DNA polymerase: It is a thermostable DNA polymerase which it was originally isolated from thermophilic bacterium Thermus aquaticu. Which copies the region to be amplified [2-4]. Grand prismatic spring dNTPs: Deoxynucleotide-triphosphate (dNTP) mixes are aqueous solutions containing dATP, dCTP, dGTP and dTTP. It used with DNA polymerase to build the new DNA. Cofactor MgCl2: Mg2+ Ions form complexes with dNTPs, Primers and DNA template, which needed for DNA polymerase activity. 27 Copyright © Biochemistry & ComputerScience Buffer solution: Which provide a suitable chemical environment for the DNA polymerase, also keep the reaction at the proper pH. Two primers: To amplify the specific sequence requires the sequence flanking region. It is oligonucleotide is usually short 15-30 bp [5].PCR primers: General guidelines for standard PCR primers: General guidelines for standard PCR primers: 28 Copyright © Biochemistry & ComputerScience General guidelines for standard PCR primers: [6] 29 Copyright © Biochemistry & ComputerScience Principle of PCR: 1. Denaturation: the temperature holds between 94°C to 98°C, 94°C for 1-2 min and 96°C for 60 s. 2. Annealing: the temperature holds between 40ºC to 68ºC. 3. Elongation or Extension: temperature holds between 70°C to 80°C for 0.5-3 min), 1kb of fragment take 1 min and 2kb of fragment take 2 min. Protocol using HotStarTaq Master Mix: This protocol serves only as a guideline for PCR amplification. Optimal reaction conditions, such as incubation times and temperatures, and amount of template DNA, may vary and need to be determined individually. HotStarTaq Master Mix provides a final concentration of 1.5 mM MgCl2 in the final reaction mix, which will produce satisfactory results in most cases. However, if a higher Mg2+ concentration is required, prepare a stock solution containing 25 mM MgCl2. Set up reaction mixtures in an area separate from that used for DNA preparation or PCR product analysis. Use disposable tips containing hydrophobic filters to minimize crosscontamination. Thaw primer solutions and then mix well before use [6]. 30 Copyright © Biochemistry & ComputerScience Reaction composition using HotStar Taq Master Mix Program the thermal cycler according to the manufacturer’s instructions. Each PCR program must start with an initial heat activation step at 95°C for 15 min. A typical PCR cycling program is outlined below. For maximum yield and specificity, temperatures and cycling times should be optimized for each new template target and primer pair [6]. 31 Copyright © Biochemistry & ComputerScience If you are using thermal cyclers with a heated lid, do not use mineral oil. Filling volume: Tube type 0.2 ml/plate: 5 to 50 μl Tube type 0.5 ml/thin: 5 to 100 μl Place PCR tubes in the thermal cycler and start the cycling program. Hint: After amplification, samples can be stored overnight at 2–8°C or at –20°C. Gradient PCR (for Mastercycler® gradient only) The Gradient PCR is used to optimize temperatures in a PCR experiment. The gradient may be programmed with a temperature range of up to 20 °C with every temperature command. The most common application is the determination of the optimal annealing temperature (see example), for which a gradient of, for example, ± 10 °C is built up. The recommended mean gradient is 5 °C higher than the calculated annealing temperature [7]. 32 Copyright © Biochemistry & ComputerScience When the gradient is set at 61 °C ± 10 °C when 12 x 0.2 ml test tubes are used, the temperature distribution in the individual columns of the thermoclock is as follows [7]: When 0.5 ml test tubes are used, the 11 rows of the block have the following temperatures. Calculation for the stock primer preparation (100 uM): "My tube contains 50.0 nmoles of oligo, but I need a final oligonucleotide concentration of 1.0 uM in my reaction. My reaction volume is 25 ul. How much oligo do I add to my reaction?" First, make a concentrated oligonucleotide stock solution (10X or 100X, depending on the concentration you need). Then add an appropriate volume to the reaction, thereby achieving the desired working concentration. Serial dilutions of the stock(s) may be required to ensure pipetting accuracy. See outlined example below: 1. Decide on a stock concentration and standardize your units. Desired final concentration = 1.00 uM 100X stock concentration = 100 X 1.00 uM = 100 micromole/liter Total nanomoles of oligo = 50 nmole (see tube label for your actual oligo) 33 Copyright © Biochemistry & ComputerScience Total micromoles of oligo = 50/1000 = 0.05 micromole Hint: The quantity of oligo must be expressed in micromoles to calculate the volume for a micromolar solution. 2. Make a 100X stock solution (100 X 1.00 μM = 100 μM). What volume (V) is required to resuspend 0.05 micromole of oligo to give a stock concentration of 100 μM? Use the following steps as a guide: 100 micromole = 0.05 micromole = Solve for V 1000 ml V ml V = 0.05 X 1000 ml = 0.5 ml = 500 μl 100 3. Use serial dilutions to make a 10X stock (10 X 1.00 μM = 10 μM). For pipetting accuracy, avoid using small volumes (less than 2 μl) of stock solutions in your reactions. It may be necessary, therefore, to serially dilute your stock oligonucleotide solution. Make a 10X stock by diluting your 100X stock as follows: 1:10 dilution of 100X stock 10 μl of 100 μM (100X) stock + 90 μl sterile water (or TE) = 100 μl of 10 μM (10X) stock. 4. Use a 10X stock to give the final concentration in the reaction [9]. A) My reaction volume is 25 μl. How much of the 10X (10 μM) stock solution of oligo is required to yield a 1.00 μM concentration of oligo in the total reaction? 34 Copyright © Biochemistry & ComputerScience Vol. of (10X) stock X stock conc. = Final reaction vol. X final oligo conc. (S μl) X (10 μM) = (25 μl) X (1.0 μM) Solve for S S = 25 X 1.0 = 2.5 μl 10 35 Copyright © Biochemistry & ComputerScience Captured photos for Amplification of DNA fragments by polymerase chain reaction Equipment: 1. Micropipettes (0.5-10 μl & 20-200 μl) 2. PCR-reaction tubes 3. Microcentrifuge tubes (1.5 ml) 4. Yellow tips (0-200 μl) 5. Gloves 6. Ice bucket 7. Reaction tube holder 8. PCR Tubes 9. Thermocycler instrument Types of PCR tubes 0.5 ml 0.2 ml 36 Copyright © Biochemistry & ComputerScience The thermoblock has 96 narrow positions for 0.2 ml test tubes OR The thermoblock has 77 wide positions for 0.5 ml test tubes 37 Copyright © Biochemistry & ComputerScience Reagents: 1. Components of HotStarTaq Master Mix kit . 2. Forward primer (5’-TGC TTT CTC TGT GTC CA-3’) 3. Reverse primer (5’-TCC AGC CTT TTC TGA TA-3’) 4. Genomic DNA Reverse primer Preparation the stock primers: Forward primer 50 nm 1. Always take great care not to contaminate the original primer stock. 2. Use filter tips and PCR-quality reagents. 3. When you receive the lyophilized primer, before opening it be sure to spin it down to insure that the primer pellet is at the bottom of the tube about 10000 rpm for 30 s. 4. This tube will be used to make working primer solutions as needed and will be stored at -20°C or below. 38 Copyright © Biochemistry & ComputerScience 5. Determine how many nmoles of primer is in the tube (usually written on the tube or on information accompanying primer order). 6. Resuspend the pellet in RNase-free water that come with HotStar Taq Master Mix and mix well to generate the 100 uM stock solution. An easy way to do this is to multiply the nmole value by 10 and add that volume in ul to the pellet. For example: If primer pellet is 5 nm, you will add 50 ul RNase-free water that come with HotStar Taq Master Mix to the pellet to resuspend it. The final concentration of primer is 100 uM. 7. Solutions should be aliquots in small portions and store Primer solutions at -20°C [8]. 39 Copyright © Biochemistry & ComputerScience Procedure: HotStarTaq Master Mix 12.5 μl RNase-free water 10.1 μl Forward stock primer (0.1μM) 0.2 μl Reverse stock primer (0.1μM) 0.2 μl Genomic DNA 2.0 μl Total 25 μl Aliquot from Forward & Reverse primers HotStarTaq Master Mix Genomic DNA (Sample) RNasefree water HotStarTa q Master Mix Stock (Forward & Reverse primers) 1. Sterilize the hood using ethanol and wear gloves. A B 40 Copyright © Biochemistry & ComputerScience 2. Thaw all solutions before use. 3. Mix the HotStarTaq Master Mix tube by vortexing briefly and dispense 12.5 μl into each PCR tube. It is important to mix the HotStarTaq Master Mix before use in order to avoid localized concentrations of salt. 3. Label PCR tubes by writing the number of sample. 41 Copyright © Biochemistry & ComputerScience 4. Add 12.5 μl of HotStarTaq Master Mix to a clean PCR tube. A B C D E 42 Copyright © Biochemistry & ComputerScience 6. Add 10.1 μl of RNase-free water to the same tube using a new tip. A B C D 7. Add forward primer (0.2 μl) to the same tube using a new tip. A B 43 Copyright © Biochemistry & ComputerScience D C 8. Add backward primer (0.2 μl) to the tube using a new tip. A B C D 44 Copyright © Biochemistry & ComputerScience 9. Add DNA sample to the same tube using a new tip. B A C D E F Total volume of reaction is 25 μl 45 Copyright © Biochemistry & ComputerScience 10. Gently vortex the sample and briefly centrifuge for 10 min at 3000 rpm to collect all drops from walls of tube. A B C 11. All PCR tubes are placed in the mastercycler gradient thermocycler, which can heat and cool the tubes. 46 Copyright © Biochemistry & ComputerScience 12. Insert temperatures and then press START button to begin the reaction. 1 2 3 4 5 6 7 T=96°C T=96°C T=55°C T=72°C Go to 2 rep T=72°C Hold For 5 min For 35 sec For 35 sec For 45 sec For 40 cycles For 4 min For 4°C See more details about using Mastercycler/Mastercycler gradient instrument. 47 Copyright © Biochemistry & ComputerScience Cutting DNA fragments using restriction enzymes Restriction Enzymes recognize short DNA sequences. They cleave doublestranded DNA at specific sites within or adjacent to these sequence [16]. Polymorphism of XRCC1 will be determined by using Polymerase Chain Reaction/Restriction Fragment Length Polymorphism PCR/RFLP technique. Amplified fragments will be digested by Msp I enzyme. The PCR products were then subjected to restriction digestion overnight at 37°C with restriction enzymes [17]. Recognition Sequence (5’…C CG G…3’) (3’…G GC C…5’) 48 Copyright © Biochemistry & ComputerScience Captured photos for Cutting DNA fragments using restriction enzymes [18] Equipment: 1. Micropipettes (0.5-10 μl & 20-200 μl) 2. PCR product tube 3. Microcentrifuge tubes (1.5 ml) 4. Yellow tips 5. Gloves 6. Ice bucket 7. Reaction tube holder 49 Copyright © Biochemistry & ComputerScience Reagents: 1. PCR product 2. Msp I restriction enzyme 3. RE 10X buffer 4. Acetylated Bovine Serum Albumin (BSA) 5. Injection water Procedure: 1. Add 4 μl of PCR product to a new microcentrifuge tube. A B C 50 Copyright © Biochemistry & ComputerScience 2. Add 2.0 μl of RE 10X buffer to the reaction mixture using a new tip. A B C D 51 Copyright © Biochemistry & ComputerScience 3. Add 0.5 μl of BSA to the same tube using a new tip. A B C D 4. Add 0.5 μl of Msp I restriction enzyme to the same tube using a new tip. B A 52 Copyright © Biochemistry & ComputerScience C D 5. Add 13.0 μl of injection water to the same tube using a new tip. B A D C 53 Copyright © Biochemistry & ComputerScience 6. Spin tubes. A B Total volume of reaction is 20 μl 7. Incubate the tubes at 37ºC for overnight [19]. A B 54 Copyright © Biochemistry & ComputerScience Useful conversions: 1 gram (g) = 1000 milligrams (mg) 1 milligram (mg) = 1000 microgram (ug) 1 microgram (ug) = 1000 nanogram (ng) 1 nanogram (ng) = 1000 picogram (pg) 1 gram = 10e12 picograms 1 mole = 1000 millimoles (mmole) 1 millimole (mmole ) = 1000 micromoles (umole) 1 micromole (umole ) = 1000 nanomoles (nmole) 1 nanomole (nmole ) = 1000 picomoles (pmole) 1 mole = 10e12 picomoles A 1 micromolar solution (1uM) = 1 picomoles per microliter (1pmoles/ul): 1uM = 10e-6 moles/liter x 10[-6] liters/ul = 10e-12 moles/ul = 1 pmole/ul [10] 55 Copyright © Biochemistry & ComputerScience Running samples using agarose gel electrophoresis Agarose: Agarose is purified from agar. Purified agarose is in powdered form, and insoluble in water or buffer at room temperature but it dissolve in boiling water. Different purities of agarose are commercially available as are agaroses with different melting properties. High purity low melt agarose is often used if the DNA is to be extracted from the gel [11-14]. Agarose Gel Electrophoresis: It is a method used in molecular biology to separate DNA strands by size, and to estimate the size of the separated strands by comparison to known fragments (DNA ladder). This is achieved by pulling negatively charged DNA molecules through an agarose matrix with an electric field. Shorter molecules move faster than longer ones [11-14]. 56 Copyright © Biochemistry & ComputerScience Captured photos for Running samples using agarose gel electrophoresis Equipment: HE 33 Mini horizontal submarine unit and was obtained from Hoefer; Amersham Biosciences AB powered by an EPS 601 (See figure below). Conical flask & balance. Micropipette (0.5-10 ul & 20-200 ul). Microcentrifuge tube, tips, comb and tap. Reagents: PCR product samples. Tris/Borate/Na2EDTA (TBE) buffer solution is commonly used. DNA ladder (DNA Marker or DNA Standard) Agarose (2 % w/v) Hint: If you use a high concentration of agarose, the pores of agarose will be small. It means the smaller size of DNA will migrate. Ethidium bromide (10 mg/ml in H2O) is an intercalating Agent. Loading buffer 57 Copyright © Biochemistry & ComputerScience TBE buffer: It is widely used for the electrophoresis of nucleic acids and has a higher buffer capacity than TAE. It can be used for DNA and RNA polyacrylamide and agarose gel electrophoresis [15]. Composition: Atypical mixture of TBE consist of: Tris base 108 g/l (0.89 M) EDTA-Na2-salt 7.44 g/l (0.02 M) Boric acid 55.0 g/L (0.89 M) Preparation 10X stock solution: Tris Base Borate EDTA (TBE) buffer is containing 10X stock solutions are made as follows: 108 gm of Tris base, 55 gm of Boric acid, and 7.44 gm of EDTA. The ingredients were dissolved in 960 ml of distill water. The pH is adjusted to 8.3 and the volume was complete to 1L. Preparation 1X dilute solution from 10X stock solution: Take 100 ml from 10X stock solution and complete to 1000 ml with distill water. Then, the 1X dilute solution is ready to fill in the gel tank to submerge in depth about 3-5 mm and to preparation agarose gel. Preparation of Ethedium Bromide (10 mg/ml): Dissolve 0.1 gm of Ethedium Bromide in 10 ml of distill water [6]. 58 Copyright © Biochemistry & ComputerScience Preparation of 6X loading buffer: The example of loading buffer is Bromophenol blue (tetrabromophenolsulfonephthalein). It is used a color marker and density to the sample when load into wells. It is carries slight negative charges in neutral buffers and thus migrate in the same direction as the DNA during electrophoresis”. It was prepared as follow: bromophenol blue 0.25% (w/v) and sucrose 40% (w/v) then complete the volume to 10 ml by distilled water [11]. Preparation of agarose gel solution: 1. For preparation of agarose gel, make 2% (w/v) of agarose solution. A B C D 59 Copyright © Biochemistry & ComputerScience 2. Boil the solution until completely dissolve. A B C 3. Let the solution cool down to about 60°C at room temperature. 60 Copyright © Biochemistry & ComputerScience 4. Add 1 µl of ethidium bromide stock per 10 ml gel solution. Hint: some researchers prefer soaking the gel in an ethidium bromide solution after running or put directly in a buffer that is filled the tank. 5. Stir the solution to disperse the ethidium bromide. B A 6. Pour the melted agarose directly from the conical flask onto the casting deck. If necessary using a glass or yellow tip carefully to remove any trapped air bubbles form the gel solution. 61 Copyright © Biochemistry & ComputerScience 7. When the gel has completely cooled and solidified, carefully remove the comb by pulling straight up on the comb holder from both sides. B A D C 8. Put the gel, together with the rack, into a chamber (filled with 1x TBE buffer). Make sure the gel is completely covered with TBE buffer, and that the slots are at the electrode that will have the negative current. 62 Copyright © Biochemistry & ComputerScience A B 9. To prepare samples for electrophoresis, combine 2 μl of 6X loading buffer with 5 μl of PCR product, and then mix well. Hint: PCR product is loaded onto 2% agarose gel to ensure that the amplification had occurred. B A First method: Transfer 5 μl from PCR product to Microcentrifuge tube 63 Copyright © Biochemistry & ComputerScience C D Throw a tip and take a new tip Combine 2 μl of 6X loading dye with 5 μl of PCR product in a microcentrifuge tube OR F E Transfer 5 μl of PCR product to a parafilm and combine it with 2 μl of 6X loading dye DNA Ladder G H Load samples into wells 64 Copyright © Biochemistry & ComputerScience DNA Ladder PCR products from different samples J I 10. The power supply can be monitored and operated in current (amps), voltage (100 volts in 30 minutes), or power (watts) mode. The black and red cords leading from the power supply are then attached to the tray in which the gel is run. K 65 Copyright © Biochemistry & ComputerScience 11. Put gel on UV transilluminator. Pentax Optio MX4 Digital Camera is used to capture photo A B DNA Ladder DNA Ladder 615 bp Different sizes of PCR Products from different samples are the same 66 Copyright © Biochemistry & ComputerScience 12. Troubleshooting in PCR: sometimes using PCR can lead to undesirable bands and contamination because PCR amplification failure under optimum conditions; for example, primer dimer bands, non-specific bands, smear, and residues in wells. A DNA ladder Interested band Loading dye Primer dimer B Non-specific band Interested band 67 Copyright © Biochemistry & ComputerScience C D Residues in well Smear The interested band 68 Copyright © Biochemistry & ComputerScience 13. Combine 2 μl of 6X loading buffer with 20 μl of restriction enzyme, and then the digestion products is separated on agarose gel electrophoresis for identification. DNA Ladder DNA Ladder 615 bp 374 bp 241 bp 1 2 3 4 1 Wild type 241 bp & 374 bp 2 Homozygous variant 615 bp 3 Heterozygous variant 241 bp, 374 bp & 615 bp 4 PCR product 615 bp 69 Copyright © Biochemistry & ComputerScience Interpretation of data using statistical analysis Here you can find some statistical tests for interpretation of data. Two-side 2 : It was used to compare the distribution of the genotypes between cases and controls [20]. Hardy–Weinberg equilibrium: It was tested by a goodness-of-fit 2 test to compare the observed genotype frequencies within the case-control groups to the anticipated genotype frequencies calculated from the observed allele frequencies [20]. Odds ratio: This is a way of comparing whether the probability of a certain event is the same for two groups. An odds ratio of 1 implies that the event is equally likely in both groups. An odds ratio greater than one implies that the event is more likely in the first group. An odds ratio less than one implies that the event is less likely in the first group [21]. Odds Ratio = (A / B) / (C / D) = (A x D) / (B x C) 70 Copyright © Biochemistry & ComputerScience Hint: The crude odds ratio is the unadjusted odds ratio. ORs may be adjusted for confounding factors using either stratification methods (Mantel Haenszel ORs) or logistic regression. Relative risk: A more direct measure comparing the probabilities in two groups is the relative risk, which is also known as the risk ratio. The relative risk is simply the ratio of the two conditional probabilities. Like the odds ratio, a relative risk equal to 1 implies that the the event is equally probable in both groups. A relative risk greater than 1 implies that the event is more likely in the first group. A relative risk less than 1 implies that the event is less likely in the first group [21]. The relative risk is simply the ratio of the two conditional probabilities . The relative risk (RR) for the event X- would be given by the following formula We can also define the risk ratio for the event X+. It would be the ratio of the conditional probabilities in the second column, i.e., 71 Copyright © Biochemistry & ComputerScience Useful links for statistical analysis 1) Calculator online: A) For a 2x2 Contingency Table: Rates, Risk Ratio, Odds, Odds Ratio, Log Odds Phi Coefficient of Association Chi-Square Test of Association Fisher Exact Probability Test http://faculty.vassar.edu/lowry/odds2x2.html B) Calculate probability from X² and d & Calculate X² from probability Q and d http://www.fourmilab.ch/rpkp/experiments/analysis/chiCalc.html C) The Chi Square Statistic http://math.hws.edu/javamath/ryan/ChiSquare.html D) Chi Square Calculator http://www.pcrstation.com/ E) Simple Interactive Statistical Analysis http://www.quantitativeskills.com/sisa/ F) QuickCalc http://www.graphpad.com/quickcalcs/contingency1.cfm 2) ANSWERS -- POPULATION GENETICS PROBLEMS http://science.kennesaw.edu/~rmatson/Biol%203380/ANSWERS.html 72 Copyright © Biochemistry & ComputerScience 3) Critical Values of the Chi-Square Distribution http://www.itl.nist.gov/div898/handbook/eda/section3/eda3674.htm 4) The Chi-Squared Distribution Table http://mips.stanford.edu/public/classes/stats_data_analysis/principles/chi_table.html 5) Table of the Chi-Square Distribution http://www.fmi.uni-sofia.bg/vesta/virtual_labs/tables/tables3.html 6) Critical Points of the Chi Square Distribution http://www.math.unb.ca/~knight/utility/chitable.html 7) ON-LINE CHI-SQUARED TABLE http://www.unc.edu/~farkouh/usefull/chi.html 8) CHI-SQUARE AND TESTS OF CONTINGENCY TABLES http://www.psychstat.missouristate.edu/introbook/SBK28.htm 9) HARDY-WEINBERG EQUILIBRIUM http://www.tiem.utk.edu/bioed/bealsmodules/hardy-weinberg.html 10) The Hardy-Weinberg Law (Animation) http://bcs.whfreeman.com/pierce1e/pages/bcsmain_body.asp?s=23000&n=00020&i=23020.01&v=chapter&o=|00010|00020|00030|00060|&ns =0&t=&uid=0&rau=0 11) POPULATION GENETICS AND THE HARDY-WEINBERG LAW http://www.k-state.edu/parasitology/biology198/hardwein.html 12) Handbook of Biological Statistics http://udel.edu/~mcdonald/statprobability.html 73 Copyright © Biochemistry & ComputerScience Tables The below table is recommended to use it in your experiment for the results after runing PCR products on a gel and and the second table for the results after agter digestion of amplified fragments by restriction enzyme on a gel. Table 1 No. of sample *Name of PCR temp. Date of running Band resolution * Name of PCR temperature: It is recorded in a thermocycler instrument 74 Copyright © Biochemistry & ComputerScience Table 2 No. of sample Date of running Band resolution Result 75 Copyright © Biochemistry & ComputerScience References 1) http://www.espionageinfo.com/Pa-Po/Polymerase-Chain-Reaction-PCR.html 2) http://en.wikipedia.org/wiki/Taq_polymerase 3) http://en.wikipedia.org/wiki/Thermophilic 4) http://en.wikipedia.org/wiki/Thermus_aquaticus 5) http://en.wikipedia.org/wiki/Polymerase_chain_reaction#References#References 6) HotStarTaq™ PCR Handbook 7) Mastercycler®/Mastercycler® gradient manul 8) http://www.mbi.ufl.edu/~rowland/protocols/pcrprimer.htm 9) http://www.sigmaaldrich.com/Brands/Sigma_Genosys/Custom_DNA/Key_Re sources/You_and_Your_Oligo.html 10) http://wheat.pw.usda.gov/~lazo/methods/donis/16/16_5.html 11) http://userpages.umbc.edu/~jwolf/m6.htm 12) http://www.life.uiuc.edu/molbio/geldigest/electro.html 13) http://www.vivo.colostate.edu/hbooks/genetics/biotech/gels/agardna.html 14) http://mycoplasmas.vm.iastate.edu/lab_site/methods/DNA/agarosegel2.html 15) Sambrook, Fritsch, Maniatis (1989) Molecular Cloning, Cold Spring Harbor Laboratory Press (B.23, p.6.7). 16) http://en.wikipedia.org/wiki/Restriction_enzyme 17) http://cebp.aacrjournals.org/cgi/content/full/10/2/125 18) http://www.stanford.edu/group/hopes/sttools/figureid.html 19) Usage information of Msp 1restriction enzyme catalog# R6401-Promega Corporation 20) http://math.hws.edu/javamath/ryan/ChiSquare.html 21) http://www.childrensmercy.org/stats/definitions/or.htm 76 Copyright © Biochemistry & ComputerScience The End 77 Copyright © Biochemistry & ComputerScience