1
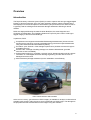
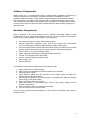
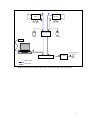
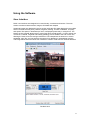
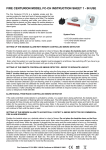
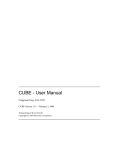
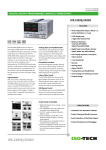
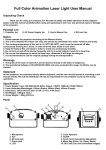
RICS
Version number: 1.4.0
Release date: 29 August 2011
Author: Nariman Habili
GeoCat#: 72650
Licence
User Manual
© Commonwealth of Australia (Geoscience Australia) 2011
With the exception of the Commonwealth Coat of Arms and where otherwise noted, all
material in this publication is provided under a Creative Commons Attribution 3.0 Australia
Licence (http://creativecommons.org/licenses/by/3.0/au/)
Software
Copyright © 2011 Commonwealth of Australia (Geoscience Australia).
This program is free software: you can redistribute it and/or modify it under the terms of the
GNU General Public License as published by the Free Software Foundation, either version 3
of the License, or (at your option) any later version.
This program is distributed in the hope that it will be useful, but WITHOUT ANY WARRANTY;
without even the implied warranty of MERCHANTABILITY or FITNESS FOR A PARTICULAR
PURPOSE. See the GNU General Public License for more details.
You should have received a copy of the GNU General Public License along with this program.
If not, see http://www.gnu.org/licenses/.
2
Contents
ACKNOWLEDGEMENTS ......................................................................................................... 4
PEOPLE .................................................................................................................................. 4
THIRD-PARTY TOOLS AND LIBRARIES ......................................................................................... 4
OVERVIEW ............................................................................................................................... 5
OVERVIEW ............................................................................................................................... 5
INTRODUCTION ........................................................................................................................ 5
SOFTWARE COMPONENTS........................................................................................................ 6
HARDWARE COMPONENTS ....................................................................................................... 6
INSTALLATION ........................................................................................................................ 8
BUILDING FROM SOURCE ......................................................................................................... 8
BINARY INSTALLER .................................................................................................................. 8
USING THE SOFTWARE ......................................................................................................... 9
USER INTERFACE..................................................................................................................... 9
STARTING RICS .................................................................................................................... 10
TEST MODE ........................................................................................................................... 10
CREATING A NEW SESSION .................................................................................................... 11
OPENING A SESSION .............................................................................................................. 12
CAMERA PROPERTIES ............................................................................................................ 12
Camera Names............................................................................................................... 12
Exposure ......................................................................................................................... 13
Gain................................................................................................................................. 14
White Balance................................................................................................................. 14
Frame Rate ..................................................................................................................... 15
Packet Size ..................................................................................................................... 16
NOTE PAD AND DAMAGE LEVEL SETTINGS .............................................................................. 16
CAMERA OR NETWORK SWITCH DISCONNECTION .................................................................... 17
CHECKLIST FOR USING THE RICS SOFTWARE......................................................................... 18
APPENDIX A – SQLITE DATABASE FILE............................................................................ 19
APPENDIX B – NOTE PAD CSV FILE................................................................................... 20
REFERENCES ........................................................................................................................ 21
3
Acknowledgements
People
•
•
•
RICS was developed by Nariman Habili (software development) and Neil Corby
(hardware integration).
The software was reviewed and tested by Frank Fu and Martin Wehner before
release.
The RICS and car icons and the front cover of this user manual were created by
Adrian Yee.
Third-party tools and libraries
•
•
•
•
•
•
•
•
wxWidgets was used without any modifications to develop the graphical user
interface (GUI). wxWidgets is released under the wxWindows Licence found here:
http://www.wxwidgets.org/about/newlicen.htm.
The Boost C++ library was used without any modifications in the RICS source code.
The Boost software licence can be found here:
http://www.boost.org/LICENSE_1_0.txt
The libjpeg-turbo library was used without any modifications to accelerate jpeg
compression. libjpeg-turbo is released under the wxWindows Licence found here:
http://www.wxwidgets.org/about/newlicen.htm.
The JPEGWriter (C++ wrapper for libjpeg) written by Adrian Secord was used without
any modifications to wrap libjpeg-turbo functions. The library is licensed under the
Creative Commons Public Domain Licence found here:
http://creativecommons.org/licenses/publicdomain/.
The Visual Leak Detector library was used without any modifications to test for
memory leaks. The library is licensed under GNU GPL, version 2.
The SQLite library was used without any modifications to write GPS data to a SQLite
database file. SQLite is in the public domain; its licence can be found here:
http://www.sqlite.org/copyright.html
The serial library for C++, written by Ramon de Klein, was used without any
modifications for serial communication between the GPS receiver and the RICS
software. The library is licensed under GNU LGPL, version 2.1.
Some icons, designed by Mark James (http://www.famfamfam.com/lab/icons/silk/),
were used. The icons are licensed under Creative Commons Attribution 2.5 Licence
found here: http://creativecommons.org/licenses/by/2.5/.
4
Overview
Introduction
The Rapid Inventory Collection System (RICS) is used to capture and save geo-tagged digital
imagery of built environments. Up to four high resolution cameras capture images that are
then displayed on the RICS Graphical User Interface (GUI) and saved in the JPEG format. It
is typically used for building and infrastructure damage assessment following a natural
disaster.
RICS was deployed following the 2009 Victorian Bushfires, the 2010 Kalgoorlie and
Christchurch Earthquakes, 2011 Brisbane floods and Tropical Cyclone Yasi to collect geotagged imagery of structures and buildings.
In particular, RICS:
• Complements and augments the detailed field damage assessments (house-to-house
and structure-to-structure) currently undertaken during post-event impact assessments
using hand-held Personal Data Assistants (PDAs);
• Provides a quick ‘first-look’ of the damage impact area to prioritise the worst-hit regions
for detailed surveys;
• Permits 100% coverage of building damage in a disaster-affected area (provided
vehicular access is available);
• Collects data focusing on ‘population coverage’ and in disaster situations quickly collects
information on undamaged structures allowing engineering and GIS staff to focus on
damaged structures; and
• Allows fieldwork (damage assessment) to be undertaken more efficiently.
RICS vehicle with two side cameras
At the end of a survey, geo-referenced JPEG imagery is available for analysis. At Geoscience
Australia each property within the survey zone is attached to a RICS image. The damages to
the properties are then ascertained from the images using GIS software.
5
Software Components
RICS is written in C++ using Microsoft Visual C++ Express 2008. wxWidgets, a GUI library, is
used to implement the user interface. wxThreads, included in wxWidgets, is used to
implement software threading. Image capture, image streaming (via the Ethernet network)
and compression in the JPEG format are performed on a separate thread for each camera.
The GPS data fetch and NMEA 0183 parsing is also performed on a separate thread. SQLite
is used to store image file names and their corresponding GPS data, enabling images to be
geo-referenced.
Hardware Components
RICS is designed to be a cost effective tool for capturing geo-tagged imagery of built
environments. As such, off-the-shelf hardware is used to set up the system. At Geoscience
Australia, the following hardware components are currently used:
•
•
•
•
•
•
•
•
•
Mini tripods mounted on a motor vehicle with magnets;
Camera configuration consisting of two, three or four Allied Vision Technologies
(AVT) GC2450 GigE 5 megapixel digital cameras (2448 by 2050 pixels);
Five port Gigabit Ethernet switch with jumbo frame support to network camera image
streams (jumbo frames reduce the CPU load required to handle incoming data);
Fujinon 16mm or 12.5mm focal length lenses;
Swann 1020 camera housings providing all weather protection;
An Intel® Core i5 laptop with 4 GB of RAM;
Inverter to power laptop and network switch;
GPS receiver; and
Camera batteries.
The hardware components are assembled in the following order:
1.
2.
3.
4.
5.
6.
7.
8.
9.
Attach tripods to the camera housings.
Attach power (from batteries) and Ethernet cables to the cameras.
Mount tripods on vehicle.
Attach Ethernet cables from the cameras to the network switch and attach the
network switch to the power-board.
Attach Ethernet cable from the network switch to the laptop and attach the laptop’s
power supply to the power-board.
Attach the power-board to the inverter.
Attach the inverter to the auxiliary power source of the vehicle, making sure the
inverter is switched off.
Attach the GPS receiver to a USB port of the laptop.
Turn on vehicle and turn on the inverter.
If you do not have camera batteries available, you can connect the camera’s power supply to
the power board.
6
Camera
Camera
Network Switch
Battery
Battery
GPS
Auxiliary power
source
Power Board
Inverter
Ethernet cable
Power cable
Diagram showing the hardware setup, with numbers referring to the order above
7
Installation
Building from Source
The RICS source code and the binary installer is available from Google Code
http://code.google.com/p/rics/. A Microsoft Visual 2008 VCPROJ file is provided. Please refer
to the README.txt file for information on building and installing the software from source.
Binary Installer
Double click the self-install file rics-<version number>.msi. This will install RICS and the Allied
Vision System (AVT) GigE Filter and GigE Viewer self-installation files. The installation of the
Viewer and the Filter are optional but it is highly recommended that both are installed. The
Viewer can be used to focus the cameras and set various camera parameters as it can
display a larger view of the captured images than RICS. The Filter offloads some of the
gigabit Ethernet data handling and reduces the CPU loading. For more information please
visit the Allied Vision Technologies website.
To uninstall the software, follow the procedure below:
1. In the Windows Control Panel window, click Add/Remove Programs.
2. Highlight Rapid Inventory Collection System and click Change/Remove button.
3. Repeat step 2 for the AVT GigEViewer and Filter.
8
Using the Software
User Interface
RICS’ user interface was designed to be user-friendly, consistent and intuitive. The main
window consists of three sections, images, GPS data and notepad.
Streamed images are displayed in the top section while the GPS data displayed in the middle
section includes the time (UTC), latitude, longitude, bearing, number of satellites, fix quality
and speed. The speed, in kilometres per hour, is displayed prominently in a larger font. The
bottom section notepad allows users to type notes during a field session. If a user wishes, the
current time, latitude, longitude and bearing (heading) can be added to the end of each line,
allowing the notes to be time and geo-referenced. The notepad text is saved as a ‘comma
separated value’ file, and can therefore be opened in a database or spreadsheet program.
The image below shows the RICS user interface in session mode with two cameras attached.
The RICS GUI
9
Starting RICS
The computer’s Ethernet adapter will first need to be set up. Instructions are available from
the AVT GigE Vision Cameras Installation Manual.
Open RICS by clicking its icon
on the Windows Start Menu or double clicking the icon on
your desktop. Please note that it will take about a minute for the cameras to register on the
computer after the cameras and/or the network switch is turned on.
Test Mode
In Test Mode, images are not saved and a database is not created. Captured images are
simply displayed on the GUI. Test Mode can be used to focus the cameras and set the
correct camera properties before a session is created, images are saved and a database
created.
At start-up, RICS is in Test Mode. If in Session Mode, click
or click File → Test (Ctrl-T) to
or click Playback → Play
enter Test Mode. To start capturing and displaying images, click
or click Playback → Stop (Ctrl-S).
(Ctrl-P). To stop, click
on the toolbar or click
To display GPS data, the GPS receiver must be found. Click
Options → GPS Properties (Ctrl-G) and select the COM port that your GPS receiver is
connected to on your computer using the drop-down menu.
If you're unsure which COM port your GPS receiver is connected to, click Search Ports and
RICS will find the correct port.
The software parses the GPRMC and GPGGA sentences; your GPS receiver must supply
those sentences. The following serial configuration is currently hardcoded in RICS:
Baud rate: 4800
Data bits: 8
10
Parity: None
Stop bits: 1
Creating a New Session
or clicking File
To create a session in RICS, open the New Session dialog box by clicking
→ New Session (Ctrl-S) and enter a session name (in the image below, the session name is
Queanbeyan). The session will be located in the directory indicated by Session Location. To
change the session location, click Browse or enter the location in the text box. The default
location is C:\RICS Sessions.
A new session is created by clicking OK. Assuming the session location is ‘C:\RICS Sessions’
and two cameras are attached to the computer (with names L and R), the following directory
structure and files will be created under C:\RICS Sessions:
C:\RICS Sessions\
Queanbeyan\
R\
L\
Queanbeyan.sdb
Queanbeyan.csv (only if the Note Pad is used)
If Add GPS date/time is checked, the date and time extracted from the GPS string is added to
the end of the session name, e.g. Queanbeyan_ 200211_31139 (20 February 2011 at
03:11.39).
Images captured by camera ‘R’ are saved in C:\RICS Sessions\Queanbeyan\R and images
captured by camera ‘L’ are saved in C:\RICS Sessions\Queanbeyan\L in the JPEG format
starting with filename 0000000.jpg. ‘Queanbeyan.sdb’ is the SQLite database created by
RICS and contains the tables ‘R’ and ‘L’. To browse or modify the database manually, tools
such as the SQLite Database Browser or the Firefox SQLite add-on can be used. Each row in
the database corresponds to a captured image; e.g. image 0000023.jpg in directory ‘R’
corresponds to frame 23 in database table ‘R’. See Appendix A for further information on the
SQLite database.
If the session already exists (i.e. its directory structure exists), clicking OK simply opens that
session. Images are saved from the last filename in each directory and data is entered into
the database from the last entry. No images or database entries are overridden. Note that if
extra cameras are attached to the Ethernet card, or if the camera names are changed, new
directories and database tables are created to accommodate the new camera names.
11
Opening a Session
To open an existing session in RICS, open the Browse for Folder dialog box by clicking
or
clicking File → Open Session (Ctrl-O). Click on the directory containing the session
folders/files and click OK. RICS is now in session mode. Note that the session directory must
contain the associated database file, e.g. if the session is Queanbeyan, Queanbeyan.sdb
must exist in directory Queanbeyan.
Camera Properties
on the toolbar or click Options → Camera Properties (Ctrl-C) to open the Camera
Click
Properties dialog box.
Camera Names
Click the Camera Name tab on the Camera Properties dialog box. Each camera attached to
the Ethernet switch has a unique camera ID and name. The camera IDs come from the
camera and are fixed. Camera names are user changeable. The names represent the
direction that a camera is pointing, as per the car image below (L = left, R = right, B = back, F
= front). Upon start-up, the cameras are assigned default names.
12
To change a camera name, click on a camera ID and then select a camera name from the
drop-down menu. Images are saved in directories named after the camera names and
therefore each camera should be assigned a unique camera name, i.e. two cameras cannot
have the same name.
Exposure
Click the Exposure tab on the Camera Properties dialog box. The exposure time (in
milliseconds) can be changed manually by moving the slider; the current exposure time is
displayed in the text box. A time can also be typed in the text box. Alternatively, autoexposure can be chosen by checking Auto. Auto Max Time sets the maximum exposure time
for auto-exposure.
If Apply to camera is unchecked, exposure time changes apply to all cameras. Individual
cameras can be selected by checking Apply to camera and selecting a camera from the dropdown menu. Press Enter or click OK if closing the dialog box.
13
It has been found that setting the exposure time to Auto and setting an Auto Max Time of 5
ms gives the best exposure results. A maximum exposure time is useful to avoid a long
exposure time which can result in blurry images.
Gain
Click the Gain tab on the Camera Properties dialog box. The camera gain, in dB, can be
changed by moving the slider; the current gain value is displayed in the text box. A gain value
can also be typed in the text. Alternatively, auto-gain can be chosen by checking Auto. The
default gain value is zero, which gives the best image quality. In low light situations, it may be
necessary to increase the gain setting.
If Apply to camera is unchecked, gain changes apply to all cameras. Individual cameras can
be selected by checking Apply to camera and selecting a camera from the drop-down menu.
Press Enter or click OK if closing the dialog box.
White Balance
Click the White Balance tab on the Camera Properties dialog box. The red channel or the
blue channel gains as a per cent relative to green channel can be changed by moving the
sliders; the current gain values are displayed in the text boxes. A gain value can also be
typed in the text box. Alternatively, you can choose auto-white balance by checking Auto.
If Apply to camera is unchecked, white balance changes apply to all cameras. Individual
cameras can be selected by checking Apply to camera and selecting a camera from the dropdown menu. Press Enter or click OK if closing the dialog box.
14
White balance can be used to remove unrealistic colour casts from the images. The default
values of Red = 181 and Blue = 202 was found to be the most suitable.
Frame Rate
Click the Frame Rate tab on the Camera Properties dialog box. Change the frame rate in
frames per second by moving the slider so that the current frame rate setting is displayed in
the text box. The frame rate can also be typed in the text box. Press Enter or click OK if
closing the dialog box.
Field trials suggested that four consecutive frames are necessary to capture an entire house
with an average frontage of 20 metres using 12.5 mm lenses. With two cameras attached to
the laptop, the maximum frame rate is four frames per second for a GigE 5 megapixel
camera. This suggests a maximum vehicle speed of 72 km/h. However, to reduce the
15
chances of image blur, especially on overcast days, the Geoscience Australia RICS survey
vehicle is driven at a maximum speed of 40 km/h.
Packet Size
Click the Packet Size tab on the Camera Properties dialog box. Change the packet size in
bytes by moving the slider; the packet size is displayed in the text boxes. The packet size can
also be typed in the text box. The selected packet size must not exceed the maximum packet
size supported by the Ethernet card (see the AVT GigE Vision Cameras Installation Manual
for more information), otherwise RICS may become unstable. Please note that the packet
size cannot be changed if RICS is in the play mode. Press Enter or click OK if closing the
dialog box.
Note Pad and Damage Level Settings
The note pad is enabled only if RICS is in Session Mode. A message can be typed in the note
pad and Enter pressed. Pressing Enter will save the note pad file in the CSV (comma
separated value) format with filename <session name>.csv. The typed messages can be time
and geo-referenced. To enable this, click Options → Damage Level Settings (Ctrl-D) to
open the Damage Levels Settings dialog box (image below) and check Add time, latitude,
longitude and bearing at the end of each line. Note that RICS automatically adds the header
‘comment,time,lat,lon,bearing’ to enable reading of the CSV file in a database. More
information on the CSV file is available in Appendix B.
Predefined damage levels can also be added to the note pad by checking Use predefined
damage levels in the Damage Levels Settings dialog box either by opening a text file
containing pre-defined damage levels or by typing damage levels at F2 – F9. If a text file is
opened, the first eight lines of the file are assumed to represent the eight pre-defined damage
levels. The current damage levels are shown in F2 – F9. If the damage levels are modified
and the dialog box is closed (either by clicking OK or X in the upper right corner) a prompt
indicates that the damage levels have changed and whether the new levels are to be saved.
To add a damage level to the notepad, use keys F2 – F9, which also saves the text file.
16
Camera or Network Switch Disconnection
If a camera or the network switch is turned off or is disconnected from the computer, RICS
will attempt to close gracefully instead of crashing. That is, any remaining captured images
are saved, the SQLite database is closed, the notepad is saved and all threads are deleted as
per normal. If RICS does close because of a camera or network switch disconnection, it is a
good idea to check that the Note Pad CSV and the SQLite database files have closed
properly.
17
Checklist for Using the RICS Software
1. Open the AVT GigEViewer.
2. Turn on the cameras and wait for the cameras to register on the GigEViewer. This
should take about one minute.
3. Focus the cameras and close the GigEViewer.
4. Open RICS.
5. Make sure all cameras are present and viewable in Test Mode after clicking
or
clicking Playback → Play (Ctrl-P).
6. Set exposure on auto (for all cameras), check white balance, frame rate, and packet
size.
7. Find GPS device and check GPS output.
8. Click
to start a new session. Enter a new session name and click OK.
to open a session. Click on a directory
9. If the session already exists, click
(containing all session files/directories) and click OK.
10. Click Option, and click Damage Level Settings. Check Use predefined damage levels
and browse to a text file containing the damage levels. Click OK.
or Playback → Play (Ctrl-P) when ready to record. The icon will blink
11. Click
indicating that the captured images are being saved.
or click Playback → Stop (Ctrl-S) to stop recording.
12. Click
13. To close the software, click File → Quit (Ctrl-Q) or click the X in the top hand corner
of the window.
18
Appendix A – SQLite Database File
The figure below shows the ‘R’ table and its fields in SQLite Database Browser. The fields are
frame, GPS time, latitude, longitude, speed (km/h), bearing (or heading), satellites, fix quality
and camera ID. Frame refers to the JPEG image file. That is, frame 288 refers to file
0000288.jpg. Satellites refers to the number of satellites in view of the GPS receiver. The
number of satellites and the fix quality can be used to check the veracity of the collected data.
19
Appendix B – Note Pad CSV File
Information entered in the Note Pad section of the GUI is saved in the CSV format. An
example CSV file opened in Microsoft Excel is shown below. As the file is in the CSV format,
it is important that the comment text does not include any commas, because commas indicate
a new field. The file can be opened in GIS software for processing.
20
References
N. Habili, N. Corby, and B. Cechet, Rapid Inventory Collection System (RICS) and the 2009
Victorian Bushfires Impact Assessment, In 2010 IOP Conf. Ser.: Earth Environ. Sci., vol. 11
num. 1. (http://iopscience.iop.org/1755-1315/11/1/012018/pdf/17551315_11_1_012018.pdf)
N. Habili, N. Corby, and B. Cechet, Rapid Inventory Collection System (RICS) and the 2009
Victorian Bushfires, In Industry Stream Proc. 21st Australian Software Engineering
Conference, Auckland, New Zealand, April 2010.
AVT GigE Vision Cameras Installation Manual,
http://www.alliedvisiontec.com/fileadmin/content/PDF/Products/Technical_Manual/GigE_Insta
ll_Manual/70-0062_GigE_Installation_Manual_V2.0.pdf.
21