1
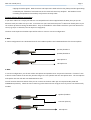
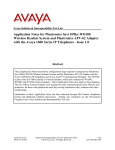
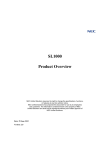
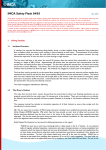
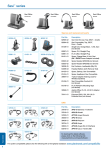
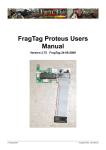
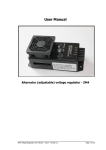
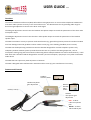
USER GUIDE V 2.2 Overview The wireless headset interface unit (WHI) will enable a Diving Supervisor to use a wireless telephone headset with most diver radio systems currently in use around the world. The WHI achieves this by providing wide range bi-‐ directional gain adjustment control to the diver audio signal. The MIC gain adjustment control tunes the headset microphone output to match the parameters of t he diver radio microphone input. The EAR gain adjustment control tunes the diver radio speaker output to match the parameters of the headset speaker input. The WHI has isolation circuitry to prevent audio interference (e.g. ground loop) and to protect the wireless headset unit from damage caused by problems in diver audio circuits (e.g. poor shielding, feedback, short-‐circuits). The WHI was developed using a Plantronics wireless headset designed for use with telephone systems only. Telephony wireless headset systems provide features that are very useful to the Diving Supervisor, such as microphone muting, long talk-‐time and call conferencing where multiple headsets are online simultaneously. It will NOT work with a wireless headset designed for use with a personal computer, mp3 player or any other multimedia audio device. The WHI does not require any external power or batteries. The WHI is designed and manufactured in Australia and has a one (1) year manufacturer’s warranty. Features and Controls Handset selector switch Headset earphone gain adjustment Cable (1 metre) Wireless headset cable socket Headset microphone gain adjustment RED -‐ To diver radio microphone jack BLACK – To diver radio headset jack WHI User Guide (V 2.2) Page 2 Components The Wireless Headset Interface is supplied with the following components: Wireless Headset Interface Banana Plug Adapters 3-‐Wire Y-‐Adapter The WHI is fitted with 2 x ¼” TRS mono male plugs. These plugs will connect directly to Helle and some Nautronics diver radios ¼” TRS mono female jack to twin banana plug adapters to fit radios with banana plug inputs, such as Amcom and D TS radios. Twin ¼” TRS female mono plugs to a single ¼” TRS male stereo jack to fit radios with 3-‐wire supervisor headset jacks, such as Divex radios. Connection Diagram 1. Assemble the Wireless Headset Interface and your Wireless Headset unit as per the picture below: WHI User Guide (V 2.2) Page 3 2. Check the dive radio jacks and determine what adapters you will need. Connect the appropriate dive radio adapters to the WHI’s ¼” TRS male plugs (if required). Connect RED to RED (microphone) and BLACK to BLACK (headphone). Helle and some older Nautronics dive radios will accept the two ¼” TRS male plugs and will not require adapters. Banana Plug Adapter 3-‐Wire Y-‐Adapter Initial Set Up (first use) NOTE: The volume controls on the diver radio and the wireless headset base unit are fine tune controls only for adjustments within each unit’s specific operating range. The Wireless Headset Interface MIC and EAR gain controls provide coarse adjustment to match the operating range of the wireless headset to the diver radio in use. 1. Connect your Wireless Headset to mains power and conduct the set up as per the manufacturer’s instructions. Ensure the wireless headset is fully charged. Do not try to set the base unit configuration switch yet – this is covered later. NOTE: It is recommended that you set the wireless range to LOW to maximise battery life and talk time. Ensure your wireless headset is paired to the base unit. 2. Set the controls on the Wireless Headset as follows: a. Headset Selector Switch to 2 (this switch should always be set to 2) b. MIC gain at half-‐way c. EAR gain at half-‐way 3. Connect the Wireless Headset to the Wireless Headset Interface, then to the Diver Radio as per the Connection Diagram Steps 1 and 2 above. 4. On the Wireless Headset base unit set the microphone and speaker volume controls to mid-‐range (see manufacturer’s instructions). 5. Switch on the diver radio and set all volume controls to half-‐way or mid-‐range. Ensure the diver radio speaker is off. 6. Leave everything connected and on for about 5 minutes before continuing with the set up. WHI User Guide (V 2.2) Page 4 NOTE: When first using the WHI out of the box, or if it has been sitting idle for a long time (i.e. between offshore jobs) it will take a few minutes after it is connected and switched on for the WHI capacitors to become fully charged. If you find you can hear on the headset but the microphone doesn’t work, then it is most likely that the capacitors haven’t charged yet. 7. Determine the wireless headset base unit configuration setting as follows: a. Ensure power is on to the wireless headset and to the diver radio; b. Press the call control button on the headset to activate the audio link between the wireless headset and the base unit; then c. Switch the base unit configuration selector through all the switch settings (there may be 3 to 5 settings, depending on the brand of headset) and determine which one has the best send and receive audio quality. There will usually be one setting that has clearly the best quality audio. Some settings will not work at all and, in fact, there may only be one that does work. NOTE: Once you have determined the configuration setting for the base unit once, you should never need to change it. Known wireless headset base unit configuration settings: Plantronics Savi-‐Office WO 300 Series -‐ configuration setting D Plantronics Savi-‐Office WO 700 Series -‐ configuration setting D Tuning the Wireless Headset Interface Unit Once you have completed the initial setup the WHI has to be tuned to match the diver radio. This will also need to be done when switching to a different brand of diver radio. Switching between different radios of the same make (i.e. different Amcom radios) should NOT require any adjustment. 1. Connect and switch on all components as above. 2. Ensure the audio link between the wireless headset and the base unit is active. 3. Set the WHI MIC and EAR gain adjustment both to minimum (fully counter-‐clockwise). 4. Slowly increase the WHI EAR gain adjustment until the audio level (diver’s voice) in the headset speakers is just comfortable. DO NOT increase the gain any further. 5. Slowly increase the WHI MIC gain adjustment until the diver reports the audio level in the hat is good. DO NOT increase the gain any further. NOTE: The WHI gain settings required for an AMCOM diver radio will be near minimum for both MIC and EAR. Gain settings for a Divex diver radio should be much higher. You should not be able to hear your own voice in the headset speakers. If you can then the MIC gain is set too high. You can fine-‐tune both MIC and EAR gain using the headset base unit adjustment if the WHI gain is too coarse, but try to get it right with the WHI gain adjustment first. Most modern telephone based wireless headset systems now contain “DECT” technology. This technology will limit unusually or dangerously high audio levels by clipping the high incoming and outgoing signals. Increasing the WHI gain settings above the minimum level required will result in the wireless headset WHI User Guide (V 2.2) Page 5 clipping the audio signals. Both the divers and supervisors audio will then lose fidelity and the signal being recorded by the “black box” and audio-‐out to the vessel will sound very artificial. The headset’s noise-‐ cancelling microphone will most likely not function correctly either. Custom Adapter Wiring Instructions If your diver radio has a unique jack which is not compatible with those supplied with the WHI, then you (or the Electrical Tech) can make one up to suit. Just make sure you travel with two spare ¼” TRS mono female jacks so you can make it up without cutting the WHI cables. They are available for a few dollars each from your local electronics store (e.g. Jaycar in Australia, Sim Lim Square in Singapore). The diver radio supervisor headset input will be either a 4-‐wire or a 3-‐wire configuration. 4-‐WIRE A 4-‐wire configuration has 2 dedicated wires for the headset speakers and 2 dedicated wires for the microphone. Speaker/Headset 1 Speaker/Headset 2 Microphone 1 Microphone 2 3-‐WIRE In a 3-‐wire configuration, one of each of the microphone and speaker wires are joined to become a “common” wire. It doesn’t matter which of the two are joined as long as it is one speaker and one microphone wire. The microphone and speaker are then left with one dedicated wire each. You will need to determine which of the pins or contacts in the diver radio jack correspond to MIC, EAR and COMMON respectively. Check the user manual or get the Electrical Tech to figure it out if you are not electronically minded. Speaker/Headset Common (Sleeve) Microphone WHI User Guide (V 2.2) Page 6 Nautronix Diver Radios Newer modular style Nautronix diver radio’s use a unique 4-‐contact 6.5mm jack for the headset connection in the Tender Module. If you are lucky, the Tech’s onboard will have a spare one. Here’s how to wire it in 4-‐wire to two ¼” TRS mono female jacks, which then plug into the WHI male TRS jacks : Speaker/Headset 1 Speaker/Headset 2 Microphone 1 Microphone 2 Make sure the master volume controls on the Nautronix radio are set very low (about 1/3) when using the wireless headset interface. The Nautronix system is quite sensitive compared to other radios, so just make fine adjustments to the Nautronix master volumes until you get it right. Suitable Wireless Headsets The Wireless Headset Interface was developed using a Plantronics Savi-‐Office WO350 headset unit. Audio quality with this unit is excellent. Sennheiser headsets have also been trialled and audio quality was found to be inferior to the Plantronics units. This is mostly due to the Sennheiser units having less configuration settings available for variable microphone type emulation. Other brands may also be suitable, but have not been trialled. Any Plantronics headset unit designed for use with telephony systems should be suitable, such as: Plantronics Savi-‐Office WO300 Series (superseded by WO700 series) Plantronics Savi-‐Office WO700 Series Plantronics CS361N (superseded by CS520) Plantronics CS500 Series Thank you for purchasing the Wireless Headset Interface. WHI User Guide (V 2.2) Page 7 If you have any questions, feedback or need advice on setup or wiring configurations, I can be contacted as follows: Mark McIntyre Tel: +61 (0)400 840 130 Email: [email protected]