1
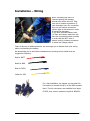
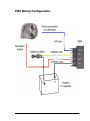
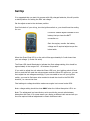
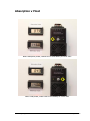
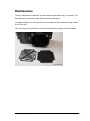
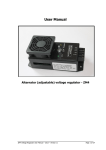
User Manual Alternator (adjustable) voltage regulator - ZM4 ZM4 Voltage Regulator User Manual – 2013 – Version 12 Page 1 of 29 Table of Contents Table of Contents............................................................................................. 2 Background ..................................................................................................... 3 Why do I need a new regulator? ....................................................................... 4 Why do I need the ZM4 regulator? .................................................................... 5 Alternator battery charging basics ..................................................................... 6 How the ZM4 works ......................................................................................... 8 How it works (flow chart) ................................................................................. 9 Alternator modification ................................................................................... 10 Battery Switch ............................................................................................... 12 Installation tips .............................................................................................. 13 Alternator size ............................................................................................... 15 Installation – Mounting ................................................................................... 16 Installation – Wiring ....................................................................................... 17 Installation – Wiring ....................................................................................... 18 Alternator Terminal Designations ..................................................................... 19 ZM4 Wiring Configuration ............................................................................... 20 Set Up........................................................................................................... 21 Absorption v Float .......................................................................................... 22 Suggested Set Voltages .................................................................................. 23 Maintenance .................................................................................................. 24 FAQ (Frequently asked questions) ................................................................... 25 FAQ (Frequently asked questions) ................................................................... 26 Fault Finding.................................................................................................. 27 Installation Notes ........................................................................................... 28 Warranty Details ............................................................................................ 29 Contact Details ............................................................................................. 29 ZM4 Voltage Regulator User Manual – 2013 – Version 12 Page 2 of 29 Background My professional background is in aeronautical engineering, but one of my passions is boating. After experiencing battery charging problems in my own launch and suffering the premature failure of one too many batteries, I started researching why. It was a local battery manufacturer here in New Zealand who tipped me off about the problems that arise from using automotive alternators in a marine vessel designed for heavy loads such as anchor winches and bow thrusters or huge house batteries running overnight services. This must be a well kept secret because alternators configured for cars seem to be extremely common in boats! I then started researching the solution: ‘smart’ voltage regulators. But I found the cost prohibitive – north of $500 for complex systems with far more features than I needed. Using true Kiwi ingenuity, my scientist son and I decided to just do it ourselves. Together we designed and built our own unit, intended for our own personal use. And it worked perfectly. Shortly after, friends with boats discovered what I’d made and I soon found myself making ones and twos for friends. To date there are more than 160 units in active service, in both private and commercial settings. Installations have ranged from launches to yachts, motor homes to off road vehicles and even trains and a paddle steamer and an aircraft. As a hobby venture for me, it provides a wonderful opportunity to meet people from all walks of life, learn what they’re doing and help them solve their battery problems. I’m sure you’ll find that the ZM4 does a fine job for you, as it has in my own launch since 2004. Graeme Polley. ZM4 Voltage Regulator User Manual – 2013 – Version 12 Page 3 of 29 Why do I need a new regulator? Here’s the dilemma. To charge your battery efficiently, you need a relatively high charging voltage (±14.5 V). But if you stay at that voltage permanently, you will overcharge and damage the battery. Conversely, if you use a lower charging voltage (<14V) you will prolong the battery life but will take a long time to reach full charge – in some cases you might never actually reach full charge! The solution is an adjustable, multi-stage voltage regulator for your alternator. The ZM4 allows you to configure the optimal charging voltage for your specific battery, and after a set time will automatically switch to a lower ‘healthier’ voltage. The best of both worlds! Typically with automotive regulators the battery acid does not get enough charge and this leads to acid stratification, which is where the water separates to the top and the acid settles on the bottom and in a ‘pure’ acid form will attack the battery plates leading to premature battery failure. Charge voltage is probably the single most important factor in charging, as all other factors are related to it. Signs that you could do with a new alternator voltage regulator include: Your battery is not charging to full capacity. Your battery is charging too slowly, and you’re wasting fuel running an engine to charge it. Your battery suffers from sulfation Your battery suffers acid stratification / damaged plates. You’re technically minded and want better control over the charging behavior. ZM4 Voltage Regulator User Manual – 2013 – Version 12 Page 4 of 29 Why do I need the ZM4 regulator? Reasons for choosing the ZM4 for your replacement regulator include: An easily adjustable voltage setting to accommodate different battery types. Can be built for 24 volt systems on request. Will regulate any N-type alternator. The principle of operation is that the ZM4 provides an earth to the field of the alternator, the other side of the brush block goes to V+ Any type of alternator can be run by this regulator, providing field current draw does not exceed 8 amps continuous or 16 amps intermittently. Most alternators only draw 1-3 amps max. ABSORPTION and FLOAT stages, indicated by LED indicators to show state Can run two alternators. Size: 160mm long x 65mm high x 68mm wide. Reliable solid state components used. 24 month warranty, we will repair or replace free of charge. This warranty does not include damage resulting from incorrect installation, accident, misuse or neglect. The warranty is void if the cover is removed or if the unit is tampered with. Designed, built and supported in New Zealand. ZM4 Voltage Regulator User Manual – 2013 – Version 12 Page 5 of 29 Alternator battery charging basics The battery is the heart of your electrical system. Your various on-board gadgets draw power from it, and it is the role of your alternator to recharge it. The alternator is just a type of generator; it converts mechanical energy into electrical energy. Coupled to your engine, it will generate an electrical current to recharge your battery. For a given amount of rotation, the amount of current the alternator produces is controlled by the field current fed to the alternator. See the following diagram. The purpose of an alternator regulator is to continuously adjust the field current in order to maintain a desired battery voltage. So it is the field current that is being controlled in order to set a charging current, which in turn establishes a desired battery voltage. Confusing I know. The dilemma of a standard ‘dumb’ regulator is twofold: it only offers single voltage target, and that target is often not even correct outside of the automotive use! Ideally a regulator should acknowledge the chemistry occurring in the wet-cell batteries and provide two different set points. When the engine starts up, we would like the battery to charge as fast as possible. This is accomplished by setting a voltage target of ±14.4V (the actual depends on your specific battery type). Once the battery reaches this value, it is at approximately 80% of full charge capacity, and gassing occurs. This signals that the highest safe level of charging has been reached. We should not exceed this gassing voltage (or we could damage the battery), but neither should we go too far below it (or we will take longer than necessary to charge the battery). At this stage the battery will continue to accept or absorb charge at a gradually decreasing rate. ZM4 Voltage Regulator User Manual – 2013 – Version 12 Page 6 of 29 Since the charging rate tails off, we should choose some sensible point to stop the intense charging and switch to just maintaining or floating the battery at a charged state. We do this by reducing the voltage set point by 0.6V and it is vital for the longterm health of the battery. Typical target values for ‘dumb’ regulators are between 13.8 and 14.2V, which is too low for the absorption stage and too high for the float stage. So you have the worst of both worlds; during motoring bursts the battery won’t fully charge, but long term it will overcharge, damaging the battery. A standard charging curve looks something like this: Yellow LED Yellow LED Green LED Bulk Charge Absorption Float 16.0v 15.0v 14.4v 13.8v 14.0v 13.0v 12.0V Full charge current Constant set voltage Constant float voltage Three step charging sequence. Initially the alternator is set to ‘full power’ and the battery voltage steadily climbs. To avoid overcharging the battery, the regulator must limit the voltage (absorption stage). Eventually we decide that the battery is charged enough, and the voltage set-point is lowered (float stage). ZM4 Voltage Regulator User Manual – 2013 – Version 12 Page 7 of 29 How the ZM4 works Broadly, the ZM4 regulator consists of a timer block, voltage comparison logic and a transistor output stage. The timer block is responsible for overseeing the transition between the absorption and float stages, and is factory set from 40 to 80 minutes according to your battery capacity. The voltage comparison logic continuously monitors the battery voltage and compares it to the voltage level you have selected with the adjustment control knob. If it detects that the battery voltage has fallen below your set point, the output transistor stage will be turned on to increase the field current to the alternator. Once the voltage level has been raised back to your setting, the field current is disengaged. Hysteresis is built into the comparison logic to ensure the feedback loop remains stable. The transistor output stage consists of a Darlington pair of transistor configuration, with the final power transistor rated at a maximum of 16 amps. A snubber diode is wired in parallel with an inductive load to prevent any damage to sensitive components. ZM4 Voltage Regulator User Manual – 2013 – Version 12 Page 8 of 29 How it works (flow chart) ZM4 Voltage Regulator User Manual – 2013 – Version 12 Page 9 of 29 Alternator modification Modification of your existing alternator to accept an external regulator is a requirement and can be done by yourself or a reputable auto electrical shop. Depending on your alternator type, an external brush block is available from most auto electrical shops. We also offer a service to modify your alternator. Standard BOSCH regulator & brush block If you have the type of alternator that uses a brush block similar to the units shown in the picture above, then this is the easy way of installing the ZM4 regulator. If the brushes are in good condition then the internal regulator can be deactivated and a wire connected to the ZM4. If you want a standalone new brush block, (pictured below) they cost in the vicinity of $50 and are very easy to configure with the ZM4. We have a supply of them here, and can supply them if required. The D+ and DF links are jumpered and the ZM4 connects to the D- pin, after the earth lead on the underside is cut off. Blank brush block for BOSCH alternators ZM4 Voltage Regulator User Manual – 2013 – Version 12 Page 10 of 29 D- Field Df B+ W D+ Ground Showing a typical BOSCH connection You will need to run a wire from the ZM4 to the alternator connection D-. We are willing to assist anyone with installation questions. You will require a digital voltmeter to assist with the setup. If you are unsure please email me with your alternator model and an overview of your battery installation and we can advise you. Most alternators are configured as per the following; Ground The metal casing of the alternator serves as the ground terminal, and will be electrically connected to the negative terminal of the battery. B+ The output connection, it feeds the charging current to the positive terminal of the battery. D+ The warning light connection. Except in special cases, this must be connected to the positive terminal of your battery through a functional warning light and switched by the ignition key W Tachometer connection, if required for a digital tachometer. D- (On the brush block) the return path for the field current, this is the connection for the Field terminal of the ZM4. DF The source for the field current, this will switch the earth side of the brush block. ZM4 Voltage Regulator User Manual – 2013 – Version 12 Page 11 of 29 Battery Switch We do not recommend using an OFF – 1 – Both – 2 type battery switch,(as shown) this switch requires input from the skipper and if you forget to isolate your start battery you could run that flat overnight. A better choice is individual battery switches And remember NEVER turn OFF the battery switch with the engine running, it can blow up the alternator and or the smart regulator. As a suggestion, if you are running a start battery and a house battery, separate the two i.e. run separate bus bars and use a VSR (Voltage sensitive relay). The following wording is copied from the BEP web page. The DVSR (Digital Voltage Sensing Relay) allows charging of two independent battery banks from a single charging source. When the voltage on the start battery rises to a charged level, the DVSR engages allowing the 2nd battery to charge. When charging stops and voltage falls, the DVSR will disengage, isolating the two batteries from each other. Dual sensing functionality enables the sensing of two battery banks, allowing two way charging. Another advantage of BEP's VSR is that the house battery is completely isolated from the engine battery during the voltage-hungry starting procedure. This means that, as long as all electronics are powered by the house battery (as they almost certainly will be), they will not be subject to damaging voltage spikes during start up. ZM4 Voltage Regulator User Manual – 2013 – Version 12 Page 12 of 29 More information can be found at the BEP website including installation hints: http://www.bepmarine.com/productmainmenu-0/product-714/digital-voltagesensing-relay-dvsr There are several options in set up in respect of which battery is charged first, please ensure you have the correct one for your needs. Installation tips Make sure your pulley ratios are correct for your cruising rpm, i.e. the alternator needs to be turning at least 3000 rpm, and preferably 5000 rpm and up to 8000 rpm for a decent charge to be outputting from your alternator. Ensure your earth leads from the engine block to the alternator and starter are not used via the block. If there is any high resistance the earth trace will find itself tracking through your engine bearings and could cause arcing. Get peace of mind and run separate earth leads. Try to use the same type of batteries i.e. Lead acid / Gel / AGM .Don’t mix them up. Your installation should have two battery banks, one for starting and one for house loads. Charge batteries in parallel, using a voltage sensitive relay. Make sure you your engine has enough “belt” to drive the alternator you select. Do not leave batteries discharged for extended periods of time. Plan your battery capacity to ensure your house batteries are run no less than 50% of capacity. Provide a means to cross-connect battery banks for emergency starting. Protect circuits with fuses or circuit breakers. Voltage drop is the enemy, look to find the offending connections and fix them. Connecting batteries in series, the amp hour capacity remains the same as a single battery however the voltage is doubled. ZM4 Voltage Regulator User Manual – 2013 – Version 12 Page 13 of 29 Connecting batteries in parallel, the amp hour capacity is doubled and the voltage remains the same as a single battery. If you have a solar panel connected make sure it has a blocking diode to prevent a reverse charge or to upset the sense side of the ZM4. An alternator has a huge fan that draws air from the back to the front of the alternator for cooling; imagine if this air has salt laden air in it, this will cause corrosion in non marinised alternators. Consider getting the internals painted in good quality paint to get a longer life out of your alternator. Automotive ‘in line’ ammeters are a huge voltage drop in your charging system. If your system charges at a low current charge and quickly drops down to 10 amps it is most probably the ‘in line’ ammeter at fault. The best option is a ‘shunt’ type ammeter. NEVER turn OFF the battery switch with the engine running, it can blow up the alternator and or the smart regulator. We strongly suggest that for alternators over 80 amp rating that you consider using a screw tensioned system rather than the traditional slide bracket tension system for belt tension. These were designed for smaller output alternators. ZM4 Voltage Regulator User Manual – 2013 – Version 12 Page 14 of 29 Alternator size I always recommend a Bosch 80-90 amp alternator, which is about the highest rating without going into high priced alternators. A rule of thumb for alternator belt size is a follows; Alternator size Battery size Belt requirements 0 -75 amp 200 to 400 AH single 10mm belt 75-100 amp 400 to 600 AH single 12mm belt 100-150 amp 800 to 1000 AH dual belts No matter how good any smart regulator is, if the alternator is not spinning fast enough then you will not get a good charge current into your battery bank. The following graph shows the importance of keeping alternator rotor rpm as high as possible. A typical alternator will be happy up to 10,000 rpm; the graph shows the performance with a Bosch 80 amp alternator. You need to calculate what your lowest cruising rpm is and arrange your pulley size to ensure your alternator is producing the best possible output. Remember, for every 25 amps you will draw 1hp power of engine energy. ZM4 Voltage Regulator User Manual – 2013 – Version 12 Page 15 of 29 Installation – Mounting Showing the ZM4 mounting feet Showing the ZM4 connection block Mount the unit preferably remotely from the engine bay to ensure a clean dry environment. Mount vertically and with plenty of airspace for the cooling fan to provide good mass airflow to the power transistor. Without cooling this power transistor gets very hot, (>60º C) should the fan fail (rated at 60,000 hours life) the unit will operate quite OK, however it would be prudent to have the fan operational. ZM4 Voltage Regulator User Manual – 2013 – Version 12 Page 16 of 29 Installation – Wiring Your battery is able to store an enormous amount of energy in a small space, that’s the point of it really. But in this way a battery is similar to a bomb, and you should show it some respect. Disconnect the battery while installing the ZM4 to avoid accidently short circuiting the battery. Note: always remove the negative terminal first. Connect at least 18 gauge (1.5mm) tinned wires to the following terminals. Negative (Terminal NEG) - Connect this terminal directly to a good negative supply bus bar. If you are unsure place it directly on the negative post of the battery, suggest you use a black wire for this terminal. Positive (Terminal BATT) - Connect this terminal directly to the positive side of the battery. If you have two batteries i.e. a start and house, suggest you connect it to the house battery, this will prevent any spikes from high drain current items like starters etc. Suggest you use a red wire for this terminal. You should connect this wire with an inline fuse (250ma) located close to the battery. Note: This wire must not be disconnected during engine running as it is the sense wire to tell the regulator the state of the battery voltage, removal of this wire will cause the regulator to sense a low voltage and charge at maximum output Ignition (Terminal IGN) Connect this terminal to the ignition switch, to avoid confusion a suggested colour is Yellow. With a correct connection the fan on the ZM4 can be heard running when the ignition is selected ON You should connect this wire with an inline fuse (250ma) located close to the ignition switch. D Field – (Terminal FIELD) This unit controls the earth side of the brush block, so you can leave the ignition connection as is. Connect this wire directly to the alternator field terminal, you will have already arranged removal of the internal voltage regulator and will have a field wire outlet now on the alternator brush block. You should connect this wire with an inline fuse (5amp) ZM4 Voltage Regulator User Manual – 2013 – Version 12 Page 17 of 29 Installation – Wiring Note: connecting the unit in a reversed polarity will damage several chips within the unit. Take care not to reverse connections. If your alternator has a D+ connection then you will need to connect an ignition light to this terminal in order to excite the alternator. If you have a double battery bank, i.e. Start and House, make sure you have the connections wired correctly in order that the BATT wire is always ‘seeing’ a battery connection to sense the voltage present. That’s it! By way of additional advice, we encourage you to double check your wiring before reconnecting the battery. We also advise you to avoid future headaches by choosing colour coded wires we suggest the following: Red for BATT Black for NEG Blue for FIELD Yellow for IGN. For a tidy installation, we suggest you use blue fork Connectors to connect wiring on to the ZM4 connector block. The fork connectors are available from Jaycar PT4623, they come in packets of eight for NZ$3.50 ZM4 Voltage Regulator User Manual – 2013 – Version 12 Page 18 of 29 Alternator Terminal Designations We have listed the common alternator connection terminology for identification between different brands. Make Bosch Ingram Lucas Paris-Rhone Sev Marchal Motorola CAV AC Delco Valeo Mitsubishi Nippon Denso Prestolite Silver Bullet Output B+ B+ BAT + B+ BAT D+ Bat B+ B+ B+ POS+ + Negative DBE DDGND DE B GND - ZM4 Voltage Regulator User Manual – 2013 – Version 12 Field Df F F Df Df F F F F F F F Auxiliary D+ IND AL L 61 61 AUX IND Tachometer W W D+ L L IND LT W W AC AC R Page 19 of 29 ZM4 Wiring Configuration ZM4 Voltage Regulator User Manual – 2013 – Version 12 Page 20 of 29 Set Up It is suggested that you start this process with fully charged batteries; this will provide a stable platform for setting the ZM4 ‘set voltage’ Set the adjust screw to the minimum position. One final check of your wiring, turn the ignition switch on, you should hear the cooling fan run. Connect a suitable digital voltmeter to the battery that you have the BATT connection on. Start the engine, monitor the battery voltage and if required adjust as per the below table. When the Green Float LED is on the unit will be approximately 0.6 volts lower than your set voltage. (1.2volts 24v units) The Green LED should illuminate to indicate the float voltage setting; this should be approximately in the range of 45 - 80 minutes of operation. If you wish to adjust the unit when the Green LED is on, turn ignition switch off and then on and this will reset the microprocessor and the Yellow LED will be on, you can then adjust the set voltage accordingly. If you are unable to turn off your ignition switch, you need to find some other method to break the circuit to the ZM4 IGN terminal, i.e. remove the fuse. Final settings to voltage should be made once engine is at normal cruise RPM. Note: voltage setting should be done ONLY when the Yellow Absorption LED is on. Note: The adjustment has been factory set to provide the correct ratio between Absorption and Float, if for some reason you require a different ratio we can talk you thru the required internal adjustment to obtain a different ratio. ZM4 Voltage Regulator User Manual – 2013 – Version 12 Page 21 of 29 Absorption v Float Note: Absorption phase, Yellow LED on and battery at 14.60 volts Note: Float phase, Green LED on and battery at 14.00 volts ZM4 Voltage Regulator User Manual – 2013 – Version 12 Page 22 of 29 Suggested Set Voltages 12 volt units Suggested set Voltages Lead Acid (Absorption setting) Lead Acid (Float voltage) From 14.2v 13.6v To 14.8v 14.2v Gel Cell (Absorption setting) Gel Cell (Float voltage) 13.8v 13.2v 14.2v 13.6v Nickel Cadmium (Absorption setting) Nickel Cadmium (Float voltage) 15v 14.4v 15.5v 14.9v Suggested set Voltages Lead Acid (Absorption setting) Lead Acid (Float voltage) From 28.4v 27.2v To 29.6v 28.4v Gel Cell (Absorption setting) Gel Cell (Float voltage) 27.6v 26.4v 28.4v 27.2v Nickel Cadmium (Absorption setting) Nickel Cadmium (Float voltage) 30.0v 28.8v 31.0v 29.8v 24 volt units Remember to set voltage at your normal cruise rpm if possible and only adjust after battery level has stabilized. If you have a lead acid battery with vented caps then you can set the voltage to the upper limit. If the battery is ‘maintenance free’ sealed type then you need to set the voltage to the lower end of the scale. Over the following weeks of operation monitor the water levels in your battery, you will find that due to gassing you will use slightly more water, this is quite normal. Further, this is a far better situation than not using any water at all. A perfect charge rate setting will see the battery acid just bubbling, not boiling. Once you have this set, there should not be any further adjustments required. ZM4 Voltage Regulator User Manual – 2013 – Version 12 Page 23 of 29 Maintenance The only maintenance required is to clean the fan screen filter every 12 months. This does depend on the environment that the ZM4 is mounted in. To remove the filter, pry the top cover off, and wash the filter element in soapy water, dry off and refit. The only purpose of the filter is to prevent fingers getting caught in the fan blades! ZM4 Voltage Regulator User Manual – 2013 – Version 12 Page 24 of 29 FAQ (Frequently asked questions) Q: What wiring changes are required on my existing boat installation? A: other than running a wire to your alternator field terminal, you will need an ignition source to the ZM4 and a battery positive and earth. Q: Will this unit work through a VSR (Voltage Sensitive relay)? A: Yes it is the preferred way to connect it. Q: Will this unit work through a diode splitter? A: Yes and the ZM4 can compensate for the typical voltage drop over a diode bank. Q: Can I fit a ZM4 to an outboard motor? A: No for the ZM4 to work it must have a field control, an outboard motor does not have this function. Q: Can I fit a ZM4 to a solar panel or wind turbine? A: No for the ZM4 to work it must have a field control. Q: Can the ZM4 run two alternators? A: Yes but we suggest you have two connected to provide for redundancy. Q: What changes are required to my alternator? A: This does depend on your alternator type, some are easy to convert other are a bit more difficult. Q: Can I modify my own alternator? A: Yes, it is a matter of disabling the internal regulator and running a field wire to the earth side of the brush block. The ZM4 controls the earth side of the brushes. Q: Can the ZM4 run a positive switched alternator? A: No it must be converted to negative switch mode. Q: Can you provide the modification required for my alternator? A: Yes call with the details first. Q: Can you refurbish my alternator and convert it for an external regulator? A: Yes we do this on a regular basis for clients. ZM4 Voltage Regulator User Manual – 2013 – Version 12 Page 25 of 29 FAQ (Frequently asked questions) Q: Where is the knob for adjusting? A: After some initial testing we found it better to fine tune the settings with either a screwdriver or your fingers, a knob was found too cumbersome. If you really want a knob feel free to install one. Q: I have been told that a smart regulator is hard on my alternator? A: The old adage, the harder you work something the faster it is going to wear out. Good regular maintenance must be adjusted accordingly. There are some dog alternators out there call and discuss your brand. Q: Why does my voltage vary with lower engine rpm? A: It is a function of the alternator output being too low for that given rpm, so your battery capacity and or status is too low for the unit to be able to achieve the desired set voltage. Q: Can I connect the V+ brush directly to the B+ terminal? A: Yes this will work fine and will not drain your battery as the ZM4 field circuit is disconnected during ignition off situations. Q: I can see a dim illumination of the Absorption LED when everything is switched off, is this normal? A: Yes it is a result of feedback from the alternator diodes, rather than a fault with the ZM4. The current draw is only 27 milliamps, which is insignificant in the overall scheme of things. ZM4 Voltage Regulator User Manual – 2013 – Version 12 Page 26 of 29 Fault Finding Write down the circumstances leading to the discovery that a problem exists. Make it as clear as possible. If you're not charging, and you just installed a new alternator, suspecting the regulator has gone bad may not be the best decision. Wiring errors or compatibility issues between the alternator and regulator are prime suspects. No alternator output Check to see if voltage supply to IGN terminal on ZM4, fan should be running. Absorption LED should be ON Is ignition light connected and working correctly, i.e. is alternator ‘excited’? Check fuses. Remove the field wire from ZM4 and with engine idling, briefly (2-4 seconds) hold the alternator field wire to earth. Note: you will get a spark. You will hear the engine load up and the output voltage should quickly go towards 16v+ This would indicate that the alternator is fine and the ZM4 is at fault. If you have a multi meter you can check for continuity between FIELD and earth, adjust the potentiometer to lowest setting and adjust up whilst watching multimeter, you should see about 1K> continuity. Another way of checking the field output is put a small wattage bulb between FIELD and BATT and again adjust the pot, you should see the light come on High Alternator output Check to see if battery voltage is present on BATT terminal, check fuse. If that is OK then the unit is faulty. Green LED only on, when powered up If when you power the unit up and it does not have any output, it is an indication the unit has been exposed to more that 18v and the main IC blows, in bad cases the cooling fan does not operate, investigate the cause of the power surge. Both LED’s on, when powered up As above, an IC has burnt out either reverse polarity or a voltage spike. ZM4 Voltage Regulator User Manual – 2013 – Version 12 Page 27 of 29 Installation Notes ZM4 Voltage Regulator User Manual – 2013 – Version 12 Page 28 of 29 Warranty Details This unit is covered by a 24 month warranty on a return to base basis. We will repair or replace free of charge. The warranty does not include damage from incorrect installation. The warranty is void if the cover is removed or if the unit is tampered with. If you do have a problem please refer to the fault finding section. When you do make contact please provide as much information about your installation in order that we can best assist with fault finding. Unit serial number …………. Shipped date………………….. Fitted date…………………….. Contact Details For any questions or warranty matters contact, Graeme Polley 49 Sunnyhills Avenue Glenview, Hamilton 3206 New Zealand, 07 843 1582 Email [email protected] See test rig results on You Tube: http://tinyurl.com/zm4-test-rig Latest copies of this manual can be obtained from our website: www.smartregulator.co.nz ZM4 Voltage Regulator User Manual – 2013 – Version 12 Page 29 of 29