1
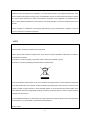
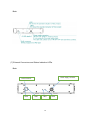
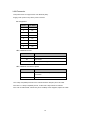
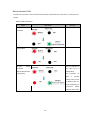
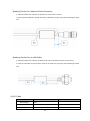
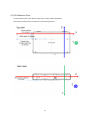
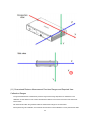
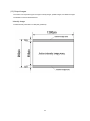
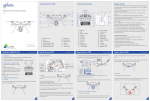
3D Measurement Camera RICOH SV-M-S1 User's Manual Stereo Contents Introduction ................................................................................................................................ 3 Safety Precautions ..................................................................................................................... 3 Disclaimer .................................................................................................................................. 7 Precautions for Use ................................................................................................................... 7 1. About This Manual ................................................................................................................. 7 (1) Contents of This Manual .................................................................................................................. 7 (2) Glossary .......................................................................................................................................... 8 2. Workflow ................................................................................................................................ 9 3. System Specifications .......................................................................................................... 10 (1) What is RICOH SV-M-S1? ............................................................................................................. 10 (2) Measurement Principle .................................................................................................................. 10 (3) System Configuration Example ..................................................................................................... 11 (4) RICOH SV-M-S1 Specifications .................................................................................................... 11 (5) Names of Parts .............................................................................................................................. 12 (6) External Dimensions...................................................................................................................... 13 (7) External Connectors and Status Indication LEDs .......................................................................... 15 (8) AC Adapter .................................................................................................................................... 19 (9) AC Cable ....................................................................................................................................... 20 (10) 3D Reference Point ..................................................................................................................... 21 (11) Guaranteed Distance Measurement Precision Ranges and Required User Calibration Ranges . 22 (12) Output Images ............................................................................................................................. 24 (13) Restrictions .................................................................................................................................. 26 4. Checks Before Use .............................................................................................................. 27 (1) Product Checks ............................................................................................................................. 27 (2) Items to Prepare Yourself .............................................................................................................. 27 (3) Software ........................................................................................................................................ 27 5. Installation ............................................................................................................................ 28 (1) Installation Orientation of Camera ................................................................................................. 28 (2) Installation Orientation of Pattern Lighting ..................................................................................... 28 6. Equipment Connections and Wiring .................................................................................... 29 (1) Connecting the Power Cable ......................................................................................................... 29 (2) Connecting the LAN Cable ............................................................................................................ 29 7. Operating Procedures .......................................................................................................... 29 (1) IP Address Preparation .................................................................................................................. 29 (2) Turning the Power On.................................................................................................................... 29 (3) Launching R-Stereo-GigE-Player .................................................................................................. 29 (4) Turning the Power Off .................................................................................................................... 29 1 8. Maintenance......................................................................................................................... 29 (1) User Calibration ............................................................................................................................. 29 (2) Updating the Firmware .................................................................................................................. 30 9. Troubleshooting ................................................................................................................... 31 10. Appendix ............................................................................................................................ 32 Warranty ............................................................................................................................................. 32 About Open Source Software ............................................................................................................. 32 Inquiries .............................................................................................................................................. 32 11. Revision History ................................................................................................................. 33 2 Introduction Thank you for choosing RICOH Industrial Solutions Inc.'s RICOH SV-M-S1 (hereinafter referred to as "this camera"). Be sure to read this document before use, and use the product correctly. Please store this document where it will be easily accessible. Safety Precautions About the Symbols The symbols in this document and on the product include various symbols for ensuring safe and correct use of the product, and for preventing injury to you and others, and damage to property. The symbols and their meanings are shown as follows. Danger This symbol indicates matters that may lead to imminent risk of death or serious injury if ignored or incorrectly handled. This symbol indicates matters that may lead to death or serious injury if ignored or Warning incorrectly handled. This symbol indicates matters that may lead to injury or physical damage only if ignored Caution or incorrectly handled. Symbol Examples The symbol alerts you to actions that must be performed. The symbol alerts you to prohibited actions. The symbol may be combined with other symbols to indicate that a specific action is prohibited. ● Display examples : Do not touch : Do not disassemble Observe the following precautions to ensure safe use of this product. Danger • Do not disassemble, repair, or modify this product. • If an abnormality such as an unusual odor or smoke being emitted or overheating occurs, stop using the product immediately. Call the RICOH Industrial Solutions contact number and request repairs. 3 Warning In the event that you notice an abnormal state such as smoke or unusual odor being emitted, turn off the power immediately. Quickly remove the power connector while taking care to avoid an electric shock or burn. Then call the contact number. Do not continue using the product because doing so may result in a failure or malfunction. ・ In the event that foreign matter (metal object, water or other liquid, etc.) enters inside the product, turn off the power immediately. Quickly remove the power connector while taking care to avoid an electric shock or burn. Then call the contact number. Do not continue using the product while there is a failure or malfunction. ・ Do not touch the internal components if they become exposed as a result of the product being dropped or damaged. Quickly remove the power connector while taking care to avoid an electric shock or burn. Then call the contact number. Do not continue using the product while there is a failure or malfunction. ・ Do not use the product near flammable gas, gasoline, benzene, thinner, etc. Doing so may cause an explosion, fire, or burn injury. ・ Do not use the product in locations where usage is restricted or prohibited such as in an airplane. Doing so may cause an accident, etc. ・ Do not use other than the dedicated AC adapter and power cord. Doing so may cause a failure. ・ Do not use the AC cord supplied with the AC adapter with another device. Doing so may cause a failure. ・ Do not use the product with a voltage other than the indicated power voltage. Doing so may cause a fire or electric shock. ・ Do not cut, damage, or modify the power cord. In addition, placing a heavy load on the power cord or pulling or excessively twisting it may damage the power cord or cause a fire or electric shock. ・ When removing the power plug, be sure to hold the power plug. Do not pull the power cord. Doing so may damage the power cord, resulting in a fire or electric shock. ・ Wipe off any dust that accumulates on the power plug. Failing to do so may cause a fire. ・ Do not remove or insert the power plug with a wet hand. Doing so may cause an electric shock. 4 ・ Do not place the product in an unstable location for use. Doing so may cause an injury due to falling or tipping over. ・ Do not leave this product within the reach of infants and children. Doing so may cause an accident because infants and children are incapable of understanding the information in "Safety Precautions." ・ Store the supplied plastic bags out of the reach of infants or dispose of them. There is a risk of suffocation. Caution ・ Before cleaning, disconnect the power connector for safety reasons. When the product will not be used, disconnect the power connector for safety reasons. ・ Do not use the product wrapped in a cloth or other material. Doing so may cause a fire. Do not short the terminals or metal parts of the power cord. Doing so may cause a fire. Do not use the product in a kitchen or other place where it will be exposed to oily smoke and humidity or in a place with moisture. Doing so may cause a fire or electric shock. ・ Do not leave the product with the lens facing the sun for a long period of time. ・ An AC adopter with ferrite core must be used for RF interference suppression. ・ A Lan Cable with a ferrite core must be used for RF interference suppression. CE Warning This is a Class A product. In a domestic environment this product may cause radio interference in which case the user may be required to take adequate measures. Manufacturer: RICOH Industrial Solutions Inc. 3-2-3,Shin-Yokohama,Kohoku-ku,Yokohama-shi,Kanagawa 222-8530,Japan Importer: RICOH IMAGING EUROPE S.A.S. Parc Tertiaire SILIC,7-9, avenue Robert Schuman - B.P. 70102,94513 RUNGIS CEDEX,France FCC NOTE: This equipment has been tested and found to comply with the limits for a Class A digital device, pursuant 5 to Part 15 of the FCC Rules. These limits are designed to provide reasonable protection against harmful interference when the equipment is operated in a commercial environment. This equipment generates, uses, and can radiate radio frequency energy and, if not installed and used in accordance with the instruction manual, may cause harmful interference to radio communications. Operation of this equipment in a residential area is likely to cause harmful interference in which case the user will be required to correct the interference at his own expense. Caution: Changes or modifications not expressly approved by the party responsible for compliance could void the user’s authority to operate the equipment. WEEE WEEE Treatment Information for Customers User Information on Electrical and Electronic Equipment Users in the countries where this symbol shown in this section has been specified in national law on collection and treatment of E-waste Our Products contain high quality components and are designed to facilitate recycling. Our products or product packaging are marked with the symbol below. The symbol indicates that the product must not be treated as municipal waste. It must be disposed of separately via the appropriate return and collection systems available. By following these instructions you ensure that this product is treated correctly and help to reduce potential impacts on the environment and human health, which could otherwise result from inappropriate handling. Recycling of products helps to conserve natural resources and protect the environment. For more detailed information on collection and recycling systems for this product, please contact the shop where you purchased it, your local dealer or sales/service representatives. All Other Users 6 If you wish to discard this product, please contact your local authorities, the shop where you bought this product, your local dealer or sales/service representatives. Disclaimer ・ RICOH Industrial Solutions assumes no liability whatsoever for any damages that occur as a result of use in a way other than described in the operating procedures of the user’s manual. ・ RICOH Industrial Solutions assumes no liability whatsoever for any incidental damages resulting from the use of this product. ・ RICOH Industrial Solutions assumes no liability whatsoever for PC malfunctions or damages to other software resulting from the installation and running of the software of this product. ・ RICOH Industrial Solutions assumes no liability whatsoever for any damages resulting from willful misconduct or negligence on the part of the user. ・ RICOH Industrial Solutions assumes no liability whatsoever for any damages resulting from fire, earthquakes, or other abnormal conditions. Precautions for Use Do not measure sunlight or other extremely bright objects. Doing so may cause damage to the light receiving element or other components, resulting in measurement no longer being possible. ・ Do not use the product in an environment with sudden changes in temperature or humidity. Doing so may prevent correct measurement. In addition, it may cause a failure. ・ Use the product within the temperature and humidity ranges specified for the operating conditions. ・ This product uses precision optical parts. Therefore, do not subject the product to physical shock such as strong vibration or a drop during use, storage, or transport. Doing so may cause a failure. ・ When the product will not be used, take measures to protect the lens so that it does not become dirty or scratched. Furthermore, do not touch the lens except during cleaning. ・ Store the product under normal room temperature and humidity. Make sure the power connector is in a disconnected state during storage. 1. About This Manual (1) Contents of This Manual This manual describes how to use the camera. It consists of the following chapters. For an explanation of the SDK, refer to "SDK Instruction Manual." Chapter Title Description 1 About This Manual Describes the structure of this manual. 2 Workflow Describes the work required to build a system to use the camera. 7 Perform the work appropriately. 3 System Specifications Describes the specifications of the camera system. 4 Checks Before Use Describes the product configuration and the equipment to prepare. Check that you have all the required equipment. 5 Installation Describes how to install the camera. Check the precautions on installation before beginning the work. 6 Equipment Connections Describes how to connect the equipment to be used. and Wiring 7 Operating Procedures Describes how to use the camera. (2) Glossary The following terms are used in this manual. Term Meaning Parallax image An image including parallax information captured by the camera. Intensity image An image including intensity information captured by the camera. Distance image An image including information on the distance from the camera to the work. Working distance The distance range from the camera to the place of measurement. 8 2. Workflow System Specifications Check the system configuration and function specification of the camera before performing the following work. Checks Before Use Check the purchased product and prepare the required equipment. Installation Install the camera. Equipment Connections and Wiring Connect the control unit and camera and then configure the initial settings of various parameters. Operating Procedures This describes how to use the camera. Use the camera while referring to the detailed explanations. 9 3. System Specifications (1) What is RICOH SV-M-S1? This camera is a vision camera for 3D measurement. The distance information obtained from the camera can be used by general-purpose recognition software to measure and recognize randomly piled work to enable the work to be picked up by a robot. The camera can be used for applications such as replacing a part feeder and simplification of a positioning device. Main Features ・ Various types of images can be output at 30 fps (measured under the environment specified by RICOH Industrial Solutions) by performing high-speed arithmetic processing within the hardware. ・ High-precision measurement over a wide range is achieved due to unique calibration techniques. The camera is shipped calibrated so it is ready to use immediately. ・ The settings can be configured and the operation can be checked easily with a PC. ・ The user can calibrate the camera (user calibration) using dedicated chart and application software. (2) Measurement Principle This camera employs triangulation to calculate the distance information from the texture information of an object captured with the two built-in cameras. As a result, the distance information of a surface without texture information cannot be obtained. However, it can be obtained by projecting a random pattern onto the subject using our recommended lighting. Recognition processing and other matching precision are improved by using dense distance information. Intensity image Parallax image 800 mm No lighting 1200 mm 800 mm Lighting 1200 mm 10 (3) System Configuration Example Connect this camera to a peripheral device using a LAN cable for communication and a cable for the power supply. LAN Cable (Cat 5e or Higher) PC RICOH SVM-S1 To power supply (4) RICOH SV-M-S1 Specifications Item Specification Value Measurement method Triangulation (stereo mapping) Lens 6.27 mm Focal length f-number Remarks 2.8 Working distance Approx. 800 to 1200 mm Measurement visual field Approx. 500 to 400 mm (horizontal x vertical) Measurement viewing angle conversion Horizontal: Approx. 28 degrees Measurement error Approx. ±1 mm (when 1 m) Reference value determined under conditions specified by RICOH Industrial Solutions. It varies depending measurement on the environment and subject. Image output rate 30 fps Value determined under conditions specified by RICOH Industrial Solutions. Shutter method Trigger mode Rolling shutter Free run (30 fps) / Software trigger Operates in free run mode (30 fps) immediately after startup Image output Intensity image: 8-bit Parallax image: 32-bit float Distance image: 32-bit float 11 Exposure time setting Approx. 0 to 33 m/sec range Interface Power supply Power consumption External dimensions (W x Gigabit Ethernet 12/24 V ±10% 12 W Approx. 232 x 40 x 140 mm Excluding projections H x D) Weight Approx. 1140 g Operating Conditions Item Operating temperature Specification Value Remarks 0 to 45°C range Storage temperature -20 to 60°C range Relative humidity Operating environment 85% or lower No condensation No corrosive gas, dust, and oil mist (5) Names of Parts Back RJ45 connector Power Supply connector LED 12 Bottom 1/4-20UNC(Screw for Tripod) M4 x4 (6) External Dimensions Front Side 13 Bottom 14 Back (7) External Connectors and Status Indication LEDs Back Power Supply connector RJ45 connector LED3 LED4 LED1 15 LED2 LAN Connector This product does not support Power over Ethernet (PoE). Supply power (12/24 V DC) via the power connector. Pin Assignment Pin No. Pin Name 1 TA+ 2 TA- 3 TB+ 4 TC+ 5 TC- 6 TB- 7 TD+ 8 TD- LED 3 Network Access LED Status Status Off No connection On Connected Flashing Sending or receiving data LED 4 Network Connection Speed LED Status Status Off No connection, 10-Mbps connection, 100-Mbps connection On 1-Gbps connection Use 1 Gbps compatible products for the network interface card (NIC) and LAN cable. If the NIC is a 1 Gbps compatible product, confirm that 1 Gbps transfer is enabled. If the CAT 5e cable breaks, transfer may be at 100 Mbps. If that happens, replace the cable. 16 Power Connector Connector: HR10A-10R-12PB (Hirose Electric Co., Ltd.) or an equivalent product This is the connector for supplying power. Use HR10A-10P-12S (Hirose Electric Co., Ltd.) or an equivalent product for the cable side. Pin No. Pin Name 1 Power GND GND 2 Power input 12/24 V ±10% 3 NC - 4 NC - 5 NC - 6 NC - 7 NC - 8 NC - 9 NC - 10 NC - 11 NC - 12 NC - 17 Specification Status Indication LEDs The status of the camera can be confirmed from the status confirmation LED 1 and LED 2 on the back of the camera. When Power Turned On Status Normal LED Status Remarks startup Green LED Red LED successful OFF Blinking Blinking OFF at about 0.5s interval Red LED Startup failure Green LED Blinking OFF ON Recovery startup OFF Red LED The LED indication is Green LED successful (Startup after firmware the same as for a Blinking OFF writing failure) startup failure. The when Blinking ON at about 0.5s interval procedure a for recovery startup failure occurs is displayed when RStereo-GigE-Player is connected. Please follow the instructions. 18 When Image Output Status LED Status Remarks During normal output Green LED in free run mode Blinking at about 0.5s interval Normal output in Green LED software trigger mode Wating trigger signal Blinking Slowly Input trigger signal Blinking Once Image output error Green LED OFF ON (8) AC Adapter Item Specification Value Product name UIA324-12 Manufacturer UNIFIVE Power supply 100 to 240 V AC (50/60 Hz) Rated output 12 V, 2 A Operating temperature 0 to 40°C Remarks range External dimensions (W x 43.8 x 28.5 x 95.9 mm H x D) Weight Approx. 193 g 19 Excluding cable Attaching Ferrite Core Near the Power Connector *1: Attach the ferrite core a distance of within 50 mm of the power connector. *2: Pass the power cable twice through the center of the ferrite core (two turns) when attaching the ferrite core. Attaching Ferrite Core to LAN Cable *1: Attach the ferrite core a distance of within 50 mm of the LAN cable connector for the camera. *2: Pass the LAN cable once through the center of the ferrite core (one turn) when attaching the ferrite core. (9) AC Cable Item Specification Value Rated voltage 125 V Rated current 7A Weight 62 g 20 Remarks (10) 3D Reference Point The 3D reference point of the distance image of the camera is defined as follows. This reference point becomes the reference for the working distance. 21 (11) Guaranteed Distance Measurement Precision Ranges and Required User Calibration Ranges The guaranteed distance measurement precision range and the range required to be obtained for user calibration of each distance of the camera are defined in relation to the center of the front of the camera as shown below. 3D measurement within the guaranteed distance measurement ranges is recommended. When performing user calibration, check that the environment in which calibration is to be performed is within 22 the following ranges. 23 (12) Output Images The camera can output three types of images: intensity images, parallax images, and distance images. The details of each are described below. Intensity image Includes intensity information of 8 bits (256 gradations). Inactive image area Active intensity image area Inactive image area 24 Parallax image Includes parallax information of 32-bit float. Inactive image area Active Pallax image area Distance image Includes parallax information of 32-bit float. Inactive image area Active Distance image area 25 (13) Restrictions Measurement Targets Work with the following characteristics may be difficult to measure. ・ Transparent object ・ Specular object ・ High-gloss object ・ Black object ・ Deep color object ・ Object with complicated shaped surfaces ・ Object which moves at high speed ・ Object that is 1 cm or smaller ・ Object for which the same pattern continues such as a fence Non-Measurable Area of Parts Supply Box When the pattern is projected onto the work by the projector, there are portions for which the projected pattern is blocked by the wall surface of the parts supply box. These portions may not be able to be adequately measured compared with the portions on which a pattern is projected. In that case, the area for which the projected pattern is blocked in the vicinity of the wall surface can be reduced by positioning the wall surface facing outwards. About Work Distance Place the measurement target at the working distance specified in the specifications because measurement outside the working distance range is not possible. 26 4. Checks Before Use (1) Product Checks The standard components of this product are shown below. Check that the package contains the following items. If something is missing, contact the place of purchase. Name Model Quant Remarks ity 1 Stereo camera main unit RICOH SV-M-S1 1 (Includes VESA spacers and VESA spacer x 4 Ferrite core x 2 ferrite cores) 2 AC adapter UIA324-12 1 3 AC cable 4 Calibration board SCP-300 1 5 PC software R-Stereo-GigE-Package 1 1 Download from Web (2) Items to Prepare Yourself The equipment and items not included in this product that you need to prepare yourself are shown below. Name 1 PC Recommended operating conditions ・ CPU: Intel® Core™ i5 2.7GHz or faster Quantity 1 Remarks For ・ HDD: At least 1 GB of free space configuration ・ Memory: At least 4 GB and ・ Support for Gigabit Ethernet data capturing ・ Network adapter that supports jumbo frames (jumbo packets) of 9 KB or larger ・ OS: Microsoft Windows 7 [32-bit/64-bit] ・ R-Stereo-GigE-Package installed 2 LAN cable Shielded twisted pair (STP) cable of Category 5e or higher 1 For connecting PC and camera (3) Software The dedicated software R-Stereo-GigE-Package needs to be installed on the PC to use the camera. The software can be downloaded from our support page. For details on installation, refer to "R-Stereo-GigE-Package User's Guide." 27 5. Installation The camera is provided with tripod holes and VESA compliant holes for fixing the camera. Use these holes to mount the camera to a frame or the like. When using the VESA compliant holes, insert the included spacers when fixing the camera using VESA standard length screws. M4 x4 1/4-20UNC(Screw for Tripod) (1) Installation Orientation of Camera The camera has been calibrated at the time of shipment. When installing it, pay attention to the following points. Distance The range of 1 m ±200 mm from the reference position is the measurable distance. Parallelism If the camera is installed with too much of a tilt, errors may occur with the measurable distance. (2) Installation Orientation of Pattern Lighting Pay attention to the following points when installing the pattern lighting in combination with the camera. Relative Distance Place the lighting as near to camera as possible. 28 Relative Angle If the specular reflection on, for example, a glossy object occurs, it can be reduced by tilting the lighting toward the camera. 6. Equipment Connections and Wiring (1) Connecting the Power Cable Connect the power cable to the power connector on the back of the camera. Connect the supplied AC adapter or HR10A-10P-12S (Hirose Electric Co., Ltd.) or an equivalent connector. (2) Connecting the LAN Cable Connect the LAN cable to the LAN connector on the back of the camera. 7. Operating Procedures (1) IP Address Preparation When you connect the camera to a network, one IP address is required for the camera. Ask the network administrator to provide an IP address. (2) Turning the Power On The camera turns on automatically when power is supplied to the power connector. (3) Launching R-Stereo-GigE-Player Configure the settings of the camera with R-Stereo-GigE-Player installed on the PC. Launch R-Stereo-GigEPlayer from the shortcut icon on the desktop or from the Start menu. For details on operation, refer to "R-Stereo-GigE-Player User's Guide." (4) Turning the Power Off The power turns off when power stops being supplied to the power connector. 8. Maintenance (1) User Calibration Sudden changes in temperature or an impact may cause the camera to become out of calibration, resulting in a deterioration in accuracy. In that case, you can calibrate the camera using a dedicated calibration board and software. 29 Required Items ・ Dedicated calibration board (SCP-300) ・ User calibration software (R-GigE-Calibration) Overview of Calibration Following the instructions of the software, complete calibration by capturing images while moving the chart in relation to the camera. For details, refer to "R-Stereo-GigE-Calibration User's Guide." (2) Updating the Firmware You can update the firmware of the camera. Download the latest firmware from our website. 30 9. Troubleshooting Symptom No connection camera Cause to Solution Cable is not connected or Check the cable. is broken. Firewall Disable the firewall. Unsupported operating Check the operating system. system Parallax not output Out of calibration Perform calibration. Outside Adjust the installation position so that the subject measurement range is within the measurable range. Blown out highlights Perform exposure adjustment for the camera and output adjustment for the lighting. If specular reflection occurs, install the lighting tilted toward the camera. Dark Perform exposure adjustment for the camera and output adjustment for the lighting. 31 10. Appendix Warranty In the event that this product fails, it will be repaired free of charge within one year of the date of purchase, so please contact RICOH Industrial Solutions Inc. You may need to bear some of the costs of shipment depending on the shipping method. Note that the following cases are not covered by the warranty even within the above warranty period. ・ Failure resulting from misuse (incorrect operation not in accordance with the user's manual) ・ Failure resulting from repair, modification, overhaul, etc. not conducted by an authorized service center specified by RICOH Industrial Solutions Inc. ・ Failure resulting from a fire, natural disaster, natural calamity, lightning, abnormal voltage, etc. ・ Failure resulting from exposure to water, dropping, mud, sand, etc. due to misuse. ・ Failure resulting from improper storage (as described in the user's guide), insufficient care, etc. RICOH Industrial Solutions Inc. cannot compensate for any incidental damages resulting from a failure of this product (costs incurred for recording and playback, loss of profits that could have been earned by recording and playback, etc.). About Open Source Software This product includes PC software licensed under the BSD License and software from third parties that is subject to copyright licenses, disclaimers, and notices. For the exact terms, refer to the documents in the installation folder of the PC application software of this product. This product incorporates the multi-core compatible real-time operating system eT-Kernel Multi-Core Edition and FAT file system PrFILE2 developed by eSOL Co.,Ltd. For the exact terms, refer to device information of the PC application software of this product. Inquiries http://industry.ricoh.com/en/fa_camera_lens/ RICOH Industrial Solutions Inc. 3-2-3, Shin-Yokohama, Kohoku-ku, Yokohama-shi, Kanagawa, Japan 222-8530 Tel: Business hours -+81-45-477-1551 9:00 to 12:00 and 13:00 to 17:00 (Closed Saturdays, Sundays, national holidays, and company holidays) * Please note that service details including scheduled business hours are subject to change without notice. March 2015 32 11. Revision History Rev. Date Changes 1.00 March 24, 2015 Newly issued 1.01 March 30, 2015 Updated Added procedure for attaching ferrite core and LAN cable 1.02 May 25, 2015 Updated Added warning information 33 Note