1
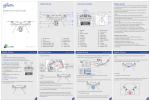
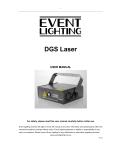
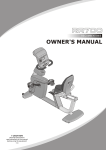
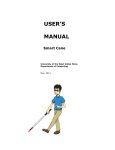
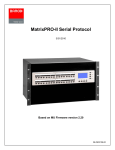
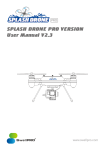
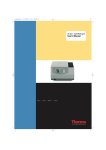
Splash Drone PRO
Remote Controller
Safety Guide
PRO
Splash Drone Quick Guide
02 01 19
01
V1. 0
02
11
10
03
04
03
18
04
05
17
06
16
09
07
15
08
08
14
09
05
07
06
Distribuited by:
UrbanDrones.com
20
12
1.
2.
3.
4.
5.
6.
Cover screw
Prop
Aircraft Nose
Flight Indicator LED
Gimbal Damper ball
Waterproof Gimbal
22
13
10
11
12
1. Antenna
2. VRA
3. Switch A(SWA)
4. Hanger
5. Left trims
6. Left Stick
7. Left trims
8. Up Key
9. Down Key
10. Binding Key
11. LCD Display
7. Land Gear
8. Seal Screw
9. Rubber Root
10. Motor
11. Prop Nut
12. Seal Cover
21
12.
13.
14.
15.
16.
17.
18.
19.
20.
21.
22.
Power Switch
Cancel Key
OK Key
Right trims
Right Stick
Right trims
Switch B(SWB.
VRB
Handle
Trainer Jack
Battery cover
1. Obey relevant regulations of the International Civil Aviation Organization
and local airspace control law and UAV management rules. Forbid flying in
any no-fly zones.
2. When flying the Splash Drone always keep it in an open area without
buildings, trees and obstacles.
3. Keep 3-5 meters away from you and others. Do not operate close to
crowds.
4. Before flight need calibrate the aircraft and Remote Controller
5. If detect abnormal operation while using the Splash Drone and/or remote
controller please stop using immediately
6. Before flight, ensure the propllers are installed in correct direction and
firmly on motor
7. Do not attempt to touch the motor until motors stop rotating .
8. If use WiFi Sport camera with aircraft. please disable WiFi function
before flight. Wifi should not be used in the area of flying.
9. If aircraft has low battery, land immediately to avoid damage.
10. Do not move aircraft for 6-10 seconds after powering on aircraft.
11.If loss of radio signal occours, aircraft will enter into Auto Return Home
mode automatically ; If signal is received again, please switch to GPS
mode control aircraft.
Forbidden flight conditions:
a. Forbid flying nearby strong radio interference activity areas.
b. Forbid flying nearby any crowds.
c. Forbid flying in extreme weather, like heavy rain, thunderstorms or
conditions causing poor visual range
d. Forbid flying around strong magnetic fields
e. Forbid flying when you are tired or affected by alcohol.
f. Forbid flying when remote controllor can not control aircraft due to any
other reasons
www. swellpro. com
Quick Guide
1. First Start:
Splash Drone PRO
Quick Guide
Splash Drone PRO
5. Install gimbal control board between fight controller and GPS antenna
corresponding location (Back of board installed 3M glue)
Suggestion Installation
12V
a. Check that all parts are in good condition and installed properly.
b. Ensure that remote control batteries are full
c. Calibrate Splash Drone and remote control (only during initial set-up)
Flight
controller
Receiver
Battery
Video transmitter
A1
A0
5V
GND
3. Use screw through fixed sheave, and choose a correct position lock
firmly
4. Payload release control cable connects with the receiver at CH5 or CH6.
(CH5 controlled by remote controller VRA. CH6 by VRB)
Video transmitter 12V
USB IMU
Gimbal
GPS
IO CHANNELS
GHz RECEIVER
Gimbal
controller
board
a. Place SWA and SWB swith to the UP
position.
b. Power up remote control
c. A safety beeping sound will start. Move
throttle joystick down once. This will stop
the beeping sound. The remote is now
ready.
NOTE: Ignore the warning sign on the
control LED.
Gimbal
controller
board
d. Propellers
Receiver
6. Install gimbal mount to the bottom of aircraft . Adjust to the correct
position and use screw to lock firmly.
POWER LED
b. Gimbal
1. Uninstall the seal screw that comes
installed.
3. Splash Drone PRO set up.
a. Land Gear
Insert land gear to the bottom of the Splash Drone PRO aluminum brackets
and ensure installation is firm.
Quick Guide
2. 4
2. Powering on remote control
Splash Drone PRO
Quick Guide
M2 M1
TURNING REMOTE ON
2. Push VTX cable(3PIN), IMU
cable(4PIN), Gimbal Roll direction
control cable M1 (3PIN) and Gimbal Pitch direction control board M2(3PIN)
through the hole and tighten seal screw fix firmly.
1. Put aircraft on a flat level surface
7. Open dive case and connect your camera AV output port to the AV cable
from within the dive case
2. Install the sliver nut propellers with motor marked “CCW“ . and Black nut
propellers with “ CW ” motor. ensure all propellers tighten firmly .
3. VTX. IMU. M1. M2 cable connect to the VTX module and gimbal control
board corresponding ports as labelled.
4. Gimbal board power cable connects with main board “12V Out JST”,
pitch control (green cable) connects to receiver CH5. Roll control (blue
cable) connects to receiver CH6. Ground (black cable) connects to CH5 or
CH6 ground port
01
02
c. OPTIONAL: Payload Release Mechanism
1. Uninstall the seal screw
2. Push the payload release control cable through the hole and fix firmly
with seal screw. Use screws to fix the mechanism to the body firmly.
03
04
THROTTLE CALIBRATION
Quick Guide
COMPASS CALIBRATION
Quick Guide
e. Install Battery
Power off aircraft. Push throttle
stick to the top position.
4. Remote Control throttle Joystick Calibration
5. Compass Calibration
Calibration is needed if:
When to Calibrate
LED Flashing
1. Turn on remote control.
2. Push throttle stick up.
3. While holding the stick up, power on
drone and wait till the blue LED flash
intermittent on the drone.
3. Pull throttle stick to the lowest
position till you see the red LED flash
intermittent. NOTE: DO NOT move the
trottle stick left or right, only up and
down while doing this calibration.
Quick Guide
6. Aircarft Horizontal Position Calibration
06
HOW TO FLY
Quick Guide
Right Stick
Left
Turn Left
Down
Backward
Left
Right
Turn Left
Turn Right
Lock/Unlock II
10. Landing(Outdoor)
Backward
Down
1. Place aircraft in an open area without buildings or trees, and keep 3-5
meters away from you and others
2. Power on the Control, then power on the Splash Drone and wait for GPS
signal. (wating for GPS is optional but highly recommended)
3. Pull both sticks to their lowest corners to start up the drone
4. Slowly raise throttle stick to start flying
2
1
2
aircraft Tail
3
4
Notice:
8. Prepare
Notice:
Defult remote controller is Mode 2. if need mode 1. (Check user manual)
09
3
Start motor
(Lock/Unlock I)
HOW TO LAND
Lock/Unlock III
Quick Guide
Specification
Splash Drone & Battery & Transmitter Specification
Lock/Unlock IV
1. Slowly pull down throttle stick until the aircraft lands on the ground
2. Please keep throttle stick in the lowest position for over 5 seconds to
allow motors to lock after landing
3. After motor stop rotating, shut down aircraft power
4. Power off Remote controller
Notice:
1. Please land aircaft in an open area
2. If aircraft lands on tree or any other abnormal place, lock motors
immediately to avoid motor and ESC burnout.
3. After aircarft lands on the ground keep remote controller throttle
stick in lowest neutral position until motors stop rotating
Left stick/rise(Slow)
1. Power on aircraft, it will enter a self-check test. Please make sure
there is no movement on the aircraft in this period(6-10 Seconds).
2. Aircraft satellite indications: 6 satellites - 2 red LED flashing. 7
satellite - 1 red LED flashing and over 8 satellite no red LED flashing.
10
08
Splash Drone PRO
Quick Guide
Lock/Unlock motor
Right
Turn Right
Up
Forward
07
We strongly recommend aircraft search over 6 satellites before starting
to fly.
3. In flying process do not stop motors for any reason.
Forward
LED Flashing
1. Put aircraft on a stable level
surface and power on.
2. Pull Throttle stick in lowest
position. DO NOT move to sides
3. Quickly move the right stick
left and right till LED flashes Red.
Release the remote control.
Put aircraft in horizontal position;
rotate in clockwise 2 circles till
green LED slow flashing
9. Launch(Outdoor)
1
1. First time using the aircraft
2. Drone is not flying stable
3. Aircraft sides lips
4. Aircraft Crash Occurs
Horizontal Position Calibration
1. Turn on remote control and
drone till you see the red led flashing
normal, then move throttle to lowest
position. NOTE: DO NOT move stick left
and right.
2. Quickly move SWA fully up and
down 6-10 times till the green LED fast
flashes continuously. Let go of the throttle
stick.
Up
7. FPV monitor
When to Calibrate
Quickly move SWA fully up and
down while holding the throttle
down till the Green LED starts
fast flashing
LED Flashing
Left Stick
Pull left joystick to the lowest neutral position, quickly left and right move
the pitch joystick. till LED become Red. Blue and Green flashing.
Turn aircraft head down.
rotation in clockwise 2
circles till green LED stops
flashing
Image
Compass Calibration Process
05
Quick Guide
While holding the throttle up, power on
the drone. Pull throttle joystick to the
lowest neutral position till bule LED
1. First time using the aircraft
2. More than 100 km from the last calibration.
3. Crash occurs
4. If aircraft parameters have been changed.
5. When aircraft shakes or has twitching motions
1. First time using the remote control.
2. When the joystick is in middle position. but aircraft drifts to one side.
3. Remote control crash occurs.
INSTALLING THE MONITOR
Splash Drone PRO
Quick Guide
3. Put aircraft in a horizontal
position and continuous rotate it in a
clockwise motion for 2 full circles till the
green LED starts flashing.
4. Turn aircraft face down;
keep the drone vertical and
continuous rotate it clockwise 2
circles till red LED starts flashing.
Put the battery inside the aircraft and install in the correct position. Ensure
it is tightend firmly before starting the aircraft
Throttle Calibration Process
Splash Drone PRO
11
Splash Drone
Weight (Battery & Propellers Included)
Hover Accuracy
Max Yaw Angular Velocity
Max Tilt Angle
Max Ascent / Descent Speed
Max Flight Speed
WheelBase
Flight Time
Max Take-Off Weight
Operating Temperature
1750Kg
0. 2 m
30°
30°
4 m/s
6m/s (GPS Mode)
450mm
19 Mins ( 4500mah)
2. 5Kg
-10C°to 60C°
Battery
Battery Type
Capacity
Charging Environment Range
Charging Time
Lipo Battery
14. 8V 4500mah
0C°to 40C°
60minutes
Remote Controller
Weight
Operating Frequency
Communication Distance (Open Area)
Receiver Sensitivity (1%PER)
Working Current/Voltage
Battery
Channels
390g
2405 to 2475HMZ
1. 0 KM
-105dbm
120 mA
1. 5V AA*4
8 channels
12