1
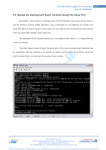
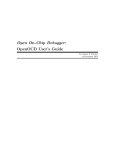
RIFF BOX JTAG Users Manual
read,
controlling
flash
program
erroneous situations (user can repeat,
ignore or cancel current operation);
1 RIFF BOX JTAG Hardware
RIFF BOX JTAG solution supports
communication with a single or multichained
TAP controller(s).
The JTAG signals have a definite I/O
voltage levels, determined by the hardware of
the device. For example, many QUALCOMM™
chipsets have 2.6V levels; OMAP chipsets
usually use 1.8V levels, etc. The RIFF Box
JTAG hardware does not sample I/O levels as
it is done in general JTAG devices.
Instead, the I/O voltage is set automatically
depending on the selected hardware to be
repaired. The VCC pin is present and may be
used by RIFF BOX hardware only as ADC
input for target voltage information on user
request only.
RIFF BOX JTAG h/w characteristics:
–
–
–
–
–
Internal DAC voltage regulator (operates
in range ~1.4 to 3.6V);
Adaptive clocking hardware support,
which gives maximum effect and speed
of using RTCK signal (RTCK sampling
frequency is 18MHz);
TCK operating frequency up to 18MHz;
Direct memory Read/Writes speeds
approximately at 100..250 Kbytes/s;
DCC Loader Read/Writes – 200..300
Kbytes/s (up to 0.8...1.5 Mbytes/s when
using data packing feature);
JTAG Manager Software characteristics:
–
–
–
–
Usage of standalone DLLs called
“resurrector” for
seamless
repair
process;
Fast RIFF JTAG H/W Scripting support
PRACTICE language support (Trace32
*.cmm scripts debug & execution) which
gives ability connecting to any device
attached to JTAG (of course in this case
some advanced knowledge is required
from user);
Memory Read/Write through DCC
Loader with many advanced features
like data packing, resuming stopped
Please refer to the SOFTWARE USERS
MANUAL section for detailed information on
these features.
All currently RIFF JTAG supported cores,
according to IEEE 1149.1 Test Access Port
standard, put 0b1 data into IR register upon
CAPTURE state. Thus it makes possible
automatic detection of IR register size of each
TAP present on the JTAG chain. In this case
IR ‘pre-’ and ‘post-’ stuffing bit sizes are not
required to be specified by user and are
determined automatically. Only TAP controller
position number of the device user is trying to
connect to has to be specified.
Here are ARM cores currently supported by
the RIFF BOX JTAG firmware:
–
–
–
–
–
–
–
–
ARM7;
ARM926;
ARM920T;
ARM1136;
PXA312;
PXA270;
OMAP3xxx (TAP Router setup).
Cortex-A8
Supported chipsets based on those ARM
cores with RIFF DCC Loader functionality (that
is NAND memory operations through custom
chip’s NAND controller):
Memory interfaces supported (through the
RIFF DCC Loader™ code):
–
–
–
–
–
–
–
–
–
–
–
–
Direct;
OneNAND;
Intel XScale PXA312 NAND Controller;
Qualcomm MSM62xx (except MSM625x
group) NAND Controller;
Qualcomm MSM625x NAND Controller;
Samsung S3C2410 NAND Controller;
Samsung S3C2440 NAND Controller;
Samsung S3C6410 NAND Controller;
Broadcomm
BCM21xxx
NAND
Controller;
Qualcomm
MSM7225
OneNAND
Controller;
Qualcomm MSM7201A NAND Controller.
Samsung MSM7291A SDCC access;
RIFF Box JTAG™
Copyright © 2010 by Rocker team
1
RIFF BOX JTAG Users Manual
In short, if you have a device in hands which
has supported chipset inside and if this
chipset’s core belongs to the supported ARM
cores list, then you can connect and read/write
memory of your device over JTAG link.
Models supported by the JTAG Manager
Software for an automatic resurrection are
listed in Table 1 (“supported” means there is
available resurrector DLL for each specified
model).
Please note: in case you got not supported
device in hands you can use this table for
quick reference in order to search for a
possible match. If you can’t find an exact
match (Target ID and FLASH memory type)
you still can write own hardware initialization
script for your device and then use one of the
pre-compiled DCC Loaders (according to
loader RAM base and NAND type it manages).
For this, use Custom Target Settings
feature and DCC Loader Settings button;
assemble proper binary file with bootcore and
other data needed for successful resurrection
(or read data from exactly same alive model)
and flash device manually.
Pre-compiled DCC Loaders, which are
included into RIFF BOX JTAG Manager
Software package do not contain any hardware
initialization routines, what means it is
assumed that target hardware is already
initialized (DRAM / SRAM / DDR / Whatever
RAM is configured and functional, FLASH
memory, GPIO access pins (if any) are
configured) prior a DCC Loader is being
uploaded and executed.
For example, you’ve got a dead device
based on the Qualcomm MSM6280 chipset;
device has NAND memory, which is visible to
MCU through the chipset’s embedded NAND
controller. Generally, upon reset, DDR memory
is not visible to the core, and chipset’s DDR
controller has to be configured first in order to
be able to access DDR RAM memory.
There is MSM6280_01000000.enc DCC
Loader file available. “MSM6280” means it can
access NAND memory through the MSM6280
Chipset’s NAND Controller. Value 0x01000000
means this loader is compiled to be executed
from 0x01000000 RAM base address.
In this case you shall do:
RIFF Box JTAG™
Copyright © 2010 by Rocker team
2
–
–
–
–
manually create H/W initialization script
which will write proper data into proper
registers;
make sure after H/W initialization the
RAM areas in range 0x01000000 to
0x01200000 are accessible;
use DCC Loader Settings button to
setup paths to DCC Loader file, H/W
initialization script, loader RAM base,
initial TCK frequency, etc.;
use the Read Memory, Write Memory
and Erase Memory features in order to
write proper data into the dead device’s
memory.
What to do if your device has no RAM
exactly at 0x01000000 address but has
somewhere at other addresses? There are
such options:
a) configure core’s MMU module (which is
available in ARM architectures starting
from ARMv4 and higher) in that way,
that core can access virtual memory at
0x01000000 address (that is add
coprocessor CP15 MMU configuration
instructions to H/W Initialization script
upload translation table into physical
RAM, setup translation table base
registers, etc.);
b) contact RIFF support to order a new
pre-compiled DCC Loader which will
work at given physical RAM addresses.
RIFF BOX JTAG Users Manual
2 SOFTWARE USERS MANUAL
is located at: $EXE_ROOT$\Resurrectors\*.*
Any DLL found there is tested and if found to
be a repair package is added to the list of
supported packages.
The JTAG Manager Software for RIFF Box
JTAG is the user friendly interface for
performing repairs of dead boards.
From the user point of view there is build a
list of manufacturers and models and user can
select exact model to be resurrected through
the main form’s interface features.
The repair information as well as all proper
procedures required to revive a definite
supported board is contained in a standalone
repair package in the form of DLL, which is
called resurrector.
When JTAG Manages Software is started
up, it browses its Resurrectors directory, which
Please use supplied *.inf file as driver to
install serial port which appears upon box
detection by PC.
After installation of the JTAG Manager
Software for the RIFF BOX, you may run it.
Fig. 1
2.1 Settings Panel
The Settings Panel contains main settings:
•
•
JTAG TCK Speed
Option to select between resurrector
and Custom Target
The JTAG TCK Speed is the TCK frequency
which is to be set after DCC Loader is
uploaded into the board and executed.
It should be noted, that initial connection
speed to a board as well as pre-loader
hardware initializations are performed on
different TCK speeds, specified by the repair
package (or by the dedicated field which is
described later in DCC Loader Settings
section).
The models info which is extracted from
each resurrector upon software startup stage is
divided into manufacturer select list and model
select list. Upon selecting your device’s
RIFF Box JTAG™
Copyright © 2010 by Rocker team
3
RIFF BOX JTAG Users Manual
manufacturer, the model list is rebuilt and you
can browse it to find the model of your device
to be resurrected.
Many repair packages contain schematics
information. If the Interface Pinout button is
visible, you can click it and see schematics for
JTAG pads pinout, which makes soldering
easier for you.
Please note, if there is Resurrection Help
button visible, click it and read short
instructions about how to repair your dead
device. Please read those instructions
carefully. If will not god of you to contact
support manager and start asking questions
about “why my dead board cannot be
resurrected while there is definite resurrector
for it available” while simple answer in 99% of
cases can be obtained after reading those
instructions.
The
Resurrection
button
performs
resurrection of the board. Before clicking it,
please do not forget to solder JTAG signals to
the board to be revived, connect it to RIFF
BOX, power the board (using external power
supply, or battery, or USB cable, etc).
In case of successful connection please
wait till resurrection is done or in some rare
cases the resurrect wizard is displayed. In last
case please follow instruction to complete the
resurrection process successfully.
RIFF Box JTAG™
Copyright © 2010 by Rocker team
4
RIFF BOX JTAG Users Manual
2.2 Direct Read/Write Page
The Direct Read/Write page’s features are
for advanced users only. If your board
resurrection is supported (meaning there is
correspondent DLL installed) you do not need
to use these features.
Fig 2.
Before using any feature the Connect &
Get ID button must be clicked. As a result,
selected TAP number, TCK frequency, I/O
voltage level and the Target Core are set and
connection to the target is tested.
In case the Resurrector Settings radio is
checked these parameters are taken from the
resurrector; for Custom Target Settings these
parameters are taken from the Settings Panel
fields).
In case of successful operation, you will see
target ID displayed. If you have unknown
board, it’s recommended first to use Analyze
JTAG Chain to detect how many devices are
connected into JTAG chain.
From now on it’s OK to Halt Target or to
Reset Target. In first case target is halted, and
in second case before halt the NRST signal is
triggered, thus target is reset before halt.
Holding left CTRL key while clicking Reset
Target you can simply trigger the NRST signal.
Write Memory, Read Memory and Target
Go features will work only on halted target. If
target is not halted, behavior is not determined.
Fields Address and Length are used by both
Read Memory and Write Memory features.
Additionally the Write Memory feature uses
Source File field as the source file from which
to take data to be uploaded into memory.
Current version of software performs only
word read/writes (thus 32-bit bus accesses are
performed by core when reading or writing
data).
The Target Go feature allows running the
target. The starting run address is taken from
the Address field. Please note, current
processor mode is not changed (thus bit T of
CPSR register remains not changed) while
using Target Go feature.
RIFF Box JTAG™
Copyright © 2010 by Rocker team
5
RIFF BOX JTAG Users Manual
Below are listed main errors which may
happen using Direct Read/Write page
features:
•
•
Target cannot be halted; halt operation
is unstable; read/write result in trash
data: JTAG soldering/cable connection
is bad, TCK frequency is too HIGH. Use
RTCK whenever possible;
All is fine, but when reading or writing
memory the communication stops or
target becomes not halted: read or write
areas physically are NOT VALID, belong
to MMU protected domains, or just NOT
YET H/W CONFIGURED inside of the
target hardware.
RIFF Box JTAG™
Copyright © 2010 by Rocker team
6
RIFF BOX JTAG Users Manual
2.3 DCC Read/Write Page
for advanced users. If your board resurrection
is supported (meaning there is correspondent
DLL installed) you do not need to use these
features.
The DCC Read/Write page’s features are
Fig. 3
The features present on the DCC
Read/Write page are performed through a
DCC Loader. Communication between loader
and RIFF JTAG is done using DCC channel,
available in most cores.
Thus, to be able to use these features,
proper repair package (resurrector) needs to
be installed. The initial sequence is exactly
same as done by the Resurrection button:
setting JTAG parameters (TCK, TAP, etc.),
initializing hardware, uploading loader to target
and executing it.
With help of the Read Memory feature it is
possible to download any RAM or flash
memory range contents from target. RAM
(Straight Address Space) or flash (FLASH
Address Space) is selected from the combo
box at the right corner.
When Straight Address Space is selected
all 4Gbytes of address space are available for
download (of course depending on valid
virtual/physical address ranges).
When NAND Address Space is selected
loader
performs
proper
communication
sequences with the core chipset or any other
internal peripheral devices in order to get
access to the flash memory.
Write Flash feature is for flash memory
write. Using it while the Straight Address
Space is selected is not allowed.
The ECC Enable enables or disables ECC
module provided by most chipsets which have
a NAND controller. In case ECC is enabled,
the Spare (Redundancy) data is flashed only
into not used areas of spare zone – into areas,
not occupied by the ECC data bytes. The ECC
data usually is calculated by the controller
itself. For example if ECC controller puts ECC
data into 6th, 7th and 8th bytes of 16-byte spare
zone, then original 6th, 7th, and 8th bytes are
RIFF Box JTAG™
Copyright © 2010 by Rocker team
7
RIFF BOX JTAG Users Manual
replaced by calculated ECC data.
If ECC Enable box is not checked, the ECC
controller will be disabled, and full spare zone
is flashed with data supplied from the Spare
file.
When reading NAND, the ECC controller is
automatically switched off, thus ECC Enable
option is valid only for write operations.
Main and Spare fields select files from
which data is taken to be written into NAND
memory. In accordance with NAND layout,
there are 2 zones: main data and redundancy
(spare) data. Main data is organized in pages
(most often is 0x200 or 0x800 byte size), and
redundancy data is extra 0x10 bytes per 0x200
byte page (which makes 0x40 bytes per 0x800
byte page).
Enabling correspondent fields separately
from each other gives possibility to flash NAND
memory in 3 different ways:
•
•
•
Only main data is enabled. In this case
redundancy zone is not flashed. Old
spare data is preserved (upon block
erase it is backed up and then flashed
back unchanged). In case ECC module
is enabled, the ECC bytes are
recalculated by controller.
Only spare data is enabled. In this case
only Spare bytes are flashed (upon
block erase main data is preserved and
then flashed back unchanged). It
depends whether ECC is disabled or
enabled that the Spare data is flashed
completely or with ECC bytes replaced
by the new automatically recalculated
ECC bytes.
Both main and spare data are enabled.
In this case total NAND page (main +
spare) is re-flashed with data supplied
from the Main and Spare files. The
Spare zone flashing scheme is done
according to the ECC settings, as was
already described twice above.
The feature Flash Files are full images has
the following meaning. Being checked, it tells
software to read from main and spare data files
using the same offset from the file beginning
as the Address field specifies. For example, if
Address is set to 0x00280000 (that is data to
be flashed into flash memory starting from
RIFF Box JTAG™
Copyright © 2010 by Rocker team
8
offset 0x280000) then main data will be read
from file starting from the main file’s offset
0x280000 and spare data will be read from file
starting from the spare file offset 0x14000
(recalculated offset for correspondent spare
address: per each 0x0200 main bytes there
goes 0x10 spare bytes).
Being unchecked, no matter what target
address is specified, data is read starting from
the beginning of both files.
And at last, Image file is used feature. After
Read Flash Memory operation the resulting
save file is created in following manner: first
goes main data from all address range
specified by read operation, and then goes
correspondent spare areas. Thus to flash back
such backup file you need to check this box.
Below are listed main errors which may
happen using DCC Read/Write page features:
•
•
Correct device is selected (manufacturer
and model) but still there is always an
error message that communication with
resurrector cannot be established: JTAG
soldering/cable connection is bad, TCK
frequency is too HIGH or RTCK is
required;
There is often or constantly the CRC
error message. It happens always or
only during memory Read, while Write
may work without problems. This
happens because of this: due to the
data
exchange
speed
increase
speculations the DCC channel status
bits polling loops are emitted in the RIFF
JTAG firmware. Thus if resurrector code
inside the target is running on
comparatively slow MCU clock, it
uploads data into DCC channel slower
than the RIFF JTAG code takes it from
there: TCK frequency is too HIGH and
should be set to lower value; if RTCK
was used, switch to constant TCK and
find stable TCK value – this is the only
case when a fixed TCK frequency may
be preferred over RTCK;
RIFF BOX JTAG Users Manual
3.1 Usage of Custom Target Settings
Custom Target Settings mode allows to
setup target in case there is no dedicated
resurrector available for it.
There are following parameters required to
be set by user in order to successfully connect
to a target:
1. JTAG TCK Speed – as usually, must be
set to proper value. In most cases when
target has RTCK signal available it is
preferable to set RTCK speed;
2. Target (Core) – please make sure which
ARM core the target MCU/Chipset has
embedded inside. In case of multiple
cores available on the JTAG chain,
make sure the selected core is the one
to which connection will be established
to (which depends on the TAP number
setting);
3. TAP number (multichain position) – in
case the JTAG chain has only one
device, TAP# will be 0. Otherwise
please select proper TAP number which
corresponds to the ARM core you’re
about to connect to. The IR and DR
registers’ pre- and post- stuffing values
are not required for RIFF JTAG since
those are calculated automatically
basing on the TAP# selected and IEEE
JTAG specification, which declares that
each TAP controller upon the IRCAPTURE stage puts binary value 0x1
into its IR shift register;
4. JTAG I/O Voltage – please select proper
I/O voltage levels for the target being
connected. If there is VCC signal
available on the target JTAG connector
then it is preferable using ‘Target VCC’
setting. If VCC is not available or not
connected (that is pin 1 of 20-pin
Standard ARM JTAG connector) then
select proper voltage value; in both
cases, RIFF Box’s internal DAC will
generate required I/O voltage.
Please note, if you are not using VCC pin,
selected voltage may fail to be set in case it is
lower than actual voltage levels present on the
attached target’s JTAG pins. This happens due
to backward voltage influence through the
enabled (open) buffer chip’s pins onto the DAC
channel. In this case software will report error
like “tried to set 1.8V but loopback measured
voltage is higher”
Having these settings set, it’s ok now to use
JTAG Read/Write page features: now is
possible to read target ID, halt/reset target,
read/write direct (MCU addressed) memory,
start/continue execution of MCU code.
Please note, if you are trying to analyze yet
unknown target (that is when it’s not known
how many TAP controllers are connected into
single JTAG chain), you need to use Analyze
JTAG Chain feature. In this case it is obvious
that only the JTAG TCK Speed and I/O
Voltage settings matter here.
To use DCC Read/Write page functionality,
it is required from user to additionally setup the
DCC Loader.
The DCC Read/Write features enable user
to read or write internal target memory (it does
not matter what memory exactly: this can be
RAM memory, NOR flash memory, NAND
flash memory, or any other memory connected
using target custom bus or whatever else)
using standard software interface and very
simple sequence of actions, which do not
require from user any special knowledge base.
What are advantages of DCC Read/Write
page features? To answer let us consider
target hardware organization. For example,
many modern devices use NAND flash
memory, which differs from conventional NOR
flash memory by more complicated hardware
access to its contents: while NOR memory
uses straight addressing and separated
address and data buses, the NAND has only
one, usually 8- or 16-bit bidirectional bus
interface. This means NAND memory contents
are not directly visible to the MCU, and to
access them MCU has to perform a series of
transactions through the NAND bus to read or
write this memory. Due to hardware signals
timings complexity and time consuming
accesses, most of modern chipsets have
embedded NAND controller interface, which
performs necessary transactions on the
hardware level, thus dramatically increasing
overall system performance.
RIFF Box JTAG™
Copyright © 2010 by Rocker team
9
RIFF BOX JTAG Users Manual
It is absolutely clear that chipset’s
embedded controller software interface is pure
imagination and resourcefulness of a chipset
developer, thus as many different brands and
even models of chipsets are available on
market, there are as many different controller
interfaces present (in theory). Each one
accepts commands and communicates with
ARM core in its custom genuine way, what
means software developer all time has to
develop new code for each new chipset. Such
complexity is unsolvable question for a general
user whose goal is only to repair his software
damaged device.
DCC Loader establishes a custom
communication interface between software and
loader’s code running inside of target. The
information between RIFF JTAG and target
code is passed through the Debug
Communication Channel (DCC) which is
available in all ARM cores.
Communication interface of a custom DCC
loader is described in the DCC Loader
Specification chapter. Please read it if you are
interested in creating own DCC loader code.
Thus, no matter what hardware device user
has on hands, all that is required from him is to
use a DCC Loader file compatible with a
current target. All necessary memory read or
programming actions are the task of DCC
Loader code. User has only to select data he
wants to write and specify to what place
Fig.4
RIFF Box JTAG™
Copyright © 2010 by Rocker team
10
(address) the data has to be written into the
flash memory chip.
As it was described, DCC Loader code is
loaded into target RAM memory and then is
executed. In 99% of cases target hardware
upon reset sees no RAM memory (besides
core’s internal small SRAM memory amounts).
Thus, before uploading the DCC Loader code,
the SDRAM controller of target chipset has to
be configured in order for system to access its
huge amounts of DDR memory.
In this case (if DCC Loader code is to be
uploaded into memory addresses which are
not yet visible or accessible by MCU) JTAG
hardware has to issue direct memory
read/write commands to the SDRAM controller
in order to configure it.
RIFF BOX JTAG Manger software supports
its own simple hardware access scripts, as well
as Trace32 PRACTICE language scripts
(*.cmm). Thus it is possible for user to set H/W
script file which will be executed automatically
prior to the DCC Loader code uploading stage.
The Trace32 CMM script files execution
speed: If software is running on PC with
processor at 2.66GHz, the execution speed is
approximately equal to same as if some ARM
MCU was executing instructions at 10MHz (!!!)
frequency.
RIFF BOX JTAG Users Manual
So, concluding above stated, there are
following DCC Loader Settings to be set by
user (settings dialog is accessed by clicking
the DCC Loader Settings button which is
available on the DCC Read/Write page):
1. DCC Loader – path to the DCC Loader
code. Is required to be set;
2. H/W Init script – path to the H/W script
file; simple RIFF BOX JTAG hardware
access scripts (*.has) and Tracre32
PRACTICE
scripts
(*.cmm)
are
supported; as well there are supported
encrypted (secured from unauthorized
view) forms of these scripts - *.ehas and
*.ecmm file extensions correspondently.
If H/W Init Script field is left blank no
script will be executed;
3. Fast Init Script – path to the fast
initialization script. Fast init script is to
be executed immediately (not even
leaving the internal halt routines) after
reset and then halt were performed by
the JTAG hardware. This script is just to
have few lines of instructions, and is
useful only in rare cases when target
has internal watchdog enabled which
constantly generates reset signals in
very short time periods, thus when
execution of general H/W Init Script may
not occur in time. In most cases the Fast
Init Script field is left blank;
4. DCC Loader RAM Base – the starting
address in RAM memory where the
DCC Loader file’s contents will be
uploaded to. Upon upload completion
software automatically starts this code
(thus before Target Run command
register PC is set to DCC Loader RAM
Base value);
5. Boot-time TCK Speed – the TCK
frequency which is used from the target
connect moment until the Target Run
command is executed. After DCC
Loader code is activated (ARM core
started executing it) the final TCK speed
is used as specified in the JTAG TCK
Speed field. Main point of separating the
Boot-time TCK Speed from speed at
which all further communication with
DCC Loader will be performed is:
sometimes
target
may
run
on
comparatively slow frequencies, thus
running DCC Loader code may be slow
enough to receive or send data over
DCC channel and thus timeouts will
happen (because, in order to reach
higher data exchange speeds, the RIFF
Box firmware processes DCC channels
without polling ready status bits,
assuming DCC Loader code is always
faster than the JTAG firmware).
Please note, if Trace32 PRACTICE script is
used for the H/W Init field, then target reset,
selection of core type, TAP number, voltage
and are to be present in the script, because
JTAG Manager Software’s strategy in this case
is such:
1. Connect RIFF box;
2. Execute given *.cmm script;
3. At this point it is assumed target is
successfully connected, stopped, and
configured, thus it is ok now to upload
into RAM memory at specified address
the DCC Loader’s code;
4. Target Run command is executed, thus
starting the DCC Loader code
execution;
5. Now standard DCC data exchange
sequence with the DCC Loader Code is
performed.
The communication protocol which is used
by the JTAG Manager Software to
communicate and issue commands to the DCC
Loader is described at the DCC Loader
Specification chapter.
In case H/W script field is blank or
Hardware Access Script file (*.has) is used, the
JTAG Manager Software itself connects target
(as specified by Core, I/O Voltage TAP# and
JTAG TCK Speed parameters) before starting
*.has or *.ehas sequence (if H/W script field is
not blank).
RIFF Box JTAG™
Copyright © 2010 by Rocker team
11